Transcripts
1. Introduction: One of the things I'm
always aiming for in my work is to keep it really simple and keep it really clean. Hi, my name is Nadine. I'm a watercolor artist
from Melbourne, Australia. I've been painting for
probably around ten years now, and when I look at the body
of work that I've produced, always my favorite paintings are those that are the simplest. They have the fewest strokes, and everything's worked in
just the first go with no. But that's not many
of my paintings. Maybe two in ten
end up like that. It is really tricky to paint loosely and simply
and keep it really minimal. That's what I want to
do with you today. Do a really simple exercise that still gives you a nice
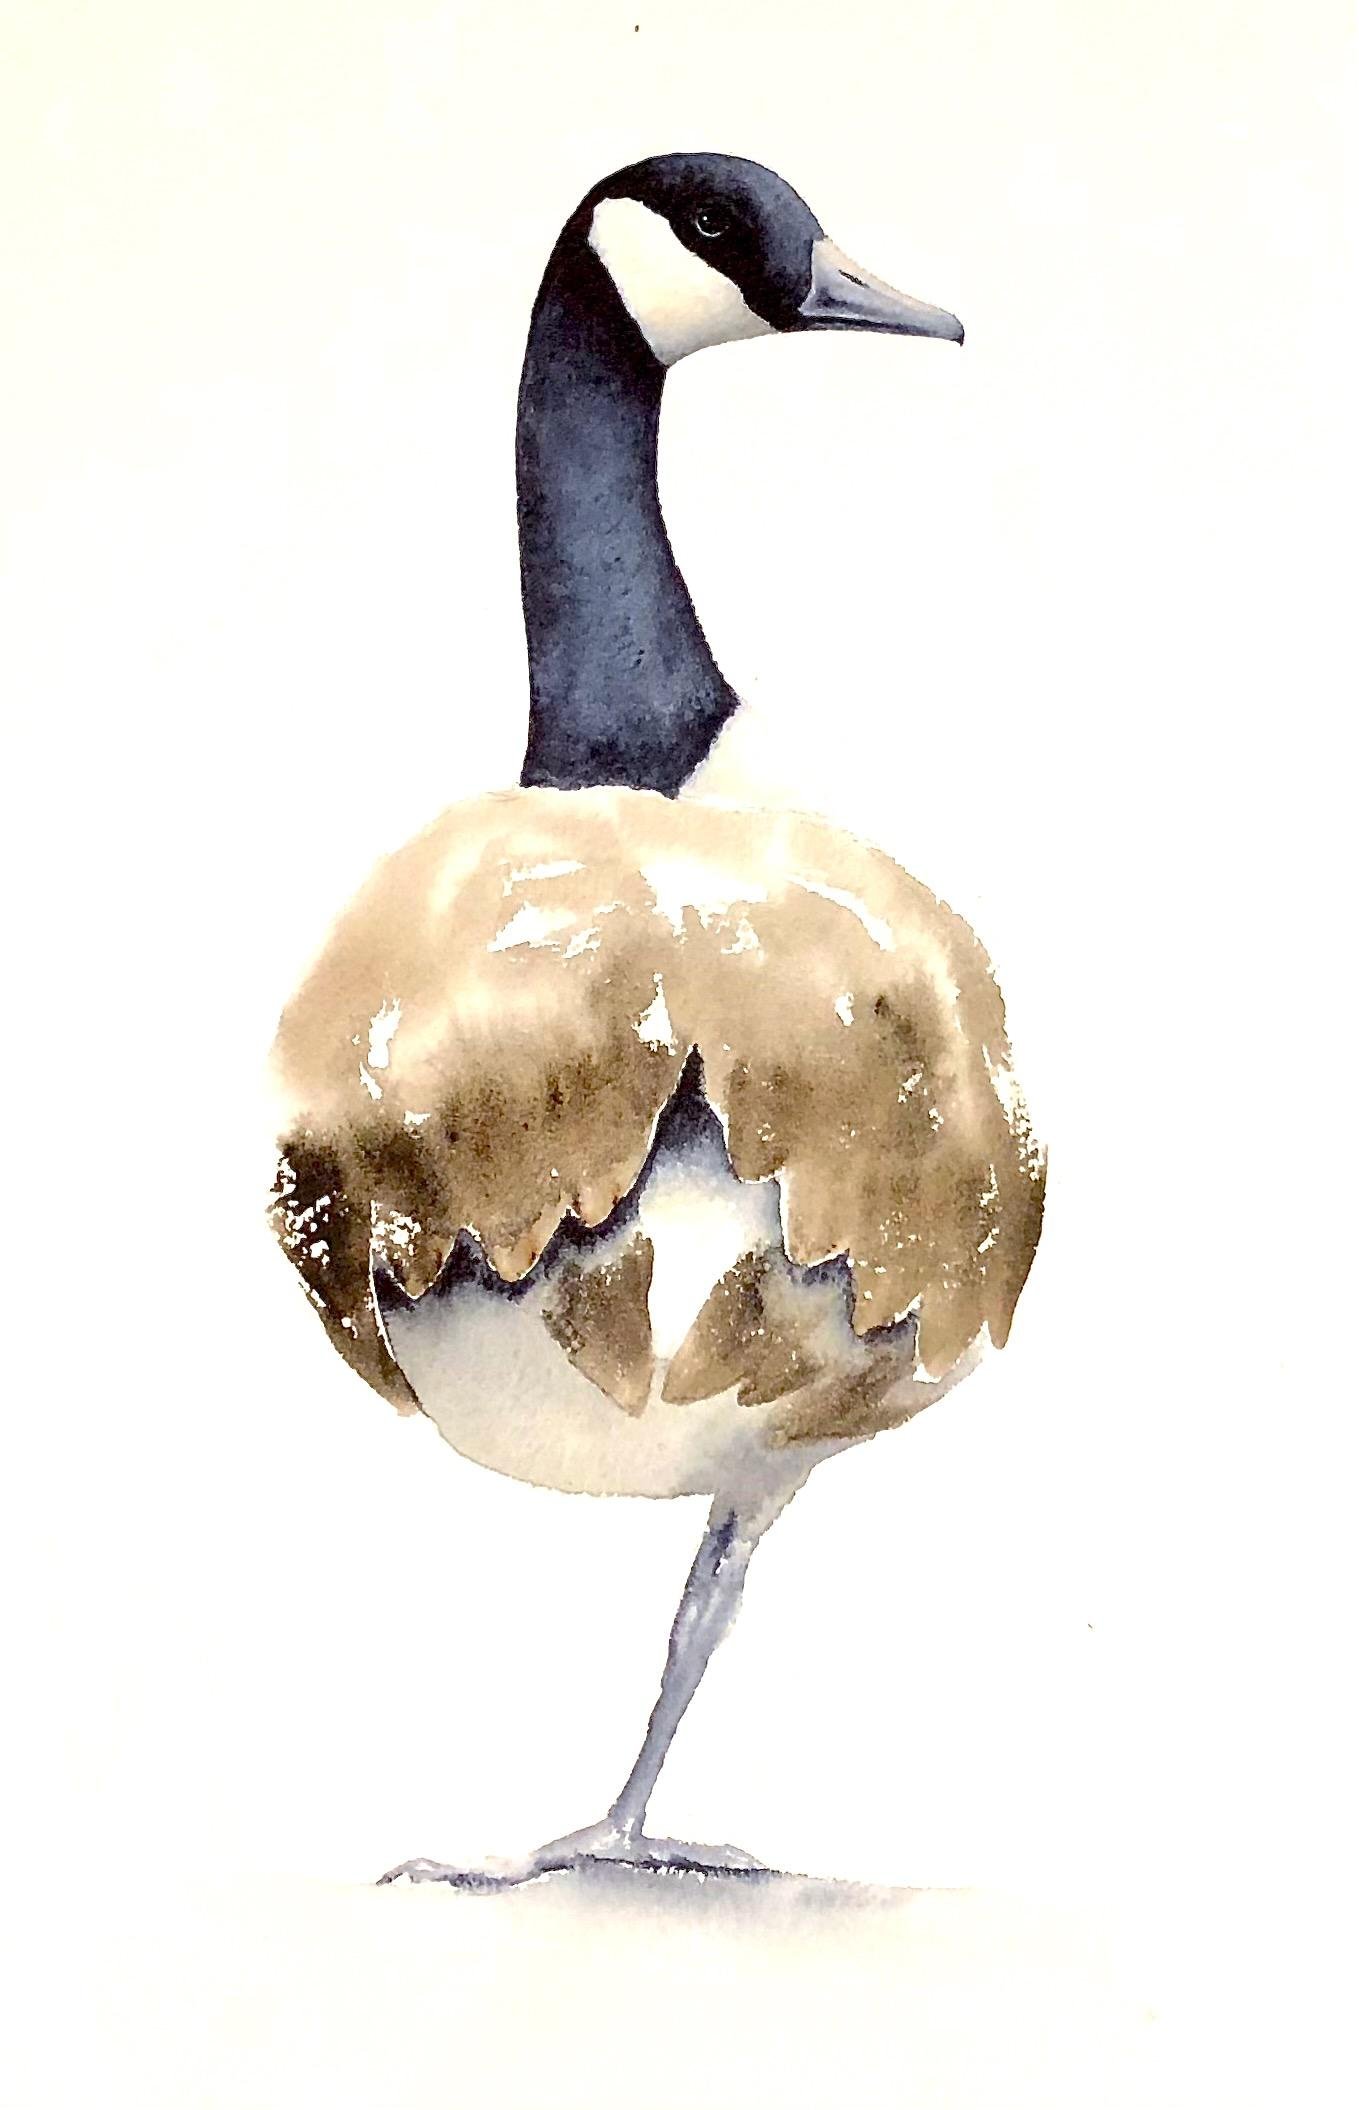
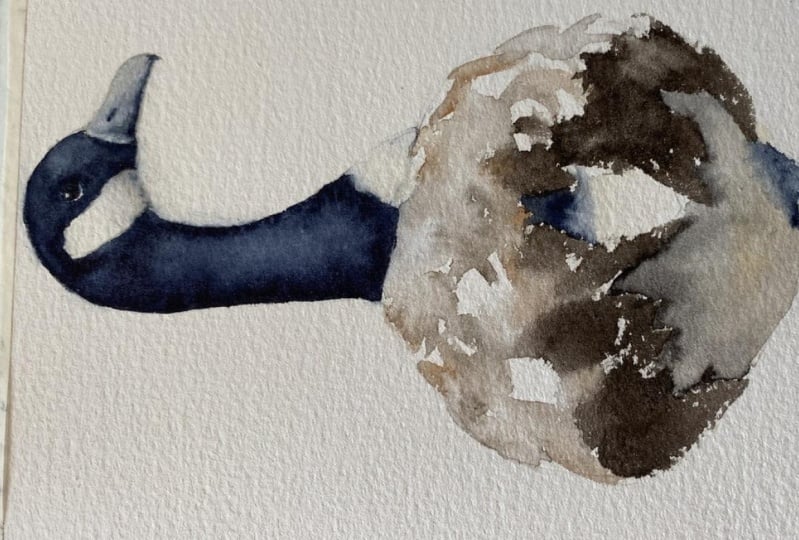
painting at the end. So we're painting
a canada goose. I've chosen this because
it has a simple palette. It has nice simple shapes, but it has a lovely
contrast between a really beautiful
light on the back of the bird and then the
really solid dark of the neck. So it's a really good place
to start with keeping simple. So we'll go through
the materials. We'll go through the
sketch, and then we'll go step by step
through the painting, and hopefully by the end of it, you end up with
something that you love.
2. Materials: We'll go through the materials that we're going
to be using today. First up the reference poder. Now this one is from
Pixabay and you can download that from
the Skillshare site. I'm painting on 300
gram Archers Cal press painting Calpress paper, and I'm painting on a board. I'm painting flat, but
I'm not taping it down. You'll need a regular pencil
and a regular eraser. In terms of brushes, I've got three today. I'm using a small iso
synthetic for the detail. And then to get around the body, I'm using this medium
sized brusher, details of these are all
listed under the materials. Then this one, I've
chosen this one because this tip makes
perfect feather shape. I have a play with the
brushes in your kit and see what works well for you. Paints, keeping it
pretty limited today. The black that you've
got here is indigo. I use Daniel Smith indigo. The brand of indigo does matter. They're all
quite different. Make sure you test it out on
a scrap before you use it. The Daniel Smith indigo
is nice and dark. I'm also using some Daniel
Smith Bandit brown. That's what I'm
using in the body here along with just a touch of winds newton burnt sienna. I've also got some Windsor
Newton yellow ochre. You could use R Ciena for that. I go and you don't need to
you don't need to have this, but I've popped because I didn't leave a little
highlight in the eye. I popped one back in with
a touch of white gas. You could use tan white
or china white for that. Other than that, you'll
need your palette of tissues and a jar of water, and I think we're
ready to paint.
3. Sketching Up: So here's a sketch.
I've taken a few lives. If you have a look, the body is actually quite lo side on this side because I'm not
painting a lot of detail. That might not make sense quite so much in the
finished painting. I'm making it a little
bit easier for myself. I'm just shaving
a little bit off this side, rounding
it off slightly. I'm making it a little bit more even just so that the
painting makes sense. Be careful to put in the
white area of the face here. I'm given myself an
indication of where the eye is and this where the neck, the dark of the neck ends. For the leg, I'm not painting
all the log and all that. I'm just going to give myself a little bit of a
foot down here. That's really all I'm doing. Keep it nice and simple. I have included a template for you that you
can download if you would rather use that.
We'll get painting.
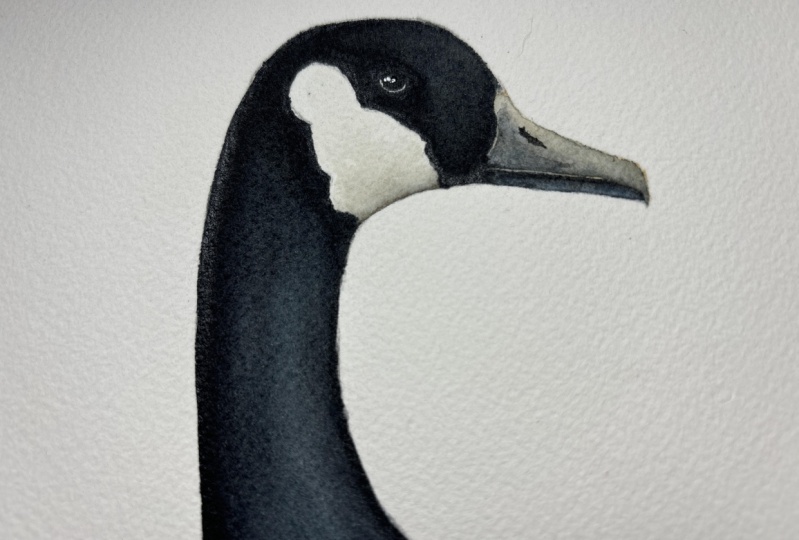
4. Starting the Head and Neck: I'm going to start
up in the beak. I'm actually going to
pop just a light wash of some yellow kern first
and then I'm going to drop some midi goo into it. I'm going to keep the
top and the bottom beak separate for
the time being. Just really milky wash
with my smaller not tiny, but medium synthetic brush. Come down into the tip. You probably depending on
how big you've drawn it, you make sure your brush will come to a nice tip to get that little hook
at the end of it. I want to I don't want the top of the bottom to run
into each other initially, so I'm just going to keep
a little bit of dry paper. Here, the back of the beat. I don't really care if it
joins down the bottom here. Now, while that's wet, I'm going to take a
little bit of indigo. I'm just going to drop
that into the page. Actually, that might have been
go that I picked up then. I'm just going to wash that back a bit. There's my indigo. I've just got multiple darks
in my well at the moment. I didn't mean to touch
them together now, I have, so there's not really
much I can do about that. That's right now I've got
enough pigment on there now. I'm just going to take
water and just drop it in and let it move around
and do its own thing. I'm going to tease it down
to the tip of the beak. You can see because I touched, you can see that they're
bleeding into each other, which is not what I was after, but I'm going to roll with it. I want to keep light on
the top of the beak. I'm just tiding up this shape. I want there's this little
hook down the end here. I've just picked up a
little bit more pigment. Trying to get that shape in. I'm just going to drop
a touch more dark down the bottom here where I've got
that bleeding light there. Dragging that pigment along. Now I've been in
here a little bit. I can add more to this later, but I probably am at the
point where I need to get out and that. Let that dry. Okay. This isn't fully dry, but I'm going to
live on the edge. I'm going to come into the
dark of the head and the next. I'm taking a slightly
bigger brush. I'm just going to
wet down first. Coming to my pencil edge. I don't have to get it
fully to the pencil, but I just want to help my pigment move because getting dark on
without being streaky, it's easier if the
page is wet first. Coming across There now I am going to leave the I I'm going to paint
straight black, but I'm going to leave it for now so that I don't lose
the position of it. I'm just painting
water around it. Now, as I come up to the beak, I'm going to switch
to the smaller brush because I don't want to touch that beak and get
water running into it. I've got a bit more control. To get as close as I can
without actually touching it. I'm not saturated. I'll go a reasonable
amount of water on there. I'm I'm going to keep this brush in my hand because I'm
going to need that. I go to go and put
my bigger brush into really creamy indigo, and I touch that
into the wet page. I don't quite have
enough water on there. Dropping it into the wet page and letting that water walk it a. I'm getting as close to the edge as I can with
this thick brush, the bigger brush, and
then I going to switch to the smaller brush to
push it to the edges because I'm not confident that
I can get the right shape. I'm going to now tick
up a bit more paint. I'm just pushing out to my pencil ledge,
being a bit messy. Chiseling out that shape. Now, I have to move
reasonably quickly. Depends how warm your room is. But if it dries before I've pushed out to
all these edges, you'll be able to
see the streakiness, which I don't want. Be careful, I'm turning it around so that I can
get to this edge. Just put a bit more
water on my brush. Be careful not to put your hand where you've already painted. Now, I want to I'm ignoring the reference and I want to keep a little bit of light on
the front of the head here. I'm going to do that
while it's still or wet. As I'm coming down here, I'm introducing some more water, I'm pushing out to that edge and diluting the pigment a bit. Now my beak is I think dry, so I can come up to there if I'm careful and actually touch it. If it's not dry, just leave a little f dry paper between the beak and
the dark feathers here. Underneath chin. Back around. Now, I don't want the light of that head I don't
want any water from here pushing up onto the top of that head because that will
leave me a really dark line. I'm going to stick
something underneath it my phone so that the pigment
isn't running up that way. Now, I'm going to
tidy up down here, so it's going to grab
a bit more pigment. And I'm just chiseling out the shape underneath
the beak there. I was a bit untidy. I put that in. I'm
really cold in my room. I've still got water in the page because it's
drying pretty slowly. I can sit back. I don't mind the light that
I've got here. If you want the light
that's in the reference, you can put some water on here
and get a bit of light in. I'm still really wet. Everything's really wet. I'm really forcing blooms here, so I can get a little
bit of that light in. But again, I just want
to watch that I don't get too dark a line on the edge. Now, if you get quite often
when you're using the dark, you don't get it dark enough initially. That doesn't matter. You can go again and
put a second round on. What I don't want to
do is end up with it too dry and seeing streaks. I'm going to come out of that. I'm going to sit on the angle so my pigment runs that way, but I'm going to
come out of that for 10 minutes and let that dry.
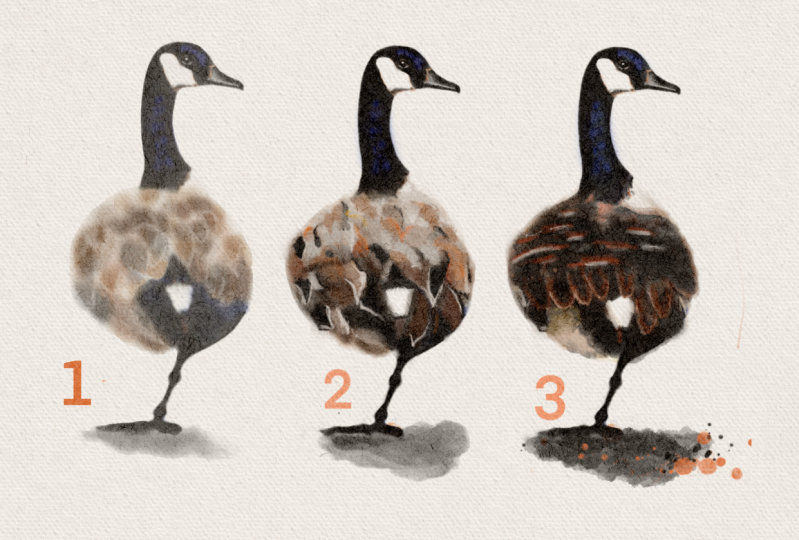
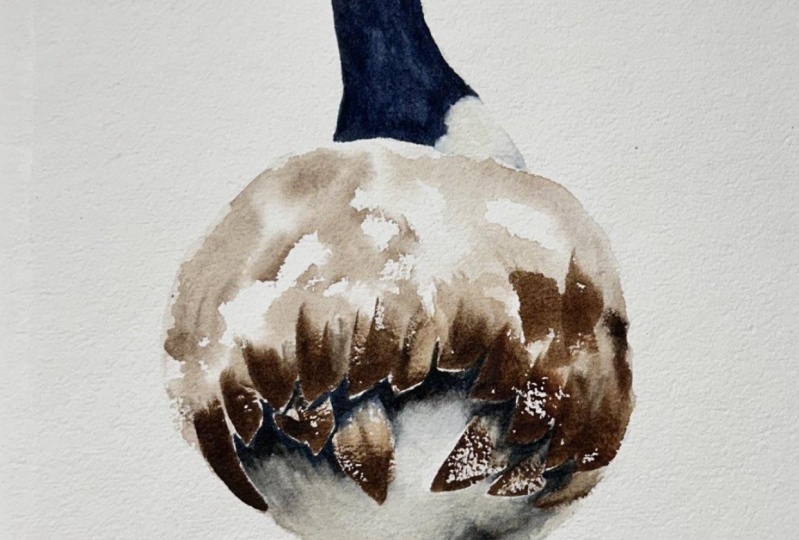
5. Getting the Body Feathers In: I didn't want to
wait 10 minutes. It's not quite dry, but
I'm going to push on away. I'm going to do the
feathers in here now. I'm going to use two
different brushes for that. I'm going to use
the same medium one that I used for the neck, and I've got this
bigger brush that I've chosen because it makes a
nice shape for the feathers. Start with, I want to
keep a bit of light on the back and I want to
keep it a bit patchy. I'm going to patchy wet down to the edge of
the feathers here. I'll hold it up so
that you can see. Now don't mind if I touch a
little bit to that indigo, it doesn't really matter if
a little bit of that bleeds. I patchy. Then what I'm going to
do, I'm going to take I use some band. I've got band and a bit
of cia in this well. Now, I don't want to get too
hung up on the patterning, but I'm going to
pick up a little bit of both on my brush, start about midway down. Wasn't enough, and just
throw a bit of color in. I want to keep those lights. Now I'm going to switch I just threw my brush off my desk, but I'm going to switch
to my bigger brush. This one, I want to use
to make feather shapes. I want it to be not too wet. I want to have a little bit of hold in the bruh. Not too water. I'm just going to put my tissue
on the heel of the brush. I'm going to turn my wrist
and put some feathers in. Then just let that one up there. There's a feather down here
that I'm going to put in. And then there's this
little under here. I'm going to just see
what my brush will do. Whatever the brush does,
I go to live with. Then I going to
come out and that.
6. Starting the Shadow on the Face: Now I'm not fully
dry in there yet, but while that settling in, I'm going to come
back up to my face, which looks like
it's pretty dry. Some of this might be too light, but I'm going to work in here first before I worry about that. Two things I'm going
to do. I'm going to paint in the eye. I've taken my small synthetic and just paint that shape in. Now, I'm not going to leave white It does have y liner
around the whole thing, but I'm not going to
leave it all there. I'm just going to leave a bit. Only because I tend to find
if you leave all of that, white, it looks a
bit cartoonish. I'll leave a touch. If you paint it all in, you can get it back with ga. That's now, you can leave a
little high light in the back of the eye there. I'm going to put
it in with later. So I think that's pro. The dark around here
isn't dark enough, but that's okay for now. Then I'm going to
work on this bit. I take my brush cleaner. I don't have very clean water,
but we'll see how we go. I'm going to paint with water. Come up to that pencil line, and then I'm going to touch
to the indigo that's there. I'm just going to let it
to give me a soft shadow. Indigo will keep bleeding for a long time, even when it's dry. I don't I'm not aiming to get a whole lot of
water moving into the face. I just want to use the pigment that's already there
to give me a bit of a soft shadow that I
can then build up. I want to wash my brush. But a clean brush now and I'm just worrying it along the edge. I want it to wick its way up. I don't want too
much of a hard line. Now I'm going to put a
touch of the same idea. I'm going to wet up
the back here and then just touch to my edge. I just want a little
bit of soft bleeding. Now, this isn't dark enough, and I'm going to put I'm
going to warm it up a bit. I'm going to take a bit of
bandy and be Sienna mix. Too much be sienna. Take a bit more band.
I can't get any band. I'm trying to get a little
bit of blue brown in here. That's now a bit too brown, so I I'm going to grab
now a bit of indigo. And just touch that. In. I started with the bleeding from the face to give me
an idea where I wanted that shadow and now I'm just
strengthening the color where I've decided I need
to put more pigment in. If you got a lot of bleeding and it was already really dark, you might not need to do this. But I also wanted a
touch of brown in there. I'm just worrying my clean
brush along the edge. Now, I'm getting this
dark line underneath. I've while it's wet, make sure I'm teasing
that out that I don't get to solid a line
underneath there. I can push and pull for
a little while in here. Probably getting close to
needing to get out of there. It's just to start
to round that up. I re it needs to
go darker again, but I don't want to
add more pigment in there now because I've
been in there a bit. I would like to let that
dry and then I might come at bar underneath, but not yet. I'm going to move down
to this part here. Now this is white, but because I'm not
painting background, you might pay a background
that you need to do this, but I need a little bit
of something in here. I'm going to do the same thing where I'm going to
take a little bit of water and Muss
up that edge a bit. So I get a touch of breathing. Just so I get a
touch of bathing. I'm going to put a little
bit of pigment just in this where the chest mets the
back of the feathers there. Pick up a little
bit more indigo. I just want to show that this is actually
a bit of a chest here, not just thin air.
Don't need much. If you put too much
on and you don't like it I just some phyto turquoise, just pop the tissue
on and soften it off. I am going to put
a little bit of yellow air in there later. But I just want to
make sure I can see that there's something
happening there.
7. The Undercarriage: Okay. Now I'm going to move to
while this is all dry, I'm going to come underneath here and see what's
happening under here. Now I'm going to just
I'm actually going to use my smaller brush because I don't want to get to
carried away here. I'm going to chisel
out with water. I'm just painting that d water, that doesn't matter because it's quite dark underneath here. That little bit underneath. I'm not touching
the feathers there yet coming over
that pencil line. Underneath here, wherever
your feathers have gone to. This isn't exactly the
same as the reference, but that doesn't matter. To work with whatever
loose strokes you've got. Now I'm going to throw
underneath there initially. I'm going to build up
the shadows underneath here once I've the shape sorted. Because although
it is white under there, it's quite dark. It's in quite a bit of shadow. Now, coming down into this leg. What I'm
going to do next. I'm going to paint with
some water roughly. I'm going to take some indigo. And I'm going to drop
that in to that we page. There's a claw there. Be one at the back here, but
I'm being loose with it. And while it's wet, I'm going to grab
my next brush up, my middle size brush. I'm going to paint
underneath it. I'm going to come
up and just touch to a couple of
points, let it bleed. Now, depending on
how much pigment you've got there, it
may or may not bleed. I haven't got enough pigment
in there for it to bleed. What I'm going to do is I'm
going to get just a touch of indigo and put it underneath, just to help it have
something to shift. Wash my brush, touch
more water on. I want to have a little bit
of something going on there, but I don't want to
paint a whole ground and get carried away. Pigment. There we go. That's probably the amount
of pigment I'm looking for. And just let that bled. I'm still a bit
dap through here. I'm going to stay out
and let that dry. I'm going to think about this
little space in here now. Now there's this beautiful
flash of white here, but it's quite dark underneath. I'm going to start
thinking about that dark. I'm going to take some water
paint. That halfway down. Again, it will depend what shape you've made with
your feathers here. Going to take some indigo, and I'm just going
to drop that indigo in and let that bleed down. Wash my brush, dry it off and just worry
that bottom edge. I want it to so disappear. I want to retain some white. Now my pigments
disappear a bit there. I'm going to pick up a bit
of my band di mix as well, so I've got a bit of a brown
and a bit of the blue. I've got some band
di and some indigo, and I'm just going to touch
it in so that I'm a bit stronger wet and wet
while everything still wet up in there. Now I've got more to go
on working up b shadows, but I'm fiddling now, so I'm going to come
out of that and that.
8. Rounding Up Using Shadows: I'm mostly dry. I'm
going to work on. I want to push this
bottom underneath. My yellow ac is dry there. I'm going to come on
again with small water. I often paint with water first while I'm working
out where to go. I'm thinking about putting
this all into the dark a bit. I need to chisel out these
feathers are sitting on top. I'll come on this side as well. I'm just going to pop
a little bit of water. Through here. You'll see
it when I put the indigo. I'm going to pick
a bit of my band and a bit of my indigo. Now my page is now. I want to chisel
out these shapes. I can leave a few whites, but I don't want
to white in there. Try my brush. I'm going
to tea that page is wet, so I'm teasing it down. It bleeds into that
yellow och over that. Now, if by pulling that down, your pigment has disappeared, grab some more pigment and
right up the top there, just throw a bit more in. I'm just going to soften off. I've got that really sharp edge there that I'm going
to soften off. Again, it doesn't have to be
exactly like the reference. We're just pushing
this bottom under. A nice and wet and wet. Now, I need to do the same
on the other side here. Picking up my blue and my
brown. I didn't wet that down. I'm I put the pigment on, but the paper is
quite dry there, so I'm just going to
grab some more water. Bit more paint. Just letting it
do its own thing. Doesn't matter if you get bleeds and things
underneath the. Maybe I'll tease
a bit of that up. Because my feathers aren't
exactly like the reference, I've got a few spots
that don't make sense. I might just pop. I think I want a bit more brown, so I'm just grabbing a
bit of brown and throwing back in while all wet and
wet, just letting it. I need this to be darker as
well the top of the leg. I'm just going to drag
a little bit of paint. I think I might just
put looking at, I reckon, I'm going a
little bit of my banda, a little bit of my indigo. Just touch a bit. Una there. Let it run. Again, because my room is so co, which is why I'm in
this ridiculous pink. I've got time to move
the paint around. I'm starting to fiddle now. If I sit back, I've retained this little flash of white that I want to have there. I've got some dark
going on there. I do want this to pull. I don't want the flash I got a bit flash of light here
that I don't really want. I'm just going to tease
that pigment down a bit. I'm at the point now where
really I need to get out of that and see what
it does and not get fussy about what was
happening in there. I'm going to come back to the top while that's all drying and we're going to
finish around the face in a
9. Finishing Off: Now, I keep saying I'm going
to come out and let it dry, but I'm feeling really
impatient today, so I can't bring
myself to do it. I'm going to come back up here while this is still wet and just try and keep my
sleeve out of it. Now, I'm not dark
enough through here. I want to be a little bre
solid through the face here, maybe at the back just
around this area. I'm going to go straight
on to before I wet it and went and dropped the
pigment into the wet page. Now I'm going to go straight on because I've already
got that first wash there. It's more forgiving now. I've got indigo, and
I'm going straight onto the face coming across and I want to be dark here
underneath the chin here. Picking up really solid pigment. Then I need to tease that
pigment into the underneath. I'm just going to pack a
little bit more on there. Then I'm going to wash
my brush, dry it off. Then I don't go outside the
edge like I just si there. I want to tea that into
the wash underneath. I have to keep washing my
brush and teasing it in because I don't want to see a line between the two washes. I don't want to introduce
a whole lot of water, but I'm just softly
working that. And I'll do the same thing on
the front of the face here. I need to finish the beak. I'm going to I'm not going
to follow the reference. I'm going to paint
down a little bit of water. I've got
this little gap here. I'm going to join
that in. I'm going to paint over the that I left between the
top and the bottom. You can see that that's
moving the pigment. Then I'm going to grab
touch of my indigo and I'm just going to
pop into that wet. I got a wobble on my hand
in into that wet page. I'm just going to drag
a bit more pigment, and just let it do
whatever it wants, and then I'll put
the nostril in. I'm retaining the light on the top and just
getting a little bit of variation in this
bottom part of the beak. I've got different
intensities there. Hiding up the shape at the end. Now I can't put the nostril
in until that dries. I can put I'm going to put a little highlight in the eye
if I was painting bigger, I would probably consider painting the brown of the eye
and all that kind of thing. But because it's small,
not worrying about it. I'm just going to a
little high light with white in the back of the eye there. That's
all I'm going to do. I am going to get rid
of that little bit probably with a scalpel
blade, not just yet. Now, I'm going to come in and push where we
were here before. It start of quite light. I'm going to go the same idea where I painted down with water. And then I'm going
to drop a little stronger of my van dike
and my indigo just into that shadow just to
make it a touch darker. We do. That's a bit strong. Clean my brush and just
tease that pigment. Around. Again, if while
you're teasing it, your pigment disappears,
you can just pick more up and just drop it just
back into the web page. Picked up a little
bit more brown there. You can. You can keep adding
to the shadow as long as you let
it dry in between. You just keep letting
it dry, then go again. Now, I don't mind the hard
lines so I've got there. I think I'm going
to leave those in. Now, dry. I think I'm dry there, so I'm going to put,
see, I might be. I don't want much water on my brush. I'm just going to pop A little nostril in. Then all I want to do, just sitting back
and having a look. I want to pop a little
bit of warmth in. I'm going to pop a little bit of yellow ochre in the face
here and at the front there. Maybe a touch here.
I'm going to rub off these pencil lines before
I do anything else. Now, before you rub
off pencil lines, make sure everything
is really dry. This is a little bit risky doing it at the moment because
everything isn't. But I'll try and stay out. I just sort of want to
see how much I need, how much is missing,
say here on the front. I'm not quite dry there.
I'm not going to do that. I'm not quite dry there, so I'm not going to
rub that one out and I won't rub anything
out at the top there. But that's probably
enough for me to see. What I'm going to do is pop
a little bit of yellow och. Preferably with clean water, I'm not going to
change my water, but it would be a good
idea to change your water. I'm going to put just a bit
of water in the face here. Grab a little bit
of yellow ocher. And just touch a little bit in. Now, if you go too much, you can either take your
brush and run it around or you can get a clean tissue
and just touch it to it. You might not be able to see particularly
well on the video. It's pretty subtle that you
just need just a touch of. I'm going to pop a little bit in here as well. Same thing. Wet the page first, drop just a touch
of yellow ocher in and maybe a little bit. I should have rubbed
that out, but I haven't. I've just painted with order and just a touch of yellow
ocher in there. The things to say
about this really, the exercise is about retaining the light. Keeping some light. I wasn't sure if I was going to, but I've kept some light
through the neck there, which if you decide you don't like, you can paint it back in, that's fine, but I don't mind the amount of light
that I have there. Then pushing this shape under, even though we know that
this color is white, it still needs the shadow on it under and round it up,
that's really bothering me. That's better. Now,
wait until this is 100% dry before you try
rubbing it off, and what you want to do
when it's fully dry is make sure that this is dark
enough to push under. Hard to tell when you've
been sitting for a while. The other thing that I
said I was going to do is I was going to tidy
up that scratch. For that, I would
take a scalp blade. Because it's so tiny, I can put the blade on the
flat and just straight back. The paper. Not all brands of
paper will let you do that, but this is archers and pretty. Okay. So if you're happy
with your painting, do upload a photo of it to the Skills share page
on the project section. I do like seeing your
finished paintings, and I'm always happy to answer questions or give feedback. So thanks for joining me.
 Nadine Dudek, Professional Watercolour Artist