Transcripts
1. Introduction: Watercolur can be a tricky
medium to work with, but it's important
to just relax. Hi, my name's Nadine. I'm a watercolor artist
from Melbourne, Australia. Now, my main line of business
is selling paintings. So generally for me, every
time I'm doing a painting, I'm trying to make sure
it's a good painting, but I think it's
really important to give yourself a break and do some little exercises
where you just relax into it and have
some fun with the paint. And that's what we're
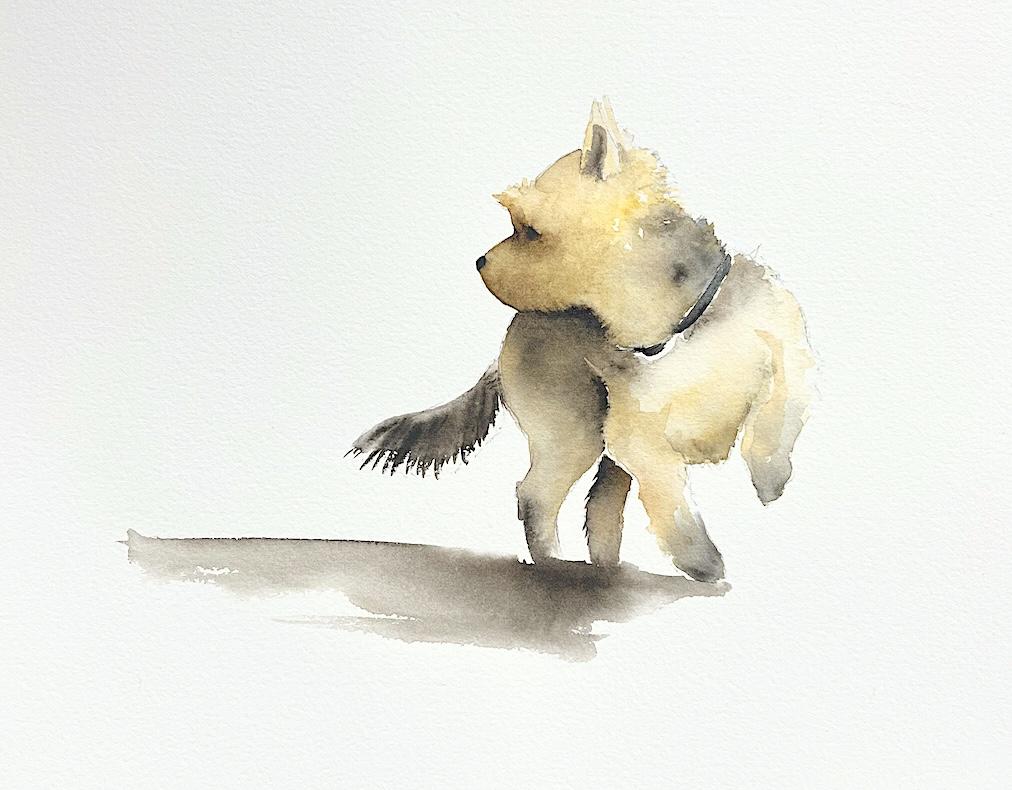
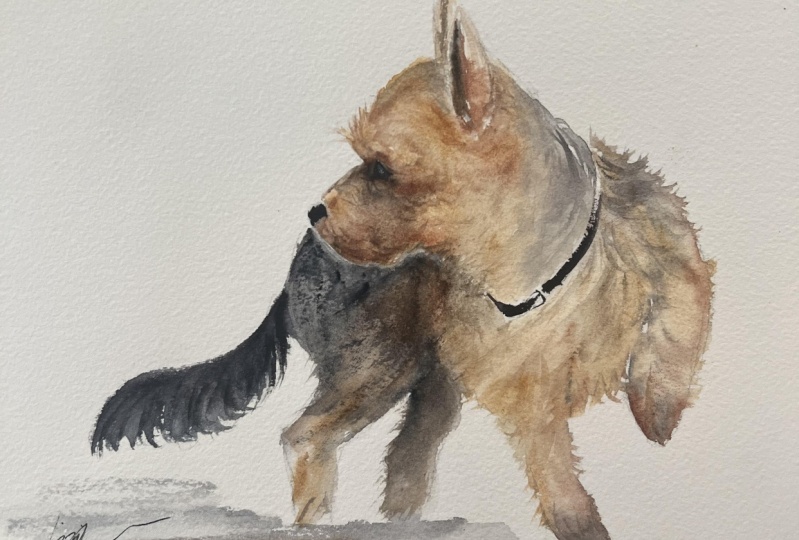
going to do today. We're going to paint
a little fox terrier, Yorkshire terrier, rather, that's looking
over its shoulder. We're going to do the
bulk of the painting in one hit really
quickly, wet and wet, just letting the
paint do its thing, no overthinking, and getting hung up on the reference photo. So the reference photo is
just a guide to get started. I want you to really lean into letting the paint do its thing and not
trying to force it. So we'll go through the sketch. We'll go through the materials and step by step
through the painting. Important for this
one to just not overthink and remember that
we're just having some fun. Hopefully you're having
fun and by the end of it, you're happy with
one of the versions. I've done this maybe three or four times and
I don't like them all, but I've got one or two that I do like. Let's get started.
2. Materials: Materials for today's class. The reference photo, this
one is from Pixel Bay. I've got a link to that on the Skillshare site where
you can download the photo. I'm painting on 300 gram
arches coal press paper. I'm painting flat on a board, but I'm not taping it down. To do the sketch, you just use a regular HB pencil
and an eraser, which is somewhere under my mess so I can't show you that, but just a regular eraser. In terms of brushes, I'm using two, possibly
three actually. I've got just two
little synthetics. The details are on
the material section. This medium one to get through the bulk of the
painting and then I've got a little one tiny nose and
eye and some of the fur. I'm also because I mucked up, I'm also using a
oil brush a flat. This is a stiff
synthetic bright white, just to lift a
little bit of paint. But if you do it properly,
you won't need this. This was just for me
fixing a mistake. Now, in terms of the
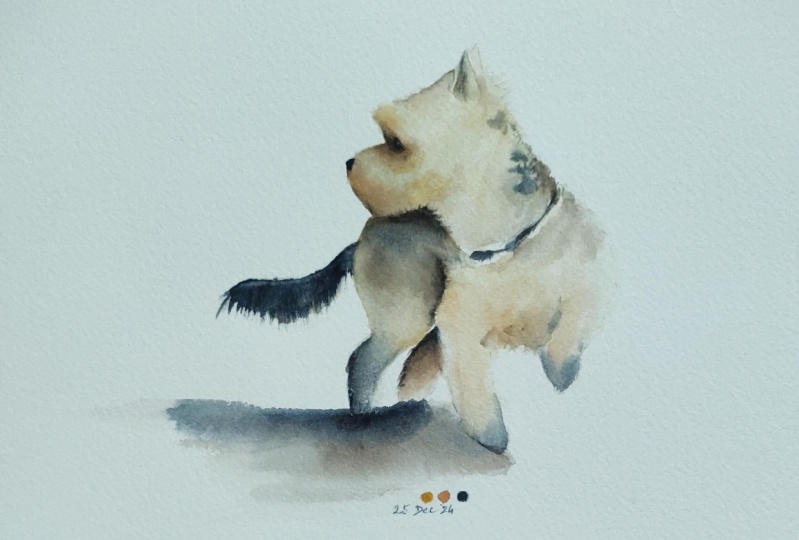
paints, I'm using three. I've got some Windsor
and burnt umber. You could use burnt
sienna for that. I've got some art
spectrum paints gray, which I think you can't really get anywhere
other than Astrata. You can use Daniel Smith indigo, you could use instead of that, and I've got just
some yellow Oca or you could use raw sienna. You'll need other than
that, your pallet, a jar of water, and some
tissue or toilet paper. We'll have a look
at the sketch next.
3. Sketching Up: So we'll have a look at
the sketch for this one, so I don't want too
much detail in here. I do want you to pop in the position of the
eye and the nose here. A little bit of an
indication of the ears. They're quite complicated
because they're all furry, but I'm not worrying
about that too much, just a rough shape. Little bit of an indication
of the collar through here. Now, don't worry about he's got all these beautiful little
bits of sticking out fur. We'll deal with that
when we're painting it, don't worry about that. Then we are going to
paint a shadow in, but I'm not going to fuss
about it during the drawing. I'm just going to let
his legs finish here. Do get in this lovely shape. He's got the beautifully
this little paw here. Get that little shape in because that's quite nice
in the finished painting. Really, that's all
we need to do. Now, if you don't want
to sketch that up, I have given you a template that you can download
from the Skillshare site. The only other thing
I would say there's little if you look carefully, there's a little gap in there on the photo that's the back of he's got his chin and then
the hair is coming down. I'm going to ignore
that and just put all the way
underneath that chin and not worry about that
little gap in there. I think we're right
to start painting.
4. First Wash Getting the Whole Shape In: Okay. Before we start painting, I want to remind
you that this is an exercise in being
loose, not overthinking, working quickly and wet
and wet and just not stressing about
whether the painting looks exactly like
the reference photo. The reference photo
was just a guide. It's just there to get us
started, don't overthink it. Just have some fun and see what the pigments
will do for you. Now I'm going to start
with my tiny brush. I'm going to just
pop in initially just to get me started
to get over the fear of the blank pages just
the position of the nose I've got some
art spectrum pains gray. You could use Indigo for that, whatever your favorite dark is. I'm just going to pop the nose
in there and then the eye. Okay. I'm going to switch to my medium brush and I'm going to wet down some of this with some
clean or clean ish water. Now, because I
want to do wet and wet for this and I want some of these shapes to bleed
into each other, I don't want them all to
just mold into one shape. I need to keep some dry
paper as I'm wetting down. For example, here
along the collar, the join between the body
here and the hind leg, I want to leave a
little bit of a gap so that I don't just blend
all the way through. See what I mean as
I'm going. I'm just going to grab some clean water. Just chuck it around
in a few spots. For the minute,
I'm going to stay out of the eye and the nose, just so that when
I pop pigment on, there's a little
bit of movement. Come down under the collar. I'm going to stay out of
the hind leg for now. Just into the tip of that
paw and this one down here. If I show you can't catch
the light there we are. I've got a reasonable
amount of water, not absolutely
saturated, but I've got some little
spots of dry paper. I'm going to start with
some yellow ochre, and I'm just going to whack
a little bit of paint, a bit more water onto the face. Into the front of the nose
with the ear, bring some down. Now, this is where I
was talking about, we could deal with those flicks. I can drag my brush out here. My pencils a bit heavy, but just so that you can see where I'm going to get
a little bit of that. I'm going to grab some more of the yellow ochre and
come into the chest. Really rough, really patchy into that foot and
the other one. Okay. Now I'm going to
grab a bit more water, and I've just taken the
excess off my brush. I'm just going to tidy up the shapes around
the front of the face. Give myself a few little
fix of fur up there. I've got a gap between the ear and the top
of the head there, fill in some of the
whites that I don't want. Now, Now, I can see I've got really strong yellow here, not as much here. When I look at the reference, there's probably a little bit of this yellow ochre down in the
chest here at the bottom. I'm just going to
grab a bit more paint while it's still wet, throw that in a bit more on the front of each paw I can help chisel out that shape
while it's all wet, my room is freezing, so this is going to
take a while to dry. Shouldn't be freezing
because it's summer and we've got 40
degrees in two days time. But today, it's freezing. All right. Now, while this is still wet, I'm going to throw
in a few darks. So I'm going to pick up some of my spectrum pains
gray or your indigo, and I'm going to chuck a
little bit around in some of the places that I know
it's a little bit darker, and just let it bleed
through the ear there. I just wanted to do
whatever it wants to do. I might check a little bit of that in the bottom of each foot. The feet aren't really dark, but this is going to dry
a lot lighter and I need some definition in the
bottom of those paws. A little bit because I know
that that arm the leg is going to come Now, I've got this really big bit of white paper there that's
going to hurt me, so I'm just going to back that
off while it's still wet. I'm going to drag that
neck down a little bit. Up here, I need to tidy up. I haven't come to
my pencil line. I'm going to tidy
up, bring that nose, and then come as close
to the eye as I can. Now, I've I'm going
to use burnt umber. There's a lot of warmth
around that face. I'm going to squeeze out a
little bit of burnt umber. You can use bunt sienna
if you don't have that. I'm just going to grab a bit again while I'm
still wet and wet. Really creamy paint,
toothpasty type paint. In the front there.
Now, I'm drying, so see that's not
moving very much, so I'm going to whack
a bit more water to get that to move a bit. I'm going to come
and touch the front of that eye over the top of it and into the top of
that head and just drag a few bits of paint through. Yeah, I want to keep maybe a little bit of light
on the top of the nose. I'm just drying my
brush and I'm just going to tease that back a bit. Now, I do want all this mixing and cauliflowers and bleeds
and muckiness on the page. I want it to be looking rough. Going to come up and touch
that nose just a bit. Doesn't matter if that bleeds. We're going to come back
to that in a little bit. Now on the chest here, I'm just going to
drop a few bits of water while that's drying, see if I can force
some cauliflowers. Doesn't matter if it happens.
When I say cauliflowers, I mean these blooms
here just to add a bit of interest without
having to work for it. It will depend how warm your room is and how
quickly your page is drying. Sometimes you'll put the water on and absolutely nothing
happens because it's too dry. All right. I'm going to come out of
that just for a minute and I'm going to move
on to this side. Now here, you could wait
until this was 100% dry. I'm living on the edge and I'm going to just
keep pushing through. I think it's more fun,
particularly when you're painting
loosely and wet and wet to just see what
happy accidents happen. I'm just wetting down into that leg and then I'm going to wet bit into
the tail as well. Same idea. I'm going to grab a
bit of yellow ochre. I've got a dry paper between the shoulder here and the hind leg so that they don't all bleed into each other. A little bit of
warmth in the tail. Then I'm going to pick up. Now that tails quite
dark, quite black. I'm picking up my art
spectrum paints gray, and I'm just going to drop. Dragging from the wet
paper into the dry so that I get those
little bits of fur, wash my brush, and then I'm just going to
tidy up. Paint my tissue. Tidy up that top bit, let that lead into
his backside there. Come out of that. Now I want to put some of those
darks into the back here. Picking up some more
of that Pain's gray which actually has got a
little bit of burnt umber in it because I've mixed my
paint in the palette. Now, trying not to
touch to that chin. Going to join that shape there. Now, bringing it down a
bit, teasing that down. I want to do a little
bit in this leg. Again, painting down
preferably with water. This leg is going
to be quite dark, but it doesn't matter that my paints dirty,
my water is dirty. I'm chucking a little
bit of yellow aca first, then picking up a bit
of my pains gray, number mix and just
chucking that again keeping the shapes all
a little bit separate. Now I'm going to do before I let you stop and breathe
for a second, I'm going to pop
a little bit more dark on this end of that leg because I'm going
to pop the shadow in. I think maybe I want a little
bit of warm in the shadow, but what I'm going
to do the shadow who knows which way
the sun's going? It doesn't matter. No
one's going to know. I'm going to paint a
little bit of water, bit of um bit of yellow
ochre down there. Then I'm going to
touch to those feet. Then I'm going to grab
a bit of my pains gray and go a little bit harder. I think actually you might
have some sepia in there. I don't know, doesn't matter. Pain's gray and burnt umber
or indigo and burnt umber, bit of blue black, bit of brown. Then that probably
needs to come out to that foot because that
foot's in the ground. I'm just going to join up that shape because that
doesn't quite make sense. Wash my brush and
I'm just going to bring that front leg forward. Now I'm going to
come out of that. Let that dry, let
you take a breath, then we'll come in and add
some more bits and pieces.
5. Second Layer: Okay. It's been about 10
minutes and I'm now fully dry. A couple things
we're going to do. I want to build up
some strength around the face, put a
few more darks in. I also want to get a bit of the color that
I've got here into this hind leg so that they
look like they actually match. So I didn't get that
in the first place. I'm going to take
some clean water. Just going to wet down, paint straight over that hind leg. Might make this gap
a bit small too. Then I'm going to take
some of my burnt umber and just chuck a little bit. In come down all the way into the front
of that leg there. Probably I need a little bit
more of that on this leg, the front leg. Just. I'm just closing
in a few of those. I had a gap there that I wanted to leave
while I was painting it, but now that it's dry, I can back that white
off just a touch. I'm just going to grab a bit
more of my burnt umber just a touch. Into that front leg. Now, on this leg, I'm going to keep it dry. I'm just going to
put a little bit of that burnt umbana
onto that front paw, but it's a dry stroke. I've got a combination of these hard edges that I get
when my paints moving from the web page onto the
dry or just going straight onto the dry to give me just a bit of variation
in the strokes. Now, I'm going to put
my collar in actually, no, I said I was going to do
this. We'll do that first. I'm going to same thing, wet down a little bit. It's quite dark
around the eye here. Wet the front of that face. I'm not touching into the Well, actually, I just did,
but that doesn't matter. Bit of my burnt umber and a bit of my
pains gray together. I meant to get a bit
more burnt umber. I got more pains then. I just want to strengthen up. This dark around his eye. I've chucked the pigment
on to the web page. Then I've washed
my brush and I'm now teasing that around. See if I can keep that. I
kept that light initially. I'm risking closing it in. I've got to close
off the little gaps of light. Around there. A bit of light on the
front of his face. Now I want a bit more dark
underneath the muzzle here. Again, I I went too much of my black blue and not enough
of my warm burnt umber, so I'll just check a bit
more burnt umber on there and then just move it around. I keep cleaning my brush. I'm taking the water off
my brush I'm painting a tissue so that I want
it all wet and wet, but I don't want to flood
the page completely. Now I've got these edges, so
I've got to deal with those. I'm just going to must them
up a bit with my brush. Roughly coming into
the dry page there. I've got this hard edge here. Dry brush, I'm just going to
smooth that back. All right. I feel like I want that. Again, this is one of
those things where I'm not necessarily saying
true to the reference. So here, there's a lot of light in the reference,
but actually, I want to extend
that color that I've got on the gas there
around into that neck. It's what makes sense for
the painting in front of me more so than what's
on the actual reference. Again, I don't mind
if it gets too flat, if the wash is too
boring in here, just keep chucking in water, chucking in pigment so that
you get variation in there. Now, all the little feathery
bits for underneath the chin here I'm going to deal with once this
is dry with the dark, I'm not going to
worry about that yet. I need to tidy up my. I've got a pencil line here, but I've got no yellow ochre. That was my dirty brush. I'm just going to wet that down and just touch a bit more yellow ochre
into the top of that. Keeping an eye on my
hard edges as they form. I'm still going to
need to add more of this color down
into this leg. They still don't really
talk to each other, but not just yet. I want to put the collar
in. I'm going to go. I'm going to take straight my art spectrum paints
gray or indigo, and I'm just going to
drag a line like that. That's all I'm going to do.
I've got some bleeds here because my neck was wet where I've just touched and they're bleeding a little
bit. I like that. I'm happy to keep that. I might I might have to
close in that gap a little bit, but not yet. Now, before I let
you again rest, I'm going to come
into this back leg. Just keeping an
eye again on this. Just every time I look, I'm
forming a new heart edge. I've just got to keep coming
back and just softening that in This back leg
here is quite dark. I might get a bit of that brown warmth
into there as well. I'm just painting
that down with water. I'm going to chuck
a little bit of my burnt umber in there
to warm it up a bit. It is quite There are some
little flicks at first. I'm going to take some of
my paints gray and with the tail and just a
few little flicks. Soften that back. I'm
just washing my brush, chucking a little bit of water and let that all
mix on the page. I will have to add a
bit more around there. But probably I'm just
looking at this. I'm going to let you
stop in a second. I'm just looking around
the eye. It's nearly dry. I'm going to pop I picked
up a bit of my burnt umber, a bit of my pain is gray
and I'm just going to drop just before it dries, just a touch more in there. And a little bit more. It's about the timing. It's testing out the paper to see what it will
let you get away with. H I done that while it was much wetter, everything
would have spread. It wouldn't have given me
the result that I wanted. Here, I can add the pigment and my paint doesn't
have much water. I've not got much
water on my brush. There's a little bit
of water on the page, so I get a small
amount of spread, but I don't get that
shooting across the page like we did
when we did that. Just put a bit under the nose. And while I've got
this out, when I look, there's going to
be a little bit of a shadow here from
the cast by the ear. So this paper here is dry so that I can
chisel out my shape. I'm just going to pop a
little bit of a dark there, wash my brush and just
soften that edge. So I've got just a touch of
something happening in there. I'm going to come out
of that and give that ten and then I'm going to again, I've got to match
these colors in this hind leg and see
what else we need to do. But I want to let that settle in the ceiling
when it dries. Give it 10 minutes.
6. Finishing Off: Okay. So we've been
10 minutes dry now. Although in the reference, this is very black blue. I still want a little bit more of this warmth into
the hind leg here. I want to suggest a few little fairy flicks
underneath the chin. I'm going to just wet down
with a little bit of water, that hind leg coming
underneath the chin and into that part of the shoulder. I'm going to throw I
think I need actually now the yellow ochre
that I need in there. Then I'm going to chuck in
just a bit of yellow ochre, it all lead, soften
off that edge. Okay. Then I'm going to
take a little bit of my burnt tumba and
a little bit of my pains gray on my
really little brush. I'm going to just pop in a few little flicks
to suggest that fur. I'm closing up that white gap and now dragging a
few little lines into the I'm dry on this side so that I can
get a bit of that fur in. All right. Then I'm going to
let that bleed down. I'm going to wash
that little brush and just let that dart bleed
into the hind leg. The only thing you
need to remember when you do that is to change. These little flicks
are going that way and these little flicks
coming the other direction, probably get a few
more in. Let's see. Don't overdo it though.
You're better off coming back and putting
in more if you need them. Than going too many
at this stage. I think there's a
lot of dark in here. To show me the
difference between that back leg and
the front leg here, I need some dark in there. I'm going to pick up again,
my blue and my brown, my paints gray in my burnt umber and check a little bit
of paint in there, wash my brush and
just let that bleed. I just letting that
move do its own thing. Just to push that
leg back a bit. And again, remembering
that this will dry lighter than it
looks at the moment. I'm going to bring it I'm
going to bring it a little bit over to the
edge of that leg. Okay. Now I need a little
bit of balance. So I've got these darks. So I need a little bit
of that on this side. The thing that's pulling my eye at the moment is this gap. When I look, there's quite a lot of dark fur on this side, I reckon I can fill
that in a bit. Sticking with my small brush
just for a bit more control, painting that down with water. Then I'm going to take a
bit of my burnt umber, bit of my pains gray, just throw a bit of that in
there. Don't need much. But I just need to back off that light and give myself
a bit of that same color. All right. Then I'm going to add just a touch
down the bottom. Just wetting the
base of the chest, picking up a bit more of my dark and just to push that
chest under a little wet and wet bit messy now I
think what I'm going to do. I added a lot of dark hue,
but this is very flat. I'm just going to
take my I've got a hard oil brush
and I'm just going to lift just a touch of paint, just to make it a bit
messy, a bit more light. Through the face there. I use the oil brush
a lot to lift and how I was trying
to keep light on the front of the nose and I lost it so I can pull a little
bit of that back through. You just have to keep
washing the brush. And drying it off. And yours might be perfect. You might not need to do that. You might be happy with
what you've got there. Just need a bit more. Okay. And then my
nose shape. Slightly. It is kind of like
the reference, but I'm just going to tidy that a little bit,
fact My little brush. I've just made the nose
slightly bigger and I'm just closing in the
light around the eye there. All right. Now that
it's dry again, I want to chisel out
the shape a bit more. I'm just picking up
a bit more dark. I'm dry there. I just want to change the shape of these
chows there a bit. I've just go on to dry paper. I just want to pull a
few more darks through. Just softening it off.
Just kind of changing the shape of its
face a little bit. And I reckon one more one
more warm bit of warmth. I know I just took
the paint off, but I'm just going to grab a
little bit more but umber. Pages dry there. Pop a
little bit more back in. I think I lifted a little
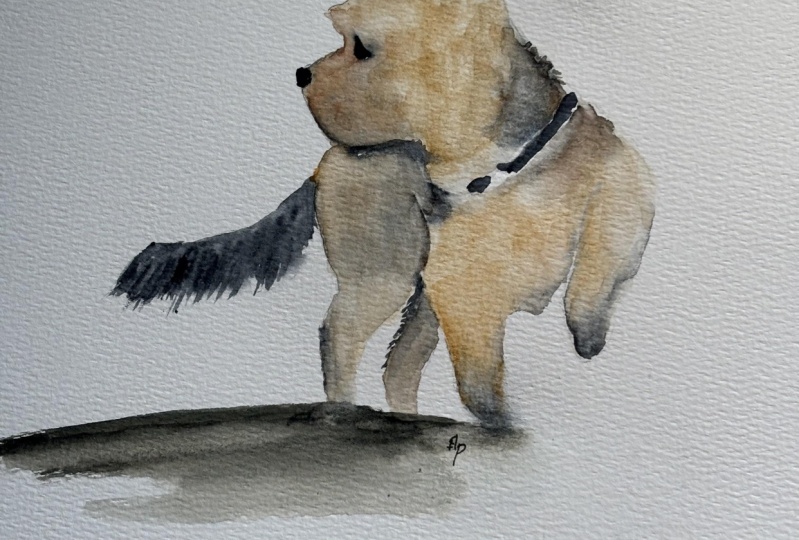
bit much, I think. Okay, so I think I'm done. So each time you
paint one of these, it will be completely
different because that first wash is
really fast and loose. I think that's the fun of it that sometimes it will work beautifully,
other times it won't. I think I probably prefer
the test version I did this one to the one I've actually painted for you
while I've been filming, but that often happens.
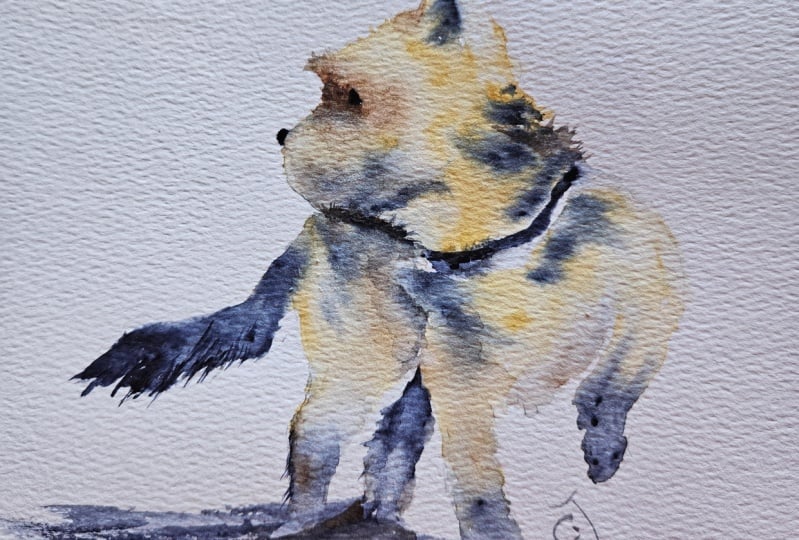
That doesn't matter. And you can play with
different colours and see which palette
suits you best. So if you're happy
with what you've done, or if you've done a
couple of versions, even post them on
the project section for me to have a look at
and thanks for joining me. S.
 Nadine Dudek, Professional Watercolour Artist