Transcripts
1. Introduction: Hi, I'm Nadine. Thanks
for joining me today, we're going to be looking at
the importance of shadows. So I think, you know, we
always talk about releasing the light in paintings and
how important that is, and a really easy
way to do that is by putting in a really
well placed shadow. So today, we're
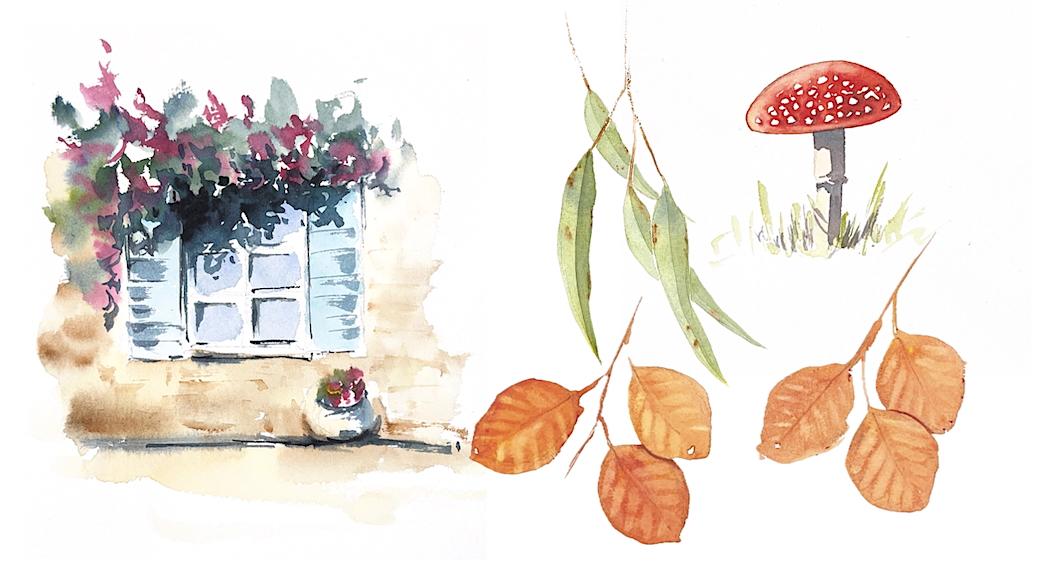
going to go through four little exercises. I've got some
leaves and a couple of different colours,
a little mushroom. That's quite fairy
tale kid like, but still a really
good exercise in showing you how
important the shadow is. And then we're doing
a little window with some vines
growing over the top. So all very simple exercises, but I think quite
good at demonstrating how effective a shadow can be. So we'll go step by step
through each of those, and hopefully you'll be
happy with what you produce. I've also for this lesson, and it's not required
for the class, but if you decide you
want some extra practice, I've put together
a little a guide that's a digital
download that you can purchase separately to
the class if you want to have another go at shadows
under my direction. But of course, you can just
keep practicing by yourself. So let's get started.
2. Materials: So I'll go through the
materials for this class. First up, I'm using 300 gram
Arches cold press paper, and I'm painting flat on a board, and I'm
not taping down. I've got a regular HB
pencil and eraser. And for brushes, you
can use whatever you like. I've just
used these three. So I've got a decent
sized round brush for going the distance
in these bigger shapes. I've got a little synthetic
for getting in the detail. And then this one,
another synthetic, I use this only for lifting the little highlights
in these leaves. In terms of paints,
use your favorites. I'll show you what I've used. I've got some
Windsor and Newton, French Ultra, Permanent Rose, burnt sienna, and yellow ochre. I've also got some
Thalo turquoise that I've used in the window and
some Daniel Smith paints. I've got a hearts yellow medium, a Pyl red, and an indigo. But again, it doesn't
really matter for this. You can use whatever your
favorite colors are. Other than that, you'll
need a pot of water, your palette, and some tissues. So we'll get straight into it.
3. Eucalypt Leaves Getting the Basic Shapes: The first one we're going
to do, we're going to do a little bunch of
eucalypt leaves. No particular
reason for eucalyps other than I'm Australian, so it seems like the
right place to start. Now, I'll probably say this
a lot during this class. I apologize in advance
if I'm repetitive, but I don't want you
to overthink this. This is really simple stuff. All I'm doing is
I'm going to sketch myself, a couple of leaves. Now, the only important
thing here might get a little insect cue in that one is that we want some
overlapping shapes. So I don't care how
you draw these. I just need a few that
intersect. All right. Doesn't really matter
what's happening up there. That's all I'm going
to sketch for this, but don't overthink it. I just want to make sure I've got some overlapping shapes. Now we're going to
start painting now I'm going to use I'm use. I'm going to us a little
bit of French ultra. Ah, and a little bit of I've got some hansa
yellow medium in here. It doesn't really matter
what colors you use. I like the French ultra. I like granulating colors, and this granulates
quite nicely. I'm going to use medium brush and I might use a little
synthetic as well. I'm going to start
in these two leaves, then let them dry, then come
and do the back leaves. So Milky, my paints
bit split there. I've got my hans yellow. I do want to just see
what sort of color I'm getting a bit of the blue, bit of the yellow
straight onto the page. I'm going to start at the
tip here, brush down, and just follow
that pencil line, come up, grab a bit more paint. No fussing. All right. I'm going to do this
one, same deal. Tip down, drag my brush. It doesn't matter
that I'm not really following my pencil lines. I'm not bothered
about that at all. Now, while that's still
wet and I don't mind, see this water here
is going to push back into this wash
and form a bloom, but I don't mind in this because it gives a bit of
interest in the leaves. I'm going to grab I've got some dried up burnt sienna here. I'm just going to
drag some through. To show a bit of the branch. Then I'm going to take a little
bit of paint and just in a few areas milky. I'm just going to
drop a couple of little flashes of burnt sienna. Depends whether you're
familiar with eucalypt leaves, but they've often got
little brown bits in them. I'm just going to drop a
little bit of that in. Now I have to stop and let that dry before I can
do anything else. I'm going to keep
drinking my coffee and let that fully dry. I'm not going to worry about
all this water pooling. You can possibly see already, you can start to
see the granulation here from the French ultra. All right. Sitting back and letting that dry.
Probably 5 minutes. It's been 5 minutes, so
I'm nice and dry here. I think, pretty good. Actually, something I don't
know if I ever say this, if you are testing
out whether it's dry, use the back of your finger, not the front because you've got more oil on the front so you
can mess up the paint more. Always just be a bit
careful when you're dabbing to see if you're dry. I'm going to pop more of
this one in, I think. So same mix of paint. Now, this one I won't be able to do the nice
stroke because I've got to try and
get in to this shape, so I have to be a bit
more deliberate in here. Come as close as I can to that other leaf and
then we'll do this bit. I'll switch to my little brush and just drop in a little bit more just a touch ofensiena
in a couple of spots. Then I should be able to get I think I'll do this one
before I no, you know what? I'm I'm going to do this twig
here. That was a bit heavy. Then I'm going to put in theory, I should wait until that dries, but you wait until it dries, I'm going to
go ahead and do it. I'm going to pop in
the one in the back. I can be not too
worried up here. I just have to be a bit
careful when I come down to this bit of branch that's wet not to touch it
because it will run together. All right. So I'll get
as close as I can. That one's dry, so that's right. I just have to make sure that this line coming underneath
this twig matches up. Do I want to extend it down? Is just what I'm thinking.
Why not? Maybe I will. I can't get too close. Again, just a couple of little sienna spots and then my twig, my
branch coming up. Stop there. Looks pretty
nothing at the moment. I need to let that dry. Then we're going to come in and I'm going to
talk to you about the shadows and how
effective that can be. But we need 5 minutes
for that to fully dry.
4. Adding the Eucalypt Shadows: Okay, spin five, and I'm fully dry and I've
rubbed out my pencil lines, which you don't have to do,
but I decided to do it. Two lots of shadows we're
going to quickly put in now. So first, I didn't leave
a vein in each leaf, and that's because
I'm going to suggest it now with a
slightly darker wash. I'm going to imagine the sun's coming this way across
the page that way. So I'm going to darken
off half of the leaf. To do that, I'm going to
take my medium brush, and I'm just going to get
a slightly darker mix of my green by how
I'm going to do that. I'm going to mix a
bit of French ultra, a bit of my Hansa I'm
also just going to pop in just a touch of my
brown my burnt sienna, so I'm just going to
be slightly darker. All right. Then I'm just going
to come onto the dry page. I'm just going to fill in
one half of that leaf. That might be a bit
might be a bit too dark, so I'm just going to just wet my brush and just
drag my brush through just to back that off one tone and it will dry
lighter than that. I'm going to do the
same on this leaf. Then I'm going to go on here, which I can do a whole
lot of and then this one. But when I do this one, I
need to be very careful not to touch into that second leaf. I'm not going to go
crazy dark on this leave behind. And then this one. Okay. And this is if you didn't get your burnt sienna
in first time round, this is, if you
want, you can come in and pop a bit more in
while these are still wet. Okay, so you can start to see there's some
thread going on here. That's not quite there
yet. We need to go our next layer of shadows, but I need to let that dry. Fully dry again, and
now we're going to put in the last
really small shadows. But it's these shadows that
I think are most important. These are the ones if you pay
attention to them can make a real difference to what is
a messy little sketch here. I'm going to use my small brush. I'm going to use a mix of my burnt sienna and French ultra to give
myself a shadow color, might put a touch of the
green in it, see what that. Looks like. All right. I'm going to start for here. I've got the sun coming this way and I'm going
to imagine that this leaf is slightly pushed away from
the one underneath. You'll see what I
mean when I put the shadow on because
the idea here is I'm trying to give
the idea of light. I'm going to come straight
onto the dry page. I'm going to start underneath that twig and then I'm
going to come down. Now, that's slightly thicker probably than I wanted it to be. But the advantage of that is that you can
see what I've done. Problem with the shadows,
once you put them on, they're really hard to take off, so you got to live
with what you put on. When you do yours,
if your branch is thin, make your shadow thin. Do better than I did. All right. Next one, we're
going to do the same here coming onto the dry page and I'm going to leave a little flash of light
underneath there, and then I can tidy
up this shape. Now, if the shadow is too light, you can go back and tidy it up. Actually, I might
close that one up because my green didn't
come all the way up. I'm just going to close
out a little bit. If you put that on and
it's not dark enough, once it's fully dry, we
can go and do it again. Now, I might have to clean up that little gap
that I've got there, see if I can get
a bit closer in. I'm just looking to see
which whites hurt me. Going to soften that gap a bit. Then I think this one probably there's not enough to do much with that one there, but I'm going to come in
here now and tidy up. In here. I'm going to give
myself a carry paint. I might start on
this side purse. I've just chiseled
out that shape. I'm going to keep this
one fairly tight. I imagine this leaf is sitting quite tightly on top
of the one underneath. This one, I'm going to soften the edge so
I've washed my brush, dragging along the edge. I'm getting a bit of
a soft transition. It's not quite as
sharp as that one. Then I'm going to pick up a bit more paint
and drop that in just to that edge and just
let it do its own thing. Then I need to tidy up that
light a little bit there. There's a bit too
much of a gap here. I'm just going to use
my same shadow color. Just tidy that up. A little bit, and I'm
going to do the same thing of softening the edge. I put it onto dry paper, wetting my brush and just
letting it softly bleed. A lot of you actually
say that you like practice that shading. This is good practice for that. I'm just teasing that edge up and then I'm going to go and put a bit more pigment
in to strengthen because I've diluted
the paint out. Really small details,
really fiddly. But I think, well, I think they make quite a big difference. That really bugs me that I
went too big on that one. But it's just an exercise.
Not meant to be perfect. I'm just coming back in. Now, the thing that sticks
out to me with this is that that shadow
is really dark, that green is really
dark and this one probably should be similar
intensity to that. Don't know if I've made a bit of a mess in
my palate here, let's see if I can actually
get the color that I want. Let's see. I just want it to
match a bit maybe too dark. As long as you're dry, you can get away with
adding more. Okay. So I'm fiddling a bit now,
so I'm going to stop. But what I want you to see is just the position
these little shadows can really change the
way that it looks. And particularly when you
imagine this in context, the context of a larger, actual piece, natural painting. So we'll stop that one there. I'm going to do another leaf one just with some
little autumn leaves, different type of leaf,
different shape to give you one more go at that and
then we'll move on.
5. Autumn Leaves: Okay. We're going to do some
cut autumn leaves now. I want two sketches
of the same thing. So I'm going to pop just a
little bit of a branch in with a bit more oval shape
leaf rather than the eucalypt. What I want you to do is have two on this side. There's one. I'm going to have
another one coming out. I might try and get them
to overlap to touch more. Really simple shapes again
and another one here. Now, what I'm going to
do I think I'm going to stick to this brush I make
myself a clean tissue. I probably should
change my water, but I'm not going to. I'm
going to squeeze out. I've got a little
bit of hansa yellow, if I can get it out of
the tube and I've got some Pyl red in my well. Whatever red and yellow you've
got, it really doesn't. Better. I've also got on
hand two other brushes. I've got this synthetic, which is slightly smaller than
the one I'm using to paint leaves and a little synthetic that we used in the eucalypse. That's the only
additional brush. I'm spilling water everywhere. I'm going to go on with
a really milky wash. I pick up some yellow and some orange some red and go
straight onto the dry page, maybe a bit more
yellow and let them do some mixing on the page. So again, not too precious a little bit with
the stems as well. Here I don't care if those shapes mix,
that doesn't matter. Make a bit more yellow. You can see I'm being really
pretty messy in there. Then same on this cluster. Just really throwing on quite
a lot of water on my brush. I don't care if
those shapes mix. I think people get
really frightened about letting the shapes
touch each other. You don't have to.
That's part of the joy. Now while that's drying. I'm going to go take my medium in between brush
and wash it, dry it off, and I'm going to lift a
few veins in this paint. Before it's dry, I'm just
going to lift a touch. I'm just touching my brush, not much water and my brush
is really dry because I don't want to cause
cauliflowers in here. I just want to lift
a little bit of pigment and then
I'm going to lift the central to get a little bit of interest without having to think about
it, same on here. But if you do this while
it's still really wet, the wash will just move
back in on itself. If it's doing that, just wait another minute before you do it. And also if it frets you
out doing two at one time, you don't have to. That's not an obligatory thing. This one, I didn't have as
much water in this one, this one's probably
dried off a little bit. On this one, where it's dried
off a little bit too much, I'm probably going
to have to use more forcing cauliflowers and lifting paint just at
the wrong wetness. But I just want a
bit of nonsense if you do have any water you
did with the eucalypt, I can if there is any water left in the
page, I think I'm too dry. You can kind of whack a
few more little spots just to add a bit more interest, but I'm not too bothered. Okay. Got the basic leaves in. Very messy. That's
completely fine. I want you to stick with messy. Then what we're going to do
is we're going to make sure this leaf comes on top and
that leaf goes behind. So we're going to
do really soft, subtle little shadow in there just to show
what's happening. So let that dry for 5 minutes.
6. Shadows on the Autumn Leaves: Okay, it's been about 5
minutes. I'm fully dry. I've rubbed off the
pencil, which is not something I normally
would do until I know this had been drying for
an hour just because you're tempting fate
on smudging paint. Now, I won't be able to get off. It's hard to get pencil off
particularly under yellow. So these sort of lines
underneath here are going to stay cause if
I try and rub it them, they're not going
to come off and all that's going to happen is I'm going to leave pigment. So they don't particularly
bother me anyway. I'm going to take my
small brush and I'm going to put I think I'm going
to put this leaf on top. I could go either way, because
these shapes have mixed, I can go either way. So
I'm going to pick up. I'm going to take a little
bit of burnt sienna. And mix it with a
little bit of my red. So my shadow colors got a little bit of brown,
a little bit of red. Not too much water on the brush. And I'm going to
now eyeball where I think this leaf sits, and I'm just going
to pop that in, wash my brush, and
then soften that etch. And because I've
now dilute it out, I put that little
red marker there, but I don't like it
now, so I'm just going to worry that back a bit. That was when I was putting
the little red dots around. Because I've diluted my
pigment a bit doing that, I now pick up a little bit more. Again, hairy brush. And just into that now web page. Drop a little bit more pigment. You can see
straightaway how that pushes that leaf back and
lifts that one to the front. Now I'm going to just pop. I'm going to paint my
tissue so I don't have much water on the brush
and I'm just going to pop just a few more strokes through those veins just to suggest that a little bit more. Now, I could potentially do I want to I think
this is quite dark? I think I quite like that
one. I was going to say I could potentially put a
few more strokes in that, but I quite like that branch. I'm not going to
worry about that one. That one, I'm going to stop. These little I keep saying I'm going
to stop and then I think of something else. I've got this little white
and I might even make use. If I put a little touch of dark around that makes a feature of those little chewed out bits. I've just picked up a little
bit of my shadow color. You mightn't be able to see
that too well on the video. But again, just a little detail. If that dries too light, like we did for the eucalypse
can just come back in. You can just come back
in and out a bit more. Now for this side, we're going to bring this
leaf to the front. Same shadow mix, bit of
red, bit of burnt sienna. Because I really
don't want to use full on black for my shadows. I just want a slightly
deeper tones. This one, again,
my shapes joined. But now I can chisel out
and show which is which. I'm dragging some paint
onto the dry page. Then I'm wetting
cleaning my brush and just dragging that down I might add a bit
more pigment. In. And I could potentially even
wonder if that would work, might not, but
we'll give it a go. I could potentially even
imagine that this leaf is casting a little
bit of a shadow. I don't know if
that's gonna work. Yeah, maybe, maybe not. Yeah, that's a bit
underwhelming. My shapes not quite. But anyway, it doesn't hurt it. Now, I don't like this one. The veins didn't really appear. Now, this could
get me into grief. I'm just going to try first. I'm just going to
try and see if I can just lift now that
it's fully dry, I can just lift a couple
nothing much happened in there. That one's a bit messy. But I want to be careful
not to go over the top. That's probably
enough because then what I'm going to do
is I'm going to just drag a tiny little
vein down the center. It's a little bit of my red. I might just wait, that's right. Just to tidy that up
a fraction and then maybe a little bit around that
little light that I left. I think probably that's where
I'm going to stop that one. You can see that this leaf underneath this leaf on the top, it didn't matter at all that those two shapes mixed together.
7. Mushroom in the Grass: So the next one
I'm going to do is just a little mushroom,
little toastil. So I'm going to do
a quick sketch. Like your little standard
fairy tale book toastil. So on the stem, they have that kind of
little funny ruffle. *****. That's all I'm going
to do for this. So really simple and
take my larger brush. And I'm going to use pearl red. So the same colors that we
had in for the autumn leaves, and I've also got a little
bit of yellow oak out like, Well, now, I'm going to do one of those
little tostols that got all the
white spots on them, but people often ask
actually when I use whites. Do you use masking
fluid? I don't tend to. I'm just going to try
and leave a few whites. I've got a bit of red, bit of my yellow initially. I'm going to come onto dry
paper and I'm just going to leave some whites basically that I can
then tidy up afterwards. Pretty loose. And moving, try to move fairly quickly. Okay. Then while
that's all still wet, a couple of things I want to do. I want to take out a little
bit of light on the top. I've just cleaned
my brush and I'm just dragging that through. Now usually, if I was
painting this myself, I probably wouldn't have drawn the pencil line in
there because it's a pain to have the pencil. Then I'm going to I'll
take a bit more red and now I'm going to tidy up some of these while
everything's still wet, I tidy up some of these little spots to get
them a little bit rounder, clothe in some that I
don't like to look of, but I need to move
quickly because I want it all to lead and
mix on the page. Okay. Then I'm going to probably
what am I going to do, I might grab some yellow. I'm just coming in with a
little bit of yellow and I'm going to use that
yellow on my brush. Just drag through a
little bit of light. Just on that bottom rim. As well, tidy up my edge, and then I have to chase that wash. My page here is
drier now than I am there. So because I've just
added more water, I have to now blend that in. I've just cleaned my
brush. Smooth that. I don't want a hard line
where the washers join, where that dry paper is
meeting that wet edge. Then I think I'm
going to strengthen the dark on this side. I'm going to pick up
a bit more red paint just before it dries. I'm going to decide that this the lights coming from this way, so this side of the
mushroom is going to be a little bit darker. I didn't mean to close that
one in, doesn't matter. Again, I have that not problem, but I have to deal
with the fact that I'm drying pretty quickly. I have to blend this
wash into the dry page. Chasing that ledge
along, washing my brush, drying it off on the tissue, and just worrying that edge. I don't think I think I've
got too much light out here, so I'm just going to
want a little bit, but I think it's probably
a bit too bright. We just soften that. Okay. Then I'm going to paint the stem I'm going to use
initially, I think, a little bit, a little bit yellow oca because I just
want a bit of color on here. It's really white, but I need something because I'm
not painting a background. I'm just roughly putting in
a touch of my yellow ochre. Then I've got from doing the eucalypse I've got a bit of a few greens and things in here. So while that's wet, I'm
just going to chuck in little bits of stuff down the bottom because I've got some grass something
happening in the front. Again, I don't mind
that this is bleeding. Up. I might just bring
that little ruffle out. Then I have to sit on
my hands for a minute, let that dry for five, and then we'll pop the
shadow in the shadow is really only on the stem here to show you
the difference that makes to the little painting. Waiting for dry for 5 minutes. We're fully dry here now. What I'm going to do,
what am I going to do? I'm going to take I think
actually I'm going to take a little bit I'm going to take some uppers indigo in here. And a little bit of my red
for my shadow on this one. Milky mix. And
what I want to do, I really want to
put strong shadow. I think that brushes too. Doesn't have a good tip
so I can't get in here. So I'm just popping
a shadow underneath the cap down to this ruffle kind on the
side of that ruffle, and then I come underneath. Just to kind of chisel
out where that shape is. Maybe come just a
little bit here. And then kind of like the
shadows that we talked about on the eucalypt leaves of the stem, bring
that across a bit. I want to just
suggest a couple of shadows from the grass
that I've got down here. And I'm just going to throw
a little bit of that dark. Through the bottom. So
really simple stuff. I'm going to strengthen.
I take a bit stronger indigo right
underneath that cap. I'm just going to drop
a bit more indigo in so that that shadows stronger
underneath there, and then underneath
the little frilly bit. I'm also going to
pop just a couple of little shadows just behind some of these little
whites because they're actually uh
they're actually raised on this darker side. So very, you know, childlike, I guess, but it just
goes to show you. It's a really good way of illustrating the difference that just the one strong
dark can make. I'll stop there with that
one and move on to the next.
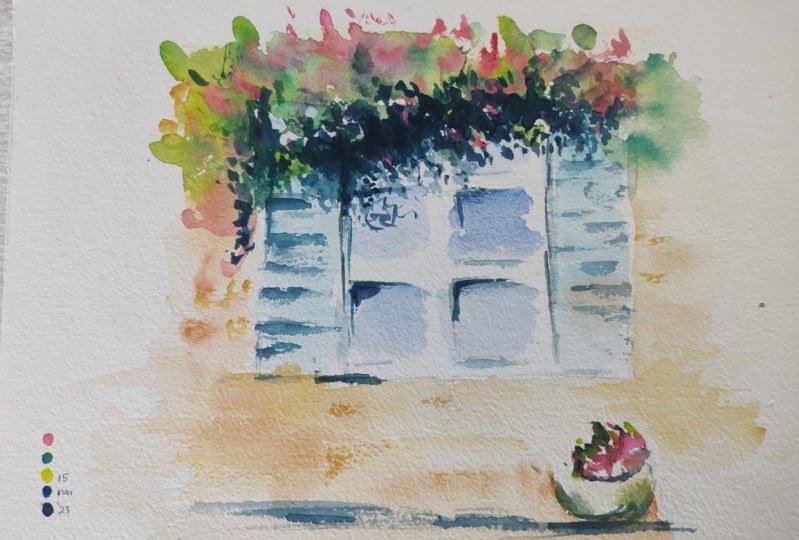
8. Vine Covered Window: Okay. Last one. This one, staying with the theme of being really messy, being
really loose, we're going to do a little
window with some flowers, and growing over the top. All I want you to
do draw a window. I'm going to give myself,
I think, six pans. Then I'm going to pop
in, I mention that I've got some shutters
on either side. The grounds down here somewhere, and maybe maybe I've
got a pot of something, some business down
on the ground. That's all I'm going to draw in. I'm going to have some foliage
going over the top here. So that's it as simple as that. Alright, I'm going to stick
with my larger brush. I'm going to go straight
into the windows first. But I don't want you
to paint squares. I want you to be
rougher than that. I'm going to pick up I've
got some French ultra. It's a bit dirty. I'll
just clean that off a bit. I'm just going to put my
brush kind of on the side, and I'm just whacking
in initially, just a bit of color in
those panes of glass. Then I'm going to
pick up I've got some Pho turquoise in
here and I'm going to pop some strokes in
for the shutters. Really messy. Now I'm going
to pick up some yellow ochre, milky yellow oca I'm going to
imagine that this is wall, underneath the window,
that's my ground there. Messy messy messy.
Maybe I want a bit of color up the sides
here. I don't mind. It doesn't matter
if I touch into that into the
shutters, that's fine. Then I'm going to
pick up a little bit of burnt sienna and I'm just going to throw
that around a bit too. Just all wet and wet, chucking a bit of paint on. Maybe I've thinking about that pot that I've got in there. Just nice and wet and wet. Then I'm going to pop while
we're still before we dry, I'm going to pop in some leaves. I'm mixing some French
ultra and my hansa yellow. I'm just going to throw my brush along and
make some shapes. Let it bleed, don't
overthink it, leave some whites in the
page because I want to fill some of those
whites with flowers. Really just throwing it on. Then I want to pick up got
some permanent rows in here. Again, while it's still wet, I want that mix of wet
and wet and wet on to dry just throwing in
a few bits of color. Walking it around.
Not much thought. Okay. And then I
might pop some if this is a pot down
here, a bit of a pink. Bit of the green in
there, let that settle. Now, before this is dry, I'm going to now
take dirty brush. Sticking with the same brush. But I'm going to just
chuck a couple of lines in a few spots just to help suggest
tighten up the shape a bit. Now I've got fine lines. Just a few walking
around the place maybe into my ground there just
to start to think about it. Now what I need to do is I
need to let that fully dry. Then we're going to come back and just put
the shadows in. I don't want to show
you how that works to then suggest that you've
actually got a window here. Come out of that
and let that dry. 5 minutes I'm pretty dry.
I think I'm good to go. We're now going to put a shadow on now for my shadow color, I think I'm going to use quite like some turquoise with
some indigo for my shadow. So mixing up myself
a reasonable pull, I'm going to start in this
corner here, bit more indigo. I need this to be
quite dark and what I'm doing coming up on
the tip of my brush and I want to have a mixture of solid dark and
leaving the white. I'm thinking of dappled
shade, I guess. As I come over to here, I'm coming up on my tip. I want to make use of the fact that I've got
these nice clean washes on the window that I
can then you can see my really deliberate shadows. And I need to come a little
bit up into the bush, there. Then I'm going to have to a
little bit of that color. I can't just have that
color there. I need to walk it in a
few other places. I'm going to use the
same color to just give myself a few horizontals
in those shutters, a little bit under
the window sill, a little bit more
under the join, and a little bit
on the pop there. Maybe I can just again. I'm now I didn't
want you to paint full on squares for the window, but you can just tidy up a few few lines to help
settle settle it in. Now, if this dries
to as it's drying, if you think it's too light, just come while it's wet and
just get a bit more dark. And I'm just going
to touch a little bit more on that pot. If you want to suggest
more brickwork, I never would paint in bricks, but you can while
that's just dry, you can come and just
walk around a few, try to actually get some paint. I'm trying to get the burnt
sienna up around the place. But I don't want to
paint bricks again. I'm just suggesting
Okay, so really messy. I want you to keep it messy. But what I'm after is that it's this dark and
this little dance of contrast between the
shadow and the light of the window to show you that this is foliage coming over it. That's a really fun *****. That's a really nice
way to use shadows. Again, if you're in
a bigger painting, doing a proper work, that's the thing that I'd
be focusing on. But you can see how
dark it needs to be to actually be effective, but it doesn't have to be a lot, so you don't have to go crazy. That's where I'm going to stop.
9. A Final Word: So now we're at the end of
that list and I hope you're happy with some of the little
paintings that you've made. I quite like the window
was the best for me. I quite like that you get partway through
thinking this is going to be rubbish and by
the time you get to the end, it's looking okay. So if you're happy
with what you've done, post a picture up for me
on the project section. I'm always happy to have a look and always happy
to give feedback. Now, if you want more practice at shadows, take
your camera out, take your phone out, go and find yourself some shadows around about your garden and your
house and have a go yourself. If you want more
direction from me, I actually have for this class made a digital download for you. It's a 18 page PDF that's got
four other little projects, but it is a separate purchase, of course, don't feel
obliged to do that. But if you want some
more guided instruction, there's a link for that in
the about page of this class. Thanks again for joining me and I'll start thinking about
what the next lesson is.
 Nadine Dudek, Professional Watercolour Artist