Transcripts
1. Welcome to the Class: Water color has a special place in my heart that I made it a habit and a commitment to myself to paint every single day, even for just a few minutes. And after two years of doing this, I now feel comfortable in sharing what I've learned through books, tutorials, workshops, and online classes like this. Hello everyone. I am Bianca, the face behind BianxArts, an aspiring watercolor artist from the Philippines. In this SkillShare class, we will paint a semi realistic food art. I know this might look complicated and intimidating, but I will guide you through the whole painting process. We will begin by observing the reference photo and plan out how to approach this painting. Prepare by creating a color swatch because we will do this with only three colors, a very limited palette. Practicing different watercolor techniques. Finding the big shapes for our sketch, and working on our actual painting. I love painting food because this taught me patience. When I was a beginner, I wanted to finish a painting in one sitting within ten minutes. But as I progress with my watercolor journey, I realized that focusing on the process rather than the output and working on my painting in a relaxed manner, could also produce a lovely work of art. Whether you're a beginner, a hobbyist, or past the beginner stage. I welcome you to this class. You can work on this painting in one sitting or work on one layer and come back to it when you have free time. Together. Let us relax while painting, and that our efforts be rewarded with a colorful artwork by the end of the class. So let's grab our materials and start painting.
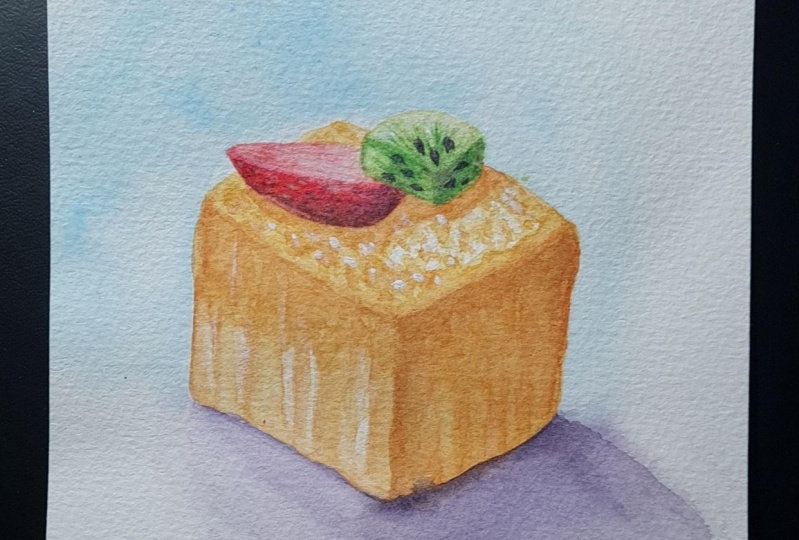
2. Observing the Reference: So there are times when I capture a really beautiful reference photo, but times like this, when I have to edit and manipulate the reference photo to produce what I wanted to paint. With this combined photos. Let's take a closer look at it. Keep in mind these observations. Light is coming from the upper left. So, the shadows are casted at the lower right side. The fruits are casting their own shadows, powdered sugar on the top of the cupcake, adding texture to the bread, which has its own texture. And the darkest colors are found on the seeds. This observations are what helped me paint a semi realistic painting. In the next video, Let's start preparing for our painting.
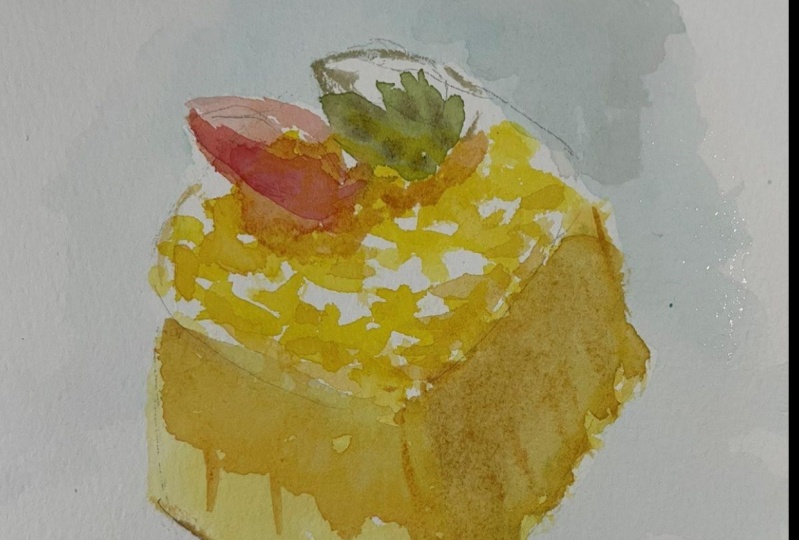
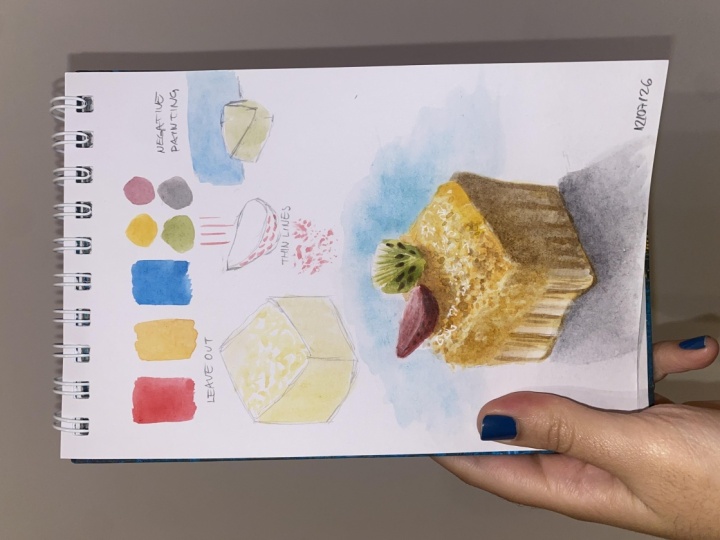
3. Color Palette and Materials: You may be excited to paint our desert. But please don't skip this step. We're working with this painting with only three colors. A red, yellow, and a blue. And there are so many pigments for each color. So we need to swatch them, test the combinations, and even change a color if it doesn't work for this painting. I will try scarlet lake for my red, which will also be used for the berry. Permanent yellow. Then I'll try Manganese Blue, permanent yellow when mixed with a tiny bit of red, should make a color close to the bread. Then I'll try Manganese Blue and see if I could mix an edible green color for the kiwi. But upon trying this out. I guess this won't work. So I made a decision to change my blue and go for Compose blue instead. Now testing my compose blue and I love this green color. It would work so well with my kiwi. Thus, why I do swatches first, as early as this stage, we can make decisions that will give us more confidence during the painting stage. So I now have my red, my yellow, and my blue, scarlet lake, permanent yellow and compose blue. What about you? What colors will you use? One final test is to mix all of these primaries and see if we could come up with a neutral color for our seeds, the darkest tones. And I think this would do, I can just add more layers to make it darker later. Now for the materials, I will use my go-to watercolor materials, Baohong water color paper, Holbein paints, and my Escoda brush. You can use whatever materials that you have right now and maximize them. No need for fancy or artist watercolor materials. This two paintings, I made them on Canson paper, a student grade watercolor paper. In the next video, let's practice some watercolor techniques that we will be using for our painting.
4. Reviewing Watercolor Techniques: Here are some of the watercolor techniques that we will be using for our painting. We'll review how to leave out the white of our paper. Create thin lines, negative painting and layering with watercolors, leave out or preserving the white. This is a common technique used for highlights. We'll use this method for the powdered sugar at the top of our cupcake. Practice this as much as you need to and don't worry too much in copying the details from the reference photo. I'm just leaving out random, tight spaces for that purpose. If needed, you might need to practice painting thin lines for the seeds and the smallest details in our painting. This has always been a challenge for me when I started using brushes. This is also the same technique to be used in adding texture on our bread. Apply light pressure on your brush and aim to use only the tip of it with the addition of dabbing it with our fingers. Negative painting to define the shape of our kiwi. This only means that we are painting around a shape instead of inside the shape. While doing this, we get to review the wet on wet technique to wet the paper first, then dropped my colors. Now, let's review how to add layers with watercolors. We can do it in three different ways. When the paper is still wet, when the paper has dried, or combining both. If you find that your colors are pale, maybe you just need to add more layers on it. There are three ways. Adding another layer while the paper is wet so that the edges are soft or blurred. Or when the paper has completely dried for a crisp edge. Or combine both my painting directly and then softening one edge or both with a clean brush. Observe how my green darkened. By just adding more layer on it. I use the same color, but as you can see, it made a difference. Feel free to practice these techniques as much as you need do. And when you're ready. I'll see you in the next video where we will prepare our sketch. One last prep for our painting.
5. Sketching the Cupcake: If you're like me, I hated sketching before painting when I was a beginner. But tell you what. This step is important, especially if you are into semi realistic painting style. Your sketch will dictate how good your painting will look like when it is finished. This reference photo can be broken down into four simple shapes. Two diamonds that form the base and two small triangles for the berry and kiwi. Seeing the reference photo this way, it is so much easier now to draw it. Now let's start sketching. Another thing to keep in mind is if the pencil you're using is water friendly or compatible with water. I mean, when you wet it with water, does it smudge or it stays put. I'll also draw in some guidelines for the shadows at the base of my cupcake. I'm using Staedtler 2H for the light lines. And later I'll switch to 7B, to darken my final outline. And once satisfied with a light sketch, I'll switch to a darker graphite pencil. It would be a good practice to avoid erasing too much or erasing aggressively. Or you'll kind of damage your watercolor paper. Once you're happy with your sketch, I'll see you in the next video. And let's start our painting.
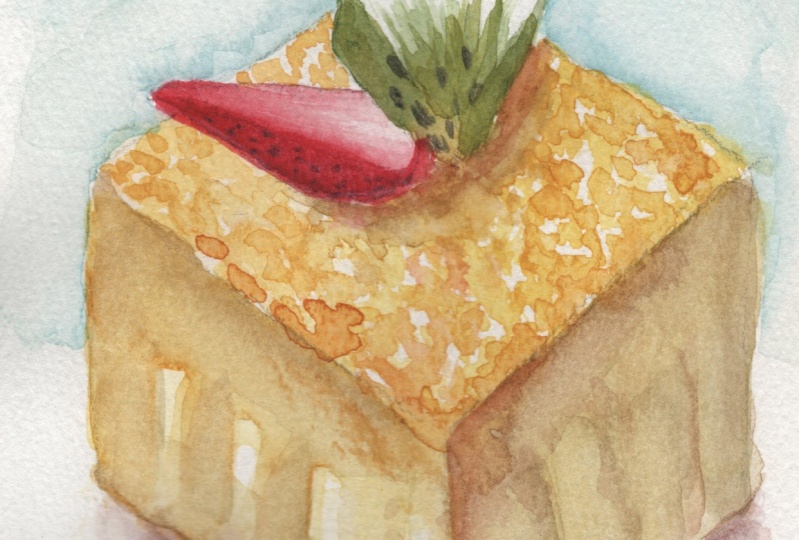
6. Painting the First Layers: Finally, we can start our actual painting. Good job on going through the preparation stage, which gives us more confidence when it comes to the actual painting stage. I'll start with the base color of our bread, yellow, plus a bit of red, and leave out the powdered sugar. While keeping in mind the observations we made earlier. Light coming from the upper left, shadow on the lower right. And fruits casting their own shadows. Don't you worry if you did not manage to leave out enough white of the paper to make it look like powdered sugar was sprinkled on top. You can always use white paint later, whether it be watercolor, gouache, or even acrylic to add those highlights. I'll color in the base of the bread while leaving out. Again, for the highlights. I'll add a bit of blue to make my brown for the darker side of our cupcake. And just paint it directly and then softening the edge with a clean brush or a rinsed brush if you may. Doing wet on wet to add texture. I hope by this time, you appreciate why we did what we did during the preparation stage. We're just literally combining what we practiced and prepared earlier, from the colors to the techniques and observations. The top of the cupcake has dried on my end. Please check yours before painting in your fruits. So that would be blue plus yellow for our edible green color. I am observing my reference photo and taking note where it should be darker or lighter and where it goes lighter. I'll just add yellow For the top bit. Same technique again, leave out. But at the same time I am painting thin lines. Remember, random shapes. Don't worry too much about those details because later when we paint in the seeds, they will be covered. Using my scarlet lake for the berry. I'll work on the bottom part first by directly painting. and softening the edge and just let those red pigments mix in the center of our strawberry, The base of the cupcake has dried. and I can add these shadows. Same color, yellow plus red. But this time there's more red. Again, softening that for a smooth blend and adding a bit of texture on our cupcake. And see nothing's new here. We've practiced all of these earlier. We will add more layers to this. But as I've said earlier, we will use the same techniques, same colors. So I want you to relax and enjoy the whole painting process. See you in the next video.
7. Painting Textures: Let's add texture and shadows on our cupcake. I find the top of the cupcake pale. And I reckon it needs more texture. So I will keep adding layers using the same techniques until I'm satisfied. During the previous video, we left out the white of the paper for the powdered sugar. And this time, let's add texture on the top bit. Just be careful when dabbing your finger on the painting. Please make sure that your hands are not too oily or that you won't accidentally dab on those parts that do not need texture. The background, for example. From time to time, I will add more yellow or more red on my mixture to add interest. You wouldn't want it if you're a desert, is too monotonous, right? Still the same color combination, but varying the amount of one color versus the other. Let's combine our primary colors for our brown mixture. Estimate how much of each color you will need to make this look brownish enough for the red. I cannot really tell you how much blue, yellow, or red is needed, since I assume that we are using different materials from different brands with different pigments. But I do trust that you can judge which pigment must be added. Like when you're making a cup of coffee. It takes experience to get the right amount of sugar, coffee, and creamer for your perfect blend. So I wanted you to own this painting and come up with your own mixture. Working on the shaded part of the bread and adjusting some parts as I go. Let's work on the top of the berry. If you'll observe closely, there are highlighted parts, and I will leave them out carefully. Looking at my reference photo to help me decide and keeping the center part paler. And then the rest. of the berry, mix some bit of blue for the shaded part of the fruit. I'll add more layer on the kiwi, since that looks pale for me. Now, depending on your painting style, you might need to add more textured layer on the bread, like what I'm doing. Or if yours is dark enough, you can skip this part. I love working on my semi realistic painting slowly by building up layers. But I assume that your art style is different from mine. So please check the reference photo and your painting if it needs more layer or not. One simple way to do that is take a photo of your painting beside your reference photo with a camera to see them with fresh eyes. How are you doing so far? In the next video, we'll add cast shadow. And paint in the seeds, the darkest colors that we got for this painting.
8. Painting the Details: The fruits are a sitting at the top of the cupcake. So don't forget the cast shadow. We will also mix all of the colors that we got to paint in the seeds. Mixing the same bread color, yellow plus red, but more red this time and testing it out on other parts of the bread. I think that would do. Let's paint the shadow casted by the fruits. We should keep in mind that shadows have colors too. They're not pure black. In this case, the shadows are casted by the fruit on the cupcake. So it should have the same color of the cupcake. Just darker. Of course, it is not always the case. But the key thing here is to really observe your subject first, plan and prepare before painting. Especially if you're painting it for the first time. I'll add darker texture on my bread for it looks pale for me. Working on the lower right side by adding another glaze of brown. It's time to paint the seeds. Mix your red, blue and yellow. And make sure there's more pigment or paint than water to achieve a darker, neutral tone. Observed the reference photo to position the seeds, but don't need to be too stiff in producing an exact copy. I'll do the same for the berry. If you want. You can switch to a smaller brush. I'm sticking with this round tip brush because I like how pointy the tip is. I can use this in painting details. That cast shadow has dried. So I can add another layer and make it darker and bolder. There's a hard edge here that I don't really like. So let me just correct that by softening. But this time the paper has already dried. I'll scrub that with a clean brush and lightly dab with my rag or a tissue. And just going darker on areas that needs to be darker. But again, before you add more layers on your painting, please check it against the reference photo first, yours might be more vibrant than mine. And thus, it doesn't need more layers. I am so excited to see your version of this painting. And I hope you're finding it relaxing and rewarding too. In the next video, we'll paint an imaginary shadow casted by the cupcake itself.
9. Painting Shadows: It's not visible in the reference photo, but since we have established that the light is coming from the upper left, it is only fitting to paint. A cast in shadow on the right side of our paper. Will work on the shadow in a bit. Let me just add more layer on the bread. This is me. Sometimes I really don't know when to stop. Can you relate to that? Okay. Into the shadow. Since the shadow is casted on an imaginary table, which is not present in the reference photo. We're free to choose the shadow color. I'll go for a grayish violet, a mixture of blue with a bit of red. I love how this color turned out. You might have a different shadow color, but just go for it. I want to paint this using wet on wet technique, so I'll have soft edges. I'll do that by wetting the paper first with clean water, not soaking wet. Just enough water for the pigments to blend smoothly, then I'll drop my colors. Generally, a shadow is darker the closer it gets to the source. So I'll do that by dropping darker colors near the cupcake. I'll even use that shadow color to some parts of the bread for a unified look. But be careful not to make your bread too muddy. This is pale for me, but I can just add another layer later. How are you doing so far? In the next video, Let's finish this up with a simple background.
10. Painting the Background: Yellows and reds are evident on our painting, but we haven't used a solid blue color yet. We can introduce that on our back ground. Negative painting for the kiwi. If you need to, you can rotate your paper to work on an angle you are most comfortable with. I am slowly painting clean water around the kiwi and the cupcake. If you're using a paper that dries fast, no problem. Try and rewet those areas which started to dry. And you can do this as long as you haven't laid down your colors yet. When ready, I'll drop my compose blue near the kiwi and work my way outwards. I am leaving white spaces for added interest and scrubbing my brush back and forth to smooth out the background. I'll stop around the middle of the cupcake and see to it that it aligns with the other side. That way, we are suggesting a horizontal line that could work as a table, a plate, or a tray. I did mentioned that my shadow is pale. So let me retouch that with another layer. Direct painting then softening the edge. How do you feel about your painting so far? If you're still with me up to this point of the class, you should be proud of yourself. We're nearly done. Semi realistic painting is so intimidating and looks so complicated. So by stepping out of your comfort zone, you are doing a great job. See you in the next video for final words.
11. Conclusion: Here's our cupcake painting. Were you able to paint along? I would love to leave a quick feedback on your artwork. So please upload a photo of it in the projects and resources tab. And let's appreciate what others created too. I'd also be grateful if you could review this class to help me improve the future ones. I do hope that you can apply the techniques that you learned here to your own paintings. I hope you enjoyed this class and I'll see you on the other ones. Happy painting.
 Bianca Luztre, Watercolor, Productivity, Color Mixing