Transcripts
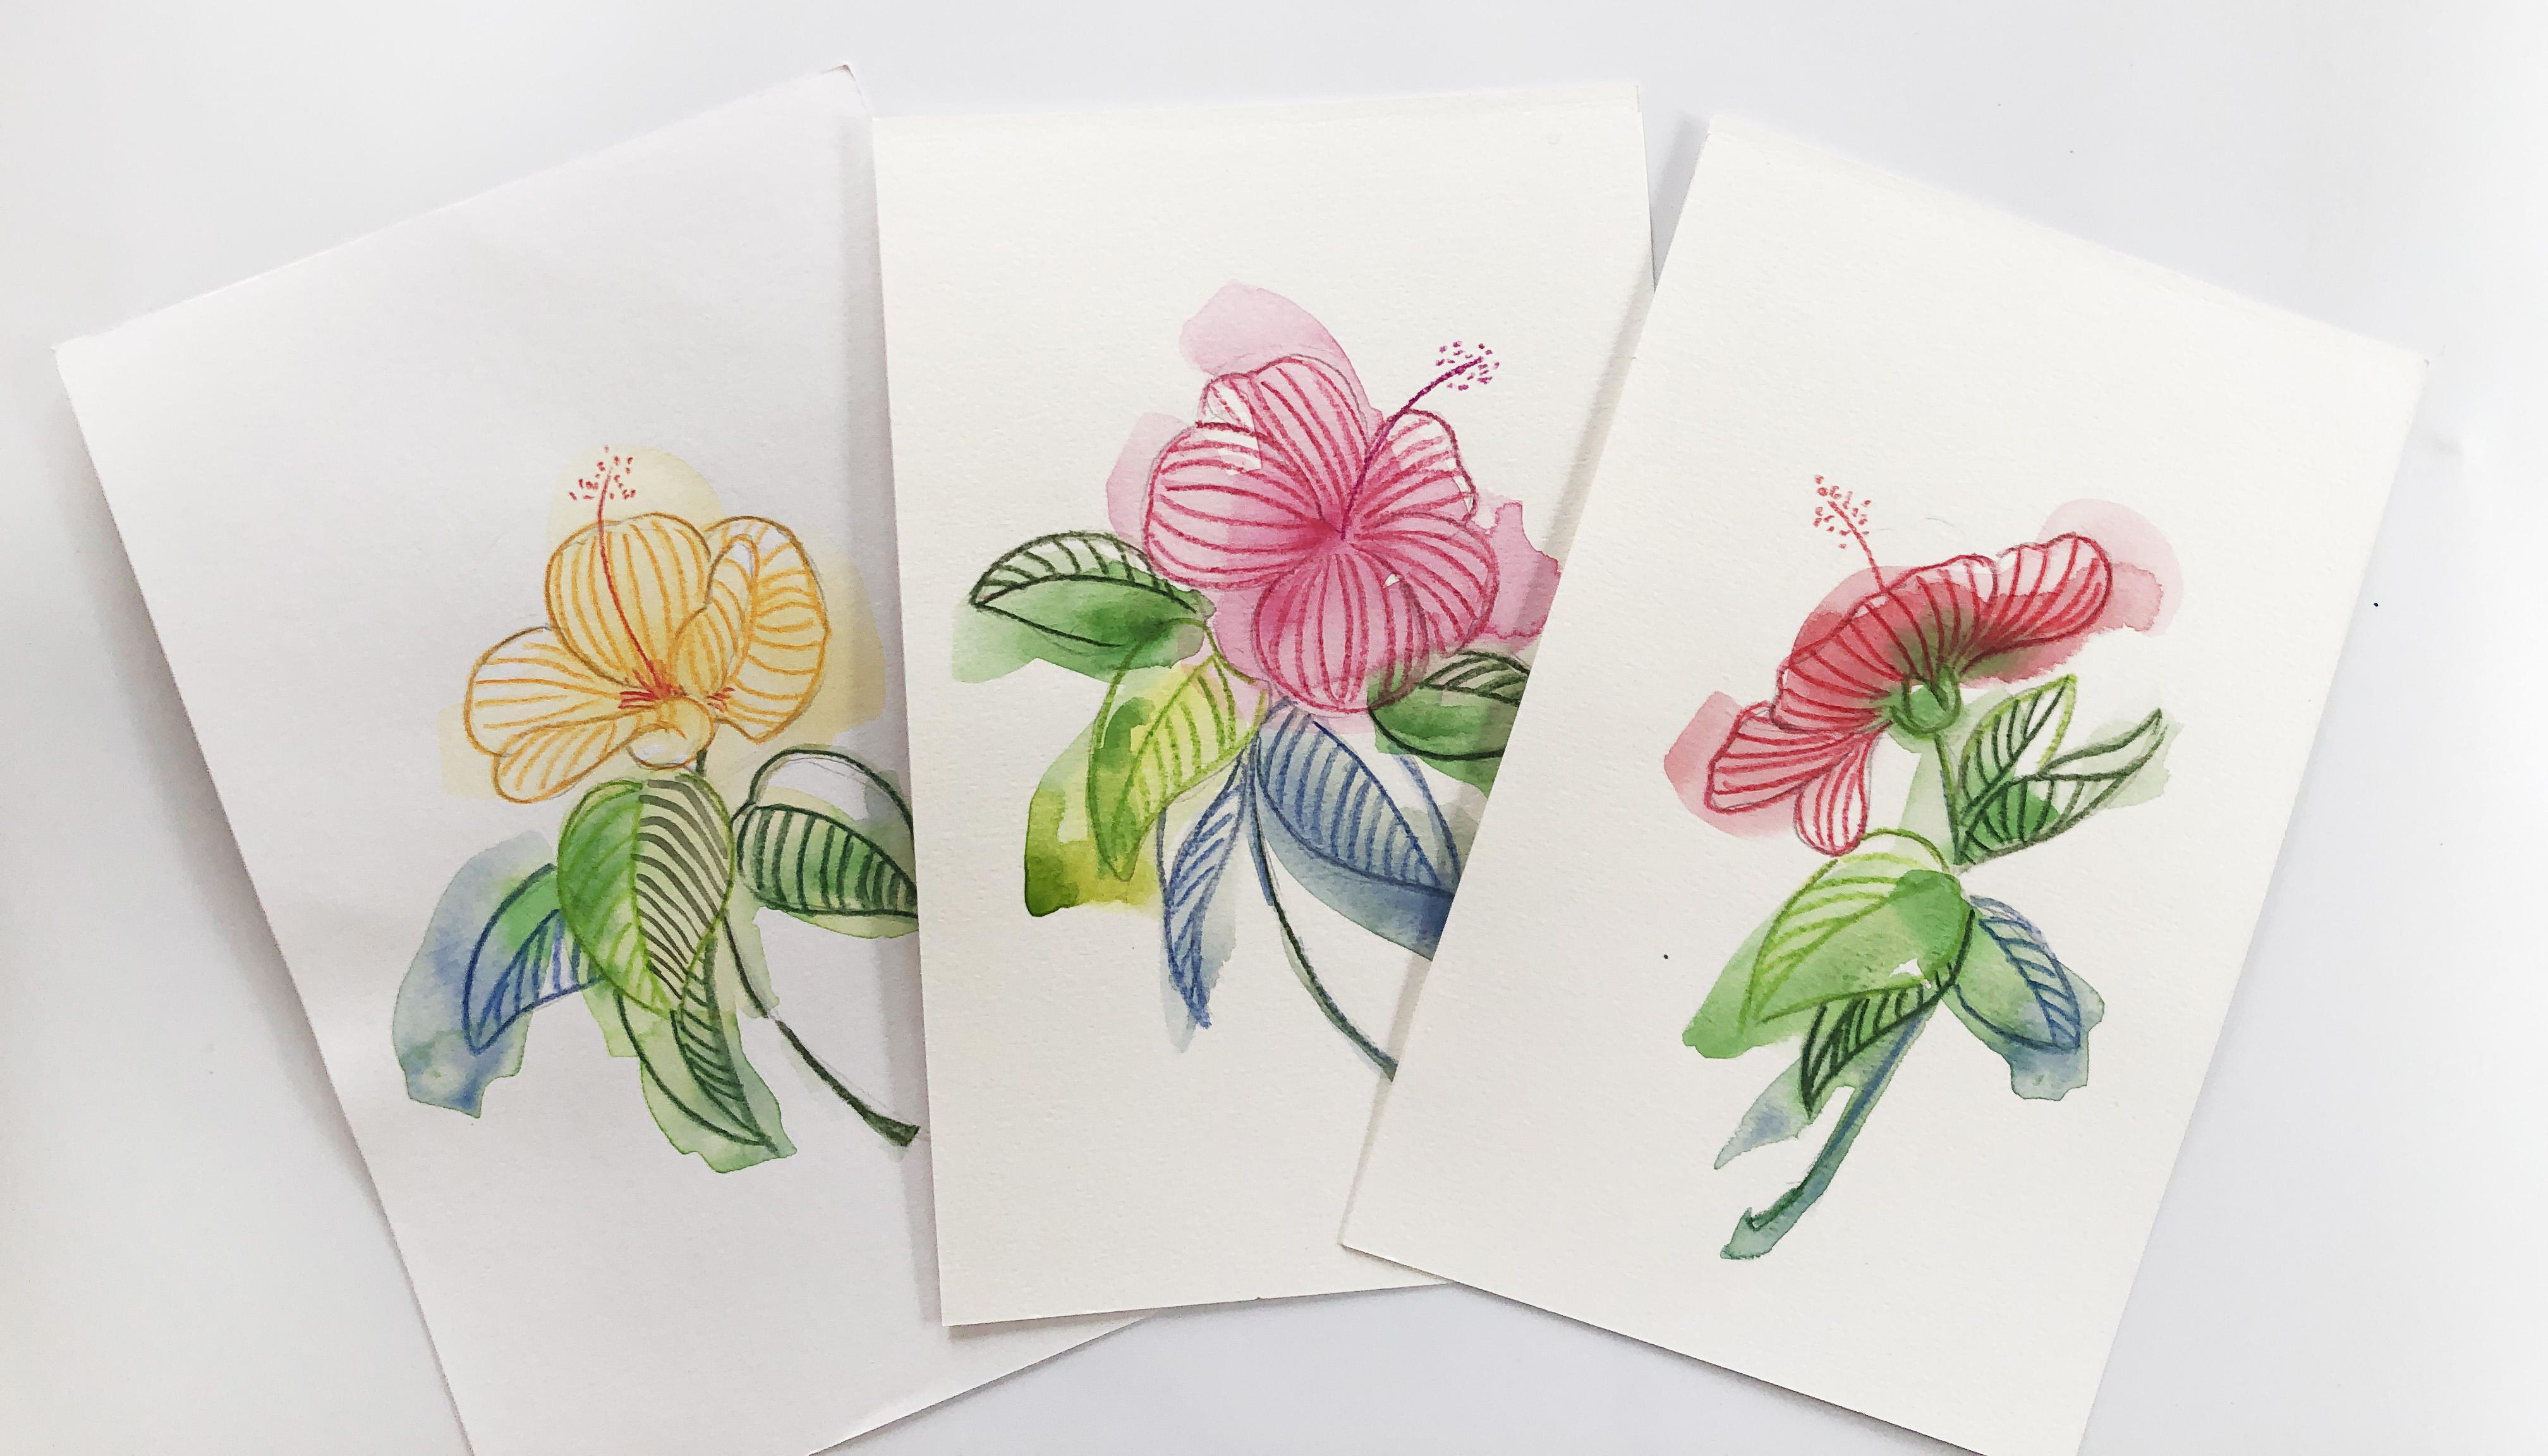
1. Welcome to This Class!: I've always been fascinated with hatching, and I usually do it with ink or pencil because it's so relaxing and the results are stunning. When I started using watercolors, I wondered if I could apply the same technique and it was quite a challenge using a brush, but if you combine it with other medium, we can make this a bit easier and still produce a satisfying result. Hello lovely people, I'm Bianca, an aspiring watercolor artist from the Philippines who loves to teach. In this class, let's relax by creating simple floral illustrations with repetitive lines. I will guide you how to start from sketch to backgrounds and the hatch details. We will paint three hibiscus illustrations that you can use for your cards, bullet journals, calendars, and other crafty projects. Once you've explored this technique, you can apply it using other medium on various subjects and come up with your own piece of hatched artwork. If you're ready, let's get started.
2. Hatching Defined: Hatching is formally defined as shading with closely drawn parallel lines. The three most basic form of hatching are: parallel or vertical hatching, contour hatching, and cross hatching. Here's a quick demo. Parallel hatching or what they sometimes call vertical hatching is done by drawing lines close together to darken an area of a drawing. Say this leaf here, if I want to shade one side, I'll quickly hatch that with parallel lines. Contour hatching, which we will use mostly during this class, is simply following the contour of a shape. In this case, I will use the shape of the veins to contour one side of this leaf. Cross hatching from the term itself is done by drawing another set of hatch marks perpendicular to the first set. If I take the first leaf and add another layer, that part becomes darker. There are other forms of hatching, but for the purpose of this class, let's just discuss these three. This technique is widely known among artists who use graphite and ink as their medium but today let's have fun and experiment this technique using watercolors, combined with other materials that are available to us. It can be your pen, colored pencil, markers, crayons, or watercolor pencil. As a simple demo, let's paint a blob randomly as our background. Then let's leave this to dry and hatch using different mediums. I'll try this with a pen just to show you how it looks. If you're opting for a watercolor and pen illustration, then with a colored pencil. You can also use your crayons or pastels, markers, and finally, a watercolor pencil, which I will wet later with a water brush. This is also what I'll use for the three projects that I will demo. You may use any watercolor paper that you have. This is a 300 GSM, 50 percent cotton paper, a student grade. This is perfect for today's project. If you want an extra challenge, you may also hatch purely with a brush. This is a bit more difficult if you're just starting to learn watercolors, but extremely helpful if you want to practice thin lines by controlling the pressure that you apply on your brush. Now that we got our basics, let's jump into the next video and start on our first project.
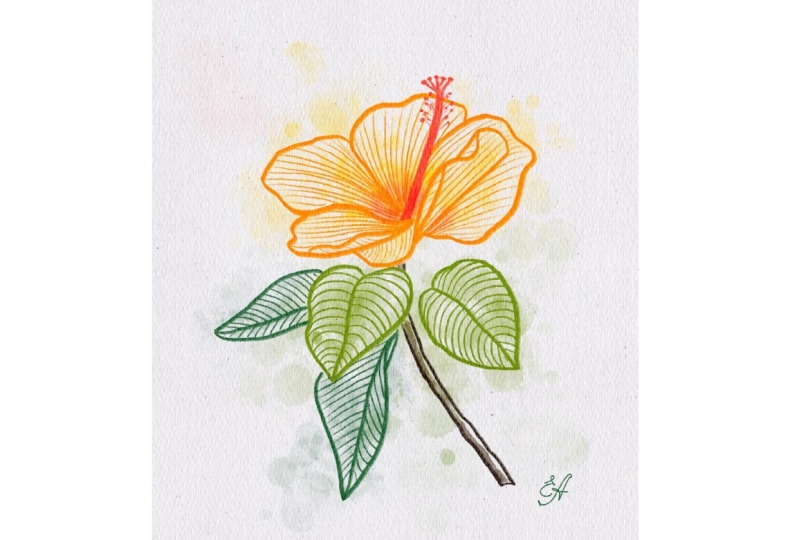
3. Yellow Hibiscus - Sketch: In sketching flowers, I always start with a circle or an oval. This will be my guide on how big the whole flower will be. Let's observe the reference photo. This sure is a busy picture, but it doesn't mean that we need to copy it leaf by leaf, it's just a reference. I'll draw the petals and remind myself that as long as it looks like a flower, then I will be happy with it. We're not aiming for a realistic look, so let's not stress about the accuracy of the sketch. Then I will choose a few leaves to include on my painting. I took this photo at a local plant shop and I loved the natural composition. I'll just copy a few leaves and that's it. See you in the next video, and let's start painting.
4. Yellow Hibiscus - Background: This is my practice piece for the yellow hibiscus project. I like how the background is done in a carefree manner with some parts of the flower left white and not colored in. I'll try to do the same for this project. I have prepared three colors for the background: a warm yellow, a yellow green, and blue green for a cool tone. With a flat brush, I loaded with all these colors, starting with yellow, my flower color, and randomly paint over my sketch. I would even deliberately go outside the outline and leave some parts white. For the leaves at the back, I'll use my cooler green to somehow depict depth. I'll then switch to a smaller brush and load it with more paint to darken some areas and make it more interesting. When doing this, please check if your paper is still wet for a smooth blend. Then leave this to dry and I'll see you in the next video, and let's hatch.
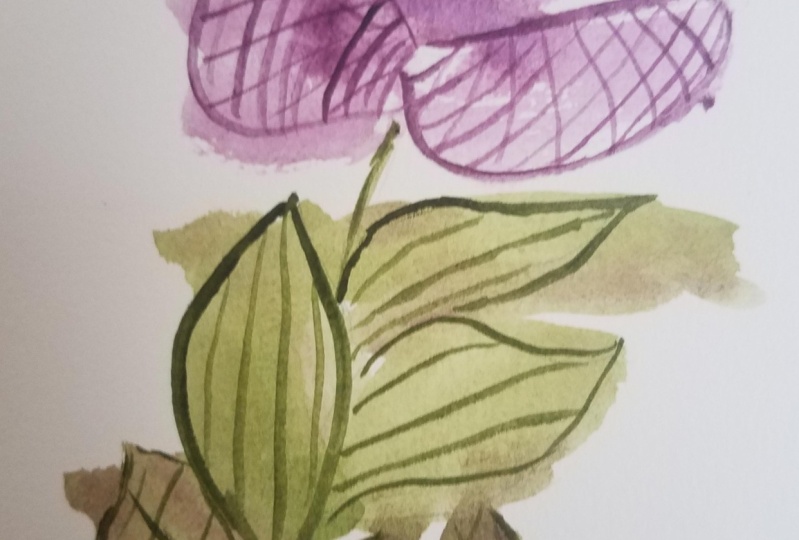
5. Yellow Hibiscus - Hatching: Time to start the hatching process. I'll do it petal per petal and leaf per leaf. I'll draw the outlines first, then divide the petal at the center with a straight line, and as I reach to the edge off the petal, I will draw my lines to follow that curve. I will do the same for the other petals. In choosing your color, whether it's a pen, colored pencil, pastel, or a crayon, make sure that it's a bit darker than the background for the lines to show. You may also go fast or go slow. For those who chose to hatch using a brush, then consider this a fun way to practice painting thin lines. Controlling the pressure applied on the brush, and overall, improving your brush strokes. I'll switch to a yellow-green watercolor pencil, draw the outline of the leaf, divide it in half, and hatch one side only. You must have seen this style on other illustrations and it makes it more aesthetic. I have also chosen another shade of green for those leaves at the back and do the same thing, but alternate the side of the leaf I'm hatching. As you work on the project, I want you to really focus on the lines. Forget about how the project should look like and be absorbed and relaxed in painting repetitive lines. That's what I love about hatching. I hope you feel relaxed too. Since I used watercolor pencils, I will wet those lines with a water brush. If you used pencils too, you may do the same or skip this step. Irregular brush is a good alternative too. It's the first time I use watercolor pencils on my tutorials too. I have ignored them for too long because I thought I got no use for them until I painted a character and experimented how she would look like when outlined with watercolor pencils. I love the result. Aside from a relaxing exercise, you might find a good use for watercolor pencils or colored pencils combined with watercolors for your illustrations, stickers, journals, and other projects. Here's our first painting. See you in the next video and let's paint some more.
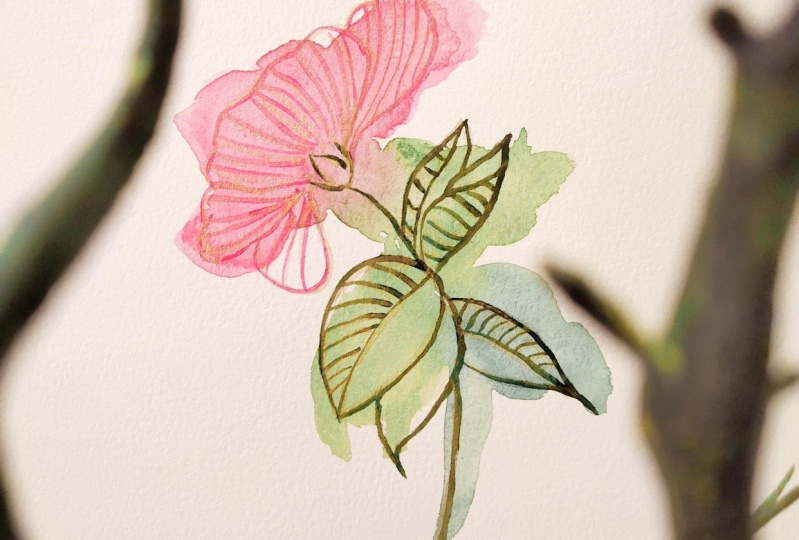
6. Pink Hibiscus - Sketch: My sketching process will be pretty much the same with the first flower, but how I treat the reference photo is a bit different from our first project. There are times when we capture perfect reference photos, I consider the yellow hibiscus a perfect one. I'm actually planning to paint that in realistic style. But there are also times like this when the reference photo might not be to our liking. We need to edit that during the sketching stage. I'll draw the flower just the same. But for the leaves, I will look around the reference photo, choose some with interesting shapes, and arrange them in a way that they are facing different directions and they have varying sizes. I'm making sure that the composition is not too plain, but not too complicated, just somewhere in-between, and this is what I got. See you in the next video and let's splash some colors on this.
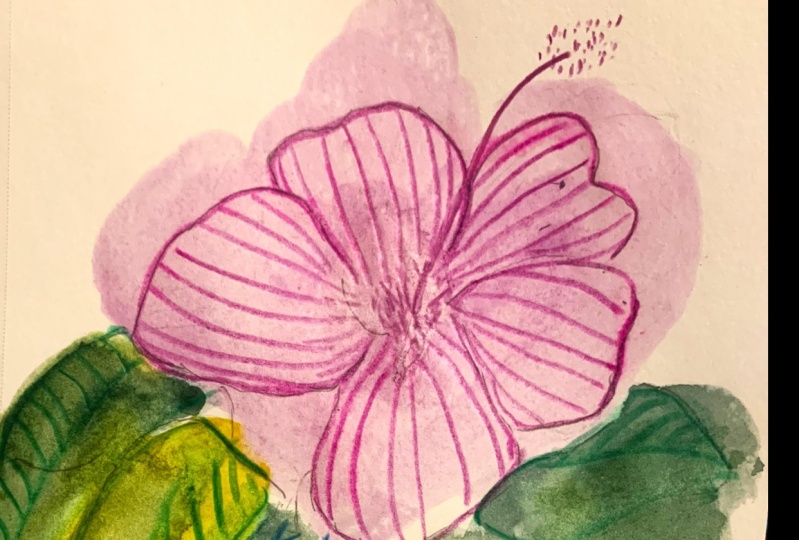
7. Pink Hibiscus - Background: Now here's my first try for the pink hibiscus. It's facing the other way around but just like our first flower, let's paint the background randomly, creating a one big blob. Just make sure to drop where the colors are supposed to be. Paint Pink where the flower petals are, mix yellow, green, and blue where the leaves should be and like what we did with the yellow flower, let us intentionally leave out some white spaces. You may want to use a bigger brush on this stage for a loose and spontaneous look, but switch to a smaller one when adding darker colors. This time, there's more paint than water for a contrast. Leave this to dry and let's hatch in the next video.
8. Pink Hibiscus - Hatching: We're on the most relaxing part again, hatching with your own medium of choice. If you want to experiment a combination of different art materials, say colored pencils for the petals, ink for the leaves, and watercolor paint on the stem, you are most welcome to do so. I'm outlining the petals first, and just like the yellow hibiscus, I will divide them in half with a straight line and gradually curve my lines to match the edges of the petals. I also chose a darker pink color for the hatched lines. I'm doing the same on the leaves, but only hatching half of it. This time, I've tried blue for the leaves at the back to suggest depth. This looks fine and simple but I'm sure that it's more challenging for those who are using brushes. Well done, I'm trying something out of your comfort zone. Those parts where we left the white of the paper are looking good, aren't they? A few more leaves and we're done. The next step is totally optional where I will wet these lines created by my colored pencils. I so love this technique that when a small business asked me to host a watercolor workshop, where the primary goal is for the audience to relax while painting and talk about self-care, this is the artwork that I pitched to them. Even the staff are excited to try hatching and they thought it was a calming technique. If there's one thing that I hope you would take away from this class is that watercolors combined with other media can be relaxing too even if you're just starting out. I included a bonus project and I'll see you in the next video to work on it.
9. Bonus: Red Hibiscus: Here's our bonus project, a red hibiscus. For the scanned copy of this sketch, please visit the Projects and Resources tab and download the file. You may print it directly on your watercolor paper, or use your preferred transferring method, or draw it freehand. My sketching process is almost the same with our pink hibiscus. I have prepared three colors for the background: scarlet-lake, yellow-green, and blue-green. I loaded my brush with flower color first and started painting the background randomly, but making sure to leave white spaces for variation. Then I switch to a smaller brush and loaded it with more paint than water to darken some areas. Let's leave this to dry and see you on the next video for the details.
10. Red Hibiscus - Hatching: By this time that you are working on our third project, I do hope that you are getting the hang of the process. The random but interesting way we painted our background and the hatching process itself. For those who took the challenge in hatching using a brush, I do hope that this time you are getting to know your brush better, and that you have discovered how much pressure to use to achieve thin lines. For those like me who are using mix medium like ink, colored pencil, markers, or crayons, I hope you are able to relax with this light watercolor exercise. That these paintings give you an idea for your personal crafting projects such as cards, bookmarks, bullet journals, stickers, and lots more. Same process as the first two flowers. I chose darker colors for the lines, I hatched and followed the curves of the petals and the leaves, and later, I'll wet these lines with water to smoothen them. You may also try hatching with pencil, ink, and use them for shading to create a 3D effect, or even try hatching on portraits, landscape, and especially, still life. As I wet this line with a water brush, I'd like to encourage everyone to upload their paintings in the projects gallery and show love to others were too. I'm looking forward to your versions of our class projects, and hope to see you in my other classes. Here is our red hibiscus or what we call Gumamela in our country. See you in the next video for a recap and some final thoughts.
11. Before You Go: Well done completing this class. I hope you feel relaxed and at the same time proud with your beautiful paintings. We've explored hatching in this class and created three hibiscus projects where we focused on the hatching process itself. Now that you've tried this technique, you may create your own cards or designer bullet journals with hatched florals. You may also try it on landscapes and still life. Don't forget to upload your artwork in the projects gallery and let's appreciate our fellow artists work. Your view would be greatly appreciated to help me improve my future classes. See you on my other classes and together, let's make this world a little bit more colorful with our paintings.
 Bianca Luztre, Watercolor, Productivity, Color Mixing