Transcripts
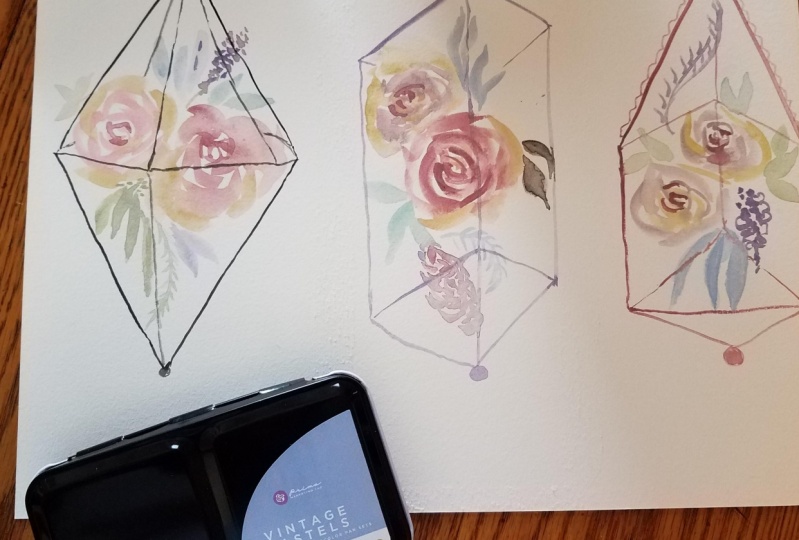
1. Introduction: Roses, I paint them big. I paint them small. In loose way. Vintage or semi realistic style. Hi, I am Bianca. An aspiring watercolorist from the Philippines who loves to teach. In this SkillShare class. I will share with you my technique in painting, loose roses in pastel colors. We will begin by choosing our colors for our pastel palette. Then we will analyze the general shape of our rose for us to be able to paint a rose blob that looks like a flower. We will also have a series of warm up exercises and practices to control our brush pressure, to give us confidence in painting flowers and leaves in a relaxing way. At the end of this class, you should have three mini floral paintings that look like these. I will also share with you a simple technique on how to keep your floral arrangements interesting, but at the same time balanced in terms of composition. If you're all set, then let's start painting.
2. Materials: The materials that you'll need for this class are watercolour paper, preferably 100% cotton. three for our pieces and one extra sheet for our practice. Brushes. I have round brush size 10 and one size 1. For the details. I have here my watercolour paint by Holbein squeezed out from tubes and dried up on a plastic palette. And the key ingredient for this class is white paint, I'm going to use Chinese white by Holbein. It's not seen in the camera, but you'll need a water jar and a rag where we will rinse our brush and tap excess water. Once set, I'll see you in the next video. And let's mix our colors.
3. Pastel Colors: To start off, I'm going to squeeze a small amount of my Chinese white paint on my palette. If you don't have this color, it's okay. You can use titanium white or zinc white, or maybe even try gouache. So I will start with my quinacridone red, and I will pair that with my permanent yellow. I will paint 2 columns of colors here. I'll go ahead and load my brush with a yellow green color, which is permanent Green. And all you need to do to produce pastel colors is mixed these individual colors with white. I'll do that with my Quin red. And you can see that it creates a lovely coral pink tone. Next I'll do the same for my yellow. This two will be the base colors of my roses. For the leaves, l also mix white with my green. I'll continue testing out my colors until I am satisfied with a color combination that I come up with. And I decided to add in some violet and blues and other darker tones. You may wish to follow the same combination that I have here. But I strongly encourage you to own this painting and create your version of a pastel palette. You can also add reds or try this combination, pink plus brown, or adds some blues. And for the vases, the floating vases of our floral arrangement, I decided to use my brown plus violet mixture. Or if you have neutral tint or Payne's gray and other neutral colors, you may wish to use them. And here is my pastel palette. I'm happy with these colors and I hope you are too with the combination that you come up with. In the next video, let's practice our brush pressure.
4. Brush Pressure: One good thing with using a round brush is that you can create thin and thick lines depending on the pressure that you apply on the brush. If you want a thin line than paint as lightly as you can, with only the tip of the brush touching the paper. And then press it down and drag it across the paper if you want a thick line. Now to practice this brush pressure, I want you to paint a continuous line with alternating thick and thin lines. Let's know their brush with any color that you have on your palette. And start with a thin line first. Use on the tip of your brush and use a light pressure and then press it down, drag it across the paper, lift it up once more, and paint in your thin lines. You might also need to reload your brush and that's okay as long as you paint it continuously. Now to get the hang of this, try and do this three more times. This is also a good warm-up exercise before starting a painting. Next, let's try painting leaves with a single stroke. You may start with the heavy pressure and end with the light pressure so that your leaves look like these. Or start with a thin line. Press your brush and drag across and end with a pointy edge. Continue doing this for a couple of times until you are confident inpainting your leaves with single stroke. Next, that's paint wider leaves with two or more strokes. I'll paint in the left side of the leaf first and complete it with the other side. Depending on the width of your leaf, you might also need to fill in the middle part. Again, I'll paint in a couple more leaves until I am confident with this technique. And lastly let us grab our smaller brush. This is a size 1 round brush and practise painting thin lines. Since I'm using a smaller brush, it is now easier to paint in thin lines. And we'll use this strokes for our hanging floral vases. In the next video, Let's observe how a rose looks like. And in our rose blobs.
5. Rose Blobs: Let's observe these photos, depending on where the rose is facing the position of the clump changes. To demonstrate, I have printed these photos and you will find this in the projects and resources tab. And I'm going to trace on the overall shape of the rose and some prominent petals, which we will use as the accent lines later on are painting. I want you to choose about three or more petals that you will use as accent lines as well. I'm doing the same thing on this rose, which is facing towards the upper right. And you'll see that the clump is on the upper right side this well, choose few petals which will work as your accent lines, and use that later on the painting. So to recap, if a rose is facing towards us, it has a general circle shape and the clump of the petals sit at the center. I'll use few lines for the clump. And when it is on a quarter view, the clumps sits directly opposite to the rose hip. For demonstration purposes, I'm going to use my round brush and plot where the center of my rose is and the general shape of the flower. But during the actual painting later, I won't do these outlines. I'll paint one facing towards us, one facing the upper left side of the paper, and another one facing the opposite direction. Remember how we practice brush pressure earlier? Let's do the same thing in painting the petals. And if you observe carefully, I'll be leaving thin white spaces between the petals of the rose. So this white spaces suggest the separation of the petals. As I reach the outer petals. I'm going to load my brush with my pastel yellow color, and I'll do the same with the other roses. So you can start with one color at the center or at the clump and change it when you reach the outer petals and let us continue practicing this, it might be challenging for beginners, but if you prepare before the actual painting, I'm sure you'll do good. You can also add some character to the flower by adding curvy edges or add some loose petals. For the accent lines that we discussed earlier. I will let this rose blobs dry first and then using the original color, if you'll remember earlier, I used quinacridone red plus white for my pastel pink. Now I will use pure Quin red and paint in the accent lines using my small brush. And if you'll notice, I'm painting my accent lines alternately like this and not this, to give it a more organic Look, I hope you practice your rose blobs. And in the next video, let's do our final practice before jumping into our paintings.
6. Final Practice: You may choose to skip this video if you're confident with everything that we've practiced. But if not, I suggest you do one last practice. First, do your rose blobs and practice leaving white spaces and painting it with two colors. You can also decide on the colors that you will use for your leaves. I am using my brown plus violet color combination here. And you can also add more leaf shapes like this one which I will use on my flower arrangement later, also, have one more go on you're a single stroke leaves and your accent lines, practise painting it alternately and not in a uniform pattern. And where to place the accent lines as well. I also decided to add a smaller flower shape that will complement my roses. And I'm painting it with dabbing motion using a smaller brush. I used my pastel pink and pastel violet alternately. And finally, thin lines for our geometric flower vases. In the next video, let's work on our first flower arrangement.
7. Loose Florals 1: For our first flower arrangement, I'm going to use a diamond-shaped hanging flower vase. And I'll start by preparing my callers, my pastel pink and pastel yellow. And of course, you are free to choose any color that you want for your roses. I'm going to start with two roses at the center and I'll do what we practiced earlier. Leaving whitespaces, changing colors, and later when this dries, adding the accent lines. Next, using my pastel violet and pastel blue colors, I'm going to lay down my single stroke leaves, but from time to time I may need to correct this and paint over these leaves to correct their shapes. You will also notice that I am trying to balance everything so that when I paint the leaves at the bottom, I will also place leaves on the top, not the exact number or angle or size, but I'll just try and balance them. And now I'll add a smaller leaf shape at the bottom. And I will complement this with a smaller flower at the top. You may wish to follow the same arrangement that I am painting or come up with your own arrangement. Next, I'll work on my green leaves. And as I add leaves at the right side of this arrangement, I will also add some at the left side. And this is my simple flower arrangement. Before adding and the shape of the vase, make sure that your flowers and leaves are dry first, because we will be painting some of these shapes over our flower arrangement. It's okay if your line is not straight. This is a loose painting and I want you to just have fun and relax painting this, If you need to draw guidelines using a ruler and a pencil. Feel free to do so. And this is our first flower arrangement. I hope you're enjoying the class so far. And in the next video, let's paint our square floral arrangement.
8. Loose Florals 2: For our second floral arrangement, I'm going to use a square flower vase. And I'll also use the same colors that I used earlier, pastel pink and pastel yellow. I'll just add some reddish color on my second flower. But I encourage you to choose your own color for your roses. This is your painting, so I want to see how yours will turn out. I'll also paint one facing towards us and one facing the upper left corner of my paper. I'm sticking with my two rose flower arrangement. But if you want, you can also add more roses in your arrangement. Next I have here my brown plus violet combination. And alternately, I'm painting in with my pastel pink to lay down my smaller flower. And once again, I'm going to complement the flower by adding a smaller leaf shape at the top. I'll load my brush with my pastel blue and green colors and paint in some leaves. Now to add some dark tones, I'll also try and add blue plus violet plus white. And balancing this floral arrangement. I'm not very strict copying what I painted the top and do the same at the bottom. As you can see, I have more leaves, more blue leaves at the top compared to the bottom. It makes our painting more interesting if we vary the numbers, the angles, and even the sizes of the elements in our painting. Checking if my flowers are dry. And then I'll add my accent lines using pure quinacridone red, and the other one is brown plus pink color. Now once everything is dry, we can now paint in our square flower vase. I'll start with a sort of distorted square shape and connect that with another two squares. And then let's add some lines at the back of our flowers and finish off with a string at the top. So how do you like this line? In the next video, let's paint in our final piece.
9. Loose Florals 3: I believe that everything is hard to do the first time. That's why I prepared three mini floral paintings for you to practice on and be confident in this loose painting style. In our third painting, I will go for this look. And once again use the same colors that I have been using from the moment we choose our colors for the pastel palette. This also gives you familiarity with your colors and if you'll. Also notice I stick to two brushes only. When I was a beginner. Every time I purchase a new brush, I will use that brush and practice with it for at least two weeks. And I will do simple exercises like this to get accustomed to what it can and cannot do. Let's continue our painting by adding and other elements like this small leaf. And just like before, I will complement that with a smaller flower pointing downwards. Let us also add darker leaves to complement the light ones. And as always, I'm balancing the composition by placing something on the right and adding its complement on the left. But again, you don't need to be too strict with this simple technique. And finally, when our roses are a dry, let's add our accent lines. Don't forget to place them alternately. And finally, I will mix my brown, violet and white combination for the hanging floral vase. Unlike the first two paintings, you can see me place dots and I will connect them to form my floral vase. You can also do the same or if needed, use pencil and ruler for your guidelines. But as I always encourage you to do, please try to paint in a relaxing manner and don't worry about those squiggly lines that you produce. Even my painting is not perfect. But the feeling that I get from it is so rewarding that I just keep on going. Here is our third and final piece, and I hope you like it. In the next video, let's wrap everything up with a quick summary.
10. Wrapping it Up: In this SkillShare class, we were able to paint three mini floral paintings. We started by mixing our white with our colors to produce a pastel palette. Then proceeded in practicing our brush pressure to produce thin and thick lines. Painting leaves with only a single stroke. And leaves that take two or more strokes to complete. We also practiced painting rose blobs by leaving white spaces and changing colors and balancing our composition by placing our elements strategically. I hope you enjoyed this painting session and I'll see you on my other SkillShare classes. Bye.
 Bianca Luztre, Watercolor, Productivity, Color Mixing