Transcripts
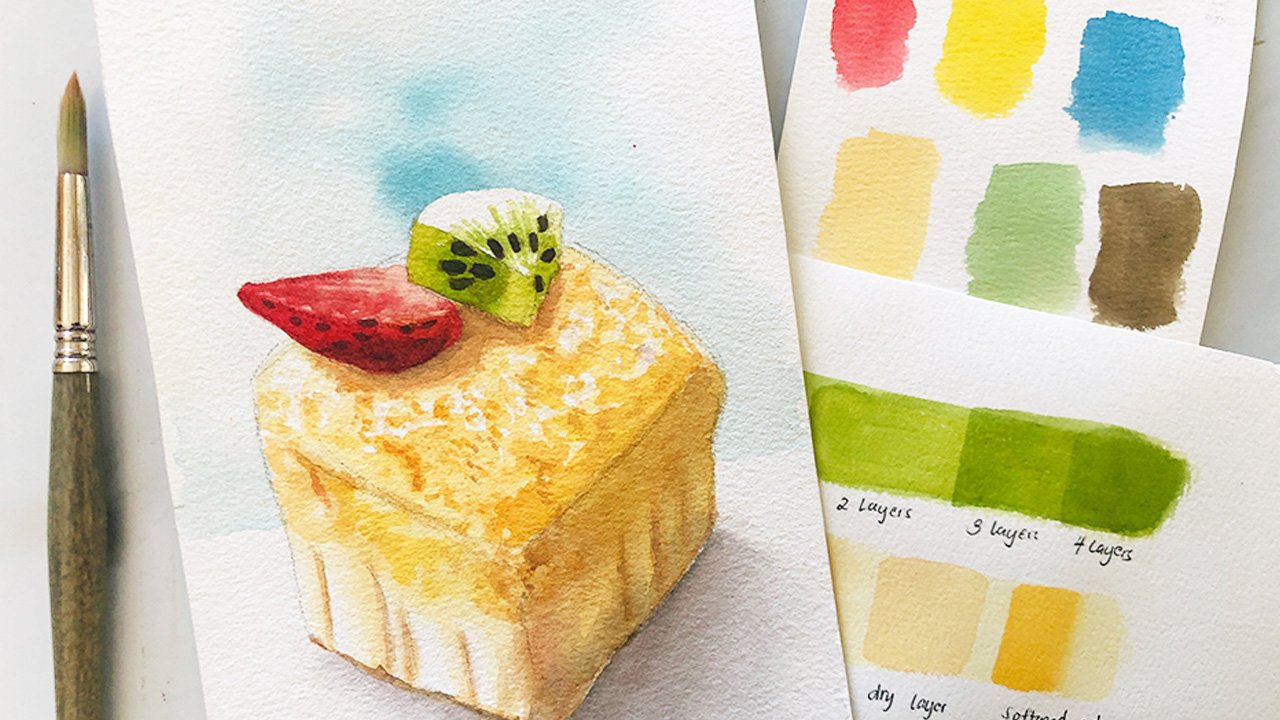
1. Welcome to this Class!: When I was new to watercolors, I thought I have to purchase lots of pigments before starting. But I was wrong. With only three colors. We can create a vibrant watercolor food art. And that will be our focus on this glass, higher lovely people. This is Bianca, a watercolor artist from the tangles Philippines. Whether you're a beginner, a hobbyist, or an experienced painter. I welcome you to join the fine. Let's paint five isometric fruits while getting to know the three primary colors and the mixes they can produce. With each fruit, we will mix and use a limited palette to produce secondary and neutral colors. We'll first create the hand, the pattern that we'll use to draw the base shape of our fruit. Then we'll test the three colors that we've chosen. And pub find painting geometric fruits. Once you've tried working with only three pigments, you can now go ahead and try other subjects like this ones. If you're up to this challenge, grab your materials and let's get started.
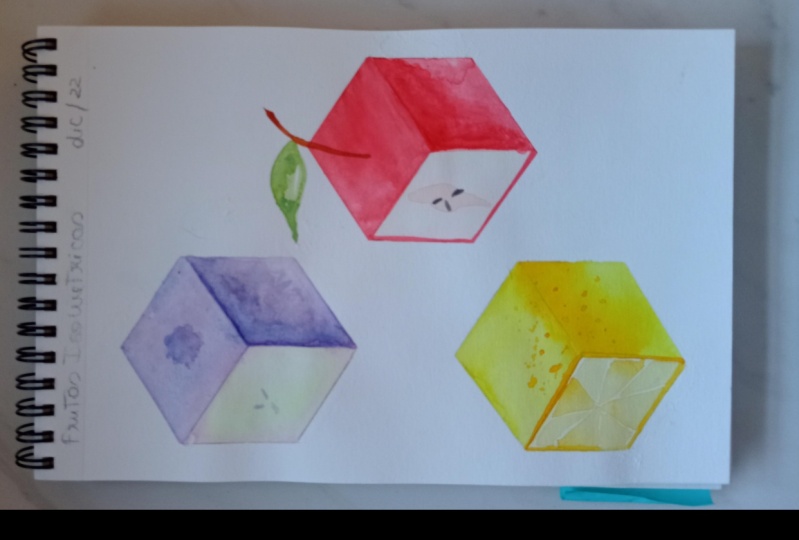
2. Fruit Pattern: Before we have fine painting this asymmetric fruits, Let's make it easier by creating a simple pattern that we'll use for all the fruits will cut out a diamond shape pattern. To draw our guidelines. I have here a scrap watercolor paper, which is perfect for the job. You can also use a board beeper or something that is thicker than a regular copy paper. Start by drawing across with your pencil and ruler. For the height of the DYAMAND. I'll keep it rather short. Around four centimeters. Of course, you're free to change the size. Go for a four inches if you want bigger fruits. And the width should be almost double the height, say you seven centimeters, so that the diamond looks like it's squeezed, giving the fruits and isometric glucose. Once you've got the measurements, all that is left is connecting those marks and creating a diamond shaped pattern. Let's cut this and I'll show you how to use this for our fruits. Now that you have this handy pattering, lay it down on your watercolor paper and trace it. That will be the top of the fruit. I'd recommend tracing at the library so it's easier to erase mistakes later. Then draw a vertical line at the center, which will be our guide in aligning the pattern. Next, please, the pattern just below the diamond that you outlined earlier. The height of the fruit will depend how far you place the second diamond. So watch out for and the distance of these two points. You'll only need to trace the bottom of the diamond, the gum believe that cube shape. Then drag the signs and you have the base shape for the fruit. See you in the next video, and let's test our colors.
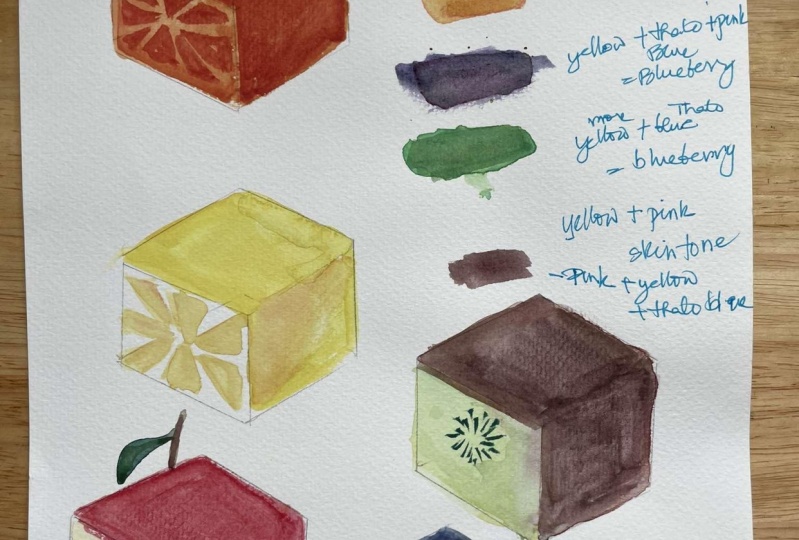
3. Colors Needed: For this class, we will only need three colors, preferably quin rose, lemon yellow, and yellow, blue. If these are not available to you, you may use whatever you have and Jain me and testing color combinations to find out if they could produce the hues that we need to be the fruit. First. I'll try yellow and pink to create an editable red color. Just a bit of lemon yellow to warm up quinacridone rose. And it should produce a mixture that's perfect for our apple. If we tweak that mixture and admin bar yellow so that it's almost a coil with quin rose. Then you should achieve a warmer tone for our orange. Next, we'll also need a blue violet for our blueberry. To do that, I load my brush with them pink and mix that with phthalo blue. And that should work for the blue berry fruit. Then we'll need shades of green for the leaves and for our kiwi fruit. That would be lemon, yellow, and blue. For beginners or not used to mixing colors. This is a perfect chance to practice and discover the perfect ratio of pigments to produce the color that you are looking for. This green works well for our leaves. Using the same mixture that I already have and mixing more yellow than blue, the emission get a yellow green, perfect for our Q0. And lastly, the colors that I find the most challenging of them all, mixing round but not muddy brown, a neutral color that would look good for the branches if it's dark and perfect for the query, if it's light. To create that color, all you need to do is mix all three. This is a trial and error process. And I want to encourage you to have fine mixing this wine. If you find it to blue, then add more of the other colors and vice versa. Keep adding to the mixture until you're satisfied with the brown that you got. This brown might lead to dark, but I can just add more water to lighten it than bit later. Now that our colors are ready, Here's a list of the materials that you'll need for the class. And see you on the next video. And let's paint an orange.
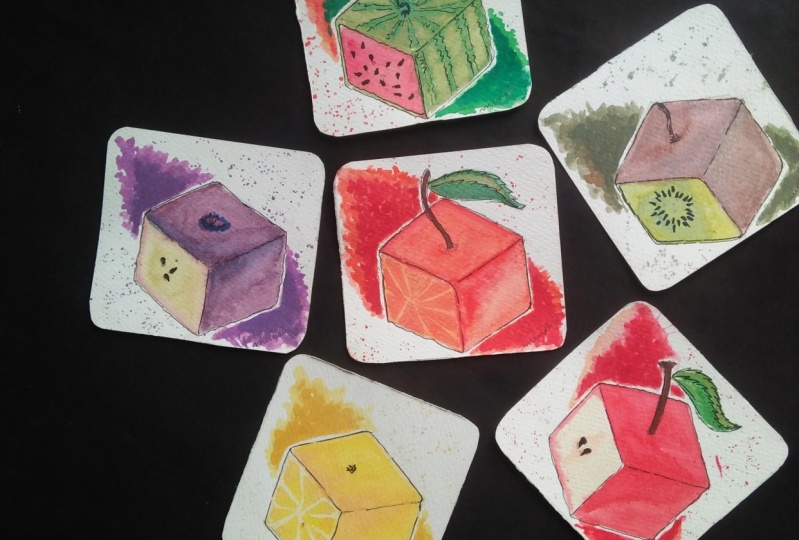
4. Isometric Orange: Let's kick this project with their first fruit, orange. I have shown you how I drew the base shape foreign to fruits in the other video. But to make it even easier, I will use a masking tape for a crisp, isometric fruit shape. If you plan to use a masking tape to please do not forget to test the compatibility of your paper with masking materials. I am using 100% cotton paper. So based on experience, I shouldn't have problems with lifting off the tape leader. I'll start by painting the inside part of the fruit with a yellowish orange. Masking tape is optional. But you can see by the way, I paint mine that I don't have to mind the outer edges as I color in my fruit. All I need is to keep an eye on the sides that separate the inside, an outer parts of the art image. I'll mix mark or Nackerud don't rose to make a darker and richer orange, which I'll use for the skin. I won't breed for the insight bar to dry before painting the orange feel. That will result to some darker orange bleeding into the lighter orange. But that should give me a problem. We're painting an isometric fruit and not a realistic one. So let's be as creative as we can be. I load my brush with an even darker orange to separate the top and side planes. That will create an illusion that the right side is on the shaded part. We use the same color, but by adding a shadow, it effectively divides the two planes. I'm doing that while the paper is still wet and keep on adding colors to it until they look like they're separate the leaves, this layer to dry. And let's work on the details. Next, let's divide the segments and define each car bow. I'll start from the center, moving outwards towards the skin. If you need to. You can also use a pencil and sketch into segments first. This is a good path. This and mastering your brush, make sure to leave out a thin line between each car bowl for the partition. I'm loading my brush with the same orange mixture I used for the skin. Keep going until you've filled out the inner plane of the orange. Then I'll add another layer of shadows to a further separate the planes from each other. Soften the edge by rinsing your brush nice and clean, and painting the rest of the shape with clean water. Time to remove that and add our final details. As expected. I did not have any issues on peeling it off. Makes brown by combining all the colors for the stem. Before you paint the branch, check if the top plane is completely dry. I placed the stem at the center of the top lane and move my brush up boards carefully. This is another practice and fainting thin lines prepared to, uh, shades of green by adjusting the ratio of the lemon, yellow and blue pigments and paint a live starting with yellow, green to define the shape. Then while that is still wet, load your brush with blue, green and drop those colors to make it more interesting. Lives, an almost pure pink mixture. Let's add texture, shadows, and outline for our orange skin. I'm dabbing my brush quickly using only the tip of the brush to create tiny marks. And tapping it slightly with my finger to soften some edges. As a final touch, I will draw some lines on our carpels. And here's our isometric orange fruit. You may post your fruits individually or as a collection. See you in the next video, and let's paint a lemon.
5. Isometric Lemon: This should be the easiest among the five fruits that will paint for this class. Not much mixing nor details for our lemon fruit. Just like what I did with the orange. I taped off the edges to make it easier for me to work on the plains of my isometric fruit. Loading my brush with fewer lemon yellow and coloring in the skin makes a tiny amount of quin rose to warm the lemon yellow and paint shadows to separate the top and side lanes. I dropped a small amount of that mixture and realize it's two orange to my liking. So I'll adjust and add more yellow. I'm working on the web beeper for pigments to bleed with each other, blend smoothly with the same mixture, add more water, and that will do for the inside part of the fruit. I will paint carefully at this time and leave a tiny space between the inner and outer Blaine's. I don't want to disturb the skin since that this starting to dry now. But if incase, we accidentally connected the two like I did here, then I guess we'll just have to let that go. Leave this to dry completely before painting the details. Painting the segments of our lemon is pretty much the same with our orange. I'm preparing a warmer mixture and marking the center of the inner blame. From that, I'll work my way outwards and use triangles and four-sided polygons to define the segments or in carpels. I'm painting for a segments first. And while they're still wet, I load my brush with the warmer yellow mixture and drop N at the outer part of each carpel. I'll do the same and cover up the inner glean with Mars segments, making sure to leave a thin line for the partition. Rotate your paper if you need to, and work on them better angle. Faint, a thin border for the lemon will mean to do that since the underpainting is to light. With quick dabbing motion, add texture to the skin. I'm making sure to use only the tip of the brush and a light pressure to create tiny organic marks. Then slightly tap with my finger. No need to cover the whole skin with this tiny dots though. Unless you remove the tape and reveal our isometric lemon fruit. Here is our second geometric fruit. See you on the next video and let's work on our kiwi.
6. Isometric Kiwi: Qe, This is my husband's favorite, so I ought to paint it. Let's prepare two shades of green by mixing our lemon yellow and phthalo blue. Depending on the colors that you're using, you might achieve a different shade of green, and that is totally fine. As long as it looks like an edible green color and not a mutant or a desaturated green. Then that will do. I'll fill in who the inner plane with yellow, green and lead l drop shade leaning towards blue-green and paint a circular ring epicenter of the fruit while the paper is still wet. How do you find working with a limited color palette so far? Do you find the color mixing bar? It's satisfying or confusing. I used to hate colored mixing when I was a beginner. But I find it's so useful now. And I love working with limited palettes. Right? Let's paint the skin, but make sure that the inner plane is completely dry. First, we'll need a brown mixture somewhat near to what AQA skin looks like in real life. So let's mix our colors and find the perfect combination. We're aiming for around that looks natural. We're not one pigment should be too obvious in the mixture. So if it's still pink, add more yellow and blue. Or if it's still yellow, add more of the two colors. It might take some time getting the mixture that steer liking and that's alright. Treat this as a part of your learning process. Try it on a scrap paper if you need to. Once you get the hue that could work for a document skin, paint, the other bleeds. This king of a QME is fuzzy. But let's give those details. As long as the colors are right. This should look like an edible q0. I'll darken the brown mixture by adding more blue and pink pigments for the shadows separate thing, the two outer planes. Finally, let's paint the seeds. We all need an even darker brown or a neutral color. So when mixing your pigment, make sure that there is less water at this time. And the consistency should be creamy and not too flowy like what you see on my palette. We'll use the circular ring. We beat them earlier as our guide and placing the seeds, use the lightest pressure on your brush. Debate those tiny seeds. Let's reveal our acutely fruit. Looks at their boat to me and I'm happy with this. See you on the next video. And let's paint an apple.
7. Isometric Apple: How many times have you been did an apple so far? This has always been my go-to fruit when trying out a new window. Acrylic, oil, wash charcoal. This time, let's give an apple an isometric look to make it more interesting. To start off, I'm makes a very light flesh color by using small amount of yellow and pink plus lots of water for the inner plane of our Apple, which is by the way, the same base mixture I use when painting skin tones. Leave this to dry before working on the other parts. Next, I'll mix a strong red color by adding more quinacridone rose to my lemon yellow puddle. It's amazing how combination of colors produces unpredictable results. Well, at least for me, I thought red is a color that cannot be reproduced since it's a primary y. But combining pink and yellow makes a lovely red apple color. I never thought of that before. Walker colors became my primary mean. Do you know that my brush with lots of the red color and working on the Albert gleans for those who aren't using masking day for whatever reason. I'd like to commend your brush control your patients and effort in painting our diametric fruits. Adding more pink to our bold red color for the shadow, dividing the top and side blames. I'll also be a thin border for the inner glean, just like what we did with our lemon. Since this bar is through light. Then L makes an orange by adjusting the amount of quin rose and lemon yellow to color in the core of the apple. This is just an impression of the core. So long as I can define that from the rest of the inner plane, that will do. I will soften that edge to give way to the seeds later. Using the same color we used on our key recedes, outlet them to paint the seeds. But then I realized that the core is still wet. So the seeds will have soft edges. And that's not what I like. So I'll stop. Instead. Elle, remove the masking tape and leave this to dry before adding a stem and painting the seeds. Let's paint the leaf, but be careful not to touch the fruit shape, which is still damp and we don't want to disturb the drying process. Even dropped some darker brown paint on the leaf for variation. Leave this to dry and we can add our final details. Being the seeds and the stem using the same brown mixture. And our isometric Apple is complete. One more free, eat a blueberry. Then we can wrap up our isometric series. Here's our apple with a twist. See you on the next video.
8. Isometric Blueberry: Onto our last isometric fruit, blueberry. Let's begin by preparing the colors of the inner blame. You somewhat dulled green, which can be achieved by mixing yellow green with a bit of thing. Let's also premix a red violet that will be used for the edges of the mirror plane. Load your brush with a dull yellow green color in the center. Then while this is still wet, load your brush with a bit of red violet mixture and drop that on the edges of the inner box. Be careful not to load too much. Since we're working on a wet surface, the pigments might travel farther than expected. But if that happens, then just let it go. I'm just letting the tip of the brush thoughts and the beeper and let some of the red violet, the paint mix with the yellow green pigment. Then prepare blue violet for the skin. Lots of primrose and phthalo blue for a vibrant color. Paint and the other planes or the skin of our geometric blueberry will let the outer and inner planes connect. But sort of control where those pigments will go. By tilting the paper and liter. Some of the skin color will bleed into the inner part of the blueberry. But that's fine with me. It adds students are organic, Luke, doesn't it? And us always let spent in shadows to separate the top and side planes. I'm still holding pick B birds so that the inner plane is at the bottom. I'd rather that the skin colors bleed into the inside part of the fruit. Then the other way around. Then I'll leave this to dry for the details. Mixing brown for the scenes and pays them as tiny as he can. I wonder is a blueberry in local fruit in your area. I'm in a tropical country and I love blueberries chat. But when I tasted the real deal, Oh my doesn't compare with a bottle version. Wander Does fruit is so famous. Anyways, as a final touch LP and eight Tiny crown and some random shapes farther texture. I'll also make the shadow more obvious, may glazing over the side plane, but this same blue violet mixture and make the borders of the inner flame more pronounced. And doing some very brushing to add texture at the top part and using the side of the bristles to do so. This allows minimal contact with the brush and the vapor, thus, less paint is released from the brush. I'll keep doing this until I'm satisfied. Revealing the blue berry fruit. But I realized I didn't. David brought her in the so I got some unwanted marks here to light them that simply scrub it with a clean brush and with a rag or a paper towel and dab, it did take off the reactivate the paint, excuse my Dirac here. Here's our final isometric fruit. See you in the next video for some suggestions on what to do next and a quick recap.
9. Before You Go: Well dyeing, finishing this class. Now that you've completed five isometric fruit paintings with only three colors, you may now try other subjects. This do for beans in with Z callers only. In fact, I have two other classes where I only used a red, yellow, and blue to complete the faint things. And before you go, I review would be greatly appreciated. And senior paintings only motivate me to teach more and share what I know. So don't forget to upload them. You may post one photo of your favorite fruit or a collage showing all of them. Convenient learning to make CR colors and together. Let's make this world a little bit more colorful with our artworks.
 Bianca Luztre, Watercolor, Productivity, Color Mixing