Transcripts
1. Introduction: Hello, everyone. I'm
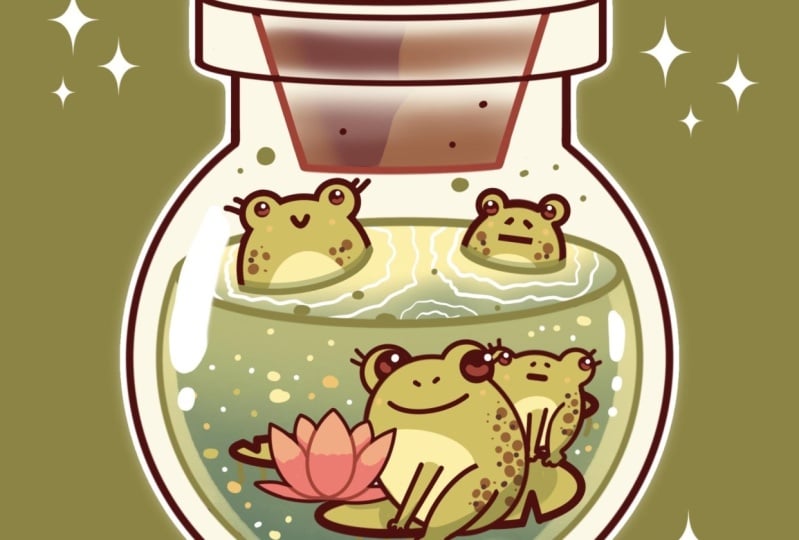
Yuni, and in this class, we are going to draw this
cute kawaii illustration of the toads in a
bottle in Procrit. During this class, you'll
get familiar with a lot of useful features like QuickShape
tool, Symmetry Tool, recoloring with reference,
clipping masks, and blending modes, and learn the basics of drawing
in Procreate. By the end, you'll not only draw an adorable illustration
you'll be proud of, but also feel super
confident using procreate. And now let's spend
some time drawing.
2. Bottle: Begin our class firstly by deciding what kind of canvas
we're going to be using. Today we are using a standard square canvas from
Procreate with pixel width and pixel
height to the 2048 pixels. DPI at 300 and our color profile is at a
SIGB with this loan number. When it's all done,
let's hit down. Let's get to our new canvas. And before starting
with our illustration, let's do a bit of a
preparational part. So firstly, we'll need to go under the project
and rusher Step and download all the materials
mentioned for this class. When you did it, let's go and deal with the brush firstly. So go into the
icon with a brush, going inside the brush library, go into the calligraphy folder and choosing monoline brush. We want all of our lines to be pretty smooth and
easy to work with. So let's tap on this brush. Go inside the brush studio. On the left, we will
choose stabilization, and we'll be played
with amounts of streamline and amount
of stabilization. You can go to the drawing
pad, try it out right here, and you can set the
settings the same way as you see them right
now onto your screen, or you can tweak them until
you like how it feels. So when you find
what works for you, let's hit D over Aro pride. And when we have
our brush selected, let's go to our color
palette that you downloaded, and we will select
the first colour that we will be creating
our illustration. So this is going to be the
color with the title dark red. The very last thing for
now is going to our size slider and setting the size of our brush to
something around 6%. And when we are all prepared, let's start working
on our illustration. We will start with a bit
of the simple shape of the perfectly
rounded circle that will be our little bottom. So let's go towards the canvas, and with one line, we will
create a shape of the circle. In the end of the line, we
will hold our Apple pencil. We'll snap the shape to a better one and we
also will put one of our fingers on the
screen to make the shape a perfectly
rounded circle. If you want to adjust the size
while holding everything, you can move your Apple
pencil from side to side. For now, let's go with
something not too big and not too small and when you have
the size that you like, let's lift up everything that
we are holding right now. Now when we have the sheep, we will need to position
it at the center. Let's go to the rake
on the top left. We will go under snapping
right here on the bottom, and into the settings, we will
toggle snapping here too. We are using uniform method and we are getting
back to our canvas, holding our Apple pencil
at some blank space, and we'll be looking
for the orange line that is going from
top to the bottom. When we have this line, this is our center and we will go along this line
slightly down, so we will have more space over the top than we
have on the bottom. When you have the
position like that, let's straightaway
go to our layers, and we will make a copy of this layer for our
future liquid. So let's swap the
layer from right to left and we will choose
the option duplicate. When we have this second copy, we will need to make
it slightly smaller. One more time, we are going to our Aoki on the
top lat and again, we are using our uniform method. Let's go toward the middle
node on the top and we will drag it slightly down and we will do the same
on at the bottom. We don't need too much space
between these two elements, so when you have
enough of the space, let's make sure that we
are right at the center. Again, we're holding
our Apple pencil and we are looking
for these two lines, one vertical and one horizontal. They either can be both blue or one of them
could be orange. When you found these two lines, we know that we are
right at the center and that's exactly what we need. Now when we have
these two shapes, let's continue
working on Arbuta. Firstly, we straightaway
go on to our layers, and we will create
one more layer on top by tapping on the plus icon. Now, when we have
this new layer, let's go and work
onto the top part of Arbota and we want to use symmetry here
because we don't want to create two details
on both sides. We want everything to be at one side and mirred on the
opposite side magically. So when this layer is selected, we will go to the range
icon over the top left. We will go under Canvas and who will toggle
drawing guides. Now you can see we
have these cells, but it's not the
option that we need. Let's hit 80 drone guides, and on the bottom, we will
use the option symmetry. When we have just
one line like that, we are not touching
anything here, we will hit down
over art to price. When we are all prepared, let's go to the top with the same brush and with the
same size of the brush, going slightly to the side from this middle line
that we've created, and we are creating a
line go in that way. You can vary the
position of this line, hold your line and the end
with your Apple pencil and also hold it with your
finger on the screen. That way we will know that
it is highly vertical. When we have it,
let's go and lift up everything and
we will continue creating the top
part by first going slightly to the side from
this first line that we've created and a little
bit higher and we will again create another straight line going
up like that. Doing the same thing,
holding our Apple pencil, holding one of our
fingers on the screen. You can adjust the
size if you want to, but don't go too far
up with the shape. When we have it, we will go
and create the future cork. So for the cork, firstly, let's go toward this first
line that we've created. We will go a little bit more
toward the inside part, and we will go a
little bit lower than these two lines that we
have for our main shape. So with this knowledge, we will go and create a
line going in that way. Hold your line in
the end so you can adjust the curvature
here, the angle, and when you like how it looks, let's also think
about whether we want to maybe change
the position of it. So when you are
holding everything, lift up your Apple
pencil and let's go to this option
line on the top. This is our editing tool. In the editing mode, you can see we have the
nodes, so you can go to them. You can hold your Apple pencil there and you can
adjust the angle here, for example, or the
position of the shape. If you want to change
the placement, hold your Apple pencil
and move it more toward the place that you
want this shape to be. So when we have the
result that we like, let's tap on the screen, and let's continue
working on this top part so it doesn't look too
weird as it is right now. Let's go to our
lays one more time, and we will create one
more layer on top. Onto this layer, let's first go and work onto
this middle part. So for the middle part with the same brush with the
same size of the brush, we will go right between these two lines
that we've created, and we will start from the first one and from the line
that we have on the top, we will go to the opposite side and create an ellipse like that. Hold your line at the end and also hold one
of your fingers on the screen to make sure that the shape is
horizontally positioned. You can adjust the size, and what we need to do
right now is to match it with the previous shapes
that we have on the side. Adjust the size and if you
need to adjust something here, the placement or the
size one more time, let's go to our Aoki on the top left and we
will go and try to position the shape in alignment with these two lines
that we have on the side. So hold your Apple
pencil and move the line towards
these two lines. As we are using our snapping, you might see some lines
that are our guiding lines. If you need to adjust the size, you are welcome to
go to the nodes and match the shapes with
the previous ones. So when you found the placement, let's tap onto our error key, and let's take a
look at our line. If you have some gaps on it, you are welcome to grab your
brush and manually go to this place and add the
filling to this part. When we have it, we
will go and make a copy of the shap and position it right
here onto the bottom. Let's go to our layers. We will go to this layer with the shape and swipe it
from right to left. We are choosing the
option duplicate and then with this new shape, we will go again to our oke uniform method snapping it on, moving along the guiding lines
that we have on the sides and trying to match it with the line that we
have on the bottom. So again, trying to find
the perfect placement, and when we have
it, let's go and tap onto our key to get
away from this mode. When we have the
result like that, we also can grab our eraser and straightaway go and erase the
lines that we don't need. Let's make the size of
the eraser a little bit bigger and let's go toward these little parts that
we have right here. Try to make a nice connection
between the parts. If you also see that
you are going a little bit beyond
with this shape, beyond the frame
that you have right here as the vertical line, you are welcome to erase
the parts here too. Then let's continue and erase this line on the top completely. Going toward the
opposite side and starting to very
carefully go toward this little part where
we have a connection and make a nice connection
between the parts here too. Again, if you have
some extra elements that you need to work on, go and work on them. When we have the
result like that, let's continue by
working onto our quirk. For the quirk, firstly, let's go back to our layers and we will merge
these two layers together that we have for
our top part of our bottle. So we will tap onto
our layer on the top, and we will use the option
merge down right here. Then when we have
it on one layer, let's tap on the plus g and to create another layer and
we will do the same thing. But this time we
will go slightly higher and create our qq. So firstly going toward
the top and again connecting these two sides
with the shape of the ellipse. Hold it at the end, hold
one of your fingers on the screen to adjust
the position of it. Adjust the size if
you need to and if you need to do
something else right here, position wise or size wise, let's go to our Ao
key and let's find the placement for it and match
it with the previous shap. When we have it, we can
either tap onto our yoke or go straightly toward our layers to make a copy of this layer. Let's swad the
layer from right to left and choose the
option duplicate. When we have the second copy, we will get back to our
Aoki and we will move it down toward these two
little lines on the bottom. You can try to make this
shape smaller if you want to, but we can stay the same way
as we have it right now. We will grab our eras and erase all the extra parts
that we don't need. So straightaway,
going to our eraser and going toward these
parts on the sides, trying to erase them, and erasing the line that
we have at the back. So let's go with our eraser. You can go with a smaller
size or with a bigger size, erase everything that we
don't need right here. You also can go toward the corners that we
have on the bottom, and you can soften
them up manually by changing the size
of the eraser slightly and going toward these
parts and softening them up by creating curves inside
these very straight corners. Let's do it on both sides to
soften up our illustration. And when we have it,
we will go and take a look on what we
need to adjust else. So when we have the
result like that, let's go and get
rid of this line that we have onto our
top part of the Bota. So we will need to get back to our layers and find
the needed layer. If you want, you can go and merge these two layers together, where we are right now at, let's tap only and use
the option merge down. Then we'll get back to the layer that we used for
this middle part. We will grab our eraser. We will make it slightly
bigger and we will go toward this back part
and erase it completely. Now when we have it, let's continue working
on other details. Going back to our layers, we will go to this layer that we have right here for our quirk, and we will go toward these
little lines where we have extra little details and
we will go and erase them. When we have the
result like that, we also can go and add one more detail toward the quirk to make
it even peculiar. So we will go back to
our layers and we will find the layer with our
top part of the quirk. You can go to the
check mark right here. You can go back and forth, hiding and unhiding
it to make sure that you are right at
this layer that you need. And when we have it, let's make a copy of this line that
we have on the bottom. Do that, we will go
to the ribbon icon. We will use free hand method
I color field is turned on, turn it off, and let's go toward this little part that we
have right here on the top. Let's go and make the
selection like that. So go only to this line, looping this whole thing around. When only this
element is selected, we will use three fingers. We will swap them down firstly and invoke this copy
and paste menu. Firstly, we are selecting the option copy and
then one more time, three fingers, swiping them down and using the option paste. Now, if you go to your list, you will see that
you have inserted image right here and that's
exactly what we need. When we have it, when
this layer is selected, we will go to our
Aoki uniform method and we will move this
line slightly down. Again, going like
that and starting to move the shape down
and when we have it, we will grab our eraser and erase these extra
lines on the sides. When we have the
result like that, we will go back to our layers. We will go to this
layer where we have the lines on the quirk, we'll grab our eraser, and we will go toward the sides. And very accurately, we will erase these
parts right here. So again, going like
that starting to create a nice connection
between the parts. If you ord it, try it
out one more time, or if you need to add
something, use your brush. When we have the
result like that, I'll probably go
right here and add a little bit of color
toward this little crease. And when we have it,
we will go and work a little bit more
on the bottom part that we have for our bottle. Firstly, let's get back to
our layers and we will find the layer with our main
shape for the bottle. This is our layer that
we have on the bottom. We'll grab our erasa and we will go toward this
part that we have right here where we have the intersection and we will go and erase this
part completely. Let's go toward the
opposite part with our eraser and very accurately erase everything
that we don't need. Now, when we have the result like that, our bottle is done. Let's go and work on
our little liquid part. Firstly, go into
our layers and we will go and find the
layer with our liquid. This is our second ellipse and we'll create one
more layer on top. Onto this layer will get back to a brush and we will
go more toward the top part of
this sp and we will create another little
ellipse right here. This time, let's
make it a little bit more open, so
going on like that. Again, with one line creating our shape, holding
it at the end, adjusting the size if we
need to holding one of our fingers on the
screen to make sure that it is horizontal, if we need to move
it or adjust it, we are going to our
ki on the top left, uniform method, and moving it to match it with
the previous ship. When we have the
result like that, let's get back to our layers. Let's find the layer with our actual shape for the liquid. We will grab our
eraser and we will go very carefully toward these
little intersections, and we will need to
make sure that we are somehow creating the
continuation of the shape. With a smaller size
of the eraser, we will need to create
a nice connection right here between the shapes
in the shape of the curve, and when we have it,
we will go and do the same onto the
opposite side too. Starting to erase
these parts and trying to make a very smooth
connection right here. Then with the bigger
size of the eraser, let's go over the top and
erase this line completely. And when we have the
result like that, our bottle is done. So let's go to our layers and merge all the layers that we
have right here together. So go into the layer on the
top with one finger and using another finger
on the layer on the bottom and making a
pinch movement like that. And when we have the
result like that, we are ready to start adding some additional elements
inside our little liquid.
3. Toads: Begin this part firstly
by going and tapping on the plus cad into our
list to create a new layer. We will go and start by
creating some lily pads. Let's get back to our brush, and with the same
size of the brush, let's go toward the
bottom and we will create another set of our little
ellipses right here. Let's go from the bottom. We will have some of the similar distance from what we have right
here on our canvas, so you can map it out like that. Then with one line, again, we are creating a shape of the ellipse. You
can make it bigger. You can make it small
use one of your fingers on the screen to make sure that you are positioning
it horizontally. When you have the
first shape like that, you can also hold it and
then go to the editing tool right here onto the top to maybe make it a
little bit more open. You can go to the
nose that you have right here and make
it, for example, like that, you can
reposition it too, for example, let's move
it slightly higher. When we have the
result like that, let's tap on the screen
and let's create another little shape
of our lily pad. Going towards the left side first and create another
little shap right here. You can go again with
a different site with a different
placement for it. It's up to you. Try to
make it horizontal. So if you need to move it, go to the editing tool, or if you need to make it
a little bit more open, again, use your editing
tool to do that. Find the placement for it,
and when you are done, let's tap on this
screen and let's go to the opposite side to create a couple more of these elements. Firstly, let's go right here toward these ellipse that
we have on the bottom, and let's create a bigger
one shape right here. So again, hold your
line at the end, hold one of your
fingers on the screen. Let's go toward our editing tool and maybe readjust it slightly. So maybe make it
a little bit less open and find a different
placement for it. When we're going toward the top, and let's create one more
little pad right here. To go in like that,
the same way, creating the shep, holding one of our fingers on the
screen to adjust it. And when we have the
placement like that, let's go towards some
of the parts that are overlapping and we will
get rid of the overlaps. So let's grab our ureasm and
we will go toward this part. And with our reasm probably
with the smaller size of it, we will go and very carefully erase everything
that we don't need. Now when we have everything
set in that way, let's continue by
going to our layers, and we will create
one more layer on top to make sure that we are not discouraged with
everything here and not very distorted with
everything right here. Let's get back to our layer
with our little pads. We will tap on the icon
on this layer and we will change the opacite so we still can see
what's happening here, but when it's not that bright. When we have the
results like that, let's get back to our new layer. And let's create a
little flour right here. So for the flour, let's
get back to our brush, and let's make the
size of the brush a little bit smaller.
So we'll use 4%. With the size of the brush, let's go toward this
little part right here, and we'll create a
very simple flower. Firstly, we are going with a
bit of the shape like that. You can go and create it with one line or if you need
to go with a couple of lines or maybe adjust some parts when you
already created the line, you are welcome to adjust it
in any way that you want. So go and create a nice
looking drop shape like that. And when you have it,
let's go toward the side, and let's create a couple
more leaves right here. To go into one side firstly, creating a leaf going like that. Try to make it a little
bit less open right here. Again, if you want, you can
hold your line at the end and go to the editing tool if you
need to j something here. When you have it, go into the opposite side and trying to create something
similar here too. You can go completely symmetrically here or you can
try out different things. For example, I will go
right here and make this a little bit more
pointy and when we have it, we will go towards the
bottom part and we will create a more
open shape right here. On one side, when it's ready, we are going to
the opposite side and creating a similar
shape right here too. Try to make nice connection, so if you have some gaps between your lines,
go and adjust. When we have the
result like that, let's go toward these
two parts and let's add a couple more
petals right here too. The same way as before creating some of the shapes like that. If you want to create
more of these details, you are welcome to
go and do that. When we have the
result like that, let's take a look at it
and decide whether we want to maybe move it or
adjust it in any way. If we want to do
that, we will go to our Ark on the top
left uniform method. If you want to reposition it, hold your Apple pencil and move the shape toward the
place you want it to be. For example, let's
go slightly higher. If you want to rotate it, go toward the green note, hold it and make a
rotational movements. Now when we have this flower, let's continue and add
a couple of frogs. Firstly, going
toward our layers, and straightaway, let's go to this layer where
we have our flower. Let's tap on the N icon
and adjust the opacity. Going towards the plus icon, creating a new layer here, grabbing our brush and
with the 4% of the size, the same size that we
use for our flower. Let's go toward
this part and let's create firstly a big
ellipse like that. Hold your line at the end, adjust it, position
it in that way. If you need to adjust the
placement or anything, go to the editing tool. I will probably make it slightly smaller and position
it slightly higher. We will have position the position of the frog that
it is sitting onto the pad, when we have it, we will tap on the screen and let go and
create the eyes right here. To make it easier for us, let's go to our less and
create one more layer on top, and we will go toward the top right here and
create the circles. So with one line, we are again holding our apple pants
at the end of the line, holding one of our
fingers on the screen, adjusting the size
if we need to. When you have the first eye, let's go toward
the opposite side and create the similar
shape right here too. So again, hold line, trying to match it with the size of the previous elements. If you need to try it
out one more time, go and try it out one more time. If you need to go to
the editing tool, go there and adjust
your shape from here. So we'll need to have a bit of the space above the
overall shape of the frog. When you have it, let's
tap on the screen. Let's grab erasa and let's go toward this eye that
we have on the left, and probably erase the bottom part of the circle right here. We also will do the same
with the bottom part of the circle on the eye
that we have on our right, and then we will get back
to our previous layer where we have our mean shape and
we will go to the right part with slightly smaller size of the eraser and we
will erase this line right here that we have as
our top part of the frog. So going like that, erasing it. If you want to soften
up the corners, you are welcome to
go and do that. When we have it, let's merge
the two layers together. G again to our lays, goto layer on the top, taping and select
and merge down. Now we will grab our
brush one more time, and we will go toward the bottom and create the little
legs right here. For the legs, firstly, let's
go toward the bum area. We will go and create a
little line going like that, and when we have it,
we will go toward the bottom of it and
create some fingers here. When we have it, we will go
toward the top and we will create the very peculiar
looking leg like that. You can try it out
a couple of times. You can create it
in a different way. When we have it, we will need to get rid of this line right here. So let's grab our eraser, smaller size ove it
and we will go and very accurately erase the
parts that we don't need. Now when we have it, let's also go and create
the front leg. Again, getting
back to our brush, and we will go slightly
to the side from this big little line right here, and we will go and create
two lines going in that way. Again, you can go
with the curves, you can go with straight lines, go toward the bottom and
create the fingers right here. And then when you are ready, grab your eraser and erase the
lines that you don't need. Everything that is
overlapping should be gone. Now when we have it, let's
get back to our brush, and let's go toward the top part right here and we will
create little nostrils. Going and creating the lines going in that way
and also let's go towards the bottom part from our nostrils and let's create
a big mouth like that. You can go with different facial expressions
if you prefer, you can try it out
a couple of times, and when we have it, let's
go and add the eyes. For the eyes, one more time, it will be easier to
go to a new layer, so let's go to the layers,
create one more layer on top. Change the size of your
brush to something bigger, so you will be able to only put the dot right here
and create the eyes. I'll probably go with
something a little bit bigger, and I will position
it in that way. You are welcome to create a different facial
expression if you prefer. So put the dot and go
to the opposite side. Try to match the placement
with the previous side. If you want to maybe try
it out a couple of times, you are welcome to
go and do that. If you see that you
will need to go and adjust something,
erase something, for example, the extra parts, you are welcome to grab your eraser and erase the
parts that you don't need. When you are ready,
let's get back to our lays and again merge
these two layers together. So tapping on the layer on the top using the
option merge down, getting back to our brush. And if you want, we can
get back to our 4% of the size of the brush that we use for the outlines
for example, add some beautifications in the shape of the eye
lashes like that. When we have it,
let's go and create another frog and we'll position it right
here on this side. Again, let's go and
create one more layer by taping on the plus icon. Let's go toward this little
pad that we have on the top. And again, we will start by creating a shape of
the ellips like that. Let's go slightly
smaller this time. If you want to adjust the shape, go to the editing
tool over the top, try to make it very rounded
or on the contrary, if you want to try out
something different, you are welcome to
go and do that. Position it in that way
when you already tap on the screen and let's go toward
the top and add the ice. Again, for us, it will be easier to go to the layers and create one more layer on top and add these elements
onto a separate layer. Again, going and
creating our circles, go to both sides and starting to create these
elements right here. If you want to overlap the shape right here
with the previous frog, you are welcome to
go and do that. Tap on the screen
when you are ready, and let's go toward the
bottom part of the circles that we've created and let's erase these parts
that we don't need. When we have it, let's also
get back to our layers, go to the previous layer, and let's erase
these lines that we have for our top
part of the head. Again, erasing everything
that we don't need. When we have it,
we also will go to this overlapping part and we
will go and erase it too. Now, when we have it, let's
get back to our layers. Let's merge these
two layers together so go into the layer
on the top, tapping, selecting our merge down, and when we have it, let's
go and work once our legs. Once this layer or by creating a new layer on top
grab your brush, go toward the bottom firstly, and let's create this
back leg firstly. For the back leg,
let's go more toward the side and we will
create a lingon like that, and then we will add
a bit of the bum right here by creating another
little line like that. If you want, you
can go and create some fingers right here and then get rid of the line that we don't need right
here in the middle. If your line looks a bit wobbly, you are welcome to go alone
at one more time with your brush and create a
more clean line right here. Again, if you need
to adjust something to make the line weight
even everywhere, go with your eras and erase
the part that you don't need. Now let's get back
to the brush and let's create the front
leg right here too. Stepping a bit from
this leg that we've created and creating another
little leg right here. Go like that, creating our lines and eras and
everything that we don't need. Now when we have it, let's go and work on official features. Firstly, let's get
back to our brush. Let's go toward our nose area, and let's create the
nostrils right here. Again, you can go
and play around with the official features to create something that you
would like to see right here. You are welcome to experiment. And when we have it, let's straightaway go toward
these parts that we have for our eyes and let's add our little
eyelashes right here. When we have it, if you don't
like how this part looks, you are welcome to keep
it as it was before. We will go and add our
little ice right here. Again, let's go to our layers, create one more layer on top, change the size of
the brush and go towards the ice areas and
put the ice right here. You can again try out
it a couple of times. You can go and find the placement
for this element and do the same onto the opposite side too when you are ready
with the first eye. So when we have the
result like that, let's get back to our list and merge these two
layers together. So tapping on the layer on the top using the
option merge down. Now, when we have the
result like that, we will go toward the
top part right here, and we will add a couple
more frogs here too. So let's get back to our list, create one more layer on top, going back to our brush and creating the ellipsis
right here onto the top. So let's first go and
create the frog like that. Firstly, going back
to the smaller size of the brush that
we used before, 4%. Going like that, creating half
of the circle on the top. You can try to hold one of your fingers on the screen
if you want to maybe match it with the prettier or if you want to do it manual, you are welcome to
go and do that. When we have this
half of the circle, it just the placement so
you will have a bit of space over the top and
when you are ready, let's go toward the
bottom and complete the shape by creating
a curve on the bottom. When we have it, let's go and do the same onto
the opposite side. You can go with a smaller
sit with a bigger size with maybe different
size and shape. When you have the
result like that, let's finish up creating
the shape by creating a curve on the bottom
and closing the shape. When we have it, let's
take a look at it and decide whether we want to
maybe adjust samping or not. For example, I
would want to go to this part and position it a
little bit more horizontally, and when we have a couple
of details on one layer, we can go to the
turban icon again, free hand method, select this
part when it is selected, going to our Aoki and adjusting the shape and placement and traction and everything that we want to adjust right here. When you are done with it, tap on the first icon
that you were using, it was our urban icon. Let's go toward the top and add our little ice right here. Again, we will do it
on a separate layer, creating it from our
layers and going toward the top and creating our
little circles right here. Hold your line in the end, go to the opposite side, create something similar here, go toward the second
frog that you have and create
the ice here too. For example, on this frog, we can go with slightly
smaller elements and create it in that way. Now when we have it, let's go and get rid of all the
lines that we don't need. We are grabbing our erasa
and firstly going toward the bottom parts
of our little eyes and we are erasing
these parts here. Go into the opposite side and erasing these
lines here too. Then when we are
ready with this task, we will go toward our layers, find the layer where we
have our main shapes, and we will go and erase these lines that we
have on our eyes. The same way as before,
creating these cuts right here, go into both sides, trying to make nice connections
between the shapes. So if you need to erase it a couple of times to
achieve nicer result, you are welcome to do it
as many times as you need. Going to the opposite side too and erasing the
parts here too. If you see that you didn't cut the parts correctly
or in a neat way, we can get back to
the previous layer and do it one more time. Again, if you want to go
and soften up the corners, you are welcome to
go and do that. When we have the
result like that, we will need to get rid
of this line that we have as our back
part of this liquid. So let's go and find this layer, and we'll grab our eraser and erase the parts
that we don't need. Again, with the bigger
size of the eraser, going like that and completely erasing these little shapes. Going to the opposite side, doing the same thing here, trying to erase everything
so we don't need to get back and forth and add or
erase the parts even more. When we have the
result like that, let's continue by
going to earlier. Go into this layer where
we have our eye and let's go and start to add the additional
elements right here. Firstly, let's go towards the bottom parts and let's
create little mouth. For example, for this
little frog on the left, let's create a
mouth in that way. If you want to go and with
the same size of the brush, add the details over the top, you are welcome to
go and do that. When we have it, let's go toward the opposite side and create
a little nostril ratium. Let's go with the shapes like that and maybe create a mouth here that will look
a bit different from what we already
have once our frogs. When we have it, if you want to add details onto the ice here, too, you are welcome
to go and do that. When we are done,
let's go and change the size of the brush to
something a bit bigger, and we will go and add the
ice toward these frogs. If you need to try
it out a couple of times, you are
welcome to do it. Go toward the next frog that you have and put
the ice here too. When we have it, we
will need to go and deal with these things that
we have on the bottom. So let's first get back to the size of the brush
that we used before. Then let's go to the
needed layers and we will go and get rid of all
the overlapping lines. Firstly, going
toward our layers, we will go toward
the pads firstly, grab your eraser and go and decide what lines you don't
need to see right here. Firstly, let's go
toward this part, and we'll erase all
the overlapping lines that we don't need
to see right here. So go with your eraser
smaller size, owed, bigger size, Ovid, get rid of all the lines
that you don't need. Go to the next
element right here and start to erase
the lines here too. We also will go right
here where we have the flower and erase
the lines here too, going like that, alone the whole shape and erasing
everything from the petals. Go toward the bottom, erasing these parts here too. When we have the
result like that, we will need to
get rid of some of the lines that we have
winter flower too. Let's get back to our layers, find the layer with our flower, and we can decide
whether we want to maybe go and keep
these two elements, two petals on the top front or whether we want to
go and get rid of them. I'll probably go and erase
only this part that we have on the bottom and keep
these two petals on the top. That means that we will need to go to this layer where we have this frog and get rid of
this overlapping line. Again, if you notice that you didn't erase some
of the elements, you are welcome to get back to the needed layer and erase everything
that you don't need. And now when we have
the result like that, let's get back to Alaers. Let's first go to the
layers where we have the reduced opacity and let's get back the full
opacity on them. So tapping on the N
icons and go into the opacity sliders and starting to make the full
opacity right here. When we have the
result like that, take a look at everything and decide whether you want to
maybe change something or not. If you are satisfied
with everything, let's get back to our layers and we'll merge all
the layers together. So go into the layer on the
top with one finger and with the second
finger on the layer on the bottom and making a
pinch movement like that. The very last thing that
we are going to be doing for the illustration
that we have right now, let's go and add some details. Firstly, we'll grab
a erasa and we will go towards some of
the pats right here, for example, and we will
make the cuts right here. For example, going like
that, going right here, grabbing a brush and
going toward these cuts, and we are connecting them with little triangular
shapes like that. So again, you can track
out a couple of times. If you need to get to the eraser and erase
some parts more, you are welcome to
go and do that. Connect these shapes nicely, try to make nice connections
where you had the line two. And when we have
it, let's also go toward the quirk and add
some interest here too. So again, starting
with our eraser, and let's go, for
example, right here, create a little cut,
go into this part, go into some other parts,
for example, right here. If you want to add more
of these elements, you are welcome to
go and do that. When we have it, let's
get back to our brush, and let's go toward these parts, and let's connect them in a
bit of the different way. So let's create some kind of the rounded connections
right here. Going toward all of these
little cads that we've created and creating differently
shaped elements right here. Try not to go too
beyond the frames of the original lines
that you have right here. If you need to go
with your eras, go and erase everything
that you don't need, go to all of these little
cats that we've created and create some peculiar
little details right here. If you want to go and
maybe adjust some of the lines to create
more interest right here, you're welcome to go and change the curvature
of the lines. But if you change something on the top, for
example, like that, you will need to go
with your eraser and do the same ones at
the opposite side too. So when we have the cuts done, let's get back to our brush, for example, we can go
and add some texture, very little texture right now. So for example, we can go
and create some creases. So for example, you can go with some peculiar
shape like that, try to make it pointy, try to work with your brush, work with your erasa and create something
that will look nice. Also can go and add some dots. For example, let's go with slightly bigger size
of the brush and go and create some of the
effect of the core right here. Try not to overdo it, but when you are done
with this little task, let's take a look one more time at everything that
we have right here, whether you need to
adjust something or not, let's continue by going and
starting to add the colors.
4. Base Colors: Begin this part firstly by
going to our Range icon, and we will toggle
drawing guide right here because we don't
need this line anymore. And when we have it, let's
get back to our layers, and we will do the fol. Firstly, we'll go to our
background color layer, and we will go to this color
palette that you downloaded. We will go and select the
background in a color of frog. So when you change the color, let's get back to our layers, and we will go to
this layer where we have lines will tap
on it and we will use the option reference
so that we will be able to use these lines and add the
colors on separate layers. When we did it, let's create one more layer by tapping
on the plus icon, and we'll grab this layer, hold it and drag it underneath
our layer with our lines. When we did it, let's get
back to our color palette, and let's start
recoloring the elements. Firstly, let's go with
the glass and we will go and recolor everything
that belongs to the glass. So one by one, let's go
and recolor everything, or you can use this
option continue filling when you've put color to one element and then just go to these elements and tap
on them to recover them. When we have the
result like that when we recolored all the glass, let's get back to our layers and let's create one
more layer on top. When we did it, let's get
back to our color palette. Let's select the color
with the title quirk top. We will go with the slot to the quirk top and
we will recolor it. When we did it,
let's get back to our color palette and change
the color to quirk middle, and with the colour, we'll
go to the rest of our quirk, and we will recolor it. When we're done with it,
let's get back to our lays, create one more layer on top. We will go to our
car palette and change the color to liquid top. With this liquid top color, we go toward the liquid top
and we will recolor it. When we're adn with
it, let's get back to our lays and create
one more layer on top, and we will change the
color to our liquid meat. With this color, we'll go to
the main color that we have right here as our liquid and
we'll recolor this area. When we have it, let's
get back to our layers, create one more layer on top. Onto this layer, we'll
change the color to pads, and we will recolor all the
pads that we have right here. Again, either one by one or by using our continued
filling on the top, let's go through all of these elements and let's
go and recolor them. If you have some smaller areas, it will be easier
to go to them with your brush and recolor
them in that way. When we have the
results like that, let's get back to our last, create one more layer on top. With the same color that
we used for the pads, let's go and recolor the frogs. Go in the same way as before using continue filling
or going one by one to all the areas
that we need to recolor and recoloring
every frog that we have. If you have some
smaller elements that you need to recolor, go and manually recolor
them with your brush. Now when we have it,
all that we need to recolor right
now is our flowers. Let's go and create
one more lay on top and change the
color to flour. With this color,
let's go and recolor everything that
belongs to our flower. And when we have the
result like that, we are done with
our basic colors. So let's move on to
some shallowing part.
5. Final Touches: Begin this part. Firstly,
by going to our layers. We don't need reference anymore, so let's tap, tap on it one more time and select
reference from the list. Now, we also will need
to go to the layer with our quirk and we will
need to rearrange it. So taping on this layer, selecting it, holding it, and drag it underneath our
layer with the bottle. If you did it and
it's not happening, try out one more time,
and when we have it, we also will need to go toward these areas where
we have the quirk, and we will need to reduce the opacity of our bottle
so we will be able to see. What we're going to
be doing? When we are in this layer
with our quirk, we will tap on it and we
will use the option select. We will select everything that belongs to this quirk and then we'll get back to
our layers and we will go to our layer
with our bottle. When we did it, we will go to our eraser and we will change
the brush of our eraser. So we will need to go to the
ear brush and folder and we will select the
soft blend brush. The opacity of this
brush is around 30%, and we will go toward
this area that we have in the middle and we will start to reduce the
opacity right here. So we will need to
go and start to cut the parts but
very, very softly. We need to have more
transparency in the middle, but more color on the top. So we are kind of erasing everything from
the middle right here. When we have the
result like that with a bigger size of the same brush, we'll go toward the
bottom and we will start to erase the
element here too. Again, we will need
to see more of the bottom part and have
a bit of the color, the white color on the top
to make it believable, and we will create something
going in that way. If you overdid it a little bit, try to make a nice transition
between the colors. When we have the
result like that, let's tap onto our ribbon icon, and let's go and continue
working on our quirk. So first, let go into our last, go into our layer with our quirk and creating
one more layer on top. Let's add the shadows to it. So to end the shadows, we will firstly need to tap onto this new layer and use
the option clipping mask. That way we will stay inside
the color of the quirk. And as we accurate
in our shadows, let's tap onto the icon, and we will change the
blending mode to multiply. As for the opacity, let's go to the slider
and let's set it to something around 30, 35%. And if we need to change it,
we will change it later on. When we have the leer
set in that way, let's go and change the
color to quirk shadow, and also we will go to
our brush library and we will go to the ink and folder to select the studio Pam brush. With this brush, we will go
more toward the left side of our quirk and we will create a bit of
texture right here. Let's go firstly from
the top and we will start to create the
element in that way. We can go and loom
the shape around to be able to add
the color inside, and then we can go and work on the overall shadow right here to create some peculiar
little details, some kind of the texture parts. So let's go and create a
couple of fibers like that. You can go with some
peculiar little details maybe with other
pattern right here. When we have the
result that we like, let's also go and do the fam. We will grab erasa the same
eraser that we used before, soft bland brush for it. We will go from this left
side where we've eddied our shadow and we will go
and erase it slightly. We are again creating a bit
of the transition here and we are making a very
nicely looking effect. So when you erase
this part very sadly, let's get back to our brush, and if you want, you
can go and maybe add more of the
texture to the quirk. You can go to the top parts here too and adjust some parts here. You can maybe add a
bit of the shadow over the top part
too. It's up to you. You can experiment
a little bit and create something that you
would like to see right here. Again, you can go with
some texture over the top and create something
going in that way. If you want to also
you can go toward this shadow part and
with your eraser, cut a bit of the
space right here to emphasize onside
the texture part. If you are okay with
everything here, decide onside the
level of opacity. If you think that it is bit
too much or not enough, we can get back to the layer
where we have our shadow, tap onto the icon and play around with
the opacity slider. So for example, let's go with
something around maybe 40, 45% to make it a little
bit more visible. And when we have it, let's
get back to our layers, and let's work onto
the next layer. So let's keep this
layer with the bottle. We can't do much to it. Let's go to this layer that
we have for the top part, and we will create
one more layer here. Let's tap on this layer and let's use the option
Clipping mask. We will be using the same brush that we used before studio pan, and we also will go toward our color palettes and we will
change the color to white. With this white color, we
will go toward this part, and we will start to add some kind of the
pulse right here. Let's go and very randomly create some of the
rounded shapes like that. We will go along the
whole shape that we have right here and create some wobbly little lines right here. Create some pattern,
make it interesting, and when we have the
result like that, let's also add a bit
more interest to this part by edging the
secondary color right here. So we'll get back to our layers. We will go back to
this main layer that we have for this top part, create one more layer on top. It will be automatically
clipped and we also will get back
to our brush library. We will go the same way to the airbrush and folder and again select
soft blend brush. Let's change the color to liquid dark and with this color, we will go towards
the bottom part of our sheep right here, and we will add the
secondary color. Are trying to create a
very soft transition, so a bit of the color will
be enough right here. Try not to have a very
blotchy effect right here, very subtle, very neat. When we have the
result like that, let's continue by
going to our layers, and we will go to
our next layer. So go into the main shape and creating one more
layer right here, tapping on the layer and using
the option clipping mask. Again, with the same brush, we will go toward
the bottom part and we will start to add the
secondary color here. We will need to have more color over the bottom and less color, the reducing effect
over the top. If you need to try it
out a couple of times, you are welcome to
go and do that. If you over did it, you can
grab the blending brush, the smudge tool right
here and go over this part over the top and make a nice transition
between the colors. When we have the
result like that, let's all secure and add a
bit more interest toward this bottom part by adding
some little reflections. So what we're going to be doing? Firstly, we are
going to our list and creating one
more layer on top, the same way we are tapping on it and using our clipping mask, and then we will get back
to our brush library. We'll go to the painting
folder and select spectra brush with this brush
and with a different color. The color will be
our liquid top. With this color, we will
go toward the sides right here and we will create a peculiar looking
element right here. Probably with a smaller size of the brush, it will
be easier to do. So let's try it
out one more time. We'll be going right here and creating the reflection
part like that. Let's go toward
the opposite side and create something
similar here. If you need to rotate
your canvas to do it, you are welcome to
go and do that. When we have the
result like that, let's also go toward
the bottom and create some kind of the t or
something like that, a bit of the
reflection here too. Let's go with wavy lines like that and create some pattern. Again, try not to overdo it, but try to create something
peculiar right here. When we have the
result like that, decide whether you like
the opacity of this layer. If you want to change
it, go to the layers, go to the Nc and
adjust it from here. For example,
something around 65, maybe 70% will look better. And when we have the
result like that, let's continue by working on some other
elements right here. So first let's get back to the previous brush that we used. It was our calligraphy folder and it was our monoline brush. We will go toward our
lays and we will create one more layer above the layer
that we are right now on. Let's create one more layer
and with this new layer, we will go to our
color palettes and we will change the
color to frogs. With this color,
we will go toward the bottom parts of our pads and we will create some
kind of the roots right here or some kind of the
little lines right here. So let's go and create a
couple of them very subtly. You can go with wavy shapes. You can go with probably
the bigger size of the brush and create
a couple of details. They don't need to be very seen, but it will be a nice
touch to have them here. So let's go through all of our little shapes right here and create these additional details. When we have the
result like that, let's continue by going to Ales, and we are going to
Aly with the pats. Let's go and add the
shadows to them. So ncreating one
more lay on top, tapping on it, clipping mask, changing the blending
mode to multiply, and let's go with something
around 30% of opacity. We'll change the
color to liquid dark, and with this color,
we'll go underneath the frogs and we will start
to add the shadows here. Let's go and repeat the shapes or we can go with simple
shapes like that, the circles, the ellipses, something in that way. Try to add the color
toward these parts, try to make the shadows
pretty horizontal too. So going toward this area and
adding the color here too. If you want to go
to this little pad and maybe completely
put it in a shadow, you are welcome to
go and do that. If you want to go
some other areas and add the shadows to them too. Again, you are welcome
to go and do that. When we have the results like that we are done with our pad, let's go to our next layer, which is our lay with the frogs. Let's create one
more layer on top, top on the layer, and use
the option clipping mask. Let's start by adding a bit of the pattern toward our tots. So going toward
our color palette, and we will be using
these frogspots and frog spots darker color
to add the spots. So let's start with
the lighter color with a bigger size of the brush. We will go towards the
back parts and we will start to add some pattern toward our little
tools right here. You can go with dots like that, create something peculiar here, go toward the legs here, too. Try not to overdo it, but try to add enough of these elements to add some
interest toward the picture. Go into the next frog
that we have right here and starting to add
the details here, too. You can go with
different sizes of the brush to add
the nice pattern. And we also will go toward these little frogs and maybe
add some pattern here too, go like here, right here and dd a bit of the texture to these
little bodies right here. When we have it, let's get
back to our color palette. Let's select the darker color. And with this darker color, let's go and add a couple
of details here too. We will add a couple of
these bigger elements, darker elements, and we will create something
in that way. If you overdid it,
grab your eraser. Firstly, go back to the
normal eraser that you will use for everything that
you are trying to erase. I'm using round brush. We will go and erase
everything that we don't need, and when you erase everything, let's go and add a couple more
details toward our tools. When we are done with
it on the same layer. Let's go toward
our color palettes and select this
liquid top color, and we will go and create
the bellies right here. So go on toward this little
frog that we have in front, creating half of the
circle like that, and then manually
recoloring the rest of the areas that are supposed
to be the tummy right here. So going like that, starting to create the additional element right here and recoloring
the whole area with a brush. Going towards the next frog probably with the smaller
size of the brush, going on right here, starting to add our little timing
right here too. To go on like that, starting
manually to add the color, avoiding to create the
color onst the leg, try to create a very rounded
shape over the top and continue creating the elements
right here on at the side. If you want to go to these
two frogs on the top, you're welcome to
go and do that. For example, you can go
right here and add a bit of the timing on this
little frog here too. Firstly, create the shape, then with the bigger
size of the brush, add the color toward the inside. The same onto this
part here too, if you want to add
the belly here too. Now when we have the
result like that, let's continue by adding a bit of shadows right
here to our thoughts. Firstly, go onto our layers, craton one more layer on top, tapping on it, using
our clipping mask, changing blending
modes to multiply, changing the opacity
something around 40%, and one more time going toward our color palettes and selecting
this liquid dark color. Let's go toward
the bottom part of our frocks and let's go and
start to add our shadows. Go like that, starting to create the shadow going along the
whole shape that we have, starting to add the lines
first and then going with our brush and
manually edging the color toward
the inside part. Going toward the legs, going and edging the
nicely looking shadows. Try not to go beyond
the frames and starting to add bit of shadows right here
on the Tammy too. When we have it on one side, going toward the next frog, starting to add the
shadows here too, go mostly toward
the bottom part. And when we have
it on this frog, let's go toward these little bodies that
we have on the top and let's add the shadows over
the bottom parts of them. Going like that and
starting to add the shadows following the direction that
they have onto the bottom. And we have the
result like that, very last thing will be to go and add the little
chicks right here, let's go and select the color, for example, quirk top, and we can go to the layer that we already have right here. For example, the one where we have created the
sports and everything, let's go underneath
the ice and put little chicks right
here. This is optional. If you don't want
to add the chicks, you are welcome to keep
them as they are right now. But let's go, for example, to all of them and add little
chicks on in that way. When we have the
result like that, let's go and add a
bit of the interest toward the bottom part right here and we will add some
additional little elements. Firstly, we'll go
toward the flour. Let's go and add
the shadows to it. Selecting the layer,
creating one more layer on top, tapping, clipping mask, changing blending
mode to multiply, and let's go with something
around 60% of opacity. Changing the color
to flower shadow and going toward the bottom part of our flower and adding
the shadows here. You can go with
some simple shapes. You can go with
very simple shape like that and add
the color toward it minuallyO you can go and maybe create some peculiar
little pattern right here. Start to add the shadows toward all of the
elements and mostly go toward the bottom part of your flour to add the
shadows to this part. If you overdid something, grab your eraser and erase the
parts that you don't need. When we have the
result like that, decide ta the opacity
of this layer. If you want to change
something, go to the layers, I can adjust it, make it brighter, make it
lighter, it's up to you. When we have the
result like that, let's continue by going again to our list
and we will create one more layer above
all the layers that we have except our
layer with the line. When we have this new layer, let's get back to
our color palette, and let's go and select the color with the
quirk top color. With this color, we will
go and start to add some bubbles and some peculiar little details
toward our liquid. With a bigger size of the brush, let's go toward the
bottom part and start to add some little dots, little lines like that. You can vary the size
of the elements. You can go to the whole area
that you have right here on the bottom and on the top with bigger elements,
smaller elements. If you want to change the color, you are welcome to
go and do that too. For example, we can go maybe with the pads color right here. You can experiment and create something that you would
like to see right here. And try not to overdo it, but try to add enough
of these elements to add a nice effect right
here for this little part. When we do with it, let's change the color to
something lighter. For example, liquid soap. Let's go toward these
lighter elements right here, lighter area, and let's add a
couple of details here too. When we have the
result like that, we can go to some other areas and add the additional
elements here too. For example, let's switch the
color to something darker. For example, liquid mean or
liquid dark or frog color, and we can go towards
this little part that we have over the top and maybe
add some bubbles here. You can go with the
full circle right here or if you want to
create the actual bubbles, you are welcome to
erase the parts inside, and with the same color, let's go toward the top and we will create some
bubbles here too. For example, let's go with
a big shape like that and add a couple more
of them going outside. When we are done with it, let's also go and switch
the color to white, and let's add a
couple more details right here with
this white color. With a smaller
size of the brush, let's go and add a couple of brighter elements right
here and dt in that way. When we're done with this task, let's go and add the
highlights toward the eye. We will go toward our layers. We'll go to the
clear that we have our lines one and we will
create one more above. With the same white color, we will go toward
our eyes and we will start to add the
highlights in that way. With a bigger size of the brush with a smaller
size of the brush, go over one of the sides from our elements right here and start to add this
big highlights. For the bigger eyes, go with the bigger size of
the elements that you are creating your highlights with and create them
going in that way. Also, we can add
a bit of interest toward the eyes by adding the
secondary color right here. Let's go toward
our color palettes and select this
flower lines color, and we will go toward
the bottom part of our eyes and we will create
little details like that. You can go and adjust it by
moving them slightly down, and we'll go through all of
the lines that we have for our eyes right here and add this additional color to them. Very easily going like that and starting to add the color. On the same layer,
let's go and add big highlights toward
our little bottle. So we will first get back to our color palette and
change the color to white. And then with the bigger
size of the brush, let's go over the
left side first, and we will go and create
a big highlight that will repeat the overall shape
of our bottle like that, and then you can add
the color inside by dragging and dropping
it toward this little. Also, you can go with
some smaller shapes, for example,
something like that. And when you have
this first highlight, let's go toward the
opposite side and create a smaller
highlight here too. I go like that, trying to
repeat the shape of our bottle, creating a couple more of these details going
toward the bottom part, and creating something
going in that way. Now when we have the
result like that, we could go and soften
up some of the lines, and we can do it very easily. We will go toward our layers. We will find our
layer with the lines, and we'll create one
more layer here. Let's tap on this layer
and use the option Clipping mask and let's go
toward our color palette. Let's select the frog
color, and with this color, we will go towards the
lines that we have onto our liquid and we will go and recolor everything that
we have right here. Let's go along the whole
shape and recolor the lines that we have here to soften
up our illustration. When you've reached
the frog, for example, go with a smaller size
of the brush and add the line only to
this line that is belonging to this liquid part. When we have recolor this line, we also can go toward the bottom part of
our frogs and recolor this line here too
to make sure that they are somehow
inside the liquid. If you want to recolor
some other lines, you are welcome to
go and do that. For example, we can
change the color to flower lines and go
inside the flower, entry color the lines that
we have right here inside. If you want to recolor all of the lines that are
here for our flower, you are welcome to
go and do that. Let's go toward the lines, entry color them
the same way as we recolored the main
shape for our liquid. Go on like that manually
and starting to add the different color
toward our lines. When we did it, we
also will go towards the quirk that we
have right here to the bottom part and we will
recolor the lines here too. Everything that is some kind of inside the bottle will be
recolored with this color. Very accurately go toward
this connection right here and add the color manually toward the lines that
you have right here. When we have the
result like that, we are done with
our illustration, but we can do one more thing to make it look like a sticker. So we will go
towards the layers. We will find the layer
where we have our lines. We'll select it and we
will go to our S Ruben ca. We will go toward the automatic
selection right here, and we will go and tap onto the outside parts
from our lines. So when we have the
result like that when everything except our
illustration is selected, we'll go back to
our bottom panel and we'll use the option invert. When our illustration
is selected, we will go toward our layers
and we will go toward the bottom to the layer where we have a
shadow on the quirk. Let's select it. Let's
create one more layer here. Let's select the white color and we will drag it
toward this selection. You will see it right
here on your layers and we will need to drag this layer underneath everything
that we have. So when we have the
result like that, we don't need our
selection anymore. So let's tap onto
the ribbon icon. And then let's go and
create this die-cut effect. So when this layer with the
white element is selected, we will go and do the follow. We'll go to our major
quantol over the top plat. We'll use Gaussian blur, and we will go to a screen with our Apple pencil and drag
it more toward the right. You can go and add as
many bluer as you want, but something around 9% will
be enough for this part. So when we have the
result like that, let's go and do the following. We'll go toward
our S ribbon icon. Will again use
automatic selection, and we will go toward this blurry little
line that we have, and we will go and
try to select it. So go on from the middle
and you can see if we are moving our Apple
pencil toward the side, we are creating the blue
outline right here. That is what's going to be
recolored with white color. If you go a little
bit more outside, you will have a thicker outline. If you go closer to the center, you will have slightly less
of the outline right here. When we have it, we can hit our color fill option
right here on the bottom, and we will have this
nicely looking die-cut. Now, when we have the
result like that, let's finish up our
illustration by adding a couple of sparkles
good outside the sheep. So let's get back
to ours and create one more Ota Ala panel. And then let's go to
this folder that you downloaded with the sparkle
brushes, Uni Stem brushes, and let's go and select sparkle full steel brush with the same white color and
with the bigger size all the brush will go outside the sheeps and we will go and add a couple of additional
sparkles right here. So try not to overdo it. Try to add a couple
of these details, vary the size of the
brush and go and add a couple of the
additional elements to finish up with
your illustration. So let's go and create
something in that way. Again, try not to overdo it. If you, of course, want to overdo it, you are
welcome to do it. Add a couple of these details, and when you are ready, we are done with
our illustration. Thank you for
watching this class. Le review if you liked it, and consider subscribing for
MekaY videos in the future. Looking forward to
seeing your project.
 Uni Corn, ⭐Kawaii Art Enthusiast⭐