Transcripts
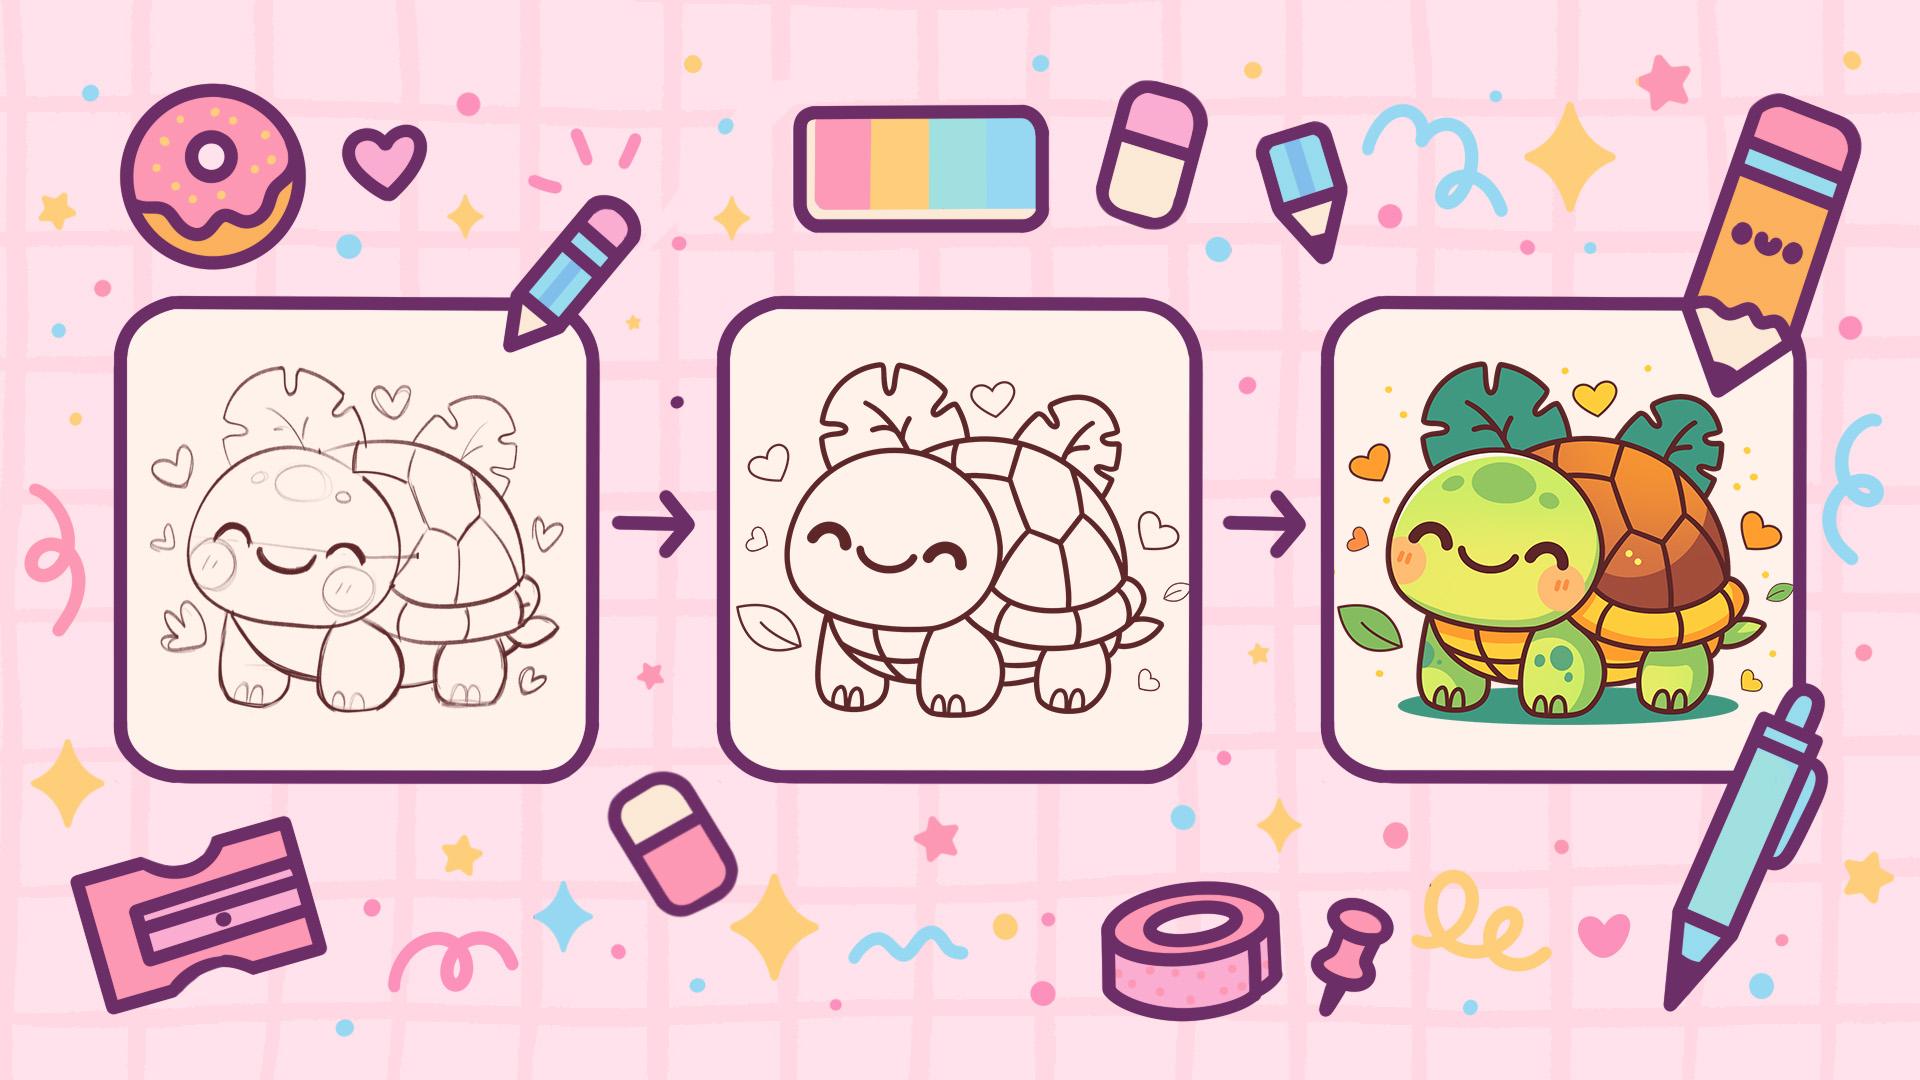
1. Turtle Intro: Hello, everyone. I'm
Uni, and in this class, we again to draw
this cute cow why illustration of an adorable
turtle in Procreate. During this class,
you'll get familiar with a lot of useful features
like QuickShape tool, Liquify tool, recoloring
with reference, and clipping masks and learn the basics of drawing
in Procreate. By the end, you'll not only draw an adorable illustration
you'll be proud of, but also feel super
confident using procreate. And now let's spend
some time drawing.
2. Sketch: Let's begin our class by firstly deciding what kind of canvas
we're going to be using. Today we're using a
standard square canvas from Procreate with pixel width and pixel
heights the 2048 pixels. DPI at 300 and our color profile is set as
SRGB with this loan number. When it's all done,
let's hit down over the top right and let's take
a look at our new canvas. Before starting to work
onto our illustration, let's go under the project
Raso Step and we will download all the materials
mentioned for this class. So when you did it, let's
first go and select the brush that we're again to be creating LTL scheme with. Let's go to our brush library. We will go to this brush
that you downloaded with the title Dell Flat Pencil. Of course, if you want
to use any other brush that is sketchy, you
are welcome to use it. If you don't want
to use this one. When you are done
selecting the brush, let's go to the layers, and we will go to the
background color. We'll go to the color
palette that you downloaded, and we will go under palette
on the bottom and under cards on the top to select the color with the
title background. Now when we did this, let's go to our actual color palette, and we will go again to the color palette
that you downloaded. We will go under
palette on the bottom, and the cards on the top, and we will select some darkish color. So for example, let's go
with the lines color. When we did it, we will
do one more thing. We are starting with a little
bit of grid right here, so we will need to have
the grid to create a grid. Let's go to the range
icon over the top plat. We will go under Canvas, and we will toggle
drawing guide. We will be using these cells, but we will need to make
them a little bit bigger. So let's go under
any drawing guide. And on the bottom, where
we have the grid size, we will go and type 130 pixels. When we have the
result like that, let's hit down over the top and let's start creating
our little scheme. First, we'll go to the middle of our canvas and with one line, we will create a
rectangular sheet. Let's go like that, and
at the end of the line, we will hold our Apple pencil, and then we will
go over the top to this popped up option
that popped up. If we have the opionRctangle,
let's go and select it. If we don't have the
option rectangle, you can go and operate with this little nose that
we have right here. What we need to
achieve right here is to create a scheme that will be three cell down or in the middle from every little edge that we
have right here. We have three cells
on the top and three cells on the
bottom and on the side. Try to make the lines
pretty straight right here. So if you need to go and adjust something here to make it
straight, go and do that. When we have the
results like that, let's tap on the screen. Let's see what we've done, and let's go and
create a couple of more lines that will help us to build up our illustration. First we will go
inside this shape, and we will count two
from the top and create another straight line going
towards the opposite side. You can hold your
line in the end to make it even straighter, and when we have it, let's go to the bottom and do
the same thing here. So again, two cells going up and pret another straight
line right here. When we have it, we will
go toward the middle part and we will go and find
the center of this part. Let's go make a little
markdown like that. And then when we
find the center, let's go one cell
toward the right and create another line that
will go in that way. And when we have the
scheme like that, we are done with our scheme, so let's move on to
the sketching part. Let's begin by going
to our layers, and we will tap onto the N icon onto our
layer with this scheme, and we'll go to
the aposte later. Let's go and drag it more toward the left so it is
not that bright. And when we found the
level that works for us, let's again tap
onto this layer and create one more layer by
tapping on the plus icon. Onto this layer, we will
start to work on R sketch. So let's go firstly and
create a shape for the head. We'll go toward this middle
big element right here, and we will start by creating
a shape of the circle. So let's go like
that. Hold our Apple pentil at the end of the line. If you want, we can try to
put one of our fingers on the screen to make this
element pretty rounded, so we'll make a shape
of a perfect circle. So if you want, you can
hold it at the end, or you can go with an
elliptical shape if you prefer. So when we have the
shape like that, let's go and make it
looking more like a head by going and using one
of the options of Procrite. So we are going to the
magic to over the top left, we are going under Liquify, and we'll go to the spoush
option or the bottom. We have the side
letter so we can go to the side letter and adjust the size of the brush that we're going to be pushing with. And we will go toward this sheet that we've created and we will start to create it in a different way. So what
we're going to be doing? We will go more toward the
bottom and we will start to sculpt it the way that we have more weight over
the bottom part. So let's go and maybe adjust the size of our brush that we're going to
be pushing with, and we can go precisely
to the areas that we want to adjust and
adjust them in that way. So let's go slightly toward the outside with
our right parts, going like that and starting to create a loaf of bread
shape like that. If you want to go to the top and maybe make it not that rounded, you are welcome to go with the bigger size of the brush or with the smaller
size of the brush and adjust it to your liking. So when we have the
shape like that, we also can pay attention toward the bottom part
more and make it a little bit more less rounded. When we have the
result like that, let's take a look
at everything and decide whether we want
to adjust some parts. For example, this shep
looks a little bit too flat and we can go and make it a little bit more
interesting by rotating. So without tapping onto
our magic one, two, let's straightaway go to
the Aoki on the top left. We'll go the uniform, and we will go to
this little node that we have in the green color. We'll hold our
Apple pencil there and we will make a
rotational movement. So we will make it
going in that way, a little bit diagonal like that. When we have it, if you
want to make it bigger, you can go to one of the nodes and go and drag it
to make it bigger. If you want to reposition it, hold your Apple pencil
at some blink space, and move the shape
to your liking. So for example, let's go with something going in that
way, and when we are done, let's tap onto our oke, and we'll go and continue
working onto our shapes. So when we have the
shape for the head, let's go and finish up with it by creating the
facial features. So for the facial features, let's go and find the center right here and we will go
and create it in that way. We are creating the diagonal elements and we
will go and create a diagonal line going
through the middle of our shape or some kind of
the middle of our shap. So when we have it,
you can again hold your apple pencil at the end of the line and create
it in a straight way. When we have it, let's
go and start to position our facial features right here in accordance
with this line. So let's go first towards the middle part and we will
create a little mouth. So let's go more
toward the middle and we will start by creating
a shape going in that. Of course, if you want
to experiment and create different shapes for
your official features, you are welcome to
go and do that. You can go with a bigger ship with more rounded shape if you prefer so you can go with completely different shape
if you again, prefer so. If you overdid it, you
can go with your brush and with your eraser and adjust
the ship to your liking. So, for example, let's go
with the mouth like that, and we will go toward the sides and we will start to create
the eyes right here. So let's go more
towards the right, firstly from this mouth
that we've created, and we will create
a shape of half of the circle but
go in other way. So go like that and creating
a shape in that way. And when we have it going to the opposite side and creating
something similar here. We need to pay attention to the distance that we are
creating between the elements, so it should be
similar on both sides, and the size of this element that we are creating for the eye should be pretty similar to what we've created onto the
opposite side too. So if you need to go a
couple of times along the lines with your
brush and with your eraser to create
a better shape, you are welcome to go and do it. You are welcome to
experiment a little bit, maybe create it in
a different way from what I'm
creating right here. When we have the
result like that, we mapped out where our official
features are going to be and let's go underneath our eyes and we will create
the checks right here. We will go underneath
and we will create big circles
going in that way. Go to the opposite side too and create the same shape here. If you want, you can go and make the little marks down for
later on where we are going to be adding the colors and we can go toward the checks right here and create a
couple of lines going in that way for
the blushing part. When we have it, let's
also go toward the top, and let's create the future
beautifications here too. So we will go with simple shapes of the ellipsis like that, and we will create some kind of the pattern onto our turtle. When we have the
results like that, we are done with
the head for now, so let's go and work a
little bit onto the body. So for the body, firstly, let's go and decide where we want to finish creating
our shell right here. So let's go toward the
bottom and we'll make a little markdown right
here onside the right. When we have it, we will go
and start to create a shape. That will go from the shape of the head and we will go more toward the shape that
we've created right here or a little bit
higher than it is. Let's go from the
shape of the head. We will go more towards
the right part. For example, let's make a little markdown right here
from this markdown, we will go with a very, very rounded shape going
down in that way. Again, you can go to this little markdown that
you've created right here or you can go and go a
little bit higher from it. When you've created the shape, we can go to the Edison tool
that we have on the top. You need to try it
out one more time, you can go and try it
out one more time. We will need to create a very, very rounded shape right here. When we have the results
like that, if you want, we can go to the Editing tool, you can see we have
the nodes right here. It's pretty similar to what we did with our shape
of the scheme. We can go to the nodes and we can adjust them
to our liking. What we need to
achieve right here is a very rounded shape,
as I mentioned before, and you can go and
do it by dragging the nodes to the
different places. When you have the shape that
you like for the shell, let's tap onto the screen, and let's go and
work a little bit more onto the bottom
part of this element. First, let's go toward the shape of the head
that we have right here, and we will make a little
markdown here too. So we will need to go to this
intersection where we have the middle line that we have for our scheme and the shape
that we have for our face. Let's make a little
markdown from here. And from this markdown,
we will go down and we will start to create the
bottom part of the shell. So let's go like that,
and we will need to connect it with this line
that we have onto Right. Again, you can hold it. You
can go to the editing tool and make this thing a
little bit more rounded. So play with the
notes and adjust it. When we have it, let's
go toward the bottom, and we will create
the second part of this bottom
part of the shell. So for this element,
we will go and start to create a parallel line
to what we have on the top. So let's go and create it. Hold your line in the end, go like that, go to the editing tool if you need to adjust it. Try not to go too far from this line that we
have onto our scheme. We will need to go
a little bit beyond the frames that we have
for our scheme right here. So with this element, we will go a little
bit toward the right. When we have the line
that is looking nice, let's tap onto the screen, and let's go toward this
bottom part and we will create a continuation of the shape and the
closing part right here. So going very rounded right here and creating a
shape going in that way. When we have it, let's go and work a little
bit on the tummy, and we will finish up with
our little shell right here. So for this tummy part, let's first go toward the left and we will make another
little markdown. So we are going toward our face, and we will go toward
the left part of it, go on one cell or 1.5 cell from the line that we
have for our scheme, and again, make an ulta
markdown like that. When we have it, we will go toward the very bottom part and we will make a little line going through the whole
sheep right here. You can go manually and create a little
lingo in that way, and that's where
we are going to be finishing our little shell. So let's first go
toward the left, and from this first markdown that we've created
onto our head, we will go and create a tummy
and neck part like that. So very rounded, going
like that and starting to create a couple of
lines to define the sheep. When we have it, let's go
toward the outside part and we will continue creating
this bottom part of our little shell. Let's go along this
line like that and start to create the line
going toward the right. Once at the right part, we can go a little bit lower. We can go not with a straight
line as we've created onto our sketche but move it a little bit lower and create
something on in that way. As for the bottom part, as for the back part
of this whole thing, we will go closer towards the
bottom part of the shell, and we will need
to connect it with this thing that we've
created onto the bottom. Let's go a little bit
inside the shape that we've created for our skin and we will start to create a
line on in that way. Again, let's try to make it very rounded and let's
grab our eraser to make the clean sketch right here so we are
not confused later on. Let's go like that and erase all the lands that
we don't need. Let's take a look at it. If you see that you can go
and maybe adjust some parts, maybe you want to go to
this area and make it a little bit rounded or
do something else, maybe clean up your
schedule even more, go and do what you need to do. When we have the
result like that, let's get back to our brush, and let's finish up with
our shell on the top. We will create some
segments right here. Let's go and start creating our little
segments from the top. We will go more towards
the middle part of the top and we will start to create a line going in that way. We will need to create some of the diamond shape right here. So let's go and create a couple of lines going in that way. And when we have
it, we will need to connect all the
corners that we have created with this diamond shape and create a couple of
more lines going down. Let's go from the
corners and let's start to create our little
elements right here. You can go in a cute
way and create them not in the lines that
will be straight, but more like the
curry lines like that. And let's go to all
of the corners that I mentioned before and create these little lines right here. We also can go right here to the top and create a
line going on here too, so you can go and create
something in that way. For now, you can map
out what we have right here and later on if you
don't like how it looks, we can fix it later on. When we have the
results like that, let's finish up by
going toward this part right here and we will create
a couple of lines here too. Again, we are trying
to create them in a cute way and in a
very rounded way. We are going along this
sheet and we are starting to create the curves instead of
this very straight lines. When we have it,
let's go towards the bottom part and we will
work on the leg right here. Firstly, let's go towards this area right here where
we have a little markdown, and from this little markdown, we are going slightly
to the left from it, and we will go down and create
a line going like that. So going toward the bottom
part that we've created onto our skin with a very
soft curve like that, and then we will go towards
the middle part right here, and we will create the thickness for this leg that we are
working on right now. So let's go, and we
are going to be making the legs two cells size wise. So we are going and
counting 22 right here, and we are creating the second part of the leg right here. So let's go like
that, and we will connect everything
on the bottom with, again, a pretty soft curve. If you need to go
with your eraser and maybe erase some
parts right here, you're welcome to
go and do that. You can go and make this line over the left a little
bit less rounded, so it is believable that
it is a leg right here. If you want to adjust
some parts even more, you are welcome to
go and do that. You can work a little bit onto the corners right here
to make them very, very soft and not going too
far from the overall shape. We are not trying to create a shape going like a
trapeze like that. We are trying to create
a shape that will go pretty stumpy like that. Let's go and work a
little bit more onto the shape and create
something going in that way. Of course, it's not
a finished look. If we would like to change something later on, we
will go and do that. Finish up with this leg, we will go toward the
bottom and we will create some kind of
the toes right here. So let's go away the very simple shapes going in that way. And when we have the
first leg like that, let's go and create
the second one. So let's go over the bottom, and we will count one cell from the first leg
that we've created, and we will go toward
the top part right here. And again, we will
start by creating a leg going down in that way. Let's connect it nicely with the shape of the head,
and straightaway, we can grab our eras and erase this line on the bottom
because we don't need it. Again, we will need to have two cells for this little leg or a little bit more than two cells because this leg is a
little bit closer to us, so we can go and create it
in a slightly bigger way. So let's go with
2.5 cells or two and a little bit of the cells
right here onto this side. And again, we are
creating a similar shape to what we have
onto the first leg. Let's go and define
the shapes even more. We will go toward this part. We will create a
lagoon in that way. So again, going along the corners, trying
to soften them up, trying to remain
the similar shape to what we have onto
the opposite side, working with our brush,
working with our erasa. And for now, when we
have the first shap, let's go toward the bottom. And again, we will create
some little toes right here. When we have it, if you want to define the shape even more, maybe make it to be rounded or positioned differently
or something else, go and do what you need to do. When we have it, let's go
toward the back part of our little turtle and let's create the
last leg right here. Again, let's go one cell or 1.5 self to the left and we will start to create
a leg from here. Again, we will need to go toward this part that we have for
our bottom part of the shell, and we will start to create
a lagoon in that way. So again, doing the
same thing as before, we are erasing this part that we don't need on the bottom. We will need to have a bit
of the tip right here. So we are going closer
to the shape right here. And again, we will need to have the similar size to
what we had before. So two cells or a little
bit bigger than two cells, and we are creating the
leg goon in that way. Again, work a little bit
more onto the orall shape. If you want to make it rounded, make rounded, go and create something
that will look nice. And when you have it, go toward the bottom and create the toes. And when we have the
result like that, we also need to go and
create a little tail. So let's go underneath
these little part, and we will create a
tail going in that way. So going with the shape of the leaf and creating
something like that. You can go with a bigger
shape with smaller shape. You can rotate it differently and create
it in a different way. So when we have the
result like that, let's take a look at everything. And for now, when we have
something going in that way, let's go and add some
beautifications on the for example, let's go and create some leaves. We will go toward
the head right here and we will create
a shape of the pe, we will need to create
something in that way. Pretty big shape
holding it at the end. If you want you can go to the
editing tool and adjust it, make it a little
bit more rounded or a little bit less
rounded, it's up to you. When we have it, we
will go to the edge of this leaf and we will
start to create the cut. So to make it easier, we can go firstly
with our eraser and create the actual cut. So go on like that
and let's create three of them on different size. When we have the cuts,
let's get back to brush, and let's go toward these cuts, and we will start to create the elements given in that way. We will try to make the
corners very, very soft, go on like that and
go onto the next one to create another
little cut right here. So given in accordance with the oral shape that
we have the curve, not creating the street lines
right here, straight cuts, going toward the next one and starting to create a
little cut here too. Again, following
the direction of the leaf that we have
with our curves. When we have it,
we can go toward the middle part and
create the veins, the future veins that we will create with a
different color. And when we have it, let's go toward the opposite side and create a smaller version of
the same leaf right here too. For example, let's go closer to this middle part, and again, we will start by creating a
little shape of the llps. Hold line at the end, go to the hen tool
if you want to adjust the shape even more. When we have it, getting
back to our eraser, and again, let's go and
create some cuts right here. So let's go with two cats on one side and one cut
on another side. And again, following the
direction of our leaf, we will create these
peculiar little details. So let's go toward this side
and do the same thing here. You can go with a bigger
shape, smaller shapes. You can vary the size of these
elements, it's up to you. When you have it, let's go
towards the inside part, and again, let's create this
vein element right here. And now when we have
the results like that, we also can go
outside the shape and create some future
additional elements. We can go with some hearts, some leaves, if you want to. We can go with another little
details if you prefer. Let's spend some time
here and add a couple of details that we finish up
with our illustration. For example, let's go toward this part and create a
couple of hearts like that, maybe going toward this part and creating something
going like that. When we have the
result like that, let's take a look at
everything that we've created and decide whether we want
to adjust some parts or not. For example, we can go and maybe work a little bit
more onto our legs to make them a little bit
more cute and we can do it very easily by using
again our Liquify tool, the tool that Procreate
has that will help us to work on our little ships. Let's get back to
our magic one tool. We'll go and select Liquify. We'll use again the push option and the size slider and we can go to some of the areas and
adjust them in that way. For example, let's
go to the legs or to some other elements and
adjust them to our liking. Let's spend some
time here and adjust our illustration so
we like how it looks. I decided to work a little bit onto the shape of
the leg to make it a little bit rounded
right here onto the right and make
the leg on the left, a little bit smaller
to make it even cuter. When you are satisfied
with everything here, when you don't want to adjust anything else with
your liquefied tool, let's tap onto our
major quant to twice, get away from this mode, and let's move on
to our next part where we are going to be
creating our clean lights.
3. Clean Lines: Start with our clean lines. Firstly, let's get
back to our layers, and we will go to this
layer where we have this scheme and we will tap onto this checkmark to hide it. When we have the position
of layers in that way, let's tap onto our plus icon to create a new layer on top. And as for this layer that
we have our sketch on, let's go to the icon and adjust
the opacity of the layer. Again, it's not that
bright and disturbing. When we have the level
that works for us, let's get back to this new
layer that we've created. If you don't want to see the cells anymore,
we don't need them. We can go and turn them off. We will go to
arrange icon Canvas, and we will go to drawing
guides and toggle it from here. When we have the canvas
set in that way, let's go and work a little bit on the brush that we're
going to be using. So first let's get back
to our brush library. We will go to the
calligraphy folder and we will use monoline brush. We want all of our lines
to be pretty smooth, so let's tap onto this brush, go inside the brush studio, go under stabilization
on the left, and we will be
working with amount of streamline and amount
of stabilization. So you can set it
the same way as you see right now
onto your screen. You can adjust it to your find how it feels onto
the drawing pad, and when you have the
sentence that you like, let's he down over
art so bright. Now with the same color that we used for our lines,
so our lines color, let's go towards everything
that we have right here and we will start to
create our clean lines. So firstly, let's go and decide onto the size that
we're going to be using. So for example,
let's try out 9%. That looks pretty perfect. When we have the
result like that, let's go and start
creating the lines that we have onto our sketch,
but in a clean way. So what we're going to be
doing, we will be going along the shape that we've created onto our layer with this sketch. We will lone all of them, and we will start
to recreate them. We don't need to go with 100% of similarity to what we
have onto our skege. We will need to achieve a pretty seamless look so we can use all the options
that we used before. We will go to the editing tool, we will go to our brush
and to our eraser. We will try to create a
seamlessly looking line. So when we have the
result like that, if you don't like it, try
it out one more time. If you want to create the shape on the top
with one line like that, you are welcome to
go and do that. You can hold your
line at the end. As I mentioned before,
go to the editing tool, adjust it to your
like and try to make it pretty, pretty rounded. And when we have it
going in segments and starting to create
the lines here too. Skilling like that, again, holding our lines at the end. We don't need to create
everything with one line. We will need to pay attention to the connections so they look nice and we will do it with our brush
and with our eraser. So we'll need to remain
the same line weight along the whole line that
we are creating and we will need to
make it seamless. So we will try to go and do it. Working with our brush
and with our eraser and finishing up creating
our shape for the head. Trying to create a curve
right here, holding it, going along the lines if
we see that we've created some bumps going with our brush and with our
eraser to adjust it. Let's finish up
creating our shape for the head by creating
the last curve. Again, trying to hold
our line at the end, and if we see that we can
go to the editing tool and adjust it from here to
create a simils connection, we can go and do that from here. When we have the
result like that, we are done with the head. Let's create other details
here. Where are the details. Let's go towards the
shape of the shell, and let's go and recreate
this line right here. We will need to make a
nice connection between the two parts so we don't need to have any gaps into our lines. Later on, when we are
going to be creating the colors that will
be a big bonus for us. So try to create the lines that doesn't have any gaps into them. When we have the line like that, let's go toward the bottom, and let's finish up
creating the shell by creating this little
line right here. So again, connect it
nicely. Go to the 18 to. If you need to go
toward the connections, try to make them nice too, remain the same line width. If you see that some corners
are looking like corners, we will go toward them with
our brush and with our erasa and we will try to make
them not that strong. So we will go with
the shape like that, and when we have it going toward the bottom end creating the
similar line right here too. This line should be quite parallel to the line
that we have on the top, so we will need to create the thickness that will go
evenly along the whole ship. When we have it going toward
the bottom right here, toward the back and
starting to create the continuation of the ship right here that will look nice. When we have it, let's continue by going toward this timing era. You can go along the whole ship and create one line like that. Or again, you can go partially and create the
lines in that way. Hold your lines, go
toward the legs, next and create them too. Again, you don't need to repeat everything the same way as
you have it onto the skege. You can go and adjust
some parts if you don't want them to be similar to what you
have on the skage. Continue working on
the leg right here. Again, try to make very
rounded connections, very rounded shapes, very rounded
everything right here, work on set the
connections of the lines and try to create them
in a seamless way too. So go along the whole shape and recreate everything
that you have right here. You can see that for now, we are working only
with the outlines, and we will continue doing that. If you see that
some elements are not starting to look
good from the first try, you are welcome to retry it and create it in
a different way. For example, for the legs, we will need to pay attention to the bottom part to make
it believable so that the paw or little leg could actually stand
onto something. So we will need to
make the bottom part a bit flatter than the sides, pay attention to these two. And when we have the line done, let's go to the next one
and create it here too. So again, trying to create
the very rounded shapes, trying to create it similar to what we have
onto our schedule, but not too similar
if we want to. Paying attention to the bottom part of the legs right here, trying to make them pretty
flat, but still rounded, working onto the connections right here with
everything that we have onto the side and finishing up by creating
a curve right here. When we have it, let's make sure that this
connection looks good. Whether we need to go with our brush or eraser, we
will go and do that. If you see that, you can
go and maybe work on some other little parts right here and go over
some of the lines. You can go and do that, but
make sure that everything that you're creating line
wise is similar in size. So if you've created the line a little bit loony shape,
a little bit bigger, protruding, you will
need to go with your eraser and erase the
parts that you don't need. So the line stays the same. When we have it, let's
continue by going toward this part and let's continue
creating our timing. We'll need to pay
attention to this line and we will need to go on the
same level right here, so we will create a
believable connection with the whole sheet. You can see right here
on these parts I'm going a little bit higher
than it is on the sketch. So we are connecting
this line with this one. We will go to this
little part right here on the last leg and let's
go and recreate it. Again, trying to make
the connections nice, trying to make the
lines seamless, working with our brush
and working with uresa. Going toward the opposite sides, trying to make a nice
connection here too. You can go a little
bit higher here to create a rounded little leg. You can experiment
a little bit with the shapes and create something
different if you prefer. Let's work onto the lines. Let's try to make
them not too pointy. And when we have the
results like that, let's go and create the last elements right
here that we have for our tail and for the bottom
part of our little shell. So for example, let's
go and create the shape going in that way to
finish up with the shell, and then we will create a little leaf shape
for our little tail. So go on like that,
and if you want, you can experiment a little
bit and create it in a different raise it up or go a little bit
lower with the shep. When we have it, let's go and create the lines that we
have inside the sheep, and it will be easier for us to do it on a separate layer. Let's go toward our last and let's go to the layer
that we have underneath, and from here, we will
create one more layer. For these elements, we will go with the same brush
that we used before. For now, let's go toward these elements that we
have once our shell, so shell segments and we
will go and create them too. Again, you can go
with straight lines. You can go with not straight
lines, it's up to you. Let's go and create
these elements. Try to make the
connections nice, so pay attention to them. Start with this
little diamond shape over the top and then go toward the sides and create these little segments
going outside from it. When we have it,
we also go toward this bottom part and create a
couple of lines right here. You can go a little
bit to the side from these lines that you have
on the top to not create a very weird tension
between the elements and not to make the
continuation of the lines. So go like that and create
the lines given in that way. And also, let's go with slightly smaller
size of the brush, and we will recreate
these details that we have on the bottom. Let's go with, for example, 6% of the size, and we will go toward these
tools that we've created, and we will recreate them with the little size of the brush. Going toward all of
the legs that we've created and starting to
recreate these details. Again, you can hold your
lines at the end or go manually and recreate
the details in that way. And onto the same layer, let's go and create
artificial features. For the eyes, let's go with slightly bigger
size of the brush. Let's try out something
around maybe 25%. Let's go like that,
and with one line, create the shape of the eye. You can hold your
line at the end. Go to the editing tool if you need to adjust the curvature, go toward the opposite side and create something
similar here too. Try to make it similar
to the previous site, so work with your
editing tool to create it in a similar way to what you have onto
the opposite side. If you need a couple of attempts
to create this element, you are welcome to
go and do that. Actually, you can go toward this eye that you
already have and just match it with the element that you
are creating right now. So hold your e at the end, and then go to 182 and move the shape toward
the opposite side, and you will have
the similar shape to what you have onto
the opposite side. So when we have it, let's
tap onto the screen, and let's make the size of
the brush slightly smaller. So again, let's go with our 13%, and we'll go toward the mouth and we will recreate it here. Again, go to the 18 to if
you want to adjust it, adjust it to your liking. When you have the result like
that, tap on the screen, and when we have
it, let's go and recreate our little
additional elements outside. Let's first go toward this list. We can go to our previous layer where we have all the elements, the main elements, the outline, so you can go to the
check mark right here and make sure that you're
at the right layer. Let's get back to the brush
to the same 13% of the size, and very easily, let's go
and recreate these details. Again, if it's easier,
you can go and create the shape going
around like that, create the shape,
hold it at the end, go to the opposite side, create the similar shape right here, and then use your brush
and use your eraser to create these elements
that we have inside. Use your eraser
to make the cuts. We are doing the
same thing as we did before onto our
sketch, go like that, make the cuts, go
toward your brush and try to create a very
rounded connections right here. Try to work onto these little
connections on the top, try to make the lines
seamless and continue by going to the next element
and do the same thing here. Let's finish up
with these elements by going toward
this little shape, and we will recreate this
little detail and work on side the corners and everything the connections with our
brush and with our urisa. When we have the
outlines going toward the next little leaf that we
have onto the opposite side, and again starting to cut the parts firstly and
then with our brush, going and recreating the details that we have onto our skitch. Trying to make everything very, very rounded and again, working on st the connections with our brush and
with our Erisa. Now when we have it, let's get back to this layer where we've edded the detail, so the layer underneath. And with the same
size of the brush, let's go and recreate
these little details that we've created
for the veins. Going like that and starting to recreate them and going into the opposite side and creating
similar details here too. When we have the
results like that, you can decide whether
you want to go with your brush and recreate these details that
we have outside, or we can use the pack with the brushes
that you downloaded later on when we're going to be adding
our additional elements at the so whether you
want to do that, go and do that, or if you want to continue later on
with the details, let's take a look
at everything that we have right here without
the lines of the sketch. So go onto our list and hide our sketch by tapping
onto these checkmarks. So when we see the result
without the lines of the cage, we can go and adjust some parts. So for example, we can go and make the ice a
little bit smaller. So we will need to go
to our layer where we have our official features
and try it out one more time. So let's go with our eraser
and erase these eyes that we have right here to go
on like that, erasing them. And if you need to see what
you had onto the sage, size wise and position wise to this element skew and
unhide it one more time, go toward your brush and
recreate these details. So we will go with slightly
bigger size of the brush. Let's go with 20
something percent, and we will try to make the eyes slightly smaller
to make it queer. Again, the same way as before, holding our line in the end, going towards the opposite side. Again, you can try to use this trick, as I
mentioned before, you can go and match it with this eye that
you have right here and then go to the
editing tool and move this eye to
the opposite side. Try to make the distance
between these elements similar to what you have
on the opposite side, when we have the result
like that, let's take a look at everything
from the distance. Again, take a look at everything without the lines of the gauge. If you like how this looks, we also can go and add a couple
of lines right here onto the bottom part of the shell to create the
interest right here. So let's make sure that we end this layer where we've
created the details, and let's go back to
the 9% of the brush, so the size that we
use for the outlines. Let's go toward the
middle right here and let's create a
line going like that. Holding our line and the ends, trying to create a very
nicely looking shape and then going toward
the middle part and creating a line like that. Again, we are trying
to create the curves, trying to match it
with the lines that we have onto the bottom and
onto the side right here. And when we have it, we
also will go right here and create Z line going
through the middle part. And when we have the
result like that, let's move on to our next part where we'll start
to add the colors.
4. Colors & Final Touches: Begin this part firstly
by going to our lays and we will find our layer
with the main outline. So you can go again to
the check mark right here to make sure that you
are at the right layer. Let's tap onto this layer and let's use the
option reference. When we did it, we will go underneath all the
layers with our lines, so to our layer with the scheme, and we'll create one
more layer right here. Onto this layer, let's get
back to our color palette, and let's start with
the color for our body. Let's select this color
and let's drag it to all the areas
where our body is. To go like that,
toward the legs, toward this little
element that we have for our tail and when
we recolored everything, let's one more time
go to our list and create one
more layer on top. Let's change the color to shell and let's recolor the
top part of our shell. When we did this, let's
get back to our list, one more layer on top, go
into our color palette, selecting the color
with the tummy and recoloring everything
that belongs to the bottom part of the
shell and our tummy. When we have it one more
time, go into our last, creating one more lay on top, changing the color to leaves and recoloring our
leaves on the top. And when we have the
result like that, we have everything that we
need for our basic colors. So let's move on to
edging the details. Let's begin this part firstly
by going to our layers, and we will find the layer
where we have a reference one. We will tap on it
and we will use the reference from the
last to turn it off. When we have the
result like that, let's go toward the body and we will create one more
layer on top of it. We also would want to tap onto this layer and use the
option clipping mask to be able to stay inside the colored eras and not
go outside from them. Onto this layer,
we will go and add a bit of the gradient
to some of the areas. So let's go toward
our color palette, and we will select the
light yellow color. And we also will go
toward our brush library. We'll go to the
airbrushing folder and select soft bland brush. We'll set the opacity of the brush to
something around 35%. We will go with big
size of the brush, and we will go more toward the bottom part of our
little turtle right here, and we will start to add
the secondary color. So we will need to create a very soft transition
between the colors, and it is easier to do with
the bigger size of the brush. We don't want to create
a blotchy effect. We want to create some kind
of the gradient right here. If you did it, don't worry. We will go to
firstly other areas and add the secondary
color to them, too. So, for example, go to the legs, add a bit of a color right here. And when we have a very
nicely looking gradient, we can go back to our lays, tap onto the icon
onto this layer and go to the apacte slayer
to soften it up slightly. When we have the
result like that, when you like how it looks, let's tap onto this layer
to close this window, and let's create one
more layer on top by tapping onto our plus icon. So onto the sly, let's tap on it and use the option Clipping
mask one more time, and then we will go toward our color palette and select
the body details color. With this body details color, we will first go
toward the bottom with our previous brush to go
into the calligraphy folder, selecting our mon line brush, and going toward the bottom and starting to add a bit of
the shadow right here. So going on like
that, going along the bottom part and starting to add the details in that way. If it looks a little bit too
dark, we can go and fix it. Firstly, create the shadow, go along the bottom part, try to make new gaps
into the bottom element. You can go with your
eraser to create a nice connection on
one of the sides, for example, or create a
softer looking shadow. If you want to go along
the line and try it out one more time or create
it in a softer way, you are welcome to
go and do that. When we have the
results like that, we can go toward our layers and tap onto the icon right here
and adjust the apacity. So for example, let's go
with something around 65%, and when we have the
result like that, let's go to some other elements, and let's add the
shadows to them too. As we've created a pretty
soft shadow right here, let's create one
more layer on top. Again, tapping on it,
using clipping mask and go on to other areas to
add the different color. So for example, let's go toward the lex and we will start
to add the shadows here. Going toward these parts, you can hold your
line and the end, go to the editing tool, and we are going towards the elements that we've
created around them, and we can drag and drop the
color inside the shape like. Going toward this
leg onside the left, let's create the first
outline for the shadow, going around the shape like that and adding the color
toward the inside part. Going to the next
little leg right here, going toward the
top part firstly, recreating what we
have for our shell, and going toward
the outside part to create around the
shape right here. Let's go and drag and drop
the color inside this part. If you want to soften
up the corner that you've created with
these two elements, you are welcome to
go and soften it up. When we are done with
it, let's go toward the tail and create a bit
of the shadow here too. And also, as you remember, we had some elements
right here onto the top, so we can go and create them. If you need to see what you had onto your layer
with this sketch, we can go and unhide it. So first, go to your list and find the layer
with the sketch. This is our layer two. We'll need to select
it, and we will need to drag it above every
layer that we have. So place it here unhide it. And when we have all
the details like that, let's go and create them. Make sure that you go back to this layer where you are
adding these shadows. So go to these elements
that you had onto your sketch and add the color inside when
you have the outlines. Again, you don't need
to recreate them the same way as you have
them onto your sketch. If you want to
experiment a little bit and create something
different right here, you are welcome to
go and do that. Now, let's take a look at it, and also let's go and add a couple of details
toward the leg. So we will go and change the color to leaves,
and with this color, we will go toward the
leg and we will go and add similar elements to
what we have onto our head, but with a different color
and maybe smaller in size. So let's go like
that and start to add a couple of details
toward our legs. Go to this leg here too
and add the details here. You can go with little dots like that with
different elements. If you want to go to this leg that you have onto
the opposite side, go and add the color here too. And when we have our layer
with the sketch still on, let's go and try
create the chicks. So go into our list and
creating one more layer on top. Again, tap on the layer, use the ocean clipping mask, and let's get back to
our color palette to select the color with
the title chicks. And now we can go with the
bigger size of the brush. You will need to test
it a little bit to see whether you want to go bigger with the size or
smaller with the size. So find the size
that works for you, and let's go and recreate
the checks right here. Again, you don't need
to place them the same way as you have
them onto your sketch. You can go and
experiment a little bit. Take a look at everything without the lines of the sketch, go to the las and hide it. If you like the
placement like that, you can keep it if you want
to try it out one more time. You can go with your layer with the sketch
or without it and try to position
these little checks to the way that you prefer it. When we have it, let's
get back to our lies. Let's select this blush color, go with the same size, all the brush that we
use for the outline, 9% and going toward
the checks right here, toward the middle part of them and creating these
little blushy lines. If you want to see how they
looked onto your sketch, you can go and
turn on the layer. When we have the
result like that, we have all the details done. Make sure that you like
the amount of opacity. If you want to go
back to your list, go to this layer where we have create our shadows and go to the icon to adjust the opacity right
here, to soften it up. You are welcome to
go and do that. For example, let's go with the level of 80%
to soften it up. And when we have the
results like that, let's continue by going and adding more shadows
toward other elements. So for example, let's go
toward our next layer, which is our lay with the shell, and one more time, we'll
create one more lay on top, top on the ley and use
the option clipping mask. Firstly, let's go and add the secondary color
right here onto the top. So we will go again with either light yellow
or Tami color. And again, we are going to
the airbrush and folder, soft blend brush to go
with the bigger size of the brush over the top and add a bit of the
gradient thread here. If you feel that this color is not working and you already
edit it right here, you are welcome to go
to the magic 12 or the top left and use the option hue saturation
and brightness. We can go to the
sliders and we can find the color that
works better right here. You can go to the hue slider and maybe go more in
orange way right here. You can go to the
saturation slider and adjust it right here, too. So find what looks good, and when you are satisfied
with everything, let's tap into our magic one. To get back to our canvas. When we have the
results like that, let's continue by going and adding a bit of the
shadow on the bottom. Firstly, let's get back to
our calligraphy folder, Mline brush, going to our layers and creating
one more layer on top. Top on the layer, use the option clipping
mask and one more time, go into our color palettes to select the lighter lines color. With this color, we will
go toward the bottom and we will create a big
shadow going in that way. You can go with a different
position for this element. You can go with a
different size of it. When we have it, let's go
around and let's go and make the line without any gaps to be able to add the
color to the bottom. Again, decide on the
level of opacity. If you want, go to the opacity slider on this layer and adjust
it to your liking. So for example, maybe
something around 80, 85% will look better. When we have the
result like that, we also will go towards
the next layer, and we will start to add
the shadows here too. So let's go toward
the yellow elements. We will create one
more layer here, tap on it, clipping mask, going toward our color palette, and let's select this
tammy shadow color. We will go toward this
little part firstly, so we will need to define the line right here
between the heat and this little shell and
then going toward the bottom and starting to
add the shadow here too. You can go with the bigger
size of the brush and create it in that
way with one line to go and try to create
the line that will be parallel to the line
that we have on the bottom. Then for this part that
we have protruding, let's go and create a rounded
shadow going in that way. When we have it, let's go toward the bottom part and let's
put this thing completely in a shadow going toward this little part and starting
to add the shadows here. So we are going underneath the shape of our bottom
part of the shell, and we are starting to
create the shadows here too. We also will need to go
underneath the head and we will need to add
the shadow here too. So going along this sheep, trying to create it
in a similar way to what we have on the
bottom of our head. So when we have the
results like that, decide whether you want to add more shadows or whether you are okay with
everything right here. And when we have the
result like that, let's go and add a
couple of highlights. For the highlights,
let's go and create one more layer above this layer
that we are right now at, and we will go to
our color palettes and we will select
the different colors. Firstly, let's go with
this background color. And we will go
towards the top part of our head to the opposite
side from the shadow, and we will create a
big let right here. So Joji line at the end, try to make a nice connection
between the parts, the part that we
have for our line of the heat and this element that we are working
on right now. Try to make it pre recedingt
so go inside the sheet. And when we have the result
like that, tap on the screen, and let's switch the
color to light yellow. And with this color, we will go toward the shell
right here and we will add a couple of details right here
if you want to. We also can go and maybe add the different color toward the nails right here
toward the toes. We will need to get back
to our layers and find the layer where we had the
shadows for these elements. Let's go and switch the color to body details and manually, let's go toward these parts and add the color
toward the nails. Now, when we have the
result like that, we are almost done. Let's go and recolor
some of the lines. Firstly, let's go
and find the layer where we have all the
details for the lines. This is our separate
layer right here. When we have it, we will
create one more layer on top. We will tap on the layer and we will use the option
Clipping mask. Now, go into our
color palette and let's select firstly the
lighter lines color, and we will go with the
bigger size of the brush toward these lines that we have inside our shell and very, very easily, we will go and
recolor them in that way. Can go only toward the top part, so we will recolor the lines that are not
going toward the shadow, so we will have a very softly
looking result like that. To pay more attention toward
the connections right here, try to make the line as if
it is seamless as always, and we will go toward
this little line here and recolor it too. When we have it, let's switch the color to Tammy
shadows and we will go towards these little parts right here and we will
recolor them too. Again, we can go only to the top like that and recolor
the lines right here, and then we will find
a different color that will suit right here
for the shadowy parts. So go on like that firstly with our lighter color and recoloring these
elements right here. Going toward the inside
parts right here, once the tummy entry coloring
these lines here too, you can go and do it with a bigger size of the
brush like that. Going very easily and starting to add the colour
toward these lines. Now let's take a
look what we have once palettes and we
can go, for example, with blush color toward these lines that we
have in the shadow, and we can go and
with this color add the different colour
toward these elements. If you see that you didn't
recolor some of the lines, you are welcome to go and
try out one more time. So try to avoid creating
these darker elements. Get back to this
blush color and go along these parts that
we have on this side, and let's recolor all these little lines that
we need to recolor. When we have the
results like that, let's get back to
our color palettes and select the body color, and we will go along these little shapes
inside the leaves, and we will recolor
these lines here too. Now when we have the
result like that, we are done with
our little turtle, so let's go and work a little
bit onto the outside part. Let's get back to our layers. We will create one
more leaf and we will drag this lay underneath
everything that we have, holding it and dragging it down. When we have it
positioned in that way, let's get back to
our color palette and select our leaves color. Let's go with slightly
smaller size of the brush, and we will go and add a little shadow underneath
our little turtle. So go along the whole shape, holding our line and the
end to create ellipse. You can hold one
of your fingers on the screen to create it
in a very straight way. You can adjust the
size by moving your Apple pencil while you are holding everything
right here. So let's go not too far
from the main shape, and we will go and drag
and drop the color inside. If you don't like the shape and you maybe want to adjust it, make it smaller or something, we can go to the key
on the top left, and for example, we can
use the option free for. So let's go from
the top and we will make the whole thing a
little bit less open, and we will have the
result going in that way. If you want to move
it slightly higher, you are welcome to
go and do that. Find what looks good
to you when you add tap onto the rake
on the top let. And if you want to add these additional details that we've added onto our
layer with the sketch, let's go and end them by using the folder
that we downloaded. Or, of course, if you want to go manually and recreate
the details, you are welcome to
do it manually. If you need the layer with
the sketch, go and unhide it, and let's go and create one more layer on top of
all layers that we have. Let's change the
color two lines, and if you want to go manually
and recreate the details, use the same brush that
we used before Monoline, or if you want to use the folder that you downloaded
with the simple stamps, let's go and explore it, and let's go and find
the elements that we would like to add right
here to the outside part. For example, let's
go with the heart. Let's go and find the right
level of size for it, and let's go and start to add these little details right
here onto the outside part. Go with different sizes, go with different directions to change the direction
you will need to rotate your canvas in accordance with the direction
that you want to add. Go toward all of these little details that
you've added onto your sketch and make these
elements in that way. If you want to change
the brush, for example, maybe you want to use
the leaf right here or any other elements that you
can find into this folder, go explore, find
what looks good to you and add the details in
accordance with your taste. When you are done with
adding these details, let's get back to our list, hide the layer with the
sage if you had it on, and let's again tap onto this layer to use the
option reference. Now let's go underneath this layer and create
one more layer on top, and we will go to our color
palace to select the colors, and we would want to go and recolor some of these elements. For example, let's go with some greenish elements
for the leaves. For example, this color, go toward all of the leaves that you want to recolor
and recolor them, and then switch the
color to something else and recolor the hearts
that you have right here. When we are done with
it, we can also get back to our calligraphy
folder, moon line brush, use some of the light
colors, for example, yellow and go towards
the outside parts and add a couple of lines or
a couple of dots right here. You can go and spend
some time here and add a couple of details. If they are not seen, you can switch the color to something a little bit darker. So for example, Tammy and go and add a couple of details
going in that way. When we have the
result like that, we are done with
our illustration. Thank you for
watching this class. Review if you liked
it and continue subscribing for Mirka wi
videos in the future. Looking forward to
seeing your project.
 Uni Corn, ⭐Kawaii Art Enthusiast⭐