Transcripts
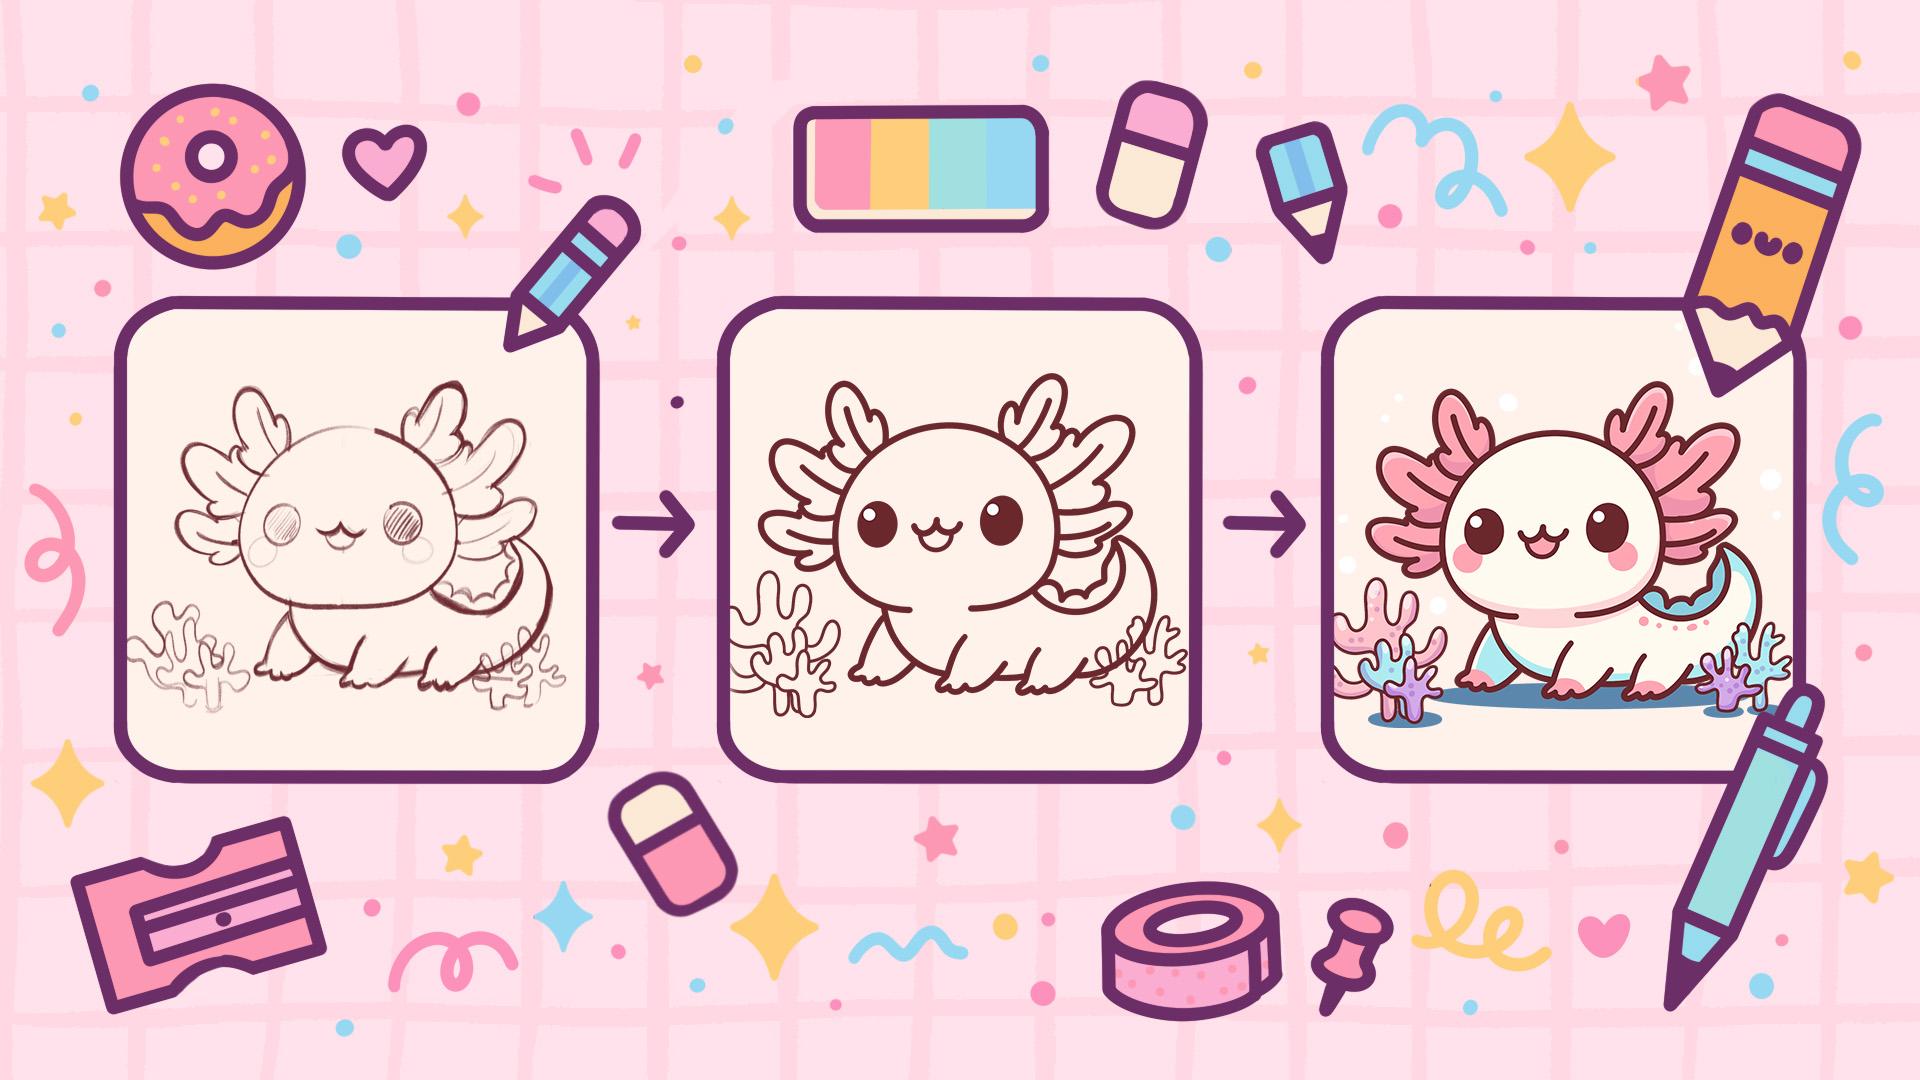
1. Introduction: Hello, everyone. I'm
Uni, and in this class, we are going to draw
this cute kawaii of an adorable
axolotl in procreate. During this class,
you'll get familiar with a lot of useful features
like QuickShape Tool, liquefied tool, recoloring
with reference, and clipping masks, employing the basics or
drawing in procreate. By the end, you'll not only draw an adorable illustration
you'll be proud of, but also feel super
confident using procreate. And now let's spend
some time drawing.
2. Scheme & Sketch: Begin our class by first deciding what kind of canvas
we are going to be using. Today we're using a standard square canvas from
Procreate with pixel weight and Pixel
height the 2048 pixels. DPI are at 300 and our color profile is set as
SRGB with this loan number. When it's all done, let's
hit down over our top right, and let's take a look
at our new canvas. Before starting to work
onto our illustration, let's go the project
res Sp and we will download all the materials
mentioned for this class. And when you did it,
let's go and pick up the brush that we are going
to be firstly working with. Let's go to the brush library, and we will go to
the brush that you downloaded with the
title Dall flat pencil. Of course, if you want to use any other brush for
your sketching part, you are welcome to select
any brush that you prefer. When you've picked
the brush, let's go to our color palette. We will go to the
color palette that you downloaded and we'll go under palette on the bottom and under card on the top to
see the colors names. Let's pick the color
with the title dark red. When we pick the color, let's continue by
doing one more thing. We are starting by creating
a little scheme and we will need to have a grid
to create this scheme. Let's go under the range
icon over the top. Let we'll go take canvas and we will toggle
drawing guide. We will use these cells, but we will need to make
them slightly bigger. Let's hit 80 drawing
guides and on the bottom, where we have the
grid size slider. Let's set it to 130 pixels. When we are done, let's
again hit down over the soprt and let's start by
creating a little scheme. We will go to our canvas
and with one line, we will create a
rectangular she. At the end of the line, we will hold it
and we will go to the popped up option on the top that for me says polyline, you might have any other
option right here. If we have the option rectangle on the top,
let's select it. If you don't have it, we can
work with any other option. All that we need to do is to go to these nodes and adjust them. So what we're going to
be doing, we will need to have the space inside, so we will have three cells on the sides and four cells on
the top and on the bottom. Let's adjust it and create
something in that way. We have the cell like that, let's tap on the screen to accept the changes
and let's create a couple of more lines to be able to create our
illustration later on. Firstly, let's go toward the bottom and we
will count to two and we will create
a straight line going across the whole shee. You can hold your
line at the end to make a straight line,
and when we have it, let's go to the sides
and we will count a couple of more
cells right here to create a couple
of more lines. Firstly, go over the left
and we will find the level of 1.5 cells and we will go
down with our straight line. To make it even straighter, we can hold one of our
fingers on the screen and you will see that you've created a very
straight line going. As for the right
part, let's go 2.5 cells toward the left end create another line
that will go down. Again, holding it
at the end with our Apple pencil and holding one of our fingers
on the screen. When we have the
result like that, our scheme is done, so let's move on to
the sketching part. Let's begin working onto our
sketch firstly by going to our layers and we will go to this layer where we
have our scheme. We will tap onto the icon, and we will go to
the opacity slider and we will reduce our opacity. Find the level that works for you when it's not that bright, when you found this level, let's tap onto our layer
to close this window and let's create one
more layer on top by tapping on the plus item. When we have the
result like that, let's continue by going toward this big rectangle on the top, and we will create a
shape of the circle. Let's go like that
and with one line, we'll create our shape, we can hold it at the end. Again, we can hold
one of our fingers on the screen to adjust the size of this element and make it exceptionally rounded. When we have the
result like that, you can adjust the size by moving your Apple pencil
from side to side. Let's go and create
something in that way. We will have a bit
of space on the top and almost no space
on the bottom. When we have the
result like that, let's adjust the shape by sculpting it a little bit and creating a different
shape out of it. When we have the
shape like that, let's go toward our major
Quan over the top plat. We'll go under Liquify and
we'll go to the push option. We have the size slides
so we can go and adjust the size of the brush that we're going to
be pushing with. And when we have the
size that we like, let's we're the size of this
element and we will start to push them to the
sides and we will start to sculpt a different
shape right here. So we will need to end up with the shape of some kind
of loaf of bread, and we will need to
have a more flat shape over the bottom than
we have on the top. And on the top, it should
be pretty rounded. So you can sculpt it
the way you like. You can go with a bigger shape with a smaller shape,
it's up to you. You can spend some time here and achieve something
in that way. So when you like the shape
that you've created, let's go straight away
toward our rookie on the top left and we will
go to the uniform method. We'll go to this green
node over the top. We will hold it with our
Apple pencil and we will rotate our shape slightly so it's not looking
too straight. When we have the
result like that, let's tap onto our
okie to get away from this mode and let's continue by getting
back to our brush, and we will work a little
bit onto the body. So for the body, let's first go toward the area
over the left. We will go closer
to the shape that we have for our head and we will start to map out where
we want to start our body. So for example, let's go closer to the two point
cell right here, so two point from this little
line that we have onto the left and we will go and create a little
markdown like that. With this markdown, we also will go toward
the bottom line that we've created
and we will go slightly higher
than this line is. Let's create another
line that will go a little bit higher
than the bottom one. You can go to the 182 and move your line if you've created
it a little bit slow, hold your Apple
pencil and move it. And when we have it, let's go to this first markdown
that we've created, and we will start to create a very rounded shape like that. You can go and create
a couple of lines to define what you want
to see right here. You can go with your
brush, with your eraser to find the lines
that work for you. And when you have the
shape that you like, the very rounded shape, let's go more toward
the side and we will start to create the
body right here. So basically, we are going along this line that we've
created on the bottom. You can go with
pretty straight line right here or create a very, very soft curve on the bottom. And when we have it, we will go toward this little
part right here, and we will start to go
down with our sheep. So starting to create
a very rounded shape, pretty similar to what we
have onto the opposite side, but go a little bit higher. When we have it,
let's go even higher across this little line that
we have once at the top, and we will start to
create the line going up. And again, we will go with
a very, very soft curve. If you need to
create a couple of lines right here, you
can go and do it. If it's easier for you to go and tratgic canvas and create
a curve in that way, go and do what you need to do. Go a little bit more toward the inwards and create
a gon in that way. If you want to try
something different, maybe make this whole thing
a little bit smaller, you are welcome to
go and do that. This is going to be
our little tail. So let's go and create it
in a very rounded way. When we have the
result like that, let's go a little bit higher than this line
that we have right here, the bottom one, and we will go closer to the
shape of the head. So again, if you want,
you can make a little markdown right here
and when you have it, let's go and start
to create the body. So we are starting by creating a little curve going
down in that way. We are trying to make
it very, very soft, and then we will need to connect it nicely with the tell
that we've created. So let's go like that
and create another curve that will be quite similar
to what we have outside. Don't try to make
the tip very tippy. On the contrary, go
with a rounded shape. So if you need to
sculpt it more, work with your brush, work with your eraser to create
a nicer shape. For example, let's create
something like that. You don't need to be too perfect with the shapes right now. If we want, we can fix something
if we need to later on. When we have the
results like that, let's work a little bit
on the legs right here. For the legs firstly, let's go toward this little part where we have the
intersection with this line and the line
that we've created for the Tammy and
this little neck. And we will go from it
toward the bottom and we will start to create
a line down in that way. First, you can go with
different direction. When we have it, we will go to the opposite side and
we will need to keep the size and the thickness of these elements of
something around one cell. So let's go and create
the line in that way. Let's connect it nicely
with the shape of the body. If you want, you can
try out to create it in a thicker way
if you prefer so. When we have the
result like that, let's go toward this area
between these two lines, and let's create little
fingers right here. Going a little bit weirdly with the shapes and creating
something on in that way. When we have the
result like that, let's go closer to our middle part and let's create the second
leg right here. For the size between the little legs that
we are creating, let's again go somewhere
around one cell or a little bit
smaller than one cell, and we will create
a similar shape to what we have onto this side. Let's go and start
by creating a leg. In that way, we are creating a little bit of the
line going down, and when we have it, we will start to create the
fingers straightaway. We are creating
something similar to what we had onto
the opposite side. If this line that we have in
the middle is distracting, you can grab your eraser
and erase it straight away. Keep the space clean right here. When we have the
result like that, you can define the
lines even more. Let's go towards
the opposite side. Let's finish up
creating our leg by creating a very soft line
going up in that way. As for the size of this line
that we have on the right, let's make it
slightly smaller than the line that we
have onto our left. So if you need to adjust it
in any way, go and do that. If you see that
maybe you want to go to the opposite
side and maybe work a little bit more onto this leg to make it
smaller or cleaner, you're welcome to
go and do that. When we have it, let's
get back to our brush, and let's go and create one
more leg over our right side. For this leg, let's
first go over this line that we have
right here and from it, we will go slightly toward
the side and we will start to create a rounded
shape going in that way. When we have it, we
will go closer to this front leg and we will create a hubber little
leg in the back. Let's create the
line goon like that. We will erase the line that we have in the middle
to go like that, and then we will get
back to our brush. Again, we will create
some fingers right here. Let's create them in a
very funny way like that. Let's go grab our eraser and adjust the parts
that we don't need. If you need to define
the legs even more, if you want to work onside with the brush or with your
eraser, go and do that. Probably we can go and
work a little bit on this finger that we
have on the back and make it more similar size wise and similar to the line
that we have right here, so we don't have a
very protruding part going to the opposite side. When we have the
result like that, let's go towards this part where we have the back and
we will go along the back and we will start
to create some bump tread here that later on we
will recolor differently. So let's go like that and create something going that way. And when we have the
result like that, let's go toward the
top and we will create these fluffy little parts that are actually the external gills. So let's go toward the sides, and we will start by going to the two cells from the
middle line points. So you can make a
little markdown like that on both sides. And from this point, we will go and start to create a
line going like that. So on each side, we will need to go
with three lines, and we will then go and
create these external gills. Let's go and go along
this shape that we have for shape of the head and create three lines
going in that way. When we have it, you can decide whether you want to go closer to one another with the shapes and maybe try
it out one more time. So when we have the
result like that, let's go and turn them
into these actual gills. So let's go closer to
the first one first, and we will start by creating
a line going in that way. We will go to the
sites and create the very cute looking
element going like that, and when we have it,
we will go to the next one and create
something similar here. So firstly, let's start by
creating these middle elements going closer to the shape that we've created as
our little scheme. And then if we see that we are overlapping the element
that we already created, we will go and create
only half of it. So we are not creating
the overlapping part. When we have it going
toward the opposite side, creating this additional
little detail onto the bottom, and then we are moving
on to the next one and again starting by creating this little shape over the top. We are going along the shape that we have for our elements, so let's try to make them
not looking too straight. Going like that, again, if we see that we are
overlapping something, we will go and overlap
it nicely and we will finish up by creating this little detail
onto the bottom. When we have it on one side, let's move on to
the opposite side and create something different. We can eyeball where our
little first lines are. You can go to the left side
and go to the opposite side, make a little
markdown right here, go to the next one, make a
little markdown right here, go to the next one, make a little markdown right here
and from this markdown, let's go and start to create these additional little
details over this side. So creating these guiding lines firstly and then again,
starting from the top, starting to create this top
part of this little gill, going to the sides, creating
the smaller ones like that. Again, taking a
look at everything, deciding whether they
are enough of the size. If you want to go along the whole shape and maybe
try it out one more time or work with your brush and with your eraser to create a different shape,
you're welcome to do it. When we have it, go into
the next one, again, starting by creating
this top part firstly, go on with a big
shape like that. You want to see it clearly from the distance and
see whether you are making the similar shape and similar size to what you
have onto the opposite side, it's too good to take a look at everything
from the distance. Try to make it similar size wise to what you have
onto the opposite side. Again, if you are
overlapping with the shape, the opposite side and the shape that you
have already created, go and overlap it to the
way that you prefer. When we have it, go
toward the next one and creating one more of these
gills over this side. Let's go like that.
Again, starting by creating this top part. If you want to maybe go and start by defining this line a little bit in a different way, a little bit higher.
You can go and do that. Let's go and start by
creating the top part, again, overlapping, going
toward the bottom and creating this
little digital here. You also can decide whether
you want to go over some of the lines and decide which
parts are overlapping. For example, right here, we
have the overlapping parts between this little
shape that we've created on the top and the tail. You can decide whether you
want the tail to be on top or this little part that
you've created on the top. Decide, grab your eraser, erase the part that
you don't need. Go over these little elements. If you want to define
the shapes even more or maybe fix
something right here, you can go and do
that right now. When we have the
result like that, let's go toward the middle part and let's work on
artificial features. Firstly, let's find
this actual middle part by creating a little
langon in that way, very easily creating
the line in the middle. When we have it going
towards the middle part, horizontal way and starting to create the mouth right here. Let's go to the third cell. Doesn't matter from which side. Go right here and starting to create a mouth that
will look like that. Go into one side, firstly, go and repeating the same
thing onto the opposite side. When we have it, going
toward the bottom to the middle and starting to create an open mouth like that. Of course, if you want
you can experiment and create different facial
features right here, you can go bigger
with the shape, smaller with the
shape, it's up to you. You can define it even
more if you want to, make it thicker, make it
thinner, again, up to you. When we have it,
let's go towards the sides and let's create
the ice right here. So for the eyes, first, let's go toward the
left and let's step a bit from this line that
we've created for the mouth. Let's, for example, go and create a little
markdown like that. And to make it similar
on the opposite side, let's define the same level
that we have onto this line. So to be consistent with
the shapes and the sizes, let's go and put a little markdown onto
the opposite side too, so we will have the similar
distance from the mouth. And when we have
it, let's again go toward the left side
and from this markdown, we will create a
shape of the ellipse. Hold your line in the end, let's go toward the Editing
two and let's adjust it. Let's go. Very rounded with the so create the shape
like that, go round it. Maybe if you want to make it a little bit closer to
the shape of the mouth, you can take a look at
erythan from the distance. And when we have the
result like that, let's go toward
the opposite side and create something
similar here too. Again, creating the shape of
the circle like that or bs, holding R line and then go
into the editing tool if we need to adjust it and
adjusting it to lin. Again, if you want,
you can make it slightly closer to the
shape of the mouth. And when we have the
result like that, let's go inside and
shade it straightaway. When we have it, we also can go underneath the eye that we've created and create
little cheeks that future on we will
create right here. If you want to adjust
something right now, you are welcome to
go and do that. Maybe define the mouth more
or adjust anything else. For now, we don't need to
pay too much attention. We can fix everything
if we need to. We just need to make sure that every detail that we
have is on our skege. When we have the
results like that, let's also go toward the outside parts and let's
create some carls right here. We are going with the
little shapes right here. We will start to
create the little irls closer to the shape of
our little ax lottle. Going like that and
starting to go with peculiar little lines
going in that way. Go with bigger shapes, going with smaller shapes, starting to create very weird looking
elements right here. So again, for now, we are only mapping out what
we want to create. So later on, we can
go a little bit more interesting with the shapes or a little bit cleaner
with the shapes. When we have one side done, let's go toward
the opposite side and create something
similar here. Again, let's start
closer to our axolotl and let's create the peculiar looking elements
going like that. You can go even
to the shape that we've created for
our main character. If you want to when we have it, go toward the right side, and let's create
one more little irl right here in a bigger size. When we have the
result like that, we are quite done
with the sketche but if you want to adjust something
to make it, for example, cutter or if you want
to fix some parts, we can do it very
easily by going toward our magic 12 and again,
going under Liquify. We are going to the push
option and we can go and sculpt our shapes a little bit to create them in a cuter way. If you want to do
that, you can go to some of the Ras and fix them and you can spend some time here and adjust the parts
that you want to adjust. Let's spend some time here and adjust our sketch a little
bit if you want to. I decided to leave the pauses a little bit
higher so they look a little bit more
chubby and make these gills on the top
a little bit small. So when you are satisfied with everything that
you've created, if you don't want to
scout it even more, let's tap into our magic quant twice to get away
from this mold. Let's take a look at everything, and let's move on
to our next part where we'll start to
add the clean lens.
3. Clean Lines: Begin working on our clean lines firstly by going to our layers, and we will hide our
layer with the scheme. We will need to tap onto this
check mark onto this layer. Also, we will go to layer
where we have our sketch. We will tap onto the N icon and we will reduce the opacity. Again, find the
comfortable level for you when you are done
tap onto the layer, and let's create one
more layer on top. Also, we don't need
the cells anymore, so let's go and turn them
off by going to Ange icon, Canvas, and we will toggle
drawing guide right here. Now when we have set
everything in that way, let's go to our brush library, and we will go to the
calligraphy folder and select Monoline brush. We want all of our lines to be pretty smooth and
easy to work with. So let's tap on the brush and
go inside the brush studio. On the left, we'll go under
stabilization and we'll be playing with amounts
of streamline and amount of stabilization. You can go to the drone pad and try out right here how it feels. If you want, you can set
the settings the same way as you see them right
now onto your screen, or you can experiment
a little bit and find what works for you. When you are down
adjusting your brush, let's hit down over
the top pride, and let's start working
onto our lines. Firstly, let's decide
onto the size. Let's try something around 9%. If you like how it
feels, how it looks, you are welcome to continue
with this 9% of the brush. If you want to experiment and
find something different, you are welcome to do it too. So when we have our brush set, let's go and start
working on our lines. So firstly, we are going
to be going toward the top and we will recreate this
line that we have right here. So with one line, we
will go and create it. We will hold our Apple pencil
at the end of the line. If we need to adjust it, we will go over this top two. We can go toward the
nodes that we have right here and adjust the
curvature of this element. When we have the
line that we like, let's tap on this screen, and let's go toward
the inside part right here, toward the bottom. And we will create
the line here too. So let's tap a bit from the g right here and
toward the middle part, we will create a
line right here. We're not going to be
creating the full line that we have on the sketch,
only the part of it. So hold your line at the end, and let's go to
this editing tool or the top to maybe adjust the curvature or make a nicer connection
between the lines. We will need to make sure that every line that we
are creating every part of it looks good and looks
as if it is seamless. So we don't have any bombs, we don't have any gaps,
anything like that. If you see that you can
go and maybe work on the line weight or the
overall shape of the line, you are welcome to
use your brush and eraser to adjust
it to your lichen. When we have the
result like that, let's move on to
the opposite side. Again, step in a bit from
the middle and we will create a line to continue
creating the shape of the hat. Again, you can hold
your line at the end, make sure that the
connection is looking nice. When we have it, let's go toward the body and
let's recreate it. So for the body, we
will start by going toward this tummy
and chest area. We will go with one
line like that, hold our Apple pencil again. And when we have
this chest line, let's go and create the legs. So again, go in the
same way as we have it onto our skegeO
if you, of course, want to experiment and maybe try out different things or if you see that maybe you can benefit by creating something different,
you can go and do that. When we have the
result like that, decide whether you
like what you did. If you want to create something different, go and do that. So for example, we can go and create something do in that way. When we have it, let's continue
by going to the next leg. And again, we will
go and recreate it the same way
as we did before. Starting to create
the pause right here, the lines that we have for the fingers and finishing up by creating a line like that. Again, we can go and try it out one more time to create
something different, more rounded if we want to. When we have it going toward this continuation of the
tummy and we will need to pay attention to
this line because this line is a continuation of the line that we
have right here, so we cannot go too far
beyond from this little line. We will need to go
to this line and magically create the similar
line go in that way. Again, you can hold your line in the end to create
a better shape. When you have it, go toward the next leg right here
and let's recreate it too. When we have it, going towards the tail and starting
to recreate it too. Go in with one line
or with a couple of lines and recreate in the
curve that we have right here. Hold your line and the end, go to the editing tool. If you need to adjust
the curvature, maybe you want to create
something different from the elements that you
have on your sketch. Again, pay attention
to this little line. If you see that it
is a little bit of, go erase it and create it one
more time because we will need to make a connection between two parts
with this line. So try to make it
a connection in. When we have it, let's
continue by going and recreating the second
part of our little till. Again, you can hold your line at the end, go toward the tip, create the line right here
so everything stays closed. And when we have the
results like that, let's go toward this little part over the top let's
recreate it too. You can get to what
you've created on your sketch or create
something different right here. For example, let's
go with something like that, and when we have it, let's go toward our little gills right here onto the top
and let's recreate them. Again, starting by going
toward these lines, trying to position
them in the center, hold your line in the end, and let's go and recreate these little details
over the top. Either with one line or
with a couple of lines, go and recreate them. If you or dit it
a little bit and have a little bump like I had, go and erase it with
your eraser and then continue creating other
details around the whole ship. Connect everything nicely
so you don't have any gaps between the lines and continue by creating this little
detail onto the side. When you have it going toward the opposite side and
doing the same thing here, try to position these
shapes that you are starting with in the middle
of the shapes of the gill. So if you need to try it
out a couple of times, go and try it out
a couple of times. If you are creating
a curve and it snaps to a different shape of a straight line, for example, you can try to lift up your Apple pencil and go to
this Edit two over the top, and you might have
the option arc. If you don't have
the option arc, you might need to try out one more time and create
a more curvy curve. So when we have this middle
part, one more time, let's go and create these fluffy little part over the top. When we have it, let's continue and start to create
this middle line again firstly and then finishing up by creating the
details over the top. Let's finish up by creating another and last
all these gills. Again, you can decide whether
you want to overlap detail or whether you want to go with the smaller
shep right here. So try it out a couple of times to create a nice
element right here. When we have the
results like that, let's go toward the middle and let's recreate
artificial fea toice. For example, let's
start with the ice. We will go with one
line like that. We will hold it at the end, and then if you
need to rotate it, hold your Apple
pencil and rotate it. If you need to adjust
it in any other way, go to the editing tool
and adjust it from here. When you have created
what you want, tap on the screen if you
were at the editing mode and drag and drop
the color inside the shape that you've created. Now let's go toward
the opposite side and create a similar
shape right here. Again holding line at the end, go into our editing tool if we need to adjust it, rotate it, maybe go to some other
place if you need to tap on the screen when
you are ready and drag and drop the car inside
when you have the shap. When we have it, let's go and recreate our shape of the mouth. Let's go like that with half of the circle or half of the ellipse again hold
your line in the end, go to the opposite side,
create something similar here. Again hold your line and the end if you want to adjust it. Make it similar to what you have onto your sketch or
adjust it to your liking. Maybe you see that it
looks better if you are not following the lines
that you have on your sketch. We have it, let's go
toward the bottom and let's create a little
mouth right here too. We can do it with
the same size of the brush or we can go slightly
smaller with the size, for example, 6% and create
this element in that way. Again, make it more
open, less open, hold your line in the end, go to the editing tool, adjust it to your liking. When we have the
result like that, let's tap on the screen
and make sure that we don't have any protruding
parts that we don't need. If we have them, we
will grab our brush, our eraser end, adjust everything that we
don't need right here. So when you have the
lines like that, let's go and work onto
the outside parts. So we will go to our list and we will create one
more layer on top. We will go to our brush, same brush that we used before. And let's go with
very, very small size of the brush
or, for example, 4%. Let's go and create this little additional
details right here. Firstly, let's go toward
this front little part, and let's create it here. You can create something similar to what you
have onto this sketch. We will need to follow
the same rules. We will need to make
sure that everything that we are creating
line wise is closed. So we will go and
make sure that we don't have any gaps
into our lines, and also we will need to pay attention to the connections and the line weight and
everything that we paid attention onto
our main illustration. So go with your brush
with your eraser and adjust the parts if you
need to adjust something. Let's continue by going to the next one and recreate it too. You can do it on the
same layer or you can create a new layer for
every element right here. That way, it will
be easier to get rid of all the details
that you don't need. For example, let's go
a little bit closer to this one and maybe we
will start from the top. Let's go with the shape like that. Let's
create something. In that way, maybe try
it out one more time. Creating something like that, going toward the opposite side, creating a couple of
more details right here, going closer to
this first element and creating
something like that. If you want to create
something different, you are welcome to do it. When we have it, we
also can go and create one more leaf and create a big coral right
here at the top. So, for example, let's go closer to this little
shape that we have on the top of our axolotl and let's create the
shape going like that. We can go to the sides and create the elements
going in that way, go to this part and
starting to create some of the tree shape or
something in that way. Again, if you need to try
it out one more time, go and try it out one more time, go toward the sides and create
the elements right here. It will be easier to go with your eraser if you are creating these elements on
separate layers and get rid of all the
overlapping parts. If it's looking good, if you are satisfied
with everything here, you also can go and
maybe try out to create a little stem
right here too. We can go to the opposite side and start to create
the details here too. If this element is clean enough, you don't have
overlapping parts, we can go to our list
and combine all of these three las together
that we have for our corals. To do that, we will need to
put one of our fingers on the layer on the top and another on the layer on the bottom, the bottom of our
coral three layers, and we will make a pinch
movement like that. To make sure that you've
connected everything, tap onto the check
mark right here and make sure that you've
connected everything. Then let's go to
the opposite side and create the details here too. Again, either on the same layer or by creating a new layer, let's go and start to
create these details. For example, let's
go a little bit lower right here and create
something going in that way. Again, you can overlap
the elements right here. For example, going like that. I'll try it out one more time to create it in a nicer way. We will go and create a couple of details
going in that way. Again, pay attention
to the connections, pay attention to the niceness of the lines and their evenness. When we have it, let's get back to Abrash and go more toward the outside part and create one more little
coral here too. Again, either on the same layer or by creating a new
layer on the top. So for example, let's
create something peculiar, in that way, a little
bit bigger than the first irl that
we've created. Go toward the outside part, go more toward the
shape that we have for our little
axolotl right here. You can go and create
something in that way, overlap the parts, create
something very peculiar. When we have the
result like that, let's go toward our list, make sure that everything
that we have for our irls is looking
nice and on one layer. We also don't need our layer with this sketch anymore,
so let's go to it. It's our layer number three. No, layer number two. We will hide it by tapping onto our check mark right here. And again, one more time, let's check out whether
everything is closed, whether everything
is looking nice and whether we need to
adjust some parts or not. If everything looks fine, we are done with our lines, and that means that we can
move on to our coloring part.
4. Colors & Final Touches: Begin our coloring
part firstly by going to our list and we will
go to the background color. Again, going into the color
palette that you downloaded, go under palette, go under cards and we will select the color with the
title background. When we have the
background selected, let's get back to our layers, and we will go to the layer that we have
for our main sheep. So let's tap on it, and let's select the
option reference. We will be able to use
these lines and we'll be able to add the colors
on separate layers. I also noticed that
one of my quarrels is not on the same
layer that others are, I will tap onto this
layer and use the option merged down to have all
the irls on one layer. We can test it by going to
this check mark one more time, make sure that everything
is on one layer. When we have everything
in that way, let's go underneath the layer
where we have our reference on our main layer with the lines and let's create
one more layer on top. Now when we have this layer, let's get back to our
color palette and we will select the color
with the title body, and we will drag this color to the body to every part
that we have for our body. Go even to the mouth and
creating something in that way. When we have it, let's
get back to our list. Let's create one
more layer on top. Let's change the color to pink red or we can go with a cheeks color that is
a little bit brighter. We can go with it
and let's start to recreate every little detail
that we have onto our head, and also we will recolor the shape of the mouth
that we have right here. When we have it, we also will make the size of the
brush a little bit bigger, and we will go to the tips of our little pots right
here or the legs, and we will add the
color here too. So let's go like that.
Let's go to all of them and create the
details going in that way. When we have it, let's go toward As and let's create
one more layer on top. Onto this lay, we will
change the color to light can or body
details. It's up to you. We will recolor this
little part onto our back, so you can go with a darker
color or with a lighter one. For example, let's go
with the darker one. Let's drag the color right here, and when we have it right here, we will go and recolor
our little quirls. For the irls, we
will need to get to the layer where
we have the irls. We will tap on this layer, and again, we will use
the option reference. You can see we changed
the reference from ys. Now, we are going to
the layer where we have our main lines and we will create one more
layer right here. Onto this layer, we are going to our color palettes
and we will use these peculiar little
colors pin crat light seal, and purple to recolor our
little corals right here. You can go one by one and recolor all of the details
that we have right here, or we can use the option
continue filling on the top. With continue filling, we can go to the areas that
we want to recolor, tap on them and recolor
them in that way. Now, when we have the pink
one done, for example, you want to switch the color, go straight away to
the color palette, change the color, for example, to light C and then
continue tapping onto the areas because we
still have color drop one. Let's recolor this little coral and maybe this
one onto this side, and then we will
change the color to purple and we will recolor
these front ones too. And when we have the
result like that, we are done with the
basic coloring part, and let's move on to the details and shadows and
everything like that. So let's begin this part
firstly by going to our layers. We don't need reference anymore, so let's tap onto this layer, tap on it one more
time, and select reference from the
list to turn it off. When we did it, let's go to our main color to
the body color. We'll create one
more layer on top, tap on the layer, and use
the option clipping mask. That way we will be able
to end the details only on the colored areas that we
have on the previous layer. So when we have it in that way, let's get back to
our color palette. Let's select this
pin cred color, and we will go toward
the bottom of our hat. I will rotate the canvas so it will be easier to
create this line. We'll get it toward the bottom and we will create the
shadow right here. So we are going along this line that we
had onto our sketch, so we are creating the
continuation of the shape, going slightly lower than we
have the shape of the hat, so creating a bit of
the shadow on the neck. So repeating the
curve like that, if you want to make it a little bit curvier right
here onto the side, you are welcome to
go and do that. So when we have the
results like that, decide whether you like
the amount of opacity. If you want, we can get
back to our layers, tap onto the icon
and soften it up by moving our opacity slider
more toward the left. For example,
something around 65, something like that
percent works better. And when we have the
results like that, let you and add a
couple more details. So for the details, we will go toward our list. We'll create one
more layer on top, tap on the layer,
Clipping mask, and again, we will go to our color palette, and this time we will
select light CN color. This color, we will go
toward the bottom and we will start to add some
kind of the shadow, but in a colorful way. So let's go firstly toward
this little tummy part, and probably with
the smaller size of the brush, it will
be easier to do. We will go and add the
secondary colo here. Go along the whole bottom
part to go like that, adding the color to
all this little part, going towards the tail and continuing to create
the line here too. Let's add the color
toward the bottom part, all this first outline
that we've created, and we also can go
toward the top and we can create some pattern
going in that way, too. We also can go towards
this front leg right here, the front back leg, and we can add a bit of
the color right here too. Let's keep a bit of the
color over this side, and then we will go
around like that. We will close the shape so
we don't have any gaps, and we will drag and drop
the color into this area. A onto this layer, let's add the checks, and let's add a couple of
details right here to the body. Firstly, let's switch the color to checks, and with this color, we will go toward the
top part right here, and we will add some kind
of the pattern right here. You can go with
the bigger size of the brush with a smaller
size of the brush. Let's go and create a couple
of details going like that. You can add as many of
these details as you want. You can go with
different shapes. You can go and try it out a couple of times
if you want to. So, for example, let's go and create something
going in that way. And when we have it, let's go underneath the ice and
let's create our cheeks. If you want to see how you've created them onto your
layer with this sketch, you can go and turn it on. So firstly, we'll need
to find this layer, this is our layer number two, select it, hold it and drag it above everything
that we have right here. And hide it by going to
the check mark and go towards the layer that we used for these little
details right here. So the layer number ten
probably with these details that we have in
the blue color and these little marks onto the top. Onto this layer with
the same color, we will go with a bigger
size of the brush underneath the cheeks and we will put the dots right here. You might need to try it out
a couple of times to find the right size for
the cheeks and find the right placement
for them if you want to. Find what looks good, and when we have the
results like that, let's tap onto our
layers panel icon, and we will hide our
layer with the sketch. When we have the
result like that, let's continue by adding a bit of the shadow
we part toward the top toward the little gills that we've created.
Let's find the layer. Let's create one
more layer on top, tap on the layer and use
the option clipping mask. Also as we want to
create a shadow, we will tap onto the icon and change the blending
mode to multiply. Let's go with a bit of the
amount of our opacity. So we will go and adjust it to something around maybe 30, 35%. Of course, if we need
to adjust it later on, we will do it. Let's select the
same cheeks color that we are selecting right now. Or if you want to try
out something different, you can go with a purple color. With one of these
colors, we will go towards the size that
we have onto our gills, and we will go with
probably smaller size of the brush toward
the bottom parts, and we will start to add a bit
of the shadows right here. So going like that, starting
to add our shadows, following the
direction that we have for our little main shapes, going mostly toward the
bottom parts of them, starting to create the shadows, going to the opposite side too. So, for example,
going right here, creating a bigger
shadow onto this part, and finishing up by creating a shadow going onto the very, very bottom element
that we have. Now when we have the
result like that, let's one more time go to our lays and create
one more layer on top, tap on the layer and use
the option clipping mask. Let's go to the icon and adjust the opacity
to the level of something around 20% or so and we will change
the color to white. With the white color, we'll
go toward the opposite sides from our shadows and we will start to
create the highlights. If this level of
opacity is not enough, we can get back to our lays, tap onto the icon, and adjust it to our liking. For example, 40% look better, and we will go to all of these little gills that
we've created on the top, and we will create our
little highlights here. When we have it, we will need to add one more detail to our eyes. Let's go to our layers. We will find the layer
where we have our lines. We'll create one more
layer on top of it, using the same white color, using the bigger
size of the brush, going toward the
eyes, and we will put little dots to the eyes, and we will create the
highlights in that way. Try to position them on one line and onto the same
place on both eyes. When we have it, let's work a
little bit onto our corals. We will go toward our layer find the layer where
we have our cirals, create one more layer
on top, tap on it, clipping mask, going to the N icon and changing the
blending mode to multiply. Let's go with something
around maybe 60% of opacity and we will
select the color. For example, let's start
with the purple and we will go and add a bit of the
shadowy part right here. You can go with the
same color to all of them and add the
shadows in that way, or you can switch the colors
going from one coral to another and start to add the shadows going with
different colors. Again, mostly going toward
the bottom parts of them. Of course, if you want
to create some texture, you can go and
maybe put some dots like that and create some
interest right here. When you are done on one side, let's go to the opposite side and create something
similar here too. Again, you can go
with some texture and create the shadows going mostly toward
the bottom parts of our little corals. You can go and create some peculiar little
details if you prefer. Change the size of
the brush and maybe put more details with the
smaller size of the brush. We have the results like
that, we of course can go and add the lighter elements
on our little corals, too. Let's go and create
one more layer above this layer
with the shadows, tap on it, clipping mask, and icon, let's change the
opacity something around 40%, and we are selecting
the white color. Let's go closer to the top and let's create the additional
little highlights right here. You can go with peculiar shapes. You can go with some
top parts right here, maybe add some dots, maybe add some different
elements right here. Go with simple shapes of the dots and lines and create
something in that way. Go toward the opposite side
too to add these details. When you are mostly done
or almost done or done, let's decide on the opacity
that we have right here. If you want, you can
go a little bit higher with opacity to make it a
little bit spark clear. So for example, something
around 60% look better. And when we have the
result like that, we will add a bit of the details towards
the outside part. So let's first go to our
layers one more time, and let's create one
more layer on top. We will hold this lay and put it underneath everything
that we have colored. So going underneath our
little parts with the body, and onto this layer, we will
change the color to shadow. We will make the size of
the brush slightly smaller. So for example, six parison. We'll go underneath
our little axo lotto, and we will create the
shadow right here. Close the shape, hold your Apple pencil at
the end of the line. You can hold one
of your fingers on the screen to make it straight. Adjust the size by moving your apple pencil
from side to side. And when you have the
size that you like, drag and drop the color inside. If you want to
adjust the shadow, go to the Aki on the top left. You can go under uniform
method or free form method. If you are going under
free form method, you can go to, for example, the snow that we
have on the top, hold it and we can drag it down, so we will have less open shape. Also, you can move this
shape slightly higher, so we will have a
believable shadow. When we have the
position that we like, let's tap on our Aoki on
the top left and let's add little shadows underneath
our little corals. Again, the same way, creating
very rounded elements, trying to position
them horizontally, so holding our
Apple pencil and go into all of them and starting to create these details here. Adding the color manually or by dragging and
dropping the color from the icon on the top right when we have the
result like that, when we've added all the
shadows in that way, let's also go outside and let's create some
bubbles right here. Go into the lead, creating
one more lay on top, switching the color to white, go in with different size of our brush and starting to
add the details right here. Let's add a couple
of little bubbles. You can go and create only the dots like that
of different sizes, or you can go with your eraser
inside the ships and maybe create the actual
bubbles by erasing the middle part of
these elements. You can decide on your own
smaller size of the brush, add a couple of
details with its two, go toward the top and finish up creating your illustration,
go in that way. When we have the
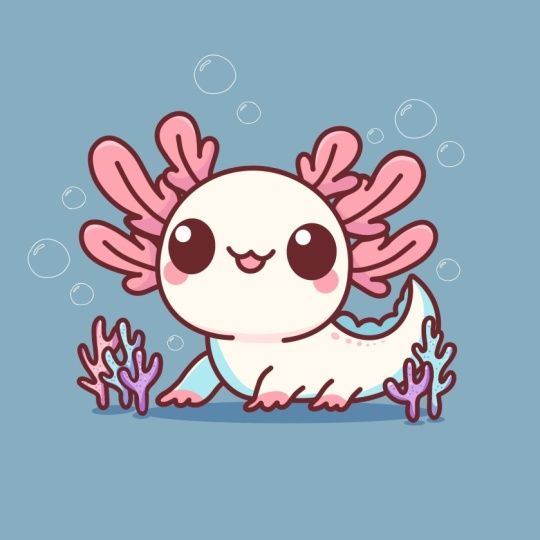
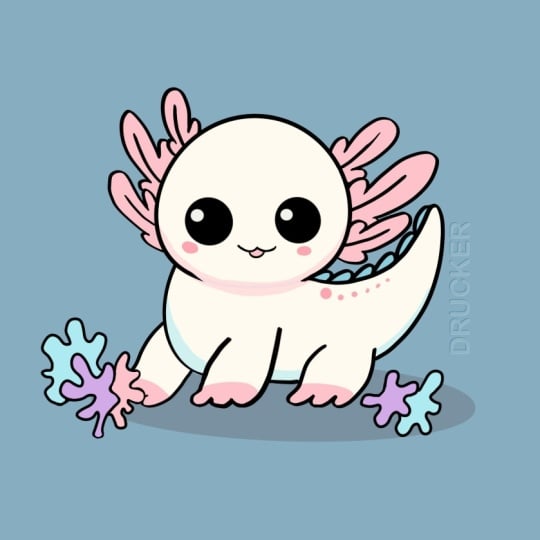
result like that, when you are satisfied with it, we are done with
our illustration. Thank you for
watching this class. Let review if you
liked it and can sit subscribing for Markay
videos in the future. Looking for Ts in your project.
 Uni Corn, ⭐Kawaii Art Enthusiast⭐