Transcripts
1. Introduction: Hello, everyone. I'm
Uni, and in this class, we again to learn how to turn a real person into a
kawaii style portrait. During this class,
you'll get familiar with how to simplify
face structure, choose the right
features to keep and use a simple color system to make everything
clean and balanced. By the end, you'll not only have your own kawaii portrait, but also a method
you can reuse to turn any photo into a
stylized character. And now let's spend
some time drawing.
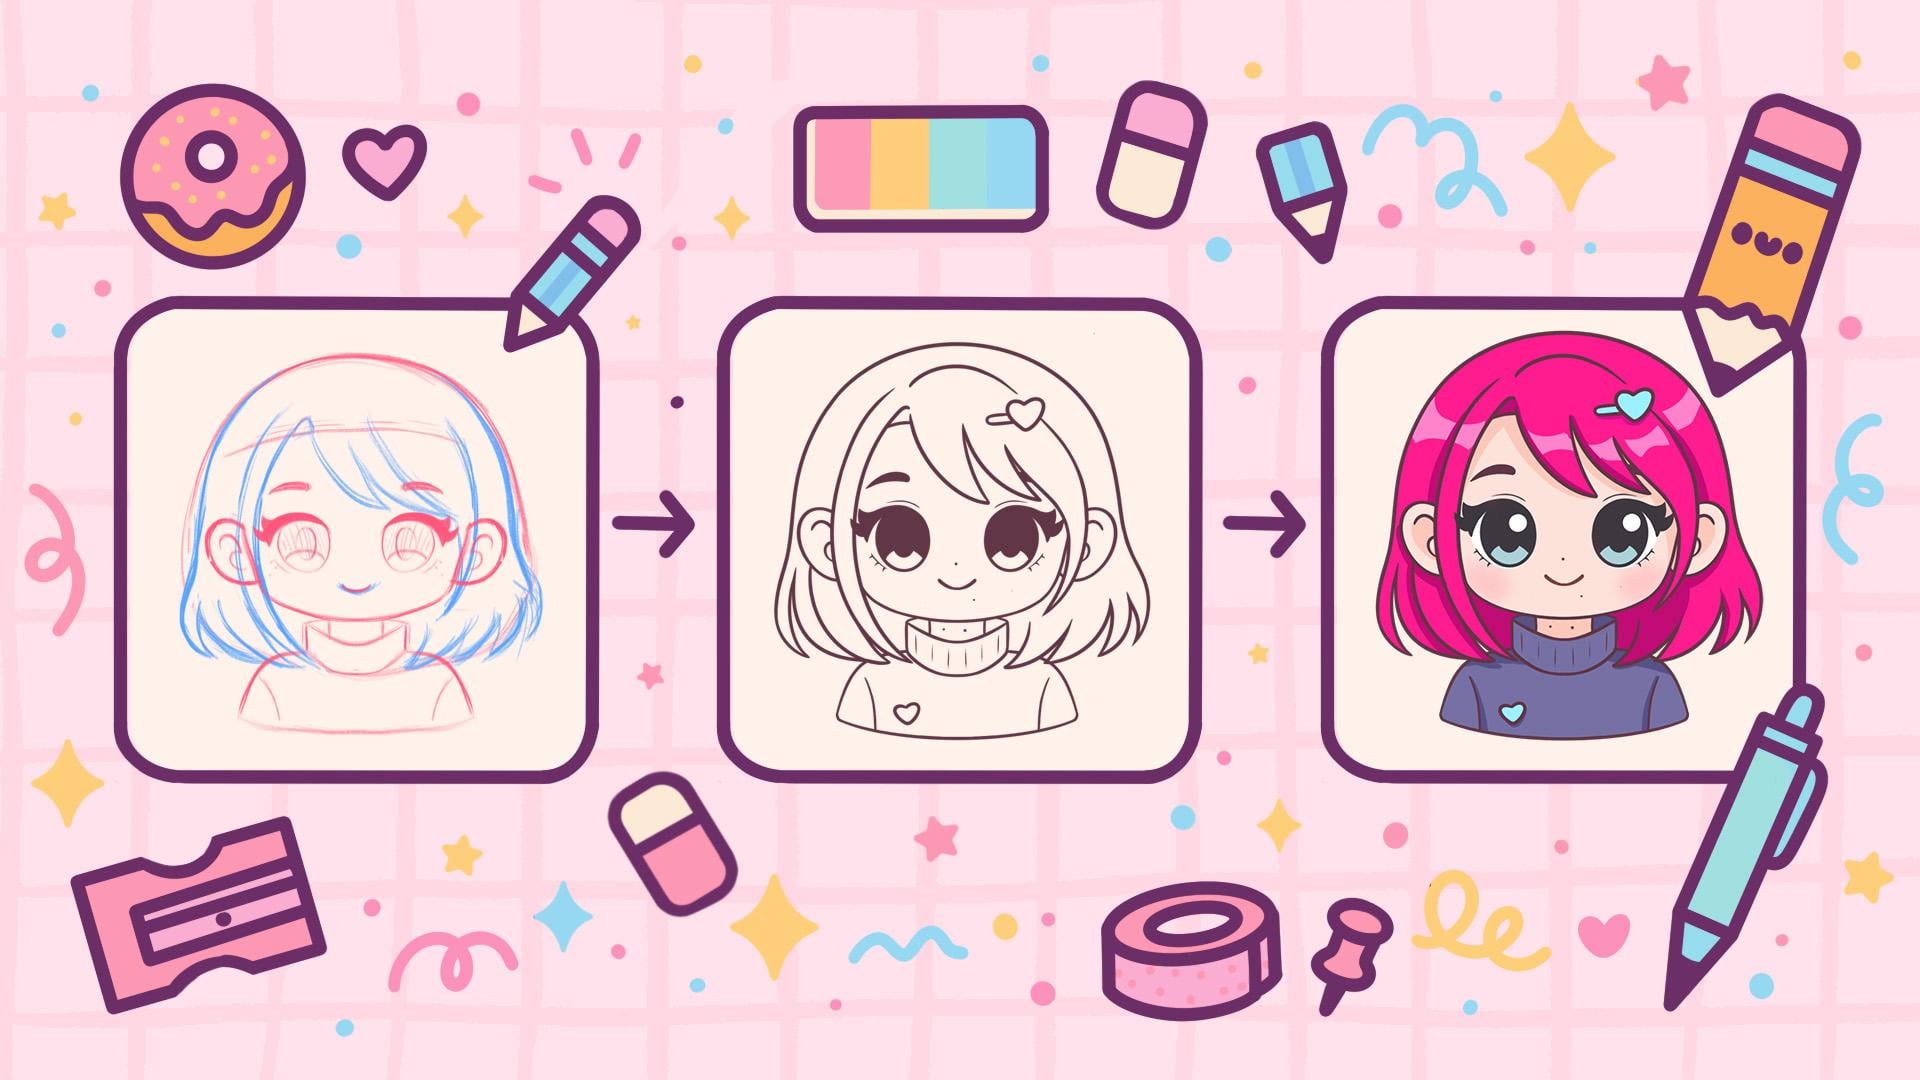
2. What You'll Learn: Before we start
drawing anything, let's see what this
class is about. This class is about
turning a real person into a kawaii style portrait without losing what makes this
person recognizable. It's less about
coping steps and more about understanding what
actually Kerri's identity. Right now, on the screen, you see two little sections. On the left, we
have our portraits, the photographs,
and on the right, we have illustrations made in a kawaii style based on the photographs we
have on the left. They are a little bit
adjusted to match the style. But overall, we can see that these pictures are actually
made from this portrait. And this area that we
have right between these two sections is where
most of the struggle is. So how to go from this that we have on our
left to this that we have on the right without losing the person
and the personality. And that's exactly
what this class is designed to fix the struggle
between these two areas. So let's talk about who
this class is really for. If you never drawn before,
that class is for you. If you can draw circles and
curves, you can do that. If you feel that
maybe you can draw, maybe you don't have a talent. That's a little bit
overlap right here. We can work with it too. I will prove your n that you can create the
actual portrait in a kawaii style using all
that we will learn today. Maybe you want to create the art that
actually looks like you. Maybe you already tried
to create portraits, but they might have a bit of the same face syndrome or
they are not looking too similar to the pictures
that you have as your reference pictures that
we will deal with today too, and maybe you want to create some meaningful art that
actually looks like you. Again, this class
is for you too. Here's what you actually walk
away with from this class. This class is not about
memorizing a style, it's about learning how
to see faces differently. The goal is not realism, it's recognizability
in acute style. We are focusing here
on understanding what makes a face feel
like a specific person. And what you learn today is a simple formula for Kai portraits that
work all the time. We are not using
a random drawing. We won't have random results. The formula will work perfectly every time that you are
going to be applying it. It's not the cute face, the random cute face or the
very general cute face. It's actually the picture, the actual portrait in a kawaii style that
will look like you. And we also will follow the simple
shapes and stylization. As I mentioned
before, if you are okay with drawing
circles and curves, it will work perfectly for you. We are not going to be focusing
too much on the anatomy. Again, we use our simple
formula to help us with it, and it is very easy to anyone to create what we are going
to be creating today. We also after we follow the simple formula
and simple shapes, we will take a look at how to make the kawaii colors
that actually look good. We will be applying some
techniques that will help us to create the very clean and
very bright kawaii colors. Also why we are learning and why we are
not following along because we want
not only to create one portrait that you will follow alone
during the class and come up with. We want to learn because we
want to apply what we learned today to the
future illustrations and the future drawing that
you are going to be creating. You can use them forever. To do all that, we will need to follow
one simple structure. Let's go and see
what we have for our simple framework behind everything that we
have right here.
3. Head Shape: The formula that we
are going to be using is a backbone of whole class. So let's break down
what's inside it. So you can see our
simple avatar formula consists from head shape, proportions, personality, and everything together
create likeness. So for our head shape,
this is your foundation. That's what we're
going to be working with firstly, proportions, it's where our facial features are positioned on the face. Personality adds
your uniqueness, and everything that we
have right here is, again, making real you. So let's go one by one, and we will start with the foundation which
is our head shape. Head shape alone changes
how the face feels. Let's see a few
heat shape families and by analyzing them, you can find out your
own heat shape as well. So firstly, we have the
round family right here. You can see we have a
couple of examples here, and everything right here looks a little bit more compact, and we can test out whether the head is rounded by
taking up our brush, for example, any brush
we'll do right here, we can go and very easily
create the shape on the top, and we can see that if we
create a shape of the circle, that looks pretty
good right here. So if we go one by
one through all of these head shapes
and create the circles, they will fit inside our shape that we are
right now creating. So everything right here is
bit soft, youthful, friendly. This is a round shape family. When we are done with
the round shape, let's see what else we
have for our faces. So here you can see
that we have a bit of a difference from
the previous slide. We have a more elongated
face right here that again look balanced,
look calm, elegant. And again, we can test it out
by going along the shapes, and we can create the
oval shape right here, and it will fit better than the shape that
we used before. So you can see
that overall shape is a little bit more
elongated here. So let's go through all of this and make sure that everything
that we have right here. Is in our oval face shape. The next head shape family
is our square shape. You can see we have a little
bit more angular parts right here over the bottom part, a little bit more
toward the jaw. Again, it's very
grounded. It's confident. We can go all over the elements
that we have right here, our little shapes for our faces, and we can go and create the
actual rectangular shapes. We can go with the square. We can go with more like a rectangle and you can see
it fits nicely right here, everything that we have inside. We will go through all of these elements and we will
create our rectangles. When we are creating
the rectangles, it doesn't mean that
we will go and create the actual shapes of
rectangles for the face. Of course, we will soften it up everything that we
have right here, and we will match it with the overall style that we
are going to be creating. Everything will be solved, so don't worry we are
not going to be using the exact shapes for the squares that we have right now
for the actual faces. For the last head shape family that we will look for today, we will be using the triangular shape
that we have right here. You can see we have a bit of the narrower element
onto the bottom. Again, if we want to make
sure that we are using the right template right
here for our head shapes, we can go and test
it out by creating the very simple shape of the triangle and match
it with the shape. Again, we will go
and try to create it on all of these
pass that we have. Again, if we need to adjust something, we will go and do it. Again, we are not using the exact shape of the
triangle right here. For the actual
shapes of the head, we will see how can we adjust the basic
shape that we have right here later on to create a nice element for our face. And when we are done figuring
out our phase shapes, we will take a look at
this slide that says to us that structure is what the
brain uses to encode identity. Our brain reads
structure before detail, so we will need to
actually pay attention to how our shape of the head looks because
this is our foundation. And when we have settled everything that we have
for our phase ship, let's go and continue with our formula and we will
go to our next element, and this is our proportions.
4. Proportions: Proportions is where our
faces stop being generic. Let's go and see one by
one what it's made of. When we are talking
about proportions, we are mostly talking
about feature spacing. Our facial spacing consists
of a couple of elements. So we have our eyes distance. This is how our eyes are positioned on the face
on the horizontal axis, and this is the most
critical for our likeness. And when we have
eye distance done, we also have eye height. This is how our eyes positions
on the vertical axis, and that affects the
overall expression. And also, we will need to pay
attention to the nose and mouth ratio right here because this is the
rhythm of your face. Again, this makes
everything recognizable. So we are talking
about likeness. Again, everything
together combines, this is our uniqueness. When we are done with
this little slide, when we know all these parts, we will go and one by one, take a look at what
everything means. So firstly, we will take a
look at our eyes distance. We have a couple of
options right here. We have the white, the narrow, and the average eye distance, and how can we make sure that we are created a right
distance between the eyes? You can see the
photographs right here. Let's first go to the average one and see what
we have right here. We have the size of
the eye right here, and if we can fit one size of the eye right here
between our eyes. This is our average
eye distance. If the area right here is a little bit smaller than
the size of the eye, we are talking about
narrow eye distance. If we have a bit of the
wider element right here, a bit of the wider
space between the eyes, this is our white eye distance. Paying attention to
eye distance could really add to an overall
facial likeness. Now let's see how the eye
height affects the face. For our eye height, let's see these two photographs and
we can see we can position our eyes a little bit
higher on the face and the overall shape
of the face will be a little bit more elongated and we can position lower on the fees, and this will look a
little bit more balanced. Again, it depends
on your photograph. It depends on your
fee structure, and this is another thing that we will need
to pay attention to while we are creating the
recognizable Kai portrait. When we are done
with the eye height, let's see what we have for
our nose and mouth ratio. This is our last ingredient for the proportions part
and the pas specim. Let's go and see what
we have right here. For our nose to
mouth ratio, again, we can position our
features higher or lower on the face and you can
see how much difference it adds to our face. On the left, we have a
higher position of the nose and a little bit more space
between these two parts, and on the right, we have it a bit more close to each other. Let's see one more
example on the nose to mouth ratio to finish up with
the proportion ingredients. Again, onto our left
and onto our right, we have a different placement
for these elements, and these small spacing changes, they are really big
recognition impact. Again, mention it one more time. We will need to pay a lot of attention to these
little details. Now when we are done with taking a look at our
little examples, let's see one more slide that will help us to
understand why we need this while we are creating our little
kawaii portraits. There is a few studies
in phase perception and caricature research
that show that humans recognize the faces
mainly through proportions and distinctiveness
and not surface details. So when we are creating
our portraits, we really need to pay
attention to the fundamentals, the phase shape, and
our proportions. That's where all the
recognizability ls. And while we are paying
attention to our fundamentals, we are doing 80% of the work that will lead
to recognizability and likeness from the
portrait that you have as a photograph to the portrait that you are creating
in a wi style. And when we are already
familiar with the proportions, let's see what we have
for our personality. Let's edit on top.
5. Personality: In personality, we can go very quickly from generic
to specific. So if you have some very
distinctive features or some distinctive elements
that you use day by day, this is what we are going
to be talking right now. And personality shows
up in a few key places. So let's go and take a look what we are going to
be talking about. To add more personality to your foundation and turn it
into a real life portrait, we will need to pay attention
to dominant feature. This is probably the
most sent out thing that you have onto your face
and onto your portrait. Hair silhouette because hair is not one strand of the hair,
another strand of the hair. We have the mass of
the hair that is recognizable and that
we need to translate to make the ability from the photograph to
our kawaii portrait. When we are done with
a hair silhouette, we will need to add accessories. Again, this is a
very quick option to add right here
to make sure that we have the likeness from the photo and this really
increases recognizability. The overall vibe is the true. Even though we are not talking about the expressions
into this class, we will take a look
at some general vibe that can help us to
translate personality. Again, let's take a look at
this formula one by one. Let's start with our
star of the face, and this is our
dominant feature. Dominant feature is one thing that people notice about
your face firstly. It could be the eyes, it could be the brows,
cheeks, nose, mouth. It's not only on your face, so all these little
details right here. It might be something
like hair or maybe you have a little bit of the
distinctive shape for your ears. That could be translated
to your portrait too and that could add to likeness
that we are aiming for. So for all of these elements, we will need to pay attention to what we have on the face, and we'll need to pick one
or two dominant features that we will be
exaggerating with purpose. So let's go and see what we have for the dominant features onto these portraits
that we already had that we are familiar
with one by one. So again, one by one,
let's take a look at all of these three portraits
and we will be paying attention to the first and the second thing that we are noticing while we are
taking a look at these photos. So without thinking too much, we are taking a look
at the first photo and we see the eyes, we see the mouth right here. It's not the signs right here. Maybe you see
something different, maybe you see different features and maybe you would like to exaggerate some things different from what I see onto
these pictures. That's okay. That's working. We will be looking
at the next two. And again, if you see the
same things, that's good. If you see some other
things that you want to exaggerate,
that's good, too. On the second photo,
we first see the eyes. We have the shape for the hair. On the third photo, we have very prominent eyes that
are very catchy and also we have this very nicely flowy hair here that again
catches your attention. Again, if you see
something else that are more prominent
to you, that's okay. We can work with that too. When we are done with round, let's go and see
what we have for the next facial features
onto the next portraits. Gain right here, one by one, let's go to the left firstly. We have the very
distinctive eyes. We have the very
nicely shaped mouth. And when we are talking
about kawaii style, we are not paying too
much attention to the nose area because this is not a very kawaii feature that we want to translate
onto our illustration. We can work with some
nodes right here, but we are not paying too
much attention right here on to these dominant features if we have them on the face. So if you see the
nose, for example, maybe on the second
photo right here, we can see that the nose is
pretty prominent right here. But we can take a look at some other features
that we can exaggerate. To create a nice and very
kawaii style portrait. So for example, to
the second one, as we mentioned before, we can go with the eyes right here. They again, very prominent. And in the whole kawaii style, we are paying a lot of attention
to the eyes because they are the mirror to our soul
and everything like that. And we can work with the eyes
very nicely and translate a lot from the photo to the kawaii style portrait
by creating the eyes. Again, getting back to
the second portrait, we have the eyes, and we can work with
the shape that we have our hair because
this is a little bit fun and we can
create something that will be recognizable right
here. We can work with it. And on the right, we
can go, for example, with mouth and eyes or we
can go with eyes and hair. So again, this is
where you want to make a conscious decision about
what you want to exaggerate. When we are done
with the oval shape, let's go and see
what we have next. Again, one by one, going through our square shapes for the heat. On the left, we have
a very bright hair. We have the pretty
distinctive eyes right here. We can
exaggerate it. We can work with it. As
for the middle portrait, we have the eyes again, catching our attention.
We have the mouth. We can go with a bit of
the mustache right here. So again, we are taking a
look at the photograph and the first thing that we see
or maybe not the first thing, but the second thing that we see this is the area right here. The upper lip, we have
the mustache here. We can work with it,
we can translate it. We are trying to make sure that our eye is catching the
right things right here. The thing that we can
work with that will translate nicely to the kawaii. On the right, we have, again, a very peculiar
shape for the here. We can work with it. We have the very nicely looking eyes, and again, we can work
with it to exaggerate it, create something
very, very nice. Again, we can add the recognizability by
using these feature. When we're done with the square, let's take a look at
the last elements that we have are
triangle shapes. Let's go and see what
we have for them. Again, for the
triangle elements, for the triangle pace
that we have right here, we have the very prominent
eyes right here on the left. We can work with the shape of the hair right here or we can make the know that we will
be exaggerating the lips. On the middle part, we have the very catchy eyes. We have the peculiar
shape for the hair. On the right, we have, again, the eyes and lips. We are not paying too much
attention to the nose. We can go and work with the hair here because it's
very flowy teeth. And when we are
done with finding out dominant features of
all of these portraits, we can go and see other ingredients that we
had for our personality. So let's go and take
a look at the hair. When we are working
with the hair, we will need to pay attention to a couple of
things right here. We will need to make sure
that we are creating big shapes and we are creating the shapes that are visible, the easy shapes right here, and we are not creating
the hair strand by strand. We will need to have
a clear silhouette. We will need to have
like banks or no banks, if we have them on the
photograph and if we want to maybe exaggerate our
kawaii illustration, we can go and add the
banks where we don't have the banks to create a nice
looking illustration. So again, this is where
your decision ls. And when we are done
with deciding whether we want the banks or
no banks for us, we need to pay attention
to where the volume lays. So we will need to make sure that we are
placing it right. So for example, if we
have hair on the top, they are a little bit bushy. We will need to translate
it to our portrait, or maybe we have the
very flowy elements and we will need to
pay more attention to the bottom part and add the placement of the volume
more toward the bottom. And also, we will need to
pay attention to the flow. If we take a look at the
previous parts right here, we can see that we have very distinctive
features right here. For example, we will take
a look at this portrait. We can see that we have
not strand hair like that. We have some floor
right here and we will need to pay attention
to it, too. So you can go and again, if you have a photograph that you are going
to be working with, you can start right now
to see where the flow of the hair is and what we are going to be
creating later on. Also for the last
element that we will need to pay attention to
our hair is the texture. Again, we are taking
a look at the flow, and we are taking a
look at the texture. So whether it's a curvy, whether it's a very
straight and very, very fly right now, we will need to
translate it too. So this is the
things that again, we will need to
pay attention to. And when we took a
look at our hair, what it contains from, we will go and take a look at what we have
for our accessories. Accessories, again,
mention it one more time. It's where personality
becomes visible fast. For our accessories, we have all the things that we can wear. We have glasses, earrings, hats, hair clips, piercings, maybe some other elements, maybe you have some elements that are not
mentioned right here. So we will again need to see what we are creating
and we will need to translate it in the
same way as we have it onto our photograph to
add to our likeness. And for the accessories, we need to pay attention
to not to overdo it. So we can have all these
accessories and we can put everything onto one photograph onto one portrait
that we are creating, and it will be a
little bit messy. Or it will be a little
bit overwhelming. So it's a good thing
to select a couple of very distinctive things and to translate them
into your portrait. So we will need to choose one or two meaningful
signature accessories, and we will add only them
to our illustration. When we are done with our hair
and with our accessories, let's take a look at
the vibe and smooth, the very last thing
for this part. So for our vibe and mood, I want to mention one more time. We are not creating the
expressions into this class, but we can create the mood and overall feeling that we want to translate with
our illustration. So we can be soft,
alert, serious, sleepy, playful, all of these things or none of these things,
maybe something different. And we can translate it very
nicely and very easily by making sure that we are positioning all the
foundational parts correctly. For example, we can go maybe
with a playful vibe or mood and we can go and translate our photograph into
a playful way. For example, we
can rise up one of the eyebrows or create some
kind of smirk on the face. That's what we can do right
here without changing the overall expression that we can create for our illustration. You can go and create it by changing the position of
your facial features, changing not the
overall position, but maybe adjusting it slightly
to translate this mood. And when we got familiar with all the vibe
accessories, our hair, dominant feature, we want to translate everything nicely and we want to exaggerate
some things. And Kai rule of exaggeration is pushing
what's already dominant. So this is not the random thing. Kai exaggeration
is very selective, and we will take a look how
we can do it on practice. So let's see what is
our practical method. And our practical method to stylize everything in
a kawaii style and keep the likeness is firstly to identify the top two
of dominant features. We mentioned it before, it may be eyes, it might
be mouth, maybe hair, something that is
the thing that you see firstly and
secondly, two things. We want to push them. We want to push scale, and we want to
create, for example, the eyes, and we want to make
them a litle bit bigger. We are not adding the details. We are not adding maybe
some beauty marks or some small things. They are not very relevant. We want to push the
scale so not detail. We are pushing our mouth, we are pushing our eyes. We are maybe adding
more flow to the hair, maybe adjusting the shape, adding more volume, and the very last step is to
choose what to let go of. This is maybe the nose, maybe, again, beauty marks, maybe some not relevant things that are not adding
to our style, the kawaii one that we are
going to be working with. And they are not what we need to pay too
much attention to. So our main goal is to
keep it simple and bold. And now when we know
all the foundations, we can go and draw a little bit.
6. Kawaii Proportions & Jaw Shapes: Before starting to draw, let's get familiar
with our foundations, as we mentioned them before, but drawn in a kawaii style. So first of all, we'll take
a look at our proportions, drawn in a Kai style in
a very simple scheme, and then we also
will need to get familiar with different
shapes for the jewels. You can remember that we
got familiar with them when we were taking a
look at our photographs, our different shapes, oval, rectangle, triangle, square,
everything like that. We took a look at
the photographs, but now it's time to take a look at what we have it
in a Kai style. So firstly, let's go and take a look at the
kawaii proportions. You can see, we have a very
simple scheme right here. We are using very simple shapes to create everything
that we have right here, very simple shape of the circle for the overall
shape of the head. As for this example, I took a shape of the
oval for our little jaw. We will get a look at everything
else on the next slide. For now, let's see what
we have right here. We have a couple of
lines right here. They are guiding lines that will help us to build up
our facial features. And on the right, you
can see that we have, again, a little bit of a
weird scheme right here. And this little ear
that we have right here contains the areas that
we have for our eye, for our nose, and for our mouth. You can see right
here on our scheme, we have the big
ear right here and everything that I
mentioned before, eye, nose and mouth is positioned right here onto
this area where we have our e. So this is our orangieT
area that is painted in pink, this is the safe
area for our eyes. So depending on your photograph and the position of
your facial features, you can very easily go and
position the eyes higher or lower but not going too far
beyond the painted area. Now when we are
quite familiar with what we have right here for
our kawaii proportions, when we know where we need
to position our shapes, we can take a look at different
shapes for the jewel. So if you remember what we
used to take a look before, our photographs that we had for our different head
shapes, round oval, square triangle, this is our shapes that we are going to be using for our
kawaii illustration. You can see very
different shapes for our jaws and let's see
what we have right here. For the round, we have a
very soft curve for our jaw a little bit closer
to the overall shape of this head that we have
in this orange color, the main shape that we are going to be
using for the head. We have a bit of the
difference right here. The oval shape is going a little bit lower than the
shape that we have around it. Not too big of a difference, but again, very simple,
very small difference. Make a little bit of the
bigger result right here. So we are creating the oval
shape slide curve at the jaw. As for the square shape, you can see we have a
bit of the angles right here onto the side,
very defined edges. And as for the triangle,
we are not creating a very straight triangle here. We are softening up everything. We are eating a bit of the tip right here onto the
bottom for our chin, so a little bit of
a pointed shape and a very softly looking
triangular shape like that. You can see how different
our little schemes look. So that's what we're
going to be doing. And when we are familiar with our dual shapes and with
our Kai proportions, let's finally go and
take a little bit of a practice right here and start to create
our illustration.
7. Practice: Sketch: What we will need
for our practice, we will need a photograph. I'm going to be creating
this pink haired lady. If you want to use
any other photograph, maybe your own photograph, you are welcome to do it. So we also need to
make sure that we are remembering everything
that we learned today. We will need to pay attention
on the shape of the hat, on the proportions, on
the dominant features, on everything that
we learned before. And we will start by
creating a little scheme. You want to start not
from the blink page, you can go to the Project resto
Stop and you can download this little scheme that was
on the previous slide with different shapes for our chin and with the overall
shape for our scheme for our little kawaii
proportions and everything and you can use it and create your own illustration
based on it. But if you want to
start from scratch, let's go and start from scratch. Firstly, what we need to create
is a shape for our head. You can go to the sketching
folder into your brush and you can go and select any brush that you want
for your sketching part, the first thing that
we are going to be creating is the
shape for the head. Let's go and create a
shape of the circle, going with one line like that and creating
the shape that big. To create a shape of the
perfectly rounded circle, we are not lifting
up our Apple pencil. We are holding one of our
fingers on the screen. Go and adjust the side by moving your Apple pencil while you are holding everything
that you are holding. So let's go with
pretty big shape like that, and when we have it, we will need to position it on the center of our
practice area right here. If you are working
on the blink space, we will need to go
and position it in the center of this blink
space too, the blank canvas. So what we need to
do to do this is go into our area key
on the top plat, and we will need to go and
find the center of this area. To make sure that we are doing everything right and
it's easier for us, we can go under snapping
right here on the bottom, and we can turn on snapping
right here into the settings. And then we will hold
our Apple pencil and we will try to find the
center of this area. You can go and try
to position it in accordance with these
guiding lines that you have. For example, let's position it somewhere here and
when we have it, we will tap onto our yoke
to get away from this mode. Now, when we have the
first shape for our head, we will also need to
create other details, and we want to do it
in a symmetrical way. We want to use all that
Procreate can help us with, so we can go and use
some tools of it. Let's go to our range
icon over the top left. We'll go the Canvas and we will toggle drawing
guide right here. We also will need to go
under 80 drawing guide, and with this 80 drawing guide, we will need to find
the symmetry too. So on the bottom, select symmetry and we
will need to go and position this line in the
center of our practice area. You can see I already
have it in the center, and you can see that I missed a little bit of the center
with the shape of the circle. So I will go and
very easily fix. If you need to move this line, go to this blue node in
the middle and drag it toward the area that you
need to position it too. So if you are working onto the blink canvas and if
you turned on symmetry, your line will be exactly
in the center and you don't need to change
anything right here. So find the center of your practice area,
and when you are done, let's tap on R. Let's check mark on the
top to accept the changes. Now I will quickly go and fix the position of the
ellipse right here. For example, let's go
with something like that, and when we have it, we will
go and create other details. Firstly, let's go
and create a couple of lines that will help
us to position our ships. Firstly, let's go and create the horizontal line
that will go through the center of our little
ellipse right here. Again creating the line
very boldly like that, holding it at the end
with our Apple pencil, holding one of our
fingers on the screen. And if we need to move it, go into the popped
up option line on the top and dragon it to
the center of the sheet. When you have it
somewhere in the center, tap on the screen to accept the changes
and then let's go and create a couple of more lines
that we saw on this slide. We will need to create a couple of lines
that will help us to find the position of our
proportions right here. Let's get back right
here and I will take a different color to
create these lines. Firstly, we will go a little bit higher than the shape that we have right here
in the center, we will go a little bit higher
than the middle line and we will create another
line right here. Again, let's go like that, holding it at the end, holding one of our
fingers on the screen. If we need to move it, I will probably go and move
it slightly higher. And when we have
it, we will need to do the same
underneath this line. Let's go and create the similar line going
underneath the central line. And again, we will need to have the same distance from the center that we
have on the top. So if we need to move it, we will go and do
it in that way. When we have it, we will go and create a couple of lines
right here on the bottom. So firstly, let's
go slightly from the bottom and create another line that
will go like that. We will need to have a bit of the tip right here on
the bottom, again, creating a straight line, so holding everything
that we need to hold. And again, if we
need to move it, we will move it slightly higher. We'll have a bit
of the empty area right here on the bottom,
and when we have it, we will need to create
one more little line with a distance like that
that we have on the top. Again, let's go above this
line that we have just created and create another
straight line on the bottom. If we need to move it, go and moving it up and when we
have the result like that, let's go and name this line so we are not confused later on. For this line that
we have on the top, we will go and
write down eyebrow. For this line that we
have on the bottom, the blue one, we will
go and write down I. This line that we have on the bottom,
underneath this line, this is our bottom line
that we have for our e, so we can go and create the line like that
that will connect these Rs and we will use
this area for creating I. This line on the bottom is
our line for the mouth. Let's go and try down mouth. And as we saw right here, our little ear is right here where we have our
eye, mouth and nose. Let's go and create
the ear right here. We will need to connect the little lines right here and create the
shape for the ear. When we have this scheme, let's go and add a
little bit of our jaw. For the jaw that
we are going to be using right here for
this photograph, it's going to be the
shape of the square. So we will need to go and create the rectangular shape right
here onto the bottom. We can do it on the same
layer or we can create a new layer and use our symmetry
tool to create the jaw. Do that, we can go
back to our last and create one more layer
right here on the top, and we need to make sure
that this layer is assisted so we can use the line that
we have for our symmetry. So we'll need to
tap onto this layer and use the option
drawing assist. Now when we have it, we will go firstly and
create the ear. You can go with the same color that you are using right now for these blue lines or you can go back to the pinkish
color if you want. Let's go toward this line
that we have for the eye. We have this little
connected era right here, and from this line,
we will go down and create a shape of
the ear like that. So you can go bigger with the shape, smaller
with the shape, a little bit rounder on the top, a little bit less rounder, use the brush, use the eraser. Remember that now we are
creating the scheme, so it's okay if it's a little bit crooked or a
little bit not looking to go. When we have the
shape for the ear, we are getting
back to our brush, and we will go from
the same line that we have for the top
part of our eye, and we will go down and
start to create the so let's go with a little bit of the reducing line
going like that. And when we have it, we will go toward the bottom
and we will need to firstly mark
down where we are going to be finishing
our shape for the jaw. So let's go slightly
down from this line, and we will go and
start to create the line that's
going in that way. So going to the side, starting to create
something like that. And when we have
the overall shape, we will need to go to the sides, and we will need
to connect it with the slightly rounder shape
that we have for our jaw, the slightly rounder
shape that we would want to create for the
rectangular shape. So when we have
something like that, we can work a little bit on it. So you can go and maybe reduce the shapes right
here onto the sides, maybe create slightly
different shape. You can always take a
look at the photograph to see how it's
going right here. So if you want to adjust
something, go and do that. Overall, what we need to create is something going in that way. Again, remember that it's
not the final result. We can fix everything
later on if you don't like something and maybe you
want to adjust something. Work with your brush,
work with your eraser, to create the scheme that you could use to create your
future illustration. So for example, we can lift this little shape
a little bit higher to create not a very
elongated shape for the overall
shape of the hat. You can work a little bit with your brush and with your eraser to adjust the overall look of everything that
you are creating. When we have the
shape for our jaw, you can again take a look at what you have right
here if you want to maybe fix the ears a little
bit or create something else, maybe adjust the
overall shape of our little jaw or anything else, you are welcome to
go and do that. Again, remember that it doesn't
need to be super perfect. It's okay if it's a
little bit messy, that's the scheme, that's the sketche, that's the process. When we have it, we also can go inside the shape
of the ears and create the shapes like that to create the inner
part of the ear. When we have it, let's go and work a little bit
inside the eye area. So for the eye area, again, we need to remember that we
accurate KAY illustration. We need to remember our
rule of exaggeration. We will need to remember
what we wanted to exaggerate onto this portrait
that we mentioned before. So for this, we can
get back to what we have onto this onto
the dominant feature, and we can take a look
that right here we wanted to exaggerate our
eyes and our and again, as we are here,
we can see we had our little lines for the flow that we also
need to remember, but that we will mention
a little bit later. So for now, let's focus on
our eyes and onto here, and we will get back
to our practice area. So when we have it, let's go and start to create the eyes. So what we need to do
firstly is to find the area that we are going to be using for the
shape of the eye. To make sure that we
are creating everything in proportion and
everything is looking nice, we can start not with the eyes, but we can start with the neck. So for the neck,
let's go right here and create the lines that
will go in that way. You can go a little bit thicker
or a little bit thinner. Again, you can take a look
at your reference photo right here and adjust it
in accordance with it. For example, let's go
with something like that, and when we have it, we can use these lines to create our eyes. Again, if you remember, we also will need
to pay attention to the distance that we
have between our eyes. So to translate our resemblance, we will need to
position the eyes a little bit closer to one
another if we are using this reference photo
because we have a little bit of the narrow position of the eyes right here. Let's first go to
where these lines that we used for the neck and we will go and mentally create the line going
up in that way. When we met a little
markdown over the top, we can go and start to
create the shape of the eye. For the eye shape, let's go and create the shape of
the ellipse like that. You can go lt bit bigger, as I mentioned before,
for the shape. Create it like that. Hold
your line at the end. If you need to adjust,
go to the editing tool, go to the nodes and adjust
the overall shape if you need to.G and create it altebt in a rounder way or alte
bit more elongated. It's up to when we
have the basic shape, again, when we are
at the editing tool, we can go and move the shape
a little bit closer to one another or a little bit
far away from one another. Take a look at your
reference photo, make sure that you are creating
the resemblance by using the white or narrow
or average position of the eyes right here,
the distance between them. If you need to move it when
you are at the editing tool, hold your Apple pencil and move your shape more toward the
side that you need it to be. For example, let's go and
create it in that way. When we have it
tap on the screen, and let's go and add the
top eyelid right here. So to do that, we will go
and start to kind of wrap around what we have right here
for the shape of the iris. So we can go like
that and start to go a little bit outside
the ship and create the basic shape of
the eyelids and the shape of the
eyelashes go in that way. So let's go at a bit lower and create some kind of the
hugging shape like that. Again, it doesn't need
to be perfect right now. When we have it, we can go toward the middle part and
create the actual iris. So what we need to do
is to first go toward the middle part and create a shape of the
ellipse like that. We will need to position
it in the center, so go into the 18 mode
if we need to move it. Let's position it in that way. Again, if you want to
make it a little bit bigger or a little bit
smaller, it's up to you. Just try to position
it in the center, and when we have it
tap on the screen, and then we will go toward the bottom and create
the shape like that, that will go through
the bottom part. So again, we are
trying to make it nice and we will try to make
it position horizontally. So one side of it is on the same level
that the other one. And when we have it,
we will go and map out where we are going to be putting the darkish
color later on, so we can go and shade this
little part like that. When we have it,
let's continue to work onto the overall
shape of the eye. Let's go toward
this little part, and let's go a
little bit lower to create this little shape
for our eye lashes. Again, we are exaggerating, so we have a bit of
the makeup right here onto our reference
photo and overall, we are exaggerating the
shape of our eyes so we can go and create the very
peculiar lashes right here. For the lashes, let's
go slightly higher than we have the bottom
part of our lashes. Again, if you need to work with your eraser and the brush
to adjust the shape, you are welcome to
go and do that. Let's go slightly higher than
the tip that we have right here and we will go and create the little line
done in that way. Then we'll go slightly higher and create another little line that is wrapping around the
overall shape of the eye. Now when we have it, let's go and turn it into
the actual lashes, and we will be creating
the shapes like that. So very rounded triangular
shapes going up. Again, straight away,
we can go and shed it and do the same
onto the top by creating slightly
smaller version of the same element that we have
right here onto the bottom. Again, we will need to make everything looking nice and we will need to make everything in a way that it
belongs together. So we will need to go and
create the smoothness. So going along the top, trying to add the
smoothness toward the sp and trying to work with our
brush and with our erasa. If you feel that you over did it a little
bit or you want to play around with the position of your eyes or with
something else, we can go and do it very
easily by using again, one tool that Procreate has. Let's go under the
magic one tool right here onto the top and we will use the option liquefy. On the bottom, we will use the push option and we
have the size latter, so we can go and adjust the size of our brush by making
it a little bit bigger, for example, and we can go and tweak what
we have right here. For example, we can make the
ice a little bit rounder. Go and maybe position
them differently. So for now, we can
play around with the overall shape that we
have for our eyes and create something that will
look peculiar and will keep the resemblance with
the photo that we are using. So spend some time here. If
you want to adjust something, remember that for
now we are creating a scheme and a sketch and it
doesn't need to be perfect. You can go and adjust it
in a way that you want. So spend some time here and adjust the
shape to your like. So I decided to go slightly lower with the oral shape and make it a
little bit rounder. And when you are satisfied
with everything, you can tap on your magic one to one more time or twice to
get away from this mode. And if you need to adjust
something manually, maybe make the thicker outline for the eye lashes right here, you are welcome to
go and do that. So spend some time here to adjust the parts
manual if you need to. And then we also can go
toward the bottom to again, make sure that we are creating this makeup effect right here, and we can go and finish
up creating the eye by going toward the bottom part and create some kind of
the lashes here too. We need to pay attention
right here is to go toward this tip that we have
right here for our eye, and we will need to create the bottom part following the overall direction
that we have right here. So, for example,
let's go like that, and let's create the
eyelashes in a smaller way. Again, if you want
to maybe spend more time over the top part
and adjust it in any way, go and do what you need
to do with the help of your brush and of your erasa and adjust the parts
that you need. Overall, when you are
satisfied with everything, let's go and add the eyebrow. So for the eyebrow, we
have line on the top, and we will go and create
the eyebrow over it too. Again, taking a look at
what we have right here on our reference photo and creating the similar curve
that we have right here. Let's go with slightly
smaller shape and create something
going like that. You can go firstly with one
line like that and then add the thickness toward
the bottom and towards the overall
shape like that. Again, let's create
the thickness and let's create
the shading part. When we have it, let's go
and create a little mouth. For the mouth, we
have our little line. We will go toward
the middle part, we will go to this
line and we will start to create our
mouth from this line. So go like that and creating
the line going in that way. Again, if you want to take
a look at your photograph, make sure that the size of the mouth is something similar to what you are
creating right here. If you want to create a bit of the more open mouth right here, more of the smiley mouth
go with a bigger curve. Again, it's up to use your
brush, use your eraser, created a couple of times to make sure that you're
creating what you want. When we have the
results like that, let's finish up creating the bottom part by creating
this little sweater. Again, we will use
our symmetry tool and we will create a
sweater going in that way. Let's first go towards the
middle part right here and we will create some element
going in that way. So a very soft V shape going
bigger in a shape like that, going toward the
bottom finishing up, creating R shape, going more
toward the inside part. So when we have it
going toward the side, creating the turtleneck part. When we have it going
toward the bottom and creating something similar to what we have right
here on the top. You can go and
exaggerate it slightly by creating the line
going up in that way. Gain doesn't need to be perfect. We can adjust it if we need to. When we have it, let's
go toward the bottom and create the finishing part right here by creating
the shoulders. We will start by going toward our little turtle neck
right here and from it, we will go to the side and create the shape
going in that way. Very softly looking
element going like that. You can go and work
a little bit on the overall shape, overall size. For example, let's go
with something like that, and we will go toward
this area where we have our shoulders and we will create the little line going like that. Go and finish up
creating our sketch by creating a little
bottom part like that. Again, if you need
to adjust something, you can go to the
liquefied tool push option and straightaway from here, adjust the oval shape if
you need to adjust it. I decided to go and make
this overall shape for a sweater a little
bit smaller and position it inside
this practice area. Again, using liquefied tool, we can push it a
little bit higher. We can adjust some other things. For example, maybe the
browse or maybe the ears. If you want to adjust
anything else, you are welcome to
go and do that too. When we have the best like that, we can get back to our screen and we can go and
add our little here. So for the hair, we
will go and create one more layer and we will go to our list and
create it from here. We're not going to be using
our symmetry tool right here. So let's go grab a brush and we will start to create
our little hair. Firstly, let's go and
decide where we want to finish creating our
hair over the top part. So let's go and create that
first line going like that. We can take a look to our reference picture
one more time, and we are looking at
this little part where we have the connection between
the hair and the forehead. We can go and very
easily create the line that will show us
where this line is. So go and create something
going like that. And maybe a little
bit lower, actually. So G on like that, again, try it out a couple of times and create the line that
will look like that. Let's start creating
our hair from the mass, so we are not creating the
singular strength of hair. We are starting with
the general shape. Again, as we mentioned before. Let's first go over the top. We will step a bit
from the top of the head and we will start
to wrap our hair around. So go like that, you can rotate your canvas
for convenience, and we can go and
start to create a rounder shape over
the top firstly. So let's go like that,
create a couple of lines. Again, if you need to
create a couple of times, you're welcome to
go and do that. When we have it, let's go
toward the ears, and we again, will want to create our
hair behind the ears. So we will need to
have some space for our hair right here too. So let's go to the ears. We will go a little bit to the side from them and
we will make a little markdown right here on one side and onto the
other side to make sure that we are going
to be going through these lines to create
our future hair. And with these little marks
down, let's go higher, and let's connect them with the shape that
we've created onto the let's go and create a very
slopy element right here, very soft curve, and we will do the same onto the
opposite side too. Try to make it pretty similar on both sides and
when we have it, let's go toward the
bottom and let's find out where we want to
finish creating our here. We want to create a
length of the here, finishing up onto our shoulders or a little bit lower
than the shoulders. So let's go and create the
line that we will use to that. Let's go toward this part, and let's create the line
that will go in that. Again, we are working
with the curves. We are working with
various soft elements, creating the line like
that, and that way, we will know where we want
to finish up, create here. And again, if you remember, we had some lines onto our here. So this is our flow lines. Let's take a look at them. We will need to go
and create this flow affect into our here by creating it onto
our illustration. So let's get back and let's
start to create it here. What we need to do firstly
is to finish up creating the overall shape of the here so let's go and start to create
it going in that way. So we will go and create it
in a rounder way like that, and then we will do the same
onto the opposite side. So now when we have the
general mass of hair, let's go and start to create some peculiar
details right here to create the nicer hair
than we have right now. So for example, let's go
firstly from the top and let's start by creating
a little strand of hair that will go
right here onto the side. Again, we don't need to recreate the oral shape the
same way as we have a right here onto
our reference picture. We can go and create
more kawaii look right here by adding a bit of
the fringe right here. So we kind of the
fringe somewhere here, but we can go and exaggerate it again and create it
in a more visible. First let's go toward the
middle part right here, we will create a bit
of the parting and we will start by creating a
little loop going in that way. From this loop, we will
go down and we will start to create the line
going down in that way. We want to hide a bit of the irate here and we will create the line that
will go in that way. I will actually take
a different color so it will be seen more
clearly onset this sketch. So let's go and one more
time, try it out right here. Go on with this blue
color going down like that and starting
to create some kind of the wrapping
around and creating a very nicely looking
strength or hair going down. When we have it, you
can go a little bit lower or a little bit
higher with the shape. Try to create a very
softly looking curve. And when we have
this first curve, let's go slightly to the side and we will add a bit
of the thickness to it. Generally going and creating the pretty parallel line to
what we have right here, and we will need
to finish it up by creating the very softly
triangular look on the bottom. So going like that and creating something
going in that way. Going thicker, going
thinner, it's up to you. Again, if you want, you can go and work with
your brush and with your eraser to adjust the overlook of the
strength of hair. Now when we have it, let's go toward the middle part right here toward the side and we will start to create
the flow right here. We will go toward this area
in the middle and we want to create some kind of the
line that is going like that. We will have a bit of the dent right here
between the parts. Let's go to the area
where we have the ear. We will go closer to
it and we will create a differently looking
shape going in that way. We are creating the curve that will be opposite to what
we have right here, not too much, but some kind
of visible right here, and we will need to connect it with the shape that
we have on the top. Let's go like that and we will create something
going in that way. When we have it, going toward the bottom and we will
need to create, again, the opposition right here to
what we have for our dent, going like that and
starting to create the curve going
down in that way. Again, we are creating this very peculiar little shape that we have for our flow. Let's go like that,
and let's connect these parts with a couple of strands of hair onto the bottom. We can go and start by going toward this first
strand of hair. We can create the second one right here to go in and creating the next element by creating a couple of lines
going up in that way. Again, we are working
with the curves. We are creating very
softly looking here. Doesn't need to be
perfect right now, go and creating
something in that way. To add a bit more of the
movement right here, we can go and create
some strength of hair that will be separate
from one another. Again, if we have created
something going in that way, we can again go and
exaggerate it a little bit and create the free
strength of hair right here. Again, connect it with
the overall mass, but we will have a
bit more distance between these parts that are in together and with this part that is
a little bit separated. When we have it, let's go toward the opposite side and starting to create something
similar here. You can go and create it
in the symmetrical way, so you can go and create the similar strength
of hair right here, or maybe we want to make
it a little bit more peculiar and create a differently looking
element right here. As I mentioned before,
we want to add a bit of the fringe right here. So let's go and work with it and create the strength of here
that will go right here, and we will go and
make it a little bit less positioned like that. We will go a little
bit higher with it. So let's go and
create the strength of hair that will
go in that way. When we have it, let's
go toward the top and we will create this fringe
that we mentioned before. We are going to this
loop that we had on the very first movement that
we created for our hair, and from this, we will go and firstly create a couple of lines that will show the direction of what we want for our fringe. Again, we are working
with our curves. We are going along
the whole shape that we have for our head, and we are creating a couple
of lines going like that. You can go and create it in a more rounder way or a little bit more in
the triangular way. Try to create it in a cute way. And you can go and hide one of the eyebrows
right here and connect everything nicely with this curve that we have
right here onto this side. And as for the soap, let's go and create the
strand of hair that will go up like that and connect everything going to
the bottom part. And now when we have
it, we will need to repeat something similar to
what we have right here. So again, going toward the ear firstly and
creating the dent. So going like that, creating
something going in that way, connecting it nicely with the shade that we
have on the top, creating a very
nicely looking dent and the overall flow of hair, and then going toward the bottom creating the similar things
that we have right here. So, for example, let's start from the middle part right here, as we don't have this line
going toward the bottom, we will need to create
something that will finish up the overall shape of here
right here onto the bottom. Again, we are using
this line that we've created on the bottom
to make sure that we are positioning everything on one line and it's not too random and then going toward the sides and starting to create
the lines right here. Again, if it's
easier, you can start by creating a couple of
lines that will show you the direction
that you need to follow and create the
thickness later on. Create some strengths that are together and some
strengths that are not together and create some flow and movement in the
hair like that. Again, if you need to go
and adjust some parts, you are welcome to use the liquefied tool and
adjust it with it. I lifted up the bottom
part a little bit, so it is similar to
what we have right here on the reference
photo and also work on the oral shape of
the hair so it's not a little bit too fluffy and
going more toward the side. So if you need to
adjust something else, you are welcome to
go and do that. Spend some time here, use your liquefied
tool to adjust it. So spend some time
adjusting your details. Go with your brush and with your eraser to adjust the
parts that you want to adjust. When you are done, we will need to make sure that
we've translated our resemblance with
reference photo by checking out
some fundamentals. We will need to make
sure that we've translated our head
shape. Is it correct? Take a look at your
reference photo, make sure that the
shape is right, the jaw line to be precise, and when you are done with it, let's see whether
proportions are right. Yes, we are creating the Kai illustration and
everything should be a little bit more rounded than it is onto our
reference photo, but our proportions
are pretty right, so we have a little
bit less distance between our eyes
than we had before. So we will need to pay
attention to it right here. We are not paying too much
attention to the nose. Again, as I mentioned before, that's not the point
of the kawaii style. The mouth, the
distance of the mouth, the size of the mouth, if you want to adjust it, you are welcome to go and do that. For example, we can
go with slightly bigger smile right here. You can adjust anything
that you want to adjust. Make sure that the hair
flow is right too, so it's not too stiff. You have some
difference when you are creating it right here
onto the sides and everything. It's not too symmetrical. Of course, if you want
to create symmetrical, you can do that. Make sure that the shape of the eyes are similar
to what you have, and the dominance
feature that you want to exaggerate
is seen right here. So we tried to create the shape for the eyes
that will be exaggerated, so we did it. And to make sure that everything is connected together and
everything is looking right, you can go and zoom out your canvas and see
whether from the distance, you can see the
resemblance right here. If it looks right, we can start to create
the clean lines.
8. Practice: Clean Lines: Start working on
our clean lines, firstly by going and
doing some preparations. So we will need to change the brush to
something very sleek. So for example, we can
go to the inking folder, and for example, select
technical pen brush. Or if you have any brush that
you prefer for this part, you are welcome to select. And one more thing
that we will need to do for this brush
is to adjust it. So we want all of
our lines to be super smooth and
easy to work with. So let's tap on brush, and will go inside
the brush studio. On the left, we'll go
under stabilization, and we can play with amount of streamline and amount
of stabilization. So you can first go
to the drone pad out, right here, how it feels. And if we want to create
very smooth lines, we will need to go and
work on side the amount. Streamline and amount
of stabilization. You can set it the same
way as you see it right now onto your screen.
You can go and tweak it. You can always get back
to this option later on if you maybe want
to check it out or maybe want to adjust it after you tried it
out onto your canvas. Remember that you can
always get back to it. And when you are satisfied,
what you set right here, let's tap on archeckmrk on the
top to accept the changes. Also, for our little lines that we are
going to be creating, we will need to select
a different color. So for example,
let's go and select something darkish,
doesn't matter for now. Let's go with
something like that. And also, we will need to
go and create a couple of more layers so we will be able to create
our clean lights. Firstly, we can go to our
layers and we can either go and merge all of these layers that we have for our
sketch together, or one by one, we
will go to the icon, and we will be
adjusting the opacity. So let's go and set
it to something around maybe 40% or so. We still need to see what
we have onto our canvas, but it doesn't need to be too bothering so you can
go and one by one, again, adjust everything
that we have right here. And then we will need to
go on the top and create one more layer for our first little lines that
we are going to be creating. So first, let's go and recreate the lines that we
have symmetrical. So we will need to again
use our symmetry too. When we have a new layer, let's tap on it and we will use the option
drawing assist. Onto this layer, we
will be able to go and recreate all the
options that we have, all the things
that we have right here in a symmetrical way. Let's adjust the size of the brush so you can go
and try it out right here, make it a little bit bigger,
a little bit smaller. It's up to use the size
that works for you, and let's go and start by recreating the shape that
we have for our jaw. Again, when we are
recreating our lines, it doesn't need to
be the same way as we have it onto our sketch. If you feel that maybe you want to go and adjust something, maybe make it a little bit different from what you
have onto your skeue, you are welcome to
go and do that. So firstly, as I
mentioned before, let's go to our jaw and let's
go and start to recreate. With the clean lines
that we are creating, we will need to make sure that the lines that we are
creating are closed. That means that we won't have
any gaps into them and we also will need to pay attention to the smoothness of the lines. We will need to go and
create the lines with the connections
that will look like we are creating the
seamless lines. We don't need to go and create everything with one line
to achieve the smoothness, but we will need to pay
attention to the connections. You can see right now it's
not looking too good, so we will go a
little bit above it and we will fix it by
creating a very smooth line. Also need to pay attention to the overall shape that
we have for our line, size of the line,
overall thickness, it should be pretty seamless and pretty thick everywhere
where we are creating it. If you need to go
over some lines and maybe adjust it slightly, you are welcome to
go and do that. Again, if you don't
like how it turned out, you can try it out
one more time. You are welcome to repeat it
as many times as you need. Maybe again, if you want
to adjust something, you are welcome to create
something different. For example, we can
go and maybe try to position the shape for the
jaw a little bit lower. This time, we can
try it out. Why not? We can go and again,
take a look at what we have right here
for our reference photo, repeat what we have right here and create our lines in
accordance with that. Let's try it out one more time. Let's create this
prominent shape for our jaw and create
something given like that. Use your brush and
use your eraser to achieve the
smooth look, again, pay attention to
the connections and create something that will
look nice for the jaw. When we have it straightaway, we can go toward our neck and create these
elements here too. Again, pay attention
to the connections that you are creating
for the elements. For example, right now, we
are using a pressure brush, and if you create
something like that, the connection won't be
too nice right here, and we will need
to add more color right here when we have the
connection between the parts. Straightaway, we can go and recreate what we have
for our sweater. So again, doing the same thing as we did with the
shape for the head, going like that and
trying to create a nice connection right
here in the middle. Go and recreating what
we have at the back and creating the lines that we have right here on the bottom too. So overall, going along the whole shape and recreating
it either the same way as we have it onto our skeue or adjusting it slightly
if we want to. If we see that we have something going like
that, for example, we can go and grab our
eraser and very easily go and make very smooth
connections with our eraser. When you are done, we
also can go toward the bottom and create this
little part right here. Let's go and create it, creating again, nice
connection between the parts. If we have very strong
corners right here, we again can go alone
the shapes that we are creating and with the
help of our brush and eraser, adjust the parts right here. Also, we can go
and straightaway, maybe add some details. For example, let's go and create some kind a pattern right
here for our sweater. Try out a couple
of times to create a nice and believable
pattern for this element. And when we have it,
let's go and recreate this part that we have
for our little shoulders. Again, either with one line
or with a couple of lines, let's go and create
the shoulders, making sure that
the connection is nice and going toward the bottom to recreate this
little part right here. With the lines that you create, you can hold them
at the end and you can go toward the
editing tool to adjust the curvature and everything that we want
to adjust right here. For example, we can go and
adjust it straight away from this mode and then
by using the eraser, we can go and adjust this little part that
we have in the middle. Pay attention to the
overall thickness and go to the corners
to soften them up. Let's recreate this
little detail. You can adjust it in
any way that you want. So for example, you can go and create something
going in that way. And also, we can go and move on to the parts that
we have onto our top. If you feel that maybe you
want to go over the lines that you have for the shape
of the hat for the jaw, so every line that we are creating is similar
in thickness. You are welcome to
go and do that. So let's go and one more time, go along these lines
that we have and recreate them by adding a bit
of the thickness to that. First, if you don't want
to use the pressure brush, you can go to the
different folder and select the different
brush you can use, for example, monoline brush to create same thickness
everywhere. When we have this
shape for the jaw, let's go and recreate the ear. Again, either with one line
or with a couple of lines, go and create the
shape right here. You don't need to
recreate it with 100% of similarity to what you have
onto the sage one more time, if you want to adjust
it, go and adjust it. If you want to go
with a bigger size of the ears or smaller
size of the ears, again, you are welcome
to go and do that. When you have the shape, make sure that the
connections looking nice. For example, going right here and making a nice connection. When we have it, let's go
toward this part and let's recreate it either with one line or with a couple of lines, and when we have it,
let's move on to the fis. For example, let's
start with the ice. We can go and recreate
them firstly, go on with the first shape, holding our line at the end, creating the shape that we like. For example, let's go
with something like that. If we need to adjust
it, go on toward our editing to and
adjusting it from here. Again, if you want
to create something different from
what you have onto your schedule, are
welcome to do it. When you are creating something and when you
are at the editing tool, it's always good to take a look at everything from
the distance so you are sure that
you are creating everything in a way that
you want to create it. For example, if you are
satisfied with everything here, get back to zoom
into what you are creating right here and tap on the screen to
accept the changes. Make sure that you don't have
something going like that. We have it right
here, we can go and create our shape
for the eyelashes. But for example, if you had something like that
going on the bottom, for example, you
connected these parts. We'll need to go
and make sure that the line looks seamless
and we will need to go and add a little bit of
the thickness right here toward this part
to create this effect. When we have it, let's go
and create the iris part. Again, going with the shape
like that, holding it, going toward our editing tool to make sure that we are
right at the center. Going like that, if
we need to adjust it, go into our nodes that we have, trying to position
it at the center. It's easier to take a look at
this eye that doesn't have this little note right here to adjust it and to see
clearly what we are doing. So for example, right
now, we will need to go and maybe move it
slightly like that. So adjust it to your liking, size wise and position wise. When we have it,
tap on the screen, and straightaway, let's go and recreate this little
part onto the bottom. Again, with one line, you can hold it at the end
to make it smooth. Go into the editing tool to adjust it if we need
to when we have it, tap on the screen,
and straightaway, let's go and add
the color inside. So we are going to
this icon on the top. We are dragging it toward
this area on the top and toward these two parts that
we have for our bottom part. If you want, you can go toward these little corners
and soften them up too. If it's okay to you to
have it in that way, you are welcome to
keep it as it is. And when we have it, let's
go towards the top and let's recreate the shape that we
have for our little eyelashes. Again, we are not going too
far from the shape that we have right here for
the top part of the eye. We are going and starting
from it and creating shape, wrapping around along
the whole shape that we have for our iris. Let's go like that with
a couple of lines, trying to create it in a
very smooth way like that, creating the corners, very smooth and very nice ones and creating something
going like that. As for the bottom
part, let's create a bit of the tip right
here and then going up and creating the eyelash that
we have right here on the and either go manually and add the
color inside or again, use your eye dropper tool
right here by adding the color by dragging the
color toward this middle part. If you zoom in and
if you see that you have little
miscolord places, go over them with your brush and add this color
manually to this part. Take a look at everything again from the distance to
decide whether you need to work onto
the smoothness of the lines or the
overall look of them. Go along the parts that you need to adjust and
go and adjust them. Work with your brush
and with your eraser. When you have it, let's
get back to our brush, and let's go and create
this little shape that we have for the bottom
part of our eye. So very thinly going with our brush and creating a
little line going like that. You can try it out a
couple of times to create a smoothly looking
element and then going toward the bottom and creating these little eye lashes in a
very soft triangular shapes. Let's go with very small details like that and create
something going like that. Again, work with
your brush and with your eraser to create these
very nice looking tips. So create the pointy elements on the bottom and a bit of the
thicker look on the top. Again, you can go toward the bottom part right
here toward the side that we have onto our
right and make it a little bit thicker right
here onto this little part. So we will have some kind of the recedent look of this line going toward the inner corner
of the when we have it, we will get back to a brush. We can go and add a bit of the eyed right
here on the top. So again, either with a
very soft line like that, go and create the
similar looking line that we have for our top
part of the eyelashes. When we have it,
let's go and create other details that we can
create with our symmetry tool. So again, going towards the
little eyebrow that we have and either repeating
the shade that we have right here or creating
something different. Again, we will need to
create some kind of the bulkier look right here that we have
on the inside part. Then we have onto
the outside part and creating something
going like that. Make sure that lines look good, adjust them if you need to, and add the color straightaway by dragging and dropping
the color inside. Again, zoom it in, and if you see that you have some
miscolord places, go manually and add
the color inside. Now, when we have the eyebrows, let's go and create
our little mouth. Again, either create something similar to what you have on the year sketch or create something different
if you prefer so. Hold your line in the end
if you want to adjust it and go to the editing tool
to adjust it from here. If you have something
weird that is happening right now onto the
screen, don't worry, if you zoom out, you will have a clean look of what
you are creating. Sometimes it
glitches, it's okay. When we have the smile, take a look at it
from the distance one more time to
decide whether you want to adjust it in any way or maybe try
it out one more time. When you are satisfied,
tap on the screen. Let's take a look at our little reference photo and whether we want to
adjust our mouth or not. For example, we can
go and maybe pay a little bit more attention toward the corners right here. You can go and thicken
them up slightly. And then by selecting
our eraser, we can go a little bit
toward the middle part and create slightly thinner
element right here. Again, it's up to you if
you don't want to do that, you are welcome to keep
everything as it was before. But if you want to try it out, you are welcome to
go and do that. Now, let's make sure
that we re created everything that should be
created with our symmetry tool. If it is everything that we needed to create
with these tool, let's go and create one
more layer to recreate other elements that we don't
need our symmetry tool for. One more time we are
going to our layers, we can create one
more layer above. Again, by using the same
brush and the same color, we will go and recreate the elements that we have
right here on the top. If it's a little bit too bright, the lines that we
have right here that we already created, we can get back to our layers, go to this layer
that we have for our features that we already
put onto our screen. Go to the N icon and adjust
the apacit slightly so you see what you are
going to be creating with the layer that
we have on top. Get back to this new
layer and let's go and recreate these details
that we have for our hair. Again, let's go toward the top. Firstly, we will recreate
this little line, firstly, select the brush, go
toward this little part, and let's start from it. When we have it, going towards the strength of hair
that we have, and again, either with one line or
with a couple of lines, let's go and create what we
need to create for our hair. Try to create very smooth lines, hold your line in the end,
create it in that way. Go and add the thickness again, either with one line or with a couple of lines to
create it like that. Adjust the thickness,
adjust the curvature. If you need to hold your line at the end,
go to the 18 to, adjust the overall look by adjusting the
nodes right here. If you want to
make sure that you are following this flow
that we mentioned before, so everything looks quite
parallel to one another, and we have the volume
positioned nicely onto our hair. If you want to try it out
a couple of more times, you are welcome to
go and do that. You also can pay
attention toward the bottom parts because
we have the thing that is called gravity and we need
to pay attention to it too because the hair when we are creating them and
all the details that we are creating them, we will need to add
a bit more volume toward the bottom part
because again, gravity. If you want to try it out one
more time, go and do that, create it in a better way, create something
that will look nice. So for example, let's go
with something like that. Let's connect it nicely
over the bottom and we will erase the parts that we don't need with the help
of our eraser. Again, trying to make
all the lines very smooth and very nicely
looking and believable. And as we have it on the top, we can go and adjust it here too by adding a bit of
volume right here. I will go and erase
this little part and create the line
in a different way. We are following the direction that we have for the head right here and we will need to create our elements in
accordance with it. Now, when we have
this first strand, let's go toward the
bottom and let's create a couple of lines
right here that we have them. For example, let's
go from the ear. Let's start to create very rounded element going toward the first strand of here. Again paying attention to
the connection right here. If we need to maybe
adjust it slightly to create a better connection,
we will go and do that. Go and adjust the
curvature if you need to create something going like that and maybe elongate this line. When you are at 18 mode, it will be quite easy
for for example, let's go with something going in that way and then we will connect it nicely with this first curve
that we've created. Let's create a bit of the
little done right here, a little bit of the empty space and we will create
something going like that. Again, use your brush, use your eraser and adjust the
parts that you don't need. Now when we have
the second strand, let's go and create
the next one. You can go and again, repeat
it the same way as we have it onto our sketch or
adjust it slightly. For example, let's
go and create it a little bit different from
what we have onto our sketch. Hold your line in the end, adjust it from the editing tool. Let's go a little
bit higher with this little part that
we have on the top. I always take a look at
it from the distance to adjust it if you need to
when you are satisfied, tap on the screen, and let's recreate this little line
that we have onto this side. Again, pay attention
to the connections, and let's go over and recreate this line that
we have on the top. When we have it the same way, let's go and recreate what we have onto the opposite side. For now, let's go
for the back here, and then when we
are done with it, we will go to the fringe. Using all the tools
that we used before, let's go and t
create the same way as we have it onto
the opposite side. Work onto the connections
between the strengths, make them pointy and
very nicely looking, and go over all of
these connections on the bottom and on the top and
create them in a nice way. Now when we have the
result like that, let's go toward the top and
let's recreate the fringe. We are doing the
same thing here, going the same way and
creating our elements. Firstly, let's go toward
this little part. We will make it a little bit
smaller and we will go and create this hook right here that we had before
onto our sketch. We will have a bit of the part
that is going on the top. When we have it, let's
go a little bit from these elements and going down and starting to create
our little fringe. Again, doing the same things, holding our lines and the ends, going to the hen
tool to adjust them, go and starting to create nice connections
between the parts. If it's easier to you, you are welcome
to go and firstly create one of the lines
that you have right here, so you will have the direction
that you are aiming for. Try not to go too
close to the eye. For example, let's go a
little bit higher like that, and then we can create a
couple of more lines that will finish up this overall look
that we have for our fringe. For example, let's go toward this part and we will connect it nicely to go on like that, creating a little
line in that way, trying out a couple of times
to create a nice result, either straightaway or after
you've created the elements, go toward the corners and make
sure that they look nice. When you are done
with this task, let's go and continue creating the last elements that
we have for our fringe. So let's go and create one more strength
of here right here. So we will create the
element going like that, and then we will create the element that we
have onto this part. So let's go a little bit
from the top and we will go above this shape that
we have for our eyelashes, so we are trying not
to go to this part. And we will create the
element going in that way. So again, if you need
to try it out a couple of times to create
it in a nice way, go and try out as many
times as you need. Create a couple of lines. After that, you can go and
find the lines that are working and the lines that
are not working, fix it. When you are satisfied
with the overall shape, let's take a look at
our corners and let's adjust them again straightaway or after we've
created the lines. When we have it, let's
finish up by creating this little part and connect it nicely with the shape that
we have on at the bottom. Again, hold your line,
go to the editing tool, adjust the thickness of it, maybe adjust the overall
shape of it if you want to. Let's go with something
going in that way, for example, and create the shape that will
look like that. And now we also can add one
more line right here on the top to create some kind
of the effect of the volume. Let's go toward this little line that we have for the
shape of the heads, and we will create the
line that will go a little bit above it and a
little bit going like that. You can again try it
out a couple of times. You can go and create a
differently looking line. You can go and connect it
some kind of connect it with this shape that we
have on the for example, for now, we can go and
try it out one more time, going a little bit lower to this little part that
we have right here. So kind the parton we have the parting that
we have right here, Osa our reference photo we
will have right here too. So for example, let's go like that. Try it out one more time. When we have it, we can work on this little part right here. For example, let's go
and elongate this shape, make sure that
everything look nice, then we can go and continue creating this
little part that we already created and make sure that it is kind of the continuation of this shape that
we have on the top. If you have some extra lines that you need to take care of, go with your eraser and erase everything
that you don't need. Now, when we have the
results like that, we also can go and maybe
add some beautification. If we take a look at
our reference photo, we will see that we have some
beauty marks right here. We can go and add them
to our illustration too. So we can think of them as
the accessories, for example. So for example, let's go to
these places where we have our beauty marks
on the photograph, and let's go and
recreate them to add the resemblance of the
photo to our kawaii. If you want to go and
add some accessories, maybe earrings or maybe some
of the clips onto the here, it's time where
you are doing it. Firstly, let's go and clean up everything to see what we have created with
our clean lines. We can do it very
easily, firstly by going to our layers and we will hide these layers
that we have for our sketch. Go one by one to
these checkmarks and hide and then don't forget that we need to get
back to this layer where we have our lines
for the features, and we will need to
go to the N icon and get back to
our full opacity. Now, let's also tap onto this layer and we
will go and turn off our drone assist because we
will need to go to all of the places that are overlapping and we will need to
get rid of them. So onto this layer, we will need to grab
our erasa and we will go to these areas that
we have overlapped. So for example, the
ears right here, the eyebrow right here, the parts that we have
right here onto the bottom, we will need to go and very easily erase them so
everything looks nice. Let's go and do
that. If you have the eyelashes that are going
to the shape of the hair, you can decide whether you
want to keep it as it is, or whether you want
to go and erase these parts that are
going toward the hair. So it's up to you.
When you have it, let's go toward
the opposite side and erase the parts that
we don't need from here. If you did it, get
back to your brush and restore the lines that you accidentally erased,
for example. When we have the
result like that, when all the lines are cleaned, we can go and merge
everything together. Let's get back to our layers, and we will need to
go to this layer where we have our hair on, tap on it, and use the
option merge down. Now, everything that we have for our lines is on one layer. And we can go and add our
beautification if we want to. So for example, we will go and
create one more le on top, and maybe we will go and add some kind of a hair clip
right here on the top. So, for example, let's
go and maybe create some kind of a heart right
here or something else. If you want to create something different, you are
welcome to do it. If you don't want to
create any details, in that way, you are welcome to keep everything
as it was before. But for the accessories, you are welcome to go and
create something that you want. If you want to add more details, you are welcome to
go and do that. So for example, I will
probably go and create some kind of a matching heart right here onto the sweater. We are not adding too many
of the details right here. We are adding some accents, as again, we mentioned before. And for example,
I'll probably try to create it one more time to
create it in a nicer way. When we have the details done, if you want, you can go and add a little nose right
here toward the top. We had the lines for the nose. This is the line
that we have for the bottom part of the ice. If you need to get
back to your lays and unhide the layer where we had these proportions
and everything to put your nose right
here onto this line, you are welcome to
go and do that. You can very easily by aiding the nose in
shape of the dot, you can again try out to
create it a couple of times. If you don't like how it looks, you are welcome to
go and erase it. If you see that some parts are overlapping or you need to take care of some of the lines, you are welcome to get back to Dia with your lines and erase the overlapping parts or work on some connections,
something like that. For now, go and erase everything that you need to
erase, adjust the lines, make sure that all of
the lines are closed, and that means
that all the lines that we have outside are closed. For example, this
part we can keep as not closed because
overall shape is closed. Again, spend some
time right now once your clean lines and adjust
everything to your liking. When you have the
result like that, when you are satisfied
with the clean lines, we are done with our clean lines and we can move on to
the coloring part.
9. Coloring Rules: Before we start coloring
our illustration, we will need to learn about fundamentals of coloring
just a little bit. So firstly, we will
need to understand that our kawaii colors are a little bit different
from real colors. They are a bit cleaner,
they are brighter, and we will need to
know how to do it, how to create these colors. So firstly, let's go
and take a look at the very simple
kawaii color formula. So the basic process of
picking the colors for kawaii illustration is firstly
to pick the first color, so for example, you
have the photograph and you will need to
pick the color from it, but we won't use it exactly
as it is onto our photograph. We will need to adjust
it. So firstly, we are picking the
color, for example, the color of the skin or the color of the hair
from our photograph, and we will need
to lighten it up to make it a little
bit more up in value. Then we will need to brighten
it to increase saturation. And that way, we will have our kawaii very clean
and very bright color. And we know about the
kawaii color formula, just a little bit that we're
going to be using later on, we will need to learn a little bit about the
balance and the temperature. Let's go and firstly take
a look at the balance. Again, as I mentioned
before, for kawaii, we will need to go
with pretty pure, pretty vibrant
tones, and we will need to not overwhelm
everything. So that we will use our
color distribution form. We have a 60, 30, ten balance rule right here where 60% goes to
the main color. And for example, it could
be the color of the skin. This is the dominant area that you have onto
your illustration. And this area that you have, the color that you are using
for the main dominant area, the 60% of the color, it sets the temperature, and that's what we need
to focus right here. So when we know the main
colors, for example, our skin tone, we will need
to use the support color. The support color could go
with the hair or clothes if we took the color of the
skin as the main color. And this color is working very
great with our main color. And together, they are
creating the harmony. When we know the main color
and the support color, we can add a couple of
colors for the axon. These colors could be
very bold, very bright. They are adding this poop
effect and you can use it for, for example, eyes
accessories or little detas. Again, a little quick tips for our kawaii balance
right here is not to use too many colors because
it will be overwhelming. We are not using more than
five colors for everything, so that includes our main color, support color, and axin colors. Nothing more than five
colors will work here. We are using the colors that we are picking
from our photograph, but we are adjusting
them in accordance with our previous Kai formula
and our little process, and we are trying to avoid very muddy colors
because we want again to create vibrant, pure, simple tones to create
the Kai illustration. When we know about the balance, let's see what we have for
the temperature because we mentioned it right here and it might be a little bit confusing. Let's go and see how we can add the temperature
and how we can create the harmony with
our temperature and the colors that we
are going to be picking for our
Kai illustration. Generally, we have warm colors, cool colors, and neutral colors, and we will need to
identify the color that will help us to build
up our color palette. For example, if we are
talking about warm colors, we can go with some
yellow, orange, red colors, something golden, coral, something like that. When we are talking
about cool colors, we are going opposite, we are using blue, purple, green, lavender colors,
and as for the neutral, we are some balancing up
the warm and cool tones, and we are talking about beige, cream colors, something
that's not too bright. When we know the
general temperature. For example, we pick
the color of the skin and we think that it is warm, we will need to test our
color whether we are correct with this notion or whether
we want to adjust it. For example, how can
we test our colors? First approach is to go and
take a look at our color. Physically, where you handle
is on the color wheel. If we are at the top, where we have the very
bright and very warm colors, the yellow, the orange, the red, we know that we
are at the warm area. If we are at the opposite side, we are at the cool colors and we know that we are
at the cool colors. Also, we can compare our color that we picked
with the pure white. And with this comparison, again, we can take a look
whether we are at the warm range of
colors or on the cool. And also we can take a
look at the undertone. Again, whether we are more at the pinkish area or more
on the orange area. So for example, we pick
the color of the skin and we see that it
is the warm color. And we also might have picked
the color for the hair, and we are not sure whether we are at the warm palette
or cool palate. So firstly, we
adjusting the color, and we also can adjust it. So for example, you
decided that you want to go a little bit
warmer with the color. How can you do? We
will add a little bit more of the yellow and we are adding a bit more of the orange, red color to balance it
up and make it warmer. On the contrary, we are
going cooler by adding blue, purple, pinkish colors,
and as for the neutral, we are adding a
little bit more gray, just a little bit to not make it too muddy and we also can mix warm and cool tones to create this neutrality
in a color. If we are still in doubt, we can compare our colors
with known anchors. For example, we know that the color of the orange is warm. We can compare our color
in accordance with it, make sure that you put
the second color near it and you can see whether it's
cool color or warm color. And on the contrary, you can go and do it with the blue color. Now, when we know a little
bit about the temperature, we need to make sure that we can create harmony
with our colors, and let's go and see what options we have
for our carbonate. So for the harmony, we can go with two options. Option A, it is a match
and option B is contrast. Again, as I mentioned before, you pick the color for the skin, you want to go with a
warm color palette. How can you do that? You will need to add the
warm color for the skin, the warm color for the hair, warm color for the clothes,
and on the contrary, cool palette, cool skin, cool hair, cool clothes. It's an easier approach. It's cohesive, it's natural, and it creates the
overall natural harmony. Option B is to go with contrast and it is a
little bit more stylish, a little bit more eye
catching and unique, and it creates visual intrast. How can we create
the contrast without creating some kind of
the chaos right here? What we need to do is to
go with one approach, either warm cool contrast
or cool warm contrast, and we are editing it in accordance with some
rules, of course. We are not editing it randomly. For example, you
selected the warm skin and you want to go with a bit more of the
contrast right here. You can add cool
hair and you can go with any color
of the clothes, but you will need to
select this color in accordance either with the
skin or with the hair. If you picked the warm skin, you can go either
with the warm color for the clothes or if you want to make sure that the cool hair is the main
point of your illustration, you can go and create
the cool close right here to make sure that
everything is looking good. Again, we are not
adding it randomly. We are adding it in accordance with some little
formula right here. On the contrary,
cool, warm contrast, go with cool skin, warm hair, and any clothes, and
these any clothes again, should match either with
the color of the skin, the tone of the skin, and maybe the tone of the hair, something either
skin or either hair. We are not mixing both of these
approaches because again, we want to create the harmony right here and if we mix these
two approaches, it won't be harmony, so we are sticking with one of
these approaches. When we know about these things, our little kawaii formula, our little balance formula, and this temperature harmony. We can take a look at our familiar photographs
that we used before to identify
the temperature of what we have right here. Let's go and one by one, see what we have for our
harmony onto these portraits. So let's identify the
color temperature and harmony of the portraits. We will go one by one through all of these portraits
that we had before. On the bottom, we have
some letters right here, some numbers and something
not very cohesive. Let's go and see
what all this means. So again, as I mentioned before, for our harmony,
we have a match. We have the contrast, and we also could have
no dominant temperature, so everything will be
quite balanced right here. So for the skin, the first letter right
here is the skin. We have the cool five color. And for the skin,
you can go under the Project Enersis
app and you can download the color
palette with the skin. We have the skin
tones right here. We have neutral,
we have warm and we have the cool colored tones, and they are going from
the very fair color to pretty dark ones. And we will be using
these colored tones that we have into
our color palette to identify the
colors that we have for the portraits that
we have onto our screen. So again, as I mentioned before, the first photograph
that we have right here, the first skin color
is our cool five. We are going to our color
palettes right here and we are going under five color
into our color palette. When we identify
the first color, we picked it, for example, from our photo, we will need to go with one approach again,
for our temperature. So right here onto
this photograph, we are analyzing everything. We are looking at
the here and again, we are going with
the cool color. As for the clothes that we have onto this
photograph, again, something pretty
cool and overall, we have a temperature
harmony match. Again, it's cohesive and it is our natural
harmony right here. Everything is matching. As
for the second portrait, we have neutral five
color for the skin. We have warm color for the hair, and we have pretty cool color
right here for the clothes, and we are creating the
contrast in accordance with it. So we have warm
color for the hair, and we have the cool color right here to create
the contrast. As for the last one,
we have neutral, pretty darkish
color for the skin, maybe a little bit of the
olive skin right here. We have pretty warm
color for the hair. We can take a look at the
highlights right here. They are not cool. They are very warm and as
for the clothes, again, we have very warm pallet right
here, again, it's a match. When we have it,
let's take a look at the next set of our portraits. Again, we will decide what color temperature
we have there. Right here on the left, we have pretty dark skin, so it's warm skin too. We have neutral
color for the hair. We can see it
properly right here, but it's not too bright or
too contrast. Again, neutral. We will go with a very warm
color for the clothes, and again, we have a match. As for this middle photograph, we pretty warm
color of our skin, it's on the darkish side. We have cool color for the hair. It's a little bit of the blond dish right here
and we have neutral clothes. We can either say that it is
the match or we can go with the balance right here
because we don't have the dominant temperature
over these portrait. As for this one, we
have warm color, the very fair one right
here for the skin, we have warm color for the hair. We have warm color for our little greenish
clothes right here. For the green, it's
a little bit tricky because green originally
is the cool color, but here we have it on
the warmer side of it. We can say that it is
the warmer temperature. Again, we have a metre here. Let's go for the next set. We have the match right here, we have cool color, the very fair one, again,
we have cool here. We have neutral clothes as for the black colors
and very dark colors, we are not using them
into Kawaiillustration. We are trying to soften them up, and I will show
you how to do it a little bit later on
when we are going to be creating the color palette and creating the colors
for our illustration. For now, let's go with
neutral color for black. And again, we have
a match right here. For the next portrait, we have warm skin. We have neutral
color for our hair. We have warm color
for the clothes. We probably can see it right
here, but it was warm. We again, have a match. Right here on the right, we have neutral color for our skin, warm color for the hair. And cool color for our clothes. And again, we have the contrast. So something similar to what
we have on the first slide, where we had the warm color for the hair and where we have, again, blue shirt
on the close part. When we identified the
temperature on this slide, let's go to the next one to the last one, what
we have right here. The first one, we have
neutral color for the skin. We have cool hair, and we have warm clothes. So again, we have a
contrast on the middle, we have the very dark
photograph right here, but again, we can identify
something from it. We have warm color for our skin. We have neutral hair, and again, we have some blackish or bluish color right
here for the short. We can go with cool
color or neutral color and we will have either
contrast or balance right here, so you can decide on your own. As for the last
photograph right here, we have very warm color. We have neutral
hair or we can see that it is a little bit
on the warmish side. Again, we can go with
warm palette right here. And again, it's not seen what
we have for the clothes, but we can say that
it's warm palette, and we can go with
the metre here. Again, it's known the
total signs here. If you see things
differently or if you want to go with a bit of
a different approach, you can fix the colors, you can adjust them
to your liking, but remember that we will
need to have harmony. To sum up everything that
we mentioned before, let's go with a bit of the three step process of how we are going to be
simplifying the colors. We will go with three easy steps to build a perfect
kawaii palette. Firstly, we will go and identify
our main color, our 60%. This is, for example, skin tone, and we will need to
identify the bees. So we are going either
with warm color, cool color, neutral color, and when we know it, we will need to select our 30%, our support color,
and it's going to be, for example, our hair color. We are either matching
our temperature. We are either creating the contrast and we can
stylize it, of course. But again, we are going
with one of the approaches, either matching or contrast. When we picked our approach, we are moving to our third step, and we are selecting our
10%, our accent color. So it's our eyes, it's our accessories, and we are adding our finishing
touches with it. Again, we are remembering
that we will need to either match or complement some of the colors that
we have right here, either skin or our hair. And when we know
our simple approach to creating a kawaii palette, let's go and one more time, sum everything up by
figuring out what are dos and dos in
colors of kawaii. The main secret is
to use fewer colors, and we will also use brighter
tones and with these, we will have a cleaner result. We are not using muddy colors, so nothing too gray, too brownish,
something desaturated. We are not picking directly from the photo
as we remember it. We are adjusting it. We are using more
than five colors because this will be a
little bit overwhelming. We are randomly not mixing
warm and cool colors, and we are not using
super dark colors because kawaii is all about
light and bright colors. And as for due, we are again, using our little formula, we are lightening
and brightening the color that we picked. We are using our harmony rule. We are using 30,
60, ten balance. We are either matching or
contrasting our temperature, and we are again, staying clean and
pure and again, not using too many colors, something simple,
something cute, three to five colors maximum. And when we sum it up, let's go and build our
little color palette.
10. Practice: Building a Color Palette: Let's start by picking up the
color from our photograph as our three step rule
is saying us to do. So firstly, we are going and
selecting the color from some area that is not in the dark and something
not too light. So for example,
somewhere in the middle, somewhere closer to the nose,
for example, right here, we can pick the color, and
when we have the color, we can go and adjust it in accordance with what
we mentioned before. We need to lighten
and brighten it. So let's go to our
color palette, and let's go firstly, a little bit purer
with the color up with the value into
our color wheel. So get a little bit
higher and then we can go and make it a little bit brighter to make it a
little bit more saturated. So let's go and create
it in this way. We can go and firstly, put the color right here into
our little color palette. I will pick the brush that
will work right here. So for example, we can
go to the inking folder. We can select some brush
that is not too misbehaving. So for example, studio pan, we can go and put the
color right here. And when we have the
color right here, we can go and decide whether we want to go with this color or whether we want to maybe adjust it more toward
our kawaii colors. For example, I
think that overall, this color is a
little bit too dark for the overall look that we are going to be using
for our illustration. So we can go and make it
even a little bit lighter. Overall, if we take a
look at our photograph, we will see that we have
pretty fair skin right here. So we can either go again to our color palette and
make it a little bit lighter by going
a little bit more toward the left to add
more white right here. Again, we can test
it out right here. Or you can go to
the color palette that you downloaded
from the project on rezo stab and we will need to firstly decide what
kind of color, what color tone and color
temperature we have right here. Comparing it to white color, we can see that this
color that we picked and adjusted is on the cooler tones. So we can go towards the color palette right
here toward the last row. This is our cooler tones, and we can pick the color
from here and compare it with this color that we have
put on our screen. So for example, let's start by selecting
the fourth color. We can go and put it right here. So we have something
similar to what we have right here as we selected
it from our photo. Or if you want, you
can go a little bit lighter with the
color to match it with the overall
photograph color that we have and make it
else a bit fairer. So for example, let's go with the third color and we
can put it right here. So you can decide with
which color you want to go. I will probably go
with the lighter color to make it a match
with the reference. So I will pick the third one. When we have our
main color selected, we can move on to
the support color, and in this stage, we will need to identify what approach we are
going to be using. We identify that the color
that we have for our skin are 60% of everything that we are going to be using is
on the cool range, and we will need to decide
whether we want to go with the harmony or whether
we want to add some contrast. So for example, let's
go with the harmony. We will use the pinkish color
that we have for our hair. We will match it with our skin, and we will use the cool
skin color here too. So again, let's pink the
color from our photograph. So for example,
let's go somewhere where we have the very
clean and pure color. And again, we will go
and put it right here onto our support
color right here. We can definitely say that we will need to lighten
and brighten it. So let's go to our color
palette one more time, and let's go first
up with our value, then we can go and maybe
make it a little bit brighter by moving more towards the whitish area over the top. Let's test it out right here
and decide whether we like this color or whether we want to go with slightly
different color. You want to maybe
make it a little bit less saturated, you
are welcome to do it. Just keep it at the
range that we have right here and something similar to what we have for our
reference photo. Of course, if you don't want
to adjust it in any way, you can go a little bit
cooler with the tone or a little bit lighter with
the tone, it's up to you. Decide on the color and put it into this little box
for our support color. And now when we have the
support color selected, let's go for our and colors. So we will need the color
for our clothes right here, and we will need the
color for our eyes. So for example, let's not select the dark color that we have right
here, the black one. We can go and pick a slightly different color and create the color palette
that will be balanced. So for example, let's go
toward our colors and we will select the matching cool
color for the bottom part. So let's go to the
opposite side and we will go with something
bluish color, maybe a little bit more
on the purplish side. But we will make it
not that bright. We can go with something
a little bit muted. For example,
something like that, something a little bit grayish, more toward the neutral
area right here. You can go again and test it out onto your color
palette right here. You can go with slightly
different color a little bit lighter
if you want to. Just make sure that you are staying true to your approach, whether you are matching
it or contrasting it. Select a couple of colors
that work for you, maybe go with slightly
different tone, decide whether you want
to adjust it in any way. When you satisfied with
the color for the clothes, let's go and select, again, some matching color for
our eyes, for example. We can barely see what
we have right here. We have something like darkish, gray or a little bit of the
bluish tone right here. We can go and match it right here with what we have
on our reference. Let's go with slightly
lighter color because we are creating a kawaii
illustration, we want it to pop. Let's go a little bit closer towards the bluish
area right here, so something a little
bit greenish blue, and we will go with very
light color right here. Again, we are trying not
to make it too popping up. We can go with something
neutral firstly. Try it out right here, decide whether you
like this color or decide whether you want to go with something a
little bit lighter, maybe a little bit
more contrast, a little bit more saturated. You can go with it too. So try it out a couple of times and create
your color palette. And when we have all of
our colors selected, we can go and put them in
the little color scheme. So we can go to
our color palettes right here and pick
the colors that we selected and put
them right here to our color palette so we can use them onto our illustration. So let's go one
by one and select our colors and put them
into our color palette. You also can go with a couple
of colors that you picked. Maybe you want to go and test
it onto your illustration, how it all looks together. You can go and pick all of the
colors that you have right here and then go and test
them onto your illustration. And when we have our
color palettes done, let's go and put it
all into practice and recolor our little illustration that we've created before.
11. Practice: Coloring: So let's get back to our lines, and let's go and start adding the colors that we
picked previously. Let's first go to our layers, and we will need to
do one more thing. So where we have our lines, we need to make sure that we have everything on one layer, and when we have
everything on one layer, we will use one
option that Procreate has to help us with
adding the colors inside. Let's tap onto our
layer where we have the lines and we will use the option reference right here. We can use these
lines that we have to this layer and we can use them on separate layers
from this one. Let's go underneath
this layer and create one more layer underneath
the layer with our lines, and on this layer, we will
first go and recolor our skin. We are going to our
color palettes and we are starting to test
out our colors. For example, let's go with
our lighter we drag it toward the areas that are
supposed to be the skin areas. Let's go one by one and
recolor these little part. If you need to go to
some small areas with, for example, your brush, you are welcome to
go and do it here. Make sure that you've recolored everything that belongs to our skin and then let's go again to our list and create
one more layer on top. Now, let's go and
recolor our here. Again, going into our
color palette and starting to test out our colors. For example, let's go with
this lighter one and we will again dragon drop everything toward our
colors right here. So when we have the
color for our here, let's go and tricolor the next elements that
we have right here. And then if we want, we can see the whole picture and we can adjust the colors
if we need to. So one more time, let's
go to our layers. Let's create one more layer, and we will go and
select the color, for example, for our
little sweater right here. Let's go with this
bluish element, maybe a little bit darker first. Let's go and edit right here to all the areas that are supposed to be recolored with this color. If you zoomed in
your illustration and you see that you
missed some parts, you can always get back to the layer where you
need to add the color. Select the color that you
need to add right here and manually go to these areas and add the color
to these places. Now when we are done
with the sweater, let's go and create
one more layer for the eyes and accessories. For example, let's go
with this bluish color, maybe this one, and
we will drag it towards these areas that
we have for our eyes. If you want to use the same
color for these little parts, you are welcome to go and do it. You can go with
something contrast, something different right here. Maybe something not
from your palette. You still have the room to add more colors
right here into our approach of
three to five colors into the Kai color palette. If you want to add
something here, you are welcome to
go and do that. You are welcome to go to
the colors right here, onto our color wheel and select the same matching color that we can use right here
for the elements. Again, remember that we are following our
approach right here and we are not going beyond we are not
adding the contrast, of course, if you don't
want to add the contrast. For example, we can go with
something maybe a little bit brighter and add the
details with this color. Now when we have all
the colors done, let's decide whether we want to adjust some of the colors. For example, we can
go and test out different colors that we had for the sweater and the hair. Firstly, let's go toward the layer where we
have our lines. We will tap on it and we will
turn off reference so we will be able to test
our colors very easily. Let's first go toward the here, create one more
layer on top of it, tap on the layer and use
the option clipping mask. Now we will go toward
our colors and we can select the different
color that we have into our color palette
and very easily just drag it towards the
area right here, toward our canvas and decide
on the color right here. You can see right here
we have the rectangle. If you like how it looks, you can merge these
two layers together. If you want to test it out, go and hide and unhide
this little element, this little checkmark, and decide which color
you like best. If you want to try out one
more color, one more time, you can go either
create one more layer, and do it onto the
separate layer or do it right here and adjust the
color onto this layer. I think this color is too dark. This color is pretty perfect, but if you want to go
with the lighter one, you are welcome to use it too. Let's go and do the
same for the sweater. Again, selecting the new layer, creating it over the
top of our sweater, tapping, clipping mask,
and testing out colors. This one looks a little
bit too pale and maybe a little bit less contrast with what we have for our here. We can keep it, but I think that previous
color was better. Let's test out this darkish one and decide
whether we want to go with it or whether we want to go with the first
color that we use. I think I will go with the
very first color that we used because it adds a little bit more contrast
and not too dark. And it also looks good with this element
that we have created. If you want to adjust the ice, you are welcome to go and
test out the colors here too. So the same way tapping, clipping mask onto the
new layer and testing out different colors that we picked for our color for the ice. One by one, go and adjust it. I think that I
will again go with the first color that I picked and when we have
the result like that, we will need to add a
couple of more details. So firstly, we will go and
add the whites for our eyes. So let's go and select
the white color. Very easily, we can go
toward our color wheel and tap twice right here
onto the whitish area, and we'll select
the white color. Again, we can use
our symmetry tool to do it on both sides
at the same time. So we can get back
to our layers, create one more
layer on the top, and we will tap
onto this layer and use the option drawing assist. When we have it, let's go
towards the bottom part of our eyes right here and
we will add the white areas. So go along this whole shape and manually adding
the white color. Now when we have it,
let's also go and add the highlight toward the eye so they don't look too blank. Let's get back to our layers and we will go above our layer with our lines and we will create one more
layer on top of it. Let's go with the same white
color and we will go over the top of our eyes and we will create the rounded
shape right here. Hold your line at the end
and hold one of your fingers on the screen to create a
perfectly rounded circle. And the color inside,
make sure that the outline looks good
and not too jagged. If you need to go over it with your brush or
with your eraser, go and adjust it to your liking. Take a look at everything
from the distance, decide whether this is
too big or too small. When you have the shape and you want to adjust the size of it, you can go to the
Aoki on the top left. Go the uniform, go to one of the corners and adjust
the size to your liking. Adjust the placement to by
dragging it more towards the top and when we have the result that we like and
the placement that we like, let's go and put the same highlight onto
the opposite side. So firstly, taping onto our rookie to close
this window and then going toward our layers and making a copy of this layer. To make a copy, we
will need to swipe the layer from right to left and choose the option duplicate. And then when we have the
second circle right here, we will get back to our
Aoki one more time. We will use snapping and snapping right here into
the settings to make sure that we are staying at the same line and we will drag it toward the
opposite side. Go along these guiding
lines and position it on the same level and on the same place onto
the opposite e two. When you are done, let's tap on our Ero key to
close this window. Take a look at everything
from the distance. If you want you can
merge these two lays together by making a
pinch movement like that, and when we have the
result like that, we can go and beautify it a little bit by
adding a couple of shadows and a couple
of highlights and a little bit of the
beautification right here. So for the shadows, firstly, let's go
with the shadows. We will go and start
from the bottom. So we will find the layer
where we have our skin. We will select it and we will create one
more layer on top. Let's tap onto our layer and we will use again the
option clipping mask. We are not going
to be adding too much of the shadows
and highlights. We want to have this
clean kawaii look, so we will add just
a few details. What we need to do is to
change the blending mode right here to create nicely looking
shadows and highlights. For the shadows, let's
tap onto our icon onto this new layer and we
will use the option multiply. When we have selected
it, let's select the same color that
we have for our skin. We can do it very
easily by holding our finger onto the screen
and popping up this window. When we have the same color, we will go with our brush to the est where there is
supposed to be a shadow. So something that is
going underneath. For example, we'll need to go
right here over the top and add a bit of the shadow
underneath this little here. And what we need
to pay attention to when we are creating the
shadows and highlights, we need to be
consistent with them, and we will need to put
them all on one side. So for the highlights, it's going to be one side, for the shadows, it's going
to be another side. Let's go firstly
with our shadows and create the shadows in accordance
with our light source. We also can go toward
the ears and put a little bit of the shadows right here toward
the inside part. So let's go toward both of
the ears and edit right here to go on very easily like
that and put in our shadows. And also, we will need to end the shadow right
here to our neck because we have the
overlapping parts on the top in the
shape of the head. You can decide whether
you want to make the shadows a little bit more bright or a
little bit lighter. You can go and adjust
the level of opacity Ota your layer with the shadows. You can adjust it
to your liking. When you are satisfied, let's
also go and add a bit of the checks right here
Osa checks areas. Firstly, let's get back again to our list and create
one more layer Os. Tap on the layer, use the
option clipping mask and also we will use the symmetry tool to do it on both sides
at the same time. Let's again tap on the layer and use the option drawing assist. When we have it,
we want to create very soft looking blush. First, let's go and
change the brush. We'll go to the
airbrushing folder, and for example, we can
select soft blend brush, and we will need to select
some color that will match with the color of the skin
and the color of the hair. Again, we are paying
attention to our harmony, so we are not going with warm color to the
blush right here. We are going with a cool color. So going more toward
the pinkish color right here and starting to select something pretty
light right here. Let's go, for example,
something like that, we can go underneath our eyes and we can
test it out right here. This color looks good, but probably we don't
need too much of it. I'll try it out
one more time with slightly lower
pressure to create just a bit of the
blush and create some of the very rosy
cheek look right here. When we have the
result like that, again, if you overdid it, you can go and adjust the amount of opacity
on this layer. If you are okay with everything, you can go and maybe add the lines right
here if you want to exaggerate the cheeks slightly or keep it as it is in that way. When we have done
everything for the skin, let's go and add the shadows and highlights
toward the hair. First, we'll go and select the layer that we used for here. If you have this testing
color on top, again, you can merge these two layers together and create one
more layer above it, tap on it, clip in mask, go into the N icon, and we will select the
multiply blending mode. Let's go with a bit of the
cooler look for our shadows. So we will first go and adjust the apacte
straightaway because we don't want to have very
brightly looking shadows. So let's go with something
around 50% for now and we will go back to our
brush that we used before. So inking folder, studio pan or any other brush
that you prefer. We will go to our color
palettes and we will select the color that will match with everything that
we have for our hair. Firstly, we can go and pink the color that we
used for the hair, and we will go a little bit
cooler onto our color wheel. Let's go with a bit of
the purplish color. Again, we can go and
add a couple of shadows toward the areas where there
is supposed to be a shadow. Let's start with this
back hair out here to go in very boldly and starting to add the shadows right here. We also can go underneath all the elements that are
supposed to be in shadow. Something behind the
ears right here, you can go with the full line like that and then
grab your erasa and erase the lines
that you don't need then create some pattern
right here with your shadows. Go again, make sure that you are putting your shadows in
accordance with the light source. So everything should be in accordance with
the light source. Let's go underneath the
ear on the opposite side. Let's add the shadow right here. Let's go and add the
shadows towards some of little here
strands right here to again make it nice and also we will need to go
toward this little part at the shadow right here and go
toward the fringe and maybe add very softly looking shadows right here onto the bottom. If you feel that
you need to go to some other areas
with your shadows, go to them at your
shadows, for example, right here where
we have the ears, make sure that everything look nice and decide
whether you need to go with the higher amount of opacity or lower
amount of opacity. If you feel that this
color is not working, it's maybe a little
bit too bright. You can select the layer and go toward the magic one tool
right here onto the top. Use huge saturation
and brightness and adjust sliders right here. For example, we can go with the brightness to make
it a little bit darker, adjust the saturation to make it a little bit less popping up. If you want to go to the hue, you can go and
play with it, too, go cooler, go a little bit, not cooler, it's
up to you again. Find the color that
works for you and looks harmonious with
everything that we've created. Now when we are done with it, let's tap on our magic one, two, and let's go and
add the highlights. For the highlights, we will go above this layer,
tap on it again. We'll use our clipping mask and we will change the
blending mode to, for example, linear burn. Let's go with slightly
lighter color for it. Again, let's go toward
the pinkish area and go more toward the
whitish part right here. We will use the bigger size of the brush and we will go to the opposite side from our shadows to create
this highlight. For example, let's
go over the top and create the line like that. If you don't see it, it's probably because of
the blending mode, you can go and test
it out right here. You can go and select any other color mode that you prefer. You can go with the lighter
color, for example, adjust the apaste straightaway when you are satisfied with it, let's go and adjust the overall shape right here
by selecting our eraser. And erasing the parts that
are not looking great. What we are aiming
for is creating some kind of half of
the circles like that, very soft, very nicely looking. When we have it going
to the opposite side and starting to create
something similar here too. Start with the bigger
shapes firstly and go over the whole ship
in half of the circle. Then by using the eraser, let's go and soften up the corners and everything and create something that
will look like that. Make sure that you are not going to the shadowy parts
with your highlight. So if you have
something like that, go with your erasa and erase the part of the
highlight on the shadow. Keep adjusting the
shapes if you prefer so and make sure again that you don't go toward
the shadowy parts. When we have it, let's test. Maybe we want to go with slightly brighter
elements right here, go into the apacti ladder, adjusting the
opacity right here, maybe go a little bit higher with it or lower with
it, it's up to you. When we have the hair done, let's go toward the sweater and add a couple of
shadows here too. Again, if you have
a couple of layers, you can go and merge
them together. Create one more layer on
top, tap, clipping mask, multiply blending
mode, and we can go either with the same color
that we have right here, so you can pick it
from your sweater that you have and go into the areas that are
supposed to be in the shadow and edge in
the shadow right here. Going behind the neck going toward the
shoulders right here, we can go and put the
shadows going like that, adjusting the shadow going underneath these little strands of hair and creating the
shadows in that way, too. Use your brush, use your
eraser to adjust everything, go and maybe create some
interesting pattern right here to match it with the hair. And also, we can go to
these little parts and add a little bit of the
shadow to them too. If you want to make these elements that we've
created as our accents, our little details right
here little bit protruding. You can go underneath
them too and add little shadows
to make them pop. You can do the same
with the here so you can get back to
your shadow layer, select the same color and edit right here
toward this part. Adjust the shadow that you've
created for the sweater. So go into the opacity, maybe making it not that bright. And when we have the
result like that, let's also soften up
some of the lines. So what we need to do is to
go to our layer where we have our lines and create one more layer on top,
doing the same thing, tapping on this layer and using
the option clipping mask, you can go with the same brush that you
are using right now or you can go with
a softer brush from the airbrush and folder. So for example,
soft blend brush, and we can go to the ice, for example, and make
them a little bit darker. So you can go toward color wheel and adjust
the color from here, go over these little
parts and adjust them. Again, we can go with the
cooler color that we are using for our overall
color palette and add the color right here. As for the mouth, for example, we can go with
slightly lighter color. Let's go with something a
little bit brownish more on the red side and soften up the overall look of the
mouth right here too. If you want to add more
color toward the mouth, you are welcome to
go and do that too. You can decide whether you
want to adjust it or not. If you want to recolor
some other elements, maybe the here or
something else, the lines, I mean, you are welcome to do
too using the same method. But overall, we are done
with the coloring part. Let's take a look
at everything and let's go toward the
finalizing stages.
12. Finishing Up: Times it's hard to
say whether you are done with your
picture or not. So to finalize everything, let's see an easy
down checklist and compare whether we have
everything on our illustration. Physically, take a look at
your picture and decide. If you zoom out your picture and see it as a thumbnail size, can you still
recognize the person? The dominant feature
that you picked and exaggerate is this
main attraction clear. Does the line weight feel
purposeful and overall, does your line look
smooth and even? As for the colors, is everything balanced and do the
colors look harmonious? And the very last thing, does it look balanced overall and would in more details help or
would it add more clutter. Trust your instincts and
stop when it feels right. And when you think you
are done, congrats. Today you identified
a head shape, learned Kai proportions, captured unique features,
applied colors that feel right and created
your own Kai portraits. Now you can practice
with different photos and create as many Kai
portraits as you like. Thank you for
watching this class. Let review if you
liked it and cantin subscribing for Mokawi
videos in the future. Looking forward to
in your projects.
 Uni Corn, ⭐Kawaii Art Enthusiast⭐