Transcripts
1. Introduction: Hello, everyone. I'm
Uni, and in this class, we again to draw this
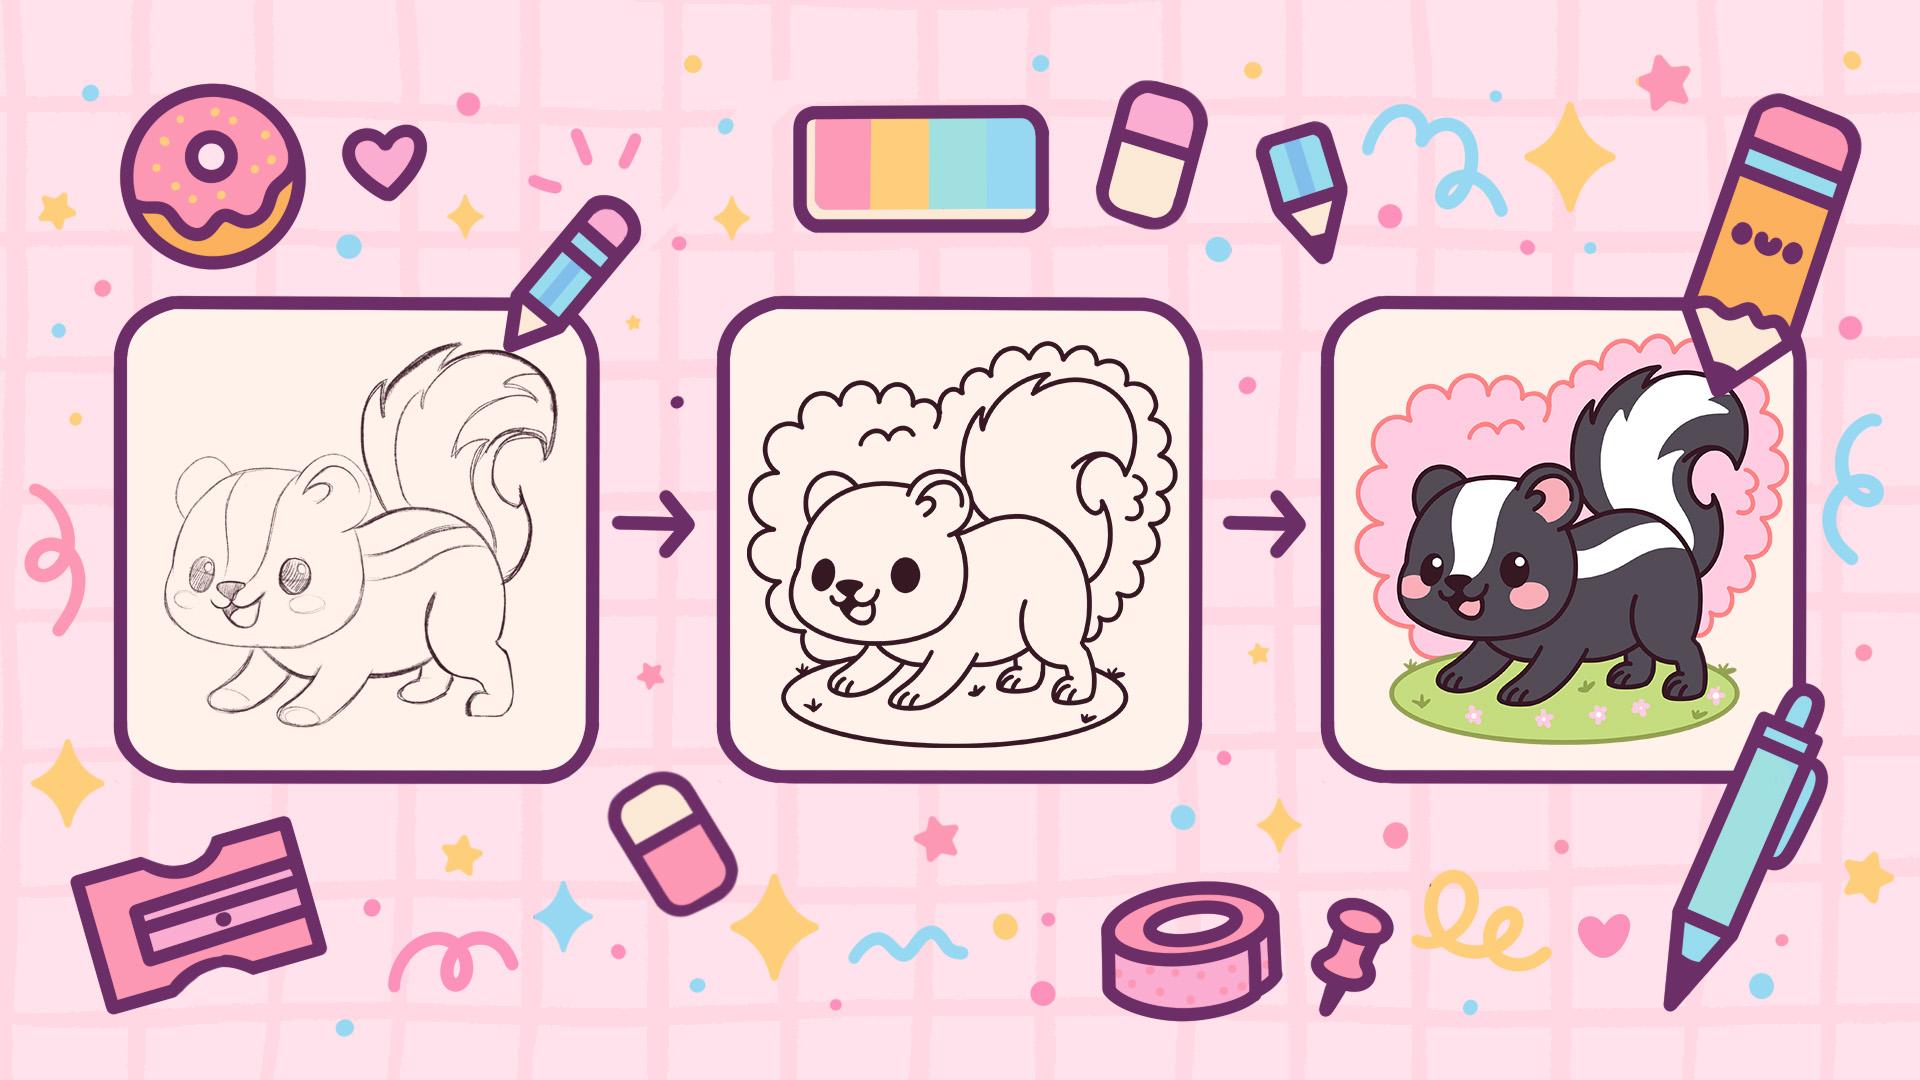
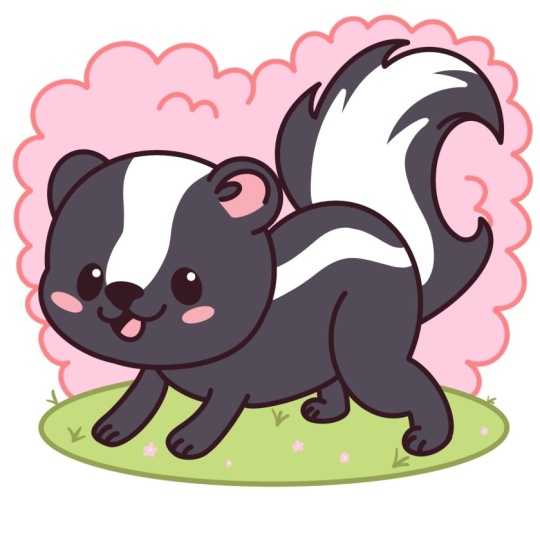
cute kawaii illustration of an adorable skunk in procret. During this class,
you'll get familiar with a lot of useful features
like QuickShape Tool, liquefied tool, recoloring
with reference, and clipping masks, and learning the basics of
drawing in procret. By the end, you'll not only draw an adorable illustration
you'll be proud of, but also feel super
confident using procret. And now let's spend
some time drawing.
2. Scheme: Let's begin our class from
some tiny preparations. Firstly, we will deal
with our Canvas. Today we are using a standard square canvas from
Procreate with pixel width and Pixel
heights, the 2048 pixels. DPI 300 and our color profile is set as SRGB with
this loan number. When it's all done,
let's hit down. Let's take a look at
our new Canvas and then to continue with
our preparational part, let's go under the project
and reso stab and we will download all the materials
mentioned for this class. When you did it, let's continue by going to our brush library. We'll go to the sketching
folder and we will select, for example, six B pencil. First, if you want to use any other brush for the
sketching part, you are welcome to pick it. When you are done with
picking up the brush, let's go to the
color palette that you downloaded from
the Project Eros Stop. We'll go under
palettes and the cards right here on the top to
see the colors names, and we will pick the
first color that will help us to build up
our little scheme. So for example, let's go with
this contrast red color. When we pick the color,
we can do one more thing. If you are okay to work onto
the blink canvas like that, you can keep everything
as it is right now. But if you want to have a bit
of the grid right here to see clearly what you are doing and straightaway when
you are creating, maybe fix something, we can
go and turn on the grid. Let's go to the range
icon over the top left. Let's go under canvas and we will toggle drawing
guides right here. We will use these cells, but we will make them
slightly bigger. Let's go under eight
drawing guides, and we will go under the
grid size right here. Let's tap onto this
little window and let's type down 130 pixels. When we are done, hitting
down over our top right, and now we are good to go to start working on
our first scheme, and we will work with
the shapes today. So let's first go
toward our canvas and we will eyeball where
we have our center. So let's make a little markdown
somewhere at the center. When we have it in that way, let's go and create the
shape for our future head. So from this markdown
that we've created, we will go toward
the left and we will create a shape of the
ellipse like that. Hold your line in the end
to create a better shape. If you want to adjust the size, you are welcome to hold your Apple pencil and
move it from side to side to find the size that
works for when you're done, let's lift up our Apple
pencil and if you want to adjust the placement all this element
or something else, we can go to the poked up
option ellipse on the top, and this is our editing too. When we are in the editing too, we have the notes right here. We can go to them with
our Apple pencil. We can go and adjust
the size or adjust the overall shape that we have
right here for our shape. We can go and reposition everything that we have
right here by holding our Apple pencil at
some blank space and moving our shape to the
place we want it to be. For example, let's go with the position like that
and the size like that, and when we have the
result that we like, let's tap onto our screen
to accept the changes. Now, when we have the
first shape for the head, let's go and create
one more shape that we will turn into one
part of the body. Let's go to this intersection
that we have right here to this little markdown that
we've created and from it, we will go down with
another elliptical shape. But this time we will create a bit more of the
horizontal shape. Again, with one line, let's create the shape
and then let's go to our editing tool to adjust it. We will go and make it
a little bit tilted, so we will go to this node
that we have on our right. We will drag it a little
bit more towards the right, and we will put it a little bit higher than this node that
we have on at the left. As for this node on the left, we will go and
reposition it slightly, so we will have this new
shape positioned somewhere at the center of the shape that we have created in
the first place. We have the result
like that, let's again take a look at everything
whether we like it or not, whether we want to
go and adjust it. If you want you can go
and put this line right here onto this little checkmark that we've created, it's okay. When we have the
result like that, let's tap on the screen
to accept the changes, and let's go and
create the rest of the body in the shape of
another circle right here. Let's go again to
this little markdown that we've created and
with one line again, we will create another
shape of the circle. To hold you in the end, go toward the editing tool
right here on the top, and let's make it
slightly smaller. Then we have the first shape
right here for our head. Working with our
little node right here and adjusting our sheep. We will go and
position it slightly higher than we have the
shape on the bottom. So we will have a very
nicely looking shape for the whole body
that we are creating. If you want, we also
can go and squish it a little bit and
position it, for example, in that way, you can go
with the bigger size of the body or the smaller size
of the body. It's up to you. We have the result
like that, let's tap on the screen to
accept our changes, and then we will
create a couple of more shapes right here
that in the future, we will turn into
some other elements. Firstly, let's go toward this part right here
over the top of our head and the
intersection that we have right here between
our head and the body. Here we'll create
another shape of the smaller version of
the circle right here. Create the shape
like that, hold it, go to the editing to adjust it. Now we are creating
a future here, create it in a way that you prefer bigger one, smaller one, maybe position it differently, move it a little bit higher, lower it's up to when we
have the result like that, we need to do the same
onto the opposite side. First let's accept our changes by tapping onto our screen, and then we'll go to
the opposite side and create a bit smaller version of the similar element
that we have onto R. Let's go to the editing
tool if we need to adjust it, if we need to make it a little bit rounder, we will
go and do that. If we need to
reposition it, again, we are moving our shape
a little bit toward the inside part or
outside if you need to. When you found the placement
tab on the screen, and let's go and create
the shape for the tail. For the tail, let's first go towards the shape that we
have for our future bump. So the element that we have
onto our right and from it, we will go up and we will create a very simple shape of
the ellipse like that. We will go more toward the bottom and create
the shape like that. You don't need to create
the elements with one line. You can go and add to these elements if you
want to adjust something. When you have the
shape like that, let's also go toward
the bottom and work a little bit onto the bottom elements that we
need right here. Firstly, let's decide
where we want to finish up our little
ex right here. Let's first go and create one line that will
look like that. We are creating a
circular element, a little bit of an
arc right here. Hold your line at the end, go and create it in a more
open way or less open way. All that we need right here is the shape that will
look like that. When we have it, we will go
toward our body and we will create a couple of
lines that later on we will turn into the lex. Firstly, let's go toward this
element right here where we have the intersection between the head and the body from it, we will go down and create
the arc shape like that. We have it going more toward the right and creating
similar shape right here. Again, from the body
going down and creating a similar curvy element
going down in that way. Now when we have the
result like that, let's go and work on
the opposite side. First, we are going
toward this element that we have onto our
right, our bum element, and we'll go find some of the center of it and
from the center, we will go and create another
little arc going down. When we have it, we also need to add one more little
shape like that, and this time we will go right here where we have
these two shapes, and we will go slightly toward the left from
this intersection. We will create a
smaller arc right here, so go like that and creating a little shape
going in that way. Now, when we have the
result like that, we can take a look at
everything and decide whether our scheme is looking nice or whether we want to
adjust some parts. If we are satisfied with it, we can move on to
our next part where we will start to
create the sketch.
3. Sketch: Head: Begin working onto our sketch. Firstly, by going to our layers, and we will go and create one more layer by tapping
on the plus icon. When we have this new
layer, if you want, you can go back to your layer
where you have the scheme. If it looks a little
bit too bright, we can go and fix it by going
to the icon right here, going to the opacity
slider and adjusting the opacity level
onto this layer. Adjust it if you need to try to make it
quite transparent. So you see what's
happening here, but it does need to disturb you. When you are satisfied
with the opacity level, let's tap once this
layer to close this window and we'll go to our new layer. We
will select it. And when we are in
this new layer, we will go to our color palace to select a different color. For example, let's go with
this main line color, and we will use the same
brush that we used before. It is our six B pencil. When we have everything set, let's go and start
working on our ships. So firstly, let's go toward
the ship of the head, and we will go and work on it. So firstly, what
we need to do is to find the center of our ship, and we don't want to
create it in a worn way. We don't want our skunk
to look straight at us, so we want to have a bit of the three D
effect and we want to position our face
litle bit in perspective. What we want to do
right now is to go to our little circle
that we have right here. We'll go from the top
of it and we will go and create a line
going down in that way. Hold it at the end,
try to position it at one third of the whole
shape and when you have it, let's do the same onto
the horizontal axis. We will go and find
the center and we will go and create a very
rounded shape like that. If you want you can go all along this whole shape and create
a three D shape right here by going behind the element that you working on right now
and create a full ellipse. But that way, we will have everything that we
need and we can work on our facial features
and everything that we want to work on
our little skunk. When we have this little cross, let's go and work
a little bit onto the overall shape of our head, and we will go and start to create a bit of the cheek
right here onto the side. Firstly, let's go toward
the top and we will repeat the line that we have
right here for the hat, going like that and very easily repeating the line
that we have right here, go slightly lower than
this line that we have for our center on
the horizontal axis, and then going a
little bit toward the side and creating a bit
of the cheek right here. If you need to try it
out a couple of times, you are welcome to
go and do that. We will need to have a bit of the protruding part
and when we have it, we will need to connect it with the shape that we
have on the bottom. Let's go from the bottom
and we will start to create a more elliptical
shape going in that way. We have it, you can
take a look at it from the distance to decide
whether you like the protruding part or whether
you want to go a little bit far to the side
with the shape. When we have it, we will need to go toward the opposite side too, and we will again, go towards the shed that we
have for our head. We will go to the
top part first, and then we will go
down and start to create some kind of the shade
that we have right here, but not in this protrudon way. All that we need
to do is to go a little bit outside the
shape that we have right here and create a bit more of the protrudon
part right here, a bit bigger shape that we have for our shape of the head. Now let's go toward the bottom and let's recreate
this line right here. So connecting everything
in a nice way, go and creating something
going like that. Now, when we have the result
like that one more time, take a look at everything
from the distance, whether you like how it looks
or whether you want to go and adjust it with your brush and with your eraser, maybe. When we have the
result like that, let's work on the ears. So firstly, we will go toward the left side and
we will just go and recreate what we have
right here on our with them. So very easily going along
the lines that we have right here and creating the
line going in that way. When we have it, we will
go toward the next year that we have onto
the right part and we will do it a little
bit differently. So firstly, we will go toward the top part and we will
go and recreate it. So go over these lines and create this
half of the circle. And then we will go
a little bit more inside and we will create
the lines going in that way. So going to both of
the sides and creating the parts that will go inside
the shape of our head. Now, when we have the
result like that, we can go and play around
with the amount of these lines going inside
so you can go and elongate these lines or make
them a little bit smaller. It's up to you. When we have it, we will go and create the
inner part right here. So firstly, let's go
from the top and we will step a bit from this line
that we have on the top, and we will kind of repeat what we have for
the outside part. You don't need to create
it with one line. You can go and create a couple
of lines and then choose which lines are working for you and erase the lines
that you don't need. When we have the
result like that, we also will go and create a bit of the protruding
part right here, the inner part of the ear. We will go from the tip
that we have right here on the left and we will create some of the
line going like that. We will create the
shape of the ear. When we have it,
let's go and again, take a look at it
from the distance. If you feel that maybe
it's not enough, you are welcome to try
it out one more time, maybe create this little part in a bigger way or smaller
way, it's up to you. Try it out a couple of times, create the shape that you like. And when we have the
result like that, let's go and continue working
on official features. Firstly, let's go and work
a little bit on the nose. We will go toward this
little cross that we have right here and
we will go towards the bottom part of this line that we have right
here in the middle and we will start by creating the rounder shape on
the top like that. You can go with a
bigger shape with a smaller shap probably go
with one cell size like that, and when we have it, we will go more toward the
bottom and we will first go over the left side to create a rounder
shape right here. So when we have
the rounder shape, go closer to the shape that you have in the middle
and when we have it, we will go toward the opposite
side and we will create slightly different shape than
what we have onto our left. We will go and create
the part going up in that way and we will connect everything nicely onto the top. Again, if you want to tread
out a couple of times, maybe take a look firstly at it from the distance to
decide whether you like the position and the overall
shape of this element or whether you want to
go and adjust it in any when we are done, we can go and
straightaway shade this part so we see clearly
what we are doing. And when we have
it, we will go and continue working on
artificial features by going toward the bottom part of our nose and we will create
a little mouth right here. So for the mouth, let's first go toward this
line that we have right here and we will go a little bit to the side from our nose, and we will go and create
half of the ps like that. You can go and play around with the size of the element with the position
of this element. When you have it, we will go
to the opposite side and we will create the second
half of our mouth, but it met in a bigger shape. Let's go from the middle and create the shape
going up in that way. Again, trying to
make it slightly bigger than we have it
onto the opposite side. Take a look at it
from the distance. If you like it, you like it, if you want to fix
it, go and fix it. When we have this shape, let's go underneath
it and let's create an open mouth right here to
make everything even queer. We are going from the left side, we will find the center of this element and we will
make it a little bit crooked like that and
create the shape of the open mouth in a shape of half of the circle
or half of the alps. Again, if we need to try it out a couple of times, we
will go and do that. You can go and make it rounder or a little bit longer
if you want to. If you don't like
how this line looks, we don't need it anymore,
so we can go and erase it. Take a look at everything that you've created
from the distance one more time to see whether you need to adjust it or not. If you need to go and
adjust it and let's create one more detail when
you are ready to create it. When we have the open
mouth like that, we will need to add
a tank right here. Let's go toward
the left side and we will go and create the
line gone in that way. Straightaway, we can go toward this little part and
we can shed it to again see clearly what we are doing with everything that
we are creating right now. Now when we have the
result like that, we will go and start
to work on our eyes. Let's first go toward the left side and we
will go slightly from the shape that we
have for the nose toward this little cell
that we have right here, and we will create a
shape of the llps. W one line or with
a couple of lines, let's go and create the
shape going in that way. We have it straight
away, you can go and shed it like that,
and when we have it, we will go toward the
opposite side and create a similarly looking shape
inside the side too. Again, we are
stepping a bit toward the right from our nose
and from our mouth, but this time we
need to go a little bit farther beyond the sheep. Let's go a little bit closer
toward the right part and we will again go and
create the shape of the llpe. Let's make it similarly size wise to what we have
onto the opposite side. Let's straightaway go
and shed it like that. When we have the
result like that, let's grab our erasa and we
will erase this cross line that we had before to see clearly what we
are doing as always. Let's go like that
very accurately and erase everything
that we don't need. Now we also can go toward
the eyes right here, toward the top parts and we can make little
highlights right here. You can go and firstly
erase the parts and then go and add these little
circular elements like that. Take a look at everything. If you want to adjust some
parts, we can go and do that. For example, we can
go and maybe work on the overall size of
the nose right here to make it a little bit cuter
and a little bit smaller. You can go and try it
out one more time, go and erasing firstly the
elements that we don't need, and then adding
them one more time, but in a smaller way. Let's try it out one more time with our nose
and then again, take a look at everything
from the distance. If you see that straightaway, you can go and
adjust some parts, but you already have
them onto your screen. We can go and do it very easily. We can go to our matric
one or the top left. We will go under liquefy and
we'll use the option push. We can go to the size slider and adjust the size of the brush that we're going to
be pushing with, and we can go to some
of the elements that we already have onto our
screen and adjust. So we can go and make
some parts smaller, some bigger, reposition them, find the different
placement for these parts, and overall adjust
the illustration in a way that you
would want to see. For now, if you want
to adjust some parts, let's spend some time here and adjust the shapes to our len. I decided to move the
eye on the right, a little bit more
toward the right, and make the overall shape of the mouth a little
bit more crooked, so it will have a
more friendlier look. So if you want to
adjust anything else, you are welcome to
go and do that. You can go and maybe adjust
the overall shape of the hat, so it's not that rounded. You are welcome to
experiment a little bit and spend some time here and adjust the shapes
to your liking. But when you are overall
satisfied with everything here, when you don't want to
sculpt anything else, let's go back to our canvas by tapping onto our
major Q tool twice. When we have the
result like that, let's get back to our brush if you are not at
the brush right now, let's go toward the top and we will create a couple of
more details right here. First, we'll go from our nose and we will start by
going toward the top. And we are going to
create a line that later on we will turn into
a different color. If you need a
couple of attempts, we will go and create it. All that we need to do is to create a wavy line like that. When we have it going toward the opposite side and creating
something similar here, going toward the ear and
trying to create a very, very nice looking
element like that. When we have it, we can go also underneath our
shapes of the eyes. If you need to fix something
right here manually, you are welcome to
go and do that. So work with your brush, work with your eraser to adjust
the shapes that you need, and we will go underneath
the shapes of our eyes, and we will create the
shapes for our cheeks. So let's go with a
very simple shape of the ellipse like
that on both sides. So go and creating two little
elements going in that way. When we have the
results like that, let's continue and we
will work onto our body.
4. Sketch: Body: For the body, firstly, let's go toward this part that we have right
here and we will go and create a very curvy
element in that way. We don't need to repeat the
line that we have right here the same way as we
have it onto our scheme. We can go straight toward the
ear right here and start by creating a little bit of the dance right here,
going toward the top. Let's go like that and create the shape and then
we will go along the whole shape that we
have right here and create a very rounded bomb
element like that. Let's go more toward the
bottom to go on like that, and we are following the direction that we
have right here of our line that we are
creating and going slightly down with our sheep. When we have the
result like that, we will go and work
on the leg right now, the leg that we have
right here at the back. Let's go towards this element
that we have right here, and we will start by stepping
toward the middle part. So if you need to make
a little markdown in the middle of the shape
like that, go and do it. When we have it, we will go
down from it and we will start to create a very rounded
shape going in that way. So we are going
with our back leg. We are starting to
create a shape. Again, we can go and create
a couple of lines right here and then decide which one
is looking good to us. When we are done with
it, we can go and again, take a look at everything from the distance and decide
whether we want to go maybe further with this line and make it
a little bit curvier. We can go and do that.
Spend some time here, decide under this element, and when we have it, we will go towards the bottom
part right here. Firstly, going toward this
line that we've created and going a little bit more
toward the inside part. And then going toward
this line that we have as our guiding line and
starting to create a pool. Firstly, go with the line goon in that way and when
we have this line, we are going toward the
bottom part and we will start by creating a
rounder shape right here. Let's go like that and create an ellipse goon in that way. Again, take a look at
it from the distance to decide whether you
like the size or not. You can go with a bigger size
or with a different shape. You can go, for example, with the shape going
up in that way. Again, if you don't need some of the lines, go and erase them. All that we need
to do is to create the connection that
will look in that way. When we have it going
toward the bottom part, starting to create a bit of
the flatter shape right here. So basically following the
direction that we have for our line and creating the
shape that will create a pool. When we have it going
toward the opposite side and starting to create a
line going up in that way. Again, you can decide whether
you want to create it in a thicker way or a
thinner way, it's up to you. All that we need to
do right now is to create the line going
up in that way, and then we will need to connect it with the shape onto the top. Firstly going a little bit inward like that
and then creating a bit of a triangular shape and connecting it with the
shape onto the top. So again, going along the lines to create a
better shape if we need to. If we want to go over some of the parts and maybe
scalp them differently, create them in a smaller
way, bigger way, maybe position them differently.
It's again up to you. If you want to do
that, go and do that. Go along the lines and create the shape that you would
like to see right here. Also you can go toward
the bottom part right here and adjust the overall connection by
creating a very soft curve. Going toward this little part, if you need to create a better
connection right here too, go with your brush,
go with your eraser, adjust the parts if you need to. For now, we are mapping out what we are going to be
creating right here. So if you feel that maybe you will need to go and
adjust the parts, later on, we can go and do it with our liquefied
tool later on. For now, when we
have this sheep, let's go and start to work
on some other elements. Firstly, let's go
toward the tummy and we will create the
line go in that way. Go on like that and
starting to elongate this line to create a
tummy of our little scat. When we have it,
let's go towards the front legs and let's
create them here too. All that we need to
do right here is to create the thickness
for these lines, and we also would want
to create something similar to the pose that we have right here
onto the back leg. Let's first go towards the
bottom parts and we will start by creating two ellipses
onto these two lines. Go on like that and start in
to create these elements and then go about them and starting to create the
lines that will go. So basically we are repeating the line that we have
right here on the guide, and we are adding a
bit of some kind of sure right here onto the
bottom part, the pore. And then adding the similar line towards the line that
we have right here onto the right and repeating overall shape that we have
right here for the poor. Again, on the
bottom, we will need to have a bit of
the flatter shape. So if you need to go and work
with your brush and with your eraser onto this
shape, go and do that. When we have it, we
will do the same on the pot that we have
right here onto this side. So for now, let's work
onto the basic shape and if we need to adjust
it, we will do it later on. So for this pot that we
have onto this side, we will do the same thing here. We will go and try to create similar thickness to what we
have onto the opposite side. When we have it, we will
go a little bit inside the shape and we will erase this line that we
have for the tummy. So when we have it, let's
take a look at it from the distance to decide
whether we like the position, the thickness, the everything, or whether we want
to go and adjust it. If you want to go and
adjust some lines, you are welcome to go and do it with your brush and
with your eraser. So you can see we
are creating a bit of a playful shape right here. So the elements that we have in front should be a
little bit stretched. And now when we have
these two elements, let's go and create
a similar put to what we have right here. But this time, we will need
to have it in a smaller way. So again, we will go
first toward the bottom, and we will start by creating this little shoe right here, going like that, and
then starting to create something similar to what we have ta, this little pot. Go on like that and creating the similar shape to what
we have Ota the right. When we have it, let's take
a look at everything and decide whether we want to go and adjust some parts or not. So for example, we
can go and move this shoe a little bit
toward the bottom. Again, working with our brush, working with our eraser, adjusting the parts
that we need to adjust. If you see that you can go to some other elements and
maybe adjust them too, you're welcome to
go and do that. Work with your brush,
work with your eraser, and adjust the parts to your. Example, we can go to this
little part and maybe make a bit of the rounder
shape right here on the side. So again, spend some time here, adjust the parts that
you want to adjust. And when we have the
result like that, let's finish up with the
body right here by adding a little stripe that later on we will
recolor differently. Again, we will go toward the shade that we have
right here onto the back and we will create the
little stripe in that way. Again, we will add a bit of
the thickness right here. You want to create a
differently shaped element, you are welcome to
go and do that. When we have this stripe, let's go toward the tail, and let's work onto it. So for the tail, firstly, let's go toward this
little part right here, and let's go and start
to go along the ship. If you don't want to follow
the overall shape directly, as you have it onto your scheme, you are welcome to go alone and maybe create the
different shapes. And you can see we are
starting to add the details straight away while we're going
along this overall shape. Let's create a couple of
strands of hair like that, and then we'll go and start to create a rounder
shape over the top. So go in that following the direction that we
have onto our scheme. And then when we have
the soap element, let's go and start
working from the bottom. So first, let's go in
from the bottom and starting to create a line
going up in that way and then go a little
bit inside and starting to create some kind
of the curl right here. You can go and spend
some time here and adjust the shape
to your liking. You can go a little
bit bigger with the shape, smaller
with the shape, work onto the overall shape of the cut and create something
very, very nice right here. For example, let's go with a shape like that,
and of course, if you want to add more
details, for example, maybe the line going in that
way inside that's okay. You can add the details. Take a look at fin from
the distance one more time to decide whether you want
to adjust some parts or not. And when we have the basic shape for our tell, for example, we can go right here
and maybe make it a little bit less
rounded right here, so you can spend
again some time onto your sketch and adjust
it to your liking. When we have the overall
shape for the teal, we can go again inside the shape and create
something similar to what we have right here
on our head and on our body. So let's follow the direction
that we have for tail, and we will go and start to create the elements
going like that. So for example, let's go from the bottom and let's
start to create a couple of strands that we will later on
recolor differently. For example, let's
go in that way, let's see what we have created, whether we like it or not. If we want, we can go and turn over our lines that we
have for rgides by going to our layers and tapping
into this check mark right here on the layer
where we have gts. So we can hide we can see
what we have created. Again, if we want to go and adjust some
parts, for example, maybe shorten the
legs right here or work onto the overall
shape of the tail, we will go first, make sure that we are at the
right layer where we have everything that we
have for our sketch, and then we are going
to our adjustments, going to the liquefied too. Again, we are working with our push option and side slider. Again, let's spend
some time here and adjust the shapes
to our liking. I decided to move the back part a little bit toward the right to create a bit more of the playful shape
and also move the leg right here and a little
bit work onto the til. So when you have the
result that you like, let's go and start working
onto our clean lines. But before doing
that, let's accept our changes by tapping
onto our magic one, to twice, and we will prepare our canvas for the clean
lines by going to our layers. We will tap onto the
icon right here, and we will adjust the
opacity of this layer. When we did it, let's create
one more layer on top. And now let's move
on to our lion part.
5. Clean Lines: Start with our clean lines, let's go to our brush library and we will change the brush. So we will go to the
calligraphy folder and we will choose
Monoline brush. We want all of our
lines to be very, very smooth and
easy to work with. So let's tap onto our monoline brush and go
inside the brush studio. On the left will go
under stabilization, and we will be playing
with amount of streamline and amount
of stabilization. First, you can go to
the draw pad and try it out right here how it feels. You can go to the amount of stream line and amount
of stabilization to these two slides and
set them the same way as you see them right
now onto your screen, try it out right here
onto the draw pad. If you want to tweak these
options to your liking, you're welcome to
go and do that. And remember that you
can always get back to these options later
on if you need to adjust the streamline
or stabilization of your brush and adjust them
later on if you need to. So when you are satisfied
with everything here, let's tap onto our done
button over the top, and let's start working
onto our clean lights. Firstly, let's go
and set the size of the brush to
something around 9% and we will go along
the shapes that we have right here and we will
be starting to recreate them. We can use all the options
that we used before. We can go with our holding of the Apple pencil at the end of the line and create
the smooth line. We can go to the
editing tool and start to adjust the
shapes from here. We will need to pay attention to the connections
that we are creating and we will need to make them
as if our line is seamless. We don't need to create
our line with one line, but we will need to make
sure that everything looks as if we have
created it with one line. If you see that some line
is looking a little bit bulkier or you have not
very cute connection, a little bit straight one or something a little
bit to straight, you are welcome to go with your brush and with your
eraser to adjust this part. Again, we are going
toward the bottom, again, starting to create
the line right here, holding our Apple pencil, going along the connection. If we see that the
line is looking bulkier or not too nice, again, working with
our brush and with our eraser to create
the seamless bin. Let's continue by going to
the opposite side and we will finish up with the
bottom part of the face. Going like that, hold R line. If it snaps to
something like that, you can try to lift up your Apple pencil and go
to this option on the top. If you have the option arc,
you can go and use it. If you don't have
it, go away from this mode and try to create
your line one more time. Try to make a nice connection, go to the editing
tool if you need to adjust the curvature
of your line, try to make the nice connection
from here if you want to. When you are done, try to get rid of all the
lines that you don't need and the bulkiness of the lines if you have it
onto your connection. When we have the
results like that, let's go and create
the shape for our ear. Again, either with one line
or with a couple of lines, go right here and
starting to create the line that will recreate
the shape of our ear. Again, go into our 18 to if we need to adjust
it, adjusting it, if we need to try to make nice connections and going a little bit inside
the shape with this. When we have it, again, taking a look at everything
from the distance, going toward the inside part
and starting to recreate it. Again, if you want to
create it a bit in a different way from what
you have te your sketch, you are welcome to go and
try it out right here. If you want to create
it in a similar way, you are welcome to
try it out here too. Again, with our clean lines, we don't need to create
everything with 100% of similarity to what
we have t our sketch. If you want to try out something
different, for example, maybe reposition the ear
or change the shape of it, you are welcome to try
it out right here, take a look at it from
the distance if it looks right to can keep it. If it's not, you are
welcome to get back to what you had onto the sketch
and try it in that way. When we have the ear, let's go and work on the
artificial features. Firstly, we will go and maybe recreate the eyes. It
will be easier for us. G along these shapes
with one line, creating our shape, starting to position in the same way as we have it onto our sketch. And then when we
have the outline when we don't have
any gaps in it, we'll drag and drop
the color inside, and then we will do the same
onto the opposite side. Again, either create something
similar to what you have onto your sketch or
adjust it to your liking, maybe reposition it,
maybe make it bigger. When you have the outline, drag and drop the color inside. Now when we have the ice, let's go and recreate the nose. So again, following
the direction of the lines that we
have it onto our sketch, and we will create the outline and drag and
drop the color inside. Again, take a look at
it from the distance. If you need to fix something, go and manually fix it. So for example, we can go over this little part on the top and make it a little bit more
horizontally positioned. When we have it, let's go toward the bottom and we will recreate
the shape for the mouth. Again, holding our
lines at the end to create smooth shape going
toward the opposite side, recreating the mouth here too. Adjust it with your editing
tool if you need to. When you have it, take a look
at it from the distance. When you are satisfied,
tap onto the screen, and let's go and recreate
this bottom part of the mouth by creating a shape
of the half of the ellips. Again, create it, go
toward this little part where we have the
tank created and then either manually add
the color right here or by dragging and
dropping it from this little to over
the top prime. When we have the
results like that, let's continue by going
to some other elements, and let's recreate them too. I would probably want to go and maybe recreate the line
that we have right here for the bottom part of the
hat to make it a little bit more positioned correctly
than it is right now. So I will go with
the eraser and erase this line right here and try
to create it one more time. We can go and try it
out a couple of times. We can take a look at it from the distance to
see whether we are doing everything right or maybe we need to go and
adjust it even more. Go into Editing tool to
create a rounder shape, trying to make nice
connections, again, taking a look at it from the
distance if it's needed. When everything is looking nice, we can tap on the
screen and work on our connections with our eraser and the brush if we need to. Going into the opposite side and recreating the line right here
to create a seamless line. Now when we have the
result that we like, let's continue by going
to Abush and we will go and recreate the shape that we have right here for our body. Let's go and start to create
the rounder shape like that, going toward the shape that
we have for our back leg, and again, starting to
recreate the rounded element. Going to our editing tool,
recreating the lines, trying to make
everything to look very seamless and
very nice and smooth, working with abush with our
eraser to achieve this look. Let's continue by going
to our brush and we will go and start to
work on our legs. Firstly, going toward
the back part. Again, if we want,
we can go and create something different from
what we have onto our Skage. Always take a look
at your lines from the distance to see
clearly what you are doing and whether you need to go
and adjust some parts or not straightaway when
you have this option of editing right now. When we have the
line that we like, let's tap on the screen and continue to work on
the bottom part. Let's make this
line a little bit more going on the vertical axis, and then we will recreate this line that we have
right here for the pool. Let's start by creating a
rounder shape right here, and then we will go
toward the bottom and create a bit of the
flatter shape right here. Again, connect it nicely, at least try to create
it in a nice way when we have it going toward the opposite side and
finishing up with our leg. Let's go and create this
little element right here. So again, will connect
it nicely with our shape and then going toward the bottom end with one line, creating the shape,
going in that way. You need to try it
out one more time, go in and trying
it one more time, or couple of times if
we need to work in ones our lines with our brush and with our eraser
if we need to. I'll probably want
to go a little bit farther with the shape, so we will go and elongate
this little line right here. Firstly, erasing
it with our erasa and trying to make
everything in a nice way. For example, go on
like that and go a little bit longer with
the shape of the bum. Again, connecting it nicely with our shape right
here on the top. If we need to go and fix our lines right here,
we'll go and do that, trying to create it
in a very smooth way, and then one more time trying to create the leg that we have
right here at the back. So one more time, go and creating the line
going outside and then connecting it with our line that we have
onto the bottom. When we have it, let's work on our connections with our
brush and with our erasa. Going in that way and
starting to create the seamless and
nicely looking lines. Going alone all of the
lines that we have created. If you want you can keep what you have right here
with a little bit of the fault or if you
want you can go with your erasa and erase the
parts that you don't need. Now, let's get back to our brush and let's go toward this
part that we have for our poll let's create
a couple of lines like that to create the
actual port here. When we have it, let's go and recreate the line that we have
right here for the timing, creating a curve, holding it, and then we can go toward this little pod that we have right here and recreate it too. Creating something
similar to what we have on the opposite side, again, starting to
create two lines, creating a bit of poor
right here onto the bottom, the rounder shape, and then
finishing up everything with slightly flatter
shape onto the bottom. Connect it nicely, go
toward this little part. If you have it too, connect it with your brush and with
your eraser work onto the thickness of the
lines and evenness of the lines with your brush
and with your eraser too. When you have it,
let's go and create these couple of lines
that will divide our paw. Go on like that and creating two little lines
going in that way. When we have it, let's continue by recreating
the front pose. Go the same way as
we have them onto our sketch and starting to
recreate them the same way. With this front poor, we will go a little bit
toward the inside part of the body and we will go and create the pole
going in that way. We will need to have a bit
of the flatter shape on the bottom and a bit of elongated
shape on the left side. Let's create it in that
way and when we have it, we will go and recreate
this chest part, going like that, starting
to recreate it to either the same
way as we have it onto our schage or
maybe differently. When we have it, we also need to pay attention to the line that we are creating
right now because this line is the
elongation of this line. We will need to
position it as if it's not interrupted
with our pull, but it is going seamlessly
right here on the bottom. Try to do that, and
when you have it, let's go and recreate the last poll that we have
right here onto our left. So trying to
recreate it the same way as we have it
onto our sketch, or if you want to fix it a little bit or adjust
it in any way, go and do what you need to do. Again, connect it nicely, go and work on your
lines onto the corners. If you have some
very strong corners, go and soften them up. When we have the
result like that, let's go towards the pose
and let's create this dividing part onto the pose by creating a couple of
lines going in that way. When we have it on one pull, let's go to the opposite side and create something
similar here. When we have it going
towards the tail, and let's go and
recreate it too. Starting to create
the curfre here, you can go and overlap
the shape of the ear, for example, and go a little
bit beyond the shape. You can go and, for example, do something going in that way, and we can very easily go with our eraser and erase
the part that we don't. Probably make the size of the eraser smaller
and with the eraser, we can use all the options that we are using
with our brush. You can go and create the
line going in that way and hold your line
in the end to create a curve and very easily
erase the part that you don't need by using all the
options that we already know. When we have it, let's continue
by going toward the tail and let's start recreating these details that
we have on the top. Go like that, starting to create our very rounded elements
using all the options, all the tools that we
already know of and going along the whole shape and starting to
recreate the tail. Let's go toward the very, very top part and we will create a big curve going
down in that way. When we have it going
toward the bottom part and starting to recreate
these details here too. Again, we are creating the
triangular shapes right here, but again, we are trying to create them in
a very soft way. So nothing too pointy
here is allowed. Of course, if you want to
have the pointy elements, go and create it
in a pointy way, continue to work
onto the tail and create the cut right
here onto the top. Again, use all the options
that we already know of and create the nicely
looking elements right here. Use the eraser if you need to
create a softer connection. When you have it,
if you want to, we can go toward this top
part and maybe create an additional lion like that to create some kind
of default right here. When we have the
results like that, let's take a look at
everything without our lines of the sketch. Go in again to our list and taping onto the
check mark right here onto the layer with the sketch to see clearly
what we have created. If you like how it looks, we also can take a look at arithin without these
lines of the grid. We can go back to our range
icon over the top left, Canvas, go into
the drawing guide and toggle it to turn it. When we have it, we also can go and start to add some
details right here. Firstly, let's go
toward our lease and we'll go underneath our
lay with the main lines. Let's create one
more lay on top by tapping on the plus
icon, firstly, we'll go toward the bottom and we will create some kind of the field where our little
skunk is standing on. Let's go with one line
with the same size of the brush and we will
create a shape of the ellipse. Close the shape like that,
hold your line at the end. Let's try to make
it horizontal so we can hold one of our
fingers on the screen to create it in a
very flat and very horizontal adjust the size
by moving your Apple pencil. For example, let's go
not too far beyond the shapes that we
have for our pose. Let's create something
in that way. We are not going to be erasing the part that we have
right here at the back. When we are going to be creating the colors, we will
get rid of it. When we have the
results like that, we also can go behind our
little scan and we can add a bit of the interest right here by creating
some peculiar shape. For example, let's go
back to our layers. Let's create one more
layer on top and we will firstly go and
create a shape of the heart. You can go and create it
with a different brush, so we can get back, for example, to our sketching folder, six B pencil and we will
go and very boldly create the shape of the heart right here behind
our little skunk. Let's go like that and
very easily create the shape that we would like to see right
here, for example, go like that, and
when we have it, we will go along the shape that we've created with
little bumps like that. Let's go and very easily and very quickly create
these little bumps and we will create some
kind of the shape of the little stinky
part right here. When we have it going
towards the opposite side and again starting to create
these bumps, if you want, we can later on fix the shape by going to our familiar
liquefied tool, but first go along this
whole shape like that. If you want to go
inside and maybe create a couple of
lines here too, you are welcome to
go and do that. If you want to fix the shape, go toward the liquefied to push option and adjust the oral shape that
you have right here. Let's go and create it maybe
in a bit of the smaller way, but we will go and create
it in a nice way too. For example, let's go like that. If you like how it looks, let's get away from
our liquefied tool by tapping on the
adjustments twice, and then we will go
back to our layers. We will first go to
this layer where we have this little
additional part. We'll tap onto the icon
and change the opacity, and then we'll create one
more layer on top and we will go to our brush
library, again, calligraphy folder,
Mnulin brush, and we will go along this sheet and we will recreate
these little bumps. Very easily, let's go
and start to create. Again, you can use all the
options that we used before, hold your line and the ends
to create nicer shapes. Doesn't need to be too perfect. We are creating some kind
of the gas right here, so it doesn't need to be
very rounded or very even. You can go and experiment a little bit and create
a different shape too. Continue working onto the shape, make the bums bigger,
make them smaller. All that you need
to do is to follow the shape so we will
have a nice result. When we have the intersection with our shape of
the, for example, the skunk, we can go
toward the bottom and we can close the
shape going in that way. So we don't need our
bumps on the bottom. If you don't see what you
are creating right now, we can go back to ys, hide our yer with our skunk, for example, and this
little element that we have onto the
bottom and overall, make sure that the
shape is closed. Closed shape means that we don't have any gaps
into our lines. When we have the
result like that, let's go and maybe recreate these little parts that
we have on the top. So let's create a couple of these elements to
emphasize on the shape. Let's take a look at it without these lines that we
have for this sketch. So go and find it and hide it. And then when we have
the result like that, let's get back our
layers that we have for our main character
and our bottom part. And when we have the
result like that, we are done with our clean lines so we can move on to
the coloring part.
6. Colors: Coloring, firstly, let's
work onto our little skunk. Let's select our layer with it. We will tap on it, and we will
use the option reference. When we are using the
option reference, we will be adding the colors on the separate layers by using these lines that we have
right here onto this layer. So we'll go underneath
the layer with our lines, and we will create one
more layer on top, and then we can go toward our color palette and
select this body color. With the body color, we will go toward the body and we will start to recolor everything that we have for our
scan right here. You can see we are hiding the lines that we have
right here at the back, and that's exactly what we need. When we have the
result like that, we will go toward our layers. We'll create one
more layer on top. We will change the color to red, or if you want to
go, for example, with pink cred, you
can go with it. We will be adding the color
right here to the tank. When we have it, let's
go toward our layers, and we will go and work onto the additional colors right
here onto our little skunk. Firstly, we don't need
reference anymore, so let's go to this layer
where we have this reference. We will tap on it
and we will use the ocean reference from
the list to turn it. When we have it, we can go toward our layer with
the main sketch, so the sketch that we have
for our skunk and we can grab it and we can drag it above everything that
we have right here. We will unhide it and we will see the lines that we
have created before. When we have these lines, we will go towards
this layer that we have for our mein coloring and we'll create one
more layer here. To stay inside the shapes, we need to tap onto this lee and use the option
Clipping Mask. You will have a
little error here. That's exactly what we need,
and then we will go back to our color palette to
change the color to white. With this white
color and probably with the smaller
size of a brush, let's go and recreate
these lines that we have created onto our sketch. Let's go like that,
recreate the lines, close the shape on the top, so you don't have any
gaps inside this line. And when you have no gaps, let's drag and drop
the color inside. When we have it, we
will do the same with these two lines that
we have on the bottom. Firstly, go toward
the bomb area. If you want, you can
repeat the lines the same way as you have them
on say your sketch. If you want to experiment,
go and experiment. Close the shape when you have two lines on the top
and on the bottom, and then drag and drop
the color inside. When we are ready
with this task, going toward the tail and again starting to recreate
our little pattern. Going toward the top, starting to create
these little elements, going into the
opposite side, again, recreate what you have onto your sketch or create something
different if you prefer. Close the shape when
you are already with the main lines
on the top and on the bottom to have no gaps into your outlines and then drag
and drop the color inside. When we have the
result like that, let's go back to our layers
and hide our layer with the sketch the layer
that we have on the take a look at everything. If you want you can
go and maybe adjust some little mis colored places or the smoothness of the
lines or something else. If you need to change
something, and change it. When we have the
results like that, we will go and work
a little bit on the element that we have
right here onto the ear. Let's recolor it too. But firstly, we
need to get back to our color palettes and
change the color to, for example, the same
pin cret right here. When we have it, let's
go towards the ear, and let's recolor the element that we have right here inside. All that we need
to do is to follow the natural direction
of the hat, going toward the bottom first in that way and then
follow the ear shape, the shed that we have inside, and adding the color
toward the middle part. Let's first go toward
the outline like that, close it, and then drag
and drop the color inside. Take a look at it from the
distance to decide whether it looks fine or whether you need to go and maybe
adjust it slightly. If you need to adjust it, use your erasa and your
brush to adjust the. Now when we have
it one more time, we will go underneath our eyes and we will need
to add our cheeks. If you need to see them the same way as you have
them onto your sketch, go to your las hide the layer and go with
the same color that you are using right now to add the cheeks right here
onto these areas. Use your brush, firstly,
create the outlines. Go with a bigger
shape, smaller shape, adjust it for editing to find a different
placement if you want to. For example, we can
go slightly toward the sheet that we have
for our eye right here. When we have the sheet that
we like, tap on the screen, drag and drop the color
inside when you are ready and do the same
onto the opposite. Firstly, create the
outline the same way, go toward the editing
tool to adjust it. Try to make it similar size wise to what you have
onto the opposite side, reposition it if you
need to rotate it if you need to do what you need to do right here to create
a nice element, except the changes when
you are adjusting it, and then drag drop the car
inside when you are ready. Now when we have the
result like that, let's get back to our layers and hide the layer with our sketch. A straightaway, let's go
towards our layer that we have our main lines and we'll create one
more layer on top. We'll switch the color to
white and we will go towards the ice and we will put the dots right here for our
little highlights. Let's go with a bigger
size of the brush. We'll go over one on the sides. Maybe even bigger size for the highlights
will work for us. We will go to one
of the sides and we will put the dots
to the same side and to the same level to create these nicely
looking highlights. When we have it, let's continue to work on some other elements. Firstly, let's go and work on the bottom part of our
little field right here. Let's get back to
our list and find the lay where we have the
lines for this field. We'll tap on it and we'll
use the option reference, and then we will go underneath it and create one
more layer here. Let's change the color
to yellow green and we will drag and drop the
color toward this area. And when we have the
result like that, let's go and add a couple of more details toward this part. Firstly, we want to go
and add a different color towards this little patch that we have right here,
toward the outlines. Let's go and do it very easily. We'll get back to Alas. We will find layer where we have our little lines
for this patch, tapping on it, using the option reference to
turn it off firstly. Then go and create
one more layer on tapping on it and using
the option clipping mask. When we have it, changing
the color to yellow green, and we will just drag and drop the color
toward this part. When we have it, we
can go and create a bit of the interest right
here toward this part too. Firstly, we don't
need this layer to be on top of this layer
that we have for lines. We can merge them together to have only the layer with lines. Let's tap onto this layer with this rectangle that we
have in green color, and we will use
the option merge. Now when we have
these little elements recolor it with
this green color, let's go toward
our brush library, and we will go to the
same calligraphy folder, but we will use a different
brush with the title script. With this brush and with
a smaller size of it, for example, let's go and try
out something around 15%. We will toward the
lens right here, and we will create some kind
of the grass right here. The brush that we are using right now is the pressure brush. If you are pushing with a bit
of the pressure right here, you are creating some kind of the little tip right
here and you can go along this part and you can add the little grass elements
going in that way. So release the pressure create the elements
going like that, go along this whole
part and create a couple of details
going in that way. Go to the top, go
toward the bottom, go toward this field
that you have here and create a couple of brass
strands going in that way. When we have it, also, we can go and add little
flowers right here. For example, let's change
the color to, for example, grayish, pink or any other pinkish color
that you have here. Let's go very easily and start to create
the flowers here. Let's create them in
a very cartoony way. So going like that and
creating five petals, go along the whole shape of this patch of grass that
we have onto the bottom. Create a couple of these flowers when you have the
result that you like, if you need to try it
out a couple of times, go and try it out
a couple of times, create some pattern
with the flowers. When we have the
result that we like, let's go and switch
the color to white and let's go inside the shapes that we have created
for our flowers, and let's add the middle parts of our flowers in that way. Now when we have it, when
we have the grass patch, let's go and recolor these little fumes element
that we have in the back. Let's first go
toward our layers, and we will find the layer
where we have these outlines. We will first go and
change the color of it, so we are creating
one more lay on top, tapping on it, and using
the option Clipping Mask. Now, go into our color palettes and let's select this red color, and we will drag and drop
the color toward this part. When we have it, go
toward our layers, and we will merge these
two layers together. So go into the layer where we
have the spin creek tingle, tapping on it, and using
the option merge down. Now when we have
it, let's tap onto this layer and let's use
the option reference, then go underneath this layer and creating one
more layer on top. Now, onto this layer,
let's go and select this grayish pink color and drag and drop it toward
the middle part. When we have the
result like that, decide whether you want to put the fumes a little bit
behind this patch of grass, so you can go and
do it very easily. We will need to go to these
two layers that we have for our patch of grass and put them above earlier
with the fumes. So when the first
layer is selected, we'll go to the next one and we will swipe it
from left to right. When we have them, we will
drag them above earlier with the fumes and we will have these elements
positioned nicely. Now, if you want to
add more details, you are welcome to go and
do it onto the background. So maybe you have a bit of the dot right here onto the background or
some other elements. But if you like how everything
turned out right now, we are done with
our illustration. Thank you for
watching this class. Let review if you liked it, and can do subscribing for
MirkaY videos in the future. Looking forward to
seeing your project.
 Uni Corn, ⭐Kawaii Art Enthusiast⭐