Transcripts
1. Introduction: Hello, everyone. I'm
Uni, and in this class, we are going to
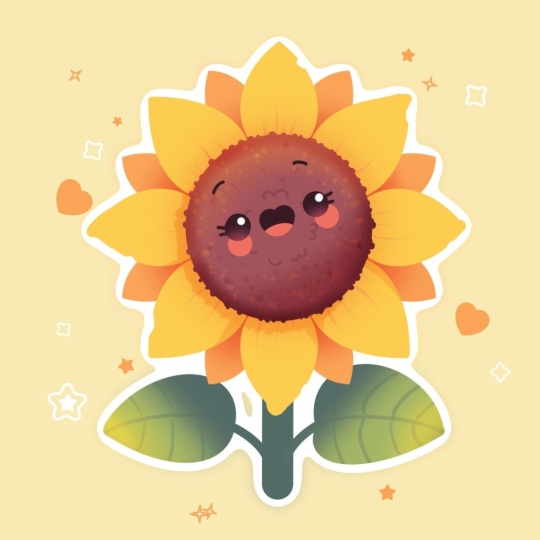
draw this cute away illustration of an adorable
sunflower in procreate. During this class, you'll
get familiar with a lot of useful features like quick
shape tool, symmetry tool, Gaussian Glor, eating
a white ticker bute, leaving masks, and
blending modes, and learn the basics
of drawing Itracret. By the end, you'll not only draw an adorable illustration
you'll be proud of, but also feel super
confident using procreate. And now let's spend
some time drawing.
2. Sunflower Base: Begin this class firstly by deciding what kind of canvas
we are going to be using. Today we're using a standard square canvas from
Procreate with pixel width and pixel
height to the 2048 pix ups. DPI a 300 and color profile is set aSRGB with
this loan number. When it's all done,
let's hit done. Let's take a look
at our new canvas. And before starting, let's first go under the
project and so Stop and download
all the materials mentioned for this class. When you did it,
let's first go and select the brush that we are going to be working
with firstly. Let's go to the brush library. We'll go to the
calligraphy folder and we'll select moonin brush. If you want to make all of your lines very smooth
and easy to work with, we can tap onto our brush and
go inside the brush studio. On the left, we'll go
under stabilization, and you can play with amount of streamline and amount
of stabilization. Try it out onto a draw pad. If you want to twig this
options, twig them, if you want to set
them the same way as you see them right
now onto your screen, do that too, and when you are done with
adjusting everything, let's hit down over our top. Now, when we are
done with our brush, let's go to our layers, and we will go to the
background color. We'll go to this color
palette that you downloaded, and to see the colors names, we will go under palette on the bottom and the
cards on the top, and we will select
the first color with the title background. Now, when we have this
background selected, let's also go to
word color palette, and we'll select
this pin cred color. This is the first color that we are going to be working with. Now, go into this slider
with the size and setting the size of the brush to something not too big
and not too small, so something around 9%. And when we are all prepared, let's go to our Canvas, and we will go and
create a shape of the perfectly rounded circle. So with one line
creating our shape, trying to make it not too big, holding our Apple pencil
at the end of the line and we also will hold one of
our fingers on the screen. Let's make it slightly
bigger by moving our Apple pencil a little bit outside and when we have
the result like that, let's lift up everything that
we are holding right now. Now when we have the shape, we will need to position
it straightly at the center for our
future purposes. When we have the shape, let's go to our Aoki on the top left. We'll go on the uniform method and to make everything
easy for us, let's go to snapping right here and turn on snapping
into the settings. That way we'll be able to
get back to our canvas, hold our Apple pencil
at some blink space, and we'll be looking for
these two orange lines, one vertical and one horizontal. That way we know that we arrive at the center and when we are, let's lift up our
Apple pencil and then hit our Aoki
on the top left. Now when we have the
result like that, let's go to our layers
and we'll create one more layer here by
tapping on the plus icon. We will need to grab
this layer the new one. When it is selected, we
will hold it and we'll drag it underneath our
layer with our circle. When we have this
layer positioned in that way, let's do the phone. We will want to create
the paddles and we want them to go on
this radial axis. What we want to do is to use the option that
Procreate has. When this layer is selected, we will go under ring
icon over the top plat, we'll go under Canvas, and we will toggle
drawing guide. We also will need to go under
IddroneGuide and switch our option radio to go into the symmetry and then when we have this
one line like that, we also will need to go under options and select radio radio. When we have it
selected in that way, we will it down over to pride, and now we can go and very
easily create the patal. Before doing that,
let's first go and switch the color
to yellow orange, and then we will go towards our top part or to any side that you prefer with the same brush and with the same
size of the brush, and we will start to
create our petals. For example, let's go and create the closed
shape like that. You can go with bigger elements
with smaller elements. You can make the greater amount of these elements if you prefer. You can adjust the
size to your liking, make sure that you are creating the closed shape so that will be easier for us to add
the color inside later on. If you want to try it
out one more time to have more space and more petals, let's go and undo what we did. Let's try it out one more time with smaller shape right here. When we have it, let's go
towards this blank space, we will step a bit
from this first petal and we will have a bit of the space between our
petals right here. Let's try to create another
little element right here. You can go with a different
shape with different size, all these elements, maybe
even different position. When we have the
results like that, let's drag and drop the color
to all of these petals. We are going to our
icon on the top right, dragging the color to
the first set of them, and then to the second one too. When we have everything
in that way, let's go to our layers and
we will make one more layer. Tap it on the plus icon. Again, we will need to
gram this layer and drag it underneath our layer
with the main petals. To be able to use this symmetry tool that we
are using onto our petals, let's tap onto this new layer and use the option drawn assist. Now when we have
it onto our layer, let's get back to
our color palette and select the orange color. With the orange
color, we will go to these blink spaces between our first shapes for
our petals and we will create another set
of our petals right here. Let's go with probably
smaller size right here and create
something in that way. Again, close the shape and then drag and drop
the color inside. Now, when we have the
result like that, we also can go and maybe change the whole set of our little petals right
here if we want to. So for example, we can
go to our layers and we will select both of these
layers with our petal. So when the first
one is selected, we'll go to the next one and
swipe it from left to right. When two of them are selected, we will go to the
major one too over the top plot and who will
use the option liquify. We will use the option
push and the size slider and you can go and play around with your little
petals right here. For example, you can go and
make them lt bit bigger or adjust them in any other
way possible right here. Spend some time here, adjust
the shapes to your liking. For example, let's have slightly bigger shapes
for our petals, so we will have the outside
parts of them alte bit in a more big way. And
the result that we like. Let's tap one our magic Q to twice to get away
from this mode. Now, when we hand the
result like that, let's get back to our layers, and we will get back to the leer where we have our circle one. We will then get back to our color palettes and
pick this pink cred color, and the same one that we use for our outline and we'll
drag it inside IH. Now when we have the
result like that, we don't need our
symmetry tool anymore. So let's go to our wrench icon or the top left and we
will toggle it right here. Now, when we have the
result like that, let's get back to
our list and we will select all of these
three lists together. So when the first
one is selected, swiping the next one from left to right and do
it one more time. Let's straightaway put them into the and then we will
grab this whole group, so select it, and then
we'll grab our rake on the top left and we will move the shape slightly
toward the top. If you want to rotate it, you
can go to this green note, hold your Apple
pencil and rotate it. Find the placement for it and have some space on the bottom, so we'll be able to add
details right here too. If you want to make it
smaller altogether, you are welcome to go
to one of the nodes on your bounding box and
make it smaller to your. When we have the position
and the size write to us, let's tap on our ear kit to
get away from this mode and then let's continue by adding some beautification
toward the middle part. For this task, let's
get back to our layers, go to this layer where we have our middle part
and we'll create one more layer on top with the same color and
with the same brush, but with slightly
bigger size ove it, we will go along the edge
that we have right here for our middle part and we will
create some texture here. So let's make the size of
the brush slightly bigger, and we'll be going
and starting to tap right onto the edge right
here to create some texture. You can go manually like that, or you can maybe create some pattern with everything
that you have right here. So you can spend some time here, make them a little
bit more protrusi, less protruson, it's up to you. Try not to overdo it, add enough of these elements
so they are not disturbing. And when you have the
result like that, you also can go and maybe change the size of the brush
and go and add a couple more of these bumps with the smaller size of the
brush to make it believable. So when we have the
result like that, let's go and work more
onto our bottom part. So for the bottom part, let's
get back to our layers. We will create one more layer
where we are right now at. We'll grab this lay and we will drag it underneath everything
that we have right here. If you left the group, you can go and try it
out one more time. Drag the layer to the bottom above the layer with
the back petals. And then just grab
this layer that you have on the bottom
and drag it higher. Now, let's get back
to this new layer. Let's get back to
our color palette and select this leaf main color. And then we will go toward the bottom part and we will
create a line right here. We can go with a bigger
size of the brush. You can go and try
out a couple of times to create the
right size right here, or you can go with a couple of lines and add the color inside. We will go with the
line like that. We will hold it at
the end to make it straight and to make
it highly vertical, we can hold one of our
fingers on the screen. When we have the
result like that, you can move your
Apple pencil to adjust the size of this thing that
we are creating right now. Decide on your own when you
have the result like that, let's get back to
our list and create one more layer on top by
typing on the plus icon. When we have it, getting
back to our brush, go in with the smaller
size of a brush, and we will create some
leaves right here. So for the leaves, firstly, let's go and create a little
middle vein right here. So we will go and create
the shape like that. You can again hold your
line at the end and then go to the opposite side and create something
similar here. For example, go slightly
higher right here. When we have it,
let's go and turn these things into
the actual leaves. So for the shape of the
leaves of our sunflower, let's go with a bit of the
hard shape right here. So we are going a little bit closer to the shape that
we have for our stem. Stepping a bit from it and creating the line
going in that way. Again, you can try to
hold your line at the end if you want to create
a cleaner line. You can go to the Edit two right here onto the top
and in the Edit two, you will have the
note right here. You can go to them, hold
your Apple pencil there, and adjust the overall
look of your line. When you have it, let's tap
on the screen and let's go toward the bottom to
finish up with our sheet. Again, we will start by creating the line
going in that way. If you want you can create a
bit of the curve right here, make a nice connection between these two sheps and when we
have the result like that, let's go and add
the color inside. Make sure that you
don't have any gaps into your coloring and when
you have the first leaf, let's go to the
opposite side and create something
similar here too. For example, let's
start from the bottom. You can overlap the
part of the stem a bit if you want to when you
are done with the bottom, go toward the top and create the second half of
your leaf right here. Again, work onto the connection right here and when you already, drag and drop the car
inside the sheet. Now, when we have the
result like that, let's go and add a little bit more interest
towards our picture.
3. Shadows & Details: What we're going to be
doing? Firstly, we'll work with our little
petals right here. And to do that, we
will need to go to our list and find
the needed layer. So firstly, let's go towards this layer that we have
for our main part, the middle part, and
we'll make a copy Ovid. Let's swipe this
layer from right to left and choose the
option duplicate. Now, we will go to one of
these layers preferably to the bottom one and we
will change the color ovet. We will go to our color palette and change the color to red, and we will drag it right here. You cannot see what's
happening here, but if you go to your list, you will see that you have these differently
colored element, and that's exactly what we need. So when we have the second
element, let's do the volume. Firstly, we will tap
onto the N icon, and we will change the
blending mode to multiply. We also will go with
the apate slater and we will set it to
something around 50%. Now, when we have the
result like that, let's go to our major
quanol one more time, but this time we will
go under Gauchanbl. When we have this
Gaussian blur window, we will hold our Apple pencil at some place and we'll move
it towards the right. You will see that you
are creating a bit of the different color right
here over the middle part. You have some of the
blurry effect right here. If it's not seen
clearly right now, we can go and
adjust the opacity. For now, let's set the Gaussian blurry to
something around 15, 20% and when we have
the result like that, we can get back again
to our layers and tap onto this icon onto this
layer and adjust the opacity. You will see that you have some of the gradient right
here between the colors. So when we have the
result like that, let's also go and work a
little bit more on our leaves. So let's get back to the
yellow layer with our leaves, and let's create one
more layer here. Onto this layer, let's
go and change the color. We are going again to
our color palettes and we will select
this orange color. With the orange color,
we also will go to our brush library and we
will change the brush. You downloaded the brush
with the title Tipper, so let's go and find
it when we have it, we will go toward our
petals and we will start by going from the middle and starting to create the
lines going in that way. You can adjust the
size of your brush to create something a little bit thicker or a
little bit thinner. It's up to you. You can go
with a couple of lines. You can go with two
or three of them. Try not to create them
in a very flat way. Try to create them
as if they are going on the surface
of this little petal. You can go and create a couple
of lines going like that, two, three lines, maybe
one line like that. Go and create these lines, go along the whole mess of petals that you
have right here. Again, you can go and
maybe adjust the size of the brush to make it a little
bit bigger or smaller. It's up to you can try out
different themes right here. Let's continue by going through all of these
petals and start to add these additional little
shapes onto our petals. Now when we have the
result like that, let's also go and add a bit of the shadow right
here onto the bottom, a bit more of the
shadow right here, and we will do it
again by going to our layers and we will create
one more layer on top. We can go and tap onto the
previous layer and we can clip it previously with our
little petals right here. So we'll be able to later on add the shadow onto
this layer two. Let's go to this
layer where we've added these additional
little details, tap on it and use the
option clipping mask. We will do the same with this new layer that we've created. Tap on it and use the option
clipping mask here too. Now onto this layer, let's go to the AN icon and change the
blending mode to multiply. For now, let's go with full apasite that we have right here. Then we will change it so it
will suit our illustration. Now when we have
it, let's go with the same brush that we
are using right now and we will go mostly
toward the bottom left part and we will start
to add the shadows here. Let's start by going with a
very simple shape like that. You can hold your line
at the ends to create this half of the circle
or half of the ellipse. You can go toward
the top editing two over the top and you can
adjust the notes right here, so you will have a bit of the shadow right here
going over the bottom. You can make it in a nice
way like that or you can go and create it in a
full way if you prefer. When you have the
results like that, let's tap onto the screen to accept the changes
and let's make sure that we are emphasizing on the little bums that
we have right here. We will go toward our
little shadow and we will go with some
bubbly lines like that, with some waves and some
peculiar little details. If you want, we also can go toward the edges right here and create little shadows going
towards the petals like that. Go through all of
these little petals that we have right here
closer to our shadow, and let's go and add this additional little
details here too. We are adding the bumps. We are adding some
peculiar little details so everything looks organic. Try to avoid creating
the very strong corners. If you have something like that, go there and make it softer. And when we have the
result like that, let's get back to our layers. Let's tap onto this icon onto this layer and adjust the opacity so it
doesn't look too bright. For example, let's go
with something around 30, 40% and everything will look
pretty nice right here. When we have the
result like that, let's work onto the
back petals too. Firstly, go into our layers and we will find
our back petals. When we have
selected this layer, let's create one
more layer on top. Again, we are
tapping on it and we are using our
clipping mask option. Let's change the blending
mode to multiply, and for now, let's keep
our opacity at maximum. We will go toward
our color palettes and we will select
some darkish color. For example, let's go
with this red color. We also will go toward our brush library
and we will change the brush by going
to the ear brush and folder and we will
select soft blend brush. As for the opacity
of this brush, we will set it to
something around 30, 35%. And then with the bigger
size of the brush, we are going from the
middle part and we are starting to add
the darker color here. So we are trying to do it
in a very, very soft way. We are trying to avoid creating a very harsh transition
between the colors. So when you have a subtle
transition like that, if you don't like the amount
of opacity right here, you are welcome to get
back to your layers and adjust it onto your
slider with opacity. So we'll need a very
subtle result like that. When we have the
results like that, let's continue by going and
working on our middle part. For the middle part, let's first go and select
our layer with the middle part and
we will need to actually go and merge
these two layers together. We will be able to add additional colors and everything
on both of these layers. To do that, we will go to our layer that we
have on the top. We will tap on it, and we will
use the option merge down. Now, when we have
one layer like that, let's create one
more layer on top, tap on it, and use the
option clipping mask. Also we will go
to the icon right here and change the
blending mode to overlay. Now let's make sure that we are using our soft blend brush, and then we will go
toward our color palette. Firstly, we will go towards
the yellowish color. So for example, yellow
orange with a big brush, we will go over the
top and we will start to add the secondary color here. Again, we are trying to avoid very blotchy result right here. We are trying to make very, very soft transition
between the colors, and when we have the
result like that, let's go back to
our color palette and switch the color to face. With this color, we will go to the opposite side
from the slide sheep, and we will go and do
the same thing here too. So go to the bottom and again, try to make a very, very soft transition
between the colors. You have a very,
very smooth result. When we have the
result like that, we also can go and add a bit more detail toward the H right here in
a more darker way. Let's get back to our
list and one more time, we will create one
more layer on top. Tap on this layer and use the option clipping
mask one more time. Going on again to the icon and change in blending
mode to overlay and let's go with slightly
smaller size of the brush over the
edge of our flour, and we will start to add a bit of the difference
in the color here. Go both toward the top
and toward the bottom to create this
kind rim of color. If it's a little bit too much, you are welcome to go
back to your layers and adjust the opacity
on this layer by tapping on the o icon and then dragging the opacity slider
more toward the left. When we have the
result like that, let's add some
beautification toward the middle part and we will do it firstly by creating
one more lay on top. Tap on the plus icon, tap on this new lay and use
the option clipping mask. Then we will go to the brush
library and select the brush that you downloaded
with the title Scattered Confetti solid. When you've selected this brush, let's first go with
the orange color, and we also need to change the blending mode all this
layer to our overlay too. Tapping onto the icon and finding our overlay
blending mode. With this brush that you picked
and the color of yellow, we will firstly go over
the top and we will start to add additional
little details right here. You can go we are adding some kind of the
confederate here. You can go toward
the bottom two and add a bit of the details here. So when we have the
results like that, we have some kind of the very nicely looking effect that shows that it
is our sunflower. When we have it,
we can go toward our color palette and change the color to
something darker. So for example, face
color or dark pink color. And with this color, we can
go toward the bottom part and toward the top two and start to add these
details here too. If this color is not very
seen onto the bottom, we can switch it to face
and go toward this part and add a couple of details with this darkish
color here too. Try to avoid adding too much
details toward the center. And when we have the
result like that, let's get back to
our monoline brush. So we are going to our
calligraphy folder, selecting monoline
brush, and let's go and add one more detail
towards the middle part. So we will go and create
one more layer on top. We will straightaway
go to the end icon and change the opacit to
something around 20%. We will need to only see what
we are doing right here. So go into the
middle and we will start by creating a
shape of the ellips. Hold it and the ends, hold one of your fingers
on the screen, and then adjust the side
so it's not too big. So for example, go in with
something going in that way. Go to the editing tool and try to position
it at the center, and when we have it,
let's get back to our layers and create
one more layer on top. If this little element is
a little bit too bright, we can go again to the icon
and adjust the opacity. What we are going to be doing is going into this new layer and we will go with slightly
smaller size of the brush, going along the shade
that we've created and we will start to create little
details going like that. All that we need this
little circle in the middle is to create these details that we are
working on right now. When we have it, let's
get back to our list. We can go to this layer that we've addited these details
on, tap on the end, I can adjust the opacity to
something around 20 parison, and then get back to this layer that we used for the guide, and we will swipe it from right to left and choose
the option delete. Now when we have the
result like that, let's go and add
the facial feature.
4. Face & Final Touches: So for the facial features, we will need to create one more lay above all the
lays that we have. Let's tap on the plus
icon and do that. When we have it, we will go with a bigger size of the brush, so we might need to try to find the right size
a couple of times. When you have the big
size of the brush, let's go over the top part and we will put two dots
for the eyes like that. Of course, if you want to
experiment a little bit and create different
facial features, you are welcome to do it. When we have the ice, let's go to the middle
right between them, and we will go and create
a little line like that. So firstly, let's change the size of the brush to
something slightly smaller, and we will go and create
a mouth going like that. So create a little curve and hold it at the end to create
the hardship like that. If you need to adjust it,
go to the editing tool. You will have the
notes right here. You can go and make it bigger, make it smaller, adjust
it in any other way. Find the placement
for it by holding your Apple pencil and
moving it to the side. You can go and adjust it in
any way that you prefer. And when we have the
result like that, let's tap onto our screen
to accept the changes. Now, when we have the
result like that, decide on your own
whether you like how it looks or if you want to
adjust some for example, we can go and maybe make the
mouth a little bit bigger. I will go and erase it. I will get back to the brush, make the size of it
slightly bigger, and do the same
thing one more time. Go right between our eyes and creating a mouth
the same way as before. Again, if we need to adjust it, going right here to
the editing tool and adjusting it from here. You always can take a look at your illustration from the
distance while you are creating it and adjusting it at the editing mode to
see whether you are satisfied with the result or
whether you want to try it out one more time or
adjust something here. If you are satisfied,
let's tap on the screen, and let's continue by adding a couple of more
details over the top. So first, let's get back to the smaller size of
the brush of again, 9% or 6% of the brush, and let's go to the eyes and put little eyelashes right here. So very simply creating
the eyelashes with little lines like that and then going toward the top and
creating the eyebrows. Again, if you want to experiment a little bit and create
something different, you are welcome to
go and do that. Now, when we have the
result like that, let's go and add
more details toward our little shapes so it's
not looking too weird. Let's get back to our last and let's create one
more layer on top, tapping on the layer and using
the option clipping mask. Firstly, let's go and add a bit more color toward
the bottom part. So we will go again
to our brush library, go into the airbrush
and folder and selecting our familiar
soft blend brush. With this brush and with the
color with the title red, let's go with smaller size of the brush toward the
bottom parts of our eyes, and we will add a bit of
the secondary colored here. Try not to overdo it at
a bit of colored here. If you don't like how it looks, we can change the
color slightly. So when you've added the color and the amount of it
is enough for you, you can go to the
magic Wan too over the top plast and use the
option huaation and brightness. On the bottom, we can
go to our sliders with the fue saturation and
brightness and we can adjust everything that we
would like to adjust a here. You can go and add a different color toward
the bottom part. So let's spend some time here and find the color
that works for us. So for example, we can go with something a little
bit more purplish. And when we have the
color that we like, let's get back to our
magic one, two icon. We will tap on it,
and we will then go to our brush library, calligraphy folder,
monoline brush. One more time, go
into our layers, creating one more layer on top, tapping on the layer using
the option clipping mask, going back to our
color palettes and selecting the color
with the title white. With the white color,
we will go toward the top parts of our eyes with slightly bigger
size of the brush. We'll go and put the eye
highlights right here. So you can adjust the size
to your liking go with the bigger size of this highlight or with
the smaller size. You can go and find the different placement for these elements if you want to. When we have the
result like that, let's also go and add a bit of the tank right here
toward the mouth. Going back to our color palette, selecting either red orange or red color and
with this color, we'll go toward the
bottom part of our mouth. Create a little tan
going like that. Add the color toward the bottom and when we have the
result like that, let's also go underneath the ice and we will put little
chicks right here. For the checks, let's
get back to our layers, and we will go underneath the layer with our
facial features. To this layer where we have these weird looking
little shapes. From this layer, creating
one more layer on top and going toward our area
where we have our eyes, either with the big
size of the brush like that or with a little shape
and creating the allps, putting little shapes
right here for our cheeks. Now when we have
it, let's go and work a little bit
more onto our leaves. So go into our layers and finding the layer
with our leaves. Going toward this layer where we have it and creating
one more layer on top. Let's tap on the layer using
the option clipping mask, and we will go to
the color palette to select leaf lighter color. With this color, let's
go toward the leaves, and let's create
the secondary color going very easily like that. Go toward the top part towards
the bottom part like that, you can go with different
direction like that. When you have it,
let's go and soften it up slightly by going
to our magic one, two and using our Gaussian blue. Again, holding our
Apple pencil at some place and moving it
more toward the right. Find the nice amount of
Gaussian blurred here, the level that you prefer, when you have it straightaway, let's go to our layers and
create one more layer on top. Tapping on the layer and using
the option clipping mask. Now, let's go to our color palette and switch
the color to leaf me. And then one more
time, we can go with the same brush that
we are doing right now, mon alge or we can switch the brush to
something different. We can get back to this brush
that we used before with the title tipper and go toward these parts that we have right
here and create the veins. So let's go from the middle part and start to create
the shape like that. Probably it will
look better with the slightly smaller
sides of the brush. Let's try it out one more time, going towards the bottom part and creating our line
going like that. If you need to try it
out a couple of times, go and try as many
times as you need. Then move on to
the opposite side and create something
similar here too. Now when we have the
results like that, let's go to the sides and
let's start to add the veins. Going like that, not
with the straight lines, but with the curves following
the direction of our leaf. Go along the whole shape and creating our details
going in that way. When you are done
with the first side, move on to the next one. Again, create the
curves right here and do it on both
sides of the leaf. If you feel that these
lines are too harsh, we can get back to our layers, tap on the NI can
reduce the opacity. For example, let's go with
something around 30, 35%, and when we have the
results like that, let's add one more detail
right here to the lips. We'll create one more
layer, tap on it, use the option clipping mask, and let's change the
blending mode to overlay. With this overly
blending mode turned on, let's get back to
our color palette and select our
yellow orange color. We will also change the brush to airbrush and folder,
soft blend brush, and we will go to the tips of our leaves and we will start to add the third coloret here. Try not to overdo it at just
a bit of this coloret here. If you overdid it or if you
want to adjust it in any way, go to your leas, go to the icon and adjust
the opacity of this layer. Now when we have the
result like that, we also can go and add
a bit more interest toward our petals so they don't look too similar
to one another. Let's go and do the following. We will go to our liars. Finally, where we have
our petals and we will tap on the lay and turn
off draw *** right here. Let's grab our erasa and we will go to some of the leaves
that we have right here, the petals and we will
make some cutree. Example, with slightly
smaller size of the brush, let's go right here,
create a little cut. Let's go some other areas and maybe add a few more
cuts right here. For example, go right here, adding a bit of
the cut like that. And also, you can
grab your brush. Firstly, get back to the normal brush that
we used before, calligraphy folder or monoline, and we will go to some
other petals right here, and we can add a bit of the difference to the
patels here, too. For example, with slightly
smaller size of the brush, we can go and work
a bit more onto these shapes to add some
interest towards our picture. So for example, let's go
right here and create a bit of the different
shape right here. If you want to go to all of these little leaves that
you have little petals, you are welcome to go and add as many interest as you want. And when you are
satisfied with it, let's go and add this white
outline to our picture. Let's get back to our layers, and we will go to the top of everything that
we have right here. We will select our group. We will swipe it from right to left and choose the
option duplicate. Now, we will have two
same groups right here, so we will need to go
to the bottom one, select it, tap on it, and use the option flatten. Now we have everything
that belongs to this picture on a one layer. Then we will go to
our color palettes and we will choose
the white color. With the white
color selected and with this layer that
we have everything on, we will go to our major pans and we will again use
our Gaussian blur, holding our Apple pencil and dragging it more
toward the right. If you take a very
quick look right here, you will see that you
are creating some of the color right
here going outside, some kind of the blur. That's exactly what
we need. We will go and add not too much. For example, 10% of the blur, and then we will go to our
strobe icon over the top left. We will use the automatic
selection and we also will turn on color field right here
to go to our flower, going toward the middle
part of it and going like that and adding the
selection to this area. Now when we have the
results like that, let's get back to
our ribbon icon to deselect everything
that we have. If you want to move your illustration more
toward the center, we can go and do it very easily. Firstly, go back to your layers, go and tap onto this
little V icon onto your group with everything that you have right
here to collapse it. Then let's select both of
these little layers together, the group and the layer
with the white outline. When they both are selected, go into our o key, uniform method snapping is on looking for two
orange lines like that, one vertical, one horizontal. That way, we know
that we are right at the center and when we have
the results like that, let's also go outside
the shapes and let's add a couple more
details right here too. Let's get back to our layers, go into this layer where
we have the white outline, creating one more layer on top, using the same white
color firstly and go into this folder that you download it with the simple stem brushes. We can go with starts, we can go with little
sparkles right here. Let's go outside and let's add a couple of details here
outside the shapes. So for example, you like
that with the stars, then we can switch our
brush to, for example, sparkle chubby full,
go towards some of the places and add in a
couple of details here too. If you want to switch the color to something different
and go with, for example, maybe something
orange right here, you're welcome to
go and do that. Let's go and add a
couple more details with slightly different color. Again, if you want to use
any other little stamps that you can find inside the brush library into this
folder that you downloaded, you are welcome to
go and do that. For example, we can go and
select this heart right here, change the color to heart
and go to the top part, for example, and add
the heart right here. If you want to change
the stamps right here, if you want to use
something else, you are welcome to go
to the next folder that you also downloaded and find
something from here it is. For example, we can go with
the heart number three right here and edit right here over the top and add
the color inside. And when we have the
results like that, when we are satisfied with everything that is
happening outside, we are done with
our illustration. Thank you for
watching this class, L review if you
liked it and contide subscribing for more Kawai
videos in the future. Looking forward to
seeing your projects.
 Uni Corn, ⭐Kawaii Art Enthusiast⭐