Transcripts
1. Introduction: All of my life, I've had
a great love for dogs. I've had some great
pairs of dogs, some silly dogs,
and some BFF dogs. So it's no wonder
that I wanted to try my hand at painting them. Since most of my paintings
have been on the serious side, I decided it was high time
to try something whimsical. I'd love for you to join me in this fairly simple painting. I'll walk you through
the entire process, including tips for painting
a wet nose and how the breakdown shapes and values
to paint a realistic com, this was so much fun to paint. And I hope it's going
to be for you as well. The painting itself will
only take 30 to 40 min, and it will lead you
with lots of tips for painting other animals
in the future. I hope you'll come
join me in this.
2. Getting in the Drawing ~ Simple!: I'm starting with an eight
by ten, just said Canvas. Of course, if you
use a larger canvas, it's going to take a
longer amount of time. I printed off the
picture of our dog. And if you'll look under the projects and resources
section on your home screen, you'll find access
to that picture. You use carbon
paper and a stylus. I ordered this set from Amazon. It came with for solace pins. So I just take the
picture of the dog, put a piece of carbon
paper underneath, get it positioned on my canvas. I like the fact that the top of the dog goes off the canvas. You can pull that carbon paper back and see how things
are looking underneath. I would caution you to make sure on the tongue that you get the lines and where you have different colors and
shapes and values. It's not one solid color. I'd also be sure to get that
mouth and the teeth drawn in because that could be a little tricky to get that
draw them in properly.
3. Color Palette: I use the fairly limited
palette for this painting. Mainly it was burnt sienna and raw sienna mixed with white. And I also use mars black
for the nose and eyes. If you don t have Mars Black, any black will do. I used ultramarine blue and Alizarin crimson with
white for the tongue. And I use just the tiniest touch of Naples yellow mixed
with white for the teeth. If you don't have Naples yellow, something like a
yellow Oxide will do. I kept my paints fresh by using a Masterson
stay wet palette.
4. Eyes, Nose & Mouth: Alright, now that we
have our drawing in, we're going to get started. This painting took
me 30 to 45 min. Your video is gonna
be a little longer because I'm gonna be
giving some instructions, but it's pretty quick. And it's actually pretty simple. I'd say the most
complicated thing is that tongue and I'm going
to talk you through that. But what we're gonna do first
is get our blackout and we're just going to put
solid black in the OSS. Be sure and get in that little point at the
outside corner of HI. Then when we get to the nose, if you'll notice the
whole nose is black, but inside the nostrils,
it's jet-black. So that means that the
space around the nostrils needs to have a slight
amount of white added to it. You don't want it to read gray, you want it to look like a black nose that's
a little wet. So we're gonna be very
gentle with that. We're not going to
use pure white. We're going to use mainly black with just a
touch of white. In these places where you
see it a little bit harder, we'll add just a
touch more white, but doesn't work the first time. You can just paint right
over it and start again. We're also going
to get the black underneath the nose
and go ahead and paint in the black
that's around the mouth. We're not going to worry about the little highlights
on the gums. Just get that solid
black painted in. When I did this
painting originally, at the bottom of the chin, there was a white fur and I had that at first and
it looked odd, I thought so. I just painted all that black. You can do whatever you
like if you want to be more true to the
photograph, that's fine. But let's get our black
and let's get started. Let's take a little
bright brush. This is a Princeton
summit, 6,100. Be soy sauce for any small, little flat or bright
brush will work. I'm just going to go
right into my black. I'm gonna do these
Rs and we just want to get a nice curve. Try to do it in one
stroke if you can. We don't want to be
dabbing at this. And be sure to go
ahead and get in that little dip
that's at the end, that little slant down. Again, try to do single strokes if you can. Okay. Now on this nose, so we know that the
nostrils or jet-black. So let's go ahead and
put the nostrils. And if you don't
feel like you can do that with the flat brush, you could switch over to
a round brush. For me. It just feels like when I can do more with the flat brush, I feel like the painting
looks a little looser, a little more impressionistic. If this isn't exactly
perfect, that's okay. These look different because there's more light
shining on this one. You don't really see as much
of the nostril over here, the nostrils going to blend
into the nose on this side. From this side we're gonna
see more of a difference. So let's go ahead and put other areas that
are gonna be rural black click down at the bottom. Again, just big strokes. Don't overthink it. I want you to have fun. And I don't want this
to take all day. I want this to be something
that is kinda loose and happens quickly and
I don't want you stress. And of course this is the
second one that I've done. I feel like I've already
gotten my practice around in. Okay. Alright, so now I'm
going to take our black, I'm going to put the
tiniest bit of white. I'm going to pull
it off to the side. So we don't want
this to look gray. We want it to look
like a light black. So I'm going to try this amount and see there is very
little value difference between these two. This is there other places in this painting where
I'm going to ask you to really push the values, get some real light
lights and dark, darks. This nose is the
place where just the most subtle difference is going to do what
you want it to do. We don't want that being to lie. We want that to look
like it's black, but it has some light on it. There's a light
place right there. Then it gets lighter right here. But with this gray steel right
in the middle of the nose, it gets a little bit darker. Someone take our gray. I'm going to add just a
little bit more to it, more black to it. So it's just slightly darker. Very little difference here between that nostril
and right there. Very little difference here. But it will make it
read like a nose. It's just it's pretty amazing. Alright, so right up at the top it gets
slightly lighter again, I'm not going to use pure
white on that notice at all. But I am going to make that
gray a little lighter. I'm going do that. I'm going to put a little
lighter piece right there. Make sure that curves. I didn't do a very
good job of that. That's okay. I can
go back over it. There's a light
piece right there. You don't have to do it
exactly like your photograph. Once you've done a few
nodes as you'll kinda get a feel for where the
highlights need to go. I'm going to try that again. Just my widest light is
gonna go right here. Going to go right
here in a curve. And I might lighten
that one more time but see that's too wide. So I'm just going to
rub that back-end. This needs to be a curve. I'm want to go back over
that if you mess it up, which I just did, I'm just going to put
some dark back on my brush and go back over there. I'm going to fill this in. That's too light. Darken that a little
bit because we don't want that to look the same. It needs to look
a little darker, but it's not as dark as
the inside of the nose. And when you get back from that, it will look like a nose. I'm going to darken this up just a little bit right through here. I think I got that a
little little too light. Think about like my original
painting better where I got where I got that knows
a little bit lighter. I added some highlights that
weren't in the photograph. So I think I may push
that just a little bit. I do like how that looked. So I'm going to go
back into this light. My paint is getting
a little dry. I'm looking for my sprayer. I think I hit it. Wouldn't show on the tape. Let's just lighten this
just a little bit more. Just remember to keep
that shape around. So it's obvious that
it's going around, that nostril might lighten it just a little
bit more I hear. Okay, I think that's all we
need to do for the eyes. That's where I would
recommend you dropped back to a tiny little
brush of some type. I'm going to use this
little like size zero. I'm just going to
dip in mainly white, but I'm going to put
just a touch of gray, so it's not stark white
and we're just going to put some marks. You can look at the
reference photo. And that's all I'm gonna do. And it will read right, Don't, don't overthink that,
don't worry about it. Just just put in some short marks and that's
going to take care of it. Now I'm going to put in
the black underneath the nose and I'm going to
put this black the gums in, just be sure to work
around those teeth. I might speed that
up a little bit. I'm gonna do the black down
in here and look already how, how quickly this is
coming together.
5. Block in the Fur: Okay, now we're gonna put in
the background of the fur. We're just going to kind of
get a underlying that going. I want you to switch
over to this, go back to the size eight brush. And I'm going to be taking the burnt sienna
and the raw sienna. And I'm just going to
be dropping those in. Be mindful that when
you're doing for if you don't have contrast
between the for, it's just all going
to blend together. So I put in some darker coat initially and then I went back over it with
lighter strokes. So I'm going to do
that up in here. Although the dog does get very blonde and white
up through here, I won't have that as much. But down in this part
because I want the code to show I am going to just
block in some darker. You don't have to be real
scientific with this. Uh, you know, what, I forgot, black goes up in this
corner to, I'll do that. But now that I've got this, so I'm just taking my brush, I'm going to pick
up a little bit of both Paul's and I'm just going
to start blocking that in. I'm going to be real
loose about it. My brush is a little dry. So we're not painting a wall. We don't want to
use one solid color and get this one stroke. We want a variety of
color under there. We don't want it
looking the same. When we do the hair on top, we're really going to
mix it up a little bit, but right now we're
just trying to get a combination of color. Again, don't don't
fret about it. I'd like you to see how
quickly you can do this. I'd like I'd like this to be looking at your
reference photo. There places where the coat
right in here is much darker. Up in here the
code is rule dark. So we're just trying to get
some coverage underneath. Be sure and go ahead and do
the sides of your painting. I like having the sides done for myself so that I don't have
to frame it or if I sell it, I think that's a nice benefit
that people don't have to put a frame on it
if they don't want to. I might speed this
up for a little bit. Keep in mind. I probably got that
too dark as we're going up and into the face. And up here it's getting
much, much lighter. So I'm going to backoff that this dark when
I get up to the top. Just doing this super
loose, super-fast. Want it to be fun?
Are you having fun? I want you to have fun. There's something about
painting a little more quickly with
bigger brushes to me. It's just a lot more fun than
when I used to paint with the supertype brushes and was just stressing over
every little thing. Actually, this is code
right through here. Okay, that looks good. Alright, now when we
get up to the top, I'm going to start, I'm going to use a little
bit on this ear right here. I'm going to use a little
bit of the darker. Oops. If you cover that up, you can wipe that off or you
can go back with your black. Easily feel spit on a rag
and push really hard. You can just wipe mistakes
off and start over. But also liked to go back with my black and clean
things up a little bit. But there are a couple of well, I've just did it again. There are a couple of places
where I'm seeing this dark and I want to
have that underneath. We see that around the
nose a little bit. That's a great place to help you see that that nose
is coming forward. There's some dark right
in front of that ear. Little bit right there. Okay, Now I'm gonna go
up to my lightest color. So I'm gonna start using quite mixed in with
this raw sienna. I'm not going to mix
it real well again, because I want to have
some variation there. Alright, remember that's black. So I'm just trying to get
a relatively thin layer. Down and then I'm gonna
go back over it with thicker paint with more
definite brushstrokes that will look like hair. But for right now, this is
just the block in phase. I just did it again with that. I love acrylics. They're
just so forgiving, so easy to work with, but you could also do the
same painting in oil. Very easily. He gets much lighter
right through here around the muzzle and around the nose. Again, I'm just
loosely mixing things. I'm not overthinking it. Trying to kind of get a
variety of color there. Keep this circle amount because that does show you That's
the muzzle of the dog. It helps with the perspective. So again, you can push back
with the paper towel and, or you can go back over this
and touch up your blacks, which I did in the
original painting. I had quite a bit
that I touched up. We're gonna be
covering up most of this black with whiskers. But for now, notice I'm painting in the
direction of that muscle. I'm keeping that in
a circle for now. I called him he earlier, I guess I'll call her she
because she does look like my golden
hammer east to look. But notice that the, the, the face is a little darker on this side because the light's
coming from over here. So you might want to darken it up a little bit
on this side just to accentuate that here
is the ear coming out. So I'm gonna, I'm changing
the direction of my stroke now because I want that
to be looked like an ear. And it got a little
darker over here as well. Okay, so we've got a
nice undercutting now. I'm gonna get back in and
do my slides real quick. And I'm gonna put that
black corner in before we put the fur on top. We also, I'm leaving
the tongue for last. The tongue was probably the most difficult
thing about this, but I'm going to show you
how to think about it. So it's not so difficult. We also need to put the
teeth and the gums. So let me put this black corner in and I'll be right back.
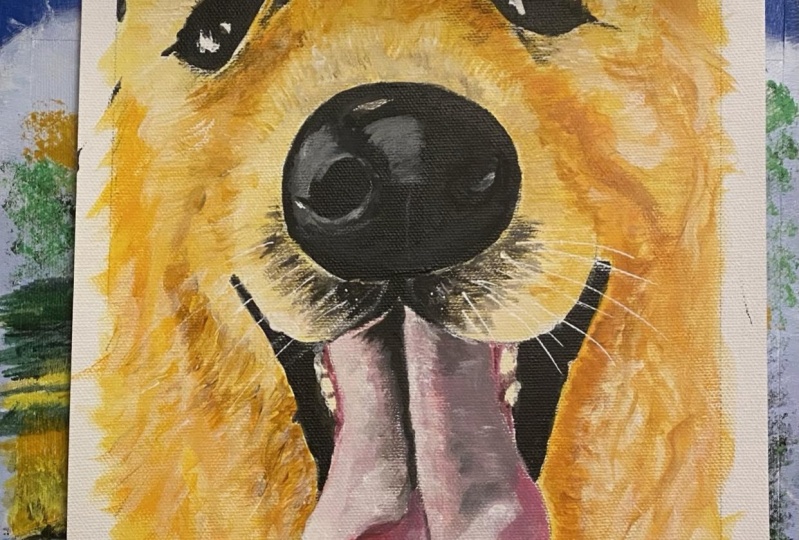
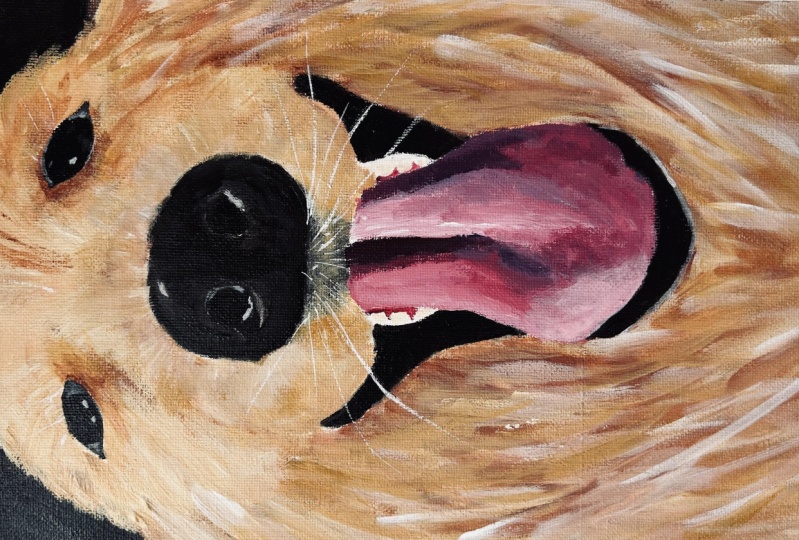
6. Tongue & Teeth: Before we start to
tackle this tongue, I wanted to show you some things that I think if you can think about it this way, it'll make this painting
process a lot easier. Instead of trying to paint
a tongue, if you will, identify shapes and values
that are within this space, just forget for a minute
that it's a tongue. Just look at it like
a jigsaw puzzle. You'll notice this
is the darkest if you don't get these values, if that's not dark enough, and if that's not light enough, that tongue won't have the
illusion of dipping down. It'll look like
just a flat tongue. So if you can just
see what this shape is and you can go to your photograph and identify
the shapes as well. And you could go back with your carbon paper
if you didn't do it already and just mark the
shapes onto your drawing. And you can see these
different shapes. And so I want you
to notice this is nice to look at this
in black and white. This is the darkest. Then you have this shade and this shade or about the same, then these are
much, much lighter. So I have used Alizarin crimson and ultramarine blue mixed together. For this. This one had a little less of the ultramarine and
a touch of white to it. This had no ultramarine. This was just the alizarin
with a little bit of why. This was the ultramarine and
alizarin with more white, but there were some
BlueMix than that. Then this was just the
alizarin crimson was white and more
white on this part. So it's just really just a
matter of if you can identify the shape and get the
color right and put it in, in the right space. When you get back from this, it's going to re like
a big panting tongue. Unfortunately, right when I
started painting that tongue, my camera went out of focus. And rather than making
you suffer through a few minutes of fuzzy painting, I decided to just
redo this tongue. So that's what
you're seeing here. Hello. Alright, next I want us to
take your little bitty, whatever your tiniest
little brushes. And we're gonna go in
and paint in the gums. And I'm going to use
pure alizarin crimson. Again, don't know, I
rethink this too much. This real simple. Wouldn't keep messing with it. I don't think
that's good enough. I'm going to take the tiniest
bit of Naples yellow. It's just going to
take a tiny, tiny dab. I'm going to mix
some white with it. To do those teeth. If you do the teeth to white, they're not going
to look realistic. Or dog has a little
harder than anyone. So I'm mixing a little bit of white with a little
bit of Naples, yellow just go into the side. It needs to be more
white than yellow. So I'm just playing on the edge of that till I get
something that looks right. And then I'm just
going to drop that in a cupboard that black a little bit. That's just a place we're going to have
to just go back in. I'm just going to wait
till the very end. So it's I keep keep doing it and repair that. Okay. That's all we have to do. Melt the teeth.
7. Hair, Whiskers & Final Touches: Alright, so to put this foramen, I have selected a brush
that I had that was just very chewed up, very worn brush. You don't want to use
something real smooth. You can also use rosemary and company makes these
classic long flats. They have a rough in
that are really nice. So you don't want something
with the smooth edge, you want something that's
got a rough edge to it. And you're going to need
lots of paint for this. I'm using the raw
sienna and white. And I am going to very
loosely mix these together. I'm just going to do, you can
even just use your brush. I'm gonna do some polls that
are sort of a medium color. I'm going to do some
vowels that are lighter. And if you'll notice, I am
just barely mixing those. There's a lot of
caramelized in there. One pile is a little
darker than the other. And then you can also go back over with almost just
pure white on top too. So very loose piles of paint. Notice that the top, everything is very light, so I'm going to keep,
keep everything light. You want to keep your strokes going in the same
direction as the hair. So look at your reference photo. Make sure you don't want to
just start going up and down. You need for the hair to go in the direction that
it's going in. Notice that it's going to be
much smoother through here, but up through here, you're actually going
to see more texture. And then when we get
down to this part, this is where we're gonna
get a bigger brush and we're really going to put some
flowing waves of hair. So for up in here, Let's just see, I'm
going to load my brush. And I'm just I'm just going to there was a little
bit of a streak of the center and try to vary if that like That's
looking a little too light. If everything is real life, it just blends together. So if it's getting too light, add in, add in a little
bit of something else. I don't have enough paint
on my brush and that's why you're seeing that
Canvas coming through. Go back to your reference photo. There are some places
up near the top where it's darker lips. So again, I've kind of lost that black edge
and may have to go back and re-establish that
and that's okay. Got a little too much
paint right there. Remember this side of the
face is a little bit darker. I'm not overthinking this. I'm just trying
to keep it loose. Member, there's an
ear right here, so you wanna make sure that ear hair is going
away from the face. Might want to get back from it, make sure it's looking good. I don't like this white. That's really jumping out to me. So I'm just going to go
over it one more time. I think it's fine that
it's a lot lighter. I don't like how that I think I just didn't
have enough paint on my brush. Someone try that again. I can go back in
with my black brush and fix that if I don't like it. So the hair here
is fairly smooth. I'm not trying to
make any big marks, but it is hair. And we want to make sure that the strokes are going around. It's getting a
little bit darker. At the bottom. Remember this is his
nose, the muzzle. It's not the long coat, so you need to keep it fairly. Smooth. This black is not solid black. It's got some for over it, It's just kinda peeking through. So try to leave some of that. This is the back
part of the dog, the shoulder and
it's in a distance, so we're not going
to get the close-up. We don't want it to look
like it's part of the face. So I would just kind of smooth that in and not try
to make too much of that. Alright, now, now that we're getting down into this
part of the code, I want you to switch back over
to your size eight brush. And this is where we're going to really load the brush
with some paint. And I don't want you to Deb. I love how we've got these
really long strokes. It's this long hair and
that's coming off the ears. And just have fun with it. Remember to kind of go in
the direction of the ear. Vary your color a little bit. Vary the size strokes. Notice that down here, things are kind of
coming together. In the middle of the coat. I've messed up that black again. Little spit on a paper towel. Takes care of that. And again, or you can go back over it. If it starts getting too light, you can go back in
and mix in some of your other colors because
you don't want it all light. So I'm just, I'm just pulling
from different piles here. You don't have to cover up
everything that's there. Let some of that peak through. But the bigger strokes, the more gestural strokes, the more realistic
it's going to look. Don't be afraid of a
few really big marks. Just be sure to get
enough paint on your brush so you don't
run out of steam. Again, try to vary the
direction of the brush. We've got some of this
hair that's coming off the ears and then we have that's coming from up there
and then we have other hair that's
part of the code that's not fanning out so much. You can pull some of
that darker back in. Try this again. Get back from your painting and just see how it's reading, see what it needs. I'm going to step
back and don't forget to go back and paint the sides while you've
got your paints out. Let me sit back from this
and see how it's looking. I wanted to show you
one thing that I did after I turn the camera off, I kept playing
with the colors of this tongue and this area. It just looked too sharp to me that the difference
between the paints, I did not put a slow dry medium. And this is, I think I mentioned because I wanted it
to draw quickly, but this area was just
looking too sharp. So I took my flat
brush and it was damped and I just scrubbed it a little bit around the
edges and it just soften that and blurred
it a little bit. And I think that helped a lot. So I'm gonna go in and
put the whisker said now. And if you have a liner brush, sometimes it's called
a rigger brush. And these are designed
to be used very wet. So you get a lot of water on it. And you don't want
to do these whiskers white because they're just
going to jump out too much. So I would do them
the same cream color. So I'm gonna go into this poll. It needs to be really liquid
so that it can move easily. That's a little too creamy, add a little more white to it. If you've never used one
of these brushes before, I would recommend that you
try this on a paper plate. Make sure you've got
enough water on it. And then it's just going to
be a real white quick touch. Think about where
you want it to go. And I'm just barely going
to put some pressure. I didn't like that one,
so I'm just going to see if I can't wipe that
off. I would advise. Have no paper towel ready and wait until everything is
good and draw underneath. Let's try this again. So getting this real wet, probably wetter than you
think it needs to be. You don't want a big drip
running down your Canvas, but it's got to be thin
enough that it can just flow. There we go. Very fee whiskers right,
right here in the middle. They should be very short. You don't really want to draw too much attention to this area. But there are some whiskers
there. May need to turn. This will make sure
you can still see. So decide how far out
they need to come. I think that one's
a little thick, a little to pronounce. It just comes off pretty easily. It's kind of hard
being left-handed. I'm going to turn
this one more time. Make sure you can still see it. Again. I'm just barely, It's nice when it
crosses the black, that's where you really get to see it in the whisker
start at different places. They don't all start here. Some of them are going
to start down in here. So I find it's
better to start at the base and then
pull out and pull up. And that way you can, it'll be thinner at the
point and then it is at the the base. And I think that's
probably enough. That's up to you. I did get back and added
a little bit more. Why thought the nose was
looking a little flat? The last thing I'm
gonna do here, this has gotten too small to me. I'm going to just put a
little more black in there, make that look a
little bit bigger. This is the point
where it's really good to just put your
photograph away and just look at your
painting and see if the painting
stands on its own. Because when people
look at your work, they're not going to be
looking at a photograph. Well, I dropped
something that was quite a chain reaction here. Should pan out and let
you see what happened. But I'm not. So I'm gonna see if I
can just go back in and just build this up
just a little bit. It's funny with us. If they're a little bit too
small or little bit too big, they can look a little funny. So I think that's probably
a little too big. So I will let that dry
and I'll go back in. It's a little too big
right through there. I'm just going to
go back in and add some hair around
the top of that. When that gets good
and draw this ones. You might want to get
back over your blacks and just kinda re-established them. Correct? You're drawing
if something needs work. And there's one more
thing we need to do. So we want to see the moisture, the SHA1 on the gum. For that gum actually
sticks up and it has an irregular shape to it. So we're gonna take our gray, go back into this
black and white. You can just keep
adding a little white until it
gets light enough, but you don't want
to make it white. And I'm just going to add a few little wavy
marks here and there. Get one back in there. And that's it. There won't be any overhear because that's more in shadow. I'm going to just drop a little
more shading right there. Just play with the nose and you can keep adding some highlights
until it gets too much, which I did earlier. And then I went
back over with my gray and my black again. Just do what makes you happy. I might put just a little
bit of a wiggle right there. That's good. Okay. My friends, I think that's it. I am going to get
back and fix that. So I hope this has
been fun for you. I hope this will give you some skills that you can
try with other animals. And again, this
principle of just painting shapes and values. You can paint anything if
you can learn to do that. I've enjoyed painting
with you today. If you don't mind. It's so important on Skillshare
to have good reviews. If you've enjoyed this, I'd love it if he
could leave a review and I would love
to see your work. I hope you'll post it below.
 Victoria Hagaman, Joyful Art