Transcripts
1. Introduction : Hi, I'm Sir Wade. Welcome to
the study session where we are going to talk about how
to make a run cycle in Maya. And specifically,
we're going to do it using a workflow where
we animate on twos, which is a workflow you may have heard of from the
Spider-Verse movies. To follow along, technically,
you can use any software. I'm going to be using
Maya, and all you'll need is a character
rig ready to animate. All right, let's get to work.
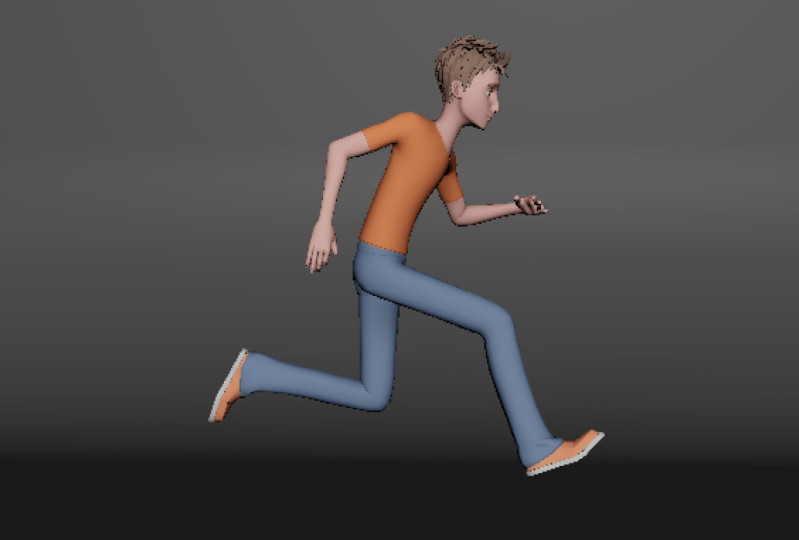
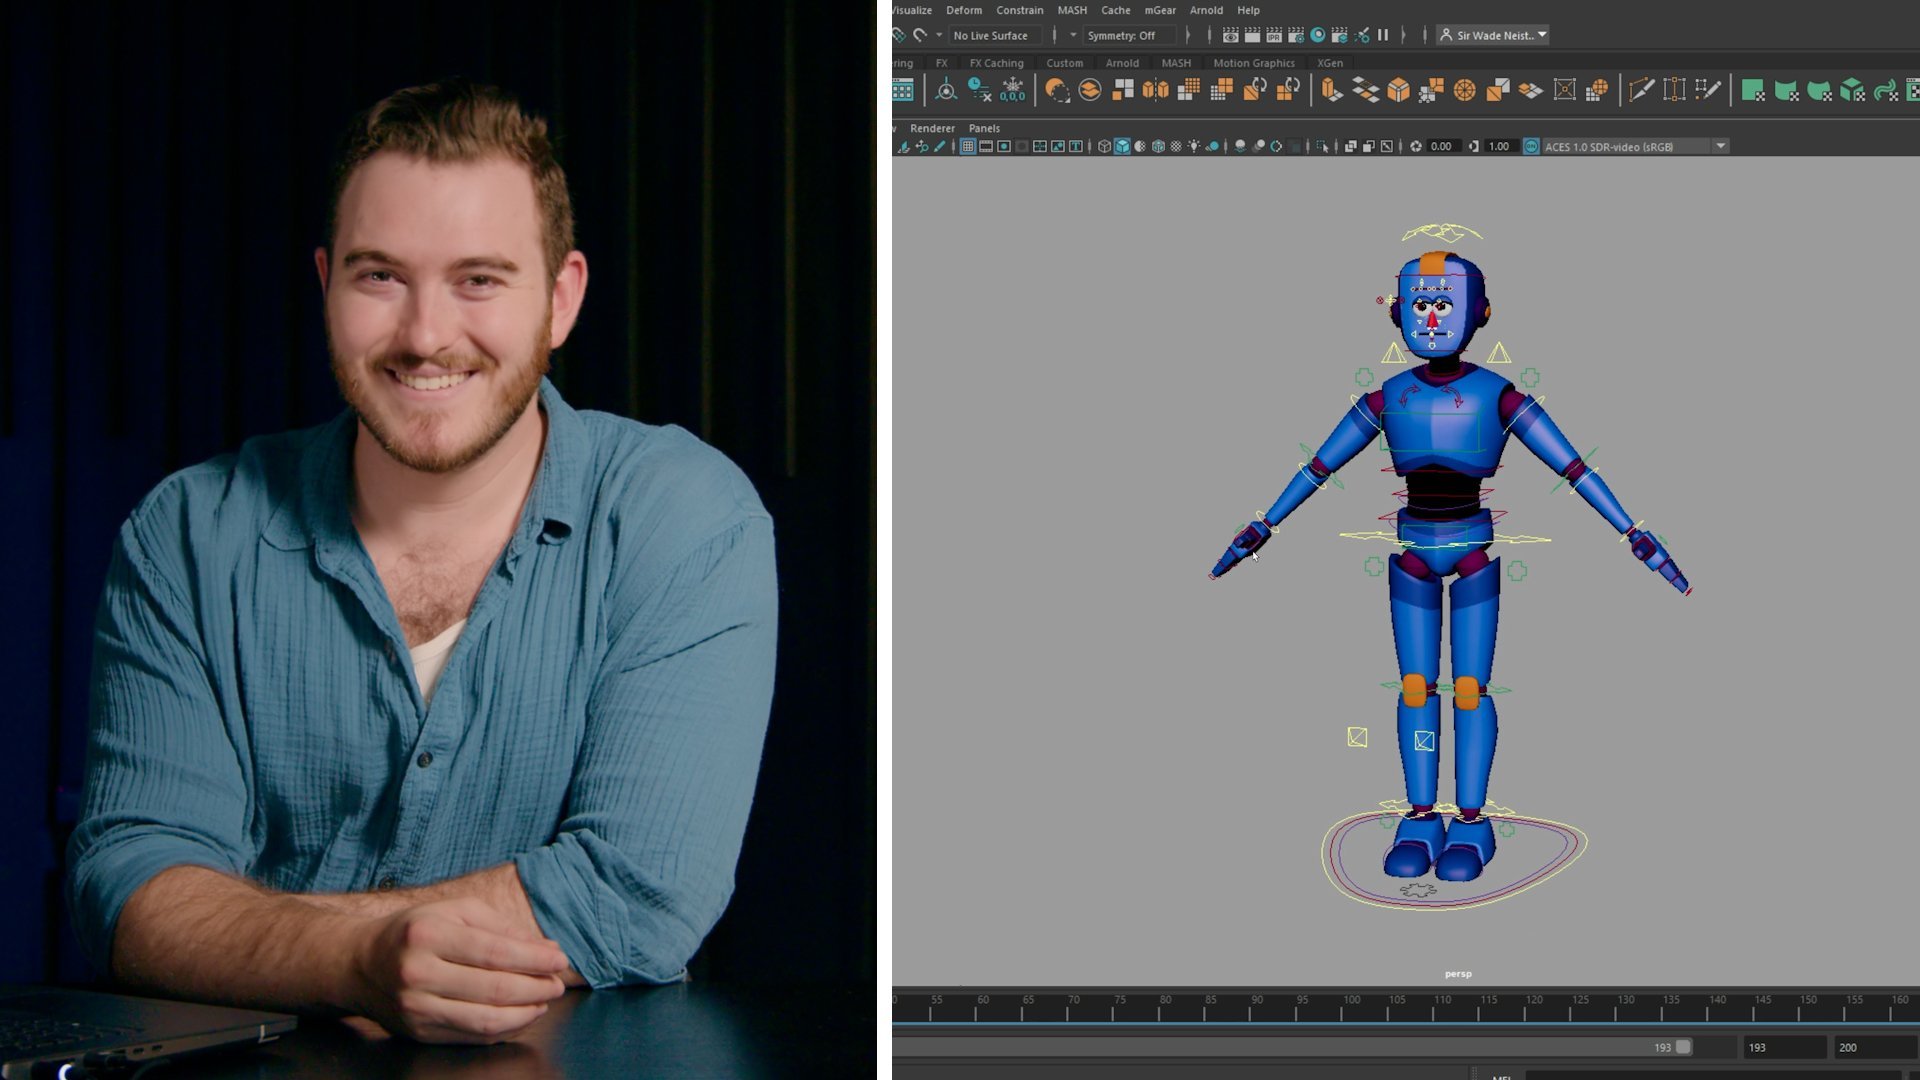
2. Animating on 2s: Here we are inside of Maya, we've got our character ready, and again, you could be
using any character. I'm using something from
Mixamo with a rig from mGear. But if you've got another
rig that you've downloaded, it's going to work as well. Now what we're going to do
is we're going to block out a run animation using a workflow where we go straight
ahead on twos. What that means
is we're going to block out every two frames, which works really well
for something like a walk or run cycle
because you're doing specific poses based on what we know
about walks or runs. Cycles are a little bit more
straightforward like this. They're still difficult, but they have a system
that you can follow, which makes them a
little bit easier to stick with the process. They work really well for this
on twos mentality because those poses typically line up approximately every
two frames or so, and you don't have to do them
straight ahead or in order, but it's up to you. Now I've got the
character in T-pose here, and I have a camera. This is my camera view
over here on the left, so I know what I'm posing to. For the first pose, I
want to do something, you could stick with
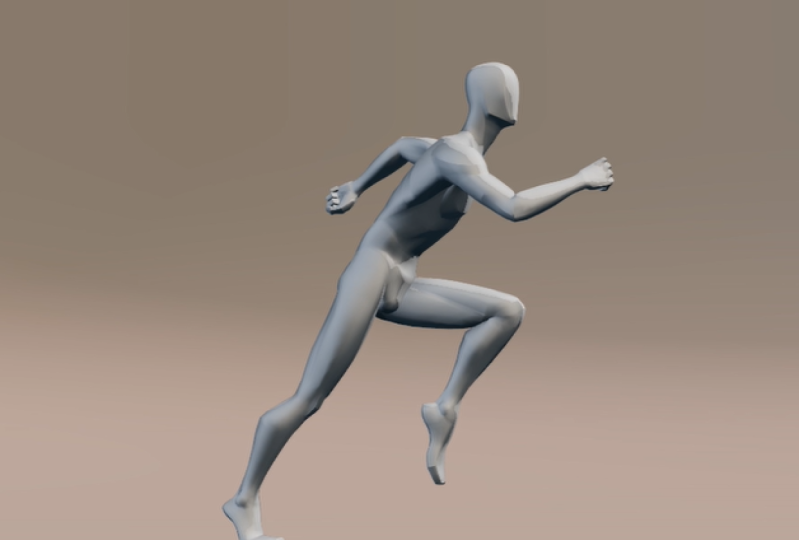
the classic example, and go with a contact frame. I'm going to do, for the
run cycle, a push pose. What that's going
to look like is I want to lean my character
forward a little bit. I want to get whichever leg
I want to be in the back, we will start with the back leg, and I'll put that back here. I'm going to bring
it in a little bit. Don't forget to rotate your
camera, look from all angles. Don't leave everything
at default. I'm going to go ahead and use whatever foot roll
control I have access to. This rig doesn't
have a fancy one. Usually, it's in the
foot, something called foot roll over here
on the right side. But I want to get
the impression that the character is pushing
off of the ground and about to leap into the air because running has a lot
of jumping-like actions. I want to also make sure that the torso feels like
we're leaning forward. Just a little bit, maybe
something like that. I'll go ahead and grab my head control
and make sure our character is
looking forward, not staring at their feet. I'm also going to
adjust the knees. I'm going to bring these
little pull vectors forward so that they don't
go backward and chicken leg. We don't want that. Keep
them nice and forward. From here, I'm going to remember that the shoulders
have to be posed out. This rig, the shoulders are
hidden inside the geometry, and I want to make sure that the opposite arms match
the opposite legs. If the right leg is back, that means that the
right arm is forwards. Or if you want to think
about it this way, if the left leg is forwards, the right arm is forwards. However you choose
to think about it, that is totally fine. The only thing that
matters is that we do it. This rig, my alignments
are way off, so hopefully your orb here
doesn't look as weird as mine. You can see that I'm moving
this in between axes. This is not a great rig,
but I'm doing it with a bad rig on purpose to show you that you don't need to worry too much about the
asset that you're using. Yours is definitely going to work a lot smoother than mine. Your graph editor will be
much easier to manage. I'd recommend, in your case, use individual axes
to move this around. For me, I'm going rogue. But I'm going to
go ahead and bring the character's arm forwards
a little bit, like that. Again, I'm posing on the right, but I'm looking on
the left to make sure that this feels correct. That it looks good
from the angle that the camera's
going to be seeing. Drop this arm down.
Make sure I bend it. Don't want it to
be super straight and awkward. There we go. I don't have to be
super perfect for this, I can always come back later. But when I do any
kind of a cycle, the first thing I
want to do once I get this feeling the way I
want, that's not too bad. One last thing I'm going
to tweak is I'm going to lean this forward
a little bit. I want the character to feel
like it's a forward lean, there we go. Keep
that head forward. That's good enough
for the moment. When I'm doing a cycle, what
I want to make sure I do is the first frame
and the last frame should always match each other. In this particular case, I have chosen to make
a 19-frame cycle. Why 19? No particular reason. You don't have to pick
any certain number, but I would recommend if
you're starting from Frame 1, end on an odd number, because if I go from one to 19, that means I have a
middle frame at 10. I could pick 1-17. I can pick 1-13, 1-21, it doesn't matter. But I do want to
have a middle frame one way or another because it'll keep the run symmetrical, and it'll make it
that much easier for me to set my key frames. I'll go ahead and key all my controls. Go
right to Frame 1. In fact, I'll use
the graph editor. Let's see, what are you? You're not sure what that
is. If I go to View, Curve Name, Active Only, I can see what it is. It's the global. Interesting.
I wonder why it's there. I'll go ahead and let that be. I'm going to deselect these bottom controls because that's what that
was pulling from. I don't need to look at that. My main controls
that I'm animating, I've set a key on everything. I can see all those key
frames sitting here. I'm going to copy them all. If I could do it down
here, too, right click, Copy, Frame 19, right click, Paste. Just like that, I now
have the same thing on frames one and 19. We're in good shape. I
posed my first key frame, and I have my pose ready to go. I'm going to jump
two frames later, set a full key on
everything, and I'm going to keep posing and keep
adjusting from here. But that's, so far, the
idea of animating on twos.
3. Posing and Adjusting: [MUSIC] Now, in the interest
of your time, for frame 10, what I want
to do is I want to flip it. I want to mirror the pose. Now, there are a couple
ways I could do this. I could just set a
key on everything, and I could just eyeball it. If the right foot is back or
the left foot is forward, I could just sit
here, and pose them and reverse it, and
that would work. I could also be really scientific about it and try to get the math exactly right, copy these values, paste
them into a notepad, and then, paste them to the
opposite feet or something. That's a lot of work. I used to do that when I was a student, it doesn't really matter. But if you wanted to be perfect and you
want it to be fast, are great tools and scripts
for Maya specifically. One is called animBot and
that's actually what I have loaded down here at the bottom is this little
colorful collection. This is not in Maya by default, but it makes for a great
demo because I can grab all these little
controls and select these ones that I don't
really care about. I'll just click on
this mirror button. Right for it, and it
should boop right there. It's good little tool tips. As this little window goes away, you can see that it
actually flipped my pose and did a
perfect mirror. Now, again, that's not something that you just
have when you install Maya, but the only reason I'm
using it is just to show you that this is one of
the benefits of using Maya. You have these great scripts
that you can download. AnimBot isn't free, but
it's not very expensive. I would recommend it, but
you don't have to use it. You can absolutely
just manually pose it. But because I did
that really quickly, I can forward and
show you more things. Now, that is a great
bass right off the bat. What I want to do
working in twos, I am not ever going to just hit play because if I hit play, it'll smoothly interpolate,
and I don't want that. Instead, what I'm
going to do is move two frames forward
from my original pose, and this time, I'm just going to quickly block out
a couple of poses. The second pose that I want to do is what I'm going to
call the spread pose. The characters up in the air, and I'm just going to
do this really rough. The first pose is important
to have working well. After that, I want to make all these
poses good eventually, but they don't have
to start off amazing. I'm just going to come in here, set a few of these keys, and I'm just doing what's called a
treadmill run right now, meaning the character is not
actually going anywhere. They are floating in place. They are running in
this exact same spot, and I'll figure out how to move them forward
in space later. Even though my
character is actually moving forward, I don't
want that to happen. I want my translate Z to stay exactly the same, keep
it on a treadmill. You can see that I'm actually having the character
move forward and back, I don't really want that either. It's where they're
just copy paste. That happened because
of the mirroring. I had a value of
whatever this number is, and it flipped it
for the mirroring. I'm sorry, that's the feet. I don't want the feet,
I want the body. There we go. Body control trans. There we go, that's what I want. Keep that from scribe.
I'm pretty much just doing the up and down of
the body. Go like that. You have to imagine that the character has
just jumped off the floor. We went from here, the character is floating through the air. I'll go ahead and swing
the arms a little bit. I won't spend too much time
on the arms because they are a little bit hard to
figure out right off the bat. I'll just set a couple of keys. But most importantly, I'm just
going to make sure I grab everything except for these,
don't care about those. That's just with my
rig in particular, I have all these extra controls. I'm just going to
key everything. Make sure I set a full key
on the whole character. Two frames later, set a full
key on everything again. This time, the character has been airborne
for a little bit, they are now working
down a little bit. They're falling
towards the floor. They haven't quite hit the
ground, but they're about to. I'm going to have this foot come down and get
ready to strike. This foot is still moving up
through the air like that. That's a little bit similar
to what I just had, so I might go back and
lower this a little bit, because if we just pushed off, so now the difference is you can see the screen right foot drops, the screen left foot pulls up
into the air a little bit. That arms starting to
look a little funky. I'm going to just drop it down a little bit, pull it back. Or I actually mind it forward. I just don't want it to be
sticking out all this way, and pull it back a little
there, too like that. I'm looking at the silhouette
over here on the left, making sure it still looks nice, if I were to lose
all the lighting. I want to make sure that I'm keeping the shoulders in mind. I do have keys on them,
but I want to make sure that if I've got
this arm extended, those shoulders are pushing
in those same directions. Here, I think the shoulder
could come forward a bit, then I'll compensate by
countering this shoulder. There are ring settings
that would keep me from having to counter animate, but I'm not using
them right now, just to show you the sort of
the brute force method of, we have a pose, we have a pose, we have another pose, we're
getting ready to fall down. Now one more, I'll
do my down pose. You can see I can
work really loose because I'm going to
come back later and make this better, key the
whole character. Let's rough out,
let's see grab my, let's see this bend control, grab the foot control, zero out all of my rotations and translate Y, put
it on the floor. Because it's my down position, the character's weight is going
to be fully on this foot, which means that this
foot needs to be fully supporting the character
underneath them, or maybe slightly in front. I want to make sure
that when they go push, all this weight crushes
that foot a little bit. I need to make sure
that it looks like the foot is holding
all of the weight. Now, if I put it
directly under his hips, he still has a lot of weight
in his torso in his head. He might fall forward, but I can't have it
so far forward that it feels like he's
not actually stable. He'll fall backwards. We got to pick somewhere that
feels balanced. To me, that feels pretty decent. Feels like he's nicely balanced. I want to make sure that
it's also balance here. His hips should move sideways. Now, I haven't really
showed you that, but as he's jumping
through the air, he may have started over
this leg a little bit. He's up in the air,
and now right here, he's over that
foot, maybe there. If I look at that translate X, you can see that I haven't done anything with these
two keyframes. I can get rid of them, but I do want to
keep them keyed, and that's where
tweeners come in. Blender has one by default, Maya has scripts for it, so you'll need to
download something. But if you don't have animBot, you can download A
tools or tween machine. There's plenty of free
scripts that'll do this. But I can basically use this little slider to say
on one end of the slider, I'm copying the right frame, on the left, I'm copying
the left frame. In this case, I actually
don't need either of them, but if I did need
something specific, the tweener is very helpful. Here, I'll just say
whatever you've got. That's fine, I'll
just add keys to it. You can use the tweener or
you can just manually set key frames and move them
yourself with the mouse button. I covered how to use
the graph editor in my Maya class here
on skillshare, as well. Check that out if you
haven't seen it yet. But that right there gives
us our down position, which I will go ahead and bring this front or this
back foot forward a little bit, maybe like that. I will at this point, make sure that this arm is
starting to swing backwards, something like this, and this front or this back arm is now coming towards the front. I'll push that forward here. They're both getting
ready to cross over each other, they're in the middle. Technically, this left arm should still be a little
bit more forward because this right foot is a little
bit more or vice versa. The left foot is more forward, so the left arm should
be a little bit back. I'll start to transition
those a little bit. Now I'll go two more frames, and you'll notice that
I'm coming right up against this other frame.
It's not a big deal. It's not a problem that I have only one more frame
till this other one, just because of the number of frames I chose for this shot, that's how the mass shapes out. I'm going to go two
more frames, and all my controls,
minus, you guys. Make sure I have a key on this. Set a full key here. Now, I've done my down position. Now I'm going to do my passing. I've got my push, what we call the jump
or the spread pose, the kick pose as this front
foot kicks out to contact. It's not quite the contact pose, the contact pose is
technically missing. It's the one we
haven't keyed yet. I mean the down pose. Then this is going to
be my passing pose or my passing up
pose. It depends. Run cycles don't have
exactly the same rules as a walk cycle does. For this passing position, the last thing I need to
do is just get the arms a little bit more forward so
that they feel like they're getting ready to sync back
up to where they need to be in next thing. Now, what's nice about having
the graph editor open is, I can see where I need
to be on frame 10, and you can see I've overshot. Like this has gone beyond
where it was supposed to go. I can either pose it manually or I can just say,
you know what, these three, just make sure that they're between A
and B, basically. This one has overshot. I'll
just bring it back to there. This one, it's almost there. I definitely don't want it to be right in
the middle because I'm not timing wise in the
middle of these two keys. That's what this tween
machine is for as well, just saying middle is, slightly to the right
and there you go. But either way, having the graph editor helps
me to like this, I'm overshot again, so
I'm just going to back those up and say shoot. Go back these up and say, no, don't overshoot. Come somewhere over
here and here we go. Now what I've got is a collection of
poses that if I hit, go like this, it should start
to feel like a run cycle. Now, I could keep
going and keep posing, but a little bit of a
trick that I can use is, I can actually mirror these poses because I
have animBot once again. I would just keep
going and posing them, but no time, once again, I'm going to just steal
this pose from three. I'm going to put it on 12,
and I'm going to flip it. Tell us not to show
me that anymore. I'm going to take
this post from five. I'm going to middle mouse drag, set a key. I'm going to flip it. Then I think it's
seven I need now. Take that to 16 key flip. You can pretty much see it
immediately why animBot is such a popular script and
why so many people use it. This is one of the
big selling points of using Maya in a production. It's the first thing people
ask about if you ever say, hey, do you want to
use another piece of software to animate, they go? Do you have a
replacement for animBot? Because that was a ton
of time I just saved. I did the pose for
one set of steps, and now I have it for the rest. Now, if I were to just
step through, it works. Now I'm going to want to
keep messing with it. But at the very least, I can now set the animation to step mode. I can move the grafter
away, and I can hit play. Now it's a little bouncy
and it's a little flay. We don't have a lot of
the weight just yet, but we have the beginnings
of a run cycle. Now, if I were to
continue to pose and adjust and just refine my
poses in the interest of time, I'm just going to do
that really quickly, I'm going to show you what
that should look like. After a little bit of time here, these are my final poses. This is my push jump pose, and you can see it's
18 me, up to 19. You see that one
and 19 exact match. Then this is my jump pose. Not too much of a difference. Five is we're getting
ready to hit the ground. Seven is I've actually
hit the ground, we're in our down position. I've controlled the arms
and legs a little bit more, so they're not quite as flay. They don't shoot
out quite as much. Then nine, we have this
passing position as the right knee or the
one towards the camera. Pulls up and gets ready to start a momentum to do this
jump once again. Now when I hit play, we have our full run
animation on twos. What's nice about working in
this way is at least for me, working on two's makes me
feel like I don't have to be such a perfectionist because
I know there's holes in it. I know there's things I'm
going to deal with later, and I can just say, you
know what, it's fine. When I'm not doing
this workflow, I have a tendency to hyper
fixate on certain parts of the animation and try to polish them and
make them really good. Here, it's still
working really well. I can see my shot, I can see
if it's coming together, and it has this cool stylization
the way I can play it. But I don't have to worry about every little
detail just yet. What we need to do next
is take it to ones.
4. Animating on 1s: Filling Gaps: [MUSIC] We have a run animation on twos, ready to take it
to the next step. Now, if we were animating
for something like Spider-Verse, we could
just leave it here. We could just say, it's on twos and make these poses
just really dynamic. But assuming we want to get
it to very smooth animation, we've got to fill
in these holes. To do that, I'm
going to show you one particular transition.
I'm going to go 5-7. This is a really good
one to do because I skipped the contact frame, which is a pretty
classic walk cycle pose. Here we're up in the air. Here we're down on the ground, so let's go ahead and do something about
this middle zone. What I can do when
I'm happy with this animation is I can
take all my curves. I'll hit "Auto tangent", and that will
smoothly interpolate now so that we have
smooth animation. If I just hit
"Play", it still has the overall idea of
our run because we had keys pretty consistently, it's not going to change
that drastically. But what I do need to do is deal with the stuff that we missed. So 5-7, we have a contact
frame that needs some work. Now, because a run is a
pretty high impact activity, there's a lot of
weight going around, I don't want to do what I might do in a walk cycle where I have this contact frame
with the heel facing up. I want that foot down. I can use the stuff that I've
already keyed to my advantage. If I go in here
and grab the foot, I can just copy the
rotation values from Frame 7 just like that. Now I'm going to make
sure I smooth this out because I haven't done
anything specific yet. I'm going to make
sure my Translate Y is down on the ground. Bam. We're just copy pasting
those speed things up. But I'll have the
foot in the air, and then the foot
hits the ground, and then he is able
to do other things. From here, it's a matter of working with the
splines and refining and adjusting because I might not want the up and down to have this exact moment or to have this exact
position in space. I might want to adjust
the stuff that I did on twos just so I can get the interpolation to
feel a certain way. It's entirely up to you
what you want to do. But a lot of this
stuff is going to feel pretty close to what
we want to keep. I can tweak things
as much as I want. I don't have to be beholden to any particular thing that I
had done up to this point, but really what I'm looking for is anything that feels off from these missing frames that
I hadn't done anything on. I'm going to look for the
feet and the contacts first. I'm going to look
at the hips next because they're the
biggest actions. I'm going to check my rotations and make sure that there's
nothing funky going on. Or especially things like
this where there's just tangent handles pointing
in awkward directions. I'm just going to make sure
that that is not the case. Keep things smooth by default. If I need to make them
less smooth, that's fine. There's nothing wrong with what we call a little
dirt in the curves. You don't have to have
perfect curves for everything you do in 3D. Sometimes things get a little
bit flat, and that's okay. You're mostly looking at what you're doing with your poses and how it feels and you're making adjustments based
on those decisions. I'll jump ahead to 15, which is the inverse
of whatever I was just doing on
the other foot, take my foot control, go to my rotation values, copy paste here,
smooth those out. Grab my Translate Y, paste
it onto zero so it's actually on the ground,
and there we go. Now that foot plants nicely. The rest of this process is going to be a
lot more of just filling in those gaps and overall just looking at the
animation, watching it. Hopefully you have
some reference or you can find some
reference to compare it to to see if there's anything important in the run
that we've missed. But at this point, we
want to just preserve what interesting timing
and spacing we captured on twos and just add more detail
to make sure that nothing feels false or feels like it's missing
with all this detail. But overall, it should
feel pretty close to done, and that's the workflow,
and that's how to create a run cycle in hopefully
record time. [MUSIC]
5. Session Completed: [MUSIC] Thanks for coming to this
study session where we covered a run cycle in a new workflow working on two's inside of Maya. Hopefully you enjoyed
it. Definitely share what have you created in the
project gallery down below. I'd love to see it, and I'll
see you in the next class. [MUSIC]
 Sir Wade Neistadt, Animator, VFX Artist, Creator