Transcripts
1. Introduction: Hey, Rowan. I'm Sir Wade. Welcome to my study hall session
where we are going to do some effects and learn how to shatter glass inside a Blender. All you need for this
session is your computer, Blender of any version, I'm going to be
using 4.2, but it doesn't really matter
which version you're in, and if you have some
finished animation that you want to
add this to, great. If you don't, you can do this in a blank scene, just
to try it out. This study hall session
compliments my class on planning and blocking
an animation using the post deposed workflow. If you haven't seen
that yet or you want to see where this
animation came from, check out that class.
Let's get started.
2. Blender VFX: Destruction Simulator : Here we are in blender with some animation and our finished
destruction simulation. I'm going to walk you through how to set something
like this up. It does not have to
be anything this complicated with this
particular type of animation. We're actually going
to start this off with a blank scene and I'll show you how to build
it up from there. A brand new scene file. We're going to go ahead
and close everything. I'll delete everything
in the scene. I'm just going to start with really any piece of
geometry that you want. I'll start with a cube just
because that's pretty easy. But you can pick
anything you want. The only thing we
need to do to start our destruction simulation is
to enable a certain add on. Now, as a blender 4.2, if I go to Edit preferences, we actually have a new window here. Before you always
just had add ons, but we now also have extensions. If you're using an
older virginal blender, add ons will have it for you. If you're using 4.2, you'll
have to go into extensions. You'll hit a little button
to allow this to get to the Internet and we're going to find something called
cell fracture. Can see here, we have to install it which is pretty quick. There it is. It's done. Now you can take any
piece of geometry, and if you have it
selected in object mode, object quick effect, and you'll see cell fracture. If you don't see
this, it's because the add on is not enabled. But with quick fracture, it'll
bull up this little menu. Oops. If we click away,
that menu disappears. Let me pull that back in here. Quick effects, cell fracture. You can customize this to all
kinds of different setting. You don't have to follow the exact one that
I'm going to do. But if I just go with the
default settings and hit Okay, actually, I'll turn
off Show progress real time just to make this
go a little bit quicker. You can see right off
the bat, it will break the cube apart and what we end up with is a duplicate of the cube that has been
divided into pieces. Now, this isn't super interesting just in
this way right here. It's also not very
organized in our outliner. I'm going to delete
those and try again. I'll take my cube,
go back to objects, quick effects, cell fracture. This time, instead of
using the defaults, I'm going to say that
let's bump up the noise. I'll just crank this up to one. I'll say that we want to have
a limit of 100 particles. That's probably not going
to give us this many. I'll turn on a few
steps of recursion, which is going to do some
like sub fracturing. Now, this probably
still won't look great, but I just want to show
you that if I change that suddenly we do get a little
bit of a different result. The noise kept it from being that grid
that we had before. It added some cell patterns and now we have little
pieces of rock. The recursion setting is what
gave us these tiny pieces, because it basically subdivided
or sub fractured some of the fractures and
so that's how it did these smaller chunks
inside of bigger chunks. You can play with these
settings all you like. I'm going to go ahead
and delete these once again and I'm going to show you how I did something
more specific for the glass. If you have a certain shape that you want this to break in, what you can do is use the annotation tool
inside a blender to draw on this cube and art
direct the destruction. Over here on the left,
there's the annotate tool, or D is the hot key for it. When you turn this on, you don't just want to start drawing because where exactly that line goes in your three
viewer matters. I want to make sure
with that selected, that tool turned on, I come up to the placement area and I switch this
to surface mode. Now it's going to actually
draw on the surface. If I move around, you can see
that line is on the object. Now this blue isn't
super easy to see, so I'm going to hit the
key as in N for Nancy, and I'm going to go
down to the view menu, and under the annotations area, I'm going to just
change the color. Once I've drawn
something I can click here and change it something that we can see a
little bit better. Maybe I'll use yellow. That's not needed. It's just so that you can see
this a little bit better. I'm just going to draw some lines and say that maybe I want to break this corner. Now I have drawn a bunch of cracks that work
specifically on that corner. I will just make some
additional lines through here. You don't have to do anything
really that specific, some spider webbing there, and maybe I'll do
something along the back and just break this
apart a little bit. Cool. Let's see what
we get for that. With these drawings, I'm going to go back to my object menu. It'll go to Quick
Effects, cell fracture, and this time, I'm
going to tell it to use the annotation pencil. Since it's on the object, it
should read it just fine. I'm going to turn
all the noise back off to stick as close to
my drawing as possible. The limit of particles
you can set here, let's go ahead and
say up to 500. I can also change recursion. I'll turn this off just to see really what we
get at the source. If you watch some tutorials
on this type of process, you might also see that the margin is something
that gets customized a lot. This is how much space
exists between lines. I've seen it recommended
to add a zero here, make the margin even smaller. We'll go ahead and do that
just to see what we get. One more thing that we really do want to make sure we don't forget is here under
the scene collection, let's actually give it a
name so that it organizes all of these little pieces
into a new collection. We'll just call this shatter
one in case we do some more. Will hit okay? It'll take just
a second and look at that. Now, this glitching that
you're seeing is because we have all these particles
on top of the original cube. I'm going to go
ahead and just hide that cube so we can't
see it anymore. I'm going to also hide
the annotation layer, which is inside of
this view menu. I'll end to collapse that menu, go back to my selection tool. Now you can see we've got all of these little tiny pieces of geometry. We're in
really good shape. It took that sort of spider web destruction with this is our main focal
point of the impact. It built out a whole web of broken geometry that we
could now take apart, animate, do whatever
we want to do with. Now, I don't know about
you, but I certainly don't want to manually animate
any of these pieces. That just sounds
like a nightmare. What we can do is I'm going to take this whole little
collection of objects. I'm going to move it
slightly up into the air. I'm going to create now
a plane or I guess, it's actually better
to use a cube sometimes for collision. Move this cube down
here. I'll scale it, make it nice and wide. From here, I'm going to just tell Blender that
I want some physics. Now, there's a couple
options of what I can do. I'm going to start with the
cube that has been fractured. I'll grab all these
little pieces by first picking a specific piece
to be my active object, then I'll shift select,
everything else. You can see that the one that I first clicked is highlighted a slightly brighter orange
than all the rest so that's going to be
my main target piece where I make all my adjustments. Over here on the right menu, I'm going to go to
the physics area and I'm going to
turn on rigid body. Now, when I hit this tag
and I leave it as active, I've now just activated
physics for the active object, just the one that
I have selected. Unfortunately, if I hit play, only that one is
going to do anything. What I need to make sure
I do is anytime I make a change that I want to happen
to all of these objects, I need to go into object, rigid body, and then
say copy from active. That's going to copy the
settings that I have here into all of
these other pieces. Now they all are active objects. If I click each one, you can see that they all have
the same menu. Now I'll go ahead
and just hit Play. It will take a little
bit, depending on how many pieces you have. My computer is pretty powerful, so I've got 500 little cubes all interacting and they go right through the floor. Not ideal. Because we haven't yet
clicked our floor, told it to be a
rigid body and said, Hey, don't be active because
active uses gravity, be passive, don't go anywhere. It's not animated, so I don't need to worry about this box. Now, because this is
literally a cube, I don't need to leave this
shape as a convex hull. This is a custom shape, like all these little
fractured bits. I would rather the simulation
be a little bit quicker, so I'll use a box. It's less math and it's
accurate for this cube. With that done, I'll
rewind and hit play. Always simulate from the first
frame if you can help it, and we'll go ahead
and let this run. We can see that it's
hitting the floor in three, two, bam. It completely explodes
and off it goes. You can see it
actually speeds up quite a bit once
all those pieces separate because with them all
pushed together like that, they were intersecting
and pushing against each other
as they were falling which is why it was so slow. But now I can scrub through
this part that's been cached. You can see that in my timeline, I actually have this
little if you can see, at the very bottom of screen, this little orange area that tells me where my calculation
has been figured out until. I can pretty much just play this back and check out
what it looks. Now from here, you
might be wondering, well, cool how do we have another object actually
cause this to happen? Because in the case of
my original animation, I had a window just
sitting there until it was eventually broken
by something else. What we're going to do is I'm going to introduce
a new object. I'm going to take an icosphere. Again, you could
take any object. You don't have to pick
the same thing as me. You could pick another shape, the monkey, whatever you want. I'll just use this. I'm going to tell this to be a rigid body. I'm going to switch
it from active to passive so gravity
doesn't affect it. I'm going to switch
it to animate it. Now I can go ahead and hit
I to key frame this object. In fact, I'm going to
switch my timeline. I'm going to switch this
to be a timeline above, compress that, then switch
this to be a dope sheet. I can actually
manage my animation. This icosphere I'm going
to hit I to set a key, which I will expand
this window so we can see my keyframes. There you go. There you can see
how key frames down. I'm going to basically
just move into the future. You can see my calculations have now gotten a little bit
weird because I just scrued. But I'm just going
to say go there. I'll make sure I
have auto key turned on so it saves that, but I'll hit I again
to set that key. It's going to pass through. You can see it doesn't know
what to do as I scrub. I have to re simulate
the cube here, so I'll rewind and I'll hit
Play and I'll just let it run and now what it'll
hopefully I didn't miss. I missed, but it worked. It interacted up to
a certain point, and I'll go ahead
and pause and scrub. You can see that I missed with
my animation a little bit, but it is interacting. It shaves off the top and creates some destruction
which is pretty cool. But how do we keep that
cube from just falling apart from the moment
that we hit go? To do that, I'm going
to go ahead and make an adjustment
to these pieces. I'll select my main piece, shift select everything else. I'll go back to my
rigid body settings, and I want to twirl down
this dynamics drop down, and I'm going to turn
on deactivation. I want them to be able to
deactivate, and in fact, if I twirl down more, I want
them to start deactivate it. This will mean that
they won't actually move until something
else causes them to move that hits this threshold of velocity or angular velocity. If I go ahead and just hit G, that might have worked
except it doesn't. Why doesn't it
work? Because I've only done this to the
one active object. Since a bunch of other things
are sitting on top of it, they immediately push it
down and activate it. I need this deactivation
to propagate through this entire network of
little pieces about object, rigid body, and
copy from active. Now they will all start deactivated until they
are made contact with. You can see a second
ago they didn't do anything until the
ball touched them. Then it activates
the simulation. That is exactly what we want. Now, there's one last
thing I want to do. Now that all of these pieces
are doing what they should, I want to make an
adjustment to the weight. You can see that in the setting, there's a certain
setting for mass. Now, all of these little pieces should have different mass
and different weights. I don't want to do
the math for those, so I'm just going to say object, rigid body, and in here
is a calculate mass. Since they're all selected, they'll all do it independently, and you can pick
whatever you'd like. If this is a granite broken, so look for broken things. Broken glass, broken
granite, marble, limestone, peanuts, if you want them
shelled or not shelled. I don't know why that's
in there, but it is. You have all these
different options, you've also got brick,
things like that. I'll just stick with
maybe broken marble. Well, we obviously want
glass for the window, but since this is
just a big cube, I think I'll go with marble.
We'll go ahead and hit Play. Now, as that cube blows through, we will see a little bit more of a difference from
the larger pieces to the smaller pieces in
terms of how they move. I'll go ahead and go
through here now. The only remaining issue is
that they slide around a lot. The floor is very
slippery by default. That's one more thing we
might want to adjust. If you click on our floor and
we go to surface response, you can see that there's
a friction slider. We can go ahead and
crank up the friction. You can mess with bounciness if you want to make
them bounce a lot. Let's go ahead and see
what that looks like. Hit the button. This is what's
fun about effects to me. If you want to play with
the effect settings, just mess with
them and simulate. See what there's
no wrong answers here because you are
just experimenting. You might come across some
really happy accidents and just discover cool stuff. If you're trying to replicate
real life, then of course, there are numbers and
math that you can follow, but what's the fun with that? Just have fun with it. That is how you do a destruction simulation
and in the next lesson, I'm going to show you
how to be a little bit more specific with things like glass and how to go beyond
just this basic simulation.
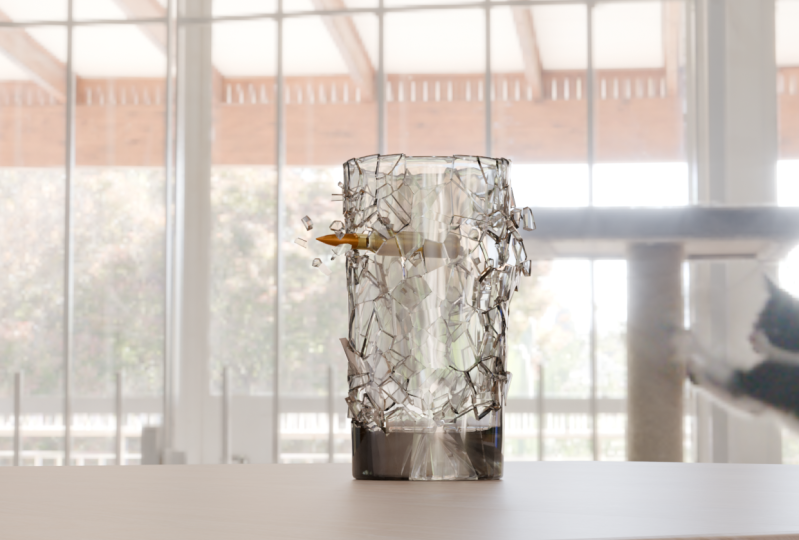
3. Blender VFX: Shatter a Window: In the previous lesson,
I showed you how to set up a destruction simulation
that looks like this, and now I want to go a
little bit further beyond. If we wanted to do something
very specific like a window, what I probably would have done, I'm going to go ahead
and just make it brand new, actually, I'll save this before I make a brand new file just in case. That was my recommendation to you is just say what you got. You can always come
back to it. Now, from here we're going to
keep it really simple. I'm going to make
a cube, go scale it down, make it nice and wide. To make the window, what I had done is I did exactly
the same thing. I created a cube. I scaled it
really narrow in one axis. It could be a plane, but I find that
using a cube makes it a little bit
better math wise just because some amount
of thickness is needed to make a
convincing effect. Glass is not infinitely small. It does have some
thickness to it. If I take this panel, and I go ahead and take
my annotation tool. You could look up reference of a specific broken
glass pattern if you wanted to try
and match the look. But glass usually has
very angular breakage. If I just make a bunch of little lines through
the middle there, and I create some little
spider web circles that'll hopefully
give me what I want. Then I want the edges to
have some of this, as well. I'll just go like that. It does not have to be
anything specific. You can really play
around with this. Sometimes you'll go way
overboard and when it tries to solve for the fracture, it
doesn't do a very good job. Sometimes you don't do enough, it's very much just
see what you get. Now, one thing I just
realized I did wrong is I just did all that drawing and it's not
actually on the surface. I just did everything
I did wrong because I did not
change the placement. Let me just go ahead
and undo really quick and switch this from
three cursor to surface. Now when I draw, I'll actually
get it on the object, and that will work a
little bit better. Spider web, spider web, spider web, and then some
lines around the edges. Does not have to be perfect. It's totally up to you
what this looks like. From here, object, quick of X, cell fracture,
annotation pencil. We want to definitely
give this a collection name Shatter 1. We'll turn off the
real time progress to speed this up a little bit, and I'll actually
just leave everything else the same except
for our source limit. How many particles do I want? I probably want something
like I don't know, at least 250, so I hit, Okay. It's not bad. I don't love this kind
of big chunky pieces, so I'll just hit Control Z, undo, try it again. If I go back and once again, quick effects cell fracture,
annotation pencil, I'll take this up to maybe 400 and just go
ahead and hit Okay. Now, if I'm happy
with that, I'll go ahead and just hide the cube. Oops, not the floor cube, but the window Cuba I should
probably rename these. I'll go back to my
annotation view here and I'll hide this layer. Now, here are a couple
of quick little tricks. When it comes to the window,
some of the things that I wanted to do is I didn't actually want the entire
thing to blow out. I wanted to keep
some of the edge pieces in the window frame. What I'll do is I'm
just going to really quickly say that this
is my main piece, grab everything
else, and I'll just blaze through this because I've already showed you
how to set this up. Active object and copy from
selected or copy from active. This one down here,
rigid body, passive. What I want to do in addition
to making sure, actually, that they are all
starting off deactivated, which I'll go ahead and
redo that rigid body copy. Then I'll also
just re-rigid body calculate mass, broken glass. There. Now in hit play,
they won't go anywhere. They just sit there.
They do nothing. What I want to do is I'm going to pick some pieces that I
want to just stick in place. I think these corners
could look nice. I think that one
could look good. Maybe I'll take this corner, that bottom piece, that one. Maybe this one
over here. I think these would all look nice
if they just didn't move. I'm going to switch that
from active to passive, and then I'm going
to go to object, rigid body, and I'm going
to copy from active. Now all of those select
pieces are passive. They won't move at all. They'll just interact
with the simulation. Now what I need to do is create something to move our stuff. I'll go ahead and use a
different spear this time, just to show it. I'll key this and let me make
it a little bit smaller. There we go. Just to be
super safe about it, I'm going to apply
the transformations. Sometimes with simulations, it helps to apply transformations. Blender is not known as necessarily the best
simulation tool out there. That title goes to Houdini. But for something like this, I like to play it as safe
as I can just in case. Apparently, that's in
the wrong spot now. That has to do with the
transformation of applications. What is happening?
Right to Auto key. You need to make sure
auto key is turned on. Now it's there, and we'll
send it through the window. Maybe a kid hit a baseball and it goes flying
through the window. Now, it doesn't do anything yet because I haven't
told the ball to be part of the rigid
body simulation as a passive object animated. You can see that there are
some different settings here. I could just set this
to sphere, for example. Although because of my
transformation thing, you can see that it's
missing the mark here. I'm going to undo that.
Leave it as a convex hole so it's going to try and read
the faces, see if that works. If I hit Play, there we go. Right off the bat,
go ahead and make this timeline a lot less
big so we can see it easy, change it by frame lengths. Now when I hit the button, you can see that some
of the pieces go flying off because the ball
hits it pretty quickly. If I want to slow that down, I can just change
where my keyframe is. I can just make this
action a slower motion. I like this, slow it down. Now the ball takes
longer to move, and it won't send those
pieces quite as far into the distance.
That's pretty good. Now, if I had other geometry here that if this window
were actually on something, I'd take another
cube, go like that, and scale it down. Create a bit of a window seal. What I could do is
do the same thing. Rigid body, passive, and switch it to box
just for the speed. There you go. Now it'll actually
collide with the object. Now, as far as doing this
as a window, sometimes, especially if you
have a certain camera angle or if you're using a character to
do all this work, if your character is appended to your file or the character
just lives in there, then you can typically just pick your character's mesh and tell those pieces to be rigid body objects and be
passive and animated and so on. But there are some situations
like when you link a rig or just in some cases where Blender has a hard
time computing that, it for some reason,
just won't use your character's geometry
to drive the simulation. Like, you'll do everything
right you'll hit the button, and then the character
passes through it it doesn't interact whatsoever. When that happens,
you're going to want to just make a proxy
character out of geometry. Just take a bunch of spheres, put one where the head is,
put one where the arms are. It's a huge pain to the but
you can basically just kind of make a rough approximation of the character out of primitive
shapes and geometry and constrain it to your
character's joints and their bones and
things like that, whether it's to the armature
or the controls, your call. But then you can just tell
those objects to do the work. So there's workaround
if you need to. Again, this is because
blender is not designed as like the
simulation tool. It has a few quirks. But once we have this done, this gives us a
really good base, and the last thing we want to do for something
like this type of work is we want to take all
of our simulation data, all of this here, we get rid of that
from our selection. We might want to go to object, rigid body, and
bake to keyframes. This, I'll leave it
at the full range. This will do the
calculation from the full beginning, all
the way to the end, and it's going to
save each piece, each little fracture is going to receive keyframe data to represent its motion
through space. This means that you never
have to simulate again. You don't have to sit here
waiting for it to do the math. You can freely scrub, you can jump around because
it's no longer doing math. It sent all that
to keyframe data, and so you can decide,
You know what? I don't like these pieces
that fall backwards. In fact, I'm going to get
rid of them entirely. You could hypothetically
just delete them. You now have a broken window. There's a bunch of
pieces missing, but now you know that all the
pieces will fall forward. Now, that's probably not
what you want to do, but the idea is you
can make adjustments. And so if you have
a certain piece that's just distracting, you're like, this one
just looks really bad from the camera.
I don't like it. You could delete it.
You can change it. You can go into
the graph editor, and you can modify
it. Things like that. That is a good process for being able to sort of save
your effects into your scene. It's no longer
editable in a way of, making large changes
to the settings. Every time I change
the animation now, I'm going to have to
like, this wouldn't work if I were still
changing the animation. You want to do all this effects stuff after you've already
animated your shot. Because if you're
changing animation, you have to constantly re sim and that can be time consuming. But once you're
really happy with it, it's a great idea to bake to keyframe data so
you don't have to keep waiting for the math
to figure itself out. Instead, you can now say, great, I have this scene,
I have all this stuff. I can do lighting. I can do additional effects on top of it, and there's nothing really
hindering me at this point. Now, the last little
tip is that if you want this to feel more intense, just do this a couple of times. That is what I did in the
example that you saw, which I will go ahead and
save this file and show you. So here's the file. And what I ended up doing on frame 7 is where I
have the breakage. I have one last tip to
tell you how I did this. But if you look really closely, I'll go
to wireframe mode. I actually have two
layers of breakage. I have a front layer of really thin glass that I
can go ahead and move. Behind it, you can see there's
a layer of chunkier glass. So I've just done two
different cubes at two different thicknesses
and send them independently. They could all be part
of the same simulation, if you want them all
bouncing off of each other. But because this is
such a quick action, I just did both separately, set them all to key frames, and then they just live in
two different collections. So what that allows me to have
is way more custom pieces, but in this variety of really thin little jagged pieces like this one, that
is highlighting. There we go. That
one right there, as well as these
big chunky ones. That just gives some variety and some texture to this effect. The last last thing is to point out that the window
starts off unbroken. All I've done is I've taken
the original cube that I started off with that I decided to draw all
over and mess with, and I animated it to turn
on and off its visibility. Now, this is where
blenders tools are not the best for this kind of thing when
you're doing a simulation, if you have a glass shader, where you can see
through the object. Because if I have this
object selected and I go to its object properties
right here on the right, down under the visibility tab, I have keyframed on frame 6. I have this object
keyframed that it's visible in viewports
and renders, and then on frame 7, I hide it. I turn it off. So that object, that
unbroken piece of glass, that cube, it exists for
the first six frames, and then I turn it
off and I hide it. That is when I turn on all
these other individual pieces. Now, unfortunately, in my case, because I had all this custom
stuff per cell fracture, I wanted the math to be
independent for each piece. So I did that thing
where I had them all selected and I did
the mass calculation. So since they all had different numbers associated with them, I had to individually
go through each one of these hundreds of cells
and set the keyframe, go to the next one, set, It's keyframe, go to the next
one, and set it's keyframe. You don't actually have
to do all of that. If you just have
one active object, you said it's keyframe, and
then you copy all of them, and then you do the same thing where you say, Well, I guess, the hot key would be Control L, and you could say
Link animation data. It would then link
that one keyframe to all the other pieces. That actually would have been
a much smarter workflow. I'm not sure why I
didn't do it that way. I learned from my mistake, and
all you have to do is turn on and off the one
you want to see and then turn off and on the ones that you
want to come later. That is how I turn on the fracture and how they explode from a seemingly
complete window, and it works this way because the objects don't actually
break until frame 7. I just wanted to hide that
so we don't have, like, a fractured piece of
glass the whole time. Otherwise, that
would look weird, if we were just staring
at this beforehand. So that's what I did here. Just for effect. Then to make it look like glass,
it's easy enough. You just tell all those
objects in the shading mode. You just grab any of these
pieces or grab all of them, and just add a glass BSTF. There's a texture
specifically for glass. You can adjust it
if you want to, make it frosted glass
or give it a color. But you plug that in, you use that material
for all these pieces, and you're pretty much
done. They look like glass. They will look better in cycles, which is fine.
Switch it to cycles. It takes a little bit
longer to render. But that's how I made
it look like this. If you have an environment and sky texture and all
that kind of stuff, they will reflect
it wonderfully. That is how you specifically shatter a window and deal with things like glass
where you want to control when it is
or isn't visible. Normally, you wouldn't
have to hide and show everything if
it were a rock, but because the
glasses see through, you have to swap them. If this were just
a block of stone, I would just have one block of stone turn off and
reveal what's behind it. But obviously, you see through the glass.
So that's the trick.
4. Session Completed: Thanks for tuning into
my study hall session. Be sure to share a screenshot of the glass shattering
that you've created, or whatever it is
you had destroyed, in the project gallery down below. Can't wait to
see what you made.
 Sir Wade Neistadt, Animator, VFX Artist, Creator