Transcripts
1. Introduction: Most of the time, I start from the technique and the
software side and figure out, "Oh, there's an
interesting feature or tool that I can use. I wonder what that
could be used for. I wonder if anyone's
ever done this with it." That is usually how I end up
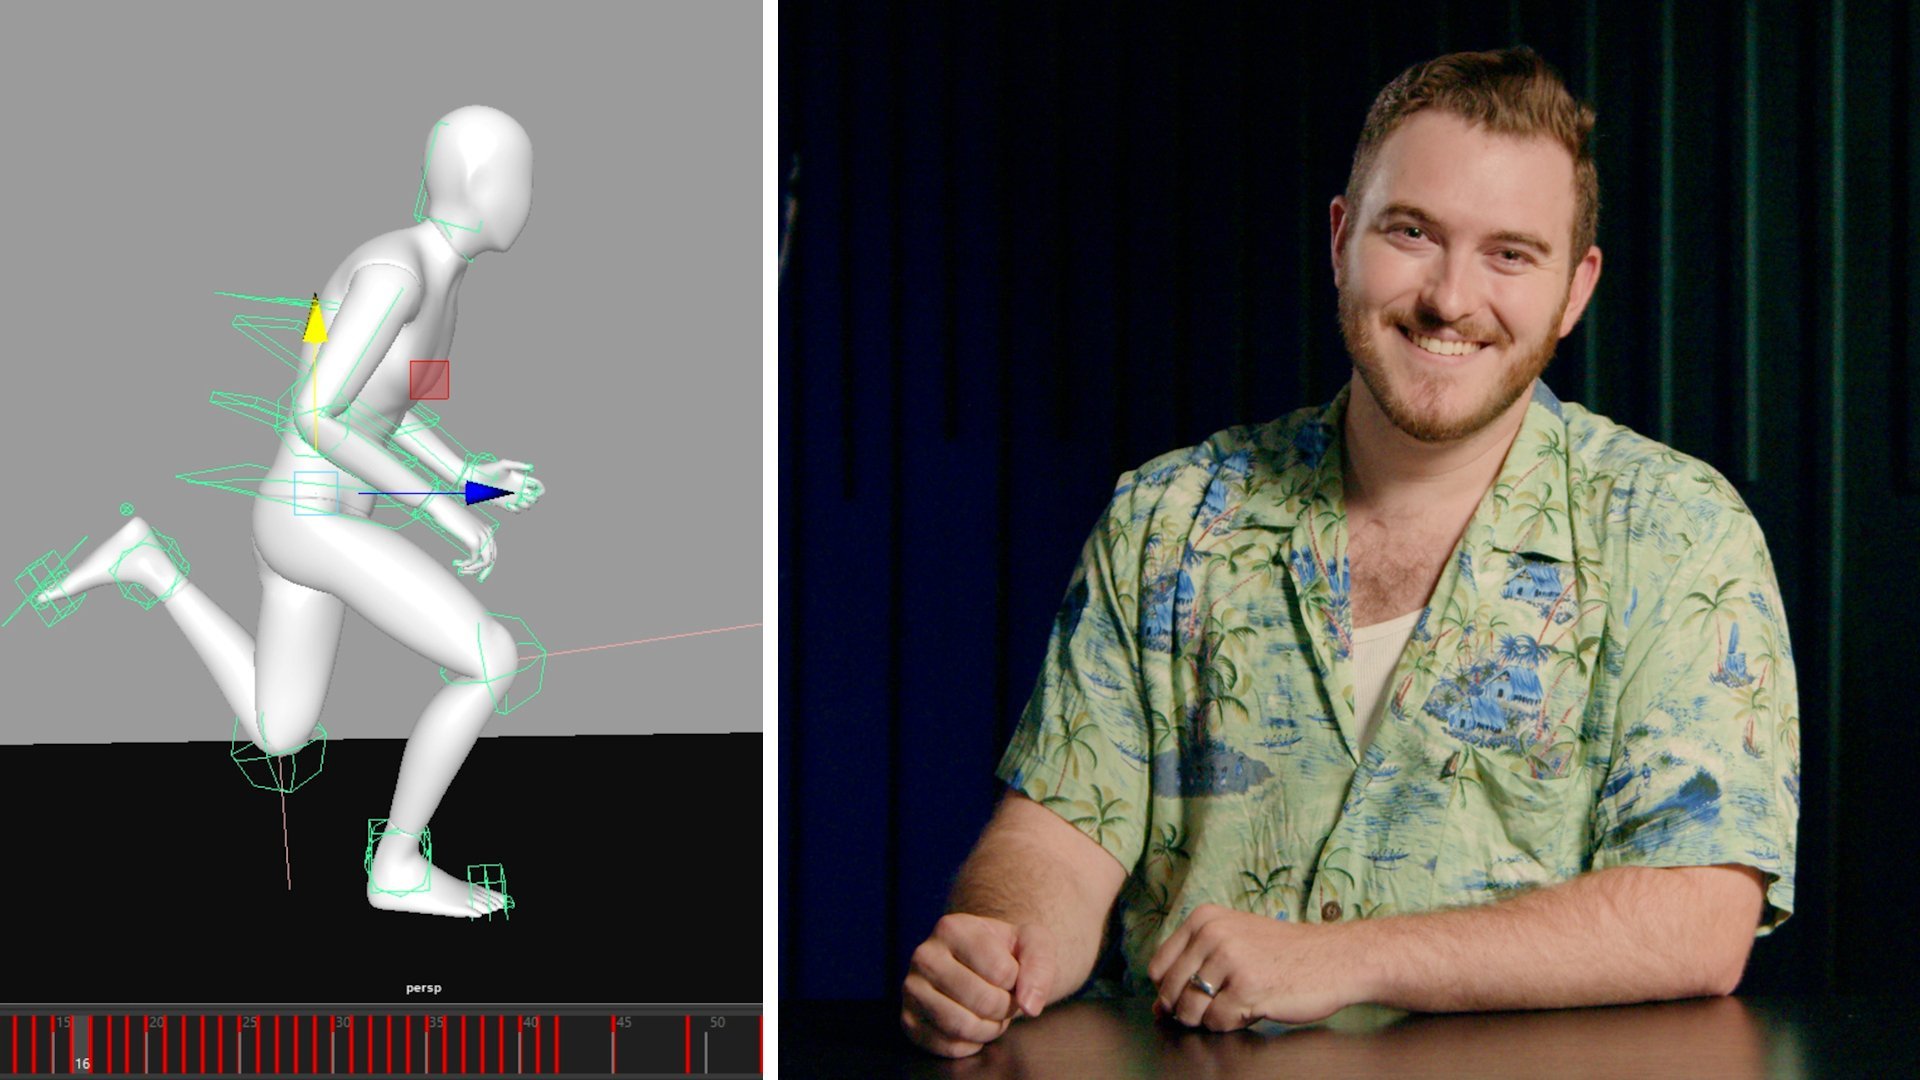
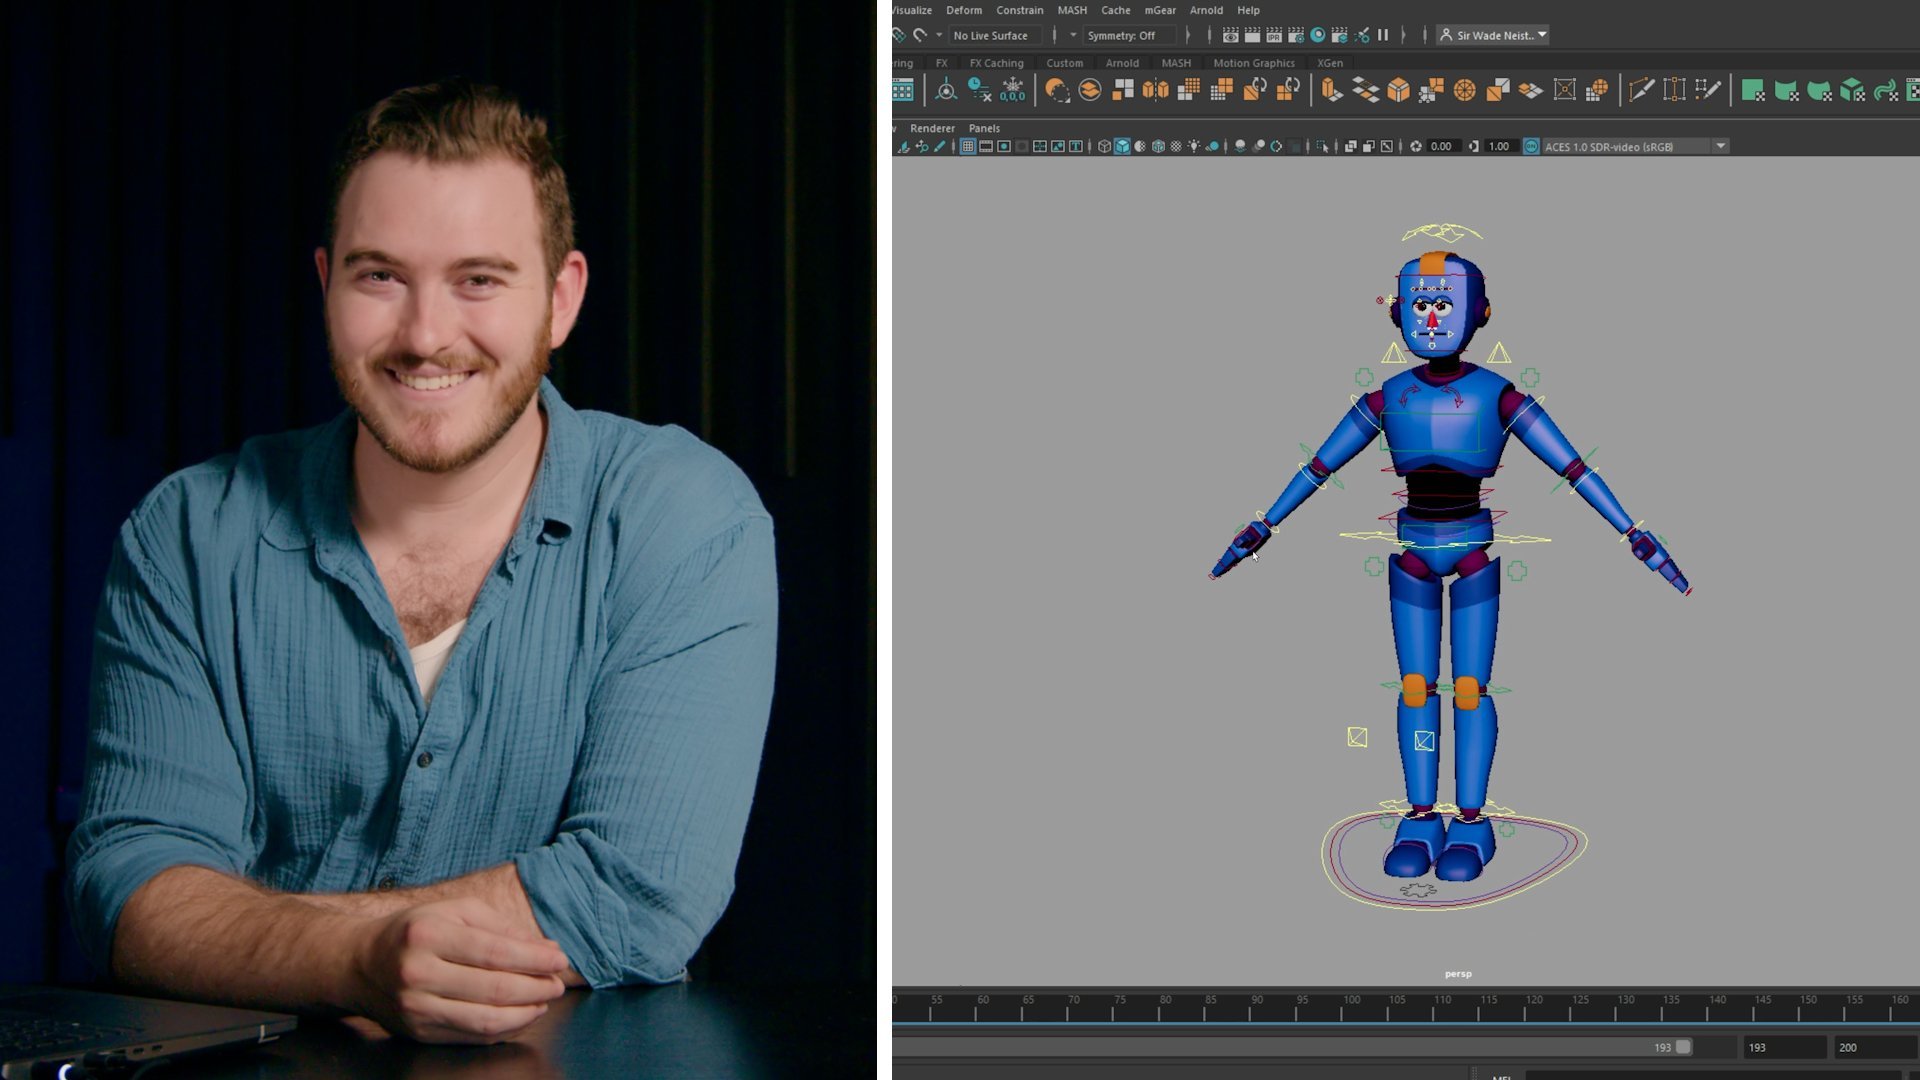
at all my creative ideas. Hi, I'm Sir Wade Nist. I'm a 3D character animator, a full-time content creator, and an educator and
technical trainer. I typically spend
my time creating educational animation
videos for our industry. Ultimately, my goal is
to create the resource that I wish I had had when
I was learning animation. This class is a continuation of the previous class where we
planned and executed a shot, but we blocked out our entire
animation inside a blender, and today we're going
to refine, spline, and polish that shot using our post-deposed workflow
that we've been working on. I'm excited to teach this topic because typically the process of moving from blocking into
spline is a very painful one. I'm hoping that if you follow the tips that I'm going to give you in this class, that process can
become a lot less painful and a lot more fun. In this class, we're
going to be taking a look at an actual shot, and we're going
to be moving from blocking plus through splining, refining, and into polishing. We'll be taking a look
at the graph editor and how to actually clean
up the animation data. Push it, adjust it, tweak it, add new things, and ultimately
finish an animated shot. This class is for
anybody looking to get more in-depth
into animation. You don't even have
to have really any experience in Blender. It definitely helps if you
know your way around it, but this is going to apply to any 3D software with
animation tools. After completing this
class, I'm hoping you'll walk away with both the
skills and the confidence to take your animations from a place where you
feel like it's going okay to actually feeling like
it ended up really great. Thanks for coming to
class. I'm excited you're here. Let's get started.
2. Getting Started: If you're coming back after
a break or you've jumped ahead just to get you up to speed on what we've done so far. We've covered the process
of animation in what I like to call the five
stages of animation, planning, blocking,
blocking plus, splining or refining,
depending on the workflow, and polishing. There are many
workflows. None of them are wrong. It
just depends on you. The one that we're
experimenting with today is pose to pose, arguably one of the most popular and well known
workflows out there. It's even listed as one of
the 12 animation principles. The specific way we're
tackling it today is with something that I like to call the milestone technique. That is not necessarily
a real name. That's just what I
like to call it. It's something that
I learned in school. Or you look at your
video reference, you analyze the
various information that's there and you try to identify your key golden
or storytelling poses, as well as things
like an anticipation pose or an overshoot, or things that are a little bit less easy to identify
like a hold frame, an extreme, a breakdown. Basically just trying to find any pose that you
feel is important to convey what's
supposed to happen in your shot and how it's supposed
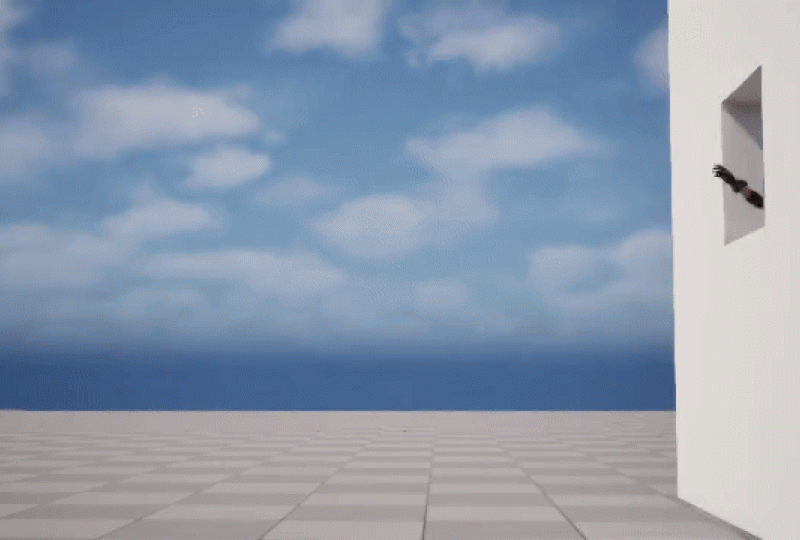
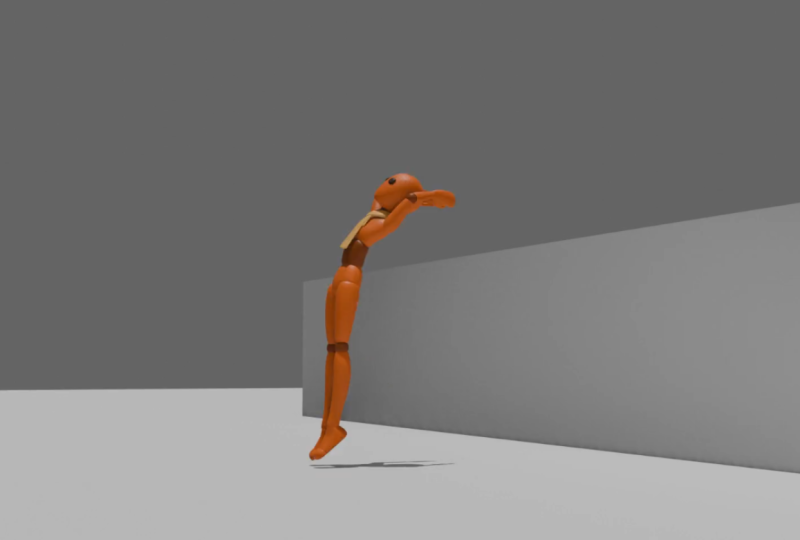
to happen in your shot. For the shot that I'm animating, this is the reference
that we have. It's a side flip
with a character jumping out of a window
and landing on the ground. Now, this particular clip
cuts a little bit short. He doesn't actually settle and stop moving once it hits the
ground, but that's okay. We're going to work
with that later. What we've done is we've gone through and identified
all the information that I find valuable. We've walked through
exactly what each of these frames contains, and we've moved all this
information onto our worksheet, which you can download in
the previous class as well. That worksheet serves as
our checklist of things to bring into blender and
to actually pose out. Now if I hit play
inside a blender, you can see that we have
the overall idea of our shot playing here
in stepped mode. Stepped mode being
this choppy playback that we have where we don't
have any frames missing, but it's just not smooth. We did this on purpose so that the computer
is not creating additional
interpolations or making decisions about
where the character should be at what frame. We only have stuff that I have manually posed in my scene. This is a good
recommended workflow for working in pose to pose so that you're really
able to focus on the specific poses
that you create. The more poses you have,
the more information there is and the better
this is going to look and the easier
it's going to be moving into our
future processes. In the next lesson, we're
going to actually evaluate this shot and decide whether we're ready to move
on to the next step.
3. Blocking Plus: Now, if you followed
along this far, you have actually already accomplished blocking
plus, hopefully. Let's talk about what
that means for a second. Blocking is usually just seen as your main poses to
convey the whole shot. Can you understand what's
happening? Is it clear? Does your audience
understand what's going on in your shot? But
what is blocking plus? Because it's more of the same. Yes, it's the whole point, is more of the same. You want more and more of these poses to just flesh
out all the in betweens. Because let's say you have
100 frames in your shot, and you find 20 poses, that's more than
most people usually find when doing blocking, but that's still only
a fifth of the frames. Which means that
Maya or Blender, Unreal or whatever tool you're using, obviously, Blender, in this case, it's still
animating 80% of the shot. It's interpolating
everything else. It's no surprise that
if you go from blocking and you have 20 poses
scattered across 100 frames, and then you hit "Spine", it's not going to go that well
because the computer takes over 80% of everything
on your timeline. When you suddenly go from
block into spline and go, it looks awful, why do I have to re-animate everything every
single time I do a shot? That's why. Because you
don't have enough keyframes. You don't have
enough information to hold your animation in place. When you watch it and stepped and you only see the
stuff that you made, it usually looks pretty good
because you did a good job. Obviously, if it
doesn't look good, you rework it until it does. But that's why there's that
big shift that everyone's so familiar with going
from block into spline and why
it's so difficult. That's why we analyzed our reference as
carefully as we did. Why we look for contact frames, and angles and shapes, and all these different things that go beyond just
the storytelling pose, because you can start
with those poses. We had quite a few of them, and we have all this
other stuff about all these different
body parts that once you start putting all
these keys in there, it starts to create the separation of various
parts of the body, and it gives you an organic
feeling to your characters, makes them feel more alive. To demonstrate this, I
actually have another shot prepared that I want to show you exactly what I mean by this. Here we've got a
bit of animation. It's a parkour shot, and there is some reference
to go with it. Now, I have already gone
into a video editor. I used Resolve just for free. I took the video reference, and I specifically went and just cut only the key golden
storytelling poses, and we just held those. I have nothing else,
as if this reference were playing in stepped mode. I went ahead and sort of thought back to
when I was a student, what would I have picked
as my storytelling poses? If I went to my reference, these would have been
the things that I thought were the most important. The question is, can you as the audience understand
exactly what's going on? I'm going to guess
that you probably have a pretty good idea. You can infer a lot from this. He's clearly running.
He does a little jump. He does another jump,
this cool leap. We call this a Kong vault. He then gets into this
tuck and roll position. He flips backwards,
then he rolls. Now, you might see
where this is going. There's definitely
some stuff missing where you don't see
certain things. If I just go ahead and
say, let's block that out. Let's just do that
as our blocking. I can do that, and
it's a great start. But if we say, time to go to spline, I've
done my blocking, I'm ready to go, it's
not going to look great. This is where most people go, I have to redo my whole shot. Well, no, that just
means you weren't ready. You haven't gone
to blocking plus. If I go back to the
reference and we say, let's add a few more poses, you can see here that I have gone ahead and added
contact frames, a huge part of the process. We have the jump,
we have a landing this time, then we
have another jump. This time we can actually see some contact of
hitting the object, and then he flips around. Then we have a landing and
the rest plays out the same. That's a lot more
information with only a few more keyframes,
but we can go farther. That would be what
I would consider decent enough blocking. Just what I showed you here of the main key poses
and the contacts, this we could call
rough blocking. But if we're going
by industry terms, if we're going by actually
trying to get a job and get hired as an animator,
we need a lot more. If you look up any
progression reels of various artists at
animation studios, who are showing their
process and you see the reference, the blocking, the finished animation,
and then when it's beautifully
lit and rendered, cloth, hair, effects, everything else,
the blocking looks a lot closer to finished
than most student work. This is the big
difference. Let's go one step further and
let's do blocking plus. If I went through
this reference, I cut out all of the individual poses that in SyncSketch, I would have drawn things
on, I would have made notes, I would have put it
in my worksheet, instead, I just say,
show me those frames. This is what I get. This almost looks like the full video. You can pretty much
just watch it play. There's a few things missing, sure, but you know
exactly what's going on. Contact frame, arcs,
motions, extremes, all that stuff that we
talked about in the previous class, it's all here. If we take that as our base, we use that as our blocking
or our blocking plus, it's really just an extra
word, blocking plus, meant to say, you're not
done yet, keep going. Now we have all of this.
That's pretty close. That's feeling really good. Now, at this point, the moment of truth here, what happens if I
say, go to spine? I'll just say spline. I
have done no cleanup, I've done nothing to
correct anything, no tweaking, how does it look? A whole lot better than it did before. That's the main thing. This doesn't make it perfect, but this is where we now go into the process of splining, refining, however you choose
to go in your workflow. This is where we get
to go ahead and say, I see it, it's working, let's keep workshopping it. That is the process
of blocking plus, and that's ultimately why we did so much work
in our original shot. Your blocking plus
is complete and it's time to move on to
splining and refining.
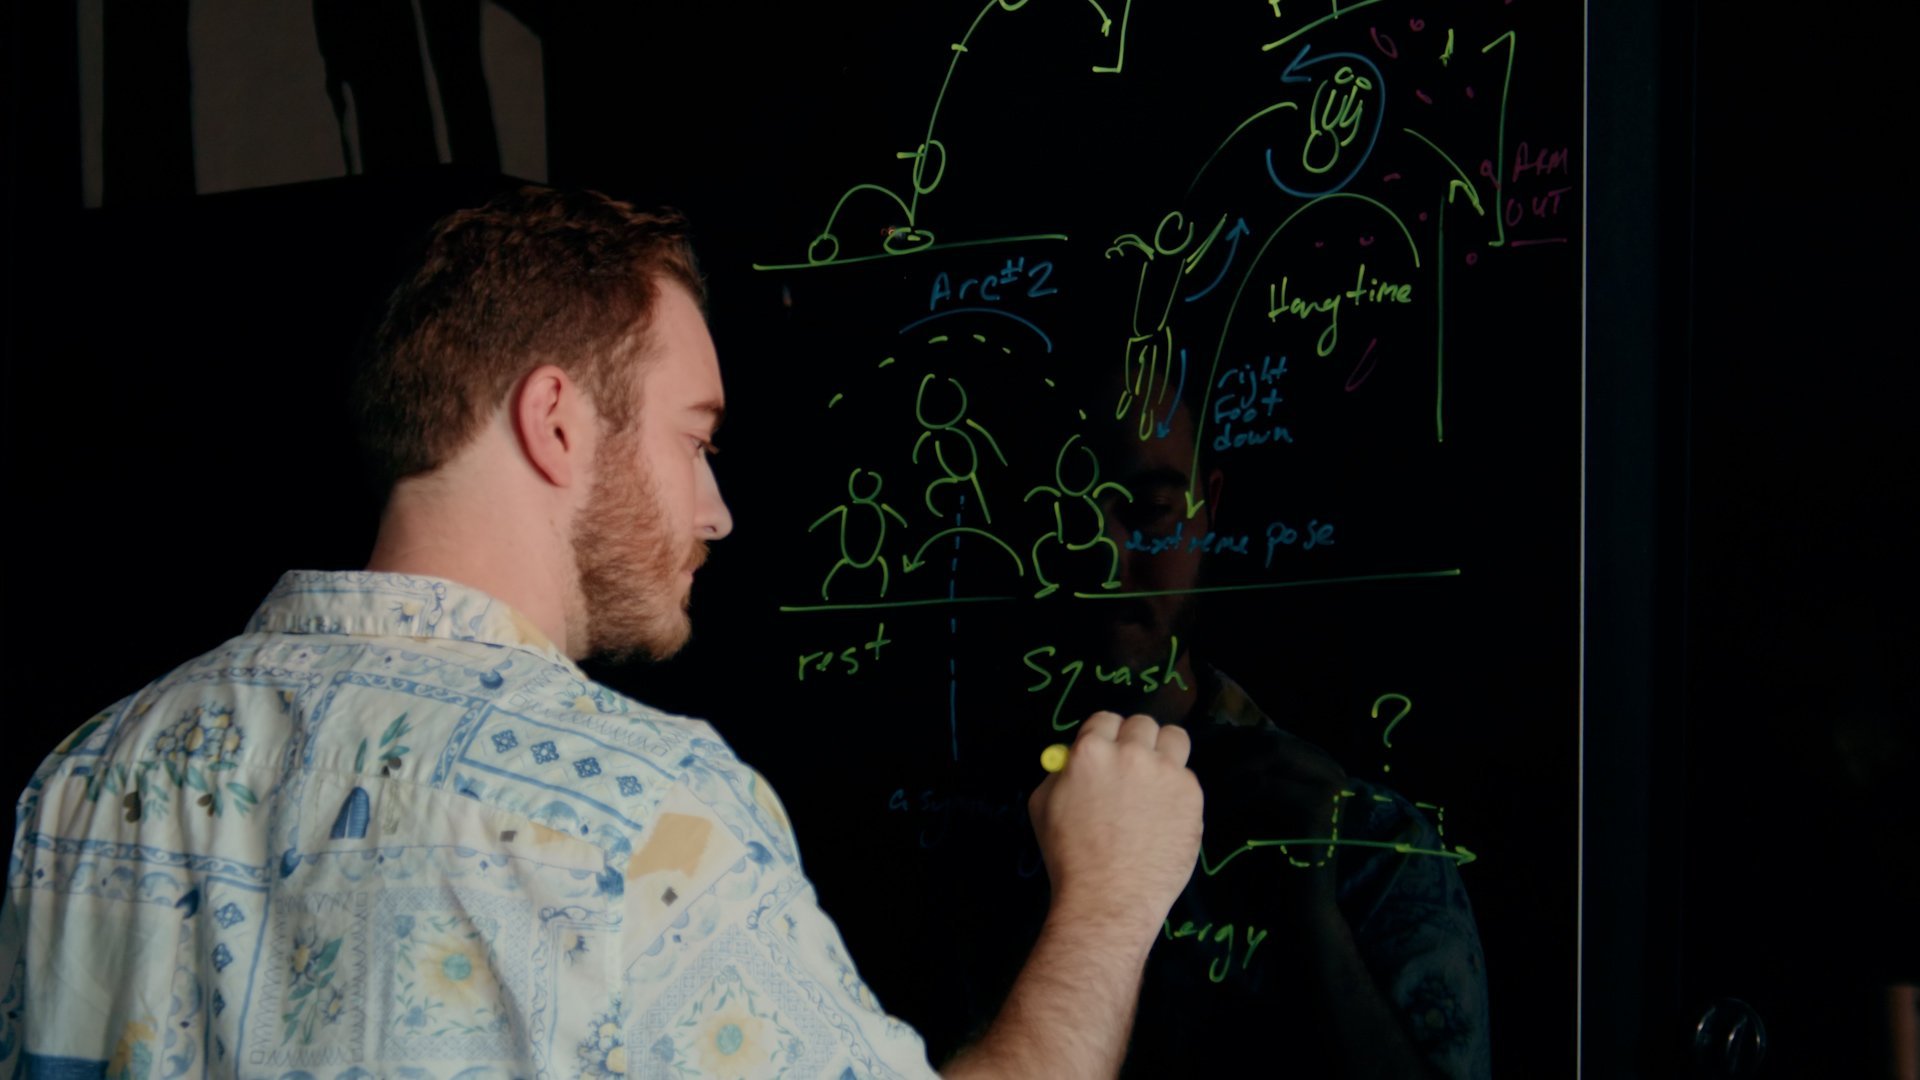
4. Timing and Spacing: In this last, we're going to talk about
timing and spacing, arguably one of
the most important and hard to understand
parts of animating. These two ideas are
really closely linked, but in this particular shot, we're going to try our
best to break it down. When we are moving into adjusting our animation,
we've got our blocking. It's all in there.
Hopefully, at this point, we don't really need to look
at our reference anymore. Ideally, we've pulled
everything we need from it. We can now turn it off and focus just on what we've created. Now, we get to be artists and push and change and adjust. It's with timing and
spacing that we want to try and focus our
attention first because the poses and
the flourishes and any little details you want
to add can all come later. It is harder to adjust
things like timing and spacing once you start
adding all those extra keys. What exactly are we going
to be taking a look at? Well, spacing is a little bit easier to identify
in a shot like this. Let's start there. I'm
going to use a tool that you've probably seen before
called the Motion Paths. If I grab the hip control
on this character, which is this little ring right
here, and if I move down, I'm going to come over here to the little Running Man icon. This menu is where
you want to be. This is probably trolled
down by default. But if you pull up
the Motion Paths, you'll see that
you can basically calculate a motion path
for any given objects. If I leave this at all
of its default settings, and it'll just go 1-36, which is my full timeline range, every single keyframe,
it'll calculate, and I'll say, go. It'll ask me a few other things. For here, we're just
going to leave it all at default and
say calculate. Now, we're going to go to
our camera view for this, but you can see the spacing of our object of this control. It's showing us the arc, which is one of the
animation principles. The idea here is that we can notice any glaring red
flags, any weird hitches. If for example, when I
had done my blocking, I had done some
weird stuff to where maybe this is a little bit
more jagged, for example. This is something you'll see
a lot with arc tracking, or maybe it's popping around, it's doing some stuff,
and you want to smooth that out. You
want to clean it up. Now, I did a pretty good job of not having that
happen in my first pass. However, you always want to
double check from the side. Here you can see
that from the side, it shoots forward towards the camera and then
back, things like that. These are some good things
to look for in your spacing, where you just have
any irregularities. I'm blending between
arcs and spacing. They're not always interlinked in the way that I'm
demonstrating them, but this is one of
the easiest ways to try and demonstrate
it to you right now. Where spacing really starts
to split away from just arcs is how much distance this control is actually
covering from frame to frame. If I just go keyframe
to keyframe here, I'm not yet interpolating. We should probably adjust that. But just based on our blocking, we can see from each of
these orange point along our curve the general distance covered from frame to frame. Now, if I happen to notice any speed increases or any parts where the character kind
of just stops in place and then they start moving
again at this point, that is where you start
to notice the timing and the spacing giving you some
hints of what to do next. One more thing I'm
going to try and do is I'm actually going to track
more than just the hips. The hips are the main
movement of our scene, but if I grab the head as well, I can calculate the head. I can add that in. You'll see that the
head has a very different path through space. It also has a jagged thing here because of the character
flipping upside down. Now, we don't necessarily have to make every arc perfectly smooth
right at this moment, but I do want to just point out you can track a bunch
of different things. You can look at the arcs,
you can look at the spacing, and you want to try and
throughout the whole shot, be evaluating the things that
we're going to talk about. Then if I make any changes,
I can always say update all paths and it'll
update anything. If I were to make a
change in the hips, it might not cause
the head path to recalculate automatically
because that's not the control I
was messing with. But if you need to
force it to update, that's how you do that. I can also hit this little
X to get rid of those. Now, what I'm going to do
is grab all of my controls. I'm going to select
all of my keys, and I'm going to hit
T, go to Bezier, and I'm going to switch
it from stepped mode. I am now in spine. Now as I move every single
frame, there's interpolation. The computer is trying
to help me smooth out the motion. Let's
see how it did. If I just watch it by itself, a couple of things
you might notice. The arc is a little bit wonky. He floats up through the air. We'll need to clean all that up. But that is, again,
arc and positioning, not so much the spacing
and the timing. It's the easiest thing to
point out and notice it there, but it's not where I want to
focus my attention just yet. Now that we have our
curves actually in spine, we are now officially in spine. I'm going to go ahead and
recalculate the motion path, just to make sure I see
exactly what's what. Now, I can see
little orange dots where my keyframes were and the little black dots where it's just the frame
without a keyframe. When you're trying to figure
out the spacing of a shot, you're really trying to
find any breaks in pattern. An arc tracker can be a really handy tool as
long as it shows you each individual frame and where those frames
begin and end. In this case, if
I'm just looking at these different breaks
from the orange to the black to the orange to
the black to the orange, it doesn't matter that it's like orange black, orange black. It just depends on
where my keyframes are, and I happen to have keys
every two frames here. But wherever my keys are, if I notice, for
example, that this key, let's call it, let's
say it's up here, and then let's say this key
is all the way down here, and then the next orange
one is also really close. Now, if I just stare
at the arc of this, if I smooth that out,
it's like smooth. We'll just assume just pretend
it's perfectly smooth. You might be like,
yeah, I like the arc. It looks good. But
that doesn't mean that the spacing and the
timing of it are correct. The thing that I'd be
looking for here is that the character
gets hung up up top. He floats up here, he's
not moving all that much, from these couple of frames, he's in the same spot. These two frames, he's
roughly in the same position. I go to the next
frame, he's roughly in the same position,
go to the next frame. He's just gone a really far
distance by comparison. That's what we're noticing from this to this, these two frames. The distance moved by the hips is suddenly a lot bigger than
it was on the frame before. This is a problem. It's
going to create a bit of a jittery motion through
space for our character, and it's just not going
to play smoothly. If I go ahead and just undo
all those little tweaks, we'll go back to what
it was a second ago, but if I go ahead
and grab the hips, the head, I'll take
the hand controls, and I'll just grab a couple of different things here and I'll calculate motion paths
for all of these objects. We can start to see all
these different things. Now, you don't have to turn them all on, look at
them all at once. It's a bit overwhelming.
I wouldn't recommend it. Focus on one thing at a time, but make sure you start from the core central pieces
of the character, the root, the cog, the hips, and work your way out. But if I were to want to make any changes to the spacing
and stuff like that, in this particular case, it might be fine because
it's an IK control. Changing the hips doesn't
necessarily move that foot. But if I were to do
that with the arm, that's not going to be the case. If I make any adjustments
to the arm and I say, I want that over there
for some reason, but then later I decide
to move the hips, I've just completely
changed the arm, which is why you have to start from the core pieces
and work your way out. Now, that's spacing.
That is making sure that the character
is not speeding up or slowing down and changing speeds in the
middle of an action where they shouldn't be, but when you have a character
jumping through the air, they have no way to
change their velocity. It has to be consistent. You can't have it change speeds, but what you can do is
you can stylize it, and that is where we
start to go into timing. So the spacing needs
to make sense. There has to be a
pattern in the spacing, and that pattern is up to you, if we're speeding up,
if we're slowing down, but when it comes to timing, we can have a character spend extra time in the air
and then drop down. If I go to my Y Location, I hit Shift H to isolate this, I'll normalize this so I can
make a little bit bigger. If I want to adjust the
timing of the jump itself, the jump, the fall,
things like that, that's a pretty common place
to want to mess with timing. I can take the up
and down curve. Here I have the character
moving up, falling down. What I'll do is I'll
add a motion trail just so we can see what
it's going to look like as I make changes. I'll just blow away some of these key frames just to show. I tend to use weighted tangents, which is the default
behavior here of scaling the tangent
handles on a curve. But if I take this
curve, I'll go ahead and update the path. We can make sure we can see
exactly what's going on. The character comes up
and starts to fall down. If I want the
character to hold up higher, I can basically say, don't fall yet, hang
up here for longer , and I can go like this. I can move this tangent
handle out a bit and I'll also bend this one a little just to show that now I could do that through
the graph editor. I could do that through
modifying these curves. Now, but when you're doing
a pose to pose workflow, all of the motion that
we've created so far is based on the position
of certain poses, which means that making
these changes in the graph editor is breaking other things
that we've done. The layered workflow and
the pose to pose workflow have the same underlying
process and goals, but how you achieve
them is different. I tend to jump into the graph editor and start to
mess with stuff, and I don't mind
breaking my shot and messing with stuff here because I know
I'll fix it later. If I were going to do
it with this workflow, I would go to the actual
poses that we've created. I would grab both the IK
controls of the feet, and the hips, and luckily, it's pretty
straightforward that I can just reposition these
different keyframes to create that hang time. This is visually a lot easier, and there's nothing wrong with
the short flow whatsoever. It's not how I usually work. I'm going to basically
just raise the character up for a lot of this so that the character stays a little
bit higher up in the air. Up here, up here. I'll just push it really
aggressively so you can see that I'm trying to keep the character up for
as long as possible. I don't want them
to feel weightless, which is where this is
going to get a little tricky because I'm creating this flat plateau
where the character is floating horizontally through
the air with no gravity. You don't really want that. I'm trying to add
a little bit of curve as if that makes sense, but I'm pushing it a little bit beyond what would make sense, just for the sake of demoing. It's like I can
make the character stay up longer, come back down, but now I've created this
thing where they slide across an invisible
barrier horizontally. I just need to reintroduce that gravity curve because that's really where
this problem is. I can have the hang time. I just can't have the character float. You can go too far with it. If I need to add a little extra, then what I could
always do is I could bring the character lower at the beginning so that it feels like there's a reason why the character
ends up up there. Let me make a few of
those changes really quick. There we go. It's a little bit
better. I can adjust the timing and I can try to
keep the character up higher, but to do it properly, I have to keep in mind
the arc a little bit, but mostly what
I'm staring at is I'm making sure that I'm not changing the spacing in a way that puts these
keyframes too close together, where, for example, if I ended up compressing
these three keys, that is a major spacing issue. The most important thing for spacing and timing is looking at each individual body part
and trying to find out if you see any of those
types of hitches, any of those parts
where the character is getting caught on nothing, or if the character
is just moving too quickly for us to really
see what's going on. If I stare at, for example, this arm, the screen right arm, the character's left arm, if I stare at that arm, throughout the entire shot, that's all I'm going to
be looking at right now. It doesn't really do anything. It doesn't add
anything to the shot. It doesn't add any
flow, any weight. It's just this thing
that moves quickly. If we have it go less
far right off the bat, perhaps I just add a little
bit of rotation to it. Maybe I take the wrist and
I could drag it behind so that it starts off
closer to the body, and we can use this
drag to our advantage. We could have it come
out here and then maybe as it hits this out point, maybe we could hold it out
here for a little bit longer. We could drag this arm
back so that it doesn't just disappear
entirely so quickly. Another thing I can do
is I can use this arm, maybe drag it a little
back behind that. Then instead of going
all the way back here, maybe on frame 28, I say, you know what, don't
go quite so far back. I'm just decreasing how
much spacing changes from frame to frame to try and
get it to be less jarring. It's a very small adjustment, but hopefully now it's
feeling less like that arm is flashing out to the side
and just shooting back in, and now it just feels like
the arm is moving out. That's a very
realistic example of the timing and spacing changes you're making and why
they're so tied together. It's fast, so it's timing, but you do it through spacing. Now let's jump into the actual work of going into the graph editor and
splining the rest.
5. Animating in the Graph Editor: The graph editor is your friend, don't let anybody
tell you different. If you don't use the graph editor or
haven't used it before, in the little menu down here, you can pull it up specifically, or you can just control
tab from the dope sheet, which is what I've been
doing the whole class. When you're in the graph editor, a couple of things to note. Let me go ahead and
just grab a control. We'll use our hips
as the example. If I show a bunch of
these different curves, if you hit the home key, if you have a home
key on your keyboard, that will zoom it up to the max, so it'll actually
maximize the space, which is nice because
often it's small, so that'll fill it out. If you select a group of keys and you want
to focus on them, you can hit your
little period on the number pad or whatever you've remapped that button to, same as when you
focus on an object in the viewport and
that'll zoom you in. If you deselect and then
hit that same button, it zooms out a little bit. You can see what that
looks like here. Home again will compress it. It's this combination of
the focus key and home to reorient yourself inside
of the graph editor. But often, if you have
things that move a lot, for example, this flip, this rotation in Z causes the character to go from more
than -360 degrees to zero. It's like 400
degrees of rotation, which means that this one curve makes our graph go
from negative 300-ish, all the way to zero, and all these other curves
are really hard to see. They're just so compressed. That's what this
normalized button is for. What this will do is it'll
take this global scale away, and it just remaps
everything to a one to -1. Now, every single one
of these curves is a relative view of themselves
within that space. The numbers no longer map to
specific plots on a curve. It's not changing the numbers, it's just changing how
you see those curves. It's a lot easier to see what each of these
things is doing. I want to look at, for
example, the up and the down. That is the Y location
for this particular rig. If I take one of these curves and hit G and move this, you
can see that's that one. If I want to just
isolate that curve, you might be tempted to just turn off all these little I's, but that could be
a lot of clicking and dragging, that's a pain. Instead, what you can do is you can just select one of these and hit Shift H, and
that'll isolate it. You can hit Alt H,
and that'll reset. So if you grab a
couple of things and you say, I want to
see just these things, Shift H, that's a quick way to just filter by those selections. We get to a point where we now want to work
on the graph editor, we want to make some changes, and we need to step away from this specific poses
on specific keys. The post to pose workflow
eventually has to end. You had a management system and an organizational structure of where your keys are and exactly what's been
keyed on what frames. Typically for blocking, you're keying everything all the time, just to keep things
all secure and stable. But eventually, you
might start to add individual keys on
certain control, certain channels,
things like that. But there does come a point where you
have to let go of it, because you can't keep all of your keys on the
same frames forever. Eventually, you have to
start breaking stuff up. You have to add
that organic feel, and you have to allow things
to overlap and offset and no longer be bound to
other parts of the body. That's really what the blocking plus was trying to introduce. Even though we have a lot of
these consistent keyframes, the different parts of the body move on different intervals. It is at this point that we must let go of pose to pose and say, great, it's given
us a foundation, now we need to build off of it. That is the process of spinning and therefore
then refining our motion. So if I look specifically at the head turn, let's
see what we got. I'll go ahead and look at
just the rotation values because I'm not translating
it in this particular case. The first thing that I recommend is just make sure you
understand which one of the x, y, and z channels you're
affecting and why. If I mesh with x,
that's his nodding. He likes it. He approves. Y is this side to
side, and then, in this case, z is
a twist and a spin. You might be tempted to say, this curve isn't
perfectly smooth. I could add a nice
little roundness to the top. That looks nice. The problem with that is now the character is
looking that way. Instead, I like the idea that he's more or
less looking hereish. Don't feel like you need
to sterilize these curves and make them overly smooth just because they should
look really pretty. Smooth at pretty curves does not necessarily mean
pretty animation. But if I can point out a
few red flags for you. In the graph editor, if I have something
that, for example, let me find a specific
thing that we can use, I will use the hips and I will isolate them so that's
all we're focused on. I'm going to go ahead
and reset all of this. We will look at just the up and down
and the side to side. These curves happen to be pretty smooth, for
the most part. The up and the down,
mostly smooth. The side to side, it's
a little bit bumpier. If I had this curve doing its own thing and it's
this weird little bump. Having this one key stand out above all the rest
makes you wonder and go, is that supposed
to be like that? If you play it and you watch it and it seems correct from
the camera's perspective, I'd recommend also
turning your camera, looking from a perspective view, make sure that it's
not doing something in a weird axis that
you're not noticing. But if it looks good, then it doesn't necessarily
mean that it's wrong. Try moving it down into
a smooth thing, compare, and if you don't
notice a difference, then confirm that you are using what you
think you're using. Something else is
something like this. This is another
outlier, but more importantly, it's a reversal. The pattern that we've
established of this curve, we're moving up,
we're moving down, then we're moving up again,
then we're moving down again. The fact that we change course in between
two different keys, if that weren't there, it
would just move smoothly down. But that key causes us to
move down, then back up. That could potentially
cause a hitch. That's one of the most
common ways to have something catch and have spacing issues is to have
these types of reversals. But often you want
something that looks more like that where it gets close to where you want it and then holds up
for a little bit, slows down, and then
resumes its motion. In this particular case,
it's really obvious, which is why I'm using
it because I want you to be able to see
exactly what I mean. But let me go ahead
and do that reversal. The reversal is the worst kind. In this case, it's
really obvious why? Gravity. You can't fall and
then just float back up. One of the most useful tools in your arsenal for this
moment is the tweener. The graph editor is
doing all that work. The character is going
to land on the ground, and you can see we
enter this pose. If I go further and back, you can see that this is the
head nodding up and down. What probably want to have happen is the character
is going to hit the ground and we don't want all that energy to
just die on impact. If the character hits the
ground with the hips, we have this, we go
into our down position, and then it comes back up. But that impact is going to
ripple through the body. I'm going to want to
add a few more things. The body comes down,
down and then up. I want to add some
overshoot or add some offset to different
parts of the torso here. The characters
going to come down, slam on the ground right there, and then I'm going to go
ahead and just adjust this. I'm going to say, right there. That's where the character's
body hits the floor. I'm going to leave
that key in place. I'm going to delete
some of these others. I'm going to go ahead
and just isolate this. Get rid of some of these keys because there's just
too much in the way. Sometimes it's easier just to
eliminate some key frames. I'm going to get rid of
all the way to here. We're going to hit
the ground and then, I want to have the character
bend in and compress. I'm going to take this
keyframe and I'm going to push it up like that, and it's going to sink down. Now I might have
already had some of this in my
original animation. You can see the shape of the curve is to have it
come down and then up, which is exactly
what I just did. But if I want to
push it further, I can adjust it. I should always check it
from the camera view, lets go ahead and do that. These other keys that are here, maybe I want them,
maybe I don't. I'll just drag them
up so they reconnect contextually to what
else is here and then I'll smooth them
out a little bit because in this particular case, I don't think I need
it to be bumpy. Then what I'll do is
I'll straighten out a little bit and
have him decompress. I'll get rid of some
of these extra keys. I'll say that at this
point, where do I want him? Maybe I want him about there. I'm just eyeballing it.
I'm just trying stuff. I can always change it, but I am going to
get rid of some of these extra keys because I don't think I want so many
keys right here. Down and then up. Then what I'm getting from this, if I go ahead and
exaggerate this, I basically have opened to
the character's torso up, so he's not very
compressed in the body. Then he lands and
he squashes down. Right around here, the
character is really hunched over in that particular joint. I'm going to keep them hunched
over all the way through here because as
the body moves up, I want that shoulder
area to drag, but not a lot just yet. I don't want this to be super
smooth, right here to here, I'm just getting very even computery perfect interpolation. I should favor something. Do I want to have
the character favor being in the bend pose
or to favor moving up? Now, rather than creating a keyframe and
dragging it around, that's where I can
use my tween tool. If I hold Shift E and now
I have this little slider, where as soon as I
commit the change, as soon as I click
somewhere in here, it will add that keyframe. It creates an ease key closer to the original
keyframe behind it. If I go back to the right, it favors the next
keyframe in the timeline. It's the difference of
the character snapping up and straightening
their back faster, versus staying hunched
over for longer. That's just one joint,
just one control. I also have these other parts of the body that I could
take these other things. If I want to do
the same thing, I can curve this
down a little bit, rotate my tangent handles. I could compress the
character even more if I want to push this pose.
I'll sit in the viewport. I'll just say R X, so I'll rotate in X and I'll just say that looks really nice. I can see that I'm
in a completely different register
of this keyframe. Maybe on the frame of
impact right here, maybe you want to have
the character actually leaned back a little bit. You can see that these other key frames
that I had in between are working against me, I'm
just going to delete them. Somewhere in here, I'll decide if I want to
ease back this way. I think I will, I think
I'll drag like that. Look from the
camera's perspective, the character comes in here, really nice and stretched
out, and then compresses. Then from here, I can
just make a decision of whether I want to have
the character stay really compressed, get
rid of that keyframe, and then come back out of it like this, compress,
stay compressed, and then open up, or
if I want to have the character compress,
and then shoot back up. I think this is
going to feel it's a little bit too jarring. It makes the head do a really
quick whip down and around. What I can do is I can
hit the head and I can create a motion trail
and I can take a look and see what the spacing of the head is doing because
of that change in the body. This can help make decisions. If I go ahead and put this back over here
and say you know what? If I keep that drag there,
update all the paths, you can see that I get a
deeper curve to the head. That difference of what I'm doing changes the
arc of the head, even though I'm messing
with the spine, which is why I'm doing the spine before I
deal with the head. I like this deeper
thing like that, and I'll go ahead and add
a little bit of ease in. I don't want to have
this too perfect. There we go, update. That is a way to start
layering in the types of spline changes that will just give you more
customization of the action and how the
weight is going to happen and how all these different motions
are going to come together. I'm going to keep playing with
this. In the next lesson, I'm going to show
you some hands on approaches to refining
certain things in shot as well as looking
at a fully spline shot.
6. Moving to a Fully Spline Shot: It took a while,
but here we are. Some of the changes that
you'll hopefully notice are the arcs for pretty much all the body
parts are fleshed out, which actually, I'll just
go ahead and show you. I just grab the hands, the hips. The hips still a little bit interesting, and then the feet. I'll go ahead and show
the feet as well. If I calculate for all
these different things, it's probably a lot but you can see that there's not a lot
of just really jagged edges, anything too crazy
or out of place. The one thing that's
weird is right over here. This little twisty is the head. The reason that I'm
allowing that is because if I look
specifically at an eyeball, that's really where we're
looking on a character. If we're looking at the
face, we're looking at the eyes and if I calculate
the path of the eyes, it's not perfectly smooth and I could probably make
adjustments even further. This would be polishing stuff. It doesn't have to be the most
perfect arc at all times. It just needs to
not be jarring or having issues or have any
weird pops or hitches. But the reason I don't need the head to have
a smooth arc like everything else is because we're not rotating
from the head, we're rotating from the hips. The feet are also just being
flung around the character. They similarly have to have a pretty normal
path through space. The hands can be a
little bit weird because the hands have
some agency of their own. Like, he can do this little
loop to loop with his arm right here because the arm comes out and then he's going to
go and grab behind his hips. But I wanted that
to be circular. At one point, that was like a weird oval shape or something. I'm trying to keep things
to be just nice, pleasing, rounded things with flow because if I wanted
to add polish, add adjustment,
what I can always do is I can take
the hand and I can rotate it back and I can really accentuate this
curvature of the wrist. Now I can use that to drag behind and keep it a
little bit more stylized and cartoony all the way
through here a little bit more. Boom, and then it goes behind. That is a way that I can
drag and stylize and add a little bit
more personality and flavor to this animation. Optional like, that's a choice. That's just up to you how
you want to tackle that. There's no right or wrong
for things like that. It makes the hand feel
a little bit more sluggish because it just
feels like the arm is moving. The hands just limply
following behind. If I undo that, I
haven't changed the arc, but now it makes it feel
like the hand does drag for a little bit but then eventually it leans
into the action. The hand cups down underneath. Again, these are choices. The main thing I want
to convey is that this whole process of adjusting curves and messing
with the graph editor, it's mostly an effort to preserve the weight
of the character, the balance of the character, and the integrity of how the physics should work with a character that
has some motivation, things like the arms, they drag behind, they
aren't leading the action. They are flowing and following
but they're not just like limp noodles that
just swing wildly. There is bone and muscle and there's motivation and he actually controls
where his arms go. They shouldn't feel like
they're disconnected from him, but they shouldn't feel like
they just follow either. There's this weird in
between and I'm going to use his landing as what I want
to focus on for that. Specifically, when he
comes down and he lands, if we watch this
screen right arm, his left arm, it comes down
right here and it swings. I could just leave it
hanging down below. I'll go ahead and look
at the curve for it. It actually swings all the
way up a little bit higher. He pulls it up
towards his torso. If I take that away and I
just don't have that happen, it just feels like it's this
little like settle action. It just feels like the
arm is just flowing, following with him, but he's not doing a
whole lot with it, but how I had it before, I undo that change
where it moves up more, now it feels like he pulls
it up a little bit more. Like, he's actively engaging his bicep up a little
bit to pull that arm up but what I've done is I've made sure that
the keys in here. The curve has the overall
energy of the settle, the ease, it has this motion that it
moves to a new position, and it eases into
that new position. I overshoots a tiny bit, and it starts moving
back in this direction. I can adjust, like what
exact values I have here. As long as I keep
that ratio of where those keys are, that's
the work that I did. The exact amount of
it is customizable. Now I'm going to
walk you through the adjustment of a
particular part of the shot, something that you're
probably going to need to do in any body
mechanics activity, and that is the
foot contacts and what happens on this little
pop off the floor here. When I have the character
hit the ground, we have a frame before impact, and then we have the
left foot touchdown and then the right foot before
impact and then touchdown. That's pretty much all
I put in the blocking. Now, getting into
the specifics here, we have the character
come up into the air, and he never quite
lands back down. This is where we need to
go beyond the reference, and we want to make
our own adjustment, and this is the stage
where we want to do it. The first thing I'm going to
do is I'm going to mess with the translation and just make sure I like
the overall action. I'll go ahead and turn
on my motion trail so we can see what
this looks like. I'm going to add a
few extra frames just so I have some
extra room to run. The character pops up, and I'm going to have
them drop back down. I'll go ahead and
update the path, I'm just going to see
what this looks like. I've now abandoned, once
again, the pose to pose. I could start adding extra
poses, but at this point, I just want to show you
the spine workflow. I could come in here
and just start adding keys to try to shape this.
That's totally fine. My preference is usually to
use the graph editor, though. I'm going to use
these two controls, isolate them, and I'll normalize it so that I can
make it a little bit bigger. If we take a look here, I'm going to mess with
the up and the down. I'm going to get
rid of this key. I'm going to take this handle,
use my weighted tangents, and just push that out. Like that, and I'll
compress this in. When I update the path, looking at the path,
it's a little bit sharp. He comes up and then he does this little diagonal
line from here to here. It doesn't feel as
archy as I would like. That is mostly in part
to my translate X. You can see how it has this plateau where he doesn't
really move all that much. His X is stuck in place. We have a spacing problem, and then he
accelerates sideways. I just get rid of
that key right there. Now when I update this, you can see that we now
have a proper arc. Now he does just go up
and then straight down. What I want to have
happen is I actually want to maybe overshoot a little bit. I actually take
this and I'll add some extra keys to my
x curve like that. I'll keep updating this just so you can see
what's happening. I'll have him shoot
forward a little bit. Maybe there forward, and then I'll slide him
back, maybe not that much. Then I'm going to also
have this up and down. He'll come up, he'll come down. Maybe I'll have him
overshoot a little bit, so I'll go ahead and
add another curve here, a key there, down,
cushion, and then back up. I'll just copy paste that. I'll hit V, just to pull this little menu to auto these tangents so I don't
have to do them manually. Here, I want to
have the character maybe land a little bit harder. I'll have them come down a
little sooner and bounce up and then go like that. Down up. There we go. Then I'll maybe hold
him back a little bit. Even though I'm just
focused on the hips, I do need to keep track of what the feet are
going to be doing because if I look at where he makes this
first initial impact, he's going to hit
the ground here and I'm going to make sure that his weight is
centered over here. Right now, he is nicely centered over the leg that's
supporting him. I like that. I want to keep it that way.
When he compresses down here, I'm actually going to
hold him back a bit. I'm starting to break my
perfectly smooth curve because I want to have the character
come down on that leg, maybe not quite so
much and then push across to the far leg. Now, if I don't like
how flat it is, then I can definitely
adjust the up and the down and I can have the down pose go a little bit more aggressive, and then that'll round it out a little bit more
but right there, I'm starting to combine what the hips are doing with
what the feet are doing. I want to have him come and land on the ground
one final time. I have to make sure that
when this foot goes to move, it actually ends up
in the right spot. If I zero out the y
translation of the foot, it'll actually put it just on the ground because I
want it on the floor. I'm going to make sure that his weight is centered
and all camera angles like this so he's
nicely over that foot. I'm also going to make sure that the other foot is
somewhere useful. I will disable the rotation
in this axis and this axis. I'll also zero out his foot there and just make
sure it's planted. Once he goes and
pushes off here, I want to get that
foot in position, and I want to have this foot
plant happen much earlier. He can't just hit it the
moment he hits the ground. Otherwise, the feet
and everything's just feeling like it's
at the same time. I need him to get
that foot down below him so it's prepared
to take the weight. I'll plant that foot
back on like 37, so he moves that foot
over here quickly, and then he can plant.
He can stand on it. I also need to make sure
I have my rotation values because you can see
that those are also related. Paste those in. Then all these little keyframes right before, don't need them. Go ahead and delete these. Now what I probably
need to do is I need to now use my shift E,
my E's keyframe, and I'm going to go ahead
and ease it towards the future keyframe so that
he moves his foot quickly. He's going to basically come off the ground and
quickly move his leg over and get it ready
to plant on the ground. I can tweak, maybe bring
it back a little bit, so it eases a little bit more, he's going to bring
it over quickly. Then this other
foot, same thing. I'll just do that very quickly. Take that final foot
position in whoops, translation and rotation,
right there all those. Take that key, find
out where to plant it. Maybe a frame or two after the other
foot is planted down. Get rid of that key here. He'll go like that, and he'll almost kick one feet
out from the other. He's not actually kicking it. I've added the idea that
he comes down on one leg, he shifts his weight
to the other, he jumps up a little bit, and he brings that next foot into position so he
can step with it. Then the other foot will
also step, and he compress. Hopefully, this
process has showed you that you should not be afraid
to break things apart, move things around,
just try stuff, make changes, save often, and save incrementally
but at this point, the animation should start
to look pretty complete. If you've gotten to a point
where you're happy with it, and you can't really think
of anything else to add. Once again, this is a great
opportunity to get feedback, to see if there's anything that someone notices
that maybe you're blind to or you're numb to and staring at this for
as long as you have, you'll start to just not see it anymore and so
taking a step away, showing it to somebody else are all really valuable tools. Revel in your hard work because you did a lot to get
here. Well done.
7. Final Thoughts: Congratulations. You made
it through the class and presumably through
one of the most tedious parts of
animating a shot. This is not an easy task, it takes a lot of
time, so great job for sticking it out
and working on that. For the completed shot that
I did with the side flip, if you'd like to
see how to do the glass breaking and
all that stuff, you can check out the study
hall session that we have, that's going to
show you how to do some extra stuff that
goes beyond animation. But for now, well done
and be sure to share whatever you've created in the project gallery down below. Everyone would love
to see it. Thanks for tuning in, I'll see
you in the next one.
 Sir Wade Neistadt, Animator, VFX Artist, Creator