Transcripts
1. Welcome and Introduction : Hi, everyone, and
welcome to my new class, meaning strawberry tree, a 14 a food
illustration challenge. In this class, we will
painting a collection of 16 strawberry food illustration, 14 mean project and two
bonus illustration. Each painting in
a small, vibrant, colorful and designed to
be simple and enjoyable. All the lesions are
taught in real time, so you can follow
along step by step. Most of the illustration
take only five to 8 minutes, making this challenge
perfect for breeding a daily creative habit
without feeling overwhelmed. For supplies, we will
keep things very simple. You will only need
watercolor paper, basic watercolor paints
and few small ruses. We'll be starting
with the basics. I'll be showing you how you
can create different kind of cakes and slices and few additional elements
that we'll be using, as well as how you can
create strawberry easily, small and mini strawberries. Hi, Edwin, my name is Michelle. I'm an artist from India
and a skill set teacher. I teach easy and approachable
classes in watercolor, gaze, oil, piston, and
food illustration. You can find more of my work on my Instag and I'm on YouTube. For this class, we will be
starting with the basics, creating simple cake seeps
and working with perspective. Then we'll move on to adding details like
strawberry toppings, jams, whirls, jam layers,
and colorful plates. I'll also show you how to paint
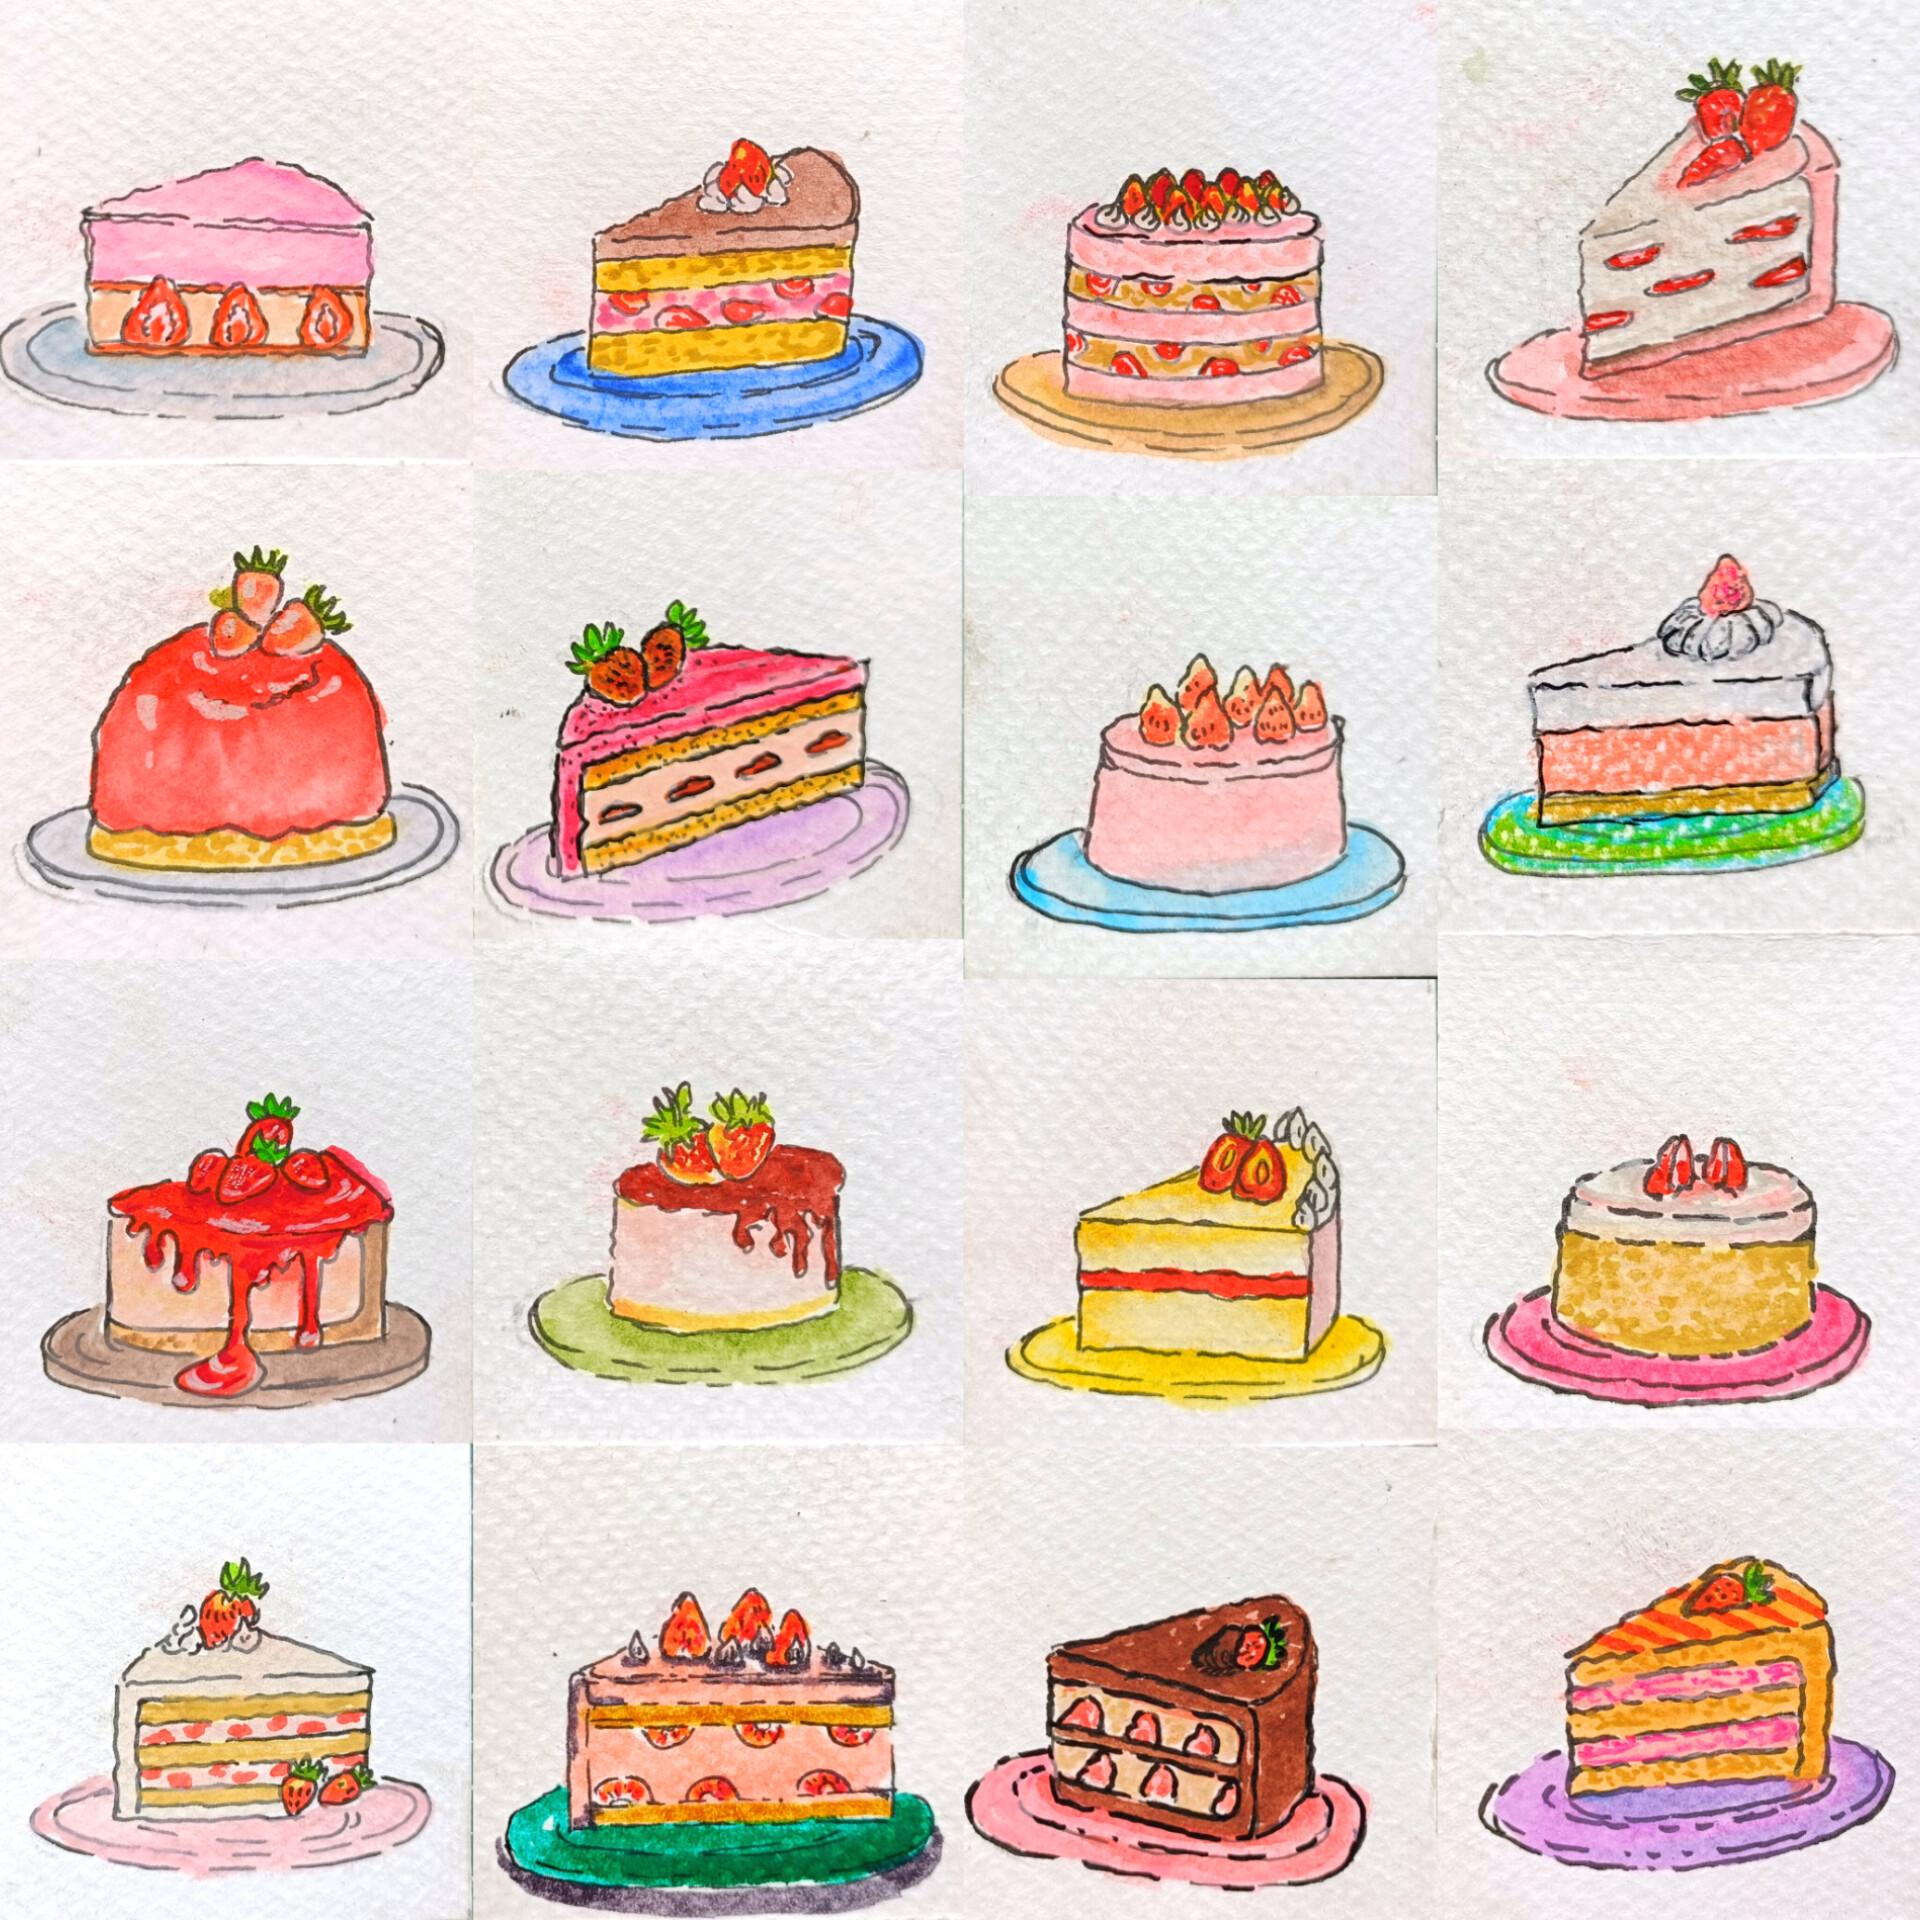
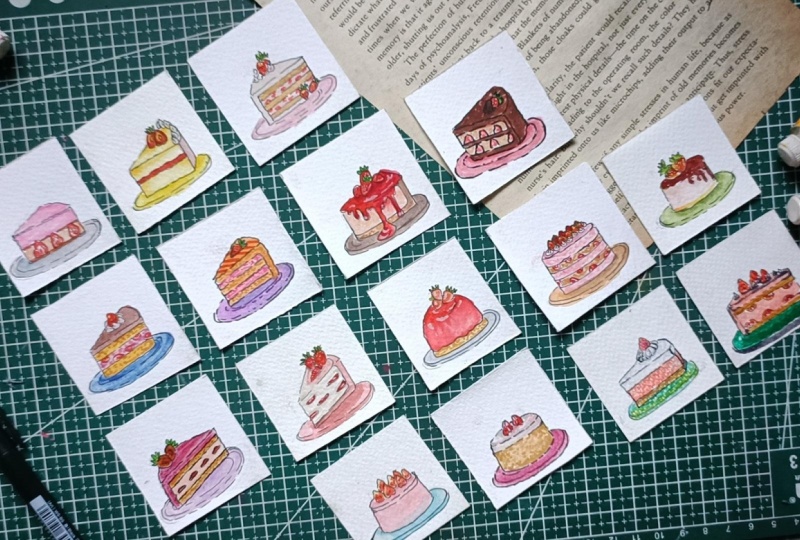
small strawberries easily and how to layer watercolor to create soft vibrant effects. So these are all the
16 illustration, mini illustrations that
we'll be creating. To keep the more simpler, I have divided the class
into four sections. The first section will include four simple illustration
to build your confidence. The second section includes five slightly more
detailed cakes. The third section includes five more decorative
and layered trees. And finally, we will finish
with two bonus projects. This class is very
beginner friendly. So if you love skewed desserts, quick watercolor projects, and building a daily
creative routine, join me in this class,
and let's paint this beautiful ministra where it treats together and
have lots of fun. I'll be uploading a
project each day, so join me, and I'll be
seeing you inside the class.
2. Class Project : For your class project,
you will complete the 14 day ministraby
treat challenge by painting one small strawberry
cake illustration each day. We'll start with a simple sap to help you understand
proportions and layering. As the challenge progresses, you will add more details
like strawberry toppings, jam layers, and cream swirls. Each illustration is designed to make quick and manageable, usually taking around
five to 8 minutes. The goal for this project is to build consistency
and confidence. Focus on keeping your
seeps clean and balanced, practice smooth
watercolor layering, add small details that
make each cake unique. You are welcome to follow
my exact colors or you can create your own variations to make your cakes more personal. At the end of the challenge, upload your favorite
pieces or a collage of your full 14 day collection
in the project gallery. I would love to see
your progresses and how you interpreted
each design. Remember, this
challenge is about sewing up daily and
enjoying the process. So join me in this
class and let's paint some sweet and colorful
treats together.
3. List of Supplies : For this class, you may
mean very basic supplies, pencil and a result to
do the basic pencil is sketching, then
watercolor paper. In here, I'm using three
ended GSM eight site paper, tissue paper, it
will come handy to absorb the water and to
remove excess of color. Watercolor. In here, I'm using
Camel's art is watercolor. Brush pin or fine liner
to do the outlining. Watercolor brushes, and small
brushes will do the work. Jelly pen if you want
to add highlights, or you can use
saturated watercolor, saturated white watercolor. So these are all
the basic supplies that you will be
needing for this class.
4. Shapes and Perspective : Let's continue
where we left off. In here, we'll be doing
the inking and outlining. Apart from doing the outlining, I'll also be adding
a little bit more detailing for the slices
that we have created. So first, we have
got this kind of bit rectangular or you can see square like C for
our first slice. You can just divide it
into a different section. So in here, we have got
layered slice of cake. I'll also be using this kind of illustration for
one of the project. Next, for this slice, let's make it a little bit more cavier this is our
simple slice of cake, once again, dividing into three different section
for the third one, making a little bit of cheese. Now, for the remaining section, doing the outlining for
the rectangular seep. So this is a little
bit different from the two slices
that we created. Strawberries present
in here at the bottom. Now for the fourth one, making it a little bit more curvious. Doing the outlining like this
for the remaining section. It's a strawberry at top and a little bit more
detailing in this manner. Next, we have got
full cake like this. Let's do the outlining. So we have got larger
surface area for the top. Sometimes I'll be creating
this kind of bed curvy lines and other times I'll be creating simple plain
and normal lines. Going over the outline the divides the cake into
different sections, doing the same thing on the
upper part, the top part. For this kind of cake, we'll be adding lots of
strawberries at the top. I'll also adding jams or other additional aliment
for some of the project. Now for the slices of the
cake that we have created, just doing the simple
outlining in this manner. For this one in
here, we have got three layered slice and toppings of the strawberry in the middle. Here's another one, just
simply doing the outline. You can experiment on
your own and create different kinds of layering and add strawberries at
different positions. And apart from that, you can also use other
additional elements. We'll also be creating multi
layered slices like this. Here's another example
of multi layered slice. Let's divide into five
different sections. For two of those sections, I'll be adding small
strawberry slices inside the lay like this. Now we have got
two more example, two slices in here that
are lying in this panel. I made a little bit of
changes to the pencil and sketch to make it a
little bit more coherent. Now for the last one, the last slice that
is lying in here, simple outlining in this manner. And finally, the
pudding king that we'll be creating
just simple ovale, simple, semi oval sap
or semicircular sap. Just like this. These are some of the cakes
and cake slices that we'll be creating
in our project. We'll be making a little bit
of changes and adjustment, but you've got the rough
idea who can easily gred different slices and different cakes in different perspective. So yeah, let's grease it. Apart from this, I
would recommend you to practice on your own with different perspective and style, as I mentioned
earlier, and I have also included one more
additional practices. So that's all for this video, and I'll be seeing
you in the next one. But
5. Inking and Outlining : Let's continue
where we left off. In here, we'll be doing
the inking and outlining. Apart from doing the outlining, I'll also be adding
a little bit more detailing for the slices
that we have created. So first, we have
got this kind of bit rectangular or you can see square like C for
our first slice. You can just divide it
into a different section. So in here, we have got
layered slice of cake. I'll also be using this kind of illustration for
one of the project. Next, for this slice, let's make it a little bit more cavier this is our
simple slice of cake, once again, dividing into three different section
for the third one, making a little bit of cheese. Now, for the remaining section, doing the outlining for
the rectangular seep. So this is a little
bit different from the two slices
that we created. Strawberries present
in here at the bottom. Now for the fourth one, making it a little bit more curvious. Doing the outlining like this
for the remaining section. It's a strawberry at top and a little bit more
detailing in this manner. Next, we have got
full cake like this. Let's do the outlining. So we have got larger
surface area for the top. Sometimes I'll be creating
this kind of bed curvy lines and other times I'll be creating simple plain
and normal lines. Going over the outline the divides the cake into
different sections, doing the same thing on the
upper part, the top part. For this kind of cake, we'll be adding lots of
strawberries at the top. I'll also adding jams or other additional aliment
for some of the project. Now for the slices of the
cake that we have created, just doing the simple
outlining in this manner. For this one in
here, we have got three layered slice and toppings of the strawberry in the middle. Here's another one, just
simply doing the outline. You can experiment on
your own and create different kinds of layering and add strawberries at
different positions. And apart from that, you can also use other
additional elements. We'll also be creating multi
layered slices like this. Here's another example
of multi layered slice. Let's divide into five
different sections. For two of those sections, I'll be adding small
strawberry slices inside the lay like this. Now we have got
two more example, two slices in here that
are lying in this panel. I made a little bit of
changes to the pencil and sketch to make it a
little bit more coherent. Now for the last one, the last slice that
is lying in here, simple outlining in this manner. And finally, the
pudding king that we'll be creating
just simple ovale, simple, semi oval sap
or semicircular sap. Just like this. These are some of the cakes
and cake slices that we'll be creating
in our project. We'll be making a little bit
of changes and adjustment, but you've got the rough
idea who can easily gred different slices and different cakes in different perspective. So yeah, let's grease it. Apart from this, I
would recommend you to practice on your own with different perspective and style, as I mentioned
earlier, and I have also included one more
additional practices. So that's all for this video, and I'll be seeing
you in the next one. But
6. Additional Elements : Let's continue on for
the demonstration video. And here, I'll be showing
you how you can create various elements that we'll be using for our cakes and slices. But the strawberries,
we have got very simple triangular splines. Here's an upright triangle
for upright strawberry. And here's for a slanted one. Now, let's make it a little
bit more detailed using this kind of line and giving
it a little bit more volume. In this manner,
we'll be creating very simple strawberries
for our project. So you have got the
idea how you can easily create strawberries
in this manner. And to give it a little bit
more three dimensional look. So let's make another
strawberry like this, and we'll be doing the
coloring in this manner, following the curved seek, the curve contour of
the strawberry to make it look a little bit
more three dimensional. As for the upper part, the
leaves and strawberry, this simple four or five lines, simple four or five brushes
strokes to create it. So here's another one with
the leaves on the top. Apart from single strawberries, we'll also be creating
multiple strawberries. So let me show you two examples of a set
of two strawberries, changing the direction
of the strawberries in this manner, and
this is the second one. Here's one example, and
this is going to be the second So two strawberries
just side by side like this, one lying behind the other,
and this is the second one. Just simple outlining
like this for the leaves. Apart from the
whole strawberries, we'll also be creating
slice off section. So let me show you some
examples of those. For the insights,
I'll be creating this kind of simple
elliptical seed, and we'll be using
lighter shades of the colour to do that detailing. Here's another one with
the leaves on the top, so sliced off portion
of the strawberry. And as for the swirls and
the cream on the top, just simple saves like this, since this will be quite small, so we won't be creating
detailed version. Here's another example. Mostly we'll be using
very simple seeds to create the toppings and
the swirls on the top. Let me so use a
few more examples. So here's another one. This is a little bit of
triangle seed like this. For one of the project, I'll
be creating this kind of top Apart from that,
we have got one more. Just simple tear drop like, a little bit more
curve tear drop like for the top
for the toppings. Now, let me saw
some more example of the strawberry mini treats or different kinds of
cake and slices with toppings and jams and
strawberries at the top. In here, we have got this
rectangular slice of cake. This is multi layered,
the strawberry on top. Here's the kneaded slice. Adding the strawberry with
two strawberries in the top, and there's jam in here. This simple outlining
like this for the jam. Here's another
one, circular one. So jam on the side. And as I mentioned in
the earlier video, we'll be making it a
little bit more longer. So this is how we'll be creating the simple, smaller whole king. As for the plates, just simple
two elliptical seep like this and a pudding
king on the top. Adding a strawberry in here. So this is how we'll be
creating simple plates. And if you want to make it a
little bit more interesting, you can create multiple
slices of the key. Here's some examples. So these two slices are facing
in opposite directions. Let's create one more in here. I won't be creating this kind of multiple slices of the
**** in our project. If you want to do that, you
can proceed with it, too. And here's the plate, simple
eptical shapes like this. Now let's do the outlining using the fine liner,
do the outlining. As for the strawberries, I'll be adding this kind of
details, simple lines. Simple, small lines or you can say simple small dots to add the detailing for
the insights of the strawberries,
the outer layer. So for all the project,
I'll be starting with the basic pencil sketch
using simple sieves. And then we'll be
redefining and adding a little bit more details
using the fine liners. You don't have to
stick with the pencil outlines that you upgraded, feel free to make changes
in adjustment to it. As required, I'll be
making some changes and adjustment to the outlines
that we have created. For now, continue on
doing the outlining for all the strawberries and other additional elements
that we have created. Mostly we'll be starting with the lighted seeds of the
color to the strawberries, and I'll be using two or three seeds of the
colour to do the coloring. For the lighter sets
of the strawberries, I'll also be using a little
bit of yellow and pink color. For the darker seds, I'll
be using mostly dark red, and if required, a little bit
of brown or burnt sienna. Simple outlining like
this for the leaves. We won't be making it
detail, but if you want, you can also create multiple
mid rips in the veins for it using two or three
seeds of the green. Mostly, I'll be
using only two sads. So here's the simple
outlining for the two sets of
strawberries in here. This is another way in which you can create the
leaves on the top, a little bit simpler
version of the leaves. Doing the outlining
for another set of the strawberries in here. So as I was mentioning,
as you can see here, I made a little bit
of adjustment to the outlines that I did
with a pencil sketch. So I made it a little
bit more bigger. Depending upon it, we'll be making changes to our
main project too. Now for the sliced portion
of the strawberries, This kind of bit elliptical
seeps for the inside, and we'll be using lighted seats of the
color for the insides, too. Here's another one. Simple outlining like this for the leaves and for the insides, simple seeps like this. In here, mostly we'll be using
lighted seats of the color for the insides and bit darker seats for the outer regions. And here I decided to show you one more example of the
strawberry with the jam ertp. Chocolate jam in here on
top of the strawberry. For one of the project, we'll be adding the jam on top like this. Now for the remaining section, simple outlining like this. To give it a little bit of rough texture and a little
bit of characteristics, I'll be using this kind
of bit broken lines to do the outlining and this kind of little bit larger
and smaller lines. This one bit of broken lines. Now for the third
one, apart from this, if you want to add more
additional elements, feel free to do that. You can include this in
your practice session. Yeah, with this, we are
done with all the toppings. Now let's do the outlining for the three slices of
the cake in here. I won't be adding any layers
or detailings for this one. But if you want to experiment,
you can proceed with that. You can add multiple
layers and add toppings. The third and the
final one in here. Now for the plate, simple
outlining like this. For some of the plates,
I'll also be using this kind of broken lines
to do the outlining. For others, I'll
be just creating simple and plain lines,
curve plain lines. Adding the plate
for this one, too. Now for the slices of the
cake that we have created, Mostly we'll be creating very small versions of
the strawberry. I'll be using A
eight sites paper to create all our projects, and I'll be uploading
one project each day. Now, for the remaining
three slices, for two of the project,
I'll be adding the jams. For the jams, mostly, I'll be using darker
seeds of the color, red, chocolate brown or other
darker seeds of the colour. I'll also be using
a little bit of white to add highlights
and reflection for some of the glossy surfaces of the cakes and
the cake slices. Now for this cake in here, the whole cake, a little bit of larger riddles of
the jams, like this. The outlining for the
remaining section. This is going to be
three layered cake, and for the pudding
cake in here, semicircular seep like this, Strawberry at the top. Simple outlining like
this for the plate. The plates that we'll
be creating won't be that much detailed
since we'll be creating very small plates and our main focus will be
the strawberry treats. And yeah, this is the
simple outlining for all the additional elements
that we'll be using. Let's add few strawberries
in here at the top. So we have got slice of porton of the strawberries
for this one. Adding a little bit more
detailing for some of them. This one, too, I decided to add more details
for the strawberry. And now let's erase
the pencil sketch. So this is how this turned out the outlining for all the
aliments that we have created for the pudding kicks in here
to give it a little bit of more three dimensional
look using this kind of cartoon lines and
adding it in this manner. So that's all for this video. And if you want to include more things in your practice session, feel free to include them. And yeah, I'll be seeing you in the next section with the
coloring of the strawberries.
7. Watercolor Strawberry : Welcome to the final part of the demonstration venue in here, I'll be showing you
how we'll be doing the coloring for
the strawberries. Creating basic outlining
for the strawberry seeds. A total of five
strawberries in here. For the first one, just using
a diluted consistency of the using a very
diluted consistency of the red to do the coloring, we have got a little bit
of darker side of the red on one side and the remaining
section is a bit lighter. For the second one, let's
use two color combination, yellow and red, and let's mix the two colors
in here using water. The two color soil mix on
its own because of we on weight technique and create a subtle gradient in
between orange and the red. So this is another way in which we'll be doing the coloring
for the strawberry. For the third one, use darker
consistency of the red. And then use lots of
water to spread it. Just reducing its intensity, the upper part will be darker, and as we move away, the intensity will
be decreasing. For the fourth one, making
it a little bit pinkies. So start with the pink color on one side and the
red on the other. And once again, using
water to spread the color. The third and the fourth
are quite similar. Now for the final strawberry, starting with the
pink, spreading the color a little
bit like this. So this will be the sliced
portion of the strawberry, doing the outlining using
bit concentrated grain. Bring small streaks
like this in this man, a little bit of
red for the side. So this is how we
doing the coloring for the slice of strawberry. We'll be making them
a little bit detail, but this is just
a rough example. Now let's do the
coloring for the leaf. Mostly, I'll be using one
or two sets of the green, and we'll be creating
very simple strokes like this to do the
coloring for the leave. You can also use a combination of both lighter and
darker seats of the green to make
this a little bit more colorful and more dramatic. You can also play with the consistency of the
green like this, a bit thicker consistency
of the green, and you can add stems
in this manner. As for the two colors
that I was mentioning, using a little bit
of darker side of the green and overlaying
it on the lighter side, the two colors will mix on its own because of weight
and weight technique. And let's add a little
bit more detailing for the strawberries for the
seeds of the strawberries. The simple dots using a bit darker consistency
of the red in this manner. Apart from red, I'll
also be using white and yellow if required
for this one, doing a little bit of coloring in here to make this
region a bit more darker. Spread the color a
little bit more with the water to get a subtle gradient in between
the pink and the red. Here's another example
of the leaves. So in here, I'm using a
bit thicker consistency of the green and creating this kind of small stros to
do the coloring. The project will be a
little bit different since we have the outline
with a fine liner, so we don't have to do
the coloring directly, but we'll have to
just feel the color for the insides of
the outline section. Wait for the greens to dry a little bit and then add
another layer on top of it. Till it dries, let's
add a little bit more detailing for the
middle strawberry in here. So using a little bit
of white mixed with the pink to create the set
to create the seeds in here, simple small dots like this, a little bit of detailing
for the leaves too. You can just create
smaller strokes like this for the detailing. The green that we used here
has dried up somewhat, so using this darker
side of the green and is overlying smaller
stroke in this manner. Also using this to redefine
the sees a little bit, making them a little
bit more sharper. So this is another way
in which you can do the colouring for the
leaf and the strawberry. And as I mentioned, the
project will be a little bit different since we'll have
the fine liner outline. You can also add the
stems in this manner. This is how we'll
be basically doing the coloring for our
strawberries and the lean. The strawberries in the project will be more simpler
and more easier. I'll be seeing you in the next video with our first project.
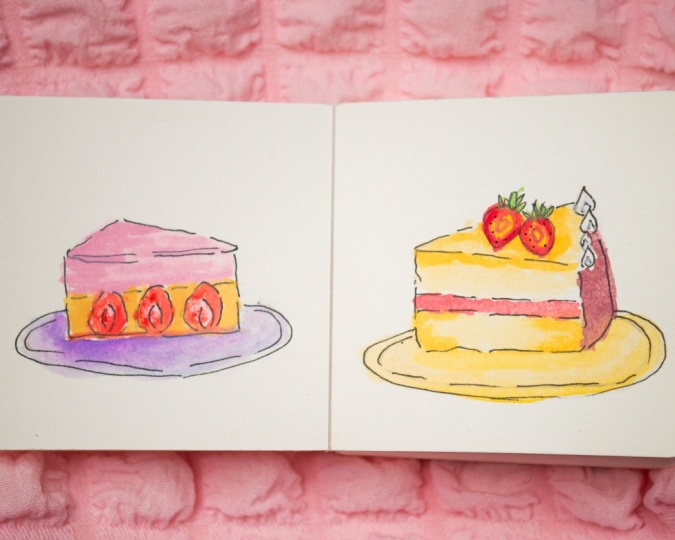
8. Golden Strawberry Slice : Welcome to the first project
golden Strawberry slice. So let's start with a
very simple sketching. Here starting with
this horizontal line to determine the
length for our slice. Converting the seep into
simple rectangular sp. Giving it a little
bit of perspective by changing the angle
like this a little bit. For the upper side,
simple triangular C, for the side extending this
like this, for the side, extending it like this, a
small strawberry at the top, frostings in here, three
or four frostings in here. Let's add one more
strawberry in here. This will be the
sliced strawberry. This is going to
be three layers, so this will be
the middle layer, elliptical see for our plate. And with this, we are done with our simple pencil sketching. Now let's do the
outlining in here, going in with a fine liner, starting with a simple
triangular steep like this. Make the outline a
little bit uneven. Small leaves at top. Both the strawberries
in here at sliced top, small elliptical sves for the inside, and now
for the frosting. In here, I decided to create multiple smaller
frosting on the side. This is optional. If you want to keep it plain and simple, you don't have to add the
frosting in this manner. You can just keep it simple. Now outlining the upper
part of the slice. Making it a little bit more uneven with this kind
of bit curvy lines. Now, let's do the outlining
for the remaining section. Using this kind of
broken line to add a little bit of characteristics
to our painting. I decided to make
this middle portion a little bit smaller, so decreasing the width, doing the outlining
on the other side. And finally, let's do the
outlining for the plate. Simple elliptical
seep like this. And in here, once again, I'm using broken lines
to do the outlining. Instead of using
the broken line, you can always use the
plain and normal lines. I decided to add one
more frosting in here. This is our first outlining and sketching for the
strawberry treat. Uh, let's do the coloring. Mostly, I'll be using very
lighter sets of the color for the steaks and slices
for the strawberries, I'll be using darker seed. In here, I'm starting
with the cambio jue for the strawberries
first layer. Now, once again, using more cambo juice for the upper part. As you can see, I'm not
covering the entire section. I'll be creating a gradient by spreading the color later on, adding it on the layers to the
upper and the lower layer. Adding a little bit
more in the strawberry. Now, let's spread the colour to decrease intensity and
create a subtle gradient. In here, I'm just simply
using water and spreading the And when this dries up, it will lose more
of its intensity and will become more lighter. For the side in here,
I'm using burned sienna. Very watery consistency of
the burned sienna in here. Enough for our strawberry, a little bit of wet
and wit technique, using a little bit
of red in here. The two color will
mix on its own, a little bit for the
middle section tube. Since the earlier
layer of the GMU ju that we used has not dried up, the two color will mix
on its own and create a very subtle gradient in
between the two colors. Instead of it, if you want, you can also use a little bit of pink to make it more lighter and make the gradient
more subtle. A little bit of green for
the leaves at the top. A little bit of green
in here for the leaves. As for the plate in
here, once again, I decided to use the camel hue. Feel free to use
any other color. Here, too, I'll be
extending the color a little bit by using
water to spread it, going in with the water
to spread the color. Creating subtle gradient by spreading the color like this. We'll have to do
the coloring for the middle layer
and the frosting. The middle layer,
I'll be using red. As for the frosting. In here, I'm using a little bit of gray, a very watery consistency
of the color. I added a lot of water with the gray to get
this consistency. Now for the middle layer, using the red for
the middle layer. In here, I did not
use that much water, a bit concentrated red
for the middle layer, making the outlining of the strawberries a
bit more darker. And with these, we had done with our first strawberry,
golden strawberry slice. I hope you enjoyed
painting this. This was quite simple
and easy to create.
9. Vanilla Berry Classic : Welcome to Vanilla
Berry Classic project. Let's start with a simple kit, starting with the
horizontal line to determine the width
of our slice. Let's convert this into
a rectangular seam. A simple rectangular sap of this length and
width in here, creating curved line on the side and converting into
a triangular sea for this bicuating
a single strawberry in here with few
frosting on the sides. Apart from that, I'll also be adding few strawberries
at the bottom. This is going to be our
first multi layered slice. So a total of four or five
layer in this manner. Now creating small
strawberries at the side and creating the
outlining for our plant. Feel free to make changes to the
seeds in the sides as well as the
perspective of the slice. You can do the same
with the strawberries. You can increase or
decrease the numbers. Let's do the outlining,
going with the fine liner, creating this kind
of small resemblance for the frosting on the side. The simple seeps like
this for the strawberry, adding leaf in this manner. A little bit of detailing with few simple lines like
this for the upper part, a bit of uneven lines like
this to do the outlining. Outlining the two
strawberries in here, adding small leaves
in this mandel. And now put all the
layers in here. For the inside, I create
a total of five layer, and for two of the
middle layers, I'll be adding a
little bit of red to so some of the strawberries
presented in that layer. Finally, doing the
outlining for the pret. Just simple broken lines. This is our simple
pencil sketch and outlining for the
Vanilla Berry Classic. Let's slightly erase it. Before erasing so that
the ink has dried up. As for the coloring, I'll be
keeping it quite lighten, adding a little
bit more detailing for the strawberries
with the fine liner. Mostly, I'll be using
lighter side of the pink, a little bit of red,
and ochre or Cambou. Starting with the
pink at the top, where lighter side of the pink. I used a lot of water
and mixed a bit of white to get this lighter
side of the pink. Upper part and for the
top and the bottom layer, completely filling
it with the pink. Now for the plain, a little
bit of saturated pink. So in here, as you can see, I used a bit less water, and I did not use white in here. Simple plain pink
with less water, spreading the color
a little bit. Using a bit of
water and spreading the color for entire
section of the plate. Now for the layers,
as I mentioned, using ocher for the first layer, first, third, and
the final layer, completely fill it
with the ocher. If you want to create texture,
you can do that, too. You can add small
strokes on top of it when this dries somewhat. Now for this middle layer, the two middle layers
in between the ocher, the same consistency of
the pink that we used earlier for the top and the
bottom and upper layer. As for the strawberry,
starting with a lighter seed a little bit
of lighter seed of the ocher. For the leaf, I use a
little bit of more green in here. Spreading the color. A little bit of green for the small strawberries
at the bottom. And finally, for the strawberries,
bit concentrated red, adding it carefully beside
the frosting we have created, doing the same thing
for the remaining two strawberries at the bottom. The two colors will
mix on its own because the earlier color that we use
does not dried up properly, and it will create
a subtle gradient. And as I was mentioning
the ta creating small pieces or resemblance
of strawberries in here. So this small pieces
in this manner. Here, too, it will spread a little bit as the earlier layer, the earlier layer with the
light pink has not dried up. I am not going to
do the coloring for the frosting,
but if you want, you can use lighter shade of green or other s colours to do the coloring
for the frosting, using a bit darker side of
the green for the leaves. And with these wee turn with our second project,
Vanilla Berry Classic. I hope you enjoyed painting
this simple and easy project, and I'll be seeing
you in the next one.
10. Blush Berry Slice : Welcome to Blush
Berry Slice project. Let's start with a
simple pencil ski, starting with the
horizontal line to determine the width
of our slice. Now converting this
into a rectangular sap, another triangular
save at the top. This will be two layered
slice and we'll be having three sliced off strawberries in here at the bottom layer. Simple triangle seep in this
man for the strawberries. This will be the bottom layer. And finally, creating the
outlining for the plate, simple elliptical save with
this kind of outlining. I'm not going to add
any strawberries frosting or detailings
on the top, but if you want,
you can do that. Doing the outlining
using the fine liner. For most of the project,
I'll be mostly using this kind of uneven lines
to do the outlining, doing the outlining
for the strawberries. Since these are sliced top
or bifurcated strawberries, adding detail in this
man for the science. Now for the remaining section, using a bit of uneven and broken lines to
do the outlining. As for here, just creating a very thin outlining
in this manner. Doing the outlining
for the plate, using this kind of uneven and broken lines
for the plate, too. Giving it a little
bit more volume by making the outlining a little bit more thicker and doing second layer of
outlining in this manner. And with this, we are
done with the sketching and outlining of the
blood bay slice. Now let's erase
the pencil sketch, sure that the ink has dried
up properly, otherwise, the ink will be smoged all over the paper, and we
don't want that. For this, we'll be using
two layers of the coloring. I'll be starting with the
lighted seed and then making it a bit darker by adding another
layer of the color. For the top, I'll be using pink. For the bottom, I'll
be using ocher. And as for the strawberries, we have got red and pink, starting with the lighted
seed of the pink in here, pink with lots of water and completely filling
the upper section. So a flat as in
here with the pink. For the insides of
the strawberries, just adding a little bit
of pink in this manner. Now let's make it a bit darker, so a bit saturated
consistency of the pink, and I'm not going to add
it for the entire section, just for the sides and
just for the sides and for the outline region to create a subtle gradient and making
these regions bit darker, spreading the color
in this manner. So we have got somewhat of uneven distribution of the darker side of
the pink in here. As for the layers,
I'm using ocher and I mixed a little bit of white to get the light side of the ocher. This is comparatively thicker
consistency of the color and carefully filling it for the entire section
for the second layer. Bring it for the bottom in the upper layer in this manner. Now, going in with the red, do the coloring for
the strawberries. Creating this kind
of texture line and creating small streaks with
the red in this manner, a little bit of red
for the inside. Just create simple
elliptical s for the inside. Do the same thing for the
remaining two strawberries, the outlining, small
streaks in this manner, add a little bit of red for the inside elliptical sal
For this middle layer, a little bit of red for
the bottom layer too, overlaying it overlaying
it on top of the ocher. We'll be making the
strawberries more darker later on, Ma. Let's do the coloring for
the plate that we have. Using a little bit of gray, completely filling the
entire section with this gray, spreading the color. You can use any
color for the plate. You can also depict
a little bit of sado you can create
pattern on design, feel free to experiment, making it a little bit bluey, a little bit of blue beside
the slice on one side. The two colors will mix on
its own since both are wet. Now as I was mentioning, making the strawberries bit darker, another layer of
right on top of it. Doing the same thing for the
upper and the lower layer. A little bit for the inside too. And with this, we are done with another simple project,
less berry slice. I hope you enjoyed painting, and I'll be seeing you
in the next project.
11. Rosy Layer Delight : Welcome to Rosy Layer
Delight project. Let's start with a
simple pencils sketch, starting with the vertical line for the length of our slice. Now let's create
a rectangular see following the perspective. So it's meant a little bit. Now, a triangular seep in here, a little bit curved at the side. And here, I'll be creating a
total of three strawberries. One will be sliced off and
other two will be whole. You are free to train
the seeds sages, as well as the placement
of the strawberry and the perspective
of the slice. Adding the outlining in this manner on the side
and at the bottom. For this slice, I'll be adding a few strawberries
in the middle. So small portions of the
strawberry like this, a total of five And finally, doing the outlining
for the pretty simple elliptical seep in this manner. So this is very simple sketch
for Rosy Layer Delight. Now going in with a fine, I
need to do the outlining, mostly using this kind of broken lines to
do the outlining, cutting small leaves at the top, adding a little bit of detailing in this
manner for the inside, the sliced off portion
of the strawberry. Now continuing on with doing the outlining for the
remaining section. Using this kind
of uneven line to give it a little bit of
more characteristic. Instead of this, if
you want, you can always use plain
and normal lines. Now doing the outlining for
the strawberries in here. If you want to increase
or decrease the number or increase or decrease
the seeds in the sizes, feel free to do that. And with these, we are
done with the outlining. I decided to add leaves
for another one, two, simple four or
five leaves like this. And finally, doing the
outlining for the plan. In here, I'm using this kind of broken line to the outlining. And with these, we are done
with a simple sketching and outlining for
rosy layer delight. Lightly raise the pencil marks. In here, I'm starting
with the pink, pink for the middle section, the sliced off portion
of the strawberry, the sliced off strawberries, a little bit of pink like this. Also adding a
little bit of pink, very small streak of the pink for the strawberries in here, a tiny bit of pink
in this manner. In here, I mix a little
bit of white with the pink to get the
shade of the color, adding it just beside
the strawberry, a little bit for this layer, beside the strawberries
that we have added. Now, I'll be adding the
water to spread it. Using water and spreading the color to cover
the entire section. Sections where we add the
color is a bit darker, and the remaining
section where we are spreading the color
is a bit lighter. We have created a little
bit of subtle gradient. Instead of this, if you want, you can use other colors. You can also lay more
color on top of it. But I decided for the
first four project, I'll be keeping
it quite lighter. Now for the layer, just
simply using brown, a bit diluted consistency
of the brown, so I added more water to it. Instead of it, if you want, you can always use
more concentrated form to brown in here
Android on this side. A little bit of red
bottom section two. As you can clearly see it's very diluted form of the color. Using a bit saturated
color with less water red in here for
the strawberries. Just adding it near
the outline section. Earlier for the strawberries, I added pink, but I'm not covering the
entire pink in here. And with these, we are done with the five strawberries in here, for the strawberries at the top, creating small brush
strokes in this manner to create a little bit
of textured strawberry, adding it for the
second one in here, creating these kind of streaks
for the middle section. Now for the final one, I'm not going to cover
the entire section, just creating small
streaks in this manner, particularly on one side. Now, using a little bit of water and filling the
remaining section, a little bit in here
for this one, too. And with this, we are done
with the strawberry for now. As for the bleat, I
decided to use red, a bit diluted
consistency of the red, making this a little bit
darker, just below the slice. Now using water to
spread the color. Moving on to the leaves,
using a little bit of green. Using a little bit of green in this manner for the
two strawberries. Making it a little bit more
darker by using burnt sienna, so sadocast it by the slice. And, yeah, with this, we are done with the
coloring for our plate. As for the strawberries, a little bit of water
to spread the color a little bit more put
some of the sections, and extending a little bit of this red color in here
to cado casted by the strawberry and a
little bit of reflection caused by the
strawberries making this region a
little bit pinkies. And with these, we are done with yet another simpler project,
Rosy Layer Delight. I hope you enjoyed painting this and I'll be seeing you
in the next project.
12. Blush Berry Bliss: Welcome to the Blass
berry Blize project. This is the first project
of the second part. For all the project in here, we'll be creating
the whole king. Starting with the
horizontal line to determine the
length for our king, feel free to make it
more longer sorter. So as you see fit, creating curved outlining in this
manner for the bottom. Simple elliptical seep
like this for the plane. Now for the top, another
elliptical sep in this manner. As for the top, I'll be creating multiple strawberries in here. You can increase or decrease the number of the strawberries. You can change ear
placement and the position. You can do the same thing
for the plate and the K, feel free to change perspective, make it a little bit
more longer, sorter. You are free to
experiment on your own. But this is going to be a
simple pencilske for it, going in with the fine
line to do the outlining. You don't have to stick with the pencilske that you have created. Feel free to make
changes and adjustments. In here, I'll be
creating a total of seven or eight strawberries
in this manner, adding a little bit
of detailing in this manner with the
small tiny lines. Now let's do the outlining
for the remaining section. As I mentioned for
most of the project, I'll mainly using this kind of uneven lines to
do the outlining. And for some of the sections, I'll also be using a
bit of broken lines. You are free to do
the outlining in other manner using
plain and simple lines. Finally, doing the outlining
for the plate at the bottom. This is going to be
our simple minike. I won't be adding any layers. So this is our simple
pencil sketching and outlining for
the bus may bliss. Erasing the pencil marks. And now, let's do the coloring. For the strawberry, I'm starting with the lighter
sad of the ocho. Just completely cover
the entire section of the strawberries with this. So a simple flat pass
with a yellow ocho. Now, a little bit of diluted red in here, mostly at
the bottom part. To give it a little
bit of texture, look, just create multiple
tiny strokes and feel the remaining section, the bottom section with it. For some of the
strawberries at the back, I completely covered it,
but for most of them, but for most of them that are in the front or are more visible, I added it mostly on
the bottom section and lift a little bit of spices in between the
different strokes. It has dried up somewhat, starting with the lighter
side of the pink. A simple flat pass in here with this lighter
side of the pink. Now, going with a
little bit of rain. Now, we are going to spread
it for the entire section. Since we are using
lots of water, it will turn into
pinkish color like this. Instead of this,
if you want, you can always use other color. You can also lay
another layer in here. Now, as for the plate, using
lighter side of the blue in here and a bit darker side of the blue for the
remaining section, making this region bit more darker to south
the sado casted by the king Going with the water to spread the color, a little bit of lus in here, so just spreading the color in here to decrease its intensity. I hope you enjoyed
painting this simple one, and I'll be seeing you
in the next project.
13. Strawberry Mini Crown : Welcome to strawberry
meaning crown. Let's start with a
simple pencil sketch. This is going to be yet
another whole king. For this project, we'll be making it a little bit textured. So we'll be doing multiple
layerings of that color. We have got two strawberries
in here at the top. Both the strawberries
are bisected. Simple triangular
seed like this in this manner for the two
strawberries at the top. Now let's do the sketching
for the remaining section. So simple outlining in this
manner for the upper part, extending the sides
a little bit and doing the outlining for
the remaining section, making the bottom
section bit more curve. If you want to make it multi
layered, you can do that. I won't be doing it, but
you are free to experiment, doing the outlining
for the plate. Another outlining
in this manner. And with this, we are done
with a simple sketching for our strawberry
meaning crown. In here, I'm using
bras paint to do the outlining to get a
little bit of thicker lines. Since we'll be doing
multiple layer in here, Here, too, to do the outline, I'm using this kind of uneven
lines and broken lines. Instead of this,
you can always use plain and normal lines
to do the outlining. A bit of broken lines to do the outlining for the
bottom part, too. Now, finally, let's do the
outlining for our plan. A little bit of more detailing. And with this, we are done
with a simple pencil sketching and outlining for our
strawberry mini crown. Now let's do the coloring, starting with the pink for the bisacrid portion
of the strawberries, completely peeling
in with the pink. Now for the remaining section, the top using gray, creating this kind
of textured look, not going to completely
cover the entire section. Now, using the water to
spread the colors unevenly. So this is one of the way in which you can
create the texture. Now for the remaining section, I'll be showing you
another way to create the texture using ocher and completely covering
the entire section. So basically, we are doing a flat pass for the
ocher for this region. Not to give it a little
bit of texture look, just use bit concentrated color and create smaller
streaks in this manner. You can just consider it
to be strippling dots. For the lower sexon in here, I'm making the dots
quite smaller to give it a little bit more denser
look for the upper region, as you can see, we have
a bit larger strokes. Adding a little bit more
gray for the bottom section. I'm also trying to
make this region, the right side a little
bit more darker, a little bit of coloring
in this manner. And when this dries up,
we'll get a textured look. We will wait for
it to dry until it dries using this
darker set of the red. No, spreading the color, covering the entire
section with it. If you want to
create cido in here, you can use another layer of the red in here, this
beside the cake. And if you want to make
the plate texture too, you can also create small strokes on top of
the rain that we just use. Now moving on to
the strawberries. Small streaks in this
manner to create a little bit of text shade
look for our strawberry. Small elliptical
seed for the middle. I'm creating more
streaks for the inside since this is quite difficult to create smaller
streaks in here. Now, spreading the
color a little bit with water to subdue
the intensity of the ocher that we used and give it a little bit
more smoother look. And for the strawberries, too, a little bit of blending in
the color by spreading it. Giving it a little
bit of redish use the upper part by spreading
the color in this manner. I hope you enjoyed
painting this one. And with these we are done with the strawberry mini crown.
14. Strawberry Melt Magic: Welcome to strawberry
Magic Project. Let's start with the
simple pencil scheme. Starting with the set
of vertical lines to determine the
height of our cake, creating curved
see for the base, eptical seep in
here for the top. In here, I'll be adding two
strawberries at the top, and there will be
jam at the top. Simple outlining in the form of elliptical seep in
here for the plate. This is our very
simple pencil sketch for strawberry melt magic. Now in here going with the fine liner to
do the outlining, feel free to make changes and adjustment to the pencil eske. You can increase or
decrease the number and the saps on the sizes
of the strawberries, you can add other
additional elements. You can also convert
this simple cake into multi layered ke. Now doing the outlining for the top and creating this kind of simple lines
for the jam at the top. We are done with a
simple outlining for the cake now for the plate. Using this kind of broken
lines to do the outlining. Another outlining in this form. With these we are
done with outlining lightly erase the pencil sketch, and then we'll be
doing the coloring. Mostly, I'll be keeping
it quite lighter. I'll only be using darker sets
of the color for the jam. Beside it, I'll mostly
be using lighter sad. For the plate, I'll
be using green. For the cake, I'll be using a bit of ocher and pink color. For the jam, a bit darker
sets of the color. Now let's do the coloring
starting with the yellow. A simple flat pass
for the strawberry. Now for the cake, in
here, using pink. Now, we are going to
spread the color. Using water to spread the
color in this manner. So we have got darker sad
for the upper regions and for the lower regions,
we have lighter sand. Now for the nun, let's do
the coloring for the am. Using a darker sad of the red, I mixed a little bit of
bond Sienna in here. As you can see, I am using
high consistency of the color. So color with less water. And I'm going to fill this
region with this color. I'm also leaving a little
bit of small white spaces in here to sew a little bit of
reflection caused by the jam. A little bit of white spaces, as you can see, to
add more highlights, you can wait for it
to dry and then use white to add a little bit more
reflection and highlight. Now for our strawberries, so using simple red, a bit saturated
consistency of the red. And I'm going to create this
kind of small stroke to do the coloring while leaving a little bit of empty
species in between, small strokes in this manner, and I'm leaving a little bit of white species or empty species. Now, using water and spreading
the color a little bit, don't cover the entire
yellow that we used earlier. Only spread the color a
little bit like this. Using a little bit of camozio
in here for the bees. Now for the leave, using a little bit of green
in this manner, completely filling the insides
of the outline region. Finally, for the plate, once again, using green, using this olive green, Now, we are going to spread
the color using water. So the regions beside
the king bees will be quite darker to show
the shadow casted by the king and completely filling the entire
region for the plate by spreading the
color in this manner. And where these we are done
with a strawberry magic, I hope you enjoyed
painting this one.
15. Strawberry Symphony Cake : Welcome to strawberry
symphony cake jet. Let's do the pencil sketching, starting with a
simple elliptical see from the top of our cake. In here, I'll be adding
multiple strawberries. Besides the strawberries, I'll
be adding small frostings. Creating vertical
lines on the side to determine the
height for our kee. This is going to be
multi layered kick with textured appearance. A total of five
layer for this key. For the middle two layers, I'll be adding
multiple strawberries and doing the outlining for
the plate in this manner, simple Alliptical
c. So with these, we are done with a
simple pencil sketching. Let's do the outlining. Starting with doing
this simple outlining for the frosting in the front. A little bit of more
detailing in this form, simple parallelines like this. With these, we are
done with the frosting now for the strawberries, creating comparatively
larger triangular seed in this manner for
the strawberries. Another row of strawberries
in the background. Continuing on with
doing the outlining for the remaining
section of the cake. A bit of uneven broken lines like this to do the outlining
for some of the sections. Doing the outlining
for the multiple layers that we have created. This is going to be
the final layer. Feel free to make
genius and adjustment. If you want to add
personal touches and add more additional element,
feel free to do that. Now for the multiple layers in here, the middle two layers, creating this kind
of simple oval semi oval saves for the
strawberries present in here, making the outlining of
the strawberries quite darker by redoing the outlining. And finally, let's do the
outlining for the plate. As for the plate, I'll be using ocher and for the two
layers in the middle. For that two, I'll
be using ocher. Besides that, I'll
be using pink. With this, we had done
with the outlining for our strawberry symphony lightly
raising the pencil marks. Removing the erasures just. Now let's do the coloring. Starting doing the coloring
for our strawberry, a bit concentrated Cambo hue. Simply doing a flat vs for all the strawberries
that we have in here. Now let's do the coloring
for the remaining section, using a bit concentrated pink and carefully adding it
beside the frostings. Now for the layers in here, a little bit of pink in this
manner for one side only. Now, we are going to spread
the color using water, spreading the color to degrees intensity as we move
from left to right. If you want to blend it
uniformly, you can do that, too. And finally, spreading the color in here for the final layer, a little bit of pink
for the insides of this semi spherical seam
that we have in here. And with this, we are done with the first layer of
the pink for now. Now going in with the ocher. Adding it in here for the middle two layers, add it carefully. We don't want to overlay
this on top of the pink. Put the fourth layer in here, cafarefully adding the
ocher in this manner. Let's do the coloring
for the plate, and then we'll be giving it a little bit of textured look, the different
layers of the cake. Now using water to spread
the ocher in here. You don't have to stick with the same color combinations that I'm using feel free to use
other color combinations. Now it has dried up somewhat. So adding red for each
individual strawberry. As you can see, I'm only adding
it for the lower section. The colour will
spread on its own. H. A bit more concentrated red for the
strawberries at the back, completely covering
the entire section for the strawberries
at the back. Do the color in such a manner
that the two layers of the strawberries or the two rows of the strawberries
that we have created. So it be quite distinct
from each other. For the strawberries in here, a little bit of red in here, not going to cover the
entire section of the pink, small tiny streaks like this, doing the same thing in here, a little bit of red
for the inside, as well as doing
the outlining and creating tiny streaks
in this manner. And this, we are done with
the two middle layers. Now we are going
to give it a taxi en lo, starting with the pink. In here, as you can see,
this is a bit concentrated pink and just overlaying it
on top of the earlier layer, creating this kind of
smaller strokes and adding it in here randomly like
this in this manner. With this, we are done
with the pink for now, doing the same thing,
using the ocher, a bit concentrated ocher and
adding it randomly in here, not covering the entire section to give it a bit textured look. The intensity of
both the pink and the ocher that we have
used in here to create a bitter of taxed looklo will decrease a little
bit when this dries up. As for the coloring of
the frosting in here, at diluted consistency
of the gray. To create shadows,
using a little bit of brown and spreading it. And with these, we are done
with the strawberry symphony. I hope you enjoyed
painting this, and I'll sing you in the next
project. Happy painting.
16. Glossy Strawberry Dome : Welcome to the Glossy
Strawberry Dome project. Let's start with a
simple outlining for the beats of our cake. And now clip in this
kind of simple oval see, or you can say simple dome see. I'll be creating multiple strawberries at top two or three strawberry. One beside other. Now, as for the bees, a simple single layered
base like this. Let's do the outlining
for our plate. Simple elliptical
seep like this. And this is going to
be our simple pencil Skee for our project. Using the fine liner
to do the outlining. Et's do the outlining. Starting with doing the
outlining for the strawberry. The other two
strawberries in here. This is a little bit smaller, adding the leaves on the top. Now, let's do the outlining
for the remaining section. In here, we'll be creating
a little bit of highlight, so simple lines like this, uneven line in this manner. Now for the remaining section, the dome see using this kind of uneven line
to do the outlining. Now for the Base layer in here, I'll be using ochre and a
little bit of wine and finally, doing the outlining
for the plate. Another outlining with
broken lines in this manner. With these we had done with
a basic pencil sketching and outlining with a fine liner for our glossy strawberry dome. Let's lightly erase it, insert that the ink
has dried up and then lightly erase
the pencil marks. Removing the erased dust. Now, let's do the coloring. Starting with the Camughu
for the strawberries, a little bit for the insides and using the same
color for the base, decreasing its
intensity a little bit. So you can use camo hu, dark yellow or ocher
whatever you prefer. Now for the dome in here,
a little bit of pink. This region will be
comparatively lighter. With this, we are
done with the pink. Only a little bit of
pink was required. Now for the remaining
section in here, I'm using this vibrant red. So this is a little bit buttery
consistency of the red, but still it has
lots of pigment, and I'm not going to cover
the entire pink that we use, so adding it in this manner. Now using white to
spread it as well as to reduce it
intensity a little bit. I'm using a little
bit more water, as well as I'm
soaking up some of the red to degrees
intensity a little bit in this manner since
I use a bit more red to make it a little
bit lighter in here, using a little bit of
pink in this manner. I decided to cover the entire
section, the pink in here. I'll be using white to
add the highlights later on and spreading the pink in here to make the lower
region quite lighter. And finally, let's do the
coloring for our strawberries. Simple small strokes in this manner to do the coloring
for our strawberries. Not going to cover the
entire section for now. Now, using water to
spread the colors, keeping it
comparatively lighter. For the strawberries too, I'll be adding a little
bit of in lights later on. As for the leaves, using green and filling the outline
region for the leaf. Give it a little
bit of texture look using at saturated
consistency of the ocher and creating this kind of small and random strokes
for the entire section. A little bit of this for
the strawberries too. And finally, doing the coloring for the plate, using green. Using the gray to do the
flat was for the plate. Going with a little bit of pink, a saturated consistency of the pink and creating highlights for the
strawberries first. And now for some of the sections in here, a little bit of white, following the curbs to give it a little bit of reflection
or you can see highlight. Instead of the
pink, if you want, you can always use the white. As for the pink, I also
added a little bit of white. And with these, we are done with a glossy strawberry dome. This was a little
bit different from all the project we
have created so far. I hope you enjoyed
painting this, and I'll be seeing you
in the next project.
17. Crimson Drizzle Dreams: Welcome to Nimsondal
Dream Project. Let's start with a
simple pencil sketching, starting with the triangular C for the upper part of our slide. This is going to be a little bit different from all the
projects that we have created. This is one of my
favorites from this class, creating the vertical lines to determine the height
for our slice, adding the outline regions
for the side and the base. We have got multiple
strawberries in here, three or four strawberries. On the top, we'll be
adding lots of jam. So creating rough
outlining for the jam. So this is going to be the
simple sketch for our slice. Now, let's do the outlining. In here, I forgot to do the
outlining for the plate, but we'll be directly creating the plate with a pine liner, continuing on doing the
outlining for our strawberries. Simple leaves like this
for our strawberry. We have got four
strawberries in here. If you want to increase
or decrease the number of the strawberries,
feel free to do that. Mostly, I'll be creating the whole strawberries instead
of the whole strawberries. If you want to
create the slices of the strawberries, you
can do that, too. I'll only be adding the
jam beside the strawberry. If you want to add frosting
or other kind of toppings, you can include those too. So you have got lots of options, so feel free to experiment on your own and add your
personal touches. Continuing on doing the
outining for the jam, creating these
kind of bit curved and bit organic lines like this. You don't have to stick
with the outlines. Feel free to make changes
in adjustment to it. Finally, doing the outlining
for the base and the signs, a little bit of division using this kind of bit broken lines. The different layers in here. So this is going to be
our simple outlining. Now creating the plate in here directly with
the fine liner. If you are not that confident, you can start with
a pencil sketch and then go over it with
the fine liner. With these, we are done
with our simple pencil sketching and outlining
for creams and grideltrem. Insure that the ink has dried up and lightly erase
the pencil marks. Now, let's do the coloring. Starting with a vibrant tread. And for the entire
section in here, the strawberries
and the jam will be completely covering
it with this. And then here I made a
little bit of mistake. A little bit of red has come out from the outline section. We'll be trying to
rectify it later on. But for now, add it for the entire section of the
jam and the strawberries. Try to contain the red
within the outline section. As for the red that
I mistakenly added, I'll be reducing
intensity with the water and mixing it with the
colors of the layer. Doing a flat was for
the entire section. In here for the base, using a bit diluted consistency
of the Camboo hue. On the side, too, a little
bit of red is required, so I'll be adding
the red later on. To give it a little
bit of texture, adding another layer
of color in here, creating these kind
of smallness strokes to add the rough texture for it. As for the remaining section, I'll be using lighter
tone of the color. In here, I'm going to use skin color for the
entire section. Carefully adding it in here, this beside the
jams that we have. You can wait for the red to dry, otherwise, the two
colors will mix. But in here since I
did a little bit of mistake, I'll be utilizing it, the wetness of the red so that I can do a little bit of
blending like this, thus reducing the intensity of the red and creating a little bit of shader
for the jam using this, completely filling the
entire region with it, giving it a little
bit of yellowish hue, so using a little bit
of camoju like this, very lighter side
of the Cambozu Ooh. We will wait for it to dry a little bit and then
do another layer. In here, I'm using a little bit more darker side of the red, creating the sados
for the strawberries, a little bit of red
in this manner, falling the seep of
the strawberries. Now, making some of the sections of the jam a little bit darker. I using this red, more
darker side of the red, especially the tea and
drop like see of the jam, a little bit near
the outlined secon Using it to create
a little bit of detailing for the
strawberries, too. Simple small strokes like this. And a little bit more detailing for
some sections of the jam with this
darker side of the red. We're going to subdue its
intensity a little bit, so using water and
mixing the two colors, the lighter and the
darker side of the red. Here too, I made a
little bit of mistake. So you'll have to
bit causes in here. Some of the red has come out
from the outline section. And with this, we are
done with the red. Going with the green for the
leaves of the strawberry, adding it for this one, too. If you want to give it a
little bit of texture look, you can add a little bit more details for
the middle layer. As for the highlights using a little bit of wine
and creating these kind of small strokes for
some of the section to show the reflection
and the highlights, a little bit of highlight for the sides of the
strawberries, too. Small simple dots like this. Now for the upper part,
simple, small lines like this, following the currenci
of the slice to give it a little bit of highlights
and reflection. Add a little bit more for some of the other
carved sections, adding it for the strawberries. Once again, a little bit
of smaller dots like this. And with these, we are
done with our slice, jam, and the strawberries, now doing the coloring for our
play, using the raw umber. Now, let's spread the colour, using water to
spread the colour to reduce its intensity
a little bit. Stranding on the other
side with the water. Adding it carefully
near the jam, making this region a little bit more darker with this raw umber. And with these, we had done
with Crimson regal trim. I hope you enjoyed
painting this. This was one of my
favorites from this class. And I'll be seeing you
in the next project.
18. Velvet Chocolate Bliss: Welcome to Velvet
Chocolate Bliss. Let's start with a
simple pencil sketching. In here, I'll be creating a
little bit of angled slice, starting with this kind
of bit angled line two parallel vertical line
for the height of our slice. Now in here, I'll be creating a single strawberry surrounded
by lots of frosting. Simple seeds like this,
simple triangular see. Now for the other side, just extending the lines to create the curved
triangular sea. This is going to
be multi layered, so creating layers in this form. And finally, sketching out the guideline for
the simple plate, elliptical seep like
this for the plate. It's going to be
our simple pencil sketch for velvet
chocolate blush. Now going in with the fine
liner to do the outlining, doing the outlining
for the frosting in the front of the strawberry. Simple small seep like this. You don't have to
stick with the pencil sketch that you have created, feel free to make
changes in adjustment. And here I reduce the number
and assign a little bit. Now continuing on doing the outlining for the
remaining section, the upper part, the
curve triangular same. Once again, in here, I'm
using the same kind of bit uneven and broken
lines to do the outlining. Now for the different
layers in here, we have got a total
of three layers. For the middle layer,
I'll be adding multiple slices for the inside. Four or five slices like this. Continuing on with doing the
outlining for the plate, using this kind of bit
broken and uneven line to do the outlining
for the plate, a little bit of more
detailing for the plate. And with these we add with
a simple pencil esket as well as the outlining for
the velvet chocolate please. Starting with the
camo je for the top. So a little bit of camo ju
like this for the strawberry, a simple flatba using a bit concentrated camel
jeu for the layer. So the first and the
third layer in here. Extending the color a
little bit like this. A simple flat in here too. A little bit more of Cambo
juice for our strawberry. Now to give it a little bit of texted appearance here
I'm using the ocher and creating this kind
of small random strokes to give it a little bit
of texture appearance, doing the same thing in here, small strokes with this ocher, use a bit saturated
consistency of the colour to do the
strokes in here. When this dries up, it will lose its intensity a little bit, and the two will mix a
little bit on its own since the earlier layer
has not dried up properly. As for the plate in
here, I'm using blue, a bit darker side of the blue. And now using water to spread it evenly for the dissection. You can use any other color to do the coloring
for the plate. Now, to sue the cadose
casted by the slice, a little bit of more blue. Beside the slice, a little
bit on the other side too, just alongside the outline
on the right side. And with this, we are done with the coloring for our plate. Now continue on with our slice. In here, I'm using burnt sienna, a bit diluted consistency
of the burnt sienna. We are going to cover the
entire section with it. So a simple flat pass
like this for the top, as well as for the
first layer in here. Just extending the color
for the entire section, the first layer like this. Instead of this, if you want to make it a little bit darker, you can use you can use
bit concentrated color. Now for the middle
layer in here, using a little bit of
lighted tone of the pink. Let's completely fill
it with the pink, and then we'll be
doing the coloring for the strawberries
with the red. To give it a little
bit of more texture, using a bit saturated
pink in here like this, small strokes in this manner. Using a very light consistency of the pink for the
frosting in here, you can use other colors too. You can use yellow,
light blue gray. Now for the strawberry in here, using a bit concentrated red and primarily adding
it near the frosting, leaving a little bit
of yellow like this. Now for the strawberry
slices in here, just adding it beside
the outline region and a small streak for
the inside like this. Spreading the
colour a little bit more for our strawberry. And with these, we are done with our velvet chocolate blizz. I hope you enjoyed
painting this, and I'll be seeing you
in the next project.
19. Caramel Berry Dream : Welcome to Caramel Berry Dream. Let's start with a
simple pencil sketching. This slice is also
a little bit angle, starting with this
kind of angled line for the beach of our slice, two padar vertical lines for
the height of our slide. This is going to
be multi layered. Now in here at the top, creating a little bit
of curved triangular C. This is going to be
the top of our slide, extending the side
a little bit in here for the multiple
layers in here. You have got a total
of five layers. A single strawberry at the top. Only half portion of the
strawberry is visible in here. And this is going
to be our simple pencil sketch for our slice. Now let's do the outlining. In here, I'm using dress
pin to do the outlining. Once again, I forgot to do
the sketching for the plate. Later on, I'll be directly
using the Breust pin to do the outlining to do the
outlining for our plane. If you're not that confident, you can start with the pencil
sketching for the plate and then continue on doing
the outlining in here. As usual, I'm using
this kind of bit uneven lines and broken
lines to do the outlining. Feel free to make changes and
adjustment as you see fit, and continuing on for now, I'm continuing on doing the
outlining for all the layer, a little bit of detailing for our strawberry in the
form of strippling dot. Now let's create our
plate using broken lines, broken curve lines to create
the outline for our plate, a little bit more
detailing in this form. And yeah, with this,
we are done with simple pencil sketching
as well as outlining for our caramel merry drn and see what the ink has dried up and
lightly raise the pencil marks. Now, let's do the coloring, starting with the orange, using the orange for both the
strawberry as well as the top. Doing a flat pass for
the top with this color. Now for the remaining
section three add in layer three layers in here as well as the side
I'll be using this orange. Adding it in here
and in here, too. So with this, we are done
with orange for the flat one. I'll I'll be creating a
little bit of texture lo so a bit more concentrated
orange like this. Small dots, small random
strokes like this to create a little bit of rougher texture for the different
layers in here. Doing the same thing for the
upper and the side layer. Adding more texture
in this form. And with these, we are
done with the orange. Now for the two layers in
here, starting with the pink, a bit concentrated pink, add it carefully in
between the orange. Adding it for the upper layer. Here too, we'll be creating a little bit of texture and look. Reducing the intensity
of the pink a little bit by using a bit ribrus
to soak up the color. Now, to create a
little bit of texture, using a little bit of red and creating small dendom strokes in this manner to give it a
little bit of rougher texture, doing the same thing
for the second layer, small dendom strokes
with this color. And when this we are
done with the texture, on put the two layer. Let's do the coloring
for the plate. And here I'm using purple
to do the coloring. A simple flat pass
with the purple, completely filling the entire
section with this purple. Make it a little bit
darker, knee the cake, using a little bit of blue to sew the sados cast
it by the slice. Now, finally doing the
coloring for our strawberry, using concentrated bread and creating this kind of
small random strokes for the entire section and a little bit of more
detailing in this form, simple angled line like this for the entire section
at the upper part. Instead of this, if you want to create jam, you
can do that, too. You can also create other
kind of pattern or design, feel free to experiment
on your own. And lastly, going with the green to do the
coloring for the leaf. Adding a little bit of
darker side of the green. And with this, we are done with yet another simple project,
Caramel Berry Dream. I hope you enjoyed
painting this, and I'll sing in the next
project. Happy painting.
20. Berry Blush Delight : Welcome to Berry Blush
Delight Project. Let's start with a
simple pencil sketching. In here, I'm starting with a
little bit curved triangular see for the top of our slice. This slice is a little bit
angle like this in here. Now extending the lines
on both the side, vertical lines to determine
the height for our slide, another parallel line
in here for our maze. And now creating the
outline for the plane. Simple elliptical
shape like this. So this is the basic
C for our slice. In here for the top, I'll
be adding two strawberries, two simple whole strawberries. And this is going to
be multi layered. I'll be creating a total of
two or three layers in here. The two simple
strawberries at the top. Instead of creating the
whole strawberries, you can create sliced off
botin of the strawberries. You can also add frosting and
other additional elements, continuing on to create the
layering for our slice. For the middle layer in here, we have few
strawberries in here. And with these, we are done with a simple pencil sketching. Now going in with a fine liner. Let's start with doing the outlining for
our strawberries. Adding the leaves in here, doing the same thing
for the second one. Adding the leaves. Now let's continue on with doing the outlining for the
remaining section, a bit of uneven lines, a bit of uneven unbroken lines like this to do the outlining. Outlining the bees. And
finally, this side. Now put the remaining section, put the insides of the layer, continuing on with
the same kind of bit uneven lines, sometimes
broken lines. This middle layer
will be thicker. And here we have got
four strawberry slices. You don't have to stick
with the same kind of slices that I'm
creating here, you can create
other variations of the slices that we
have covered so far. Continuing on doing the
outlining for the plate in here. Using both broken
and uneven lines like this to do the
outlining for the plate. For the plate in here, are
we using purple color. Going back to the strawberries, adding a little bit of
detailing in this form, simple small lines like this. We'll be making this region
a little bit darker. And to add a little
bit more detailing, I am using the
stippling technique, creating smaller dots to add this kind of duper texture
for the different layer, mostly for the upper
and the lower layers. Just simple plain
dots like this. This will give it another layer of texture to our painting. If you don't want, you
don't have to do this. This is optional, a little
bit for the upper part too. Mostly I use this stripling dot to make some of the
reasons quite darker. Now, ensure that the
ink has dried up and lightly release
the pencil mark. Removing the eraser dust. Now let's do the coloring. Starting with the
lighter side of the pink for our strawberry, mainly focusing for the inside, middle region of the strawberry with this kind of small stroke. Now, giving it a little
bit of lighter tone, using cambzOling a little bit of this Camboji on
top of the pink. Extending the camoju
a little bit. Now, going in with the red. So we have got a
vibrant tread in here, I'll be adding it for the top, the first layer and
the side layer. Going with the water
to spread the color as well as to reduce the
intensity a little bit. You don't have to
do this. If you want to keep the layers and the upper part darker and
more dies, you can do that. But it would become a little
bit difficult to create a clear distinction between the strawberries
and the upper part. That's why I decided to make
it a little bit lighter. Now for the layers in here, I'm using very diluted
consistency of the camiogio. For this one, I decided to use a little bit thicker
consistency, applying it for the
upper layer too. Now, in here, I'm
using a skin color, and let's cover the
entire region with it. And when this dries
a little bit, we'll be overlaying the red on top of it for the strawberries. Now as for the plan, going in with the light purple color, starting with doing a flat pass for our plan and
then if required, we'll be adding a
little bit of sados. In here, I'm using
lighter side of the purple by adding
lots of water to it. A bit proper set of the
purple to make this region a bit darker to sow the
sadose cast it by the slide. The two colors will
mix on its own. Moving on to the strawberries, going in with the
green for the leans. Adding it carefully like this. Now, doing the coloring
for our strawberries, a little bit lighter
seed of the red in here, creating small and
simple strokes like this for our strawberries, adding another layer with a
bit darker seat of the red. As for the strawberries in here, it has dried up somewhat the
earlier layer of the colour, so adding it for the
inside in this manner. If you want, you can
also use a little bit of this red for the
upper region to make some of the section
bit more darker to sow the cado casted
by the strawberries. Now extending the colors a
little bit to mix it properly, the lighter shades
in the darker side. I decided to make it a
little bit more darker, so another layer of Cambogio
adding it in here too. The outlines are not
that much clear in here. Using the fine liner
once again to redo the outlining to create a clear distinction
between separate sections. This is optional.
If the outlines in your project is clear,
you don't have to do this. This going over all the
outlines and making the lines a bit more crisper
and a bit more defined. Doing the outlining
for the strawberries in here for the middle region. Now for the Best layer in here, once again, in here, I'm
using the same kind of line, uneven and broken
lines like this. If you want to do the outlining for the uplate, you
can do that, too. And with this, we are done with our project, very
blessed delight. I hope you enjoyed
painting this one.
21. Chocolate Strawberry Affair : Welcome to Chocolate
Strawberry Affair. This is one of the longest
project in this class. Let's start with doing this simple pencil
sketching for our project, Chocolate Strawberry
Affair, starting with the angle line for the base and using this to determine
the length of our slice. Now, two vertical parallel
lines on above the sine, and in here, we
have got this kind of rectangular polygonal seam, triangular set in here and making it a bit cut
for the upper part, and another parallel
line in here for this sin This is going to
be multi layered cake, so dividing into
different layers for the two layers in here, I'll be adding multiple
smaller strawberries. And for the top, we'll have a single strawberries
covered in chocolate. Only small portion
of the strawberries will be visible in here. This is going to
be multi layered, and this is going
to be comparatively darker than all the project
we have created so far. Creating this kind of
simple triangular see for the inside for the
strawberries present in here. This will be covered
in chocolate. And finally, creating the
outlining for our plate, simple elliptical shape in here. Feel free to make some
changes in adjustment. If you want to add more
additional element, feel free to do that. You can also add. You can also add more personal
touches to it. Now, let's go in with the fine
liner to do the outlining. Adding the leaves
in this manner. This will be covered
with the brown soup. The strawberry in here will
be covered with the brown, doing the outlining
in this manner. And now continuing on with
the remaining section, using this kind of bit
uneven unbroken lines to do the outlining for
the remaining section. Increasing the height of
the slice a little bit, you don't have to stick with
the pencil sketch that you have created feel to make
changes in adjustment. Doing the outlining
in this side. And finally, the layers. This will be quite smaller, so a bit thinner layer in here. Just going over the outline of the triangular seed that we
have created and making it a little bit more curvier for another of
strawberries in here. Simple uneven lines like
this to do the outlining. And finally, doing the
outlining for our plate, using curved broken lines
to do the outlining. And with this, we are done
with a simple pencilketching, as well as outlining for our chocolate to
strawberry fire. Is that the ink has dried up and lightly erased
the pencil marks. Removing the erasers just
Now let's do the coloring. In here, I'm using burned Siana a bit thicker consistency
of the burned siana. This will be our primary layer. This will be our first layer. Adding it carefully
beside the strawberries. This is going to be two layered. In here, we are going
to create another layer with a bit saturated
consistency of the color. But for now using
this consistency of the color to do a flat fast for the entire section in here, the sides, the top, as well as the upper
and the bottom layer. For the insides, the middle layers, I'll be using ocher, mixed
with a little bit of wine. Before using that,
going in with the pink and creating this kind of
textured look for the inside, only adding it for the middle regions for the strawberries. I forgot to add it
for the last one. Now, for the plate in here, using a thicker
consistency of the pink. Spreading the color for
the entire section. Adding it on the other side. It's not that much
evenly spread it since I use thicker consistency
of the color. So using water to get a smooth and uniform spreading
of the color. Now, this will be
our second layer. So using a bit saturated color. So using a bit saturated
brown in here. And I'm not going to
cover the entire section. I'll be living a little
bit of species like this. Since the earlier layer that we use has not dried it properly, the two will mix a
little bit on its own, adding it for the
strawberry, too. Now for the two
layers on the side, adding the colour
in the same manner, not going to cover the
entire section and creating these kind of
strokes to do the coloring. Instead of this color, you
can use any other colors too. Finally, for the base, ensure that the
pink has dried up and added carefully
near the pink, otherwise the two
color will mix, and we don't want
that Middle layer, making the outlining a
little bit more crisper. With these, we are done
with a brown for now. Now, we'll be doing
the coloring for our strawberries and
two middle layers. Using this ocher
mixed with wine. Instead of this,
if you want, you can also use the skin color, completely filling
the first layer, completely filling
the first layer, doing the same thing
for the second one. Giving it a little
bit of textured look by using a bit thicker
consistency of the color in here, the same color, but it's a
little bit less diluted. And with this, we are
done with the two layers. Finally, let's do the coloring
for our strawberries, going with the red, starting with doing the coloring for
the strawberry at the top. And now for the
strawberries in here, going over the outline and
adding a little bit for the insides we are not going to cover the
entire pinkish section, doing the same thing for the
strawberries in this layer, a little bit of pink
for the inside and then going over the outlines. Giving this region a little
bit of pinkish look, a little bit of pink in here. This is optional, also to show us a little bit of
satos using this pink in here, beside it, beside the slice, adding it in here for
the second outline. The two colors will mix on its own since it has not
properly dried up. Now, finally going with
the green for the leaves. So basically with this, we
are done with the project, but the outlines
that we did with the fine liner are not
that much visible in here. So I waited for it to dry, and now using the fine
liner and now using the breastban to redo the outline making
it bit more darker. This will help create
a clear distinction between separate
parts of the slice. Once again, using
the same kind of uneven broken lines
to do the outlining. This is optimal. If the outlines in your project is visible,
you don't have to do this. But in here for my project, it was not that clearly visible. That's why I decided to use the breast paint to
redo the outlining, doing the outlining
for the strawberry in here, the leaves. A little bit of detailing
in this manner, making it quite darker
near the strawberry. And finally, on this side. Let's do the outlining for
the strawberries in here. The second row of strawberries, simple uneven lines like
this to do the outlining. And with these, we are done
with our largest project of this class, Chocolate
Strawberry Affair. I hope you enjoyed
painting this, and I'll be seeing you
in the next project.
22. Strawberry Ribbon Slice Bonus : Welcome to the first
bonus project, Strawberry bond slice. Let's start with a
simple pencil sketching. This is going to be a
little bit more detailed. Starting with simple
rectangular see for the slide, simple rectangular C for
the front of our slice. This is comparatively
larger piece of slice as compared to the other
that we have created so far. A bit curved triangular
see for the top. Now creating more
triangular save in here for the multiple
strawberries. I'll be creating a total
of three strawberries and multiple frostings
like this in here. For the two bonus projects, I'll be using different
mediums to do the coloring. You don't have to use
the other mediums. If you want, you can continue
with the watercolor. But for this one, I'll be using the colored brass pans
and for the next one, I'll be using the colored
pencil to do the coloring, dividing the cake into
different section and creating this kind of semicircular see for the strawberries in here. And with these we are done with a simple pencil sketching, going in with the file
and to do the outlining. Just going over the
pencil is sketching, and if required, I'll be
making some adjustments. Also, as I mentioned,
I'll be making it a little bit more
detailed since I'll have more precision over the use of breast beans as compared
to the watercolor. So a little bit more detailing
with the fine liner. Small seeps like this
for the frosting. You don't have to
use the same element or do the detailing
in the same manner. Feel free to add your
own personal touches. In here, I'm using broken
lines to do the outlining. So mostly uneven broken lines to do the outlining for
the entire section. We have got multiple
layers in here, mostly using the
broken lines to do the outlining for the different layers that
we have created. Now, for the small strawberries, the slices of the strawberries
that are present in here, three on the top and
three at the bottom, simple circular seep, simple
semicircular seep like this, a little bit more detailing for the insides of the slices. Small seeps like this and small line like this
to do the detailing. A little bit more detailing for our strawberries with this
kind of simple lines. Now, let's sketch out the
guideline for the plate. Simple elliptical
seep for the plate. Giving it a little
bit of more dimension by adding more lines like this. And I erase the
pencil sketch now, doing the coloring,
starting with the red for the strawberry. Small simple strokes
with the red in this manner to do the
coloring for the strawberry. Now going in with the pink and adding it on
particularly one side. And finally, going
in with the orange to feel the entire section, the remaining section,
overlaying a little bit of this orange on top
of the pink and the red that we used earlier. Now, doing the coloring for
the strawberries in here, a little bit of red
streaks like this for the smaller sections of the
slices of the strawberries. Now, going in with the orange, creating more smaller
streaks in this manner. Now for the frostings in
here a little bit of green, a bit lighter set up
the grey in here. Creating a little bit of
sado using the green. Small streaks of the gray like
this to create the sados. Making the outlining a little bit more distinct with the gray. Now going in with the ocher. For the layers in here, I'll be using the ocher
for this layer and for the bottom layer as well as a little bit for the sine, completely filling
with the ocher. If we want, we can add it
for the sine layer too. For the remaining
section in here, I'll be using the skin color. Filling the entire section
with the skin color, adding it carefully near the frosting as well as
near the strawberries. Now for the middle layer, add it carefully just beside the small slice of
the strawberries. And with these, we are
done with the skin colour. As for the plate, I
decided to use the green, a bit darker sad of the green. We are going to completely
fill it with the green. Filling the remaining
section with the green and making this
region a bit more darker. Now adding another layer of the green to make
it a little bit more darker so the sados
cast in by the slice. And I also decided to create
the sados for the plate, so using a little bit more green to create the
sado for the plate. And with these, we had done with the strawberry ribbon slice. Oh.
23. Soft Blush Cheesecake Bonus 2: Welcome to the final project,
Soft Blush Cheesecake. Let's start with a
simple pencil sketching. Starting with a horizontal line for the length of our slide. No two vertical lines to determine the height
for our slides. Now creating the top. So we have got a rectangular
s for the front of our slice and a triangular
sin at the top. In here, I'll be
creating a little bit of defined as well as a single
strawberry in the middle. So simple seeds like this for the strawberry and the frosting. Creating the outlining
for the plate, simple elliptical set like this. Extending the side
a little bit more. This is going to be a
simple pencil sketching. Now, going in with the fine
liner to do the outlining. Starting with doing the
outlining for the strawberry and now continuing on doing the
outlining for the frosting, making it a little
bit more detail. Since for this
one, I'll be using the colored pencil
to do the coloring. So I'll have a little
bit more control over it as compared
to the watercolor. You don't have to use the pencil colour
to do the coloring. You can use the watercolor. Like earlier, I'm
using this kind of bit uneven unbroken lines to do the outlining for the cake. A little bit of detailing for the strawberry in the
form of stippling dot, doing the same thing for
some of the sections of the frosting to make this a little bit darker,
simple dots like this. Now continuing on with the remaining section for the slice. This is going to be
two layered slice, doing the outlining
for the other side. Now doing the outlining
for the plate. Creating the border. Adding the beast
layer for our slice, making it a little
bit more thicker, extending the line
on the other side. And with this, we are done with a simple pencil sketching and the outlining for soft
plus cheese cake, ins that the ink has dried up and lightly erase
the pencil marks. In here, as I mentioned,
I'll be using the colored pencil
to do the coloring. You don't have to use it. If you want, you
can continue with the watercolor to
do the coloring. Let's start with the red. In here, I'm starting
with the red to do the coloring for
the strawberry. Simple strokes with the
darker side of the red. Now going with the pink to do the coloring for the
remaining section, completely feeling
the insides with it as well as overlaying
it on top of the red. Now going with the
green, a little bit of green for the frosting, not going to cover the entire
section, only a little bit. Now using the same green to create a little bit
of darker region. So a little bit of gray as the primary layer in
here for the top. It will be depicting a
little bit of sado doing the same thing for
the remaining portion of the cheese skin, a little bit of grey in here to make the other regions
a bit more darker. Now going in with the
white for the upper layer. So we have got a
creamy top in here, applying heavy presser
with the white and blending it with the grey
that we used earlier. Also blending a little
bit of white for the frosting that
we have created. Now going with the pink
for the remaining section, the middle layer
of the cheesecake, overlaying it on
top of the gray, extending it on the other side, apply heavy freezer and feel the remaining
section with it. Since this is a watercolor paper and it has lots of texture, it is a little bit difficult to overlay the pencil
color on top of it. Otherwise, we would
have achieved a smoother consistency and a smooth color for
the cheesecake. Now for the best layer in here, using auger, completely
filling it with the auger. And finally, let's do the
coloring for the plate, go in with the sky blue. Adding the sky blue
in this manner. Adding it for this region too. Filling the green for the
remaining section as well as overlaying this green
on top of the sky blue. And with this, we are done with the coloring for the
plate and the cheesecake. If you want to create a
little bit of texture, you can add more
layers on top of it. And here, the outline
was not that much clear since we used
a lot of prison. So going back with
the fine layer to do the outlining portion
of the sections, doing the outlining
for the frosting too, the outlining in
here for the base of our soft blush cheesecake. Going about the
outlining for the sign. And with this, we are done with the final project of this
class, Soft Blush Cheesecake. I hope you enjoyed
painting this, and I'll be seeing you
in the next video.
24. Thanks and Conclusion : Congratulations on completing
the mini strawberry tren over the past two weeks. Over the past two weeks, we have created a
beautiful collection of mini strawberry dessert, from simple slices to glossy domes and layered
celebratory cakes, more than just
painting cue treats. We have practiced
watercolor layering, adding highlights and shadows, creating texture and
welding consistency. Most important thing is that you sewed up day even spending five to 8 minutes a day strengthens your
creativity and confidence. I hope this challenge helped you feel more
comfortable with watercolor food illustration and inspired you to experiment
with your own dessert designs. If you enjoyed this class, please upload your project, leave a review and follow me for more creative challenges. Once again, thank you so much
for painting along with me, and I'll be seeing
you in my next class.
 Vishal Munshi