Transcripts
1. Introduction: Hello, and welcome to
this Blender Mini class. I'm Harry, a season
three D artist with over a decade of
professional experience, and the privilege
of being recognized as a top teacher on Skillshare, specializing in
Blender tutorials. In this mini class,
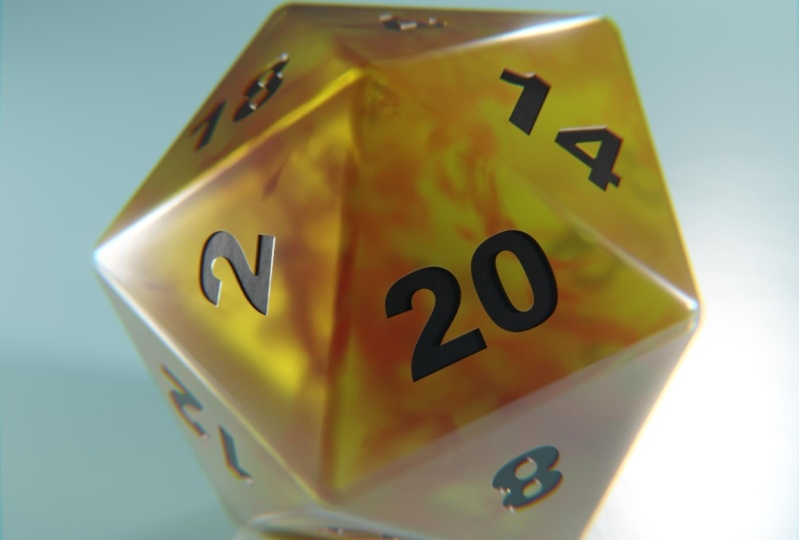
we'll be creating a swirled resin material
for this 20 sided die. If you're familiar with tabletop role playing games,
you've no doubt, seen a plethora of multi colored and eye catching
dice hit the table. I'll be teaching you how
to create your own swirled colorful resin material using
a pre made starter file. We'll end the class
with rendering our newly created 20 sided die, and I'll even provide
tips on how you can customize it to your
own unique style. By the end of this short class, you'll be amazed at how
easy it is to create this key component of your favorite tabletop
role playing games. So if you're ready for a
fun and colorful adventure, I invite you to join me in
class. Let's get started.
2. Creating the Resin Material: If this is your first time
taking a blender class, I'd highly recommend
you start with my complete beginners
guide to Blender first. This class was designed for the absolute beginner to Blender and three
DD art in general. We cover every single
necessary topic in order to get you up to
speed and running and blender. We'll accomplish this with
short and focused lessons that cover each topic from
a beginner's perspective, utilizing a well
organized starter file. We end the class with an
easy project where you set up and customize your
very own cozy campsite. With that out of the way, let's
continue with the lesson. Due to this being a mini class, we'll be approaching
this a bit differently than some of my other
full length classes. In this class, I'll be narrating the making
of this material, which you'll watch me
create here on screen. This means this lesson
will be a bit faster than you might be used to if you've
watched my other classes, but it should still be
a comfortable pace to watch and then pause if you
need a moment to catch up. As always, I won't be
skipping any steps, but I will be going from step to step without too much
break in between. So if you're ready,
let's jump right in. First, make sure you
have starter file, underscore D 20 render, underscore zero one, downloaded from the
project resources, and open and blender
version 4.1 or newer. With the file open,
you can switch to the shading tab found here
at the top of the interface. Set the top viewport to the rendered viewport
mode found here. Select the 20 sided die, also known as a D 20 in the viewport or the
outliner list to the right. Make sure you're set
to slot one found here to edit the resin
placeholder material. Now we can begin setting up
the principled B SDF node. Set the roughness to 0.22, five, Twirl open the
transmission settings, and set the weight
slider to one point. Twirl open the coat settings, set the weight
slider to one point, and then set the roughness to 0.15 inside these coat settings. Now that we have the
principled BSDF setup, let's move on to the color
of the resin material. We need four new nodes to achieve this colorful
gradient we want. So let's add those now. To add a new node, hit Shift and A to bring
up the add menu. In the search bar, search for color ramp and
add this node. Then again, shift and A, go to search, type
in gradient texture. Again, shift and A. Search search for mapping. And then one last
time, shift and A, search, and then add a
texture coordinate node. We can now link all
of these new nodes together in the order
shown here on screen. Taking special note to use
the generated socket on the texture coordinate node and plugging that into the vector
socket on the mapping. Lastly, make sure you
plug the color socket on the color ramp into the base color on the
principled BSDF node. We'll start by rotating the gradient applied
to our D 20 by setting the y rotation to 90 degrees on this mapping node. With our gradient rotated, all we need to do is adjust the colors using the
color ramp node. Let's start by
changing the positions of the sliders here
on the color ramp. Select the black slider
and set the position 20.36 using the slider here. Now select the white slider
and set the position to 0.72. Now we can move on to changing
the colors on each slider. With the white slider
still selected, click the color bar
at the bottom of the node and adjust the
sliders to a red color. To do this, set
your hue to zero. You saturation to 0.985
set your value to one. Now let's select a black slider and adjust this to a
bright blue color. We'll set the hue to 0.6 the saturation to one
and the value to one. With our color finalized, let's work on the surface bump. Again, we'll need four new nodes for this effect.
We'll add those now. This is the same
process as before, just with different nodes. To start, you'll
hit Shift and A, go to search, and then
you'll add a mix node. Now we can add a bump node, then a noise texture node. Then lastly, a bevel node. Before we connect these nodes, we need to set the mix node to the vector mode so that it can mix vector
information properly. You can find that here
in this drop down. Now we can connect
these four nodes together in this orientation. Be sure to plug the
mixed node output, the result socket into the
normal socket for the coat, not the normal socket at the
top of the principled B SDF. We specifically want this
to affect the coat normal, not the base normal. Let's start by adjusting
this new noise texture. We'll set the scale to 30, the detail to 15, the roughness to 0.5, six, the lacinarity to 2.1, And the distortion to 0.3. Now we can lower the strength
of this bump node to 0.02 to lessen the influence
of this noise texture. Lastly, we'll adjust
the bell node to add some fake rounding to
the edges of our numbers. We'll start by setting
these samples to 16, and then setting the
radius to 0.001. At this point, we're nearly
done with the material, but we have the most complex
effect left to create still. We'll be creating a
swirled opaque fog inside the resin to mimic a
purple ink inside the die. This will require
quite a few nodes. However, we won't create
them all at once, as that would be
pretty overwhelming. We'll start with
the basic grouping first and then branch
out from there. Let's start with our first
grouping of three new nodes. So we'll shift A to bring up the ad menu and
add a mix shader, a volume scatter, and
a volume absorption. Now we can plug the volume
nodes into the mix shader. The volume scatter
is plugged into the top and the
volume absorption is plugged into the bottom. Plug the output of
the mixed shader into the volume socket for the
material output node. This is important as this
effect we're creating is not a surface detail and is instead a volume
inside the material. With this base set up, ready to create the swirl
pattern inside the die. This will be a
multi part process, and it won't really pay
off until the very end. You're just going to
have to trust me that these nodes will create the
effect that we're after. Let's start by adding
two more nodes. So we'll hit Shift and A
and then add a math node. And we'll also add an RGB node. Now we can set the math node to the multiply mode instead. Then we'll plug this
multiply node into the density socket on both
of these volume nodes. Then lastly, we'll
plug this R GB node into the color socket on
both of the volume nodes. We'll come back to this
RGB color in a moment. Now let's add some value
nodes to the bottom, which will drive
the intensity of this swirl pattern
we add afterwards. We'll start by selecting the multiply node that
we created and then hit Shift and D to make a duplicate of it,
placing it down here. Set the bottom value
slider to 1,000. So one, zero, zero, zero. Now let's add a new node
by hitting Shift and A, and then we'll add a value node. We'll set this value node to
ten and then plug it into the top value socket on the
new duplicated multiply node. Plug the new duplicated
multiply node into the bottom socket of the
original multiply node. These two nodes that we created aren't entirely necessary. However, they make the values
a bit easier to use as a slider due to multiplying a smaller number
to create a larger one. We'll explore this relationship
in the next lesson. Before we go any further, let's change the color on the
RGB node we added earlier. This node will control the color of the swirl
inside the resin. We're going to change it to a
bright, pinky purple color. So we'll set our hue to 0.7, five, and then our saturation to one and our value to one. This color needs to be
a bit brighter than we'd actually like it to
appear inside the die. As the resin we're viewing
it through, we'll darken it. The last grouping of
nodes we need to add are the ones responsible for actually making
the swirl pattern. We'll need three more nodes to create this effect. So
we'll hit Shift and A. Then add a color ramp, a noise texture, and
a texture coordinate. We'll connect them
together in this order, paying special attention
to use the object mode in the texture coordinate when plugging it into
the noise texture. Lastly, make sure you
plug the color ramp color into the top value socket on
the original multiply node. Now let's adjust
the noise texture to change the pattern
of the swirl. We'll set our scale to 12.5, the detail to 14.5, the roughness to 0.54, the lacinarty to 1.9, and the distortion to 3.1. We have the pattern set up, but it's really
subtle right now. We can make it a lot more stark by adjusting the
color ramp sliders. So we'll select the black slider and set the position to 0.6, and now select the white slider and set the position to 0.73. You may notice after adjusting the color ramp sliders that the ink swirl inside your die seems really dark and
has really sharp edges. If this happens to
you, like it did here, then zoom out a bit and
select the mix shader node. Delete this node, then hit control and Z to
undo that delete. This will force the material to update and fix the really
harsh swirl pattern, making it this
nice, soft flowing ink that we see
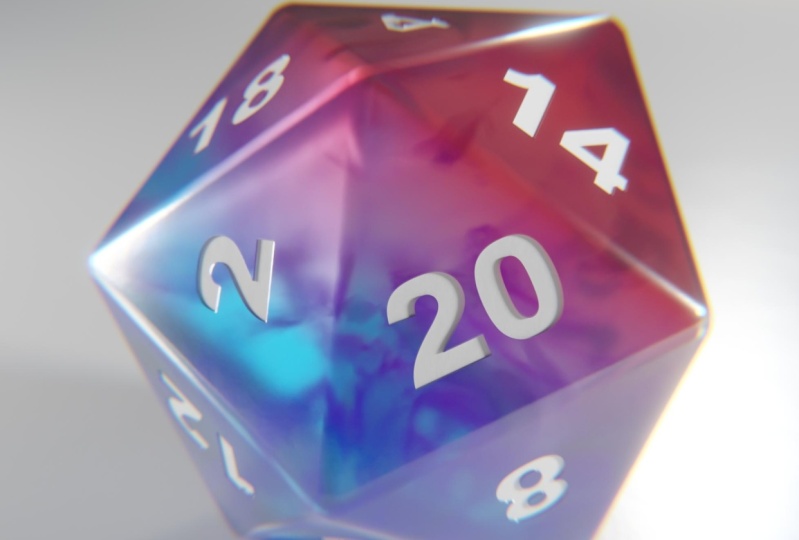
here. And that's it. We're done with our colorful, 20 sided die material, complete with a
purple ink swirl. In our next lesson, we'll
render our D 20 and explain some simple methods
for customizing this material to your own
style. I'll see you there.
3. Rendering and Customization: In this lesson, we'll
render our D 20 and explain some simple methods
for customizing this material to your
own style. Let's begin. We'll start by rendering
our final image. Let's head over to the
rendering workspace found here. Now we can head over here to render and then
choose Render image. We can also just hit F 12 on
our keyboard as a shortcut. No I'll give your image a
moment to finish rendering. With our final image rendered, you'll notice some additional
compositing effects that I've added to the
starter file for you. We can find these effects on the compositing workspace found here next to the rendering tab. We can see here on the
left side that we have two different nodes creating
two different effects. This glare node is adding
the slight glow that we're seeing around the
brightest parts of our image, also known as bloom. And this lens
distortion node here is adding this rainbow blur that we're seeing at the
edges of our frame. We can see that here
in the corners. As well as along the
edges of our die. It's relatively subtle and it's just there to add a
little bit of realism. Feel free to adjust
these effects or add to them as you see fit. For now, let's head back to the rendering workspace so
we can save our final image. We can find that
here at the top. Now, click on this image
button found here on the left, and then choose Save as. Navigate to whatever location that you'd like to
save your final image. And then down here, we
can give it a name. As an example, you
could name it D 20. Underscore final render,
underscore zero one. Now we can go here
to the top right and change the file format. We're going to switch it from
P and G to JPEG instead. And then set this quality
slider up to 100%. With that done, we can go
down here and hit Save image. You now have a final
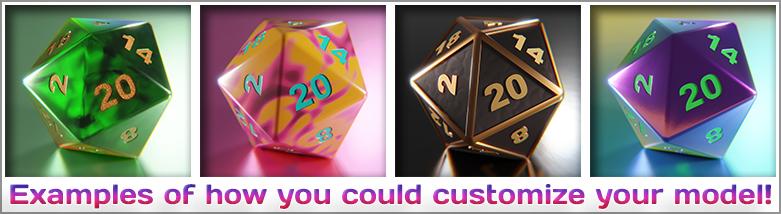
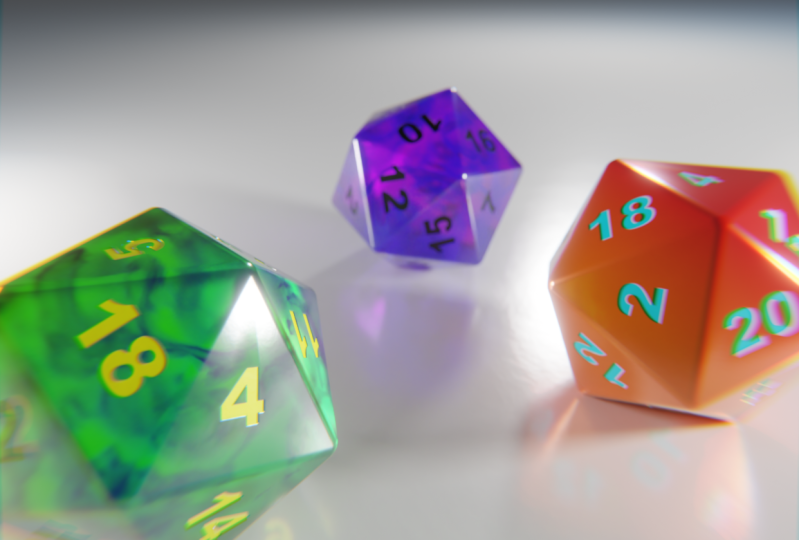
image saved that you can easily share with your friends and family on social media. Now, let's discuss some of the ways that you could customize this material to make it match
your own personal style. Before we start this
process, however, I'd recommend that you first
save the file as it is now. So go up here to file, and then choose Save to save this file in its
current configuration. And now let's save
a specific version meant only for the
class project. To do this, we'll
go back up to file. Then choose Save as instead. Now navigate to wherever you'd like to save
this new file, and then we're just going
to change the name. Down here, I'm going to
cut off all the stuff in the beginning and type
in class project. That's why I know this
specific version of this file is meant exclusively
for the class project, and I still have the
original version as it was. Any changes made will only affect this version of the file. With the name changed, we can go down here and hit Save as. Now let's head over to
the shading workspace, so we can begin making some
of these customizations. We'll go up here, do shading. Then make sure your top viewport is set to the rendered
mode found here. Then also click on the die in the viewport or in this
list on the right, to make sure you can actually
see the material down here. You also want to make sure that you're still set to slot one, which is editing
the resin material. The most obvious
adjustment you can make would be to the
color of the resin. This would be achieved by
changing the colors on the color ramp plugged
into the base color. And that's the one
here at the very top that's currently set
to red and blue. So we zoom in here so we
can get a better look. We can just select any one
of these sliders here. So maybe we change this red one here and we'll make
it orange instead, just by changing the color
using this color wheel, or using these value
sliders down here. So if we change
the red to orange, then we can select this blue. Maybe we'll turn
this green instead. Then additionally, we can select one of these
sliders here. In this case, I'm going to
select the far right one. Then I can click this plus icon to add a new slider
here in the middle. Then I can change the
color of this new slider. Maybe I'll make this more of a yellow, make it really bright. That way, there's a nice vibrant yellow band in the middle. You can also change the
position of these sliders to make more or less of a
color present on your die, maybe you want a
lot of yellow and a little bit of orange
and green on the edges, or you can move
them really close. There's a really tight band
of yellow just in the middle. Whatever you'd like to
do. This changing of colors also applies to the
numbers on the die as well. So to change the
number color here, we can go to slot
two by clicking on the drop down and then
switching to numbers. And now on this, we're
only going to be changing the principled BSDF
color right here, which is currently set to white. So if we make this
a different color, say bright blue, or we can make it black,
whatever we'd like to. We can see here it's now
updating the colors on this die. With our number color changed, we can go back to slot
one to adjust the resin. And then, before we continue
adjusting the resin, you could also select this
plane in the background, which is the floor
that it's sitting on, and you could change this color as well to better match the die. So maybe I'd want this to
be maybe a light blue. Somewhere in this
range. Now you'll notice because
this die is clear, this color is affecting the
color of the die as well, because we are seeing partially through this die
to the background. So the darker this color is the darker your die
is also going to appear. Take that into account when
you're choosing your color. If you wanted to
maintain the similar brightness that we had before, make sure your color
stays relatively bright. Maybe I'll make this maybe
a bright yellow color. For any of these materials, you can also adjust the
metallic slider found here. To make a material metallic, simply increase this value
all the way up to one. So you'll notice it looks
a lot more metallic. However, it is also darker, so that's something
to take into account. For now, I'm going
to set this back to zero to leave it as this
normal yellow color. Now let's select the die again so we can see
the resin material. And then to continue
this color adjustment, we could also
change the color of the ink swirl inside
the material. If we zoom out here and
go down to the bottom, we'll find this RGB, and this is what's controlling the color of this ink swirl. So in my case, maybe black would look good
to match the numbers. So I'm just going to pull this all the way down
and make it black. And this is a relatively
easy thing to change. So if I decide, actually, the black doesn't look great, I can just raise this back
up and then maybe try a blue or a red or green. In this case, I think the
red actually looks the best. I'm going to make it red. And now with our color decided, We can move over here to the left where we have
this value node here, and this is what's
going to determine the intensity of this ink. So if we simply drag on
this slider left or right, we can change the intensity
of the ink that we're seeing. So if we lower this number, we're actually going to
make the ink more intense. So as I lower it down
closer to 1.5 or two, you'll notice that this
ink here is a lot more opaque and it's much more
visible inside the die. But as we raise it towards
the original value of ten, it becomes more subtle. In anything over ten,
you start getting really wispy kind of very
transparent ink inside here. If you're looking for
a value that makes this ink a little
bit more intense, we can set it down
to around two, and now we'll see a lot
more of our ink in here, but it doesn't look
too unbelievable. The next change that we can make concerning this ink inside the die is by changing the type of noise
that we're using. Right now, we have
this noise texture set to three D. However, if we click on this drop down, and then change it
to four D instead, you'll notice that we
get a new slider here. Well, one, you'll
notice that the die has updated here because we've
switched the type of noise, but we'll gain a
new slider here. And this new W slider here
that it adds at the top is essentially the seed or the randomness of
this noise texture. So by just clicking on
this little arrow here, we don't even really
need to use the slider. We can just click on this
arrow once to the right, and we'll notice that the ink inside the die is
just randomizing. It's changing its position. So if you find that you
don't like the look of how this ink is dispersed
inside the die, Just click a few times until you find one that
you do like it. Maybe you'd like it to
have a nice strong streak here behind this number, or if you don't
like how it looks, you can just keep rotating through these numbers until you find a position
that you actually like the way the ink looks. Then lastly, another
thing you could adjust is the transmission
weight slider. That's found all
the way over here on the principled P SDF node. Well zoom in here to the middle, and we see here the
transmission weight. This is what's controlling how C through our die material is. If we lower this all
the way down to zero, we'll notice that our die
is no longer C through. It just looks like a
normal opaque plastic, which in this case, we lose
the inside of the die. We can't see the
swirls that we had, but it does change the
look of the die to basically a different type of plastic, which you might prefer. You can also choose
a middle value here to make your die through, but still a little bit more
opaque than it used to be. Now, these techniques
that I've shown you here aren't the only ways you
can make your die unique, but it does give you
a place to start. You could also try
things like adding new textures to the swirl
pattern to make it look different or applying a
texture to the outside of the die to make the
outside have a swirl as well. You could also convert
your D 20 into a metallic surface rather
than a plastic one. There are countless different
ways that you can express your own creative style
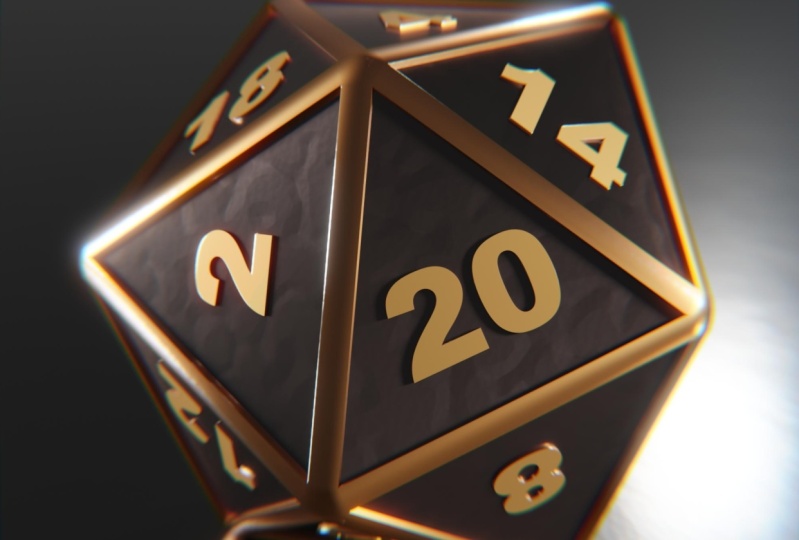
with a simple object. The renders you're seeing
on screen are just a few of the different examples
that I came up with to show you different ways
you could change the die. When you're done with
your own unique D 20, don't forget to save
your render and post it to the project
gallery for this class. I'll personally
review every project submitted and give you
feedback on your render. In the last lesson,
we'll end the class with some conclusions and
farewells. I'll see you there.
4. Conclusion: Congratulations on reaching
the end of our class. I wanted to take a
moment to express my heartfelt gratitude
to each and every one of you for taking
this fun mini class. Your participation
and excitement for learning is incredibly
rewarding for me as a teacher, and I can't thank you enough. I hope you've had a good
time learning how to make this instantly recognizable tool of tabletop role playing
games and blunder. It's been a pleasure guiding
you through the basics, and I hope you've
found this experience both fun and valuable. Now that you've got these
new skills under your belt, I can't wait to see where
your creativity takes you. I wish you the best of
luck in your adventures crafting your own
unique, 20 sided die. If you like this class, let other students know
by leaving a review. Your feedback really helps me understand what you found
most valuable in the class. You can leave a review easily by going to the reviews tab just below this video and clicking
the leave a review button. I appreciate the support. After leaving a
review, you might want to follow me here on
skill share as well. You can follow me at any time by clicking the follow button above this video or by going to my teacher profile and clicking
the follow button there. Following me is the best
way to get notified when I release a new class or make
important announcements. Don't forget to check
out my teacher profile for more classes just like this. You might find something
else that interests you. Lastly, I want to thank you
all again so much for taking this class and supporting me by participating in
the class project. I can't wait to see what
you all come up with. Farewell for now, and I hope to see you in
another class soon.
 Harry Helps, Professional 3d Artist