Transcripts
1. Introduction: Hi, my name is Harry and I'm
a professional 3d Artist. My jobs have included Creating
User Interface Art for a major video game development
company and working as the lead 3d Artist and
later Studio Director for an award winning architectural
visualization studio. This class, I'll
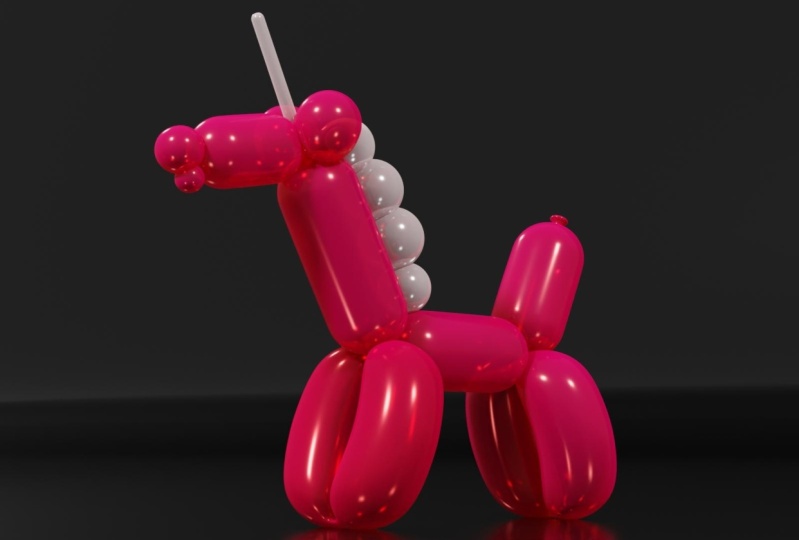
guide you through a FUN beginner exercise
where you modeled, shaded, and render
a Balloon Dog. We'll go through each part
of the process step-by-step. So you should find it fund and easy to follow along with me. We're using Blender
for this tutorial, which is an amazing and
totally free 3d software, the only barrier to entry is having a computer to
run the software on. A balloon dog might seem like an odd choice for a
beginner project, but it really is a
perfect place to start. In this class you'll
learn modeling, which is how we'll create
the body of our balloon dog. Modifiers that add
Additional modeling effects such as smoothing, shading. This will make our
balloon dog look like a colorful rubber Lighting. We'll add lights to
illuminate our scene. And Rendering, which
involves Positioning a 3d camera and generating
a picture of our new model. At the end, we'll have
a cute balloon dog to render to our
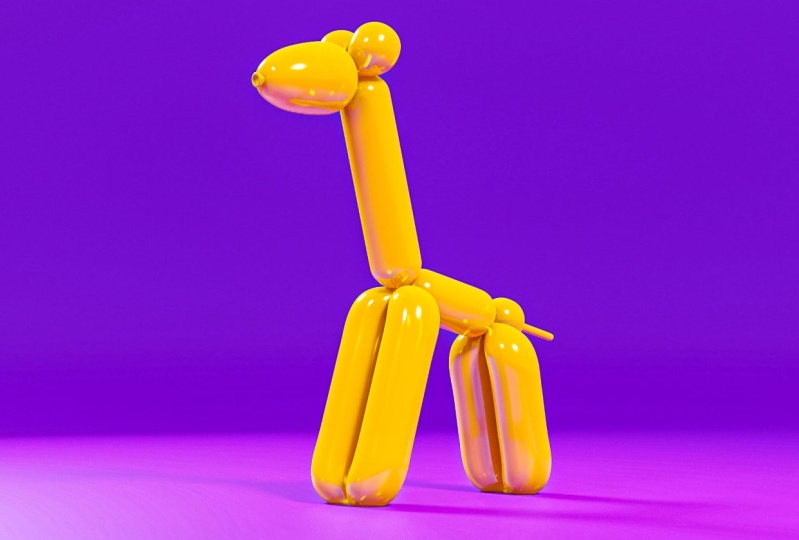
heart's content. It's also a model that can
be easily altered into different animals
just by adjusting some proportions or
adding a new piece. Our class project will
have you take all of the techniques you've learned
making the balloon dog, apply them to make another
animal of your choice. You can keep the shape simple and abstract like
the balloon dog. Or you can go all out and
make a balloon masterpiece. Post your balloon animal
to the gallery to show off your hard work and imagination to myself and all
the other students. I hope you'll join me on this Fun little
beginner's journey through Blender by making
your very own balloon dog. See you in the first lesson.
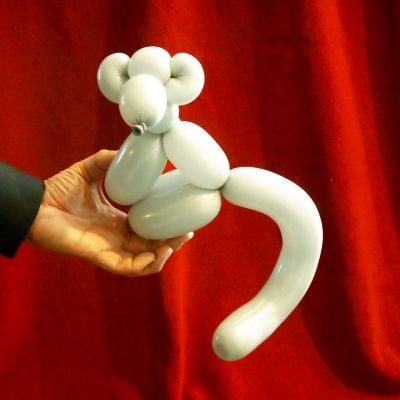
2. Gathering Resources: In this lesson, we'll start with Gathering photo references
for our balloon dog model. Gathering our
reference images is an important first step in
modeling our balloon dog. Having accurate reference
to follow is the key to accurately replicating the thing you're trying to make. I'm sure most people can imagine what a balloon dog looks like. But do you really
know the proportions of the body segments
to The Ears? Probably not. That's why we want
to have at least a few reference images. In our case, Google workout fine for the reference
image gathering, we want to search balloon
dog instructions. If we search just
balloon dog will basically only get images of a famous balloon dog sculpture, which is a bit
simplified and stylized. We're going to be replicating
a real balloon dog will want to avoid using the
sculpture as a reference. For the purposes of this lesson, I've already collected a
few good references for us. You can download them
by the class resources. Using a reference images could be as simple as you
printing them out on paper or keeping a folder open with all the images
in it when your desktop. However, there's a free software
that can help with this. I'd like you to consider
downloading pure ref. Pure ref is a fantastic
donation-based software that allows you to have your reference images
always visible. You can download it for free and use it as long
as you'd like. If you feel like the program
deserves your money, please consider donating to the developers to continue
improving the software. With pure ref open, we can just drag our
images directly into this window and make
it a nice little canvas for us to collect
all of our images. We need some useful pure ref key binds are right-click
to move the window. Left-click to move an image. Middle mouse-click pans
around the canvas. Click and drag on a corner
to resize the window. And control shift. And a makes the pure ref window always on top of
any other window. Meaning we can use
Blender without losing sight of our references. Right-click on your
canvas to save this pure ref file so that
you can open it up later. In the next lesson,
we'll be getting our Blender file setup
and ready for modeling. I'll see you there.
3. Setting Up Our File: If this is your first time
taking a Blender class, I'd highly recommend
you start with my complete beginner's
guide to Blender first, this class was designed for the absolute beginner to
Blender and 3D Art in general, we cover every single necessary
topic in order to get you up to speed and running in Blender will accomplish this, but short and focused
lessons that cover each topic from it
beginner's perspective, utilizing a well-organized
starter file, we end the class with an
easy project where you set up and customize your
very own cozy camp site. With that out of the way, let's continue with the lesson. Let's set up our file
before we begin modeling. There are few things
that we can get set up right away
before we dive in. The first thing
we'll do is change our unit display to inches. So this is an optional thing. You don't have to do
this if you'd like. However, during the tutorial, I'll be referring to things
in inches rather than metric. To change this, you can
go to this symbol here, which is your scene properties. You can open up units. Then we're going to switch
from metric to imperial units. We're going to change the
length from feet to inches. We're doing this because
the object that we're creating is not
particularly large. The whole thing is going
to only be about a foot. So it's easier to work
in inches because the scale of the object
overall is much smaller. The next thing we
need to do is enable your graphics card and
they Blender settings. So we're gonna go up to
Edit Preferences system. Then we're gonna go up here. So if you have the
option to select optics, please select that. If you don't, then you
can select CUDA instead. However, if you have optics, you should be using optics. You also want to put a checkbox next to your graphics
card, in my case, the 2060 super, and then
also your CPU down here. So you should have
both of these checked. This will allow the
Render Engine to access both your GPU and your
CPU during render time, which will speed it
up significantly. Now that we have this setup, we can close this box. Then we're going to go down
to the Render Settings. So this little camera icon here, we're going to change
the Render Engine from EV to cycles. These are just two
different render engines. However, cycles will give us more realistic results
and also the shader we're using for this will require us using cycles rather than Evie. We want to go down to the device settings
and switch it from just CPU to GPU, compute. This will allow us to use our GPU when we're using cycles. Will go down to the
viewport settings here and change max samples to 500. Instead of 1024. We're going to check de-noise. We can click this
little drop-down here to open up more options. We're going to switch
the D noisier from automatic to optics instead. Now we can close this menu. We can go down to
the Render Settings. We can twirl open this option here with a de-noise
which is already checked. And just make sure you have open image de-noise checked here. For the viewport will prefer to use the optics because
it's a bit faster. However, the Open Image
T noise is better for our final render because it does a better job of de-noising it. Now that you have
those settings setup will go up to File. We can do Save. And then let's rename this file. We're just going to call this
balloon dog underscore 01. Now once we have that set, we can save this file. And then in the next lesson, this is the file
you'll be opening up because it has all the
settings already set up. For. The next lesson, we'll start modeling The Body
of our balloon dog. I'll see you there.
4. Modeling: The Body: In this lesson, we'll be
starting the model of the balloon dog by
Creating the body, neck and snout segment. To start with, make sure
you have pure ref loaded. You can see down
here at the bottom left I have paragraph open. However, there's nothing in it. So I'm going to open up a pure ref scene that
I've already created. I can right-click,
go to the load. And then I can
either load it from a file browser or I can
just load a recent. I'm going to load this recent. You can see here
that it has all of my reference images in it. So let's resize this window so it doesn't overlap so much. So I'm gonna grab the
corner here and drag it. Want to right-click on the
window to drag it around, to reposition it a bit. Then I'm going to hit
Control Shift and a to make sure that
stays always on top. That way I can work in Blender without this window
disappearing behind. Now I'm going to pan over to this image here using
the middle mouse-click. And then I can zoom in on it just by using the mouse wheel. This is the reference
we're going to start with. Now that we have pure ref setup, let's go ahead and delete
these three starter items. So I'm just going to
drag over top of these. I have all three selected
and then I can hit Delete or I can hit
X to delete them. So as I said in the
beginning of the lesson, we'll be creating
the body segment. The next segment, as
well as the snout. We wanted to think about
what shape is this. So to me this sort of looks like a sphere except it's a
little bit elongated. So I think a sphere
would probably be a good place for us to start. Let's start by
creating a sphere. We're going to hit shift
and a to create our sphere. And we're going to want
to choose UV sphere. You don't want to choose circle. A circle is actually going
to make a flat 2D circle. Whereas what we want
is the 3D version. It's gonna be the UV sphere. Now that we've created a sphere, well want to change the
properties of this, however, are pure ref
window is actually sitting on top of the
option box down here. So what I need to do
is right-click on my pure ref window and then just drag it over
here to the right. So maybe the right
side is better for this sonata that's on the right. You can see here it
says Add UV sphere. And you want to make sure
that once you create your sphere that you don't
click off of the sphere. Because this is
the settings that you'll get that allow you to change some of the properties of the sphere that we just created. So if I zoom in on this, if I click off of this, now this option box
disappears and I can't, I can't access it again, so I'll have to
recreate the sphere. So in my case, I'm just
going to delete it, shifts a mesh and then I'm going to create
the UV sphere again. Now that we have
the UV sphere here, we're gonna want to change
some of these settings. Tim give this a little
bit more polygons, which will make the
object a bit smoother. You can see here that the edge of this is a little bit rough. You can see corners on
these jagged edges. So the more of these segments
and rings that we add, it'll make it a little bit
smoother to begin with. Let's start with,
let's make this 36. For the segments. We're going to change
the rings to 18, which is the vertical cuts. So you can see here
that we've added a little bit of
smoothness to this. Now, later on we'll be actually
further smoothing this. So we don't want to go
too crazy at this step, but a little bit more smooth
now it'd be a good spot. Then the radius, right
now it's a 1 ft radius. So it's actually too big. So we're going to type in
here 1 " radius and enter, and you can see it makes it
a lot smaller down here. The reason we're doing
a one-inch radius is because the
radius is measured from the center of the
sphere to the edge. So it's actually 2 " across. And these balloons
here are typically made with 2-inch
diameter balloons. So in order to keep
that realistic, we're going to type
in 1 " radius so that our balloon width
overall is actually 2 ". Now that we have these
properties setup, we can safely click off of
this to confirm those changes. And now that option
box disappears. So you might notice
that this sphere looks almost like a golf ball. It has a lot of little
faces all over it that are almost has like maybe
like a diamond look. What this is called as
actually called faceting. What you're seeing
here is actually every single
individual polygon on this sphere being
smoothed by itself. So if we want this to look
like a nice smooth sphere, we can just right-click on this and then choose
Shade Smooth. We choose Shade Smooth. Now it looks like a
nice smooth ball. And it actually helps get rid of the illusion that this
has a jagged edge on it. So when you look at
it, it looks like a relatively smooth sphere. Now, if we wanted to go back to how it looked
before for some reason, just make sure you select it. Now it looks like it had before. So we'll go back
to shade smooth. So before we begin, let's make sure that we
turn on the wireframe for our scene so that we can kinda see where
our polygons are. It'll just make
our lives a little bit easier while we're modeling We're gonna go up
here to this symbol with the two
intersecting circles. And these are your
different overlays. These are the all the viewport
overlays that we have. We're going to turn it one, the wireframe checkbox here. Then we're going to turn down
the opacity a little bit. So when we turn it on, initially it just
makes a full opacity, completely black
wireframe across the model to show us where
each of the police are. However, that might be a
little intrusive when we're working in some
of the viewports. So let's turn down
the opacity of that. We can turn this down
to maybe about 0.2, 0.25, somewhere in that range, just to give us a nice
light wireframe on this. This will help us figure out the orientation of this object
for the next step as well. Now let's select the sphere
by left clicking on it. Then we're going to
rotate this sideways. So at the top of this sphere, you can see we
have a point where all the polygons converge. And we want that at the
end, not at the top. So we want that on the left and the right rather than
top and the bottom. We're going to first
rotate this 90 degrees. So we're going to hit R and
then we're going to hit X to make sure that we're
rotating just on the x-axis. Now we can hold Control
while we rotate. And it will actually snap it
to these nice increments. We can rotate it right to the 90 degree point so
that it hits right here. So you can see it lines
up now with this y-axis. Now we know that we've have
it set to 90 degree rotation. You can also see that
down here as well. Now that we have
our sphere rotated, we can go into the edit
mode for the sphere. Let's select our sphere and
make sure it's selected. And then we can hit Tab
to go into the Edit mode. Let's hit the three key to go into our Face Selection mode, which is going to select the
individual squares here. Then we're going to line
it up so that we select this front face here. So we can go up here
to this top-right. Click on this little X here. And that'll put us into a nice straight
orthographic view, which make selecting the, the midpoint of
this much easier. So we're going to
select the X here. Now before we select
any of the polygons. So normally we
would just go like this and we could select it. However, we're only actually selecting the half of the model. If we rotate around, we can see that we didn't actually select all
the way through, which is what we want to do. Because our goal
here is to split this sphere in half,
stretch it out, and then draw polygons between it so that
it looks more like this capsule shape or this
elongated sphere that we want. In order to alleviate this issue of not being able to select
all the way through it, we want to hit Alt and Z together to turn the the
wireframe into an x-ray mode. This mode here will allow us to select it directly
through the model. So if I go like this now, you can see when I select it, actually selected
completely through the model, which
is what we want. Let's go back to
our X view here. I'm going to click on
this Up at the top-right. Now I'm a nice straight view. I don't want to select
exactly half of this. You'll have to select
over top of these. Now that we have half
of our sphere selected, we can right-click
on it and then go down here to the bottom
where it says split. This will do is split this
model into two-halves. Now we have a half
here and a half here, and they're no longer
connected right down this middle point,
which is what we want. Now we're going to move our
camera over a little bit. We wanted to pull this apart
and this will create a gap between these that will
then draw polygons between. So first, let's hit G, Then we're going to hit Y
because we want to move just along this green axis here. We want to move
it apart about as much as that reference
down at the bottom right. We want to look at the
reference while we're moving these parts away from each other and make sure that we're
adding enough gap here that it seems to be about the
same distance here. If we don't get it perfect, It's not the end of the world. We can always adjust it. But at least use your reference as a guide when
you're doing this. That's the point of having these references
always a visible. Now that we have the have split up with a gap between them, we can zoom out
and we can rotate our camera to go back
into this regular view. Now we're going to
switch to our edge view, which is the two key up here. Again, you can use these
keys if you'd like, although you should probably get into the habit of using the 12.3 to switch
back-and-forth between them. We're going to hit to, to
go into the edge mode. Then what we need to
do is select both of these loops that we've
created on the inside. So there's these sort of open bowl shapes that we've created. So we want to create
polygons between them now. So to do that, and
we're going to hold Alt and select this edge. I'm going to angle
your model here. So you actually want
to select here. If we hold Alt and select it, you can see it highlighted
this entire edge. Now we have this
entire edge selected. If we hold Alt and Shift, and then select this edge. Now we'll add to that selection. I just held Alt and
clicked on this, and then hold Alt
and click on this. You can see it swaps
back and forth. They won't select both unless you're holding Shift
while you do so. I'm going to hold Alt
and Shift to make sure I have both of
them selected now. Now with both of these
edge loops selected I can right-click. And I can go over here
to bridge edge loops. So when I click this, you can see here that
it actually draws polygons in between these now. So you can see the point of us moving these apart and splitting them in half is where a
lot closer to the shape. Now, in our case, we won't need to
do anything with this option box down here, so we can just click off. Now that we haven't
successfully bridged, we can hit Alt and Z again to
get out of this x-ray mode. So it's a little
easier to look at. Sometimes the X-ray
mode can be a little complicated to look at, especially at certain angles. So it looks a little
nicer when you don't need it if you just turn it off. Now we can zoom out. Now let's reassess
the shape here. I think maybe mine is
a little too short, so I'm going to
lengthen mine a bit. I can do that by going
into my vertex mode. So I'm gonna hit
one on my keyboard. I can go back into X-Ray mode so that I can select through it. Now you can see I
have these selected. Then I'm gonna hit
G, then I'll hit Y, so that I know I'm moving
just on the screen axis. I'm just going to stretch
it out just a little bit smoother to about there. Again, we can adjust this
later if it doesn't feel right later on once we have more
of the balloon dog created. But for right now
this feels better. Somebody had Altman Z to go
back into the regular mode. Now we can hit tab to exit the edit mode because we're not adjusting the shape of
this one any further. I'm gonna hit Tab to go back into the just
regular object mode. Now what we need to do
now that we've created the body segment is we want
to create the next segment. We can just duplicate
this object that we have here by hitting Shift
and D at the same time. So you can see now
that it's moving this and it's making
a duplicate of it. However, we don't want to
just move it anywhere. We want to move it
specifically on the Y so we can hit Y now. Then just move it just so it touches the edge of the other. Now we have a duplicate segment, except this one's a
little bit too long. So let's go back
into the edit mode with this one selected
by hitting tab. Go into X-ray by using alt Z. Drag select over
these G and then why? To shorten this one
up a little bit? This next segment shouldn't
be quite as long as the body. I think somewhere about
that range is pretty good. Now I can click off of it, it Alt and Z, and then hit Tab. Now let's rotate the
neck so that it's at the same orientation
as our reference. We're going to hit
our and then we can hit Control and
rotate this neck. We're going to rotate
it about here. Again, this is
somewhat preference. Not every balloon dog will have an exactly the same shape. So just rotate it to about
what this reference is that it looks like TO
think that looks good. So in my case that was
negative 55 degrees. Now I'm gonna go back into this orthographic view
up here with the X. So I'm gonna click
this so that I get a better view of this.
Now I can just hit G. I can move this around so that it matches up about where those two poles we'll meet up. So these, these points
here were all of these vertex meet up. So this is called
a poll one here. I want these polls to
be about the same spot. So in this case
they're pretty close and they're also
intersecting a little bit, so we don't have to
worry about that yet. We'll just leave that as it is. Okay. So now that we have
the neck created, Let's duplicate
this model again. In this case, let's actually
duplicate the body. So we're going to
select the body, hit Shift D to start
duplicating it. Now we can move it over here. We're going to hold down or
just click the Y button here to make sure we're only
moving on the, the y-axis. Going to move it right
about to the right spot. And now we can hit
G and Z again. To have it here. We might need to move
it back a little bit. So we're going to hit G and Y to move it back into
the neck a little bit. Now let's rotate this downward. So I'm gonna go back into my
orthographic view up here. So I'm gonna go into the X view. I'm gonna hit R to rotate. Then I'm just going to rotate
this down a little bit. So I want the Nose to point
down just a little bit. I don't want it
perfectly horizontal. I'm gonna hit Control
while I'm doing this so that it snaps, will rotate it down
to about here. So in that case
about ten degrees. And then just reposition
this with G key. It looks good. Now that we
have the Nose rotated down, you'll notice that
it's a bit too long. So we can go into the
X-ray mode by holding Alt and C and then hit Tab to go into Edit
with this selected. And then we can select
these vertex here, which is the one key to be in
that mode, the vertex mode. Then we can start
moving these and we can move them on
the Y if we want. However, you'll notice
that it's actually, it's moving them horizontally, but we've rotated that down
so it doesn't work anymore. So it moves back and
it's sheers a downward, which isn't what we want. So I'm going to right-click
to cancel that movement. And instead, we're gonna go
up here where it says Global. And we're going to click
that, and then we're going to switch it's a local instead. What this does is it's
changing how the transform is looking at the object with a world that
you're referencing. So when you use global, It's using the this
as this reference. So it's saying exactly Up and down is up and down for the Z. And then this is the
X and this is the Y. However, if you
change it to local, it uses the orientation
of the objects. So since we rotated this
Nose down about ten degrees, it will rotate these, see X and Y axes, also ten degrees in order to match the orientation
of the object. Now if we hit G, we can see which lets
see which one it is. I think it's the Z in this case. So if we hit G and then Z, now you can see it moves nice and smooth
back-and-forth because the z-axis for this object
is now been rotated. You can see it's rotated
about ten degrees to match the orientation
of the object. And that's because we're
in the local mode. So I'm going to
shorten this Nose up a little bit about there. Again, we can always
adjust these proportions. These aren't set in stone. Now that we have that set, we can go back to
global over here. For other movements. Now we have our Nose
shortened up a little bit. We have our next
segment shortened up, and then our body is set
to the correct length. We can now hit tab to
exit the edit mode. And we can hit Alt and Z
to exit the X-ray mode. And now we've finished
modeling The Body, the neck, and the snout
segment for this video. In the next lesson,
we'll be modeling The Tail of the balloon dog and the not on the tip of this. Now, I'll see you there
5. Modeling: The Tail and Nose: In this lesson, we'll be modeling The Tail
of our balloon dog, as well as a simple not
on the tip of its snout. Let's begin. The first thing that we
wanna do now that we have a few objects in our
scene is we want to start renaming these
objects so we know what they are based on
this list on the right. This list over here shows you all the different objects
you have in your scene. So you can select an
object from this list, or you can select it
in your viewport here. Either one works. So you want to keep this
nice and clean and we want to know exactly what we have
in our scene right now. Everything is just named sphere, sphere a 1.0 to. So let's start by renaming
this segment here, body. So we're just going to go
up here to the top-right. We're going to double-click
on the word sphere. We could just type in
body and then hit Enter. Then we can either select it here or we can select
it from the list. We can double-click on this one and we'll rename this neck. And we'll rename
the last one snout. The next thing we're going
to be Modeling is The Tail. For that. I'd like to
make sure that I have my reference pulled up. So I'm going to reopen pure ref. You might already have
it open if so, great. I can right-click
to move this down. Going to right-click to open it. Then I'm just going to
open my most recent one. Now that we have our
pure ref open and set to always on top with
Control Shift and a. We can now work in this
without a disappearing behind. So first let's select
the body segment. Then we're gonna go into
this X view up here. So now we have a nice
perfect side view. We're going to duplicate
this with shift and D. Then we're gonna move it
just in the y-direction. Going to click that. Now we have a
duplicate back here. Then we're going to rotate this so that it's about the
same angle as our reference. We want it to be
about out there. So that in my case
it was negative 110. This doesn't have to be exact. Just do it to your preference, but you want to try to match the reference as much as possible. Now we're just going
to move this here to be about where
it needs to be. So we now have two
options with our Tail. We can keep it simple, like this Tail in the reference. Or if we zoom out here, we can see that some
of these other tails, they have these little
nubs on the end here. This is a pretty common detail
with your balloon Dogs. This is just a simple
thing where they didn't put enough air
into the balloon. So when they're folding
it up and twisting it, there's a little bit of
spot here where they leave this little gap here that
lets the air expand. I think that looks kinda nice. I think for our balloon dog, we're gonna go
ahead and do that. So you can make it
short like this. You can make it a bit
longer like this one. We're probably going to
do something in-between these I don't quite like how long this Tail is overall are probably going
to shorten our Tail, but then have a somewhat
longer tip on the end of it. So first, let's begin by
shortening our Tail up a bit with our Tail
segments selected. So first we can rename it so
we don't lose the name here. So I'm just going to
double-click over here. Type in Tail. It's not, it's renamed. We're gonna go over
here to our Tail. Hit Tab to go into edit mode. We're going to hit one to
go into our vertex mode. And then up here we
have it set to global. So if you'll remember
from the last lesson, if I tried to move this in just the z-direction while
one I have to go into X-ray, but you can see Z is
directly up and down, but it's not moving along with the Tail. We don't want that. So first we need
to go into local. Which animal now make the Z
go along with the Tail rather than going just perfectly up and down within
the world itself. Also need to go into Alt see, which is my x-ray mode, which allows me to select all
the way through the object. Now that I'm an x-ray and
I have it set to local. I can hit G. And then at Z. Now I can move adjusting the
z-direction or you can see it's just shortening The
Tail as we expect it should. I'm gonna make my Tail. I lay about here so we can
zoom out a little bit and get a better sense of how it looks for the rest of the object. Me a little bit longer. Thinking about there.
So a little bit taller than my
head is right now. So now that we have
the balloon for the overall Tail shortened up, now we need to add that
little tip on the end of it. So let's zoom in
on our Tail here. We're going to switch to our
face mode by hitting three, which will allow us to select
the faces individually. So now we want to select
our faces here at the end. Hover. The best way we have
to do it right now is just by using this square, which you can see when
this object is rotated, it makes it rather difficult to select just the ones you want. You have to do it
multiple times. And it's a pain. Rather
than doing that? We're gonna go up here towards this square Selection Tool is, and if we click
and hold on this, we can go down to
select the Lasso. What this does is rather
than doing a square, now we can actually just
hand draw our selection. Now I can just go over here, select a little bit
past the ones we want. If we get too much,
you can just hit Control and deselect them. Now I have all of
these selected, and that's the ones
we actually want. With these faces selected. Now we can rotate
our camera a bit. We're going to start
extruding these out. So would extrude does is
it actually is going to create more geometry here. So we can hit Alt Z to get
out of this x-ray mode. Now that we have what
we want selected. If you hit E, it'll
start extruding. This works just like the, the move tools and that
it's going to use, in this case our
local axis here. So we're going to extrude
it up just a little bit. Now that it's been extruded, we're going to hit S to
scale it in a little bit. You can see here we're
starting to try to make that little taper to create that little
tip on the end of it. So we extruded up a
little bit by hitting E. Then we scale it
down a little bit. We can extrude it up again. So maybe we'll do
one more scale. Again. If it seems like it's
moving too fast for you, you can hold Shift
while you're moving this to make it a
little bit smoother, a little bit easier to control. Now we'll extrude it out again. This time we're gonna go
up a little bit further. That's rotate around. Make sure everything
we've done so far, it looks pretty good. Can zoom out a little bit. We can see here
that The Tail looks pretty similar to
what this looks like, except ours stops with
a really blunt edge. So to correct that, we're gonna go into our
edge mode by hitting to. We're going to hold Alt to
select this edge loop here, and we're going to click it so that it selects the whole thing. Now we can right-click and
then go to bevel edges. As we move this, you
can see it's starting to sort of cut that
edge and half, split the difference
between them. If we scroll up on our mouse, it will add more edges
to it to smooth it out. If we scroll up
just a little bit, just add a few more edges here. And then we want
to move it down to about, right about here. Now we can see that we have
a nice round edge on this. Now that we have nice rounded
corners on the edges here, let's hold Alt and click
this bottom edge here. Then we're gonna use
something called proportional editing. So at the top here there's
this little circle with a.in the middle of it,
guide and click that. Now hit your G key
to start moving. And we want to move this
in the Z direction. So you can see here, when I
start moving that I'm getting the ability to move things sort of almost as if they
were made of rubber. So it's sort of stretching everything a little
bit all at once rather than just moving
a single edge or a single polygon
or a single vert. Proportional editing
allows you to move all of them All at once, but to a different
degree based on how close it is to the edge
of the F selected. In order for this
to work, however, you need to adjust the size of this circle that's showing
the influence of it. So the larger the circle, the greater the influence it has when the objects around it, the smaller the less
influence it has. You might start out by
doing this and then realize once you try to move this
and moves the entire object. And that's because you are
proportional editing circle here is much too large. That's because this object
is relatively small. So to remedy that,
you can scroll up on your mouse wheel
to make it smaller until eventually you start
seeing it come into view. Or you can use your page up and page down buttons to
change the size of it. If you use page up,
it'll make it larger. If you use Page Down, it'll make it smaller. So you might just have to hold down the page down button for awhile until you start
seeing it come into view. You can see up at
the very top left of my screen that it's actually showing the size of this proportional
editing circle. So just keep holding
on that button until it gets down
to about this size. So we want it to
be almost in like the half inch, 2.25 inch range. So once you have a down
to about this size, make sure you have that bottom
edge selected and we're moving it just in Z
with the local axis. Then we're just going to
pull it down a little bit to help round out that edge. We can move it to about there. And now you can see
it's a lot more round. We might also want
to do something similar to the edge down
here at the bottom. We can hold Alt and
select this edge. Now we'll hit G and Z so that we're moving it
just in the z-direction. Then I can scale this
up a little bit. And I want to move this
down so that I kinda make a little bit of a sharper corner down here based
on our reference, it shouldn't be quite so gradual So I'm gonna move
it down to about here to help flatten
this out a little bit, make it a little bit more
of a corner rather than a nice soft edge
like we had before. Now that we're done
making those adjustments, we can go up here and turn
off proportional editing. Now if we go back and move, you can see it's just
moving that singular edge, which is the normal
way of moving stuff. I'm going to Control Z that
since I don't actually do that, we can zoom out, get a better idea of what
are Tail looks like now, I'm gonna hit tab to exit
the edit mode and go back into object mode.
We can zoom out. I think that's how it
looks pretty good. Again, we can always
adjust the proportions as we start adding more pieces. We might want to make
the tail a little longer or shorter or the
body a little longer. But for now we're
just trying to build the basis of this that
we can then edit later. Now that we have
The Tail created. Let's start on me, not on
the tip of the balloon Nose. This is Reference
we have for the not on the balloon Nose. We're going to be
much more simple than this because for our model, we're really not doing
a close-up on the nose, so we don't need
to go to all this different detail and all these different folds
increases and stuff. We just need to have
the indication that it has a not on the end of its
Nose similar to what this is. So to begin with, let's start
by hiding our body segment. We're just going to
select the body segment. And then we can click
this little eyeball here at the top right. And that will just hide it in the viewport so we
can see past it. Now we can zoom in down here. We're going to hit shift and
a to create a new match. We're gonna go up to
mesh and then we're going to go to and tourists. This is going to make
a doughnut shape. We're going to start by
creating this shape here, which is the outside edge of this balloon. Let's
zoom in here. The measurements that
you're going to want are what matches my screen here. So you're going to want
48 major segments, 18 minor segments. And then for the major radius, you want to 0.2 ". And then for the minor radius, which is the thickness of this, you want 0.05 ". You can see this is a
relatively small detail and it's gonna go right
at the tip of the nose, which really isn't the main
focal point of this object. So we don't need to put a
whole lot of detail in it. Something like this would be
pretty overkill for this. Once you have that created, you can click off of it. Now we can select the model. We can right-click and
we can do Shade Smooth. Now it's a nice smooth
shading on the outside of it. So we're going to be using
some align tools to help align this tourists to
the edge of this Nose. To begin with. Select your tourists first, then hold shift and
select your snout. Now we're going to
go up to Object, Transform and then
align objects. Now that we have
this option box up, you want to hold
Shift and select each of these letters
here for the axes. So this is aligning
it to the x-axis. If we have this
highlighted, the Y, if we have this, and
Z if we have this. In our case, we want
to align it to all of these axes for this object. Now if we had Alt and Z, we can see that our
tourists here is actually snaps right to the middle and the
sensor of the snout. Now that we have
the object aligned, you'll notice that
it's in the center of the object that
we want it to be. However, it's not
rotated correctly. Now that these objects are
intersecting with each other, it's a little bit difficult
to just select the tourists. Now, we can select it
from this list over here by first selecting
the tourists here, and then hold Control
and select the snout. Now we're gonna go up
to here and change it from global to local because we want the rotation to match the local
rotation of this, not the global rotation. Then we go to Object Transform and then align to
transform orientation. We can see now that the
tourists has been rotated successfully to match
the orientation of this. Now, let's go into
our X view here. It's got a nice side view. With just the tourists selected. We're going to hit G and then
Z to move it on the z-axis, which is going this direction. Now that follows this. Now we're going to
move it just off the edge here and
we're going to leave a little bit of a
gap between them. Think about there it looks okay with the tourists in place. We can now begin the
modeling of the non. First, let's hit Alt Z because we won't really
need that for this port. Then we can zoom in here. And we're going to hit tab
to start editing this model. Now that we have the
tourists and place, our goal here is to
delete the backside of this torus so that we can start creating
this back portion here. First, let's make sure that
we're in the face mode. So let's hit three
on our keyboard. We're going to
start by selecting, I think this ring here
is probably good. So we want to, we want to leave a little bit of this round here, but then we're going
to be deleting off the back of this and then re-creating the back of it to taper inward
towards the snout So I think there looks good. So we're going to start
by holding Alt and then click between these
two polygons here. So we're going to click
on the line between them. And that'll let us select
all the way around it if you select directly in
the center of it instead. So if you select directly
in the center of a polygon, it will actually go
around the other way, which isn't what we want. So we're going to select between
the two to get the line. Then we can just hit
Delete on our keyboard or X, either. Neither works. They'll get It's going to ask
us what we want to delete. So in our case, we want
to delete these faces. So we'll just click
faces and delete them. And you can see we've
deleted out of gap here. Then the same story on the
inside and we want to find a spot that leaves a little
bit of this interior round, but deletes the rest of it. So I think about maybe here. So a few in it looks like
it might be for four faces. In the fifth phase, I
believe we're gonna hold Alt and select this
border between the two, selects the round, then
we can delete that faces. Now the easiest way to delete
these faces off the back. Now that we've made two
different gaps here didn't separate it from the
main body of the object. We can select a single
polygon on this, then hit L on our keyboard
for select the linked. Then that'll select everything
that's attached to that. So everything that's
attached to this polygon, which in this case
it can't go pass these gaps here because
there's a gap between them. So it'll select everything here on the back that's floating. And then we can
hit delete faces. And now we've
successfully deleted off the back of this torus. With all of those
phases deleted, let's hit the two
on our keyboard to switch to the edge mode. Now we're going to
start by selecting this interior edge loop. We've created this border that
we've made on the inside. So we'll start by
holding Alt and clicking this line
between these two. And that'll select
the interior edge. Now, like we did with the
Tail where we extruded out, the polygons can actually
extrude out edges as well. So we're going to hit
E to start extruding, and then we can hit
Z to make sure it conforms to the
correct direction, which is straight back. So we're just going to scale
it in just a little bit. Or rather we're going
to extrude it in first. And now we'll scale it in. So we'll hit S on our
keyboard to scale it in. We're going to start
making a gradual bowl on the inside here that caps
the inside of this, not. Now we'll hit E again
with Z selected. We're moving it back in
the correct direction. Move it in here. Then we'll scale it down. Again. If you're having
some issues with the angle or it moving too fast, just hold shift to slow
down that movement. Let's move that in a little bit. And I might've been a
little bit too far, so we had G and then
Z to reposition this. Now let's hit E to
extrude it again, Z again, to make sure it's going to direct
correct direction. Let's scale this in almost
until it's touching. We want to go quite far. Might help if you
rotate around now. We're just gonna do
one more extrusion. So he, and then Z, just to move it back
just a little bit. We only want a little edge on
this one. Now we'll hit S. To scale this inward. We want to scale it until
it's basically touching here. So about there. Okay, so
now we have this edge here, but it's not actually
fully capped off. It's an open edge here that
it's an intersecting itself. So to begin with, we're going to hit the one key to switch into our vertex mode. As long as you had
that edge selected, when you switch to vertex mode, you should notice
that it automatically selects the vertex than
made up that edge. However, if for some reason you de-selected or it didn't
automatically select it, you can just go into your old C mode so that you
can see through the object. Then just drag select over
these vertex in the middle. Now you can see I have all
of them selected again. I can get out of alt Z. Now we're going to hit M
on our keyboard for merge. We hit M, we get three
different options. So we're gonna do
merge at center, which will merge
all of these vertex into the center point. So just averages and all out picks the center
point and then converts them all into a single vertex to help cap off this object. Now we can hit G and Z and then pull this so that it's a little
bit closer to flat. If we wanted to flatten
this out a little bit more, we can hit Alt Z to see
through the objects. Select all of these, and then hit G and Z to flatten them out
a little bit more. We make a nice bowl shape here. Now that we have this
interior shape done, we can finish the outside
tattoo on our keyboard. To switch back to the edge mode. We can hold Alt to select
this edge loop here. Now we're gonna do
a similar process, but instead of bringing them all to a point like we did here, instead we're going
to taper it back and then just bring
it back to this now. So first we'll hit E and then Z. To scale it back a little bit. We can scale this end so
we can start to taper now. Then we're just going
to keep performing this action until we
eventually reach this. Now. Now that we've
reached the snout, we can go back and re-evaluate the shape and make sure it
looks like how we want it. So first let's start
selecting this edge here. So hold Alt and click this edge. Maybe we need to move this a little bit more to the front. We just hit G and Z. We can just slide this a little bit more to the front to keep that sort of round edge here
and that we had before. Let me can hold Alt and
click this one, G and Z. Remember, we'll just pull
this a little bit further forward to make the taper
a little less gradual. Now let's hit Alt and Z. Then we can x-ray this mode. Then we'll hit the Alt, click on this edge will hold Shift while
clicking this edge. Then the same thing for
the last edge here. So we have all three of
these edge loops selected. And let's scale these
in just a little bit. Okay, Now hit Alt Z to get
out of that x-ray mode. We can rotate around and inside of our model
here to make sure that it's actually intersecting,
which is what we want. Now let's zoom out
and just double-check that our balloon non
here on the front. It looks correct. So we can hit tab to exit the edit mode. Let's zoom back a little bit. We can turn back on the body up here at the top right by
clicking the little I. Then let's rename
this tourists to not that we know what it is. Let's zoom out. Now we can see here that we have
a nice simple balloon, not that makes up the nose of the snout for
the balloon dog. The next lesson,
we'll be modeling The Ears of our balloon
dog. I'll see you there.
6. Modeling: The Ears: In this lesson, we'll be modeling The Ears
of our balloon dog. Let's begin. To start. Let's go to our
X view at the top-right. Now let's select our
body segment and hit Shift and D. To start
duplicating it. We're gonna move
that up to right around this intersection between the snout segment
and the next segment. So you can put that about here. Now let's rotate this
new piece by hitting R and then hold Control. And then we're going
to rotate it until it's straight up and down. Now, eventually we're going to rotate this backwards
a little bit, but it'll be easier to work with when it's straight
up and down for now, because we're gonna be
doing some modeling on this Ears segment. Now up at the top right, we can click on this Y to switch to the front
view for this object. We're gonna move this over to the right just a little bit. We want it to be off to
the right of the center. This blue line here, we're going to move it
off to the right of that. So right about there,
just passed it. Now that we have this starting
Ears segment in place, let's discuss what
we're trying to accomplish with this piece. So you can see down
here in our Reference that The Ears for
the balloon dog, it's actually one segment of balloon that's been
twisted in the middle. And then they're
folded over and then ran back down into
this intersection. So our goal with this is to
create something that looks similar to this sort
of twist at the top. And then Abbott pinched
down at the bottom. You also noticed
that the balloon for the ear bows out a little
bit here on the sides. So it's kind of
squished together in the middle and then it
pushes out on the edges. So we're gonna be trying to
accomplish that as well. If we zoom out here
on our reference, we can see another
photo reference down here that's a little bit closer to the Ears to help see what I was
talking about here. So it bows out a little
bit on the edge. It is a little bit flat in here, maybe a little bit concave. So there's gonna be a bit
of a gap between the ears. And then there's a section
at the top where it either pinches together or they squeeze the air out so that
they can successfully fold it and make a
transition between them. There are different types
of balloon dog ears. You can see on this
balloon dog here that they've opted to not do any
sort of pinching at the top. However, in our balloon dog, we're going to try
to do that because I think it looks
better when you have two distinct Ears rather than this shoe U-shaped
for that Ears. So let's go back to the original
reference I showed you. Will try to just generally
match these shapes. We don't need to be
perfect with this. Before we begin any modeling, let's just go up here and
rename this new piece. Instead of Body 001, we're going to name this Ears. So we don't forget
what this object is. Now we can hit Alt and Z on our keyboard to go
into the X-ray mode. Then we're going to hit Tab
to go into the edit mode. Now we need to go to Edge, which is the two key when the keyboard or this
little symbol here. We're just going to drag select through these
middle points here. And then we'll right-click
to sub-divide. Our next step here is going
to be to bend this object to get this bowing on the edges as well as the
concave in the middle. And in order to do that, we need to have more polygons
here in the middle to bend, because you can't really
bend a single polygon. It needs to have
some additional cuts in it so that you can
bend it smoothly. So down here at the bottom left, we can see it starts with a
number of cuts is set to one, which means it's
just going to put a single cut down the middle. We're going to click this
all the way up to ten. We want to have these cuts
here, relatively square. We probably don't
need more than this. I mean, it could be a little
bit more square than this, but this will be plenty
for our purposes. So once you have
that set of ten, you can just click off of it and then it'll
accept the change. We can hit Alt and Z to
exit the X-ray mode. So that's a little bit
easier to look at. The next thing we need to
make is the lattice object. First, let's exit the
edit mode by hitting Tab. Now we can hit shift and a. It's bring up the Add menu. We're going to be
adding a lattice. So we can click this here. Now I want to zoom out
a little bit to get an idea what this lattices, this big orange box that we
just created is the lattice. The lattice itself
is not a mesh. However, you can re-size this lattice to be a
cage around a mesh. Then we can add additional
cuts to this lattice. That lattice will allow us to deform the object that
it's parented to. The first thing we
need to do is to line this lattice
up with this ear. And you can see it's much
larger and it's off center. So there's a few different
ways we can do this, but I'll try to show
you a different way than the line method
that we did last time. Up at the top center
of your screen here. And you'll see this
little U-shape here that looks like a magnet So this magnet is
your snaps toggle. When you turn it on,
you can see it lights up and it looks like
a little magnet icon. Now, now that we have
our snaps toggled on, we can change the type of snapping that it's going to use. By default, it should
be set to increment. However, in our case we
want to set it to vertex. One vertex is going
to do is allow it to snap to the vertex is on
an object and the scene. So to start, let's go up to our Y view to see the
front of the balloon dog. We consume in a bit. Now let's hit G to start
moving this lattice around. And you can see this
little orange dot is snapping to these vertex through these points where
they converge on the model. We want to center it up on
the center line of this year, which is this line here. Then we also want to put it into a center point on this ear. I think right about
here, it looks good. We can always adjust this
later if it's not dead center. Now let's go to our X
view at the top-right. Can recenter our camera a bit? Now we're going to
hit G. Then why? To make sure that
it's only snapping on this direction
if you just hit G, It's going to snap to
the outside of this and it'll mess up the last
movement we made. We want it to only consider
snapping in this direction, so we'll hit G and then Y. And then we're going
to snap it again to this midpoint here. Now if we rotate around, you can see it's centered
in the middle of that. Now that we've snapped the
lattice to the sensor, we can go up here
to our snap toggle and turn it off just
by clicking it off. Now we're going to scale down this lattice so that it's the
correct size for this ear. So we want to snug it up, right up to the edges of this ear without
intersecting it, we can leave a little bit of
breathing room around it. So to start, let's just
start scaling it down uniformly to meet
roughly the same size. Again, you can use
shift if you find that easier to slow
it down a little bit. You might also find this
easier if you're in one of these more orthographic views by clicking one of these
dots at the top right. We can see here by
scaling it down, I was a little bit off on
my choice of vertex here. So if that's the case
for you as well, click this handle here
and just pull it down. Again that you were seeing
these handles here because I actually have the Move Tool
selected at the top-left. If you don't see these
handles, or you could just, you could select
this icon up here or you can just
hit G and then use Z to move it as well. I'm
going to center it up. And now we can scale
it up a little bit because you don't want to
actually intersecting, you want to just a little
bit outside of it. Right about there is good. You can see I've a bit of a gap. Now I can hit S and then X to make sure that I'm only scaling it in
the x-direction. Just hold shift to slow
it down a little bit. We're gonna get about the
same distance from the edge. And I'm going to go to the
X view at the top right. Now I hit S and then why? To make sure I'm
only scaling it in the y-direction. I
think that looks good. So now we have a little
bit of breathing room all the way around the object. If we rotate around, it
seems to be nicely centered and it's scaled down to
an appropriate size. Now let's go into the
lattice properties. So we can do that
by going down into this little green icon down
here on the bottom right, that looks like the lattice. So we select that. Then the settings
we're concerned with here are the lattice resolution, which is how many
cuts it hasn't it? So if we turn this number up here by turning and
accepts a three, you can now see that we have a cut right down the middle,
going this direction. And we'll do the V as well. Now we have a cut
going this direction. And then for the horizontal
cuts going this direction, we need to increase the W
value, except this one, we want to have a
lot more cuts than just a single cut
down the middle. We're going to turn
this up to seven. We're choosing
seven specifically because it gives us
a nice mid point. If we make it an even number, then we lose a midpoint that we can select
in the center here. So we're going to turn
it back down to seven. That way we have a nice point right down the middle
that we can use to select basically direct
center of this year. Now that we have the
lattice resolution setup, we can now select the ear, then select the lattice, then hit control and P to
parent these together. What we want to select
this lattice to form. So when we select this, you'll see nothing
happens immediately. You might have noticed that your little menu over
here has changed and now The Ears reside
within the lattice itself. What this means now
is if we select the lattice and then go into the edit mode for the
lattice by hitting tab, we can start adjusting the
points on this lattice. And it will actually deform the object within the
lattice that we put there. So I can hit Control and
Z to undo that change. The point of putting this object within a lattice and
then deforming it with the lattice instead of just using the
points themselves, is we get a bit more
control by using this lattice because we have
less points to worry about. So we don't have to
worry about getting it sort of weird and lumpy in there by not selecting
the correct points are having to make a
nice smooth curve. We can just let the
lattice do some of that work for us
because it's going to deform all these things
uniformly based on the lesser amount of
verts that we have to work with on the
lattice itself. Let's switch back
into our front view using the why Up
at the top right. Now we can select a
points on these lattice. We can start to try to match
the shape that we see here. So one thing you
might find a little bit easier while moving these lattice points
is to turn on your proportional editing like
we had in the last lesson. If you click this, now when you move things
with the G key, so we can hit G and then X to move it only
in the x-direction. We can make this circle larger or smaller to affect
other points with it. If we wanted to affect these, these two points directly
above and below it, we can make this circle
encompass those points. And the larger we make it, the more influence it will
have on other points nearby. So first let's just try to
pull this out a little bit. Some of that sort
of rounding we see in the reference image. So we'll pull this out. Maybe I'll make my circle a
little bit bigger so the, the pool is a little
bit more uniform. We can select these inner
points here by selecting them and then hitting G and X. Let's pull those in
just a little bit. So we're going to try
to create a little bit of a gap because
eventually we're going to be duplicating this ear and
setting it next to itself. So we want to have
a little bit of a see-through gap here to
let people know that these are two unique segments of balloon and this isn't
one confined object. Now let's select these
points on the bottom. This case we can just
hit R to rotate these. We want to rotate these slightly towards the center
because we want to give the impression that this
little segment here is going into this intersection
where there's going to be more knots and things in
real life tied together. Since we have that move there and we can just drag this over. Tried to center it a little
bit back towards the middle. Now I encourage you
just to go through this ear and just start, just try to massage some
of these curves here. If something seems
a little too lumpy, go ahead and just, just start pushing these
points around. It's pretty easy to
mess with this lattice. We're going to try
to round this out, try to match this
shape a little bit. Now once you get something
you're happy with. We're gonna go up to the top. We're going to select these
top three points here. We're going to start
rotating these. So our goal here is to rotate this center point more towards about where this
corner is actually. Because eventually
we're going to have two different here
segments here. And then we want to
have some sort of connecting bridge between them. And a connecting bridge
is going to look a lot nicer if these are
rotated towards each other so that the
bridge isn't so thin and sort of squished at the top. Let's start by hitting
the R key to rotate. These might need to hold Shift to rotate these
a little bit slower. We're just going to rotate
it just a little by little. And at this point you
might want to turn off your proportional
editing because if you're happy with
your shape down here, you don't really want to
mess with it too much. So you can just click
this icon here. Every time we rotate it,
we're going to need to try to pull it back towards the center. So in this case, I might want to grab a little bit further down, rotate these a little bit. And then I'm just going
to move them back towards the left again. So you can see I'm
slowly inching this central pole at the top or all these points
are coming together. I'm trying to move a little bit. So that's angled more
towards the left. I think one more rotation of just the top points
should do it. I'm going to rotate a little
bit more to the left. Then we're just going
to pull this out again. So in this case, it's
starting to look a little bit flat up
at the top here. And we can adjust that just by grabbing just like the
center point here. And moving just that. You don't have to grab
them in large groups. You can grab a
single-point at a time and really tweak this shaped here. Heart's content here. We're just going to
try to make a nice little rounded top on it. But eventually we're going
to be bridging between. So just go through here, finish up any rounding
you wanna do, make sure your top is
rotated about where mine is. It's I'd say it's just
about a 45-degree angle, maybe a bit shy of 45 degrees. Okay, So I'm pretty happy with the shape that I have here. Now for my ear, I'm gonna hit the Tab key to exit the
edit mode on the lattice. Then I'm going to select the
ear instead of the lattice. Then you're going to
go to your modifier properties panel
here on the right. So it's a little
blue wrench icon. And then you can see here
that we have this lattice here as a modifier
on this object We wanna do is apply the changes of the
lattice to the modifier. Because if we just delete this lattice now that
we're done with it, it's going to lose all these
changes we've made to it. We need to have first apply those changes to
this balloon model, the actual mesh itself so that when we delete this
lattice and get rid of it, it doesn't just lose
all the changes. We can do that by hitting
this little drop-down here on the right side and then
just choose Apply. Now those changes, you can
see the modifier is gone because it's actually applied those changes directly
to the model. We can now select the lattice, then just delete it
with the delete key. And you can see those
changes stick around. Now that we have these
changes applied, Let's select the ear again, hit the Tab to go
into the edit mode. Then we're gonna go
to the face mode. We're going to have three. We can select a single
face on here and then it L to select all the linked ones. Or alternatively, since there's only just this object in here, you can just set a and it'll select all
those faces as well. So either one works. Now we're going to
hit Shift and D to start duplicating
just these faces. And we went to only duplicate
them on the x-axis. We hit X while we're duplicating and it'll make
sure it only moves on the X. Just move it to about here. You're gonna have
to reposition at any way after we mirror it. Now we have our duplicate. We can go to Mesh mirror and then we don't
wanna do X global. So you can see now that
it's mirrored these and then we can just move
it back into position. We want to move these
so that the top here just about touches. I mean, it's okay if it touches just a little bit so it can
intersect just a tiny bit. Right about there seems good. And then we want to make
sure that these bottom here is close together. I think that'll be
okay once we slide these Ears down into
the correct position, right now there are
a little too high and they're also not angled. So I think once we
slide them down, you won't notice
the small gap here. I think this works
out fine for ours. Now we can rotate
around our model. What we wanna do now is
select these polygons surrounding the central
vertex here at the top. So just make sure you have
your Lasso Select tool on. Up here. You want to select lasso. That'll make it easier
to select this circle. Then you can just click and drag and just draw a little circle around this hold Shift. And draw a circle
around the other side. I can see we have
both sides selected. Then we can just hit Delete. And we want to delete the
faces that we just selected. Now we have all of
those faces deleted. We can get to the jump
to our Edge mode. And then we're going to select
both of these edge loops. We can add Alt and
select an edge here. Then, while selecting
the other one, make sure you're holding shifts. So we're going to click
while holding shift for the second and
select both of them. Now. Now we want to hit right-click and then
choose bridge edge loops. We can see here now that it's bridged across these edge loops. So the intent that we're doing here is we want
to try to make it look like whoever was folding this balloon dog and twisting it up did something similar to what they did here
where they didn't fully inflate the balloon with the intention that
they would need to have somewhere that
they could bend this. So rather than going with a
really tight, twisted look, we're going to just
let it be a little bit sort of uninflated
in the center here. And then we'll have
a bridge between these two pieces
to let people know that this is one single balloon that's going around the ears. But you might notice
that we're getting some really weird
looking shading on this enormous looks like
this part here is in shadow. That's because when we
duplicated these faces across, it's actually flipped this one inside out for some reason. The best way we
can check that to make sure that we are
correct and the fact that this is inside out as go up here where we change the
wireframe mode before. So these two little
intersecting circles, we want to go down here
to face orientation. So when we check this on, you'll see the
whole model here is blue except for this
side of the year, which is red, which
means this side of the year is actually
rotated inside out. So it looks correct as a model. However, these faces are
actually turned inside out. So this is the inside face. And then the inside
of the balloon is actually the outside face, which is obviously incorrect. And that's why we're getting
these weird shadows here. Blender isn't quite sure how to, to sort of figure out
what's going on here, because the model just abruptly
turns itself inside out. So the way we can fix
this is by hitting the a key while we're
in this edit mode, we want to make sure we're
in face mode actually. So first switch to face mode. So adding three.
Then we're going to hit a to select
the entire model. Then we can go to Mesh. We can go down two normals. We wanted to re-calculate
the outside. So essentially we're
just telling Blender, Hey, can you look at
this model again? And then just make sure
everything that we have selected is actually
considered the outside, not the inside or the outside. So when we click this, you can see now the model
is turned entirely blue We can go back up to
this overlay panel here and turn off for
face orientation. And you can see now
that the shading between these is
actually a lot better. So the smoothing groups are able to figure out
what's going on here. Now, it's a pretty sharp edge here that we have and
we'll be fixing that. You're still getting
a little bit of a sort of a weird
look at the top. But it's much better
than it was before. Now that we have the
faces correctly oriented. Let's go into the
X-ray mode again. So we're going to hit Alt and Z. Then we're going to
switch to our Edge mode. We're going to select these
edges here in the middle. So we want to select these new bridged edges that we have. Then we're going to right-click. We're going to do
sub-divide again. We don't need a ton of faces
here, and let's just try. We'll do three. So we can see we add the
three little cuts here, which this is just
going to give Blender a little bit more resolution for the next step where we're going
to smooth this stuff out. We have three cuts in it
now, we can click off of it. Now let's switch back
to our vertex mode, which is one on the keyboard. We can get out of this
x-ray mode as well. So we can Altman Z
get out of that. Now we'll hit a to
select everything. Then we're going to right-click and then go to smooth vertices. So once we select that, we can zoom in up here. We can see it's started this actually smooth
out some of this. So let's a little
bit more rounded. You can see it's not
entirely flat here. It started to bow it
down a little bit. We can make that
smoothing more severe by turning up the
smoothing value down here. By default, it's set to 0.5. If you turn it down to
zero, it's doing nothing. And then you can
turn it up to one to increase the smoothing. That's at one. It looks a little bit better. So we can click off of
that. Can check it out. We hit tab, we can go back into our regular objects mode to get a better idea of
how smooth it looks. Maybe we want to
try that one more time so we can go back into our edit it a, to
select everything. Right-click. Go to smooth vertices. We can turn that back up to one. You can see it's
actually, it's smoothing it out a little bit
more this time. However, if we wanted to
do it again without having to go back in and re-select
and rehydrate everything. We can just increase
this repeat value down here at the bottom. So this is essentially
saying paid, do this smoothing that one value except to it twice on the model. If you turn it up, it'll
do it three times, four times, five times. However, you can see as we
smooth it more and more, it actually starts pulling these points away
from each other. So we might not need to do
it quite as much as that. I accidentally clicked
off of it there. So I just need to go
back like Control Z that no listen with vertices, maybe five, a little
bit too much. We'll try to. At this point, we've
smoothed this thing about three times. Now I'm happy with that.
We can click off of it, go back to object mode. We can see here that it
looks a lot more smooth. That's a lot more gradual now. Now we just need to adjust
the placement of our ears. So I'm gonna go into
my X view here. Select my year. Now we can pull it down so that it intersects with this intersection here. Let's pull it down
to about here, and we might need
to adjust it later. And then we can hit the R key
to rotate these Ears back. And we don't want to
rotate them back too far. Although it's up to you. If you really wanted
to pull it back, then it just kinda have Ears is sort of look like
they're blowing in the wind. But maybe we'll try to match the rotation there of the Tail, make it uniform with that. So think about
right about there, maybe a little bit less
somewhere in that range. So about 20 degrees backwards is a nice match for
the tails rotation. We can rotate around, see how this looks. When you to pull it down
just a little bit more. I think that looks pretty good. So there's sort
of like a hidden, not essentially
that we're implying to the viewer of this object
that's somewhere in here. All these balloons are
being tied together. And then the areas
where we can't hide it, we're giving them
this indication that the balloon is not
fully inflated at the top. That way they were
able to fold it over, sort of like The Tail. The next lesson, we'll be modeling The Legs
of our balloon dog. I'll see you there.
7. Modeling: The Legs: In this lesson, we'll be creating the legs
of our balloon dog, utilizing The Ears we
modeled in the last lesson. Let's begin. We'll start by going into the X
view at the top right. Now we need to select our ears and then we're
getting to duplicate them using shift in D. We're going to move
them down here. It's about where the legs are. About. There looks good. We can rotate around. The first thing
we wanna do is we want to make these
Legs symmetrical. So before this
intersection here was pretty well hidden
by these two pieces. However, on the legs, we're going to want to
make sure that we have this sort of deflated section, that bridge that we made
before on both ends of this this Legs segment because we don't want them
separated at the bottom. Let's start with censoring this pivot point
that is currently down at the bottom leg to
the center of the object. So that's easier to
make symmetrical. It's we're gonna go up to Object and then go to set origin. Then we're going to choose
origin to geometry. Now you can see here
that it's snapped at right to the center
of this object. And that'll make
it easier for us to make it symmetrical. Now. Now we can go into the edit mode for these Legs by hitting tab. We're going to switch
to the face mode using three on our keyboard. Then we're going to hit a to
select all of these phases. Now go up to mesh and
then down to symmetrized. We'll click that. Then you can get,
I need to switch your direction
here on this drops down to plus Z to minus Z. So if we did the
opposite of this, so if you did minus
C two plus Z, you can see now it's duplicating the side that had
no bridge on it. At the top there's no bridge and the bottom
there's no bridge. Then also there's these
other options here that will make it symmetrical in other ways other
than what we want. The one we want is
plus Z to minus Z. And that will make the
top symmetrical as well. On the bottom. We can see here and now we have that bridge on the
top and the bottom. So much you have that setup, you can just click off of it. And now that'll confirm
that selection. The symmetrized, did
a pretty good job of making the model symmetrical. However, it left some messy
geometry here in the middle, there's a lot of cuts
really close to each other. We don't really need that. We're gonna go into our edge
mode now with the two key. Now we're just going to zoom in here and we're going to select the top edge by holding Alt. And then we're going to
continue holding Alt. And now hold Shift to select the bottom on both the
left and the right leg. So we're only leaving
the middle one behind. Now that we have those selected, you can hit X or delete
on your keyboard. And we want it to
dissolve these edges. So we don't want to
actually delete the edges because we delete
the edges entirely. It will delete the
faces that are associated with them as well. By dissolving them edges. We're only getting rid of the edges themselves but leaving behind the faces that
they are attached to. Those edges deleted. The model is a little
bit more clean now. We don't have all those
really close together faces. Now we could do a
little bit better job here of placing this leg. So we're going to switch
out of our edit mode. Now we can just move
this leg around and make sure that it's kind
of nestled up inside this this intersection here. We want to make it
look like it runs into some sort of twisted, not with inside here. We can check on our X view here. We can see as long, as, long as this
rotation looks good, we can probably leave
it as is right now. It's currently the
exact same rotation as the, The Ears are. If we wanted to
make that a little less symmetrical on the
top and the bottom. We could also rotate
these a little bit. So maybe we rotate them out
just a little bit further. So about ten degrees more. You can move this
back to where it was. About there. I think these legs should
be a little bit longer. So currently our ears are the same length as our Legs,
which is a little odd. So you can see up here
at our reference, The Legs are a fair bit
longer than The Ears, maybe 25, 30% longer. Let's try to make sure our Legs match that proportion as well. To lengthen our legs, Let's go back into
edit mode using tab. Then we're going to change
it to the vertex mode, which is the one key. We're going to hit Alt Z so that we can select
through the model. Make, see here that
this edge here is kinda like the exact
midpoint of this leg. So let's select all the
vertex below this point. You can see here I'm also using the Lasso Select to change into the Lasso Select in case you don't
have that selected. Now is up here at the top, you can click and
hold on this button. Then you have the option between different types of selection. So I'm currently using lasso. With these vertex selected. Make sure you don't have your proportional
editing turned. One's still, we're
going to turn that off. Now we can hit G and then Z to move them just
in the z-direction. Now that we've lengthened
it a little bit, Let's zoom out and see if
the proportions are correct. I think our leg could still
be a little bit longer. So we're going to G
and then Z again. To pull these Legs out
a little bit further. We'll hit tab to exit
or edit mode and then hit Alt Z to
X at the C3 mode. And let's just spin around
and make sure that we liked this leg before we decide to
duplicate it to the back. So before we've duplicated it, Let's switch back to global, because right now you
can see our arrows are pointing the
wrong direction. If we move this in this direction, it's
going to go downward. We want to make
sure it just goes straight forward and backward. So we'll go back to global. Can deselect this just to
rotate around our model. I think that looks okay for now. They might be tilted
a little bit too far, but let's see what it looks
like once we get the back leg on the start and we're going
to select our front leg. We're going to hit
shift in D and then hit Y to make sure it only
moves in the y-direction. We're going to move it
approximately the right spot. We're going to have
to rotate this. Now you have the
option to either rotate this leg by hitting R and Z to make sure it only
rotates and the z-axis. And then you can
just hold Control to rotate the amount of degrees
you need, which is 180. Or alternatively,
if I Control Z, that change, I can go
up to Object mirror. Then why global? And that will just mirrored
across the y-axis. So either one works. In this case, because this
object is symmetrical, it really doesn't
matter whether you rotate it or you mirror it. It's the same thing either way. Now we can go into our X view. And let's just make
sure that this leg is positioned on the same
roughly the same area, but the last one was
like That looks okay. Let's rotate around,
just get a feel for whether or not there's
any gaps in the model. I think overall, it
looks pretty nice. Our next step is to parent
all of these pieces together. That way we don't have to move
each piece individually or just drag select
over it every time we want to move the
entire balloon dog. So to start with, we're going to select this body segment. We're gonna kinda go to Object, set origin and an
origin to geometry. Because we're gonna be
using this body segment as the main parent for all the other pieces
with the origin set. Now we can go through
and select each of these pieces individually. We're going to hold Shift
while we select them. Make sure you select
your body segment last. You have to select
every piece first. Then the body segment
will be last. That way this operation Nose, which piece is the parent
of all the other pieces? You can see that
these pieces are a different color from this one. So this one here
in the center of the body segment will be the
parent of all the others. Now we can hit Control and P together to bring up
the parenting menu. And we're just going
to choose object. When you click that, you
might even notice that these little dotted lines shoot out of this body segment here and go to the other pieces. They're the most
noticeable here on the top and the
bottom of the head. What that means
now is if I select this body segment and I move it, it moves the entire
balloon dog with it. You do, however, have
to make sure that you, when you're selecting
this balloon dog and you want to move the entire thing that you're
selecting, the body segment. When you do that, if
you select just a, another piece and then
try to move that, it's only going to
move that piece. It won't move the
entire balloon dog because that piece
is not the parent. I'm going to Control
Z that change because I don't want to
actually just move The Tail. I want to move the
entire balloon dog. Now the last thing that
we'll do in this lesson, because we're going to be
applying a modifier to this model that will make the model overall
a bit smoother. So it's going to
add more geometry to this model to even out some of these jagged
edges we might see when we get a
little closer to it. So to start with,
we're going to have the body segments selected. We're gonna go to our
modifier panel here, which is the little
blue wrench icon. We can select add a modifier. We want to add a subdivision
surface modifier. We can click that. Now that we have the
Modifier applied, we can turn off the effect to see what it looked
like before and after by clicking this
little monitor icon here, which will disable this
effect within the viewport. If we turn off the
little camera icon, this will also turn it off
for the Render as well. So by turning this
on and off here, we won't see any change because
this is not the Render. However, we turn off the
little monitor icon here, we can see a change
in the model with a subdivision surface Modifiers
doing is it's duplicating all of the faces we have on
this monitor and putting in-between cuts between all of these different edges here. When we turn this back on here, you can see that overall it's a little bit smoother
here on the edge. And the reason why it
doesn't look like it's adding any additional phases. Because we have this
optimal display turned on. When you turn this off, you can see here now that
we do have more cuts. So by turning it on and off, this isn't actually
changing anything about the edges of the model, but it's allowing us to see these hidden cuts
that it's putting in. So it's up to you whether
or not you want to have this optimal display
turned on and off. If you want a cleaner
looking model, then you can just
leave it checked. But if you want to know
for a fact that you have this thing turned
on and it's enabled, then you can uncheck
it so you can see all these extra police. This modifier also has to
other settings. We can adjust. The first one here where
it says number one is how many cuts it's displaying
within the viewport. So this is the multiplication of the faces that it's going to
display within the viewport. So if we turn this up, this is only adjusting what
we see in the viewport. It will not adjust what it looks like in the final render. That's what the
second one is for. This one here is, we can have this higher
than the viewport display. If we have this sets of five, that means that the
Render is gonna be significantly higher poly than what we see here
in the viewport. Now five in this case
is significantly overkill in our situation here, I think that the Render could actually be set down
to one as well. We don't really need
the Render to be much more smooth than
what we're seeing here. I think this is plenty. We can have both of
these set to one. And then like I said, it's
up to you whether or not you have the optimal display
turned on or off. In my case, I'm going
to turn it back one just so that the model
looks a little bit cleaner. With the smoothing now
applied to our body segment, we can zoom back out. We're going to deselect
the body segment. And now we're going
to select each one of these pieces by holding
Shift and clicking on them. Remember select
your body segment last because that's what we're
going to be pulling from. Now we can select
the body segment. We're going to hit
Control and L. Then we're going to
choose copy Modifiers. So when we do this now, it will copy the modifier
from the last selected thing. In this case the one in one
subdivision surface modifier. And it will apply it to
every other piece here. Now, we don't have to go
through the hassle of adding each individual one by itself. We can just copy all the Modifiers
from the one that we've already set
up that we like. And it'll apply to each one
that we also add selected. In the next lesson,
we'll be building the Render Studio
for our balloon dog. I'll see you there.
8. Creating the Render Studio: In this lesson,
we'll be modeling the Render Studio and adding
some lights to our scene. Let's begin. The first thing we
wanna do is start organizing our layers
up at the top right. So let's start by renaming this collection which currently has our balloon dog in it. We can double-click on
the collections name. We're just going to
rename this balloon dog. We can now collapse
this collection. Then select the scene
collection at the top. So we're going to select
this little white box here. Then we're going to right-click and create new collection. This collection here
we'll name Render Studio. A collection is
essentially just a folder that holds different items that are in your Blender scene. And a nice compact package or Render Studio will
be multiple parts. We want to make
sure we have a nice way to categorize that. With the little white box highlighted next to
the Render Studio. By clicking it,
we can go back to our viewport and
hit Shift and a. And we're gonna go to Mesh. We're going to create a plane. This plane is going to make up the infinite wall of
our Render Studio. However, we can see that
our balloon dog is actually pushed down into the
floor of this plane. So let's select
our body segment. Now we're just going to
move the balloon dog Up until it reaches the plane. We can zoom in here. We go up underneath it, we can see where it's intersecting. So we're gonna move it up
slowly until it's just barely intersecting with the plane.
Right about there is good. It's okay to have just a little
bit of a poking through. Now let's select our plane. We're going to zoom
out a bit. We want to scale this plane
up pretty large. So we're going to hit
S on our keyboard and we're just going
to start scaling it. We want to make this pretty
big because our camera needs to make sure
it doesn't see the edges of this plane. I'd say somewhere in
this range is okay. In my case, I made it
about 22 times the size. So maybe we'll just make
it a little bit bigger. I think, right? There's good. This should give us
plenty of room to render this balloon dog without any worry about
seeing the edge of the scene depending
on which angle are camera is going to be. Now let's switch
into our edit mode. We're going to switch
into our edge mode here. So we're going to have
to on the keyboard. We're going to select
this back edge here so we can just click
and drag over top of it. Do matter. But now we're going to hit E. We're going to hit Z so that we can extrude this
edge straight up. I think about, what
about there's good. It's almost as tall
as it is wide here, might be a bit shorter. We'll see if we
need to make it any taller once we get
to the next step. Now we can go down here
to our modifier panel, which is the little
blue wrench icon. And click add a modifier, and we're going to add a
subdivision surface modifier like we did on the balloon dog. Since we click that, you'll see all of a sudden
our plane now is a rounded kind of
almost potato chip shape. So while this is helping smoothing that out and get
rid of that hard corner, it's obviously smoothing
it a little bit too much. Subdivision surface is
trying to average out all of these points and make the
surface is smooth as possible. But since we're giving it
very little to work with here by only having it
at a single subdivision. It's doing a pretty poor job
of smoothing it out while also keeping the
floor flat for us. So first, let's turn this up. We're going to get a
bit more subdivisions. I think three will work well, want to set both
of these to three. We can go back to our
object mode by hitting Tab. And then we're going
to right-click on this plane and
choose Shade Smooth. How it looks like a nice
smooth surface rather than all those facets that
we were seeing before. Now we can go back
to our edit mode and we're going to try
to figure out how to get this potato chip shape that we currently have
to be a little bit more cooperative
and a more flat on the bottom with a nice
subtle curve at the back. To start with. We're going to rotate around. We're going to drag
select through all of these vertical edges here. So we want to select this edge, this edge, and then
this front edge. So we'll select down. So now I have all three
of those selected. I'm going to right-click
and then do sub-divide. I want to add two cuts here. We're going to set it up
to number of cuts to. Now we can click off of this
to accept those changes. I'm going to hold Alt
to click this edge, which is going to select
this entire edge loop here. I'm gonna hold shift while holding Alt to select
the second one. What we're seeing here is two
different versions of this. So this see-through frame that we're seeing here is what the model actually looks like. And then the, the
potato chip shape, for lack of a better word here. Is what we are seeing after this subdivision
is added to it. The way we're going to try
to clean this shape up. So it's a little bit
more cooperative, is by adding more
geometry to it to let this subdivision surface
modifier know where it needs to smooth things out and where it's okay to
leave them flat. So first we added
these two cuts. Now we need to hit S and X. And we're going to
scale these cuts further apart from each other. So you can see as we're
scaling them more towards the edges of
the original plane. It's making it a little
bit more square, a little less rounded. So we're going to scale these up pretty close to the edge, I'd say about right
about there looks okay. There's a little
bit of a gap here. We can see we've made it
uniform on each side. That way this shape
means consistent. We solve the issue of
it being a little bit too rounded on the corners here. However, we still the
issue of not really having a flat floor to render
this balloon dog one, it's pretty much
entirely curved. So what we need to
do now is we need to add cuts going this direction. And then we're going to slide
those cuts further down here to let the subdivision
surface modifier know that this top
wall can be mostly flat and that the bottom floor can be mostly flat as well. And the only place
we really want this soft curve that it's giving us is basically just
right in the corner here. We can click off the model
to deselect these edges. Now we can hit Control R to
bring up a loop cut option. So when we hover
over an edge here, you can see this, the
little yellow line pops up. So this is saying that
it's going to put a cut here once we click
on those edges. So the place we want
to put a cut is across this back wall like this. Since we click it, it's
going to make the edge. And now it gives us the
option to slide that edge. So the further down we slide it, the more straight that
back wall is going to be. In our case, we don't
want it entirely street, so maybe we'll stop
right about here. And then we can do the
same thing on the bottom here by hitting Control into R. And we're going to hover
over this bottom line here. And we want this horizontal
cut, this direction. We're going to click. And now we can slide
this back as well. The further back we slide this, the more of this front
area will remain flat. We're going to slide
it back to about here. I think that's good now. Now we can click off. We can rotate around the
model and see what we have. I think for our purposes, this wall should
work out nicely. If we need to
adjust it later on, all we need to do is just move some verts around
and we can make the wall slide back a little bit further so that this
curve is more gentle, so it's not quite so tight here. If we find that we're seeing
the edges of the plane, we can simply just select
this object and scale it up in the direction that
we're seeing the edges on. For now, we're going
to leave this as is. Our next step is to add
lighting to the scene. However, we want to turn off the wireframe that
we've been using wall modeling because at
this point we're not going to be doing
much modeling anymore. It's not that helpful to us to see this wireframe at all times. If we zoom in here, we
can see that we have the wireframe displayed
on our model. But we want to turn that off now so we can go back up to this little drop-down here with
the two intersecting circles. We can go down to our wireframe. We can just uncheck that. We don't need to see
this at all times, will still be able
to see it when we're selecting the model and working in the edit
mode like this, if I select The Ears
here and hit Tab, I'll still be able to see the
wireframe when I need to. But otherwise, if I'm not
working on the model, I don't need to see
the wireframe anymore. Now let's add our Lighting. We're actually going
to be using an add-on that's already
pre-packaged with Blender. So you don't to worry
about purchasing this. It's entirely free, it's
already in Blender, you just need to enable it. So we're gonna go to Edit
and then our preferences. Now you can go to Add-ons. Then the search bar here
you want to type in trie, T-R-I-E. That'll bring up the try Lighting
lighting plugin. So you need to do is just enable that by checking
the little box on. There's some information
here about how to access it. So once you have
this checked on, we can close this box. Now that we have
the add-on enabled, let's first turn on our cycles rendering for our viewport. This is how we're
going to visualize what these lights
are actually doing. So up here at the top right, you'll see this far-right
circle here. If you click that. Now you're seeing is going
to actually be rendered. So currently, it's only rendering with the
default scene Lighting, which is sort of ambient light that's just being cast
across the entire scene, which is a light gray. However, once we add our lights, you'll be able to actually
see what the lights are influencing without switching
to the Cycles Render, you won't actually see
what the lights are doing. You'll only see the
gizmos for the lights. With our body segments selected. We're going to hit shift and
a to bring up the lights. So normally we would be
adding a mesh from here. However, there's also
options to add lights. What we've added is this
three-point lighting system. By default, there's only four
lights that you can add, but the three-point
lighting system has been added by that plugin. We're going to select the
three-point light system. Then you should
notice an option box down here at the bottom-left By default, these lights
come in very dim, so you might not
have even noticed that we've added lights. There are some subtle shadows
now being cast by the Legs. However, overall it's
still pretty dim. So first we're going to
turn up the base energy, which is defaulted to three. We're going to turn that
all the way up to 50. If we type in 50. Now we can see that these lights are actually doing something. We can see the shadows
cast by each one of them. Now let's zoom out a
little bit and our scene, make sure you don't click
off of anything though. So only use your, your mouse wheel to zoom out. We can see that these
lights are being generated all the way out here. So they're really, really far
away from our balloon dog. Let's get them a
little bit closer. We can do that with
this interface here. So first let's adjust the
height of these lights. As we lower the height, they'll get closer to the floor. I think 1.5 looks good for this. We're going to type in 1.5
here and just hit Enter. Now we can see that there are
a lot closer to the floor. However, there's
still too far away. We can see that
the light here is actually not casting that far. So as we move it closer, it should actually be
brighter on this as well. For our distance
here, we're going to basically have this. So we're going to type in 80
" for ours. Then hit Enter. Now you can see that
the balloon dog is much brighter because the lights
are a lot closer to it. If we zoom in down here, overall, the scene has
gotten much brighter. We also have the option
to adjust the rotation of each of these lights before
we leave this option box. For the left angle, Let's slide it up a little bit. So we're going to
move it a little bit more towards the front of the head, which is about 30. For the right angle. We're going to move it a
little bit further behind it. So maybe just five more
degrees to about 50. So that's this one. Then the back angle, you could probably leave that where
it's at or we could just move it a little bit
more towards the back of it, which is 230. So we can see here
now that the bulk of the light is coming
from the front here. And there's just a
little bit of light here filling the back of the object. This seems like a pretty
good place to start. So now we can click
off and we've gotten rid of that option box and
accepted those changes. Let's go light by
light and see if maybe we can improve
this scene at all. The key light is typically your brightest light
in your scene. We can see the properties
for this key light by going down here to this little
green light icon. So our key light here, it sits currently to 50. I think it needs to be
a bit brighter though. So we're going to turn this
all the way up to 100. I think. We'll type in 100 here
and then hit Enter. We can see now that the key
light is much brighter, this is almost starting to
feel more like a sunlit scene. Your fill light here. So the try lamp fill is a light that's there just to
fill in the shadows. So there's not really, really dark shadows anywhere. Right now it's defaulted to 25. I think this could still
be a bit brighter. We're going to turn
this up to 65. Now might seem like our scene is getting really bright right now. However, we have to
remind ourselves that currently everything
is pure white. Almost all these lights are sorted being exaggerated
in the scene. And eventually our scene
will not be entirely white. So we have to
compensate for that. Now. We can always go back and adjust the brightness of
our lights if they feel a little too dim or a
little too bright later. Now for the backlight, let's see what that set to. So that's at 25. I think it could be a
little bit brighter. It seems a little dim here. Maybe we'll turn that up to 30. I think that looks
good now it's a little bit less dark there. Again, if you wanted to
play around with this, you can just slide
these lights and get it to something near your liking. The settings I'm giving you now, or just something that I prefer. Another thing we can adjust is that global light that
I mentioned earlier. So to adjust that,
we'll need to go to this little red globe icon. We can click that. Then this is the area where
we can adjust the lighting. So currently it's casting a
gray light at one strength. So let's switch this
to white instead. We're going to just grab this. Slide it all the way up. So you bring this
color slider up by just clicking on
this color here. You can also adjust it to be a different color if
you wanted to be. So you can make it
a little green, a little blue, little pink. But for our purposes, let's just leave it
at white for now. But now it's way too bright. So we're going to slide
this all the way down to, I think about maybe
plus 0.2 or 0.3. So let's start
with 0.2. For now. Need to make it brighter. We can always just
adjust it here. Now that we have our lighting setup
that we're happy with, Let's start Positioning
are camera. First, we're going to make a second viewport to work with. You're gonna go all the way
up here to the top left. So next is little icon here that has the ball sitting on a grid. You'll notice when you
move right to the left, at the top-left corner,
your icon changes. Once it turns in that
little plus sign, click and drag, and you're just going to slide it to the right. Now we've created a brand
new viewport to work within. So we can set it right
in the middle here. And now we have two
different viewports. However, they're
showing the same thing. So I can rotate around this one independently of
rotating this one In this new left viewport, we can select View and
then go down to cameras. Then choose active camera. Alternatively, you
could just hit numpad zero if you
have a numpad. So we'll click active camera. Mic can see here now that it's snapped us into our camera. What this will allow us to do is visualize what our camera
is actually seeing. However, the second you rotate, you'll notice you pop
out of that camera. So we have two ways
that we can move this camera around so we can go back to view cameras,
active camera. Now we have to go to
the right viewport. We can zoom out and select this camera and we
can move it this way. We see as we move this camera, it's adjusting it on the left. However, I find this
pretty unintuitive and rather difficult to get a good camera angle
doing it this way. My preferred method
to adjust our camera is actually go back to
the original viewport. We're going to hit N on our keyboard to bring
up the side menu. Then we're gonna go to View. We're going to choose
camera to view. By default, it's a little bit too narrow here to see the word. But if we check this
camera to view, now if we go back
to this viewport, we can hit Enter to
close that menu. Now when we zoom in
or rotate our camera, it's actually moving the camera on the right side as well. So I find this a lot easier to position my camera
in a way that I like because I'm already used to orbiting my camera
around when modeling. This is just a nice intuitive
way to adjust that. We're going to select
our model here. Selecting the body
segment will allow the camera to rotate
nicely around that. We can just zoom in and get
a nice framing around this, this dotted line
that we see here is the framing of the camera. So let's just get a nice
tight view on this. And this is the only thing we're looking at in our cameras. There's not much else to see. We'll slide it off just a
little bit to the right, give it a little bit
nicer composition. But again, there's
only one thing here, so there's not really
much the focus on, I think about there, looks nice. Now I'm going to hit N
on my keyboard again. Then go back to the View tab
and uncheck camera view. Because I want to make
sure that now if I accidentally rotate
my camera over here, that I don't move my camera, I want my camera to remain locked like an IT N to get
rid of that menu again. Now if I rotate around, I can see that my camera's pointing directly at my object. Now let's flip the purposes
of each of these viewports. So we started out doing a viewport render
on the right side. And now we're moving our camera and the left
side, however, we want to just have all of our rendering done on
the left side now. So we're gonna go back to
view camera, active camera. So that's set to this. We can also zoom
in now so we can get to see a better
view of our camera, because now we're not moving the camera because
we uncheck that. Now we can just zoom in, get a relatively close
framing on this. Maybe we tighten
this up a little bit since we don't really
need to see the left and the right past the
bounds of the camera. Then up here, we'll
notice that we don't actually see this menu is here on either side
because we've made each of these viewports smaller. So the way that you can see that cycles viewport button
that we clicked over here to begin with is by using your middle mouse-click and then clicking on this top bar. And that allows you to slide
the bar left and right. Now we can slide
it to the right. We're going to switch
this back to cycles. Now this is the cycles viewport. And then on the right one, we can do the same thing. We can slide this over
and we're going to switch this back to the regular
shaded viewport, which is this solid circle here. Now we have all of the Rendering been done on this viewport. And then the right
viewport is where we're actually going
to do our work. One last step to do
on this viewport is to uncheck this little
highlighted button here. So before this is where we
returning on the wireframe. If we just click this, this hides all things in the viewport that aren't
actually the model. If we unselect the
model now we just see a nice clean version
of our Render. You also might have noticed
now that we're seeing the edge of this plane
that we put in the back. Simple way to fix that is
just to select our plane. Then we can rotate this. So we can hit R and
Z and just rotate our planes so that
the entirety of that plane is encompassed
within our camera view. So just rotate it
until you can see on the left side that it's
entirely covered up. Now we're good. The next lesson, we'll be adding color to our balloon
dog with shading. I'll see you there.
9. Shading Our Balloon Dog: In this lesson, we'll
be adding color to our balloon dog with a
transparent balloon material. Let's begin. The first thing we
need to do is that a brand new material
to our balloon dog. So let's select the body segment of our balloon dog in
the right viewport. Then we can go down here
to the bottom-right, and we're going to click
on the material icon. Now that we have that selected along with the body segment, we can click the New button
here to add a new material. With this new material added,
we're going to rename it. So we're going to
double-click on this material O1 at the top. Just double-click
that. And then we're going to just type in balloon. We know what this is. Now that that's completed, we're gonna go up to the
Shading tab at the top. So this is actually
going to switch the view ports that
we have access to. Since we click shading, you'll see it all updates. A few of these viewports
are irrelevant to us, so we're actually going
to collapse them. So the way to collapse these
two viewports on the far left is to go up here to the
top left of this viewport. So the larger one at the top rate, we're gonna
go up to this corner. I'm just going to click and drag over top of this viewport. We can see here that
it makes this viewport larger and gets rid
of the original one. Then we can do the same
thing at the bottom. We're going to click the top
left to the bottom and then move it over to
collapse that viewport. Now we can use the top viewport to rotate around our scene. And we can see here that it's defaulted to a different type of render and we need to
switch it back to cycles. So we're just going to
click this top right one. Now it'll switch it back
to how it looked before. We can zoom in on our
balloon dog here. We're also going to check
this little box up here. So we're gonna make
this invisible now so we can uncheck that. Now all of those overlays have gone away just like
we had before. Then lastly, we're
going to switch this to our camera view
so we can go up to view cameras, then
active camera. Now we have a nice view
of what we had before. Our first step is to choose
a color for our balloon dog. And we can do that by clicking
on this little color box here next to base color
down at the bottom. Then you can choose
whatever color you like. For my purposes, I think I'll
go with a pinky red color. Now that we change
this color, however, we noticed that the whole
balloon dog didn't change. And that's because
we only applied our material just to the
central body segment. Now we're going to
duplicate this material to all the other pieces
of the balloon dog. To start with, select the body segment of your
balloon dog up at the top. For this purpose, we might
want to turn this overlay back on so that we can actually
see what we're selecting. It's a little bit hard to
tell what you're selecting. If you don't have the
overlays turned on. We're going to select
the body segment. Now we're going to hold Shift, select over the rest
of the balloon dog. Now we have the rest of
the balloon dog selected, however you can tell
it also selected these lights that we're
seeing come in here. And it's also most likely
selected the plane in the back. So to avoid that, we're
just going to hold Control and then drag select over everything that
isn't the balloon dog. In this case, that'll
deselect the lights. And it should have these
selected the plane as well. We can just make sure by
going around here and just avoid touching the
balloon dog with this hold Control selection. But now we should have just
the balloon dog selected. Now we'll hit Control and L. To bring up the link menu. We're going to choose
link materials. Once we click this, you see the entire
balloon dog now shares that central
material that we had. It's now if we make any
adjustments to this, it should change the
entire balloon dog. So just to double-check, I'll move the color
around and you can see now the
whole balloon dog is textured and they're all moving together with the material set. Now we can go back up to this little overlay
button and turn that off. So we get a nice clean
view of our render. As we start talking about
how to create our material, I'm going to move this
window up a little bit so it's a bit smaller at the top that we add more
room to explain. Feel free to leave
yours at the same size if you'd prefer to see more of your balloon dog or you can resize it so it's a
bit smaller like in. Let's begin discussing what this actually is at the bottom. This is where you're
going to be adjusting the nodes for your material. So each one of these boxes
here is considered a node. And then each node typically
has an end point and an out point where
you can draw lines between them to make sure
that they all work together. There's a considerable
amount of settings within this material
editor down here. I won't be going
over everything, only the things that
are in the most important for our balloon dog. Let's go down here
and just start looking over some
of the settings up, you will be changing. So the first thing
we're going to change, we already have, and
that's the base color. So this base color
here determines what color the balloon dog is. You can see it's being a
little bit adjusted by the lights and the
reflections and the scene. This material and naturally has a little bit of
reflection on it. And then it's also being
bathed than white light. The color we see here
is being a little bit washed out in our scene. The specular slider here
is something that will, as we increase it will make
the object either more reflective or less
reflective as we lower it. For our purposes,
I think we're just gonna leave it right
at 0.5 because that amount of
reflection is probably accurate and we're going to be adding more
reflections later on. The one thing we
do want to change though, is the roughness The roughness is what
makes this reflection on the balloon dog
either sharp or blurry. Right now it's right
in the middle, so it's 50% blurry, 50% sharp. We need to make ours
a little bit sharper. So we're going to
lower the roughness. We're going to lower
it down to about 1.6. So you can see as
we pull this down, Our Balloon Dog is
getting a lot shinier. You can also just click on this number here and then
type in the number you want. Instead. You can type in 0.16
and then hit Enter. And now we've set that. The next thing we'll do is add more clear coat to this object. We're going to turn
up the clear coat. So clear code is a clear almost think of
how a car pain works. It's a clear paint or
a clear layer that sits on top of everything and adds an additional
level of reflection. So right now we have the
reflection on the bottom, which is what we
were setting with the specular as well
as the roughness. But now we're adding another Additional clear
coat layer on top of that to have some
more deep reflections. Similarly to the specular
value with the roughness, we also have a clear
code roughness. For this one, we're
going to set it to 0.1 and then we're
going to hit Enter. Now you can see here that we
have a very shiny balloon. You want to get a better
look at your balloon dog. You can simply
just scroll in and zoom into your balloon dog
to see what it looks like. We can see here now that
we have a very shiny, very polished rubber
look to our balloon, however, will notice
that it's not actually transparent at all. We can actually see
through it at all. Let's zoom back
out a little bit. Now we're going to
add our transparent node to the material. We're going to zoom out here. Then at the top, we're going
to hit shift and a to add, just like we were before. In the search bar here, we can just click search. We're just going to
type in transparent. So as you fill it in, you'll see more options
put pop up here. And then when we want
is transparent, be SDF. Click that can after adding it, we notice that nothing
really changed. And that's because
this node is not connected to this system at all. But we also can't just plug this directly into this line or into this part here because
that'll actually make the entire balloon dog transparent and that's
not what we want. We're going to
reconnect. This should look like this right now. We're going to add a node
that will allow us to mix the effect of this node
along with this node. So we'll hit Shift a. Again. We're going to search, and this time we're just going
to type in mix. And then when we want
is the mix shader. Now that we've made
the mix shader, we can plug this
node by clicking this little green dot and
plugging it in here at the top. Then we can plug this
node into the bottom. Now we'll take this output. So the combined
results of these two, we're going to drag this
down into this one instead. So now we've bypassed the direct link from
this to the output, which is what we're
actually seeing. This node here is essentially what we're seeing on the model. Now we're routing it
through this mix shader, which is combining
the effect of the transparent as well as the original color
that we had before. Now that we've
done this, we have a few more things to adjust. Now. We're going to take this base
color that we add before. We're just going to
hover over top of it and hit Control and C to copy it. Now we can hover over this
white for the transparent, we're going to hit Control
V to paste that color. Now you can see it's back
to being read except it's really not that transparent
anymore either. And that's because of
this color is so dark. So we're going to
click on this color. And we're going to lower
the saturation of it first. We're going to make
it in a pinky color. Then we're going to raise
the brightness up as well. In your situation, depending
on the color you chose, you might need to adjust
your values here. But right now I have mine at 0.7 saturation and then 100% value. The next thing we
need to do is to adjust this factor value here. So the factor value
here is determining how much each of these is being
blended with each other. So currently we're at 0.5, which means it's 50% of each. However, we want to favor this transparent went
a little bit more. And to do that, we're going
to lower this number. So all the way to
the left is going to favor the first
one in the list. And all the way
to the right will favor the last one in the list. This is essentially entirely
this, the bottom one. And that can make it zero.
It's entirely the top one. We're going to make this 0.35. So we want to slightly favor the transparent over top of
the, you'll pick one. And we can see now that
we've lowered this number, that we're actually seeing
through our balloon dog. We're seeing through
this body segment now and we're seeing the back, the top of the back
leg. Same thing here. We're seeing through pieces
of this to see through it. We're also getting a nice
reflection here where we're actually seeing the
back sides reflection Shown through this model. So this little reflection here
with overseeing this DEM, reflection is the backside of the balloons reflection being
shown inside the model. So it's a nice little
detail here to make this look more like rubber. The next node that we
add is actually going to be on this side
of the node tree. We're going to hit shift and a. Then the search bar,
we're going to type an ambient occlusion.
Here at the top. We can choose ambient occlusion. We can set that here. Now we want to copy
this color from here and put it into the
color for this will hit Control C over top of the color and then Control V on top of the
ambient occlusion color. Now we're going to drag
this color output from the ambient occlusion into
this base color node here, we're saying that
this base color is supposed to pull all of its information from this node instead of what we had before, which is why it
was important that we copied this color and pasted it into this node
before we plugged it in. Because as you can see,
once we plug it in, this color disappears
and this node won't pull that color
from the original. You most likely would
have noticed right away that when we plug this in, that the model changed. However, if you didn't, I'm going to show you on mine. So if I hold down Control and
then drag my right-click, I make this little knife icon, which is how you sever
a link between these. Now plugging in again and watch the balloon dog at the top. It's gotten a lot darker, but it's specifically has gotten darker in these
crevices of the model. So in-between the ER and these intersections where
the balloon is all meet up. In this segment around the nose, what ambient occlusion is doing is it's darkening
the crevices of a model while leaving the outsides of the model
relatively untouched. So in our case, we actually have a really high distance on this, which is the influence of
the ambient occlusion, which means we're
getting some darkening actually on the outer
parts of the model, which normally you shouldn't
with ambient occlusion. So to lessen that, we're going to
lower this number. We're going to type in
0.08 and then hit Enter. Now you can see that the
edges of this model, the outermost
segments of it now, won't really have
any change to them. However, the insides of the model are getting
this darkening. We're adding this ambient
occlusion node to make sure that we have some definition
between each of these parts. It's just overall gives the
Model a bit more depth. The next set of nodes we're
going to add will make more sense if you're looking
at our reference here. So I'd probably
referenced backup. The thing we're
trying to accomplish here is we want to match this darkening you see on
the edges of this balloon. The reason you're
seeing more darkness on the edge and less than the
middle is because we're actually looking
through more rubber on the edges than we
are in the middle. We're looking down
through all of this rubber going
backwards in space, rather than the situation
in the center where we're looking through a much
thinner piece of rubber. To start with. Let's make a
duplicate of this mix shader. And because we're
going to be again mixing two things together. So select the mix shader, hit Shift and D to make
a duplicate of it. And then we can just
drag it directly on top of this line. You can see it turns
Willie, when we do that, that means that
it'll automatically start plugging
things in progress. Let me do that. Now we can see it's
running it into the top. And then again,
it's going to run the output down into
the material output. So you can space these
out a little bit. Now we can hit Shift a
to create a new node. We're going to search
for the word diffuse. So D, E, F, F. We can choose
to diffuse be SDF. We can place that down here. Now we're going to copy
this red color with Control C and then paste
it into the diffuse with Control V.
This diffuse note here is essentially
just a flat color. So we're telling it to
whatever this is plugged into is just going to show
whatever this color is. We can run the
output for this into the bottom shader of
this new mix shader, the node that we have. We can see here and now that
it's just entirely red, which isn't ultimately
what we want, but we need another node to make sure that this
doesn't happen. So we're going to
hit shift and a. Then in the search, we're
going to type in the layer. Then the one we want
is layer weight. We'll choose that. Now what we're
going to do is plug in the facing node here. So this output at the top, we're going to plug
that down into the factor for the mix shader. Now we've plugged it in and
we can see it's gone back to being a little bit more
transparent like we had before. This facing output that
we've plugged into the factor is going to allow us to adjust how
this factor is being applied. Facing means that anything that is directly
facing the camera, he's going to get less of
the influence of this. Anything that's facing away is going to get more
of the influence We can see this effect in action by adjusting this
blend slider here, which is now controlling the
factor of the mix shader. So as we lower it, we
can see in here that the transparency is being more concentrated towards the
center of this object. And it's less so on the edge. So what we're seeing
blended onto the edge is actually this diffuse that we plugged in down here before. We're essentially
just overlaying a solid color on the edges. But we're using this
to determine how far into those edges that that
color is being overloaded. The higher the number, the less that we're seeing of the transparency
and the more we're seeing of just this
entirely diffuse object. So as we pull this down, we're getting the effect
more that we're looking for. The value you want here is 0.26. That'll give us a nice
sort of darkening on the edges like we're seeing
down here and our reference, but still remain
transparent in the middle. Then the last step we're
going to do is optional. So if you don't want to do
this, you don't have to. But I think this looks a little bit nicer and renders when it has a little bit more
reflection to it as well. So more than what we have now. So we're gonna give
it another layer of clear coat on top of it. To do that, we're going
to select our mix shader. It's Shift D to copy it. I'm just going to drag
it right onto this line so that it duplicates
it right into there. Then we're going
to hit Shift a and we're going to create
a glossy be SDF. We'll type in PLOS
to get glossy. Can paste that down here. Then we're going to copy
the lighter red color, or in your case, the lighter blue or green,
whatever you chose. So we're going to hit
Control C to copy that color and paste
it into this glossy. And how we can plug this
into the bottom shader. Now right away you can see
the difference here and it's ruining the look
that we had before. Unless you were going with
more of a metallic rubber, which does exist if
this is a lucky like, you can leave it as this. However, we're going for a
more realistic rubber look. We're going to lower
this roughness down. This glossy be SDF
works very similar to the specular and the roughness that
we adjusted earlier, or the clear coat and roughness if you want to
think of it that way. However, we gave it a
bit of a tinted color. So the reflections we're getting here are actually
a little bit more pinky to match the
color of the balloon. So first let's lower
this roughness down. We're going to lower it to
0.15 and then hit Enter. Now we can see that
this whole thing is a lot more reflective. However, it's probably
too reflective. Now, we can lower the influence of this
glossy node that we added. By lowering this number. We're going to type in 0.15 to make this influence a little bit less when the overall material. Now with this final step done, our balloon material
is completed. So we can zoom out and get a little bit
better look at it. If we want, we can just
rotate around in the Viewport here to get a
better feel of what this balloon material is
actually doing for us. So we can see here that
it's nice and reflective. We're also able to
see through it. So down here we can see
we're seeing through this back leg to see through
and see the front leg. So it has that transparency that a normal heavily inflated, in this case balloon would have. The less you inflate
the balloon, the more opaque that
balloon will be. But in this case, this balloon is pretty heavily inflated. So we should be able to
see through it pretty well because this rubber is being
stretched really thin. Now we can go back
to our camera view by going view cameras, active camera, or just numpad
zero. If you have a numpad. The last thing we're
gonna do is we're just going to
change the color of this environment that it's end to make it feel a
little bit more FUN. So it's not quite so sterile. So we can select this
plane back here. We can see here that we've
moved to a new shader panel, and this has nothing
in it because of that plane has nothing
applied to it. So we can just click
this New button for this material and we don't really need to change much. We're not going to
go nearly to the same depth as that one. So maybe we're just going to choose a different color here. We're probably gonna
wanna pick something other than our balloon color. Maybe just slide this around until you
find something that complements the color of your balloon without
detracting from it. In my case, maybe a light
blue would look nice. I think somewhere in
there it looks nice. Maybe I'll brighten
it up a little bit. Then if you want, and you
can adjust the specularity and the roughness to make this plane a little
bit more reflective. Maybe I'll turn up
the specularity a bit to make it more
reflective overall. Then I can just
lower the roughness down to let it have a
little bit of reflection. So you can see here
on the left side, we're actually seeing
a reflection of this back wall on it as well. Then if we zoom in down here, I can see a slight reflection of our balloon dog
on this floor. So it's a shiny blue
paint that we've created. If it seems like it's too much, you can always just turn up the roughness to make it
a little bit more blurry. Or you can lower down
the specular value to make it a little less
reflective overall. I think there it looks nice. Now without apply, and we have everything in our
scene textured. The next lesson,
we'll be creating the final render for our balloon
dog. I'll see you there.
10. Rendering Our Balloon Dog: In this lesson,
we'll be rendering a final image of
our balloon dog. Let's begin. To begin the rendering process. Let's go up to the
Rendering tab at the top. This will again
switch our viewport. Now this is the
area in which we'll actually see the
final rendered image. But before we do anything, we need to make sure that our
Render settings are set up. So to start, go up to your
render properties tab up here. We're gonna go through each
of these settings and just double-check that it's actually
set to what it should be. So these are all things
that we changed in on one of our first
lessons where we went through and
set up a bunch of initial settings
before we got into it. That was said that we had a
good fast viewport render, as well as to kinda preemptively get everything set
up for this step. But let's just go through
each of these and make sure that you have everything
set up correctly still. So to start with,
you'll need to have cycles set as your
render engine. You want your device
set up to GPU compute. At this point, the viewport doesn't matter anymore because we're going to be creating a final render which
we'll use these settings. But just make sure that these settings are
matched as well. So it should be 0.1
noise threshold, five-hundred max samples
and zero Min samples. And then your de-noise
should be set to optics that it all
should be checked on. Now the part that
actually matters for the part of the
process that we're in. Now, let's open up
the de-noise here. We'll just go through
each of these. Your noise threshold should be checked on and set to 0.01. Your max samples
should be at 40, 96. Men should be at zero. Time limit should be at 0 s. Zero second time
limit means infinite. So if it's at zero, that means it'll
just Render forever. However, if you
typed in 1 s here, it would only render for
1 s. Or you could type in 120 s. So it would
render for 2 min. However long you have to render, you could type in there, but I would suggest
keeping on zero that way it actually reaches
these settings. Then for our D noisier and just make sure
it's checked on. And in this case, you want
the Open Image de-noise, not the optics. The optics is a lot faster. However, the open image
de-noised looks a lot nicer and we're going
for a nice image, not a fast image necessarily
for the final render. Let's a quick rundown
of what each of these settings means just
in a really basic term, our noise threshold here. The lower we have this number, the more noiseless
the image will be, because it's getting closer
and closer to zero noise. In the case of our
viewport, we added a 0.1, which doesn't sound very high, but that's still higher
and further from zero. Then 0.01 is. The lower this number, the more noiseless
our image will be. The max samples is
just saying how many times will
Blender go through the image and checking
it individual part of the image to make sure that it's met a certain quality threshold. The higher this number is, the longer your
render will take, but the higher-quality one up being the minimum
samples is telling Blender how little it
can check a part of an image before moving
on to something else. So if blender thinks it got to an acceptable quality
threshold after 345 samples, then it'll just move on so we can tell it to make
sure that it's checking longer in certain areas by
raising this minimum samples. If you haven't set to zero, it's not actually zero samples. It's just saying that Blender is going to use some sort of automatic system to figure out what the minimum samples
are for the image. We can just leave this at zero. For a time limit here, it's set to 0 s, but it's
not actually set to 00, just means that zero is
going to disable the limit, which means it'll
just let it render forever until it meets
these thresholds. If you have a time
limit set here, so if you have, say, 60 s set, it will only
render for a minute. And regardless of whether or not it meets these thresholds, if you haven't set to zero, it will render until it
meets these thresholds. That we know a little bit
about these settings. We're now going to go
to the output settings. So that's the setting tab
right below the Render Output, or sorry, the Render
properties settings. So we're going to click this. It's sort of looks
like a little printer printing out an image. And this is where we'd
set up how the image is going to output for this Render. And we're gonna go down
here to the output. We're going to change
it from PNG JPEG. This is a pretty simple image. It doesn't have any
transparency in it. I think JPEG will work fine. And we're also produce
a smaller image. We're going to set the
quality up to 100%. We want to make sure
RGB is turned on. We don't want it to render
out a black and white image. Then the last thing
you need to do is just change this output
location to a folder on your desktop or in your
Documents folder or along with this Blender file
that you've been saving. So you can just click
this and then navigate to the folder you want
and then set it up. So I currently have
mine set up now. With all of our settings done, now we're actually ready
to render the image. We have two ways of doing that. We can either go up to render and then do
Render Image at the top. Or alternatively,
you can just hit the F2 key on your keyboard. We click that. Now our
image will begin rendering. We can see up here some of the settings that
we said before. So in this case we can
see that we had at sets of 40, 96 samples. And currently it's
at 71, 80, 89. And it's just going
through this image and trying to reach
the sample count. You can also see your current
time that you've rendered, then how long it thinks it's
going to have remaining. You can see here this says
is going to take 6 min, five-minutes, but it's
quickly dropping. This is purely just an estimate. Almost always this number
will go down unless you have a pretty complicated image
with a lot of reflections and refractions and other
complicated effects, then this number
might go up once it reaches certain
spots of the image. However, in our case, it's
just quickly plummeting. The image has reached
its 40, 96 samples. It's completed the image. In my case, I took a
minute and 32 s and 0.2 s after that to
finish this image. And again, this is
on my computer, so this is going
to change entirely depending on what your
computer's configuration is. If you have a stronger
computer than mine, it'll probably
rendered much faster. If they have a weaker
computer than mine, it might've taken a bit longer. So we can change some things to make this render a
little bit faster. So you could change
the resolution, which by default we
didn't change it, and it was set to 1920 by ten at which is
standard HD resolution. If you wanted to render faster, you can make this a bit smaller, like 12, 80 by 720. That would speed up your
render because it has less overall pixels to render. However, we don't
usually want to adjust the overall
size of the image. We kinda wanna keep that at whatever the intended
purpose of it is. We'll set it back to 1920 by ten at There's something else we can change and the
Render Settings instead. So we can go back to the Render. Let me can go down to
the Render Settings here, not the viewport. I'm just going to
collapse viewport for now since we're
not adjusting that those settings have no
bearing on what happens here. We can instead change
this noise threshold. So remember how I said
how the lower the number, the closer it's trying
to get to zero noise. But in that case,
it actually takes longer to render an
image with no noise, because it takes
longer to render those bits of noise
out of the image. If we make this number
higher, to say 0.020, 0.03, your image might lose some overall quality
because it'll be generally noisier
than it was. You should notice that
the render speeds and improved significantly. So we'll just do a test
here at 0.03 to see how it compares to the 1 min and
32 s that I had before. So another thing you could do is to switch your render slots. So up here you can see I
have it set to slot one. Now I could render
something else into slot t2 and then I can go back and
forth and compare them. So in the slot t2 now
I'll render this with 0.03 noise and we can see how it adjusted
the Render speed. So our new render is done
with the 0.03 noise. We can see that only took 40 s, so we knocked off
almost a minute. So basically 48 s, I believe, off the
original time. Now we can zoom in
here and we can see a difference in the quality. See if we notice much. Sorry, now we're on slot t2, which is the higher noise image. Now if we just go up here
and choose slot one, we can look at the
difference in the image. So let's zoom in here I noticed a little bit of a change here. This is the longer
render, the a minute 32. Then slot t2, you can see there's a little bit
more noise here. We saw some pixels
move around here. But overall, the amount
of difference that we're seeing in this image
versus the first. Probably doesn't make up for the fact that it took
nearly a minute more. Now, 1 min doesn't make a
huge amount of difference. Maybe if you have
the time to kill, but if you really need to get these renders out done fast, or if you just want to do
some quick test renders, this noise threshold
is something that you definitely should
consider adjusting. So if you make it, like I said, if you make it higher, your
render will go faster. It'll just be a little
bit lower-quality. Now that our images complete, we can go up to
Image and then Save, As we can say about this
image whenever we want. What does call this balloon dog. Let me can hit Enter and
then choose save image as. Now we have our completed image. We can see here
this is what we've actually output from Blender. And this should be the
exact same quality that we were looking
at within Blender, except now this is a JPEG and we can post
this wherever we want. Social media. You can print it
out if you'd like, you know, whatever you want. Now with this JPEG image, at this point, feel free to adjust the color of
your balloon dog. Move the camera, or
adjust the color or placement of your lights to get a different result
with your render. Now that you've modeled, shaded and rendered
your balloon dog, ready to discuss
the class project in the next lesson,
I'll see you there.
11. Our Class Project!: You made it to the
end of our class. Great job. Now that you have an
understanding of how a simple balloon dog is
modeled, shaded, and rendered. I'd like you to create a balloon
animal of your very own. I suggest you keep
this balloon animal to a more traditional and simple
style like our balloon dog. As this will allow
you to practice the skills you just learned, but with a slight
twist, pun intended. Examples of other traditional
balloon animals would be a T-Rex or a Monkey. Feel free to come up with
your own ideas though. As an example,
here's a render of a balloon giraffe I created
for this class project. You can see that it has
a lot of similarities to the balloon dog
and was created primarily through
adjusting some proportions and modifying some key pieces. It doesn't take much to
create a brand new animal. After you've modeled, shaded, and rendered your
balloon animal. Post it to the gallery for all
the other students to see. I'll provide my
feedback on aspects of your render that look fantastic, as well as other areas that
could use some adjustments. Thank you for taking my course. I really appreciate it. I hope you found this course
both PFK-1 and educational. I'd really appreciate
it if you could leave an honest review
on this course. So you could let other
students know if it's worth their valuable time. Also feel free to check out my other courses via
my instructor profile. You might just find something
you're interested in. Thanks again for your support. I hope to see you again soon.
 Harry Helps, Professional 3d Artist