Transcripts
1. Introduction: Hey, guys. Welcome
back to another class. My name is Braden Messer. I am an artist, an
author, a YouTuber. And today, I'm going to be the one that
teaches you how to draw. Now, this is part three of a three part series that I have made where I'm
taking you through, and I'm showing you how to
master charcoal drawing. In this series, I've shown you how to draw a
hummingbird in part one. I've shown you how
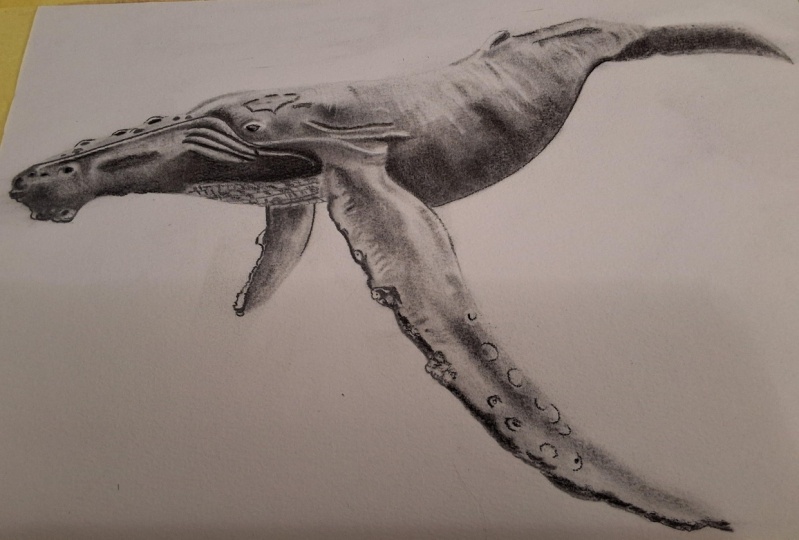
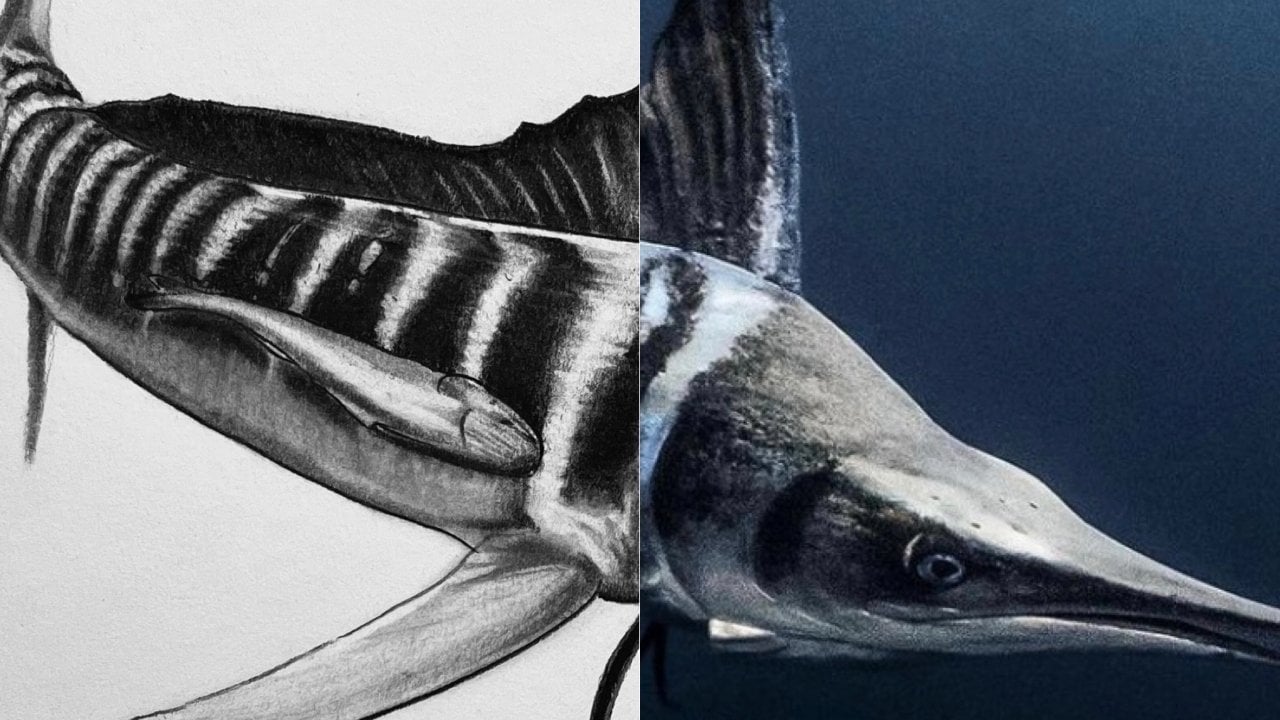
to draw crocodile. In Cart two. And in this one, I'm going to show you how
to draw a humpback whale. You're going to learn how to use the three layered method, which is a way of drawing that I personally have
developed over just many, many years of drawing. If you like this
method, it is outlined extremely well in my new
book drawing the portrait, step by step lessons for mastering classic
techniques for beginners. This book does an
excellent job of breaking down the
three layered method from tools that you'll need. The book itself
is project based, so you can go through
a nice flow and learn everything
that you need to learn in digestible steps. So, if that's something
that tickles your fancy, something that you
find interesting, then I'll draw a
link description of the class so that you can pick a copy of that
up for yourself. So h. What to expect? In this class, we're
going to go through. And I'm going to
show you how you can use the graphic pencil and you can start to draw out the
contour lines of the whale. Once we have contour
lines drawn out, I'm then going to just show you a little trick that
you can use to help frame the third
dimension of drawing. These are called
form frame lines. And then once we have the basic structure
of the whale drawn, I'm then going to
show you how you can use soft charcoal
and you can begin to lay down the foundational
layer of the drawing. Once we have the
foundational layers placed, I'm then going to
show you how we can jump back and forth
between charcoal pencils, smudgers and erasers
and we can start to build up the character
of the humpback whale. We're going to be
going in sections. We'll do the head
first and then we'll do the fins and then
we'll do the body. Then, of course, we'll go back through and we'll
detail all of this out. I'm going to be explaining a lot of the definitions of
what it is that we're doing from line weights and qualities to
retrieving and saving high values to accentuating the value scale from
complete to complete white, and then of course, all of the tonal variations in between. And then of course,
the subtleties of the drawing and how to really maximize the
three layered method to its fullest potential. Now, what I'd
recommend for you just because I know that this
is a lot of information, especially this is your
first time getting eyes on it is go through and just
watch the class first. Don't try to draw along with me. Nothing like that. Just
sit back, watch it. Try to fully immerse yourself in everything
that I'm saying, all the techniques
that I'm using, just so that you can
really absorb it all. Once you've done
that, then go back through and follow along
with me and draw your whale. Once you have a drawn,
upload your project and then make sure you leave
your review of the class. That way, I can actually
showcase your project in my monthly newsletter that comes out in the first half
of every single month. So this is a great
opportunity for you to not only get your art out there but your name as well in the art community that
we have here on SkillShare. Then I'm also going
to have a link to my patroon in the description
of the class as well. Where I offer drawing
consultations. You can support my brand, and I even offer what I call
my draw Along with M series, which is a portrait
series where you can follow along and draw
all kinds of portraits. I will also have affiliate links to all of the tools that I use with three layered method in the description of
the class as well. That's it. That's all. And
I hope to see in class.
2. Draw your Contour & Form Frame Lines: Okay. So for this one, we're just going to be using
a normal graphite pencil. We're also going to be
using a soft, a medium, and a hard rated set
of charcoal pencils, as well as a couple of brushes. We're going to be
using an elf brush with a diagonal cut in it, and we're also going to be using the good old number
six brush here. And we're going to be using a couple of different erasers, battery operated
artist and eraser. We're also going to
be using this guy, Pentel Click Eraser. This is for erasing Charcoal
as it gets away from us. And then, of course,
the mono Zero eraser. It's my detail eraser. Probably my single favorite
Eeraser of the three. Okay. And we're going to be using three different
smudgers for this one, a little three 16th, number seven and number ten. And we're going to be using
a scratch piece of paper. I like to put all
my soft charcoal, grind it up into the top
of this candle lid here, and then I check my tone on
the scratch piece of paper, and then I apply it to
the actual drawing. Okay. So without further
ado, let's commence. So, this, in my opinion, this part is the single
hardest part of the drawing. And so what we need
to do is we need to establish the outline of
the Humback whale here. And this, by
definition, actually, this type of line
work that we're doing here with
the graphi pencil, this is what they
call contour lines. And a contour line is
pretty much when you use a line to define
the edge, right? Or the basic shape of an object. This, of course, is
two dimensional. And the two dimensional shape is the basis for the
charcoal to come, which, of course, when we lay down the charcoal
onto the paper, that's when we bring out the illusion of that
third dimension. But just go nice and light here. I mean, what I'm doing is I'm looking at my reference photo, and I'm just trying to get
just an idea, if you will, of pretty much where does
that fin need to be, right? And the biggest part
of this single step here is to remind yourself that if you do
mess up, no big deal. We have three different
types of erasers, okay? So if we need to
make an adjustment, as I like to call them, and erase and then draw
it new with our graph, we can do that. We can do that. That's not a problem at all. For many younger artists, I find that when I'm talking
to them about drawing, they tend to want to do
everything all at once, right? They want to start drawing details and they want
to draw the eye, and they want to
draw all this stuff. And it's like, Whoa,
wait a minute. Like, you need to establish the basis
of the drawing first. You need to understand and
get your contour lines in order so that you bring out the shape of
the subject matter. Once the shape has been put onto the paper from there
through the use of charcoal and
retrieving high values and playing around with
your high and low values, you can then start to manipulate detail
work in a drawing. But for now, in this step, all we're doing is we're just trying to
get an idea, right? Just a basic idea of where
these contour lines live. And bear in mind,
when you are drawing out your whale and
you're at this step, make sure that you are using a very light pressure
control, right? You more or less want your graphite pencil to
glide across the paper. And just notice the
technique here, guys. This is real time. This part of the drawing tutorial is real
time because I want you to start to get a sense of the
speed at which I draw, right? And I also want you to notice the technique
that I use when I'm laying down these initial contour lines
with my graphite. I see something just
like that there. And then right
about there, yeah, that is where the other fin comes into play.
Something just like this. Notice how there's barnacles
and there's all this, that and the other on this fin, but, like, I'm not
worried about that. I'm not worried about that
at this point in the game. I'm just trying to iron out these contour lines
and bring out that basic two dimensional
shape of the drawing. And then right about here, this is where that
mouth is, right? This is where that mouth is. Somewhere right about here. Something like that. Very nice. And then right about here
is where that eye lives. But when you're drawing
out these lines, make sure that you go into it with the understanding
that if you do mess up, you can erase, you can make your adjustments, and
also think of this. Most all of these lines
are cementing proportion. Now, you can mess with
your proportions a little bit when it comes
to the charcoal, but for the most part, you want your proportions to be 95 to 100% where you would like them to be
at the end of the drawing. So much like when you
watch a house being built, that framework that framework
doesn't change, right? The aesthetics change, you know, the siding, you know, the
roofing, the windows. That all changes. That
brings character to a home. That's kind of where
we're at right now. These contour lines are
very much the framework, you know, the naked bits, if you will, of the drawing. So now here what
I'm going to do is I'm going to go in
and I'm going to start bringing out just, you know, the subtle details because I am confident
with where my drawings at. Now, as far as the overall contour
lines are concerned of the shape of this whale to
where I'm like, Okay, cool. Now I'm going to go in and
this isn't necessarily detail work so much as when you
actually look at the drawing, a lot of these details that I'm bringing
out in the whale are only visible to your
viewer's eye because of the contrast between
high and low values. So I already know,
looking at this, that I want to more
or less solidify exactly where these low values are going to have
to go on my whale. So while I'm at it, I might as well use my
graphi pencil to give myself a little more framework as far as where do my
high values live? And where exactly
is that contrast? And where's that
definition between, like, a high value, let's say, like on the top of the whale and then a mid to lower
value as the light depreciates as we work our way towards the
belly of the animal. But it's also important
for you to understand that this stage of the drawing
is completely up to you. You can add as much
framework as you want, or you can add as little
framework as you want. The only question that you have to ask yourself while you're drawing your whale is do I, as the individual artist, feel confident enough with the framework that
I have to move forward and take that
next step and start to throw around some
charcoal on top of it? Because if you're confident
with that, then off you go. You know, let's see. But here what I'm doing
is I'm just looking at the reference photo
and there's a lot of creases and different
levels of skin between, like, the shoulder of the
whale on through the side and, like, up along its mouth. So because I'm going
to bring those out through the contrast in my values between
high and low. But yeah, I'm just just
starting to go through, and I'm trying to
focus really on the actual shape of
the whales fin here. But see, this is why at the very beginning, I
said, you know, Hey, don't even worry if it isn't quite up to snuff as far as
your outline is concerned, because you can go
back through and you can solidify exactly what
you want it to look like. Like, say, you know, the
calf, right here, right? Just put in some lines, and give the tail a
little a little dovetail there, something like that. We don't need to get too crazy. We don't need to get too crazy. And I think with this one, what I'm going to
do is we're going to touch up on form frame lines. Now, it's been a couple
of tutorials since we messed with form frame lines, but I think that
with this whale, it's gonna be a nice
refresher for some of you. And even for those of you who maybe this is your
first tutorial with me, you'll get to understand
form frame lines. So So here we are. Here we are. This is what
form frame lines R, right? So as it stands right now, with shape, by definition, this drawing is two dimensional. But what form frame lines kind
of get us to start seeing, right, especially if
we are new to them, is that this is a
way where we can start to understand
the dimension, right, that third dimension in our drawings even before any
of the charcoal has come. So this is one of the reasons why I've always talked
about how, you know, draftsmen are almost more like magicians than they
are artists, right, because our whole job is to
fool our viewers eye into thinking that the drawing that they're looking at is
three dimensional, right, that they could reach
out and they could touch it. Oh, it looks real, right? It doesn't look like a drawing. These form frame lines here, enable us to frame the drawing
in such a way as to where we understand the flow of the
body of the animal, right? And you will come to
appreciate form frame lines, especially when it comes to your brush work and
your smudger work. So if this is your
first time using them, I think that you will be
most happy with the results. It comes to these
form frame lines, don't think that you need to put in exactly the amount
that I put in. I only put in enough to
where I feel comfortable. So if you feel that you need twice the amount of form
frame lines, then go ahead. If you feel that you don't
need any form frame lines, then go ahead. It's
all up to you. That's one of the beautiful
things about drawing. As long as it works, nobody
really cares how you get there. Yeah,
something like that.
3. Establish your Base Layer (Head): There we go. That looks good. Okay. Now. Now fooling around. Let's get serious. Let's get
serious and start drawing. Okay. Good old number six. And this bit of the drawing, I'm actually gonna do this
in real time, as well, because I know that if you've never drawn
with brushes before, it can be extremely
intimidating, just the idea of it, right? But I'm here to show you that
there's nothing to fear. So here we are. So we
got a nice mid tone, and just very lightly.
Very lightly. What we're doing here
is we are more or less establishing what they call a base layer of charcoal, right? And notice notice how
I'm actually starting my base layer at the
bottom of the animal here. And what we're
actually going to be doing is you start
at the bottom. You want a nice light
pressure control, right? Let the brush do the
work for you, right? Let it do what it was
meant to do and it will. It will. But one of the reasons why you want a nice
light pressure control here is that you want the charcoal and
this is a soft charcoal. This has the least
amount of binder in it, which is one of
the reasons why it glides over the paper so nicely. Then here we're just
going to lift up. Just lift up's like this. Bear in mind those form
frame lines, right? Use those to your advantage with how you pull because
the direction that you pull that charcoal
will come through subconsciously in your
viewer's eye regardless of how much gradation
work you put in it with your brush or
blending with your stumps. So just beware. But
as I was saying, one of the reasons
why we want to use a nice light pressure
control is because we want that charcoal to
rest on top of the paper. Okay? If you go in
and press too hard, what'll happen is that
charcoal will seed itself into the paper. Many papers, not all but many are porous when you actually look at them
under a microscope, and those pores are
what basically hold, graphite or hold charcoal
or hold ink, right? So just be aware. But with this step, right? Even with this step, we aren't
worried about detail work. This is how we start
to really bring out the underlying
form of the way hire. Gonna grab a little bit
more charcoal here. Just a little bit more. Okay. And as you look at
the reference photo, you'll start to see
those slight variations in value, right? Low values, by definition,
are completely black. High values by definition,
are completely white. And, of course,
your mid tones and your mid values are
everything in between. But just go nice and light. And then, of course,
when you feel that you need more charcoal, right? You need to lower that value. Just go ahead and grab some
more charcoal just like this. And always start off
with a nice light hand. Always start off light
because with charcoal, it's very much
like cutting hair. I've used this analogy before. You know, if you think of
a hairdresser right and they cut off too much
hair, it's like, Whoops. Sorry, you know, you can't
grow it back immediately. Well, with charcoal, if you
throw down too much and that value gets too low and you're not able to
retrieve it with erasers, you've kind of backed yourself
into a corner. Right? So a nice light hand
with charcoal in this manner is very much like taking off just a little bit of hair, check with the client. Is that what you like? Oh, no, a little more. Okay,
cool. We can do that. Same thing. Same thing. Okay. And then notice, you know, look at the reference
photo and notice where I'm putting these larger
amounts of charcoal, right? These lower values. Yeah, something just like that. You'll come to find with brushes that not only do they allow you to move a lot of
charcoal very quickly, but they also do
multiple things at once. So on the one side of it, yeah, I mean, we're able to
put charcoal onto the paper. And then on the
other side of it, it also blends the
charcoal and it gives off this type of gradation across our values,
which is nice, as well. But nice and light,
all of your brush work should be with a nice
light pressure control. You shouldn't have to
press very hard at all. But this initial layer, this initial base layer of charcoal with the number
six brush is all real time. This is how quickly
you can actually move. I know a lot of times I speed through decent parts of
these drawing tutorials. But you guys have
to understand that it's I'm trying to
squeeze three or four, sometimes five or 6
hours of drawing into a comprehensive tutorial that's, you know, longer
than most movies. So but as long as there's
value there, right? As long as you're starting
to see, oh, okay. Like, that's how he does that, you know, that's how he
gets that effect, right? That's the real
value add for me. But even right here,
just nice and light. I don't want to put too much charcoal on
the top of the whale. Not at all. I mean, look
at the reference photo. All those super, super
high values, right? It's because the
light is shining down from the top of the water. And that's another reason why a best practice when you are laying down your base layer
is to start at the bottom. Okay. Alright, so now we're gonna switch it up for our
three 16th smudger here. And if you don't use
smudgers in this way, I would highly
recommend you star. It just like this here? So
all these low values, right? You know, the barnacles or the
growths here on the whale. This is how we can start
to bring those out, right? This is the beginnings of
detail work, but even here, it's not so much
detail work as much as I'm bringing out the
form on this whale. And when you start to run
out of charcoal, you know, and that value gets a little
higher and you're like, Man, I need that to
be a lower value. Just take your smudger, you know, smudge it in some charcoal and
then bring it out. Straw along here on the bottom. I want to get a nice,
saturated, low value. You know, there's not a lot
of there's not a lot of light on the bottom of
this whale right here. So this is what
we want. Lift up. It's like that. See that? Just run that line and then lift up. Something just like that. One of the things you'll find
that is a main difference between brushes and smudgers and pencils is that as
you go down the line, control of the charcoal is
really what the difference is. So with brushes, you
move very quickly, but you have the least
amount of control. With smudgers you move
somewhere in the middle, as you can see, but
you have more control. And then with pencils, pencils are where you run all of your line work and you start to really focus and
bring out the detail work. But one of the
reasons why I'm using the three 16th smudger right here is because it
has a smaller head on it. It gives me the most
amount of control versus my number seven and my
number ten smudgers, right? So, I mean, as you can see, I can use the very, very tip, and I can start to bring out the jaw of this
whale a lot more. I would not be able to
do this with a brush. Not even with my
elf brush that has the diagonal head on
it. That wouldn't work. Not like this. And this is why it's important
when you are drawing, make sure you have
multiple tools. B.
4. Layering & Value Building (Head): Good old number seven,
slightly bigger, right? Slightly less control. However, because it's got
the bigger head on it, it allows me to move a little bit more charcoal
a little quicker. Check my tone. Okay. And what I'm going
to do is while we're here, I'm going to start beefing up the bottom of the whale here. It's back and forth,
back and forth. Then also, when you
turn the smudger on its side like this when
it's loaded up with charcoal, you are able to start having this type
of an effect, right? You can almost glide
over the paper and you can start to
bring out almost like a blotchiness, if you will. What that is is that's
basically just it gives the skin of the whale almost like that
weathered look, right? What I always thought that certain whale species
almost have like this patina look to
their skin, right? They have all these
different patches of tonal values from, you know, low to high and mid and everything
else in between, right? And so, you know, when you take your smudger
on its side like that, that is a way where you
can start to bring out that same kind of look
with your charcoal. So then here's a trick, too. You can take your
smudger and you can pretty much push it on its side. You just push it on its side, and you'll get
different effects. And if smudgers are something
that's new for you, if it's a tool that you don't really use a lot of or maybe you only use it a certain
way, I encourage you. I much like your brushes
to just use them more and more because as you use them, you'll start
to understand, especially when it comes
to a drawing such as this, that, you know, if you run
the smudger on its side, it gives you a different look. If you run it on its tip, right, it gives you more control
in a different look, so just be aware. Yeah, it's got some
runaway charcoal here. Get that out of the
way. Got to stay on top of that charcoal. Okay. So now we've switched
it up and we're back to the three 16th smudger. Back to our 3/16. Just load it up real good. There we go. That's
a nice low value. Okay. So I got some more growths and
stuff here on the top, so I'm just gonna blotch
it just like this. See that? Just like that. And now, if you're
thinking to yourself, Well, wait a minute. Like, that looks kind of
flat. Well, don't you worry. I have yet to even pick up one of my pencils
on this drawing. And so I'll show you how we
can round those growths out and give them some
dimensions and a little bit more detail work
and really make them pop. Hmm, let's see. And then the other thing,
too, is even with this, like, we can just kind
of add, like, you know, little, you know, little blotches and stuff to the skin here,
nothing too crazy. They can all be of
different values and different tones because they're just they're all different. So now, a medium
charcoal pencil. And I'm using a medium
here, you know, of the three, of the soft, the medium, the hard charcoal. The medium has, like, a
nice goldilocks amount of binder infused in it. And so I'm able to run really nice crisp lines just like this. See this? Boom. Yeah. Now we're rocking them, we're rolling them but
see just like this here. And you don't need to put a line all the way
around it, right? Just run a nice little line over the top and then lift up. Nice little line
on the one side. And then lift up. All right. And if you want to go in, you want to sock in a little bit more lower of a value
in the center, right? Maybe give it a little I or something like
that. You can do that. The whole point is we want to accentuate the
value scale, right? We want complete
black, complete white, and then everything in between, even in our detailed work,
and we're really able to bring that out as soon as we pick up our charcoal pencils. Alright, so as promised here, I just want to give this
one here. There we go. Now, be careful
with your line work on the top of this whale, guys. Be very careful. Notice I'm only really putting these lines
around these growths, right? The reason why is
because I'm going to run defined lines on the
belly of the whale. And then right here,
I'm going to just push a really nice steady line
all the way up right here. I'm going to just
keep pushing it. This is real time here. I
wanted to show you this. Nice and steady.
Nice and steady. All right. Now, these lines have a very, very nice weight to them, right? You know, just a
nice dark weight. And they also have a nice middle of the road quality as well. Now, for those of
you that are new, I'll just explain
this real quick, line weight is used to describe the strength of a line or
as I like to think of it, how light or dark that line
appears onto the paper. Where line qualities is the actual thickness
or thinness of a line. So a lot of times
you'll hear me talk about lifting up
as you conclude. Well, what that does is that varies the line
quality from, say, a thicker line and then as it concludes to a thinner line, albeit it's all the
same line, however. And so when we lay down
these lines like this, these lines have a dark
weight and they have a very, very middle of the road
quality about them, okay. Then here, if we just want
to thicken this up, right? We want to thicken up that
quality on this line here. We can do that. We can do that. But, you know, pretty much on the
top of the whale, what I want to have is I want
to have a bunch of tones. I want to have a bunch
of different values that imply the line on the
top of the whale. And then on the bottom, I want to have
defined lines, right? Now, the difference between
an implied line, um, as opposed to a defined line is implied lines are pretty
much what they sound like. They are when you have
different values, so say, if you look at this drawing so far on the top of the head, there's no actual defined line like what I'm
putting right here, on the bottom of the whale. See this. What I'm putting
on the bottom of this whale, these are defined lines. They have a thicker quality, they have a darker
weight to them. They're just more saturated, where the implied line is
where you can tell, oh, yeah, the top of the animal
is right there, but there's no line defining
the top of the whale. And I do that on purpose. It's it's a principle of optics. It has to do with how you can take an object and
you can weight it on certain sides to make it look
like it has more dimension than if you had just the same
line with the same quality, with the same weight
everywhere, right? So now hear what I'm doing
is this is what they call retrieving high values. And I'm doing this with
my monozero eraser. Now, this is my detail eraser. All right. And then here, I have my elf brush with
diagonal cut in it. So I'm just gonna
load it up here. And that's how you know
when your brush head is fully loaded is
when you hit it on the paper and a bunch
of charcoal falls out. But just check this
out. So what I'm doing here is I'm doing a
couple of things. I am lowering the value. I'm also blending the charcoal, and while I'm
lowering the value, because I'm using the
brush in this way, I'm also getting a nice
gradation across my values. Now, one of the things
you'll notice with the elf brush as compared to the number six brush is that the elf brush gives you
slightly more control. And because it's
brussels are fiiner, you just get a slightly
better blend here. So notice how I'm running
this charcoal right along the bottom of the
whale's jaw here because this is where there is the least amount of light hitting the subject in
the reference photo. So I want to make
sure that we are as accurate to that as we can be. Then here, just lift up, right? Just lift up and follow
those contour lines, remember how the flow goes
across the whale's jaw. And here, you can pull the
brush sideways, right? Just run it along the
bottom right along the top of these defined lines. But even in this step, guys, unless you are pushing the
brush head into the paper for an extremely low value,
don't press very hard. You don't have to.
You don't have to. Just pull these
out a little bit. There we are. Something like that. Just get a real nice blend here. But
just play with it, guys. Just play with it. And
then when you're all done,
5. Linework & Detailwork (Head): Let's blow off that charcoal. All that excessive charcoal,
get it out of there. Okay. So now let's switch it back up to
our larger Smudri here. And I'm just gonna go
in, I'm just gonna lower these values. That's
really all I'm doing. And that's the thing with
this step is you want to focus on taking care of the
low values first, right? Get those built up because when you take care
of the low values first, the high values almost take
care of themselves, right? And of course, you can go
in and you can, you know, bring a brush and work
with your gradation and blend your values together. But at the same
time, I have found that it is easier when you focus on your low values first. And here, what I'm doing is I'm basically
taking the smudger, and I'm focusing on exactly where the
low values have to be because at the
end of the day, there's only so much that
one can do with a brush. So Okay, and then we're
taking our 3/16 smudger. I'm just kind of defining
the lip of the whale's jaw here. Something just like this. I notice how I can barely,
like, almost, like, flicking the paper,
and I'm able to bring out some dimension.
Like, just play with that. Like, you can do that
with your smuchers. Absolutely. Then just running the mudra right along that line, lowering the value of
that a little bit, kind of beefing that up. And that's the other thing
to be aware of, too, with this step is if it looks gratty or
if it looks kind of, you know, kind of sharp, right? It doesn't look as smooth
as you would like it to be, don't worry about
that because we can hit all of this with
a number six brush, and we can blend
it all real nice. We'll give it a nice gradation, and we'll be happier
artists for it, trust me. H Alright, so now we're gonna take a
medium charcoal pencil. And we have this
texture down here. It's almost like
these skin wrinkles in the throat of the whale. So here we're just going to push some defined lines
right here that have a nice nice medium, nice, medium quality,
medium thickness. But at the same time,
we want them to have a nice dark weight and
nice nice saturation. But let's put the
lines in here first, and then I'll show
you how we get that unique texture in
the throat of this whale. Yeah. Perfect.
Sweet. Okay. So now that we have our
defined lines in place, let's go ahead and
just like this. We'll use, like, a mid
mid pressure control, maybe maybe slightly harder
or just gonna flick it. We're gonna flick the
paper, just like this. We're just going
to flip the paper. And the reason why we want to do it in this manner is because this is going to give
us that same type of texture that we
see in the drawing. And then right here, if you just do nice tight little circles, nice medium pressure control, don't press too hard because you don't want to scratch the paper, but this is a way
for us to lower that value a little bit more
while at the same time being able to keep the variations
in the low to mid values. Just like this. Run that
line along the bottom, darken that up, kind of beef
up that throat a little bit. There we are. That's
coming together. But, see, one of the
reasons why we wanted to do it this way is because
we wanted that contrast. I mean, when you look
at the reference photo, this part of the
whale's throat, like, that's you know, that's
a pretty high value immediately next to a bunch
of lower values, right? So this is a way This is a
little trick that we can use to nail that look. In here, this is kind
this is kind of cheating, but what I'm doing
is I'm just using my medium charcoal
pencil and I'm pinpointing and putting
those low values exactly, exactly where I want them. There's just a layering
process. That's all it is. We don't call it
the three layered method for nothing, right? Just a layering process. But see, now that I
have my arcoal pencil, I have exact control. Then just a 316 smudger. I'm just going to go in here and blend this up a little bit. Little blend here,
little blend there. You know, something like that.
Okay. So elf brush time. So now, my brush is, uh, pretty much unloaded
for the most part. But what I'm doing
is I'm just going in here and I'm just
trying to blend this. I want to get a I want
to get a nice gradation. I just kind of want to make sure that this looks
a little softer, 'cause right now it
looks pretty harsh. And that's the
thing with charcoal is brushes love charcoal. So let them love each other.
Absolutely. Absolutely. And that way, you'll
have a smoother drawing. And that's always nice. That's always nice. Let's see how that softness
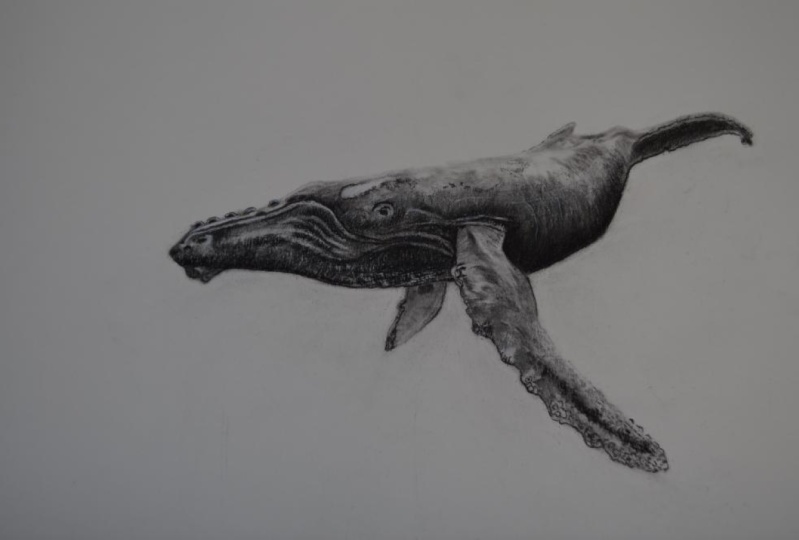
just kind of comes out. That's what we want. I want that softness. Alright, so it's time to
give a whale an eye here. So give him a looks
like top of the eyelid. Just make sure that your medium pencil when you do this is, um, as sharp as you can get it. And actually, what I'm
going to do is I'm going to switch it up here
for a hard charcoal. Now, I haven't
touched on this yet, but hard charcoals have the most amount of
binder in them. And so because of that, they are wonderful for bits of a drawing such
as this that are very, very small and require
a delicate hand, right? So hard charcoals are
good for detail work. And the reason why
is because they have the most amount
of binder in them, so they tend to rest on top of soft and medium charcoal
work very, very nicely. Yeah, something like that. Okay. Yeah, something like that. And the reason why I'm
using this heart charcoal is because I want to put as much detail into this
eye as I can, right? You know, I talk about
with my pet portraits how the eyes of the
subject are the soul. And so, just because
this is a whale, that doesn't mean that
it doesn't have a soul, so we want to try to
capture that in its eye. So here, I'm going to put my
hard charcoal pencil down. I'm gonna grab my
medium charcoal. I'm gonna go ahead and I'm
just gonna I'm just gonna punch in this
eyeball right here. Something like that. There
we go. Leave it alone. That's the thing
with eyes is, like, you can you can kind of
overwork them very easily. So Just do au couple
quick little hits. Kind of blend this with
a smudger a little bit? And you know what?
While I'm up here, it looks like there's a pretty
decent high value blotch on the top of this whale's head. So I'm gonna kind of
call that out while I'm up here with my
three 16th smudger. And when it comes
to implied lines, remember how I was talking about how at the
top of the whale, it's gonna be an implied
line all the way. And then on the
bottom, it's gonna be nothing but defined lines. Well, your smudgers are your best friend when it
comes to implied line work, so just keep that in mind. I actually think
that when it comes to the smudgers, the brushes, and the pencils that you
have greater abilities with your smudgers with just the simple variation
of pressure control. Then here with the
number six brush, we're doing some blending
here, little dabs. Little medium pressure
dabs. And look at that. See that? See how that
all blends real nice? You know, it takes
away that sharpness, that rigidness of charcoal.
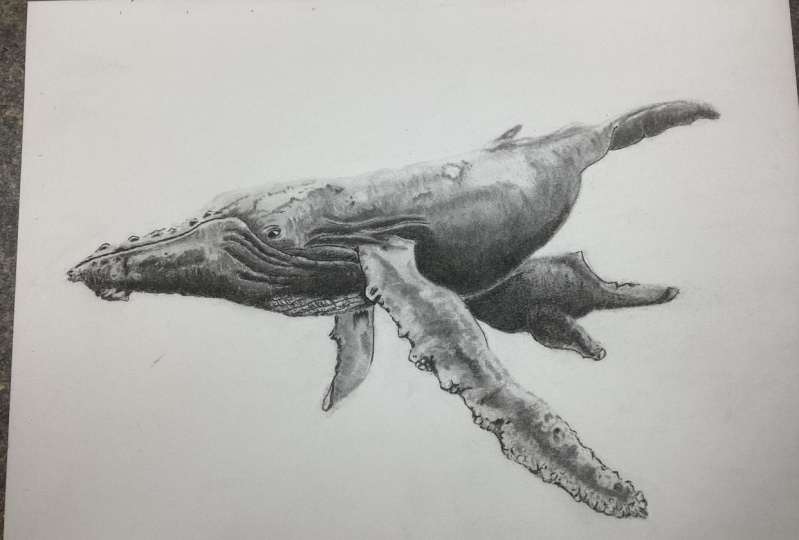
6. Layering & Value Building (Fins): Then here, I'm gonna take
my number seven smudger, and we're going to start
working on this, fin. And while I, iron
out the base layer here. Just very, very lightly. See how I'm pulling
the charcoal in the direction of my forum
frame lines, right? Okay. It's now my
medium charcoal pencil. And what I'm gonna
do so I'm gonna pull a define line and run it right along the
front of this fin. Okay. And watch. Notice how notice how I'm laying
down this line, right? I'm laying the line
down, I lift up. Then I'm laying it down, I stop, then I lay the line again,
stop and I go up and over. I'm doing that deliberately. Okay? Because the texture on these fins it's
pretty rough, right? It's rigid. It's
a rigid texture, and so I want to make sure
that I'm speaking to that. Then right there, put that
defined line on the back, but then I lift it up as I
concluded, and that's it. I'm not gonna run that
line any further down. I want to try to give this fin as much
dimension as I can, okay? A lot of times, what you'll find when it comes to, you know, making something look
dimensional is putting different line weights and different line qualities on different sides of
something, right? Okay. So now here, I'm just taking my elf brush, and I'm just laying down
a nice little base layer, and I'm pulling
the charcoal from the front of the fin to the back of the fin. Okay. Now I can just pull down. It's
getting a nice soft blend. And I want this to be fairly
low in value, too, yeah? And the reason why is because when you look at the
reference photo, the way the light is
hitting the whale, there's hardly any light on the bottom of
this fin at all. And so I want to make sure
that I speak to that. Okay. High value retrieval time. And in here, too, you can use your monozaser to give
you a sense of form, you know, kind of
like this, a sense of form, a sense of texture. You can do that. You know, and if you want to go in and
you kind of want to lighten up the backside of
your fin, go ahead. And then after you've
done that, that looks kind of kind of rough, you just take your
number six brush and just blend it real quick. There's your gradation. I just want to clean this
up a little bit. There we go. That's nice. But yeah, no, the mono
Zero eraser and high value retrievs as we use high value retrievals with
the three layered method is it's hard to beat. It's pretty nice. Okay, so now what I'm
doing is I'm just going in with my medium charcoal
and I'm just going around in nice tight little circles. And again, I'm pinpointing exactly where I want
some low values to be. More or less, bringing
out the details in the form of this whale. Okay. Here, I'm actually gonna push
this line one more time, kind of thicken it
up a little bit. Then right about here. I'm gonna pull this line. I'm just going to
lift up right there. And there are differences
between pushing and pulling. And then here while I'm at it, I'm actually going
to switch it up from my graphi pencil and just kind of solidify exactly where I need some of
these lines to be. You know, this is actually a
really good best practice, especially if you've gotten to a certain point in your
drawing and, like, maybe say your brushwork kind of blended away your
graphi and you need to reimpose it onto the paper so that you have a little bit more guidance
for your charcoal. I definitely do
that. Alright, so now what I'm gonna do is
just like the other fin. We're gonna go
ahead and I'm going to start at the very front. I'm gonna start at the front. I'm going to use my
number six brush, and we're gonna establish
a base layer, okay? We're establishing a
nice soft base layer of which we can work from. We're following those form
frame lines like this here. Run it right along the front. And then once you've
established it on the front, then you
can pull it, right? You can kind of pull it
up and down. Up and down. Because when we actually look at the reference photo
here in the center, the value is slightly lower, and then it kind of gets
higher towards the front, and then it gets higher
along the back side too. I'm actually going
to be showing you a really cool trick that you can use with your battery
operator eraser to get that kind of texture on the fin that we see
in the reference photo. Okay. So we switched it up
for our three 16th smudger. And now, this is where we start to solidify our form, right? This is where we start
to call this out. Just like this. And again,
don't worry about don't worry about defining
anything yet, right? This is just where
we more or less are focusing on the
values themselves. You know, the cool
thing about this step is that it's not defined. You know, if we need
to go in, like, if you are taking your smudger and you're like, actually, I don't like that. You can go in with your model zero eraser and you can erase it because we're not using a heavy pressure control
here, not at all. We're just gliding
across the paper. Unless, of course,
there's areas where you are confident in your low value, and you want to press a
little harder like this here, and the values get lower. And then here, if you want
to press a little less hard, notice how the value
is not nearly as low. It's because we're not pressing nearly as hard as
we were before. Pressure control is half of your technique with this
method. It really is. And that's why it's
so important that you understand how to best manage
your pressure control, because you can
ruin a drawing very easily by being overzealous. Yeah, it's like this. This is
coming together real nice. Do you see how slowly but surely the form is starting
to show through, right? This is what we want. Just nice and light at first. Then you can go back
over it again and again, it'll just get darker
and darker and darker. Okay. So now we have switched it
up for our medium charcoal. And we're just going to go in on the front here and
we're going to start socking in
some defined lines. And notice just
like the first one. Quick little poll here,
quick little pole there, lift up here, push a
little harder there. A right? We want different line weights. We want to take that
quality of these lines, and we want to vary them. We want a little thick, and
then we want to go thin. We want thin, and then
we want thin and thick, and then we want a thick
one that becomes thin, then we want a thin one
that becomes thick, right? Like, that's what we want here. Just we're kind of jumping
all over the place. You know, Alan Watts, one of
my favorite philosophers, always talked about
how nature was wiggly. Everything about
nature was wiggly, including the animals
that are part of it. You know, it's not until you
get into the big cities. You know, and notice, symmetry. You know, rectangles and squares and triangles and all that. That's very, very
rare in nature. So when we're drawing
things in nature, we need to keep that in
the back of our minds. See that, we'll just lift up as we pull down as
we conclude that line.
7. Linework & Detailwork (Fins): And then because we have
our charcoal pencil here, we can go in and we can start to vary our pressure control. Just like what we were doing
with our smudger only now, we have the ability to
really start to focus on the details on
this fin, right? And I'm going pretty fast, so I'm not going to
spend too much time on the detail work, but I'm sure you get the
gist of how to do this. Right. You know, the less
pressure control I use, right? The lighter this
detail work becomes, the harder I press, you know, the darker, the darker the
detailed work becomes. And so the trick is to
get everything, right? To bring out, you know, the thickness and
the darkness of line weight and quality. And then, of course, being able to convey the detail work and the variation of all of those different
values on this whale. You know, that's
really the trick, and that's what you should focus on when you're
drawing your whale. Absolutely. Something like that. Okay, so now our smudger. So now, remember how on, right after we had drawn
the eye of the whale, and then we took the 316
smudger and started kind of messing around with all
the different values in the form of the
top of the whale. Well, that's pretty much
what we're doing now. Just we're doing it with a
slightly bigger smudger. And this is one of the reasons
why I always say that, you know, your smudgers
in my mind's eye, are one of the most
versatile tools that you can have as an artist that utilizes
the three laric method. I mean, look at this. Like,
look at everything that I'm able to do with just slight variations in
my pressure control. I can convey a low value, and then I can in
a split second, I can convey, you
know, a higher value. And then if I pull my
smudger a certain way, I can convey form, right? I'm just gonna grab
some more here. And so that's what we're
doing here. I'm I'm looking at the reference photo, and I'm trying to lower the value anywhere
where it needs to be. And the cool thing
is I'm not even pressing that hard,
like, at all. I'm just more or
less blending and trying to get these
low values to pop, right, trying to
get them to come out. There we go. Okay,
runaway charcoal, Runaway charcoal.
It's everywhere. Okay. Little here, little there. Alright, so now we're taking
the number six brush. We're just gonna blend
this all real nice. It's nice and light.
Let your brush kind of glide over
the paper and notice. Notice that gradation. Nice blend. Okay. So now, this is what I
was excited to show you. So watch this. Little zip, little little zip zap Zip
zapperu. Check it out. This is how we're gonna get
that texture that we see those big high value like
swirls and circles, right? So if you don't have one of these battery operated erasers, definitely get yourself one. Because this is detail work and high value retrieval
that I just simply would not be able to get with
a Monozero eraser alone, and I sure wouldn't get it
with the Pentel click eraser. You know, power tools
in the hands of any craftsman are meant to
make their job easier and allow them to do things
that they could never do with just their hands
or with a manual tool. So it's the same principle
in drawing, right? We're just we're
taking this tool, and it's giving us the ability to not only
retrieve high values, but retrieve high values where they're literally
as white as the paper, right, before we laid
down the charcoal. And that is another reason your high value retrieval
is doing this right here. This is the pillar of why. When you go to lay down
your charcoal with a brush, you always want to use a very
light pressure control so that you can retrieve high values to this
capacity, right? Because if you press
too hard or if you push the charcoal into the paper like what we were
talking about at the beginning of this video, then you would not be able to get these types of aesthetics. But, I mean, you can see
just how much detail work I'm able to provide with my battery operated eraser in a very short
amount of time, right? Like, look at this,
just little bits. And you could spend
you could literally spend hours with all
of the little details. But like I said, I only
have so much time. And we got a lot to cover, so I'm more or less, you know, going 100 miles an hour. Well, yeah. Something
like that. Okay. So I think what I'm gonna
do is while we're here, I'm just I'm gonna take
my medium trucal pencil, and I'm going to beef up this
fin just a little bit more in certain areas,
certain places. Alright, 'cause, like, you know, the thicker of a quality you put on some of these
growths, right? You know, they just look
a little bigger and they look a little bit
more intense, right? And I think what I'm
gonna do for the sake of the drawing is I'm I'm going to thicken up the quality
on the front of this fin, just like this, see this here? Just go to thicken this all up, but I'm not going to do that same thing to
the back of the fin. And that is going
to give that fin. It's gonna give it that
same type of look that we see in the reference
photo, right? See you just like
that. There we go. Just thicking it up and
thinking up this line, too, because what this does is this, you know, kind of
brings the fin forward, and it pushes the main body of the whale back a little bit, so you get this sense of the sense of depth
of field, right? You know, the right fin
is the farthest away. And then because of the define line on the
throat of the whale, that's a little bit closer. Then because of the fine line on the fin here on the left, that makes the left fin even
closer to the viewer, right? So That is a subtle
trick of optics. An optical illusion. All right, just like this. There you go. Okay. So now mono
Zero eraser time, some high value
retrievals, right? So let's say maybe you don't
like power tools, right? You don't like battery
operator racers. That's totally fine. You
still have recourse here. You can still take
this Monozero eraser and you can accomplish pretty
much the exact same thing, albeit probably with
the exception of, you know, the squiggly circles
and stuff that we did. Not saying that you
wouldn't be able to get those effects, but they probably wouldn't be as high of a value unless
of course you go in with just extremely extremely
light pressure control. But, you know, multiple tools, different tools give you
different abilities, right? They allow you to practice different techniques to accomplish certain
aesthetic goals. So but here what I'm doing this is how you can
just barely kind of kind of skip across
the paper like this. This is how you can make your whales fin looks
like it's worn, right? Like it's like this whale
wears a lot of scars, you know, she's an girl. She's been in the deep
blue for a long time. So we want to make sure that we can convey that
in the drawing. But then here what we're
doing. Nice and light. Nice, light pressure control. But we want to
establish a base layer. We kind of already have
one at the front here, but as we pull this charcoal
back and then down, we want to follow
that follow that fin. Follow it down to
the bottom here. And then right along the
bottom of the belly, right? Always start at the
bottom. Just pull it. Just pull the charcoal. Just pull it.
8. Layering & Value Building (Body): Yeah, looks pretty good. Okay, pick up some more charcoal
here. Let's get serious. That's get serious. And then what I'm
gonna do is I'm gonna lay my brush on its side, and I'm gonna start right
here at the bottom, and I'm just gonna pull
this charcoal down. Pull it down. Kind of established a nice line
then just lift up. Just like this. Lift up. See that? From the bottom, same thing from the top
and then just lift up. Establish your baseline first, and then you can pull
up with your brush. Then from there, you can blend it sideways or
whatever you want, but that's really the key. That's the key to bring out that underlying form
of the whale's body. It's just like that,
just how I did that. Then I'm just taking
my monozoaser here and I'm just cleaning up the edge of the
whale's body here. Get that cleaned up. Alright.
And then what I'm gonna do 'cause I'm gonna take my
medium charcoal pencil here. I'm just gonna pull this
line. Nice and steady. Remember, nice and steady. You want to try to go at
the same speed through the entire length of your line. And the reason why you want to do that is because you want to maintain the same quality throughout the line
until the very, very end when you lift
up to conclude the line. Alright. So now that we have that defined line on the bottom, I can go ahead and
take a elf brush, and I'm just going
to start pushing this charcoal into
the paper here. And one of the reasons
why I'm pushing it into the paper like this is because if you look at the
reference photo, this part of the humpback whale is one of the darkest, right? It's one of the lowest values. And so because of that, we want to make sure that we're
getting a nice saturation, a really nice blend. I'm just pushing, more or less smudging the charcoal
into the paper. The reason why I'm doing
that is because that'll push that charcoal into the pores of the paper and just
give us a really, really nice, low value. And then just let the charcoal kind of fade as we go up, right? Just let it kind of let that value kind of
increase, right? Okay, so now what
I'm going to do is I'm just going to go
along the line here, and I'm just going to go in tight little circles
just like this. Tight little circles. Not pressing too hard. I don't
want to scratch the paper. I'm just going right up
next to that line, right? I didn't have much
control with the brush. So now I have pinpoint
control with my pencil. Nice, tight little circles
right up to that line. Right up to that line. See that? That's what we want. Perfect. Okay. So now,
back to the smudger. I'm gonna double check
our tone right here. Okay. I just want to go ahead and I want
to use my smudger. I want to continue to target these lower values right here around the shoulder
of the whale. And notice how I'm taking
the smudger and I'm laying on its side and I'm
pushing and I'm pulling. One of the things that you'll find as you use smudgers
more and more is a lot of times when
you want to get real serious and you really
want to lower the value, the smudgers work much better
when they're on their side. Here what I'm doing is I'm
just taking my smudger. And because this line that I'm going to have on the top of this
whale is implied. Remember how we
were talking about implied lines versus
defined lines. We want implied on
the top because we want to give this whale
as much dimension as we can. And just watch and notice the direction that I'm pushing
and pulling my smudger. Then here, I'm just going to
take my number six brush. I'm going to make
sure it's pretty much unloaded for the most part. We're just going to blend this. Notice that. See that blend? You can establish the
baseline with your smudger, but then just hit
it with a brush and it'll blend away real nice. Then in areas that need to
be a little bit darker, you can use the smudger to
really bring those out. But I don't want the
top of this whale to be too defined because
it's just there's too much high value
on the top of the whale because
of the sunlight shining through the
top of the water. And just kind of pull
up, blend and pull up. Notice how you can get
texture with the smudger. Just like that. Got
some runaway charcoal. Get that all cleaned up. Charcoal gets
everywhere, even with a method as refined as
the three layered method. So and then just like
we did to the top, we're gonna go ahead and we're gonna establish the bottom of the whale tail here. And you might be
asking yourself, Oh, well, why aren't you
using a brush for this? Well, the reason why is because when you actually
look at the drawing, there's not a lot of room
to work with the tail. So that's one of the reasons why I wanted to use the smudger. I just needed a little bit
more control for that part. In the tail here. I want to put a defined
line, you know, with some breaks in
it like this here on the bottom of the tail. But again, I don't want to
run the same line on the top, because I just wouldn't
look quite right, right? I wouldn't look right. Okay. So now smudger, 'cause, again, I need a little bit more control than what the brush can give me. So I'm just gonna start
from the line here. I'm just gonna kind of lift
up. See that? It's like that. Start from the line and then
just lift up. There we go. And there's that little
lip right there. And you can spend a
lot of time on it and get super super detailed, but we've already been at
this for well over an hour, so I want to we
still have to draw the calf. But we're having fun. That's that's all that matters
here. We're having fun. You should have
fun when you draw. That's why I do it.
Because it's fun. Alright, so then here, as far as the different
blotches and stuff in the skin, go like this. Just go like this. And even if you do see a couple of those lines and
stuff like that, and you think, Oh, wow,
that doesn't look right. Don't worry because you
can hit this with a brush, and you can blend it really
nice and you can bring out that gradation across all
of the different values, and that softens it up a lot. The whole point of
these tutorials is to teach you principles. You know, once you have
the principles in mind, I mean, it's you're unstoppable. You can do whatever
you want. And you can add on to them,
too, you know, the three layered method
is a method that is designed by its very nature to be the first couple
steps in drawing, but it is by far,
not all of them. So here what I'm
doing is, I'm just going ahead and I'm just kind of making sure I got my
brush fairly loaded up. And this is what I was
talking about as far as being able to kind of kind
of blend your way. You know, through
the drawing and kind of really bring out
as much gradation as possible while at the
same time blending all of the different values that
you were able to convey through different pressure
controls with your smudger. So Okay. Mono zero eraser time. So effectively, what this is, I'm just going ahead
and I'm bringing out kind of the textural
element of high values. And again, I mean, this Lil, you know, she's a
good old girl, right? Like, she's been
around for a while. And so by using the high value
retrieval method with our monozaEeraser here,
we can put in, you know, scars and, you know, scratches and bruises and just any type of texture
that we need now. Now, what this is this is essentially detail work to the capacity of this
drawing, right? So and this is one of the
reasons why I was saying, Well, don't worry about the
detail aspect of things for this drawing when we were
in the initial stages because detail is one of the
last things that you do. Pull this just like this. And you can also, I
mean, if there is, like, light reflecting on top
of a whale's body, like, you can use your monos eraser in this exact same
way to bring out, you know, those
light reflections on the back of your whale. It's exact same thing. O
9. Layering & Linework (Calf): You know, it just
depends on what your reference photo
looks like, right? And then here's another
thing that you can use your pen tail, click eraser for. You can actually use
it to, you know, go ahead and lighten up certain aspects of the
top of your whale, right? Because it has such a
big round head on it, it's actually perfect
for creating almost like that blotchy look between your different values on
the top of your whale. I just kind of
wanted to show you that you could use
it in this way. I don't normally use the Pentel clicker Racer for drawings. I use it to clean up
runaway charcoal. Alright, so 316, Smuger here. I'm going ahead and, you know, lowering
values in certain areas, right? Just like this, sir. And just how we were using the monozo eraser to retrieve high values and bring
out detailed work? Well, you can do the
exact same thing just on the opposite end
of the scale, right? So rather than doing that and bringing out all
the high values, you can use your 316
smudger just like this create little blotches
and stuff of low values. Remember, your
smudgers are one of the most versatile tools that you have in your drawing
kit with this method. And with the 3/16, Mudra, you have the most control of your most versatile
tool, in my opinion. Okay. Then here I'm just gonna bring out a little bit
more detail work here. There we go. I like that
look a little better. So now let's get serious her. This is a mama whale, and so she needs a baby whale. A little calf. But yeah, just like this. This
is what we're doing here. This is what we're doing. So just right along
the bottom, right? Just like with mama. We're doing it with
baby. Just like this pull this sideways. Then once it's
been put sideways, you just, you know,
you'll lift up. Here, actually I'm
gonna pull this down. Then you can just pull
it sideways, too. However you want the blend to
be, it's really up to you. In this reference photo, the calf is kind of kind
of in the background, and you actually can't even
really see it that well, because obviously, you
know, big mama, right? She's she's pretty much the
focal point of this drawing, but we're gonna give the calf as much justice here as far as detail work goes as we can do. Mm. There we go. Okay. Yeah, so now
take my smudger, right, a little
bit more control. And this is where
we're going to really establish the lower value. See that? Because I actually need a little
bit more charcoal, a little bit more charcoal. And I'm just gonna
run this charcoal right along the bottom,
just like this. And then I'm gonna pull up from the line and smudge
the charcoal. There we go. And then you
can lift up like this. See this? Just lift straight up. And then just like
with Big Mama, right? Just like with her, how we
had the lines coming up. And, you know, if you don't
like the way that looks, you can just hit it
with a brush, right, and blend those lines away. We're gonna be doing
the exact same thing with the calf here,
exact same thing. Alright, so now that we got
that pretty much solidified, now we're gonna go
through, we're just gonna punch in our
linework here. Just like we did with Big
Mama. I like that name. I think that's what
I'm gonna call her. 'Cause she's pretty big, especially compared
to her baby here. Or just running these define
lines just like this, you know? All along the bottom. Put a little dove tail
in the tail here. And actually, just because
of the way this tail is, I'm actually gonna
do a define line on the hump and then write down the tail. There we go. But the reason why I did that
is because of the angle, the angle that the
tails at, right? Maybe we guys get
this all cleaned up. Got the edges charcoal everywhere from
where we established that base layer for the calf. There we go. Now I'm
gonna take my smudger. I'm just gonna try to try to lower this value
and bring it right up to this line that I have defined with
my medium charcoal. Much better. Much better.
10. Final Detailwork: Okay, so now I'm gonna
take my medium charcoal. And just like what I did
for the belly of Big Mama, we're gonna do it for the calf. Here, nice, tight
little circles. Nice, tight little
circles, just like this. And we're gonna
bring that low value right up next to
that defined line. Like, that's what we want. I mean, the bottom of this
calf is the darkest part. And we're just gonna lift up. We're gonna follow our
conto our lines that we know are there. Perfect. Medium pressure control. Remember, medium
pressure control. No need to press hard. Right here, yeah, right
up next to the line. Then just lift up. Biggest thing is just remembering
that underline form. Don't forget about it. Okay. And while we're here,
I'm just gonna add a few of these little little
growths on the fin here, some texture. Why not? And this part of it doesn't have to be
too detailed, guys. I mean, when you look at the
reference photo, I mean, that calf is pretty
much pretty much blurry, for the most part. And, I mean, ideally, you know, when we look at it, what we want is we
have to remember this. As the artist, we
are in control of where our viewer's eye spends
the most amount of time. So, believe it or not,
depending on how you draw something like
this, for example, where you have multiple subjects in the same greater composition, we can make this
calf fuzzy, right? We can make it out of
focus with our brushes. And then what that does is that subconsciously sends
the viewer's eye, not necessarily to the calf, most of the time, but
to big mama, right? That's where we
want the viewer's eye to spend the
most amount of time and really appreciate
the detail work and, like, say, the head and
the fins, for example. You have that power
as the artist. You know, when you
think about it, a viewer doesn't want to look
at something that's fuzzy, right? That's out of focus. Subconsciously their eye routes to something that's in focus. And so, understanding
that principle of optics, you can quite literally steer your viewer to where
you want them to look. You have that power. Just be aware and use it.
Have fun with it. You know, a drawing is meant
to be a journey, right? That's why art museums exist. So, we're just gonna
take our brush, and we're just gonna
blend this real nice. You know, art museums
exist so that people can appreciate art
so they can study it. Because most most people that appreciate art will
be the first to tell you that all art tells a story. The only question is, what does that piece of art
on the wall say, right? Then here, I'm just doing some final detail work on this calf. And we blended it. We
blended it with the brush, and now we're gonna
blend it even more with our elf brush here. It's just because this
calf is pretty pretty, pretty dark, pretty low value. And so we just want to make sure that we blend that real nice. I mean, I could probably
spend days on this drawing, you know, really getting it
as detailed as possible, but for the most part,
I think we've done a pretty decent
job trying to get all this runaway charcoal
figured out here. There's charcoal everywhere. Then here as gonna
blend this real nice. And this is what I
was talking about how we kind of blend it
and we soften it up. We take away a lot of that
definenss in the calf. There we go. Then here as I actually kind
of wanted to lower the value on this fin
a little bit more little a little
light for my eye. We got just some detail
work and whatnot. But, yeah, I mean, most all of these drawings that
I do, you know, I want to teach you how to use the three
layered method for all sorts of different animals
and different textures. So I hope that by this point, you know, in this
tutorial, you've learned, you know, one or
maybe even two things about just composition,
about optics, right? And just little subtle
tricks that you can use at home while you draw whatever it is
that you're drawing, and you can, you know, send your viewers on kind
of kind of a journey of, you know, what exactly is
this drawing all about? And, you know, where are
these details and whatnot? So You know, a lot of times we think that, you know, we might know all there is to know about drawing. And I, you know, I hope that I never
know everything. You know, I hope there's
always something to learn. So I hope that you learned
one or two things, as always, stay happy, stay healthy and remember.
Never stop drawing.
 Messer Creations, Artist | Author | YouTuber