Transcripts
1. Introduction: Hey, guys. Welcome
back to another class. My name is Braden Messer. I am an artist, an author, a YouTuber, and today. I'm gonna be the one that
teaches you how to draw. So mastering charcoal drawing. This is part two of a three
part series that I'm making. Part one, I taught you how to use the three layered
method to draw a hummingbird. But in this one, I'm
teaching you how to draw a crocodile using the
exact same method. Now, I will say that if you find yourself enjoying the
T layered method, and you're like, Wow,
this is amazing. I really like this. Then I would highly
encourage you. Pick up a copy of my new book, drawing the portrait, step by step lessons for mastering classic techniques
for beginners. Yes, I know the book is
about drawing portraits. But the same principles apply. The cool thing is, as
you go through the book, it teaches you everything that you need to know about
the three layered method, and it breaks it
down step by step, much like I will be
doing in this class. So if that sounds like something that you'd
be interested in, I will provide a link so that you can pick one up in the
description of the class. Alright. What to expect? In this one, we're going
to be breaking it down. And we're first going
to start off and I'm going to show you how you can easily use a graphite pencil
to draw your contour lines. Once the contour
lines are placed, I'm then going to
show you how you use form frame lines
so that you can start to get a good idea of that
third dimension in tot space. Once we have that,
we are then going to start drawing this
crocodile in sections, just like the
hummingbird in part one. We're going to start off
with the nose of the croc, and then lesson by lesson
section by section, I'm going to show you how we use soft charcoal for our base
layers and then how we can use smudgers start to build
up the differences in value from complete white on through
to complete black. I'm going to be explaining
the intricacies of using soft medium and
hard charcoals to layer the details as we
go section by section. I'm going to be explaining
line definitions and showcasing those one by one. As we develop the detail
throughout the drawing. Then we're going to be playing a little bit with
background and foreground, the landscape effect
as DaVinci put it. I'm going to show
you how you can detail out specific sections of the crock and then leave others more or less
blurry, out of focus. I'm going to be talking
a lot about that so that we can start to get a
depth of field to the drawing, which is something
different than we didn't go over in part one. So, yeah, I mean, that is
pretty much what to expect. I will say a good way to tackle this class
just so that you get the most out of it
would be to sit back initially and
just watch the class. Take it in, kind of
like it's a movie, right? Don't draw along with me. I want you just to
really focus on what I'm saying and
more importantly, what I'm doing so that you can just absorb all the information. Once you've watched
it through once, then create your project with
me a second time around, draw along with me and upload your project so that I can
give you my feedback on it. And then if you want your
project to be featured in my monthly newsletter that comes out the first half of
every single month, just make sure to leave your
review of the class as well. And that allows me
to do that for you. So before we jump into class, I just want to let you
know that I do have one on ones available
now here on SkillShare. What those are is those
are a 1 hour Hall with me, where we get to meet
each other, and I can give you my
feedback on drawings. You can ask me questions. You can send me
multiple drawings that you have questions on, and I can coach you
and consult you through ways to develop
your skills even further and really help you come to your fullest potential
when it comes to drawing. If that sounds like something that you
would be interested in, you can go to my homepage
and right at the top, you can book a
time slot with me. So yeah, that is pretty
much it. That is all. And I hope to see you in class.
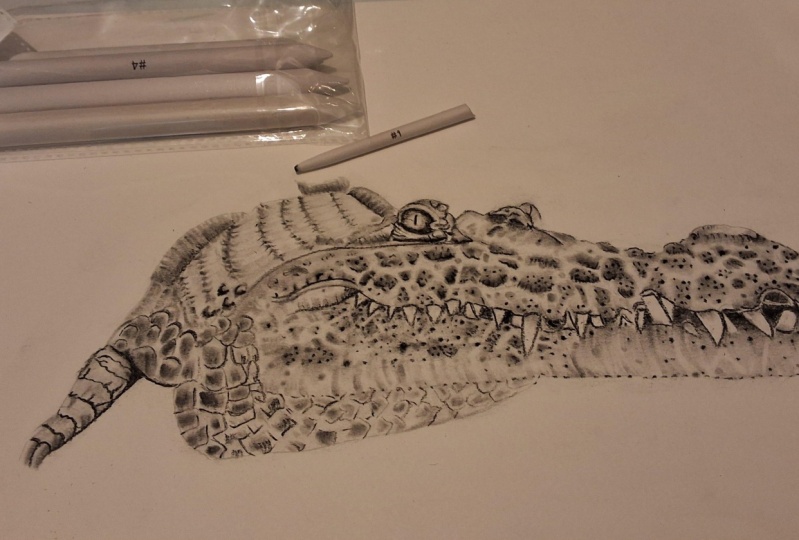
2. Draw your Contour Lines: Okay. So for this one, we're going to be using
a graphite pencil. This is just a humble HB. We're also going
to be using a huh, a pent out click and
a mono zero eraser. As well as a soft rated, a medium rated, and a hard
rated charcoal pencil. Yes. We're also going to be using three different
smudgers number one, two, and three, as well
as a sand paper strip. And a piece of what I call tone check paper for
checking our tones before we lay them
down onto the paper. And last but not least,
our Trustee brushes. This is a number six, as well as a diagonal
cut elf brush from a makeup kit.
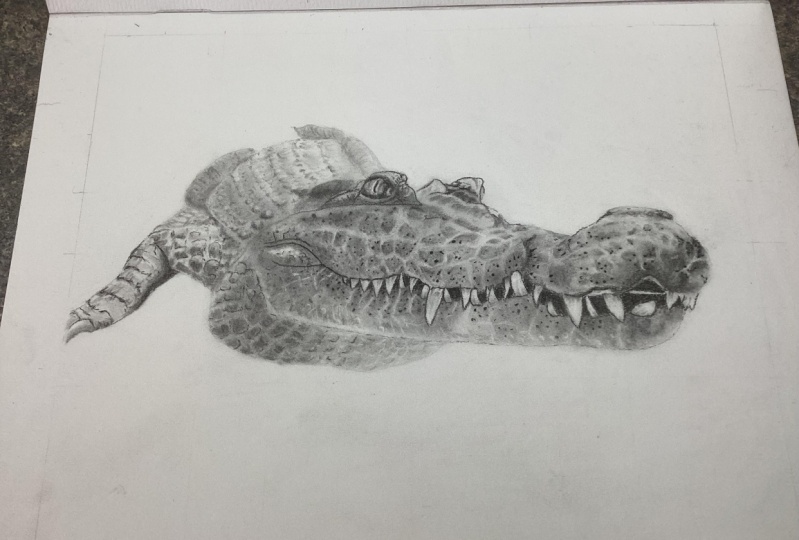
And here we are. Okay. So the first step that we want to focus
on with any drawing is, of course, ironing out the basic shape of our
reference image here. So uh the shape is, of course, going to be the two dimensional
area that is defined by a change in value through the build
up and layering of tones, which of course we
will be doing with our charcoal when
the time comes. But for now, we are focused only on the outside
edge or the outside, contours of the reference image. So what I'm doing is
I've started the eye, and I've come down the snout of the crocodile and
now I'm focusing on the end of the
crocodile's nose here. And for this step, um, it's good to just take
your time and go slow. A big thing to keep in mind when you start drawing,
in my opinion, this is one of the
more difficult things to do in the whole
process of drawing any image because I'm teaching you how to free hand your
shape with your drawings. And because of that, as the
artist, when you freehand, you have complete discretion
as far as what you think looks proportionate
and what does not. Of course, if we were ironing
this out and we were using, say, the grid method,
for example, um, we would have a much better
structure to go off of, to make sure that our
proportions were in place. But for me, I enjoy the freedom, the creative freedom rather. Um, of free handing my drawings. And so that's one of the things
that I want to teach you. I want to teach you
to not be afraid of tackling these drawings
with your free hand. You must learn, in my opinion, to trust yourself, right? Trust your hand.
And not only that, but because you're only going to be drawing more and
more, you will grow. In regards to your skill level. Okay. So as you can see there, I just hit that with
my Monozeroeraser. That's another thing that
I want you to consider is I want you to
embrace mistakes. When you embrace mistakes, you tell yourself
that it's okay to make them and that you can
learn from them, right? The big thing about this
outline here that we're doing is that I've done the eye, I've done the nose,
I've done the chin. And now, in my opinion, the best way to tackle this crocodile is to iron
out the teeth, right? Because when it comes
to proportions, one of the things
that you can use when you are drawing is what I
call reference points, right? Now, reference
points are basically parts or specific areas of the outline that you can use to reference other specific
points in the drawing. Like, say, for example,
this big tooth, if you look at the
reference image is in line with the middle to the back
of the crocodile's left eye. So we want to make sure
that we stick as closely to that with our outline
on paper as we can. But the big thing here
is to make sure that you go slow and when you're
drawing each tooth, give that specific
tooth that you're drawing your
undivided attention, one of the things
you'll discover when you do that when you move slow, when you focus on exactly what
it is that you're drawing, you will have better
proportions, which is wonderful, especially if you are free
handing your drawings. And if you need to
take a break and you need to make sure to count the number of teeth that you have, say, like
this year, one, two, three, four, five, one, two, three, four, five, six, there's six teeth back from that double
tooth that we had there. Actually, there's seven. There's this little
itty bitty guy here on the end. There we are. Boom. Something just like that. But that's the big thing
when it comes to drawing out the basic shape
of your crocodile. One of the things that you're
going to notice as we go through this tutorial
is how many times I actually erase and I reset my outline for
the charcoal to come. That's part of the
creative process, right? It's the art of
looking, if you will, is that when you're drawing,
you want to be fluid. You want to be able to make
adjustments quickly and understand that those
adjustments are necessary for the overall benefit
of your drawing. So see there, I just use
that reference point of that tooth and
then at that point, is where I'm going
to start drawing the front part of the
crocodile's right eye. Right. And that's one of
the things that the three layered
method teaches is that if you start on
one part and then you move your way across the drawing as you are
laying down your charcoal, you'll be able to make
those adjustments and see, Okay, wow, this eye here actually is a little bigger
than I wanted it to be. So what I'm going to do is
I'm going to take my eraser. I'm gonna eras it real quick, and I'm going to redraw it with my graph. That's not
a problem at all. Like this, for example,
my proportions are completely off here
and noticeably so. So I'm just going
to take my Pentel click eraser because
it's my biggest one. I'm going to make
that adjustment, and that's fine. I can do that. I have the power to do
that, and so do you. So do you. Here now we're
going to redraw that. There we go. That's much more in line with what the reference image
actually looks like. I'm just focusing
on the main lines. Now, you don't
need to draw every single little detail
in your outline. Like I said, the outside
contour is the biggest part. It's the biggest
thing. The say right about here is where that it's like the neck of the crock
is, something like that. And then here, this is kind of a unique piece
that we're going to be doing. I'm actually going to
be teaching you uh, what Leonardo Da Vinci actually called the
landscape effect. Now, granted, this isn't
necessarily a landscape drawing, but the principle
of what he talks about is very much the same. That is, of course, and
I've mentioned this in other drawings that I've done is that there are parts of this crocodile that are
very close to the viewer. Then the whole body of the crocodile is actually farther away from the
viewer and because of that, there are subtle techniques that I'm going to
be teaching you on this tutorial that u will
speak to that visual. And help you convey
the proper aesthetics so that it makes the crocodile. By the time you're done
drawing it look elongated. But we'll get to that. Right now, we're just ironing out the basic shape,
right? The outline. That's all we're
trying to do here. We're not trying
to overthink it. It's little foot sees there. And then I'm going to draw
some guidelines here. Basically for it
looks like there's some spines on the back
of this crocodile, so we want to make
sure that we speak to It's something
roughly like that. Okay. Now I'm gonna take
my monozoaser here, and I'm just gonna embrace
these mistakes that I've made, and I'm just gonna clean
them up real quick. Yes. I don't really
like that line, so I'm just gonna get rid of
that. Don't like that line. Get rid of that one. Clean
that up a little bit. Wonderful. Okay. So now what
we're going to focus on is what I call framing,
the underlying form. And I'm going to tell
you why it's important. So as I said, you know, shape is defined by the outer contour of
an object, right? Which is how your
viewer will first perceive it and begin
to make sense of it. Um, but form is three
dimensional versus shape, which is only ever going
to be two dimensional. So we want to give the illusion
of that third dimension. Framing your form is what
I call form frame lines. Now, these lines basically are to help give more structure to your outline so
that rather than only being able to deal with that two dimensional structure, you now have three
dimensional structure. Now, when it comes to
these form frame lines, you can put as little or as
many in there as you need. All right. We are ready
for some charcoal.
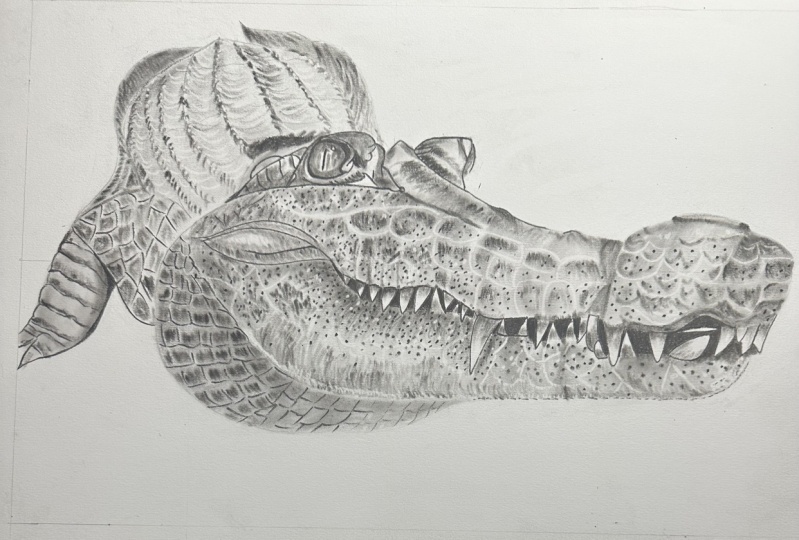
3. Establish your Base Layer (Nose): Now we have our
tone check paper, and what I've done is I've
taken my sandpaper strip, and I've grinded some
soft charcoal on here. One of the reasons why I'm using a soft charcoal as
opposed to the medium or the hard graded charcoals
is because it has the least amount of binder
in it from the factory, and because of that, it's
going to spread very evenly, nice and evenly,
and it's going to rest on top of the paper for us. And when we go to
retrieve higher values with our monozura eraser
and other erasers, it's going to lift
off the paper very nicely as well. So here we are. Nice and light.
The biggest trick when you are laying down what I call your base layer of
charcoal is to choose a very, very light hand, right? You don't need to press hard at all. That's the big trick. I've had students come back
and say, well, you know, I wasn't able to retrieve the highest value that I wanted. And I asked, well, you know, there is probably only one
reason why that's happening. I asked them about
their pressure control, and they always say, Oh, yeah, I was pressing
a little bit too hard or maybe I overworked the paper a little bit.
I said, that's fine. Just make sure that you
make the adjustment and that you go very light handed
on the next round, right? So now here we are.
This is the next step. What I'm doing here is I'm
taking my monozeroeraser, and I am doing what they call retrieving, my higher values. This does a couple of things. One, it starts to
really speak to the texture that we see on the uh of the
crocodile's nose here. And not only that, but it helps us to
build what they call value relationships in
our drawing as well. See here, I didn't
like any of that, so I'm just going to make
a quick little adjustment. And notice how because I was
light handed with the brush, I was able to erase
that completely, and there's no residual charcoal onto the paper for
when I go back to kind of re solidify exactly what I want this
crocodile's nose to look. Here we're going to just
draw this out a little bit. There we are. And that's the thing is when
it comes to this technique, everything that you do
from drawing out the shape and the form frame
lines to your charcoal, always use a very light hand. Even when you're going through and you are putting
in defined lines, you're just nice and light. Let your tools work
for you, right? Let them do what they were
designed to do. And they will. Okay, so now what I'm doing
is I'm taking I'm a smudger. And I'm going through. And one of the reasons
why I'm using a smudger now instead of continuing with my number six brush or say, maybe switching to my elf brush is that I want more
control, right? And that's what the smudgers
regardless of size, really allow you to do. In fact, the smaller
the smudger, the more control, right? And of course, the
most control that you can have with
your charcoal is going to be a very sharp
tipped charcoal pencil, right? But basically what I'm
doing is I'm referring to my reference image and what I'm trying to do is I'm
trying to build up all of my lower values first. And the reason why I
want to build all of my lower values first is
because the higher values, if you do that will take
care of themselves, if you build up lower values and once those are completed, then the next thing will be
to go after your mid values. Of course, your high
values almost always, especially after you've laid down a base layer of charcoal, are going to be conveyed
via eraser work. Now when it comes
to higher values, you can do one of two things. There's two separate approaches. There's what I'm
doing here, what I'm showing you now, okay? Retrieving higher values, and that's basically
where you go back over charcoal or graphite or
whatever your medium is and you basically erase it and you retrieve that
higher value, right? The other one is what they
call saving your high value, which is basically
what it sounds like. That's where you don't
have to retrieve anything. Though high value is there
and it always will be there because you didn't put any charcoal down onto the
paper in the first place. So And when it comes to not getting yourself
overwhelmed, right? Because that's
very easy to do in the drawing space is only
focus on one thing at a time. As you can see here
with this drawing, I'm only focusing on the
snout of this crock. I'm not caring about
anything else. It's not here. I'm
going to take my brush. I'm just going to
lend this real quick. This is going to give
me a form of gradation. I got some runaway
charcoal here and just clean that up. Okay. So now, notice how we've
graduated in our control. We've gotten us we
used the brush, which allowed us
to move quickly, but gave us very little control. Then we switched to the smudger, which gave us a little
bit more control, and now we've switched to
a medium charcoal pencil, and we have even
more control still. So one of the reasons why I'm using a medium
charcoal for this versus a soft charcoal is that
the medium charcoal has a little bit more binder in
it, and because of that, wherever I hit the paper
with my charcoal pencil, I know that that charcoal
is going to be low in value and it's going
to keep its integrity. Because there is
more charcoal binder in it than there is
with the soft charcoal. I hear what I'm
doing is I'm just putting a defined
line right here. There we are. That's
good. It looks good. So that's basically the inside
of the crocodile's mouth. So I'm just gonna
darken that up, bring out that low value. Then here I'm gonna put
in another defined line. Right there. There we go. If you look
at the reference image, you can see what I'm what
I'm lining out here. There's not a lot
of light that's hitting the inside
of the mouth here, so I'm just gonna
line out this tooth. When it comes to the teeth, I would recommend
lining the teeth out because you want the
teeth to be prominent. When the viewer looks
at this crocodile, you want their eye to
be drawn to the teeth. Well, the best way that you can make sure that that
happens with your viewer is to make sure that
when you're drawing it that you actually
outline those teeth. Just use a light hand
and make sure that you're using as sharp
of a charcoal pencil as you can get so that you
really get a quality line, something that has
a mid line quality and has integrity to it. Now, I don't think I've
touched up on that, but line quality, by definition, is the thickness or thinness of a line by varying
that line quality, you can show form
in a drawing with literally just the use
of your line work. So and while we're on it, line weight is another term that you want to
get familiar with, and that is used to describe
basically the strength of a line or how light or
dark it appears on paper. Obviously, these teeth that
I just outlined, obviously, they have a very
high line weight and they have a mid to higher
line quality as well. That's by design. We
wanted to do that. So now here, what I'm
doing is I'm just taking a smaller smudger and
I'm just going through and I'm just blending blending
a lot of this charcoal. That's one thing you'll find
as you draw with charcoal more and more is that when
you first apply the charcoal, regardless of grade, it's going to have a
grittiness to it. And that's just the nature of the medium. That's
just the way it goes. So one of the things that you
can do to combat that look on your paper is by hitting
it with your smudger, right? Okay. Want to check
my tone here, kind of lighten that
up a little bit. This is a little trick that
you can check this out. See this? See how I'm kind of running
it and I'm going up with it, running it along the line, along the edge of
where I would want it to end, and
then I just go up. And this is basically
an implied line, right? We put a we put a define
line on the tops now, but this is all
going to be implied. Now, basically, by definition, what an implied line is is an implied line
occurs when you continue a line
after a small break and that line proceeds
in the same direction. Then a defined line basically occurs when you continue
a line without any break. Typically, they have a
mid to heavy line weight, and that's what you
see with the teeth. The teeth are defined lines. The bottom of the
crocodile's chin, that's more of an implied line.
4. Layering & Detailing (Nose): But then here's a cool
trick with these teeth. You just take your smudger with a little bit of charcoal
on it and you just pull pull down and see
how that kind of gives it gives the teeth
kind of their own look. It almost makes them look almost rounded in a sense.
That's what you want. Here, I'm just going
through with my monozura eraser and I'm just doing subtle
retrievals of high value, you know, lines, you know, smudges, just different areas. And you can see the more
the more you work it, the more that kind
of wrinkly rough aesthetic comes out in
the crocodile's nose. But then here, we're
just having fun. We're putting out some
more defined lines on this crocodile's teeth. A little implied line there. I got to break that
up a little bit. I'm gonna run a define
line right there. Boom. Okay. And then that's
the other thing too. Anywhere in this crocodile's
nose where you just think, man, I need that
value to be lower. It's not low enough. You can use your medium charcoal pencil,
like what I just did here. Okay, and I'm just
filling this in. When you look at the
reference image, some of the lowest values in this entire drawing are going
to be right where we're at right now in the process
of creating this drawing. It's going to be in between these teeth under the
crocodile's nose. Oh these are some of
the darkest values. And that's why when I'm running these defined
lines on these teeth, if the line itself seems to you to be maybe
a little too thick, maybe it has too heavy of a line quality or a line weight, don't worry about that because notice how these
first couple teeth, when we ran those low values right up next to those teeth, some of the lines
completely disappeared, but you still have a very, very crisp boundary between
your high value and your teeth and the low values
in the inside of the mouth. Like right here, for example,
see how I'm gonna run this low value right
up mix that line. And all of a sudden, that line thickness on that one side
of the tooth goes away, but yet, you have a nice, crisp definition
between your values. So if that's something
that you're concerned about, don't be concerned. Then here's another
trick. Take this smudger. And when you're going
up, you can pull up, and then when you're
going down, pull down. And notice how
that kind of gives us a really nice kind of almost like mid value
between our teeth, and that gives us almost like
a slight form of gradation, but it really brings all of the values together as far
as the mouth is concerned. Okay. Now we're just doing
our little teeth trick. We just pull up and pull down. And this one will pull up, but a couple strikes on
the paper, that's it. Hit it once. Move on. And that's one of the
things that you'll find with this
specific tutorial, if you do end up drawing
this one with me, is that less is more. Less is more. You don't have to go ham on your
crocodile drawing. That's one of the
cool things about this technique is
that it's very, very subtle, very, very subtle techniques that give you the best aesthetic that you can get. But then when you're looking
at your reference image, notice how there are those
lines of high value. Just just be aware
of where they're at, and when you're building
your low values, make sure that you keep the
values where they're higher, a little lighter with your
charcoal so that when you go in with your monozura eraser, you can retrieve
them very nicely. There we go. We got a nice form of gradation with our brush. So like this, for example, what I'm doing is I'm going in
with my model zero eraser. See that? Just doing
really quick retrieval. Really quick high
value retrieval. And notice this is about the third or fourth
time I've gone back over the nose of the crocodile. And that's the thing that
I absolutely love about the three layered method as an approach is that
it is very forgiving. You know, if you want to go back over something two or three times and really hone in on exactly what you
want as the artist, this method allows you to be able to do that,
which is very nice. Okay, so now what we're doing is I'm taking a medium, charcoal, and I'm going back through I'm referring to the
reference image, and I'm starting to just build up all of the
freckles, if you will. The dots on this crocodile. And if you are new to charcoal
as a medium and using it, this specific tutorial
will definitely test your skill set in
the wake of being able to convey texture and form. And it's really going to be a good lesson in the wake of developing
your skill set. I'm of the belief that you
should never think that you know everything about drawing or anything
for that matter, because the moment that
you think you know it all, you're unteachable. And that goes for masters
as well as students. So that's just my that's
just my own opinion. I mean, I when I was
drawing this crocodile, there was lots of
things that I learned that I didn't
necessarily know before. And that's what I
love about drawing. I love that it has that, uh that ability to
teach every day. Every time you draw
something different, you're going to learn
something different. Okay. So see that, see how
I did that there. What we're doing
is I'm just taking my smudger and I'm hitting the paper and
then I'm twisting it, and then I'm hitting the paper,
and then I'm twisting it. But notice, did you notice
how I was doing my dots with a pencil and now I'm doing dots with a smudger or
there's a reason for that. The reason why I did
that was because I want different types of dots. Because if you look at
the reference image, there are dots that
are nice and tight, they're really low in value. But then if you start
to look even closer, you start to see that
there's other dots that aren't so tight and they're
not so low in value, but yet they're still
very much at dot. That's the reason why
not only do I use the charcoal pencil for some of the smaller lower value dots, but then I use the
smudger for some of the bigger and
higher value dots. Then here, I wanted to
show you guys this. Basically, when it comes to continuing to move on into
a new area of the drawing, you can do one of few things. You can either use
your brush and get that base layer down
and then retrieve your higher values with the eraser like I did for the snout, or you can go in
with your smudger. The choice is up to you.
I prefer the brush. But let's say, for example, if you are still kind of
iffy on your brush work, if it's maybe something
that's so new to you that are
uncomfortable, right? Then stick with
your smudger work. Just do smudgers. Smudgers offer more
controlled than brushes. So that'll be a
reason as to why you prefer your smudgs
over your brushes. But eventually, as your skill set grows and as your confidence builds with each
drawing that you do, you'll come to really
enjoy brushw, I promise. It just takes time,
just like anything. Then here what I'm
doing. I'm just continuing to line
out these teeth. The big thing with the teeth
guys is just make sure that your pencils are as
sharp as you can get them. The sharper your pencil,
the better integrity your linework will have,
especially on the teeth. Okay. Sir I got some
runaway graphite that'll graphite there from the
from the outline phase, I'm just going to go
ahead and clean this up. But notice, this is
the flexibility. This is why I was saying when
it comes to your outline, you're not committed because
you have this flexibility. You have this opportunity
to go back through and literally redesign and rebuild your drawing as you
see fit, right? And one of the reasons why
you might want to do this like I'm doing it is
because, for example, my proportions were
off on those teeth and I wanted to have
another go at it, right? So that's why I did that.
Then here I'm just going to pack in a lower value because that's what the
reference image dictates. For those of you who have been drawing with me for a while, you already know that I'm not
a fan of perfection at all. Um, for me, it's not about drawing something
perfect. It's about learning. It's about growing,
you know, such a life. And I feel that it's
the same with drawing. I'm not trying to
make my crocodile exactly like the reference
images crocodile. I'm trying to make my crocodile
look like my crocodile. And if you feel the same way,
then you should as well. Right? We're all different, and there's
nothing wrong with that. We all look at
something differently. We all interpret
something differently. And our individual art is our individual take on what we see and how we
think about an object, how we feel about
a reference image. So if you're drawing
and your crocodiles not turning out exactly like you
want it to, don't stress. Don't stress at all. That's
what it's all about. Just learn and take your time. And if you have to take a break, walk away, go ahead and do that.
5. Establish your Base Layer (Mouth): Those of you who have been following me for
a while already know that I'm a big fan of Leonardo DaVinci because
he said just that, you know, if you find
yourself getting frustrated with a piece of
work, just take a break. Take a break. The best
things in life take time. They take time to grow. They take time to
come into being. And drawing is quite
literally no different. So here we are. Now,
what I'm going to do? I'm take my brush, and we are moving on
onward and upward. So I'm gonna go ahead here, and just like with the
crocodile's snout, we are laying down that
base layer. Real light. I am not pushing hard here
at all. Blending this. But the big thing is,
if you want to just bear in mind your poles. When you're hitting
the paper, make sure that you are following the form frame
lines that you lay down in your initial step. Here's a cool trick, see this. See if you lift up
directly from the teeth. See that? See that? Now, all of a sudden,
even in your base layer, you have this sense of form that your viewer can actually see when the drawings
all said and done. But it's subtle
tricks like that. Brush work is very powerful. Yes, you don't have
a lot of control, but there are certain
things that you can do to your drawing
aesthetically speaking, that will tie in to all
of your smudger work, all of your eraser work, and all of your detail work for a really streamlined
final product. But now what I'm
doing is I'm going through just like I did with the crocodile's nose and I am retrieving my
higher values here. When I'm looking at
the reference image, if you look at the
reference image, you notice how there's all
those high value lines, all that line work in the
top of the croc's mouth? Well, I'm trying to follow
those as closely as I can because those
are going to be the boundaries between
my lower values. That's why I line them
out the way that I did. Now what I'm doing is I'm going through
with my smudger work. And I am building up my mid values as well
as my lower values. But here you see
this. See how I'm building my lower values in between those high values that I retrieve with
my monozureaser. That's the trick.
That's the trick. Just like that, boom. It doesn't take a whole lot. It's just the big thing
is those first two steps. Base layer retrieve
the high values, and what that does
is that gives you a more solidified framework for building up those mid
and lower values, right? And even the base layer itself speaks to the majority of
your mid values, right? Because you think about it, when you hit it with the brush, that's not exactly a very, very low value, but it's also
not a high value, right? So, essentially what you do when you hit your base layers, you're accomplishing
building up your mid values. Okay, so now here what
I'm doing is I'm taking a very sharp medium charcoal and I'm putting in
some defined lines. That's what these are.
These are defined lines. And one of the reasons
why I'm doing this is because if you look
at the reference image, the croc's eye is very
callous, very rough. That's pretty much the texture
of an entire crocodile. But for here, what
I'm doing is I'm just solidifying the main lines that we see in this
crocodile's eye. And this is just
the start of it. So now that we have that,
now what I'm going to do? Because I'm going
to go through with my smudger and I'm going to
start blending this charcoal. Again, I'm only focusing
on the low values, right? Where are my low values? When I look at the
reference image, where are my low values? That's my thought process. That's that's how I'm thinking
when I'm looking at this. There we go. See how
all of a sudden, with a couple quick
strikes of the smudger, boom, there's that eye.
That's what we want. Something just like
that. Continue to build these lower values here. Okay. All right. So now I'm going to take
my number one smudger. If you look really closely,
you can see the eye. You can barely see
the actual eyeball. I'm going to put that down
there. That looks good. I want to keep it implied. I want to keep it implied, so I'm going to take
my monos eraser and lighten this
up a little bit. Now I'm going to take
my medium charcoal. I want the medium charcoal because I want it
to be a low value. And here's the center of
the eye, right there. That's it. I'm going to
leave it just like that. Now, I wouldn't want to run
that line all the way down to the bottom because
then all of a sudden it wouldn't look like
the reference image. Right? So now that we
have the medium charcoal, now I can start to go in
and I can really bring out the lowest values that we see
with this crocodile's eye. Okay, so now what I'm
gonna do is I'm just gonna run run a line right down here. But notice how this
isn't a solid line, so this would be a type
of implied line here. One of the reasons why I
did it that way is because the texture of this
crocodile is just so rough and coarse and callous that there would be many
things on this crocodile, but there's very, very
few straight lines. Now what I'm doing is I'm taking a heart charcoal and I'm using a heart charcoal for
this step because it has the most amount
of binder in it, and because of that, it's
able to keep its integrity. As you can see, if you look
at the reference image, there is a little
different texture here, almost like a ini type texture. On this section of the
crocodile's mouth. And the heart charcoal actually throws,
believe it or not, a little higher of a value than what you see with
medium and soft charcoals, and it is very hard to retrieve because it has
so much binder in it. So because of that, it's the
perfect detail charcoal. It's the charcoal where
if you want to put some kind of texture or
like a line like we're going to do here, There we are. You can do that, right? A lot of times it's
the subtleties. I can just go through and I
can add all sorts of texture. I can add texture all day
long with a heart charcoal. Okay. Alright. So
now what I'm going to do is I'm going to take
a number two smudger. I'm just gonna start blending and bringing out
some of these lower values. And then here on this section, if you just barely
take your smudger and you more or less skim
across the paper, what'll happen is it'll
give you this blotchy look. See that? It's like
a blotchy look, which if you look at the
reference image is perfect. That's the kind of
aesthetic that we want our crocodile to have. Values kind of a fickle
beast in a lot of ways. And here we're just going
to retrieve higher value. But see that. I mean, if you
make a mistake or if there's some kind of proportion
thing that's out of whack, you can hit it with an eraser and because you
were light handed, you can make those adjustments. Okay. So now what we're doing
is we're just going to put some defined lines on
these teeth. There we go.
6. Layering & Detailing (Mouth): See, for those of you maybe this is your
first tutorial with me, I want to break down value a little bit for you while
I'm lining out these teeth. Value simply means, how
light or dark something is. Now, a drawing is said to be a value drawing when
it's in black and white, you know, when it has no color, which is essentially
what my drawings are. Black, white, and the
mini shades of gray in between the two are called
values and sometimes tones, I call them tones sometimes, but they basically
mean the same thing. Value is what allows us to
see form in these drawings. We see form through
these differences in values or differences
in lightness and darkness, it's this range, this range of values that makes objects
look three dimensional. Now, you can enhance
value relationships, and that's basically what
the key to realism is. Simply, it's how dark or light one value is
compared to another, right? So in this drawing, especially
like, say, for example, like with these teeth,
the value relationship is the linework of the tooth. And because that linework
is low in value, and then the main body of
the tooth is a high value, that is kind of that value
relationship, right? And this is really
what makes a lot of drawings
believable, you know, is when the value
relationships in our drawings mimic the value relationships
that occur in life. All right. Now, because we're only working
with black and white, uh, the value scale is something that you should always keep in the back of
your mind, okay? So basically, you know, artists use a system
of, you know, sometimes it varies, but
most of the time it's nine values that range from complete white to
complete black. And for those of you that have been
following me for a while, you already know that I am a big advocate of using complete white,
which is, of course, our highest value and then complete black,
which is, of course, our lowest value, and
then bringing out all those value relationships in our drawing that
are in between. If we do that, we maximize
our value relationships. We create a believable
drawing and we maximize value for what it can do for us in the
wake of bringing out our form and that
third dimension, which make no mistake. Your drawings only ever
going to be two dimensional. It's only going to
exist in what they call two dimensional
space, right? It's your job as the artist to convey that third
dimension for your viewer. Okay? All right. So here we are. We're moving on to bigger
and better things. And notice how I took that base layer of charcoal
and I went up from the tooth. I went up from the teeth.
Well, I did that for a reason, and you can see the kind
of aesthetic that is underlying in that base
layer of charcoal. See that. I love brush
work. Brush work. If you have been
drawing and you've never used brushes, you
should definitely start. I think you'll really enjoy it. But now here I'm doing the exact same thing on the bottom. I'm grabbing that charcoal in between those teeth
and then I'm pulling it down in between each tooth
and you see what happens, you see that kind aesthetic
that it brings out. It makes that jaw look rounded. It makes the top of the skull look rounded,
and that's what we want. So now that we have that
base layer, of course, we're going in with our
monozoaser and we are retrieving all of
the high values that we can possibly retrieve. I hope you're starting
to see seeing as this is technically the third section that we've done
in this tutorial, that the process, the
approach, is the same. Base layer of soft charcoal. You can hit it certain
ways with your brush to really bring out an underlying
form effect if you want. You don't have to do that
if you don't want to. Then you go in with
your monozoeraser, and you retrieve all
of your height values. Now, granted, this is going
to be different depending on exactly what it is
that you're drawing. But for an animal such as this, such as a crocodile that
has a very callous, hard, rough texture, this
is what we want to do. Now here what I'm
doing is I'm taking my huh battery operated eraser, and I'm just showing
you different retrieval methods
that you can do. You can do spots, dots. You can go through
and you can really retrieve a lot of charcoal in one area if you
really need to go in and lighten something up, okay? I have some other tricks
that I'll show you with the Huh eraser in a little bit. Okay, so now I'm
taking my smudger, loading up with some charcoal. And I'm going through because
this jaw definitely has its own areas that need to be darkened up and those
low values brought out. So just like we did with
the top of the skull, we're going through
and we're using those high values as
boundaries for our low values. Because if you look at
the reference image, that's what that aesthetic of
this crocodile looks like. So if you use your high values that
you just retrieved with your monozur eraser as your framework for your
mid and your low values, I think you'll be very pleased
with the aesthetic as far as how it turns out
for you at the end. But nice and light. As with
everything in this technique, you don't need to
press hard, okay? You just don't. There's
a cool little trick. If you actually just
pull up and then you give it a little bit of a
break in between each pole, you can see how you can
really start to convey that actual form of how
that jaw is rounded, right? It's not flat. So that's starting to come
together pretty good. But now what I'm doing. I'm
taking a medium charcoal. And again, there are little poka dots all
over this crocodile, so I'm just going to go through, and I'm just going to
start putting dots down. Then here, I'm actually going to put a define line right here. Just pull it and then as
you extend, just lift up. Pull it, and then as you
extend, just lift up. See that? That I'll give
you a really nice line. And then here with this line
when you're pulling it, just kind of do a couple quick pulls up and
then back down, and then I'll give you the proper aesthetic
that you need for that line when looking at
the reference image here. But just go ahead and dot, dot, dot, dots for days. I'm gonna call this
crocodile Dotty. I like that. Because, Dotty, you got a
lot of dots, girlfriend. Alright. I don't know if
the crocodile's a girl, but it is now. Okay. But yes, when it comes to the dots,
just take your time. I find a lot of the
times when it comes to dot work that if you go slow and you really pinpoint exactly where
those dots are at, the drawing will
be better for it. Then of course, just like when
we first started drawing, I want to have those
variations in the dots, right? Here I'm just hitting
it and hitting the paper with my smudger, and then I'm just spinning it, hitting the paper, and
then I'm spinning it. And this is actually
accomplishing a couple things. Not only is it giving me
the dots that I need, but then I can also
go back through, and I can start to
smudge and bring out that blotchiness that
we see that's very, very apparent in the aesthetic of this reference image, right? Okay. It's coming together. But now that I've gone through, and I've hit all that
with my smudger work. Now I can go through with my medium charcoal and I can continue to do
what I was doing before. But then in here,
what I'm doing is I'm just putting in
some defined lines. Again, like I said,
this crocodiles skin, as with most crocks, you're going to have a lot
of coarse callus skin. So you're going to have
a lot of defined lines, as well as implied lines, and it's going to be a
really good test for you to see the kind of skills that you bring
to the table with how you are able to
convey those looks. Okay. So now the ELF brush. Here, if you look at
the reference image, we do have a little bit lower of a value and
notice how with my brush, how I'm dabbing the paper. When you dab the
paper with a brush, you give yourself a little bit more control
and you can really pinpoint where exactly you want that gradation
effect to be.
7. Establish your Base Layer (Cheek & Eye): Okay. All right. Now I'm
going to switch it up to a hard charcoal.
And look at this. You see the differences
in the lines with the hard charcoal
because it's finer, because it is a higher volume immediately next to
the medium charcoal, medium charcoal will
give you thicker lines, lines that have a
higher line quality, and a higher line weight. Hard charcoals will give you a thinner line quality and
a lighter line weight. Okay, so just keep that in mind. But here what I'm doing is
I'm just taking my smudger. Again, we're working on that
blotchiness all the while, focusing on the lower
values first and using those higher values
that we retrieve with our monozyeraser as our
framework, as our guide. Okay. Now I'm just gonna hit this real light real
light real quick. Just to blend this all together. I don't want to
press hard at all. I just more or
less want my brush just to skim across the top. Okay. So now I'm just going
to go in with my number one. I'm going to hit
the paper and spin. Hit the paper and spin.
I'm just try to bring out as many of these dots
on Dotty as I can. And while you're doing dots, if you want to go
through like I'm doing here and, you know, bring out lower values
and mid values, wherever you want, you
can do that, as well. Don't think that there's any one right way
to draw something. There's all sorts of ways. There might be some
ways that work a little bit better than others, but that's more
process than approach. If you want to adhere
to a certain process, then, you know, you
can build off of that. Okay. Let's retrieve
some high values there. That's looking good. So now I'm taking
my medium charcoal, and I'm gonna start
putting in low value dots. Dots here, dots there. Dots everywhere.
Dots everywhere. But again, when you look
at the reference image, that's the first thing
that you notice about these dots is there's big dots, small dots, little dots, you know, bigger dots, dots that are more
like rectangles and squares and all
sorts of stuff. So the more time you spend bringing all
those individual guys out, the more realistic your
crocodile will look. But, you know, of all the seven elements
of art, you know, line, shape, form, and value are
probably the biggest ones. Those are the ones that
you're going to be using in this type of aesthetic, every day, every day
your life when you draw. Texture, of course, is big. I mean, they're all important, but I think certain
elements of art stand out compared
to others in regards to specific types of art, right? I mean, a drawing
is a mini thing, but a drawing is not a painting. And vice versa. So say, for example, in
a drawing, you know, your line work is going to
be absolutely incredible. Like, you're going
to need to have really good linework
in a drawing. Whereas in a painting,
that's more that's more, you know, color is
very important, you know, like the
space of the painting. You know, that's really
what will separate, like, you know, a person's hand from
the background, right? So just keep that in mind. Okay, so we are coming along. Win here, I'll just continue to bring this down and
bring out this jaw. See how I'm going
down, but then I'm coming up, going down,
then I'm coming up. That's good. That's
what we want. Okay. You just take my
little elf brush here, do a little bit of dabbing. Just a little bit of
dabbing. There we are. Just get this blended.
It's the big thing. Okay, no, I actually
don't like this eye. So guess what I'm gonna
do. That's right. I'm gonna erase it. I'm
gonna make my adjustment. Get that out. There
we go. Okay, cool. Now I'm going to take
my graphite pencil. Again, this is just a humble HB, just middle of the
road GraphiV lightly. Very lightly. Because see
now that I have the majority of the head drawn and I've
solidified my proportions. Now when I go to redraw my eye, it's going to be a lot more accurate to my reference
image and to what I want. And this is what I was
talking about, guys, is when you're doing
your outlines, don't think that you're
committed. You're not. You're the artist, right? You have the power to make those adjustments
whenever you need to. Don't go into a drawing
thinking that it has to be picture perfect. It
does not have to be. There we go, just kind
of bring this out. Skin behind the eye here. Okay. That's a pretty decent
framework to work with. I've got some runaway
charcoal here. Clean this up a little bit. There you go. Okay. So now, smudger. Now notice how I'm going to
be using a smudger for this. It's a very small area, right? So I don't want to use a brush. I want to use a smudger
because I want to maximize the control that I
have for where all of my base layering goes. So like say for the
eye, for example, if you look at the
reference image, your lowest values are on the
outside of the eye, okay? Your lowest values. So that's where you're going to
want to go in with, say, a medium charcoal, what we're going
to do here, okay? To match that callous aesthetic
that this crocodile has. Then just here, I'm just
gonna go ahead and do a couple quick pulls.
Really bring this out. There we go. Something like that.
It's looking good. I'm gonna bring this up
over the top. There we go. Okay. And the cool thing about this line
work on the eye is that we can go in
with a smudger, and I'll show you
how he can blend right up close to the
line on the bottom, and you can really make
something look rounded. Run that line down right there. Okay, got this line. You kind of these wrinkles
and bring these out. I'm just gonna run this
line along the bottom here. Attach it there. Then
bring this line out here. There we are. And
then right up over the top. Right up over the top. Boom. Then connect this bottom
line. There we are. Okay. And then you can go in
and you can lightly press. You can use a light
pressure control, and you can bring out, you know, the wrinkles and stuff like that in the
crocodile's skin, too. You could also use a
hard charcoal for this, or you can just use
your medium charcoal and just go light handed, right? With line work, you want
to be definite, right? So if you press a little harder on line
work, that's fine. But when it comes to,
like, detail work, you don't have to
press hard at all. Run this line down here. This is looking good. Just run this line
right on the top, but not the bottom, the top. There we go. It's looking good.
8. Layering & Detailing (Cheek & Eye): Okay. So now, this is
the tedious part, okay? So what I'm going to do
is I'm going to take my medium charcoal and I'm
going to start building up that lower value immediately
next to the line, okay? Immediately next to the line. And what I'm essentially
doing is I'm starting from the outside and I'm working my way in, okay? I don't want to start
from the inside. Just want to start
from the outside. This will minimize mistakes. And remember what I
always say about eyes, guys, get in and get out. Less is more when
it comes to eyes, especially in a
setting such as this. Just be light. As you get closer to the center
of the croxie, just be lighter with your hand. Be lighter because we're
going to go with a smudger. We're going to blend this, okay? So you don't need to press hard. The right here is about the only part where you need
to press hard. This is the center
center of the croxie. Just hit it, one pole. That's it. Don't touch
it. Don't touch it. I know you'll be tempted
to, but just literally one pole with your medium
charcoal, and that's it. Now take your
number one smudger. You want your smallest
smudger because you want the most control because we're
in a very tight area here. Okay? Then just blend it. Just real lightly. Just
blend it real lightly. And like I said,
get in, get out. That's it. You can overwork an eye
without even trying. I know I've done it multiple
times, and it's no fun, so just hit it and
then leave it alone. Okay. Alright. And while we're here, I'm
just gonna go through, we're just gonna kind
of bring out some of these lower values
these mid values here. Okay. And you can go in with your moon zero eraser and you can kind of bring out those higher
values if you want to. Here we go. This is
a hard charcoal. So remember how I said
you could do this with a hard charcoal
or a medium. Hard charcoals nice because you don't really
have to worry about your pressure control so much because it's going
to throw a thinner, higher value line anyway. So that's looking pretty good. So we're gonna switch it up. I'm gonna put my
heart charcoal down, swap it out for a medium, and just kind of solidify
some of these lines. There we go. Okay. Now
what I'm going to do here. I'm going to take my medium
charcoal and I'm going to run a line right here. Effectively, what this is
going to do visually for our viewer is that we've
just pushed that eye back, we've brought that cheekbone of the crock skull
forward, right? So now all of a sudden
we have some depth to the drawing. Isn't that amazing? How one line, how one line can change how someone
perceives your drawing. That's pretty cool. Pretty cool. Yes. Okay. So yeah, I'm
just going through here. And a lot of times
when it comes to these skin rolls and
stuff that you see, if you actually build up a
lower value on the bottom of, like, a roll, it'll actually make that roll look
rounded in nature. See that? And here, I'm just going to darken this
up just a little bit more. A little more. That's it. Okay. So we're actually
getting pretty close to finishing the head of
this crocodile for now. Or this drawing gets
really fun is when we start doing the throat
and then we do the body, and I show you what not to do? What you don't want
to do to convey that elongated look
of the crocodile. So that's right around
the corner here. But then here, you can just take your smudger
and you can just continue to build up,
those lower values. A lot of times when it comes to doing this part
with the smudger, If you use a nice light
pressure control, what's going to happen is even though you're
lowering the value, you're still keeping
those mid values. Yes, granted, they are
getting lower in value, but there's still a
mid value compared to your darkest value as you smudge that charcoal and
really get a nice blend on it. Okay. So now, moving on. We got her number six brush. We're going to load it up here. We're going to start laying down a base layer of soft
charcoal for the throat. Again, nice and light. We're not pressing hard at all. Not pressing hard at all here. We're just going
through and making sure we have a nice blend, nice blend of charcoal. And now, watch this. So if you look at
the reference image, you see how there's
all those scales on that part of the
throat of the rock? Well, this is how
you bring those out. This is the first
step in bringing out all those scales is we want to retrieve the boundaries of those individual scales
with our monozaser. And here what I'm doing is
I'm kind of running the line. If you actually look at
the reference image, the way the scales
are they are in some kind of cohesive set, albeit it's not
perfectly symmetrical, but nature hardly
ever is, is it? So what we're doing
is I'm going through and putting scales
where I see fit, right? Now I'm going to take
a nice dry elf brush, make sure it's dry. Just go to hit this real light. It's more or less to get all
this eraser gunk off here. There we are. Now. Now
what I'm going to do? I'm going to take
a hard charcoal. Not a medium charcoal. I'm
taking a hard charcoal here. I'm going through and I'm
basically just highlighting or bringing out exactly where
those scales are at. And you can start to see why I highlighted this with my
monozoa eraser because I wanted to bring out kind of just another
dimension to these scales. Now, Grant, we're gonna be doing a lot of work to these scales, but these are the
first couple steps to really really convey
the scaliness, if you will, of this
crocodile's throat. Then as you move your way farther and farther
to the right, make sure that your
pressure control gets lighter and lighter. Okay. So now, I'm just
going to take my off brush. Dry just hit this very lightly. More or less just to put a
nice blend on the charcoal. But don't press too hard.
You don't want to get rid of your linework that you just laid down with your hard
charcoal, okay? Now we're going to take our smudger and we're going to add some texture
to these scales, This texture is
coming in the wake of a lower value. Right? Just like that. Boom. Those
scales are really coming out. The cool thing
about these scales, I'm also going to
show you a trick with the medium charcoal. Because if you look at
the reference image, there are scales that
for whatever reason just have a bigger linework to them. I'll show you
how to bring that out. Then here what I did is, I took my uh eraser and I
actually just sharpened. Uh, the tip into a point. And what this allows
for is, again, in drawing, it's
all about control, especially with this technique. So this gives me more
pinpoint control with exactly where I
want to retrieve, um, those higher values. And especially when it
comes to scale work, if you have a battery
operated eraser, try sharpening the tip
of the eraser into just a simple point and
see if that gives you, um more control
and allows you to convey the kind of aesthetic
that you want to convey. All right, so now we're going
to take a dry number six. Let's hit this real light.
Just real light. There we are. So now, here what I'm doing. This is what I was
talking about before. I'm taking my medium charcoal. And you see how my lines
are lower in value, right? They have a thicker
line quality and they have a heavier line weight. Now, I don't want to do
this to all of them, right? Just look at the
reference image. There's only certain lines
and certain scales that merit this kind of line quality and this
kind of line weight. And this is something that
your viewer will appreciate. Their eye will pick up on that subtleness of this line
is thicker than this line. This line has a heavier
line weight than this one, but they won't even realize
what they're looking at, but they'll appreciate it. They just hit it real lightly. Just real trying to get
a little lower value overall on the bottom
of this throat. Because not a lot of
lights hitting it. Then here, you take your
uh eraser and you can really solidify the
edge of this jaw. Because if you look at
the reference image, it's not a high value. There's no real defined
line right there.
9. Establish your Base Layer (Arms & Body): Okay, looking good.
Scooch this over. All right. And here we go. So now the arm of this
crock is probably the last part of the drawing
where we're going to have any kind of real true
definition um brought out. And this is to help us
elongate the image. This is what Leonardo Da Vinci called the landscape effect. Now, granted, this
isn't a landscape, but the principle of what he was talking about
is very much the same. It's very much in play here. And that principle is, you know, background,
foreground, right? What's close, what's far away. And so obviously, you know, we're going to put
we're going to maximize our detail in the
head of this crocodile. But everything else, especially as we get farther and
farther away from the snout of the crock is going to have less
and less detail. Okay. And I'm going to show you how we're gonna
how we're going to do that. Alright, so you can't really see it the
reference image, but there is a tail back there, so I'm just gonna give
him I'm just gonna give my crocodile his tail just
clean this up a little bit. There we go. Okay. So after our base layer,
what's our next step? That's right. You guessed it retrieving our high values with
our monozoa eraser. This is our opportunity
to go in and solidify exactly where
those scales are. And this is the second step of mini to bring out what this
crock looks like here. Okay. I just gonna bring
this in a little bit. Then there we go. And what I'm doing here is
I'm just basically circling. If you look, there
are some circles and some crazy scales on
the back of the crock, so I'm just more or less pinpointing where those will
be when the time comes. But now what I'm
doing, more or less highlighting everything that
needs to be highlighted now. I'm running my pencil
along the bottom, and then I'm running it along
where I retrieved a lot of my high values
because those are how I can identify exactly
where those scales are, how those scales mingle
with other scales, right? This is looking good. And now, same thing.
Same thing on the shoulder and the
elbow of this crock. I'm just going through with
a sharp medium charcoal. I'm just highlighting
all those areas. And then lines that don't
have nearly as, uh, you know, they're more on the thinner
side of their line quality, just go real light with your
pressure control, okay? And then here what I'm doing
is I'm taking my uh smudger, and I'm more or less blending all the areas that need to be blended and to where I can
bring out that lower value. And I can also start to really, um, more or less bring out exactly where
those scales are. Then back here as
well. A low values. We're not going to
be defining anything from the shoulder of
this crocodile back. It's all going to be implied. This is all implied work. Implied meaning that
they're not defined. I'm not going to
be going back with a hard charcoal and putting line work anywhere
on this crocodile, from the shoulder back, and
what that's going to do is that's going to more or
less blur the image. It's going to give us
that landscape effect that we want from DaVinci. Thank you, Leonardo. And it's really going to sell the realistic
look of our drawing. Oh Okay. But then here, if you look, this is
where it can get complex. Basically, what I'm doing
is there's almost see how there's almost like they're almost like ice
cream cone heads, scales on the back of the crock. Well, this is how we
can convey those. It's all smudger work.
I'm not using a pencil. I'm not using a brush, and I'm just more or
less hitting the paper, and then to create
those rounded cones, I hit the paper with the
smudger, and then I spin it. I do like a half spin, and that's how I can bring that out. But when you're doing
this, when you're building these spines on the
back of this rock, just hit the paper, hit it, and then lift up and then hit it again so that
there's a break. So you see how there's
a break, how I hit it, and then I lift,
and then I hit it, and then I lift, then I hit it. And the cool thing is, even if these aren't necessarily the lowest value that
you would like to see, you can always, with
this technique, you can always go
in and continue to build up those values, right? And I'm going to show you some other techniques that
we can use here. Now, we take our
model zero eraser and we can start to go in and
we can do some retrieval. On these cones, if you actually retrieve the
top of the cones, it makes them look a little
bit more rounder and a little bit more like
the reference image. And then here in between in these valleys of
these spines here, just take your eraser
and go like this. See that? See how I'm doing
that with my monozo eraser. What that'll do is
that'll give you that soft look, but
at the same time, it'll make it look like you
have crests and troughs, you have valleys,
and then you have peaks on the tops
of those spines. Then here, just take your number six brush dry, just
hit it real light. Just real light. You don't
need to hit it hard at all. Give us a nice blend,
nice softness, right? Now we're going to take our smuder and we're just going to continue to build up. See that? See how I can just hit that real quick, do a little half moon, like a little
crescent moon, boom, boom, boom, boom. And that's it. And that's how we start to bring out that type of
that type of look. And then we can do
the exact same thing that we did on the spines. Just go through, it's
the exact same motion. Hit the paper, lift up,
hit the paper, lift up. And those values will get darker in areas that
we want them to be. And then on the spines, you
can start from the peak, and then you can
pull down, right? Pull down at an angle,
just like this. See that? Pull down at an
angle, just like that. Wonderful. Just like
that. See that? And that way, it does give the crocodiles
back some texture, but when I have my viewer look at this
drawing and the way that it comes through in
the reference image is the head of the crocodile
is the focal point, the teeth, the eye, the head itself,
that's really where you want the viewer's eye to spend the most amount of time. A viewer's eye is
not going to spend time on an area that's blurry. They're just not unless
it's an abstract piece, which I don't do abstract art, then they're going to be looking at what's crisp, what's clear. That's what your
viewers going to look at when it comes
to your crocodile draw. Okay. So here, I'm going to take my hoo hoo battery
operated eraser. I'm just going to hit
this real light here. Just being about a boom.
Power tools are amazing. But here's a cool thing I'm
just going to go through and just retrieve any high values on the peaks of these
spines here and see that. See how that kind of just really brings out the same
kind of aesthetic that we see in the
reference image. It's just subtle
tricks like that. Subtle little tricks like that. They just real lightly,
real lightly hit it. You don't want to lose
all those high values that you just retrieved, see? Something just like that. Okay. So now what
I'm doing here. I'm just going through
with my medium charcoal. I'm just building up some
of these lines and I'm only building up certain parts
of these lines, okay? Because remember how
I was talking about the landscape effect
from DaVinci, right? The head is the focal point. The throat is still very much the focal point and
even this arm here, parts of it, this arm is the
last thing that's really, truly somewhat in focus. And then after this, everything
else is blase, right? Everything else is blurry. So we want to make sure
that we stick to that. Then here's doing a
little implied line. What this does. This
effectively pushes the back of the
crocodile back and it really brings the head and the throat of
the croc forward.
10. Final Detail Work: Okay. So now I'm just gonna
take my smudger here. And this is more or less just
just for aesthetic appeal. I'm just going through and
notice how I'm pulling this. And if you look at
the reference image, there's very much that kind
of shadow look, you know, that kind of coarse uh look
that the scales convey. Just blend these
lines a little bit. Okay. Yeah, that's
pretty much that. Now what I'm doing is
I'm going through. I want to beef up the bottom
of this crocks jaw here, but I'm going to do it
with an implied line. I'm not going to do it
with a defiant line because I want it to
look as much like the reference image
as I possibly can. Then here what I'm doing
as I'm going through with my monozya eraser and
I'm adding texture. Because if you look at
the reference image, a lot of these scales are they almost have a very worn
out look to them, right? Like old worn out
metal or armor, right? So when you use eraser
work and high value work, you can really bring out that weathered texture,
that weathered look. Here I'm just
rebuilding the peaks of the spines. Alright. But when it comes
to these scales, the more you work those scales, the more weathered they'll
become, basically. So even this back here, I'm just kind of going through and putting a little here,
putting a little there. Do a quick blend, soften it up, soften it up. I don't
want it to find. I want it soft. And quick little quick little
blending effects here. Quick, little blending
effects there, right? And that's the
other thing that I love about the three layered
method is it's really truly up to you as far as how much time you want
to spend on your drawing, you know, thorough
do you want to be? One of the reasons why I devised
the three layered method was because I wanted
to draw quality art. I wanted to make quality art, but I wanted to do it in the most efficient manner
that I possibly could. And I like the way the aesthetic comes through
using this method. And that's one of the
reasons why I teach it. It's 'cause if it works for me, it'll probably work for you. I'm a very humble
person that way. I'm just a normal guy. There's nothing
special about me. I just like to draw and I draw
a lot because I enjoy it. And just like anything with enough time, with enough effort, with enough It doesn't even
have to be formal training, just with enough time spent
and wanting to be better. You will be. If you're a younger artist or maybe if you're a
little older and you're getting back into it
for the first time in a while, just understand that. It's not about perfection. It's not about
competing with anyone. The only person you should
ever compete with is yourself. All right. But here,
I'm just going through, just adding some
weathering effects onto the scales and kind
of beefing up any of the high values that
need to be beefed up. This is something that I
try to make this point and all of the tutorials
that I teach is that, you know, I've had people ask. They're like, Whoa, you
know, this is really cool. Like, how long did it actually
take you to make this? It's like, Well, every drawing
that I do I draw twice. And one of the reasons why I do that is because one,
it's good practice. It's always good to practice. I believe that you could be
at the top of your game, but if you're not practicing and trying to make
yourself better, you're really doing yourself
a disservice because you're throwing away potential at how good you could become, not how good you are, it's
always where you're going, not where you're at,
or where you've been. I draw everything twice, and then the second time that I draw it is the time
that I record it. Um, and I'm not in
some fancy studio. I'm I'm in my art studio and I do these recordings
with my smartphone. And, um I do all my visual
edits on my laptop. And, uh, basically, the whole reason
why I do that is because I want to
archive my work. And I want to teach this
technique to you guys. But all in all, it
takes a long time. Is it takes probably
a week to get all the drawing done from the preliminary sketch
to the final sketch. And then it takes
probably easily another week to do
all the visual edits, the audio edits, the music that I put into my backgrounds. And I've always believed
in quality over quantity. For me, I mean, if I could crank out a video every week, that
would be wonderful, but I wouldn't be able to to tell you that it was
my best quality. And you guys put the time
into me to watch my videos, to learn as much as you can. And, it's my duty to do the best job that I
can possibly do for you. I want to give you guys
the best product and the best courses that I can. And so, if you wonder why I don't come
out with a lot of videos, it's because I'm busy creating the best
videos that I can. So we are getting pretty
close to the end on this one. Um, I know this one
was fairly involved, kind of tedious,
especially if you're new to the three layered method. But just like anything, just make sure you take your time and just have fun. You know,
that's the big thing. I'm a huge advocate for
having fun while you draw. You know, I always say I always say the world
is stressful enough. When you're in your world, when it's you and your music and your paper and your tools, you should be at peace. You shouldn't be stressed
out about nothing. So Okay, so I'm just gonna clean
this up a little bit here. Got got some runaway
runaway charcoal. Then here just gonna
take my take my smudge. And I'm going to
go through and I'm going to just add
a little bit more, a little bit more weathering, a little bit more
texture on these scales, especially these ones
that are tucked right underneath the crocodile's jaw. Okay. Then just do a
quick little blend. Bing ta boom. There we are. Okay. I'm just going to go through. I know I've hit these
a couple of times, but that's another thing
that I wanted to show you with this technique
is that if you want to go back over and retrieve higher values
on a certain area, you can do it a couple of times. It's not like it's like a
one and done type thing, but just be aware that you can only do it
about once or twice more. Then here what I'm
doing is I'm just going to go through and
I'm just going to kind of lighten up some
of the texture on these teeth, this
crocodile here. Bring out some of this
blotchiness with my Huh eraser. And a lot of times people ask me, how do you know
when you're done? Like, how do you know when
your drawings finished? And, honestly, for me,
I always go by this. I always go by the
principle that, you know, less is truly
more, especially in drawing. The human eye is, I mean, when you look at something,
the eye wants to see it. So when you look at a rough image of something or an implied image of something, the viewer will automatically
look and say, Oh, that's a pig or that's a
sheep or that's a dragon, even if it's not
completely solidified. So keep that in mind. I hope this video helped and good luck in your
future drawings.
 Messer Creations, Artist | Author | YouTuber