Transcripts
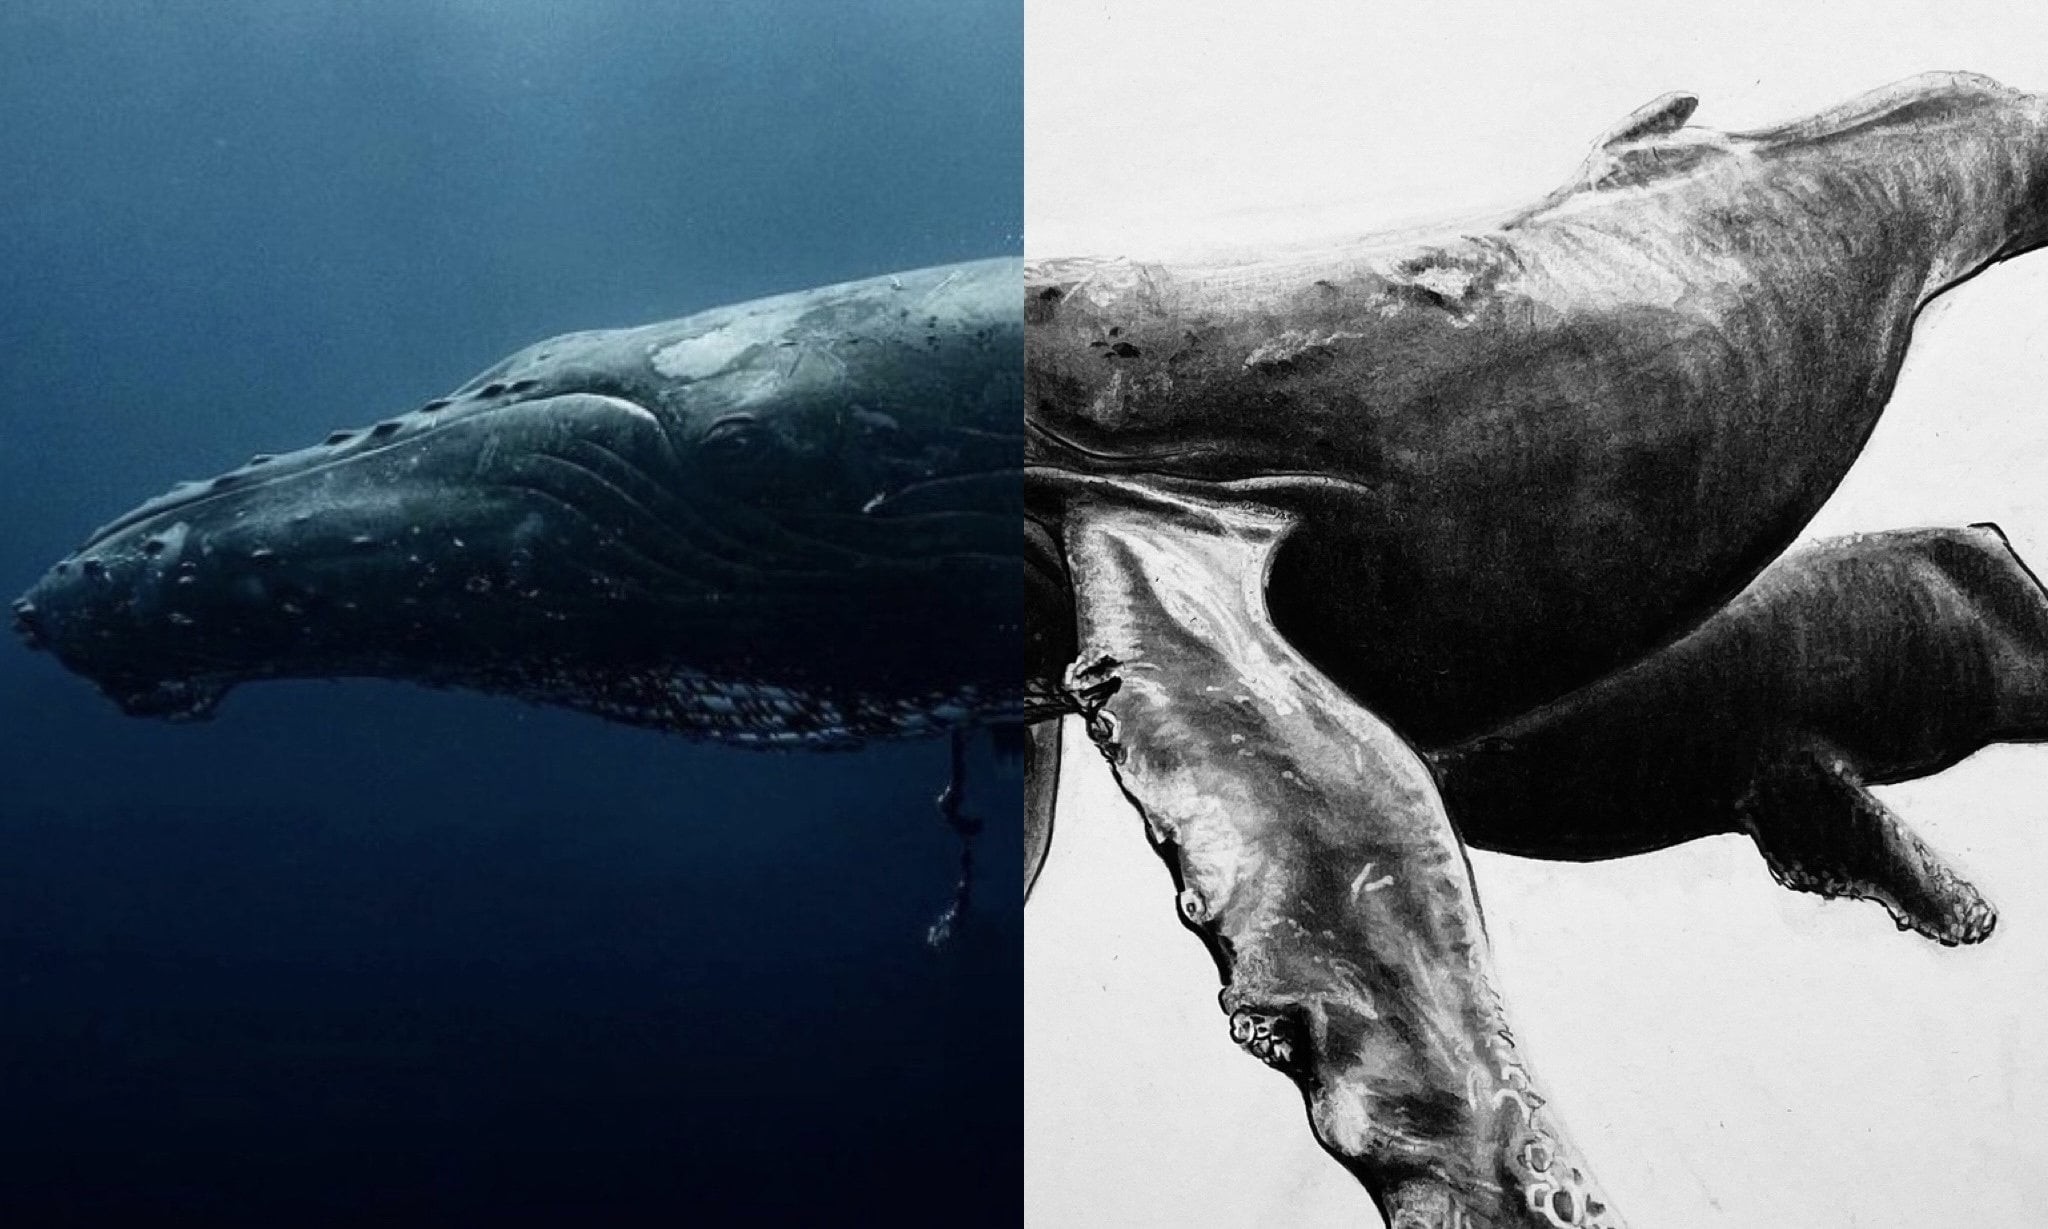
1. Introduction: Hey. My name is Braden Messer. I am an artist, author. YouTube, and today, I'm going to be the one that
teaches you how to draw. To become a portrait artist
is kind of challenging. That's one of the many
reasons why I came up with this class and made this
little mini series so that you can begin to think about drawing portraits the correct
way and the simple way. Now, this is P one of a three part mini
series that I'm making where I'm showing you how to use these methods and draw multiple portraits
at different angles. So once you've watched P one, make sure you're on lookout
for P two, And part three, the Lumis method and the
ISRO method by themselves, don't really allow for every
answer to drawing portraits. But when we fuse them together, we create something
completely new, and that is what you're going
to learn in this class. I've broken the class down
into ten digestible lessons. First, you're going
to learn how to use the reference photo and
draw a basic Lums head. Then I'm going to
show you how you can begin to place the
ears and the hair. Once we've placed the hair, I'm then going to
show you how to use the saro method and begin to
draw the facial features. Each lesson is going to focus on specific facial feature
drawing and placement. As we progress
through the class, and all the facial
features have been placed, I'm then going to
show you how we can begin to hatch and cross hatch certain planes of the face so that we can introduce
volume to the drawing. Of course, we're going to mess around with
that a little bit, lowering values in
specific places and keeping mid and
high values where they need to be so that
we create the most dynamic portrait
sketch possible. So that's pretty
much it. Now, I will say that if you find yourself
enjoying this class, I have recently come
out with a new book, drawing the portrait step by step lessons for mastering classic techniques
for beginners, where I have broken down the Lomas method and
the Asaro method in the exact same
way as this class, only, of course,
it's in book form. So if that sounds like
something that you'd be interested in picking
up for yourself, for your own library, I have an Amazon affiliate link in the description of
the class. Right? There. Now, in order for you to get the most
out of this class, what I would recommend is go through the class
first and just watch it and really absorb everything
that you possibly can. Then once you've gone
through and watched it once, go back through and
draw your project. Once you have your project, make sure that you upload it so that I can give you
my feedback on it. Then, of course,
leave your review. I always love to see what
you guys have to say about the class and the kind of value that you actually get out of it. By doing that, by
uploading your project, And leaving your review, your project gets featured
in my monthly newsletter, which I come out
with the first half of every single month. So it's a great way to
get not only your name, but your art out there in
the community as well. That's the short
and site of what to expect and hope to see in class.
2. Draw your Loomis Head: First things first is that we
want to establish a circle. Now, it's important to understand that your
circle does not have to be perfect so long as its height
is relative to its width. This is to give us a sense
of the subject's cranium. Once we have the circle placed, we are then going to
draw in our side oval. Now, the purpose of the
side oval is to elongate the cranium and
give us a sense of direction for where our
subject is looking. Then we're going to insert our vertical axis and
then our horizontal axis. This is to help us understand
how the head fits in space. Then we're also going
to use these to plug into other aspects
of the ums head. Now, on the top of the vertical axis and
the top of the oval, we're going to pull
this line over, and that is our hair line. Roughly where the hair line
begins for the subject, that is to give us
a sense of where to place the contour lines for
the hair when the time comes. Once that's placed,
we're then going to extend the horizontal axis over. This is to give us a sense of where the brow of
the subject lies. Effectively, it's
called the brow line. But we are going to build our eyebrows and our eyes
down from this line. Then we're going to
extend the bottom of the vertical axis and the
bottom of the oval over. This is what's called
the nose line. Refer to reference to that
has the um head overlaid. That is what we're doing. Then we're going to place
the center line of the face, and then we're going to connect everything off of
the center line. Now, the center line
lives between the eyes over the center of the nose the center of the lips into
the center of the chin. Then we're going to
bring this line down, and this is the jaw
line of our subjects. We're going to connect
that to the center line, and we're going to
pull up and over roughly to where the brow line rests on the opposite
side of the lumis head. Once we've gotten to this point, we have the lumis head
about 60% complete. But now what we need to do is
we need to take an eraser, and we need to erase this bit of the initial circle because
we don't need it anymore. Now, you can keep this part of your
circle if you want to, but just understand that
you do not need it. I like to break my drawings
down as simply as I can, and by getting rid of
this initial line, it helps me accomplish
that for myself. The simpler the better.
Now we're going to draw our neck lines here as those
plug into our lumis head. This way, we don't have a
floating head in space. You can go one
step further here. I think what I'm going
to do is I'm going to give our subjects
some shoulders. I'm also going to draw in the top of that
shirt eventually. But for here, what I want to do is right underneath
the nose line, I want to establish
the top anchor point, which basically rests right
at the top of the lip, and then I want to draw
in the bottom cor point, which rests right at
them of the lower lip. Then I have these
cheek planes here, and this again is to
help me understand how elongated the face
of our subject is. Then here just to
finish this lesson up. Let's just bust out these lines. Go ahead and take an eraser and hit your Lumi head
and make it more or less transparent and ready
for the next lesson.
3. Placing your Ear & Hair Outlines: In this lesson, I'm going
to show you how to place the subject's ear
on the ums head. Then I'm going to
show you how you can sketch in the hair of the subject and how to use the underlying ums head as
a basis for that placement. Right here. In the
bottom rear quadrant, notice how the
side oval is split effectively into four
different sections. The bottom section as in bottom to the
horizontal axis and then rear segment as in
rear to the vertical axis, that is where the
subject's ear will always live when it comes to using
them method approach. Roughly, what I want
to do is I want to sketch in the contour lines, so the outer edge of the
ear and place it here. Once I have a good sense
of where this ear sits, I then want to start to draw in the beginnings of
the subject's hair. Now, every reference is going to be slightly different,
but for this one, the ear rests partially under the subject's hair as the hair itself
is pulled back. And so Right here, once we have the contour lines drawn in and you're
happy with them, then you can go in and you
can begin to bring out the character that we see
in the ear. Just like this. Now, I would recommend
that you do not go too crazy with the details. We are still very early
on with this drawing, and we want to make sure that our proportions are in
line with our expectations before we really take a deep dive in and start
detailing out this portrait. So make sure you check
yourself in that regard. But yeah, you can start to
see the ear coming together. Now that we're done with
that, what I'm going to do is I'm going to start
placing these lines. I'm doing nice light poles on the paper so that I
don't scratch the paper. Also, we want to use a
light pressure control for this step so that
if we need to go in and we need to
re any high values. If we need to erase and begin again and make an
adjustment, we can do that. But notice, notice
how right here, I'm pulling these
lines this way. Notice what's underneath it, that hair line of the
ums head and see. The lumis head is a mannequin, and it allows you to build your portrait off of
it just like this. Notice how the hair is
pulled over. We have a fold. We can pull these lines, and we can start to get
a good sense of how the hair is going to
rest on our lumis head. What I'm actually going to
do is I'm going to bring this hair down on the back
side of the ear right here. Now, there's two different
ways that you can draw hair. This right here is where
you draw the contour lines and the segments of
hair simultaneously. You can do this if you want, but if you want a more general, even simpler approach,
what you can do is you can go in and just draw the outer contour
lines of the hair. You don't have to worry about
the different segments. By segments, what I mean is the different flows of the hair. The hair has different
chunks or waves to it. Hair texture does play an
important role in this. Sometimes depending
on the texture, you'll have big chunks of hair. Like this reference does. Or if you have maybe say tighter curls or
something like that, then you won't the
texture and the flow of the hair will
be fairly uniform across the subject's head. But in this case, this one
is really good practice for you to go in and start to identify these different
segments of hair. With all of them,
just nice and light. Further along in this class, I'll show you how to go in and vary your line qualities and really bring out the dimension in the hair and the
shadows and whatnot. But for right now, this
is all we're doing. Notice how I'm not doing
extremely long poles here. Nice and short, short and sweet. That is what we are looking for. Because we want to make
sure that we are capturing the flow of the hair
in every aspect. When it comes to the hair on someone's head,
believe it or not. The hair on the top of the
head ally, not always, but usually is actually
shorter in length than say the hair on the sides of the head or on the
back of the head. You can take that
knowledge and you can use it to your advantage when
it comes to your drawing. But that's pretty
much it for this one. Let's move on to
the next lesson.
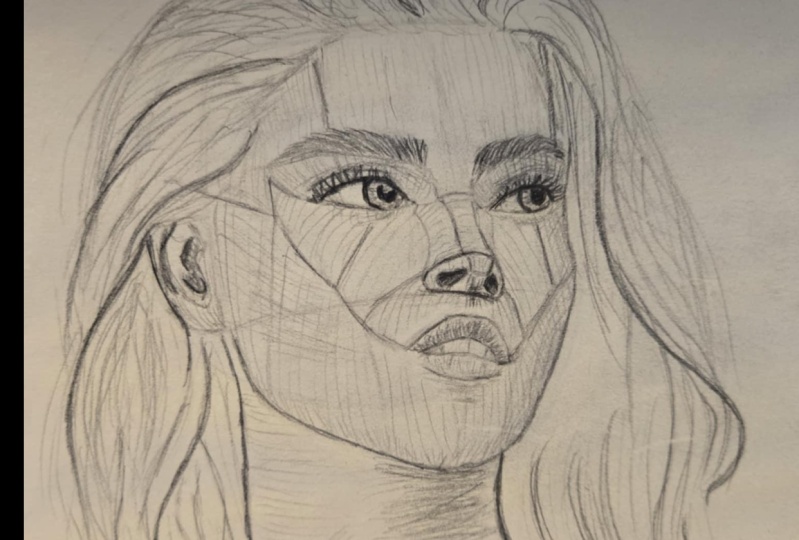
4. Draw your Eyes using the Asaro Method: Now for this lesson, notice
how with reference to, it has switched from the
Lums head to the Oso head. We're going to be
using the planes of the Asarro head model to draw out to the facial
features of our subject. Now, right here, we're going to place this
horizontal line. Then following the
ASO head model, we're going to pull these lines up slightly at an
angle and vertical. We're going vertical with them. What these lines are
going to plug into are the contour lines
for the eyebrows. Just like this. They're going to plug right into the corner. Now, like with the hair
in the last lesson. Notice the underlying ums head. That brow line is going to follow the eyebrows
on both sides. You can use that as a gauge, a guesstimate for exactly
where the eyebrows live Again, we are not worried
about detail right now. We want to get the basic
two dimensional shape of our features first. Once we have the two
dimensional shape of the features and
we're happy with them, then we can go start hatching, shading, lending,
all of the things. Just like this. We've established
the sides in the bottom of the eyebrow and
now we're just placing the top of the eyebrow. That's pretty much
it, just like that. Now, we're referring
to reference one, and we're going to go
ahead and we're going to draw the contour lines
for the other eyebrow. Notice how much like the hair, I'm doing nice short pulls. One of the reasons why
you want to draw like this is because the
shorter your poles are, the quicker, you can see
discrepancies in proportion. If you do longer poles, you're more or less
committed to that line and they'll be more to if you need to make an
adjustment for any reason. So just be aware of that. You don't have to abide by that, if you have the
confidence or maybe if your style lends itself
well to longer poles of your pencil
onto the paper for establishing features such
as the eyebrows here, then by all means, that's
what you should do. But if you don't have
that confidence yet, then I would highly recommend that you stick to shorter poles. Now, we have the eyebrows drawn. Now what we want to do
is we want to go to the next step of establishing
the planes for the eyes. I would recommend
to always start your portrait for your asso planes for
the eyes like this. Establish that nose bridge
plane and then your eyebrows. Then right here, notice
this temple plane here. If you look at the
Aso head model, you can clearly understand the plane that we're trying
to bring out right now. But we're just pulling this line down and we've done that
on both sides here. Now, the corner of
those eyes lives right about here and
here on both sides. Then I'm going to
bring this frame line right here over to the bottom
of the nose bridge plane. Then I have this frame
line right here. This is how we construct
the eyes using this method. We're going to extend
that temple plane line down for the next frame line. Then the final frame line
lives right about here, and that's going to more
or less get pulled up to roughly where the
edge of the eyebrow is. It doesn't have to
connect to the eyebrow, but they are very much
in that same vicinity. Now that we have those
frame lines established. What we're going to do is we're going to do
this right here. We're going to pull
this line over. You can either use the three point grip for
this or the overhand grip. If you have my book,
drawing the portrait, step by step lessons for mastering classic
techniques for beginners, you'll understand those grips and what they are
and how to use them. Here, we're just going
to connect these lines. Something just like this. Notice how what we've done
is we've built the eye. We framed it, much like when you framed the wall for a house. We framed it from the top down. Now that we have this,
what we can do as we can go in and you can clearly see when looking
at reference one, that upper eyelid,
how it's folded, and it's resting
in the eye socket. We want to bring that line out, and now that we have the
top of the eye drawn, we know exactly where this
lives and how it sits. We can just go very
lightly into that. Yeah. Something just like that.
Now, let's go ahead. We're going to pull
this line over. Again, nice short polls. Eyes can be finicky, so you don't want to overcommit. Then go about halfway
from left to right, and then from the tear duct, bring that line over
from right to left and lift up as you
bring them together. Have some variation
in that line quality. We want the line quality to be a little thicker
on the edges, and then we want to get a little inner towards the center. Then we can go
ahead and place our ris and then our pupil. Let's put a little
reflection in there. Why not? Yeah, that
looks pretty good. It's about the direction
that the subject is looking, and now we're going
to rinse and repeat. We're going to do the exact
same thing again, obviously, the angle is a little different, but the principle of how we're
doing it remains the same. Just like this, drawing
in these frame lines. Then once we have that, going to pull up and connect each frame line to the other with short poles
just like before. Then of course, we have the eyelid tucked back
into the eye socket, so we want to bring
that line out as well. This is the most effective
way that I have found for being able to
draw eyes accurately. Then of course, just
like the other one, we're going to pull
from left to right. We're going to bring
that line over. There's a slight dip to the eye, and then we're going to bring it from right to left and
lightly connect that. And then we have the
something like that. Now, when you look at the eyes, I'm pretty happy with
those proportions, but when we look at the eyes, another thing that you can do
to bring dimension to them and character because obviously the eyes or the window to
the sole, so they say. What you can do is
you can go back and you can start to thicken
up some of these lines. I'll notice here I'm
doing thinner lines on the bottom to give them a
little bit of dimension, but right here like
the Iris, we can thicken these lines
up with the pupil. We can do that on both sides. Then if you actually go
through and you thicken up the line on the
top of the eye. Not the very top where
the eyelid line is, but the very bottom of
the eyelid right here. If you thicken up these lines and give those lines
some variation, what you will get is a very
dynamic look for the subject. You can do that with
most any portrait. Obviously, we haven't gotten
to the detail lesson yet. But, that's pretty
much it for that one. Let's move on to
the next lesson.
5. Draw your Nose using the Asaro Method: In this lesson, I'm
going to teach you how to use the ASRro method
to draw the nose. Much like in the last lesson, we used planes to draw the eyes, we're going to do the exact
same thing here for the nose. The first line is right here, and it's set a slight angle given the nature
of reference one, but we're going to pull this
line from left to right. And we're going to start
pulling over and up. We're going to do
that on both sides. What we want to establish is the basic framework for that bottom plane of
the subject's nose. Here on this far side,
I'm just going to pull this line up a little
bit, just like that. A good gauge that you can use is pretty much that nose
is always going to live equal distance between
each tear duct of each eye. We're going to pull
this line over, refer to the planes that
we see in reference to, which is the ASRO head, and then refer to reference
one and just make your line. A guestimate right there. What that is is that is that
bottom plane of the nose. Then once we have that
plane established, then what we can do
is this right here. On that far side,
what I'm going to do is I'm going to
pull this line up and it's going to
plug right in to the bottom of the
nose bridge plane. Remember the nose
bridge is right between both eyes
and both eyebrows. Now what we're going to
do is we're going to follow that same line,
but on the other side. What this line is
going to bring out for us is this is going to establish the plane known
as the nose ridge plane. They're similar, but different. There's the nose bridge
between the two eyes. Then there's the nose ridge
on the top of the nose. You think of like the
ridge of a mountain. There's the ridge
of the mountain at the tippy top and then it slopes down to the valleys. It's very much the same
thing with the nose. But those are the main planes. Now what we're going to do is if you refer to
reference number two, we want to bring out
the nose tip plane. This is just going
to help us bring out the dimension of
our subjects nose. In this one, they have
a fairly sharper nose, so we want to make sure
that we bring that out and convey that accurately
in our drawing. We're going to pull
those lines down, we're going to pull this
over, and effectively, what we've created is
the nose tip plane. Then if you look, there's
another one that plugs roughly into where the
top of the begins. Somewhere right about in here. Now, you don't have to add that second plane if
you don't want to, but I'm just doing it for
the sake of the class. Then right here, we're going
to draw in the nostrils. We've got the top and
we got the bottom. Then it's always a good idea to go in and do a second line so that you elongate
the nostral hole. Then here, we have what are
called our slope planes. Much like it sounds,
these planes slope down from the ridge plane. This just helps give us a very comprehensive
understanding of how that nose sits on our lumad with its
planes established. Let's move on to
the next lesson. O.
6. Draw your Lips using the Asaro Method: Okay. So on this lesson, I'm going to teach you how to draw out the lips
of the subject, using the Asaro
planes as a guide. Right here, beneath
that bottom line that we drew for the nose. We're going to pull
down this line. And then we have a
second line right here, effectively, this is to help us see and bring out the filtrum. Now, the filtrum
is that flat bit from the bottom
center of the nose that plugs right into
what is known as the cupid's bow
of the upper lip. The cupid's bow, one of the
reasons why they call it that is because it looks
like the top of heart. So when you say exchange a kiss with a loved one,
that's why they call it that. Then here from roughly
where the tear duct of the eye is we're going to
draw down a very light line, and we're going to use that as a proportional gauge
for right about here, which is roughly where
the tip of the mouth is. Then from about the
center of the eye, we're going to pull
down very lightly. Then we're going to place a rough guestimate of where
the far side of the lip is. Something just like that.
Now that we have that. What we're going to do
is we're going to go right here at the crest
of the Cupid's bow. Then we're going
to start pulling this line from left to right, and we're going to plug that
line in to the ups Bow. N short poles just so we
can make sure that we have a good grasp of our proportions
and if it gets a w, of course, we can
make an adjustment. It just pull it up in
something roughly like that. Now on the far side,
we're going to pull down. We're going to continue
that line all the way down from the far side of
the Cupid's bow to the corner this far corner right here of the
subject's upper lip. That looks pretty
decent proportionally, that's right in line roughly with our subject
and reference one. But much like how we built
the eyes from the top down, we want to build the
lips from the top down. Now, that stands in contrast
to say like the nose, for example, where we build
the nose from the bottom up. Those are just the best
flows that I personally have found after many
years of drawing, but if you feel more confident doing it
another way by all means, then right here,
her mouth is ajar. I open. So here, we've got
the bottom lip, so we're just going
to pull that over. I will say just be wary when
it comes to the lips guys, the lighter you make
your lines the better. You don't have to go in and define the lines when
it comes to lips. Very often. You want
them to be soft. You don't want them to be harsh. But then here,
we're just going to pull this line over and that will give us that rough
two dimensional shape, those contour lines
of how the lips actually live on
our luma head here. Yeah. We're going
to pull this line over and that brings that bottom lip
forward a little bit. Then here. I'm going to
do some light line work to bring out the
bottom of the lip, make it protrude a little more. Then I'm going to
pull this line over. But I'm not going to
connect it all the way. I'm just going to pull it
over and I'm going to lift up as I conclude and that's going to thin out
the quality of the line. Then there's a
little drop shadow underneath the slower lip, so I just want to place a line there much like I
did for the lines immediately under the eyes. This is more to just give me
a sense of the structure of the tissue of her
face as far as how it rests and how I can start to shade it and hatch
it when the time comes. Then refer to reference to, that top lip when it comes to the R method is split into two, and then the bottom lip is split into three
separate planes. So let's move on to
the next lesson.
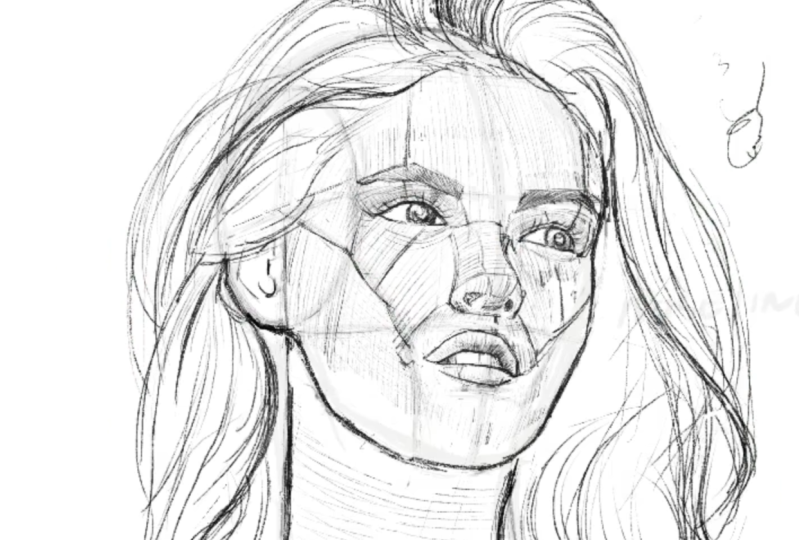
7. Draw your Facial Planes using the Asaro Method: For this lesson, what
we're going to do is we're going to establish all of the saro facial planes in preparation for
hatching and blending. On the far side
of the face here, this is where I want
to start to carve out the actual edge that
I'm going to stick with for my portrait. Notice how the head is resting underneath that and it's more or
less transparent, but then I actually
have these lines right here that I'm
establishing with my pencil. This is what I mean by the luminous head is
only a mannequin. That's all it is.
It's not absolute. Lots of times people
will get hung up on it, but I encourage
you to just be as fluid as you possibly can and
give yourself some grace. I've been drawing
for a long time, which is one of the
reasons why I have the muscle memory that I do or I can bust
these drawings out. But for you, enjoy the process. Enjoy everything about it. All art is a life of learning. Even Michael Angelo, when he was 87-years-old and close
to his deathbed, said that he was still learning. And that's Michael Anglo. Basically, once we have
that jaw established, we're going to start
pulling this line right here right here
from the corner, see this corner of the mouth. We're going to pull this
up, and then we're going to pull this is
sorrow plane over, and it's going to connect
to the corner of the nose. Now, when you're
drawing these lines, I want you to be aware
of the underlying form. Don't draw a straight line. Try to draw and use some finesse and bow the
line up a little bit. Try to follow and picture that underlying form
because these lines, essentially just like the
frame lines of the eye are the frame lines for
the actual face. And then we're going
to pull this line up, and we're going to
connect it right here. Then once we have
this referred to the reference to the
ASRro head model, we're going to pull
this line back, and this line goes straight back right to the
top of the ear. Those are the basic frame lines of the ASRO method in action. Now, this last
intersection here, we're going to pull
this line down, and it's a single line, and it's going to
go all the way down to the bottom of
the subjects jaw. Now that we have
that established, what we're going to do is we're going to do the
exact same thing. Only we're going to do it on
the far side of the face. Now, be aware of the
slight angle difference. Pull that line up, connect
out to the corner of the nose, pull this line up. And then up and over,
make sure to try to bring out the contour of
the face just like that. Then we're going to pull the
line right here to where it disappears on the horizon of the far side of
the subject's face. Then obviously, we don't
need to worry about the other lines because of
the nature of the angle. We can't see them anyway. Let's move on to
the next lesson.
8. Drawing the second layer of Hair: For this one, what
we're going to do is I want to build up the
hair of our subject. Much like we did, when we
first established the hair. We're going to take our pencil, and we're going to start to really bring out
these segments. The last time we
established them, so we know how the
hair flows generally. But now what we're going
to do is we're going to go in and we're going to
solidify those segments. We're going to really
bring them out with line qualities line weights
and placement of those lines. Now, some quick line definition. This is all in my book as well. But line quality, by definition, what aligns quality
is is its thickness. So if we want to
increase the quality, then we're going to
increase the thickness. If we want a super thin quality, then we're going to
decrease the thickness. As far as line weights, Lots of people use the
terms interchangeably, but they're actually
two different things. A lines weight by definition
is it saturation. When you say that you have
a very light line weight, what you're actually
saying is that that line is transparent or beginning
to be transparent. If you have a very
heavy line weight, then that is an extremely low
value, a dark saturation. What we're doing
here is we're going through and these
lines that we are establishing for the
hair tend to be of a slightly thicker quality
and heavier line weight. So they are thicker
and they are darker. One of the reasons why
we want to do this and why we want to have variation in our lines when it comes to hair like this is
because of the texture. Now, the cool thing about
this lesson specifically is that this will show you
how much manipulation, how much power you
have in the stroke of your pencil by using
different pressure controls. Now, when it comes to
actually conveying these different types of aesthetics for the
lines on paper, How you do that is
by pressure control. If you push a little harder, If you use a heavier
pressure control, you will by writes, convey a heavier line weight
and a thicker quality. Now, there is some finess
when it comes to this, finesse that you will
learn with time. I'm just giving you
the basic rundown of how you can start to manipulate your paper with how you actually press
and hold your pencil. Yeah, something just
like this and notice how much more character the hair has now that
we've gone through, and we've added another
layer of line work with varying line qualities
and heavier line weights. Also less is more. So just be aware of that. Let's move on to
the next lesson.
9. Initial Hatching & Value Building: In this lesson, I'm going
to show you how we can hatch and start to bring
form to the drawing. The planes are the first step, but the hatching is
really where we're going to see the development
of this drawing. Just like this, we're doing nice light single poles
across the paper here. I would recommend that
when you're starting out, make sure you use the
lightest pressure possible. If you feel like it's too light and you're not able
to really see the lines, that's fine. That's
totally fine. You can always go back over and do what's called
double hatching, where essentially what
you're doing is you're lowering the value
just a little bit more by pulling
your pencil lines in the exact same
direction as before. But when you're doing
this, especially because we have the Asarro
facial planes in place. What I want you to
start practicing is I want you to start
practicing changing up the direction of how you're pulling these lines when
it comes to the drawing. The reason why is because that will help
solidify in your mind exactly how the phase flows in regards to the
planes themselves. Just like this notice
how I'm switching this right here along the eye. What you can do to to know where your pitch needs to be as you rotate that line as you
see the center frame line. I'm using that as the gauge
for how I need to bend these lines ever so slightly moving across
the top of the eyelid. This is a good best
practice because of the fact that what it
does for you is it is allowing you to
fully understand the overall flow of the face and the dimension
that it conveys. But just like we
did the first eye, now, we're going to be doing
that to the second eye. Already, you can start
to see how hatching like this is giving us
that necessary form. Okay. That's looking
pretty good. Now, right underneath
the eye right here. I'm just going through
and I'm hatching these because as you can
see on the far eye, there is a little bit of
a lip underneath her eye. I want to make sure that that is brought out with my hatching. If you want to convey a little
darker texture and say, right along the
bottom of that lip, you can go and you
can cross hatch to, which is basically where
you change the axis. First axis is top to bottom. We can go left to right
with our second axis, and that will help us lower
the value and it gives the drawing a little
different texture as well. Just keep that in mind.
Yeah. That looks good. Now we have that texture
underneath both eyes. We're going to continue with
our hatching right here. Notice how we're following the direction of
our sorrow planes. Just like this and notice
how if you actually spread out each hatch mark versus keeping them
closer together. What that will do is the farther apart they are, the
higher the value. The closer they are,
the lower the value. It's subtle, but it
is a difference. Just make sure that
you understand that. Then that way, you
can manipulate that however you will
in your own drawing. And then right across the
nose ridge plane right here. We're just going to pull this
over from left to right. Notice that flow from the slope
plane to the ridge plane, how it's up and then it's over. This right here is
a perfect example of the dimension
that you can bring out so long as you abide by the direction of
your hatch marks. Then of course on
the bottom here, we're going up and down. Same directions
when we're pulling our hatch marks
across the forehead. Now we're getting
the slope plane on the far side right there. Now we're just going
to go up. We're going to fill in the top
of the cheeks here. Nice and light because you can notice when you look
at reference one, how that light is cast across
the top of the cheeks. So it's a very, very high value. When I'm hatching, I
want to make sure that my hatch marks are
separated as much as possible while
still being able to convey the direction
and the flow of the face so that the drawing
will look more realistic. But now here right
across the top of lips from the top corner
of the lip to the filtru, and then from film
to the other side of the lip. I want
to fill those in. Now, I'm going to do
nice long pulls from the ear down to the chin and then back
up on the far side. It's always best with these
ones to make sure that you extend from the As
facial plane line, the main line that goes
up, and then you have your forks off of it,
that go vertical. Do all the way to the jaw line. Then, of course,
make sure that we pivot around the tip of
the chin just like this. What that does is that gives us that sense of roundness
to our subjects chin. Now we're just going to go up, and we're going to
tighten it up each m make them tighter and tighter all
the way up on the far side. What I like to do with
these classes is I like to go through and I'll do
one layer of hatch marks, and then of course, in
the incoming lessons, I go through and I can show you a double hatch
or cross hatch, lower the values
in specific areas, whatever we need to do to convey that realistic
look that we want. Now for this lesson,
we're pretty much done with
hatching the face, but now I want to
hatch the neck. Starting from the ear, we're
going to work our way down. I'm just pulling my hatch
marks from left to right. Because if you refer
to reference one, we can see how that
neck is rounded and they're looking off to their let that neck muscles are
twisted over, they're turning. And so we want to make sure
that we are conveying that. Yeah. That is looking
pretty pretty good, so But then what we
can do. Like how we were working
from left to right, now we can work right to left. We can make these
hatch marks a little closer simply because by
looking at reference one, we can see that the value immediately under the
chin is a lot lower. We want to make that as low
as we can and then of course, keep the chin value we can. What that will do
for us is that will make appear closer
to the viewer. So we have a sense of depth. All right, Let's move
on to the next lesson.
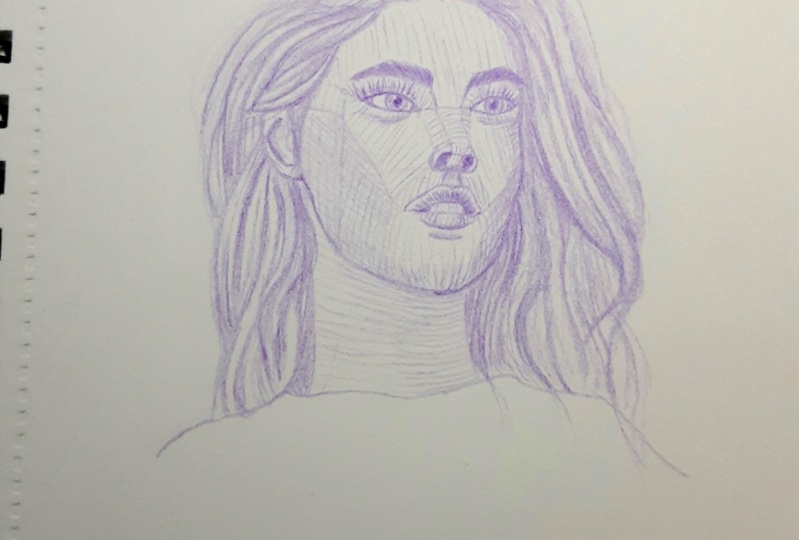
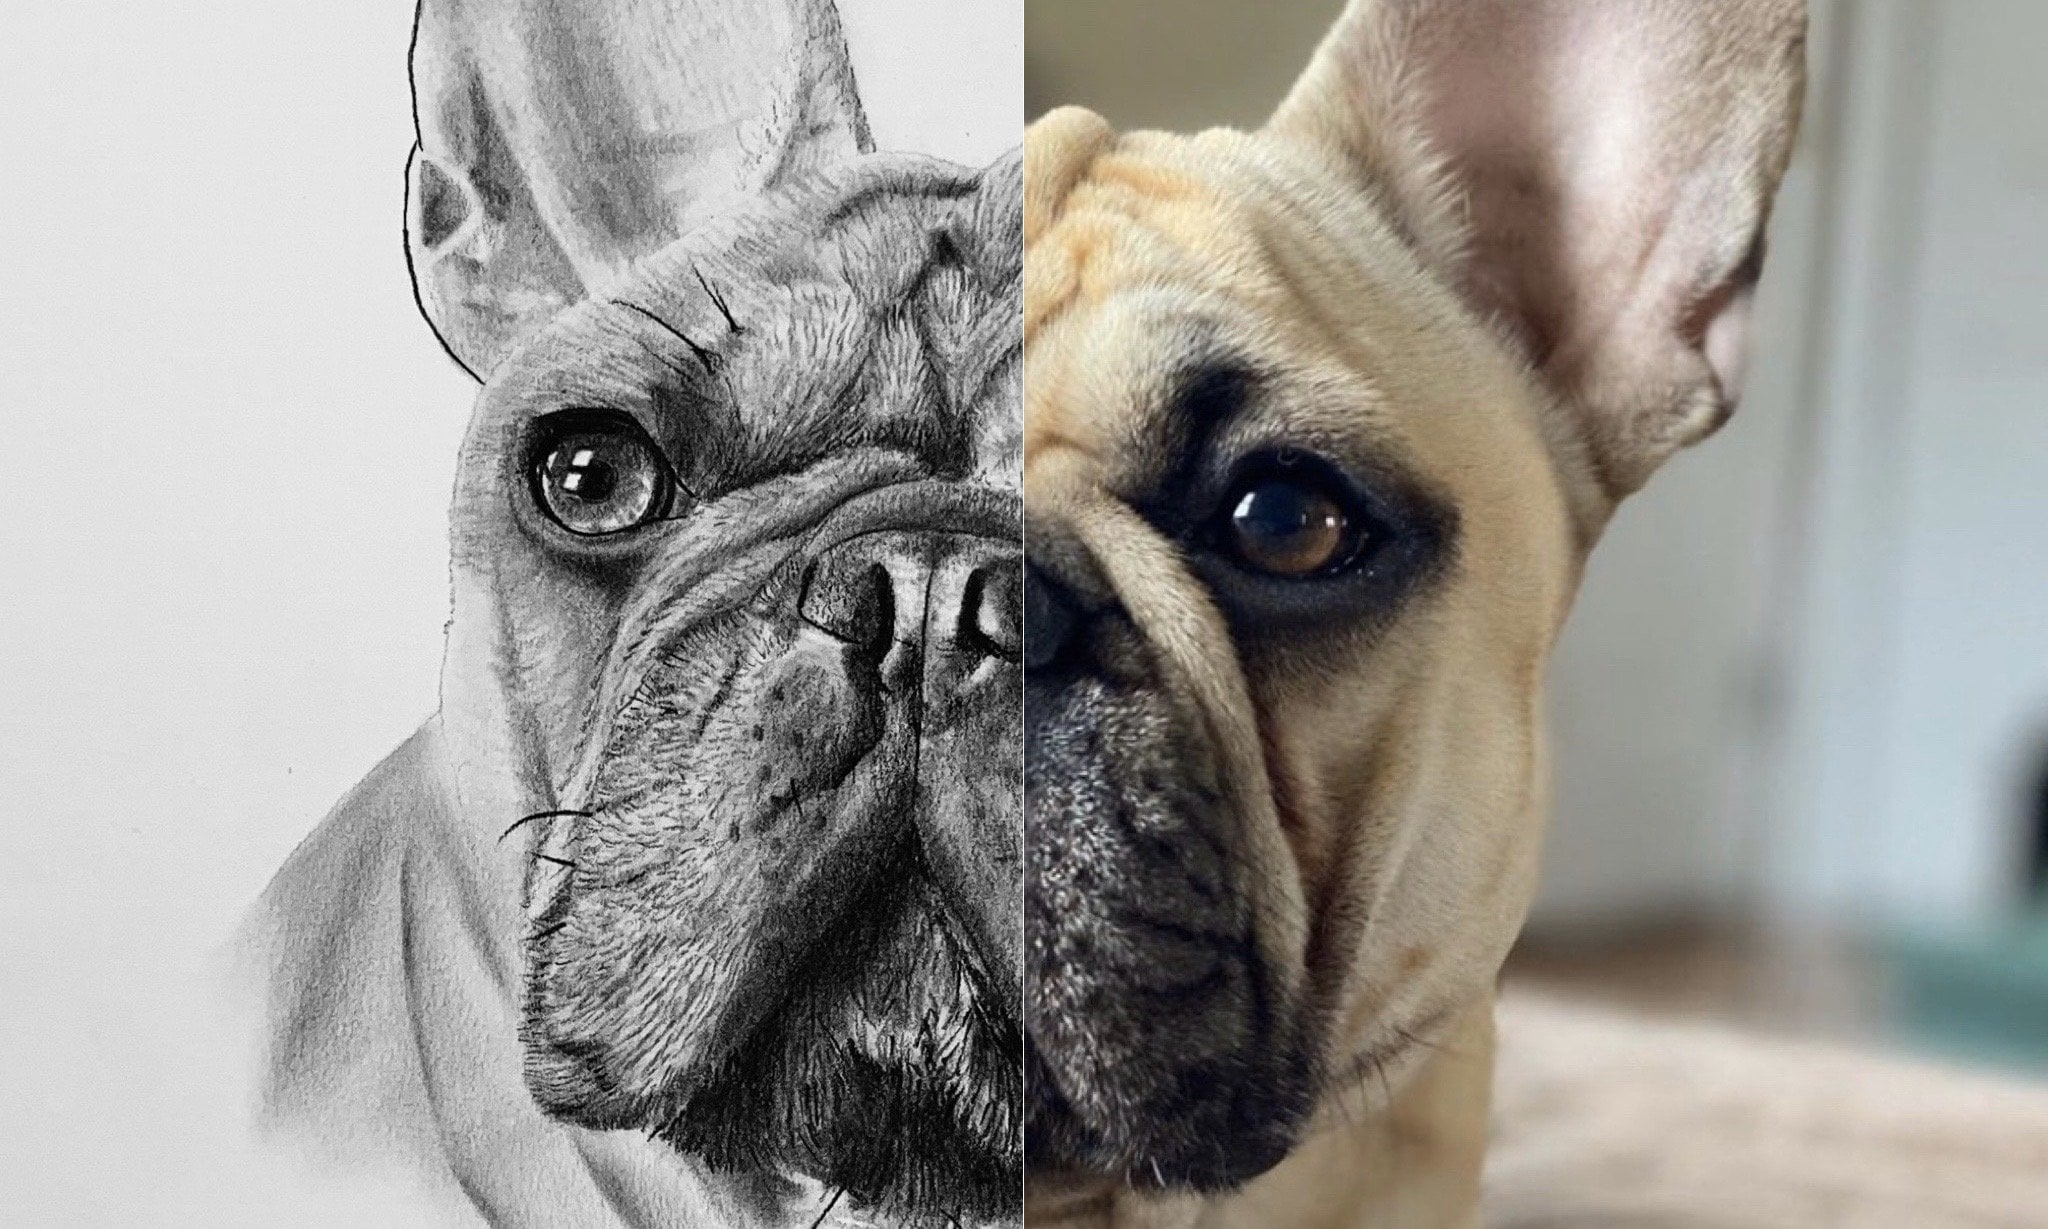
10. Continued Hatching & Value Building: All right. Now in this lesson, this is where we're really going to bring
out the character of the drawing and you're going to see how much it looks
like the reference photo. What we're going to
do is we're going to start going through the
hair here by the ear. What I want to do is
how I was mentioning the difference between a line
quality and a line weight. Well, that's effectively
what we're doing here. I'm going through and
I want to bring out the dimension that we see in the hair just
a little bit more. It's fairly flat in
my opinion right now. In order to bring
out that dimension, make it a little
bit more dynamic. We're going to do
this. We're going to go through and I'm just going to thicken up the line qualities where they need to be
effectively what I'm doing. Is remember how I was mentioning the different segments of hair, the different sections
that we see that comprise the overall flow
of subjects hair. That is what I'm
bringing out here. Look at reference number one, and one of the things that
you can do as a trick to see what I'm looking at is identify
all of the low values. Once you've identified the
low values in the hair, then you can basically outline
those in your own drawing, and what that will do
is that will bring out the contrast between your high
value and your low value. Then of course, when it
comes to your low values, like how we were
hatching the face, and I mentioned how
you can make sure your hatch marks are closer together if you want
to lower value. Go ahead and do that same thing to the segments of hair
that are of a lower value. Then of course, the
exact opposite is true for sections of the
hair that have a high value. We want to keep our hatch marks thin and farther away
from each other. I was just thinking up
the neck line there. Now what I'm going to
do is I'm going to go through and I'm
going to solidify the far side of her face
here with my pencil. What this is going to do
is this is really going to separate her face from her hair. It's going to push
your hair back. It's going to bring
her face forward. I just kind of pull this up. Pull it over. Let it fade. I'm going to drop the jaw
line down from her ear lobe and then bring it over
right to where it attaches. But I want to thin
out my quality, so it looks a little
bit more dynamic and it's not just a hard
line all the way across. Okay, that is looking good. I'm fly hay with that. But now what we're going
to start doing is I need to start detailing out
this face a little bit more. We're going to start
here with the eyebrow. Remember how I had you draw the basic two dimensional
shape of the eyebrow. Now I want you to fill it in. Just like this, here,
just pulling up and over. Make sure that you
pay attention to the direction that
the eyebrow flows. You can convey that
in your drawing. But we're going to
go with one layer. Now we're going to go back
through with a second layer, pulling in the same direction. Effectively, we're double
hatching the eyebrows, here. Yeah. Pull that all
the way to the end. Then if you need to, you can go back through and
you can add another layer, but I think that's fine for now. Then of course,
we're going to do the exact same thing
to the other side. Just pay attention to the
direction that you're pulling. If you need to, just go ahead and watch this
lesson and then of course, go back and watch it again
and then draw with me. There's a reason why
I recommend that you guys watch the class first, just to absorb everything
and then watch it again, and then the second
time you watch the class is when you
should do your project. It's because there's
a lot to this. I know. It can be overwhelming. But hopefully, By breaking this all down
to the bite size lessons. Makes it that much
easier for you so that you can be successful. Now, what we're going to do
is now that we have that, I want to bring
out her eyelashes. She's got some pretty long ones. Just like this do like
an upside down V, pull a line up and then pull another line up and
meet them in the middle. That doesn't always
work depends on if some one has done
their eyelashes or not. We got that one, now
we're going to go over to the far side of the eye
here and do this one. I just remember upside down V. When it comes to eyelashes, I will say, less is more. Now I'm just going to
sock in the ris here. I'm going to do the exact
same thing on the other side. Yeah, I like that it's
looking pretty good. Remember with eyes
like eye lashes, just get in, get out, don't spend too much time there. Because you can overwork
an eye very easily, and that is the last
thing that we want. Okay. Te eyes look a
lot more, don't they? We've got the eyebrows in
there, we've got the eyelashes. We filled in the rises.
That's look good. Now, what we're going to do is we're just going
to continue to do those subtle details in
the drawing so that we can bring out as much character in reference one as
we possibly can. One of the things that
I'm doing here is I'm just crossing in and ad the eyes to make them a
little bit more dynamic. You can see it here
on the far side. I am cross hatching for this. I'm going against the
axis of the first line, effectively making a cross, Hints the name cross hatch, and notice how that's lowering the value, in and
around the eye. That is exactly what we
want. Just like that. Now here on the far
side of the face, I'm just going through and doing some double
hatching as well. You can cross hatch
or double hatch, but I will say if you
want a more dynamic look, then you can cross hatch. But you also have to be wary. Double hatching, especially
if you don't use a very heavy pressure control is typically the best way to go if you're looking to
do a subtle lowering of the value in a specific
area of the face. Cross hatching almost
always gives you a lower value regardless of your pressure control.
It really depends. You have to be very tactical and intentional on exactly where in your drawing, you use those
different techniques. So just be aware of that. Pretty much gone all
the way down and I've slowly lowered that
far side of the face, the value along that,
and then of course, I've gone through and lowered the value in and
around the eyes. That's already
looking a lot better. In the next lesson,
the final lesson, I'll go through and we'll just be doing
final detail work. Now here the nostril. I want to sock that in. I'm going to fill this one
in because obviously that is pretty much next
to the open mouth and the pupils of the eye, the lowest value.'s
fill it in all the way. Try to be subtle too when
you fill in your nostris, like typically the line on
the top of the nostril, that'll always be the
lowest value possible. But then you'll have a mid value as it goes to the
edge of the nostril. It's subtle, but it's definitely something that
will look a lot better than if you just
sock the nostril in completely black. Just
be aware of that. We want a nice gradation
effect, if you will, from the top of the nostri line all the way to the
edge of the nostril on the bottom of the nose. Yeah. That is
looking pretty good. So now, what we're going to do is we're going to move
on to the next lesson, and we're going to
wrap this drawing up with subtle detail work
and final thoughts.
11. Final Detail Work: For this one, we're just going
to detail out the mouth. Then we're going
to lower some key values throughout the drawing, and that should
pretty much be it. But notice how on the
bottom of the nose here, I'm just going through
and doing a little bit of cross hatching so
that that brings out the dimension of that
bottom plane of the nose. For the most part, the
only real dimension that you see on most noses, not all but most is that bottom. Especially in an angle such
as this where the head is looking up slightly
and to the left, so we get a much better
angle on them of the nose. Now here for the lips, we're just following
those sauro plane lines. We're doing single hatch
marks from the bottom of the lip I'm being very wary and conscious of the direction
of my poles here. Lips are like eyes in the sense that you don't want to overwork them if
you can't help it. Less is always more, but
notice how I went through, did one layer of hatch marks. Now I'm going back and I'm
double hatching so that I can lower the values to a bit more and really bring
the form to life. Then, of course, I have the
basic outline of the teeth. When it comes to teeth,
always be extremely subtle. Teeth are very hard
for that very reason. Here, for the bottom lip, we're going to do the
exact same thing, only the upper lips opposite. So we're just going to
pull this over like this. Notice how the lower lip
does have a higher value. The upper lip most
always will be of a lower value because
of the nature of light and how light
casts across the face. That is looking good. We have the lips hatched.
Now I'm going to go in. I'm going to start to lower these values inside
of the mouth. It looks like on
this left side here. The values fairly low. I don't want to make
it too dark though because it looks like she
does have a tooth there. There's hardly any light. Then I'm going to lower the value a little
bit on this side. Then I'm just going to go
across the top of both of these teeth and just lower
the value a little bit more. I don't want the teeth
to be completely white, that would be too
high of a value and that wouldn't look right. I just went in and
lower the value subtly. Now that we have that, I
can go and I'm just going to continue to double hatch this upper lip
and lower the value. Because I still want
to bring out the form, but I do want to
lower that value a little bit more and that will show the contrast between the lower value and the upper
lip and then of course, the higher value
on the bottom lip. It'll just make her mouth
as dynamic as possible. Yeah. It's looking very nice. When you're double
hatching, I would recommend just start
from one side, either or, and then
just slowly work your way over across the
whole length of the lip. Then here I'm just going in and I'm thickening up
the line quality on the bottom lip a little
bit because remember there's that drop
shadow that we have. And that mouth looks
good. That's py decent. Now, what we have left is we have this drop shadow
right here under the lips. I'm just going to cross
hatch a little bit. Notice how that lowers
the value subtly. Now I'm going to go through, and I'm going to
cross hatch starting from the top of the cheekbone. I'm going to work my way down. These lines here are
extremely subtle. When it comes to cross hatching, you don't have to use a crazy pressure control.
You simply don't. And then I'm going to
stop right about there, and then I got a couple here on the back side right
in front of the ear. As you study, the
human skull and you study poses and basically
the anatomy of the face, you'll come to understand the basic flow of most
every human face. Now obviously, every face
is going to be different. The lighting will be different. The pose itself
will be different. There'll be lots of things that will be challenging going
from one to the other, but the principle of human anatomy remains the same and because anatomy
remains the same, lighting is generally the same, not exactly the same, but generally depending on various poses and such
and lighting situations. But now that I've cross
hatched on the side closest to us and I've hatched
on the far side, I can continue to go
through and hatch. Now what I'm doing
is I'm starting at the bottom of the jaw line, and I'm pulling up, but I'm
only pulling up a little bit. If you actually look
at reference one, you can see the dimension of the jaw and you can clearly
understand the low value that I'm trying
to bring out from the edge of the jaw
bone up a little bit. I don't want to pull
it all the way up. Subtly. Now I'm going to go back through and
I'm going to double hatch that exact same area. All along her jaw bone is being
double hatched right now. This is lightly
lowering the value. Because of this
specific reference, everything about the hatching, the double hatching,
the cross hatching, it's all very subtle. The reason why is because the reference photo
itself is fairly soft. It's not what I call a harsh
reference in the sense that the contrast between those high and low
values is very intense. A lot of times people
with sharper features will tend to have that harsher, sharper contrast between
high and low values. But her facial features are fairly soft in the
grand scheme of things and the lighting source is pretty much all over
the face up above. Because of that, I
don't need to be super heavy handed with my hatching in order to lower those values in specific areas. Again, that's something that, as you draw more
and more people, you'll start to
understand is different. But I wanted to start you off
with something fairly easy. If this is your
first class with me, you can go back to my home page and you can see all the different portrait classes
that I have available. I actually have an entire
course of lips and eyes and noses and basic
lumis heads and whatnot that you can take so
that you can start to study each component
of on its own, and that will make it a easier for you to comprehend
and be successful at. Those classes have
great reviews. I would definitely recommend that for you if you would like. Now here on the ear, I'm just going through
just like with the face. I'm doing a simple hatch. I'm double hatching on
the inside of the ear to lower that value just
a bit and bringing out the overall shape of the subjects ear. Yeah. This drawing is definitely
coming together. What I'm going to
do here is, I'm just going to sock
in these pupils. And give them an
extremely low value. And that definitely looks a lot more like the
reference photo now. Ma I'm just jumping around here. I'm doing a he a little there. But as we are nearing
the end of this class, I hope you enjoyed it, and I cannot wait to
see your projects. Make sure that after you've
uploaded your project, you leave your
review of the class. That way, I can showcase
your project in my monthly newsletter
that comes out at the beginning of
every single month. It's a great way for you, like I mentioned, to get
your name out there, get your out there, when you upload your projects, I see all the projects. I'm able to give
you my feedback. If you want, I can give you
more in depth critiques. Just let me know of what
you're looking for. And yeah, I'd be more
than happy to do that. I'm super excited to see your projects and
read those reviews. Stay happy. Stay healthy. And remember, never
stop drawing.
 Messer Creations, Artist | Author | YouTuber