Transcripts
1. A Gentle old Introduction to Loose Florals: Today, we're going to create a loose watercolor
floral piece that's all about relaxing and
letting go of control. This is not about painting a specific flower or trying
to get everything perfect. It's about allowing
your brush to move, letting the paint
blend naturally, and enjoying the
process as it unfolds. We'll start with a light, soft background wash just
to take away that bright white on the paper and give us something
gentle to build off of. We'll come in with
a simple branch and start adding those petals, small clusters of flowers, and then a few vines and leaves and bring
everything together. If you're newer to watercolor, this is a great way to
practice without pressure. If you've been
painting for a while, this is a nice way
to loosen up and reconnect with more
relaxed style. You can pause at any point, take your time and
really enjoy each step. By the end, you'll have a soft expressive floral
piece that feels light, natural, and
completely your own. Grab your paints and
let's get started.
2. Creating a Soft Background Wash: Using my great big
synthetic quill brush. It's nice and floppy and
holds lots of water, I'm just going to add in a really soft yellow background this over so you can may see
some of my palette here. So we're going to add in a really soft it's
using lots and lots of water and just the
smallest amount of paint, just basically to
give it a little bit of a wash across here. It has a little bit of yellow, a little bit of this orange
that's on my palette here, putting it down, allowing it to move around
across my page, not going edge to edge, just using lots of water, basically to create just a
little bit of a background. Even going to dip into some
of that green that's on my palette and just
let that move around. Such a pretty color.
I like this yellow. Just want to add a
little sunshine to it. Remembering that our
paints are going to dry lighter than it shows here. You can see I didn't
go edge to edge. I'm allowing there to be some
white space on my paper. So I just did that real quick and I'm going
to dry this off with a hair dryer or a heat gun so that I
have a flat dry surface. Okay, you can see that it has a really soft yellow background with just a hint of green and
a hint of orange in there. You can also see that it has the white edges around
the outside edge, a very organic,
loose style there. So I am going to be
using a brush hold on. I'm going to be
using this brush. Now, this is my script
brush. I have this. It comes in several
different lengths where the bristles
can be even longer. See that one, it's really
long compared to this one. And it comes shorter and
it comes even longer, which I really like the set. But I'm going to use
this one because it's more average and you might even have something
that's similar, where this one here is from a kit that's a detailing brush. I just like it
when it's a little bit longer because it's floppy. I'm going to be using this
one and we're going to create a branch that goes across this page and then
it's going to branch off from that and have
some little wispies when you use a paint brush like this that is
long and scripty. I really allows you
to be fluid and allow that paint brush to wander and go wherever
you want it to go. One of the things with painting in this
style is you don't need to create all the stems and show them in
every single spot. We're going to create
one little start of it and then we're going
to put some flowers down, and then we're going to
add some more little vines and then we're going to
add some more flowers, and then we're going to add
some leaves and some berries. It's going to be a really
fun little adventure, but I'm going to start
out with this brush. And I am going to use
a very dark green, um, and I'm just going to start it here
down at the bottom. See how I'm holding my
paintbrush near the top. It's to help me
lose control and to not have as much control over where this paint
brush is going to go. Then maybe I'm going to need a little branch off
that direction, and maybe I'll need another
little branch off that way. I'm just going to
leave it like this and that's as far as I'm
going to go for now. And then we're going
to start putting some leaves and flowers around this and then we'll add in
some extra details later. So I'm going to lay
that down for now. This is where we're getting
into the very organic, kind of just letting
it happen kind of a way where we're not
pre planning this. I haven't traced it on here. I know that I want something to kind of go across this page, kind of maybe being bigger
at the base and kind of getting tapering to a point
at the top over here. That's as far as my plan goes, and I also know
that I want it to have lots of vines
going across it. So I have my two
favorite paint brushes. These are the
Princeton Heritage. I have a size six and
I have a size eight. I prefer to use a larger
paint brush when I paint. I just find that it's, um, a little bit easier for me, and I find that I can
still make a very, very small item with my tip
of my brush or a larger one. I feel like I have
more flexibility with a larger paintbrush. This size eight is
always my favorite. It's always my go to. I'm going to just add a little bit of pink and a little bit
of this clay color and create this little thing, we're going to use a couple
of different colors, doing a little wet on wet. But I'm going to start
it right off by making a little four petal flower, one, two, and watch
how I do that. I'm just pushing that around maybe like
that. There's one. And we're gonna put
another one up here, and maybe we only
get to see part of it. See how that works? We just kind of put
in something one, two, three, and maybe
another one here. So I don't have all the stems. I don't have all the
insides of everything. Maybe there's another one
that's just peeking in here, but we only get to put two
or maybe just a little bit of a third one there
because it's hiding. Now I'm going to pick up
my smaller paint brush and I'm going to
use this yellow, and we're going to add in a little yellow into the centers. Right into the centers of these flowers and we're going
to let that just blend out. It's okay that it goes up
into the other petals. We're just letting
that bleed creating almost a two tone effect. I don't need to rinse out
this brush every time. It has my yellow in it. I can just let it sit here because I'm going to be
going back and forth, back and forth pretty quickly. Now I'm going to be putting
in another one in here. A little petal a flower
there and another one here, see how they're just kind of like they're the
shape of a flower, but it's just a really
quick little flower. I'm not needing to be
particular about that shape. And then I'm going to be
putting in that yellow again, letting that bleed out,
create that two tone effect. Maybe I even want one over here. So 12 kind of pushing it, pushing it. See that? Then I can just drop in some yellow onto those
petals and let that bleed. I love how that's
really working. That's looking
really pretty cool. So maybe I'll put
another one up in here. Maybe this is a bigger one. Maybe I'll have it
going one Look at that. That's pretty cool. I'm
picking up my yellow, dropping some yellow in. Well, we're going
to be adding in more green stems and leaves
and everything as we go. So it's fine just the way it is. And we'll just add in maybe
I'll add a little bit more of that terracotta color
and put something up in here because
we're going to be bringing this branch all
the way up into here. But sometimes it's nice to have some flowers already designed. Up in here. This is just
such a fun way of you're not exactly sure what we're
painting yet. I don't know. We're just having
fun with watercolor. Alright. I'm gonna
add in some yellow. You do want to wait you don't want to wait too long
'cause you don't want this first paint to dry because you want it to be able to suck
back up into it. So now that I have that, I'm gonna do one
more up in here. Add in some yellow. I might even want to just bring kind of know where my
end point is going to be. Maybe that's just going to be a little tiny flower,
almost like a bud. Because you know how at the
top of your flower stems, they sometimes are just buds. I think that's what we're
going to do over there. See how they're just
like the little buds, but I still need the
little bit of yellow. Put that at the base. So I'm going to rinse off that brush now and go back over
to my script brush. Pick up that green again. Now that I have a beginning
and an end point, I can start to connect them. I can bring this
screen over there. I can just allow these to
kind of merge together. I can know that this is
going to come over this way and that's going
to go that way, and maybe these
connected this way. This one just has a little
stem there. Let's see. This one's going to
come this direction. This one probably came this way. You can see that that
blended in here. Do you see how that
was still wet so that green got soaked up into it? That's fine. What we're going to do is I'm going to use this
paintbrush that's almost dry, it's clean, it's almost dry, and I'm just going
to lift that up. Just going to lift up that
extra green, move it around, dry it off on my towel, and then I'm just going
to go grab some more yellow and just add a little
bit more yellow up on top. Might even add just
a little bit more of this red and put
that in there too, just to camouflage that. Nothing to worry about.
Now you can see that I'm starting that branch
that's going across, but I haven't connected
everything because I still need to add
in some more flowers.
3. Building Your Branch and Composition: Going back over to
my round brush. This is the size eight. I just mix up a little bit
more of this color paint, maybe then add in
a little bit more orange just to give it a
little extra variation. I like to make these petals and these flowers look
like they're going in different directions by adding some petals that are larger and then some
that are smaller. Then that way, it really helps us identify
which direction the flower is facing so that they're not all facing like they're going straight up. We like to have some look
like they're on their sides. So that's what
we're doing here by adding just a couple
off to the side. Then here in between here, this stem doesn't connect
to anything that branch. I'm just going to add
another little flower maybe right on top. And say there's a flower there, maybe there's another one here. See how I don't really care if it looks exactly like a flower. We're just creating things
that have flowers, um, shapes. I can't really tell you what
flower I'm making here. We're just making
flowers that are pretty. I think I need my yellow again. Makes up a little
bit more yellow. I do like my yellow to
be a little bit more on the creamy side so that
when I drop it in, it doesn't spread too far. And in a little bit more yellow. Use some that didn't get it. Pretty. I'm really liking that. That's really looking pretty. But you can really start to
see. So here's it again. I didn't bring that vine that comes all the
way down here. I didn't connect them because
I'm going to use that as an opportunity to put
another flower in here. I'm just going to fill
in that little flower. Maybe there's another one
that needs to go here. See how we can just
kind of fill in. It doesn't even
have to. They don't all have to have four petals. Some of them can just
have three or two or one. I'm gonna bring one over here, but I'm going to make it big. And then maybe another
one over here, but make it more
of a smaller one. It's a great time of year to
be painting some flowers. I was just outside enjoying
the sunshine and noticing how many different
flowers were starting to get going into my yard. I'd like to add in a couple of different colors so that I'm not just making sure that
they're all identical because sometimes those
flowers they have different, maybe some are in the shade or maybe some are
developed differently, so they're just always a little different,
and that's fine. I like it that way. That way you have some that are
lighter and then some that are darker and some
that are pinker, but then some that are oranger. But when you look across it, they're all very, very similar. That's because I'm
using the same puddle and then just adding
in extra colors. So now I just added in this
little pinkier colors. Now it's going to be a
pinker flower petal. Then I spread those around. Put one all the way out here
and I'll start putting in some vines again and
the little stems. You can see that I don't
really have a plan. I'm just waiting to see what my painting says
to me while I am painting. Using that green again, I'm going to use my
script brush and I'm going to start connecting
some of these flowers. I don't touch the flower itself. I'm just getting
really close to it, and I'm just going to
bring that stem over this direction and see how I don't have to connect
it to anything else. I'm just letting them flow. I'm going well,
something like that, and something like that. Maybe it comes up like this. Maybe they're sharing the stem. A couple more. They don't
all have to have stems. I feel like maybe I need a little bit more down
here to anchor it. I think I might come out a little bit further
because right now it's just very linear,
almost the same. Yes, it gets tinier up here, but I want it to fill out a
little bit more down here. I think I will add out a couple more stems that kind
of come out away which will encourage
me to add more flowers out that direction
and maybe another one out that way. Okay. We'll probably add I have
a little flower out here. Some of these might
need to be buds because you know how they
always just bloom out at the ends as a little
bud Here's another bud. But then I need to have a
bigger flower down in here. Before those dry too much, I want to add in my yellow just so I have that
same consistency. Since I am using some
of the petals being orangier and some of
them being pinker, I do like to have a
little consistency by having that yellow
inside all of them. You can see I did that right on top of that stem,
and that's okay. I'm just going to fill that in. I wasn't really liking the
way that stem was looking. So I just got covered up. I'll go back to more orange. This is your opportunity
to just play and see what kind of shape
flowers you can make. They're really just four
little flower shapes, petals that go around. Nothing too difficult. So I like that better.
See how much wider it is? If I feel like I need just
a little bit of something, I can also just put in a little a little
pretend flower there, little dot here and
a little dot there. Look for areas that I feel like it needs
a little something. So yours is going to
start looking very different from mine because we're not following a pattern. We're just putting down whatever shape yours turns
into is going to be perfect. Now what I'm going to do
using my little script brush, I am going to choose a
different color green. I'm going to use a
green that's a little softer, not so dark. I'm going to add in little
squigglies and that's where a little tiny script brush or a little detail
brush is going to come in handy because what I'm going to do
holding my paintbrush near the top and just letting
it dance along the top, I'm going to add a little curly
cue, something like that. Then maybe I want a
curly cue out here. Maybe I want one
that comes this way. Oops. Over here.
Sometimes they swirl, sometimes they curly cue. We'll make some
coming over here. Oh, it just creates
some little movement. I don't have to add in a lot. It does help with some movement. Okay. And now, what I'm going to do using
my smaller brush, I'm going to start
adding in some leaves. When I add in leaves with
a small brush like this, I'm just going to use
different colors of green, and I'm just going to lay my paint brush
down and stamp it. Just make some lit
stamps like this. I'm going to vary my greens and I'm going to move them
all over my page. Sometimes there's going
to be a little cluster, and other times
it's just separate. But I don't need to make
a really detailed leaf. It doesn't have to be difficult. I'm trying to figure out
how I can show you that. I'm just pushing it down. Here I'm using
this darker green. It's not even
connected. See that? It's not even connected to anything. It's
just sitting there. When you start adding in leaves, it really there's a hair on it. Just a little push push down, push it down, stamp it. I'm using different colors. Now I'm going to go find
a much brighter green. Look at that beautiful green. I think you can see that. We'll add in this green. You can see that I'm not
using a lot of water. It's creamy. I'll just add in some greens some little tiny green leaves. I personally like to add three
different colors of green. I feel like that really helps your painting feel
like it has depth. Anytime I am painting, I almost always will make
three different greens in it. Look how I even added
some out towards the end. It's not
even connected. It's just a little leaf out
at the end of the flower. I'll put one up here. Mm. I don't want to add too many, but I also don't want
it to be too sparse. I'm feeling like that
might be getting close to the right number. Just scanning it, looking
does anything need anything? F pretty. Using the same
really small brush, I want to add in a
little bit of blue.
4. Adding Leaves, Vines, and Final Details: I'm just going to make
a little room up here. I'm going to add in some blue. I think that's a good color. Maybe lighten it a little bit. Add in a little purple. Yeah, that's good.
That's really pretty. Okay. So I just want to
add in some berries. So maybe put some berries there, and these are just dots. Dots. Dots. You can
sneak some in here. You can sneak some over here. You're just going to find
spots to put your dots. These are little tiny berries. Refresh your paint brush
if it starts to feel dull. You can put them
out at the ends. See how there's the end of
these little squigglies. You can say, maybe that's
what those were for. Maybe that's where the berries are growing off of
these squiggilies. Fun. Maybe they're
embedded deep inside. Whatever you want. Again, you
don't want to put too many. But it also adds just
a really nice depth if you add in a
couple little dots. See how we're not really
painting flowers. We're just making some
marks on our paper. But when you put
them together in a pattern and in a plan, it starts to look like a
whole composition of flour, which is just so fun because none of these things
were difficult to do, but all you had to
do was put them together and put
them into the shape, and then all of a sudden you
have a beautiful flower. Not sure what it is, not
sure what kind of flower, but that's not really the point. It doesn't have to be
a specific flower. And really, at the
end of the day, the most important thing
is that you're having fun. Now, I want my stem to
be a little bit thicker. I'm going to come in here
with another green and just make this a little thicker
of a stem coming up into it. If your stem doesn't need to be thicker, you can
just skip that. I just preferred to have my stem a little bit
on the thicker side. And then because this
is a darker color, I'm just bringing
that up through the piece so that you see that thicker,
darker color elsewhere. Okay, so does this
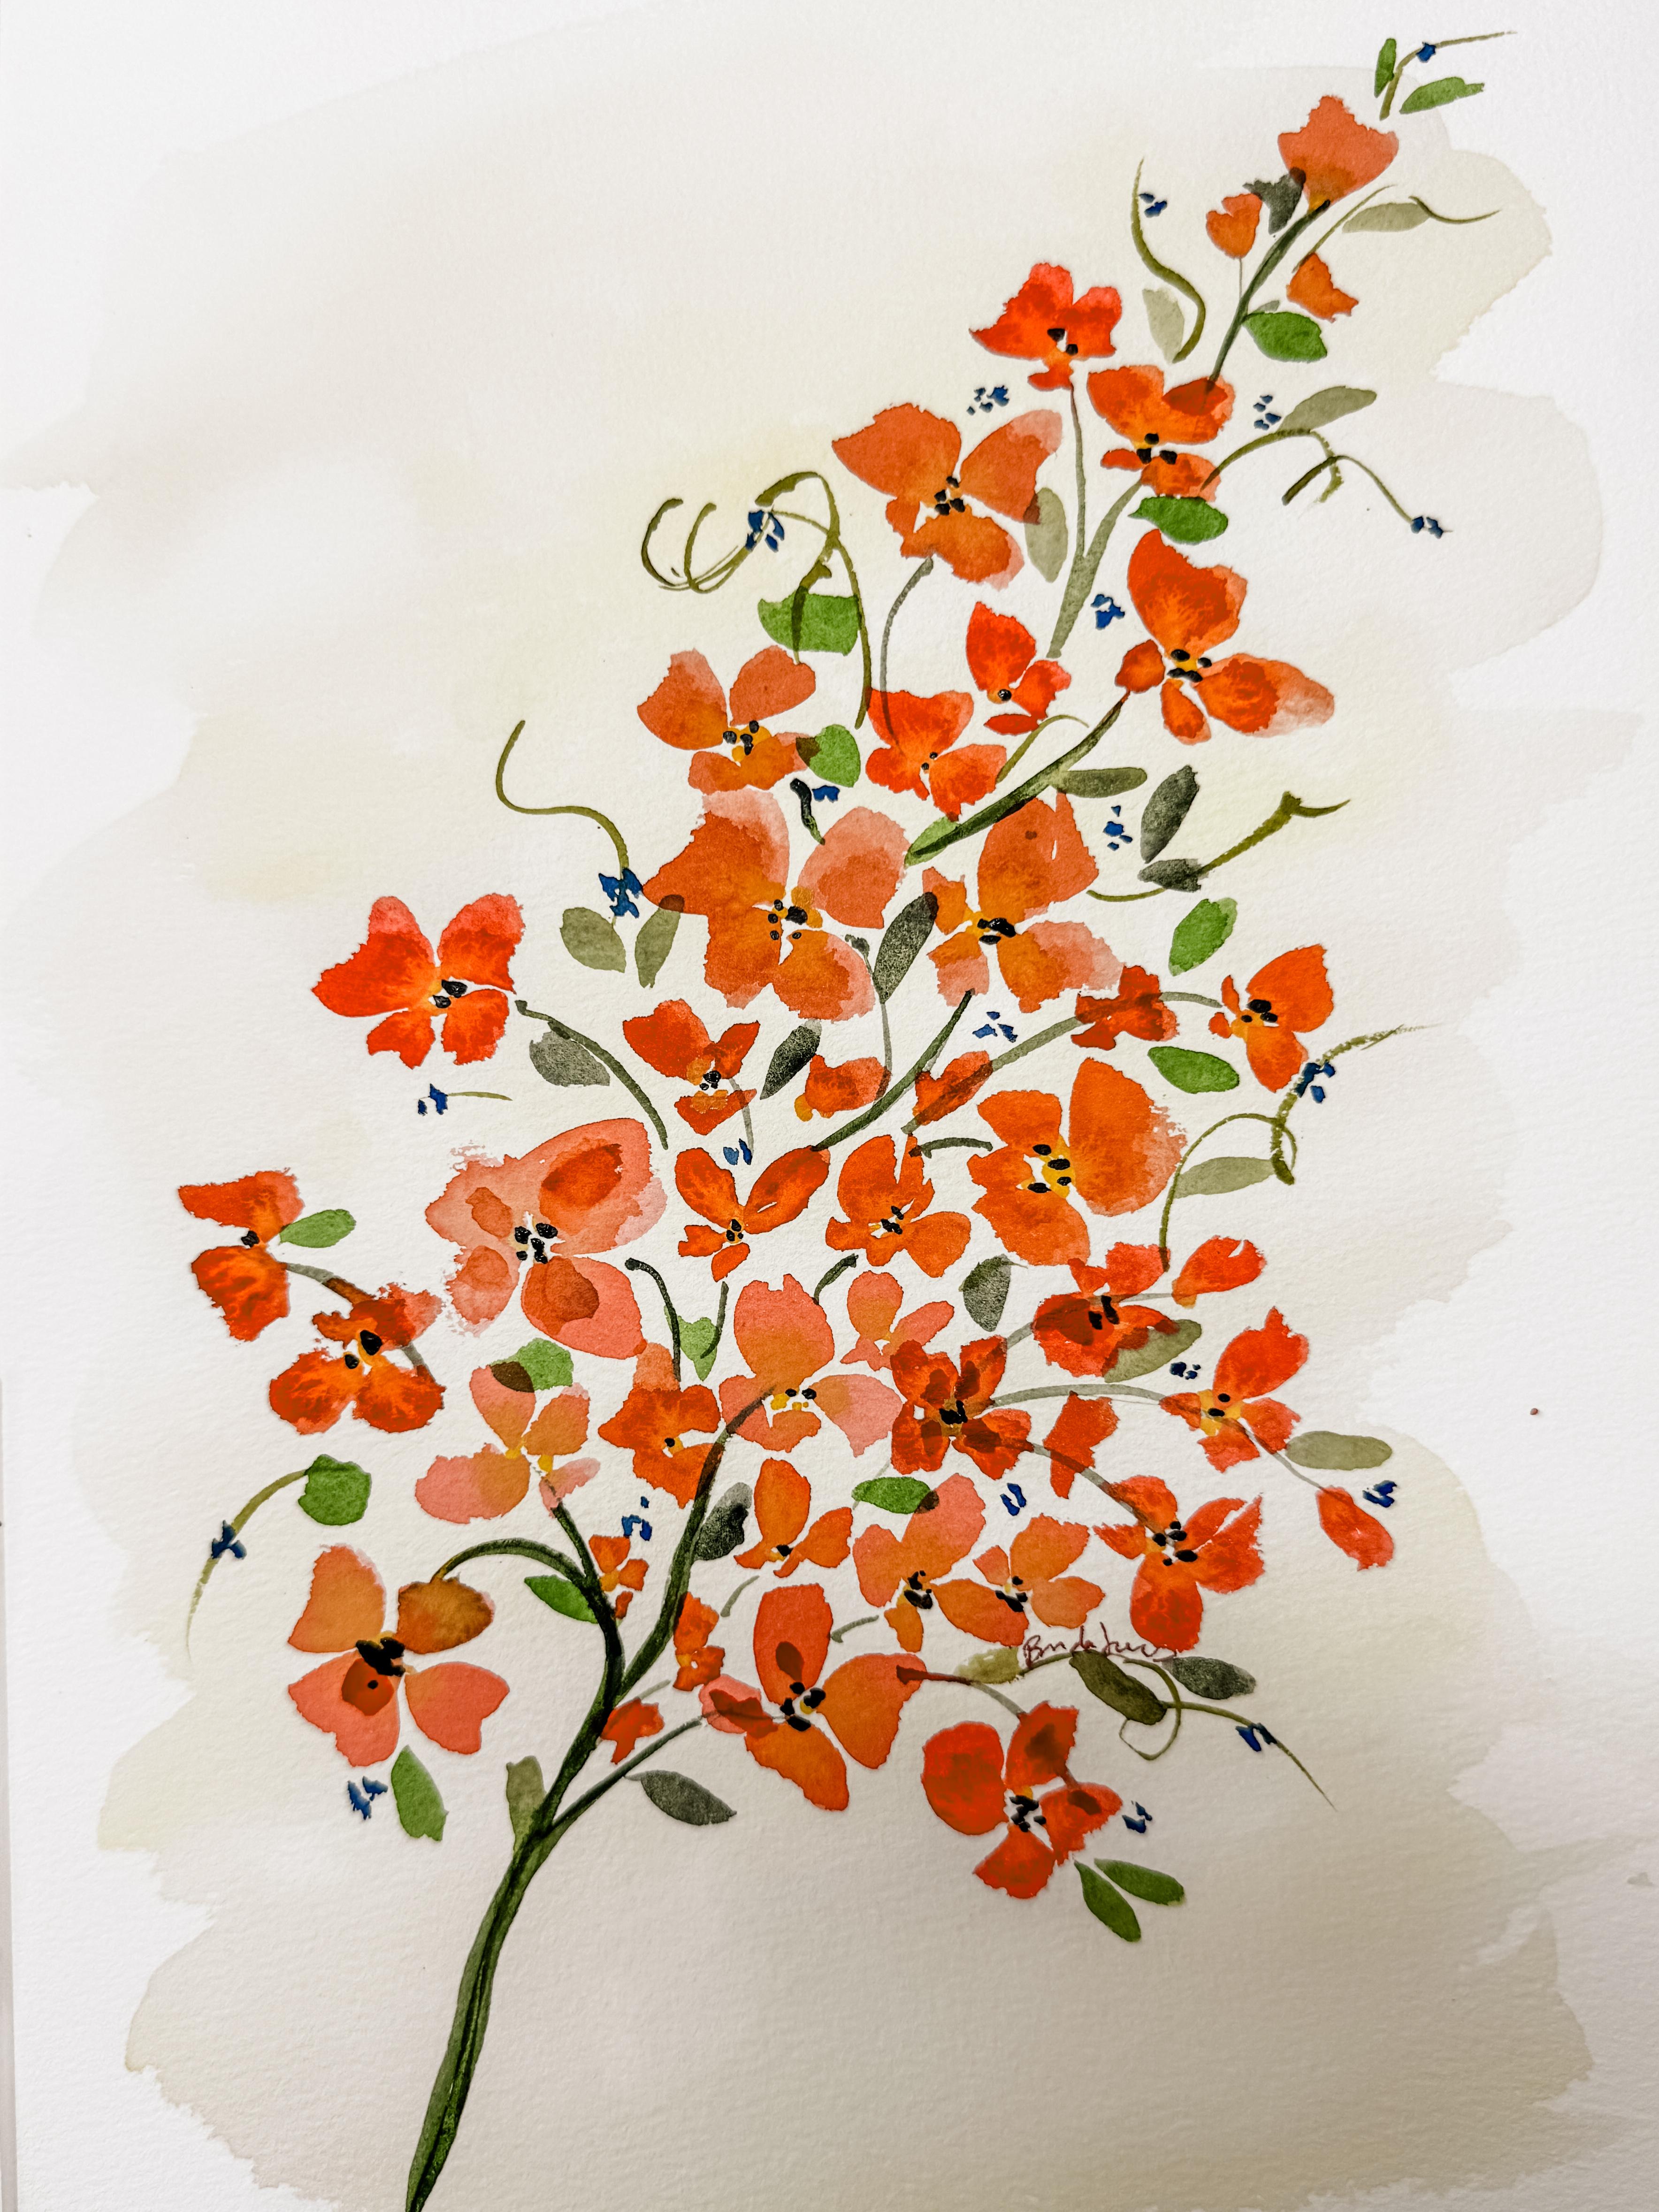
need anything else? I feel like it might be done. It's just so beautiful. So simple, has a
beautiful background. It has a beautiful shape. I would love to see this
growing in my yard somewhere. You know what I think
I'm going to do? I think I'm going to add some darker colors into the centers of some
of these flour. Not into all of them,
but into some of them. There's a little water drop. I'm just going to pick that up. I'm going to use my
script brush again and I am going to get this going. This is my really dark gray, almost a black color.
You could use brown. I'm going to see if
I want to mix in just a second color just to
soften that a little bit. I think that might be
a little too harsh. I have a brown over here. Going to just mix into it.
I think that's better. See how it's almost a chocolate
dark chocolate brown now. So very creamy, very
little amount of water. I want this to be
really creamy color, thickness, not watery. Why I do that is so that when
I lay this down on here, it stays exactly where I put it. It's not going to
bleed all over. The less water you use, the more it'll just stay
right where you put it. I like that. I like having this little darker
accent here and there. Feels like that's going
to anchor some of these. I don't know that they all
need it, and I'm just putting, some of them are going
to get two or three, some of them might get
five, just get two or one. The thing that you
don't want to do is make anything to expected, if everything all of a
sudden got three dots, it might just feel a
little too predictable. Some get little smaller ones, some get bigger ones. These little tiny ones are
only going to get maybe one dot or none. I like that. I think
that really helped. So I'm just looking it over and seeing what is missing,
if anything's needed. Everything feels
like it's balanced. It looks like that
one needs something. Okay. So I'm going
to grab my marker. I'm going to sign my piece. I think what I'm
going to do is sneak my signature in up in here. Just so it's part of my piece. Well, I hope you
had fun doing this. Come back to the next lesson and we'll take it off of
here and maybe add it add it to a frame and see
what it looks like framed. I'll see you in the next lesson.
5. Finishing Your Piece and Next Steps: Hopefully you just
finished your piece, and I'm glad that you gave
yourself the space to relax and enjoy the process
a little bit more with me. This kind of painting
is less about the final results and more about how it feels
while you're creating. Letting that brush move
freely across the paper, allowing colors to blend
on their own and not overthinking every petal can really change the way
you approach watercolor. If your piece didn't
turn out quite exactly how you expected,
that's completely okay. Every time you do
something like this, you're building confidence
and you're getting more comfortable with the way water
and pigment work together. You might even try this
again with different colors, a different brush or slightly
different composition and see how much it changes just by adding some
small adjustments. If you created
something you love, I would really encourage you to share it with the
project section. Even the symbol imperfect
pieces are worth sharing and it's always inspiring to see how different everyone's
work turns out. If you'd like to keep going, I do have more classes
where we explore the same loose carefree approach with different flowers
and techniques. You can jump into any
of those that feel interesting and just
keep practicing. If you enjoyed this class, I ask that you follow me here on Skillshare and leave
a quick review. It really helps me to continue creating more of these
classes here for you. Thank you so much for
painting with me today and I'll see you in another
class real soon.
 Brenda Jones, Watercolor Artist & Teacher