Transcripts
1. Introduction: Hello friends, welcome to the pencil figure
drawing course. In this course, you'll learn
step-by-step how to design the human figure and learn
about the anatomy of the body. In this course, you'll learn everything you need
about figure drawing. And of course, you will first learn different methods
of figures sketching. Then you'll learn how to
draw the figure as style of a woman's body and how
to hedge and shade it. Next to the anatomy
of a man's buddy, you'll learn how to draw
muscles and shape them as well. Then by drawing the body
of two male athletes, you'll learn step-by-step
how to draw muscles, bonus structures of the body, turns and twists of the body and shape
them with a pencil. And finally, by drawing a cloth man in a
sitting position, you will also learn to
draw a closed figure. I hope this course
is useful for you. And with a lot of practice, you can become a professional
figures sketcher. Good luck.
2. Tools: Hello everyone and welcome to a new course of
sketching with me. Well, in this course
we are going to create figurines and
styles together. Well, before we start that, I should tell you what equipment you can
use in this course. The tools that we need
for this course is a B6 sketching pencil that we've used in
previous courses as well. Our eraser and an H2
or a normal pencil. We also need a normal
and an eraser as well. Well, next session, we're going to see how we can
create the proportions.
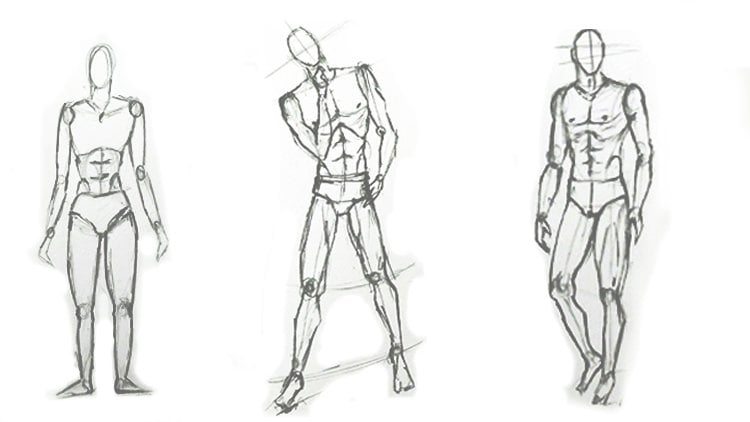
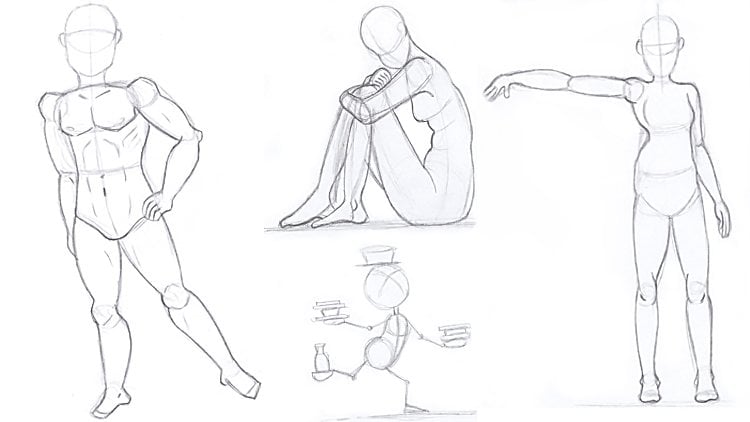
3. Types of figure drawing: Hello, welcome to another
episode of sketching with me. In this episode, we're going to start creating
figurines and styles. And before we want to
do it professionally, I should tell you how
the proportions work in figuring or a
human bodies style, or how we can create it. Based on what we can
create our proportions. Gets your normal HB
pencil and you start from the top is part of
the human's body, which would be the head
and until the toes, which is actually the
ending part of the body, is as the amount of eight heads. In the beginning. I will
create eight equal circles, which also look like ovals. I mean, it's a shape, something between an
oval and a circle. And I'm going to
create eight of them equally as our
presenter of the head. And I need eight heads from the top to the
bottom of a human's body. Then we will the proportions. How was the sixth 78? The eighth one would be a semicircle and
indicate engineers, I'll tell you why. Is it going to be a semi-circle
or it would be in half? From the top to the bottom. I would have the amount of
eight heads almost there. I would have to make, actually transform these eight heads into
complete figuring. So I will have to divide each
head into a separate part. And the last one. The first one is pretty clear. The first one is our figurines. Head. Or better to say our
character's head. Alright. Then between the first head and the second head would
be our neck area, which basically it
looks like this. Then with a little distance between the first dividing
line of the first, second head, I'll create
the line for the shoulders. And then until the end
of the second head would be the ending
part of the chest area. Just like that. Until the end of our second
head measure would be the placement of the ending
part of the chest area. Alright. Now these would be the collarbones and from here we would have
the shoulders. Now to create, I'm now going to create the
arms right now. I want to create the
rest of the body first. Above this separating
line between 34, I mean, over here,
little above that. This would be the ending
part of the waist area. Okay. And then over here, we would have the area between
the waist and the hips. It starts from here
and it continues until the middle part of the fourth measurement
or the fourth head. This would be our pelvis. Okay. Now, from here, from our fourth
measurement until r until the end of
our fifth little bit. Even below that, I mean, this area would be our knees. These two points that
I've created here. Would actually be Denise. So I'll create, create a Sy over here and
another one on this side. Here. We would have the nice. Then from the knees
until the ankles, I would have this much. Well, the ankles would be on the beginning line
of the eighth head. This would be the ankles from
the knees I'll continue. And L connected to the ankles. Dislike that. Okay. If done. Well, if the feet we're in a way that she was standing or he
was standing on his toes, this eighth head
would be completely, but if our character is a standing normally on their feet, this eighth head would be 1.5 and we will create
a semicircle for that. But again, I say, if your character is
standing on details, that will be a complete head. Now, area between the chest and waist would be
actually our elbows. So we'll start from the shoulders and I'll
continue up to here. And also on this side, these would be our elbows. And now, where
would be the risks? It would be here below this area in the middle of the
fourth measurement. So I'll bring it
down just like that. And then I'd be creating the
hands like this up to here. This is a normal proportions
for a normal anatomy. So it would be as a
proportion of a hit. Okay, if I want to
create the same, figuring in a different
style and a different way, I should continue
these measurements. And then I will be
creating an angular style. I mean, I'll create my anatomy. And an angular way. I'm just going to
continue this so you would know where
would everything go? Okay. Well, dad is the head. It doesn't change in any style. Then we would have
the neck in this way. And I'm just going to change
this figure in a bit. This time. I'm going to give it another
style and a position. And then this time
the collarbone would be actually in this way. It's the steep and sideways. I want her to take one hand
up and turn it over her head. That's why her collarbones
are not straight. Then we would have the
chest and depressed. So first of all, I should create the
center of the body like that so I can have my
things symmetrical. So from here, this would
be the shoulder joint. I bring it down up
to here which would be the ending part of our chest. And then again from here, I'll bring it down
until I hit the pelvis. Here I would have my
models ways then at last, it will finish here
over the pelvis. Okay. Now, the next thing that we should do is
determining these parts. I told you this would be the
ending part of the chest, so I'll show it over here. And over here we'll
have the chest itself, which contains the breasts. Each on each side. One on each side. Sorry. Okay. Now what are
we going to do next? In next step, we are
going to create the arms. Here would be our elbows. I'll just create it, create DRM until the elbows. And then from here, I want to take the arm over here toward the
lower part of the chest. Basically almost on her waist. This would be her hand. I can also use my eraser to erase extra lines from Mark and that would
actually make my work, is there, make it
cleaner to do the rest? Then I'll work on the
lower part of my work. This would be actually the
ending part of the pelvis. Here would be my
characters hips. And now I want to
consider the knees here. Well, this time I want
to create the legs in a way that the left leg is stretched and it's coming
in front of the right leg. So if I want to create my one of my knees over here and I want to shape it in a
more curved way. It would be placed over here. So from here that I have my hip. I'll connect it to
this knee area. And from this part
I'll do this say okay. Now leg is actually more in behind and it's
stretched out underground. It's like it's keeping our bodies straight and it will come from behind the other leg. And the knee cannot
be seen completely because it's been covered
by this first leg. If you want to create the
ankle in the same direction, it would be placed
here. You remember? I've told this in the previous
style from both sides. I'll move on toward the ankle. And then this time I would have to create a
stretched feed on the toes. So this time I'm going to
create the feet completely. And this one because actually
this leg is straight. I'll just put the
ankle over here and create the foot
normally like I did before because one of the
legs and one of the foot basically is placed whole lot underground and
the other one was a stretched out on the toes. Didn't have to create
this other arm. This would be my elbow. I'll bring it down up to
here to the shoulder. And then from the
elbow down it will come toward the head and it will be turned
to create the hand. So just as easy as that, we've created a style like that based on the
proportions that we've created on the first
part of our tutorial. Let's move on to the
next way of creating a fingering or
proportions of anatomy.
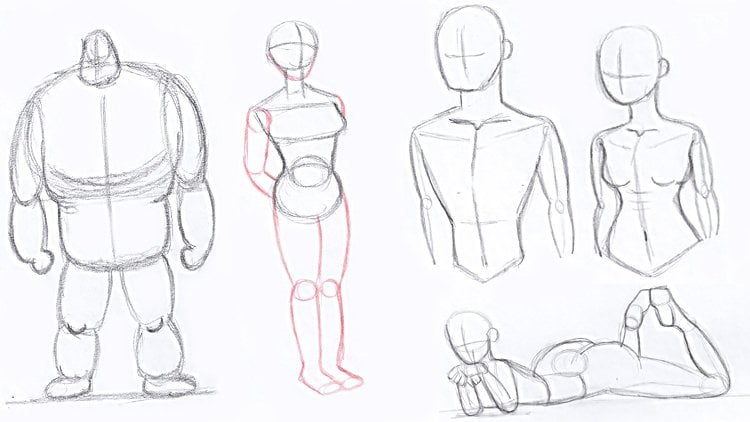
4. Continuation of types of figure drawing: Hello again and welcome to another episode of
creating figures with me. Well, this episode,
I'm going to tell you this third way of creating
a figure or a style, and this way is linear way. As usual, the first part
would be the head area. So I'll create the
head as usual. Then. I'll create a line as
a representer of the neck. Then I will create the shoulders area and I'll
continue it until here, until the lowest
part of the chest, the ending part of the chest. And it would be sideways, as you can see, it's
not as straight. Then my body has
came through here. I'm considering
the central line. This would be the waist area. And then again, I want to
create the hips this way. And then this shape, this would be the hip. These two would be
actually the leg joins. Those two were the
shoulder joints and in the middle
we have the waste. Just as easy as this. If I wanted to create the arms, this would be the elbow, again being placed as a joint and here
would be the wrist. I want her hand to be
placed on her hips. It's the same thing
for over here. I'll create the arm. This would be the elbow, and here would be the
wrist and the hand. Just as easy as that. Now I want to work
on the leg area. I'll continue this same line. First. Let me just create
a straight line down. This would be the central line. Now, I want to place this
leg student on the floor. I will have this knee joint
and I'll create the leg. The upper part of the
leg here would be the ankle and allergists
connected to here. And that will be the foot. I want to create the other
leg in a particular angle. So I'll bring the knee over here and I'll create
the ankles this way. Go sideways and the
other foot as well. So this is actually
a third way to create a style in
Illinois array. Up to here, I've told you
about three ways of how you can create a figure
and a body anatomy. Well, in a way of eight heads, the angular and linear way. If you want to use one
of these three ways, you can actually
create the figures and bodies styles in
anatomy is very easily, I'll simply, we had
these three ways. And I hope you can use them to create beautiful anatomies.
5. Drawing the figure of a sitting woman: Hello, welcome to
our new episode of creating and sketching styles
and positions with me. We're going to create
a sitting position in a side view and a three
faces view altogether. First of all, I'd
be creating ahead. No. You see? This would be
the head of my model. So after Dad, I can
create the neck area. Alright, now I can start creating the position and
the style of the body. Create a line. And I'll bring it
down from here. With this angle. I'll be doing the same
from this side as well. Okay? You see my dear friends, I'm actually sketching very
easily and very simply. If I bring this part
of the neck down, this would be actually the symmetrical line
of the whole body. So from here I'll
go up and okay. So this would be the chest and
until the end of the ribs. This would be stomach area. Here we will have the waste. And from here down, again, it would be the
waist and the stomach. And this part would
be our pelvis area. I'll shape it as
a circle for now. Okay. For placing D arms, because our body is placed in a three-phase
is via position. We can only see one of the arms. The other one would be on the other side of the
body and cannot be seen. So I'll continue
from the neck down. This area here would
be the shoulder. As you can see, I've
created a circle as the placement of
the shoulder joint. I cannot create the
rest of the arm now. And now I am going to
create the body parts. If this is my drawings
from below that, from beneath that
actually be the armpit. And when it comes to here, this area would be the
placement of the breasts. And they would look like this. And it would be the same
for both sides of the body. Just as easy as that. Over here, I'll have a curve
for the stomach and then I will come out a little
bit again. After that. This would be the lower
part of the waste. And then I can get
to the pelvis area, which I want to create
in a sitting position. So the pelvis would be wider than it should be
because she's sitting. This would be the
back of my character. So it's our back. Okay. Now I'd be erasing the
extra lines of my work. I'll make these lines
neater and cleaner. While you're erasing
the extra lines, you might erase some of
your main lines by mistake. Don't worry. You can always bring
it back like this. Right now. I can even give some shading to these areas as central part of the body cavity here,
the curves here. And also the apps. Abdominal muscles. Which are created like this. Easy. Here we have a shading for the lower part of the bag, for the curve in the back. Here, we would have
so more shades to show the back even more. Alright. When I come
down from here, this part would be well, back and the legs would be
actually starting from here. Alright. This is the knee
joint over here. And very easily all connected to the
beginning of the leg. So that will be the ankle. And again, from the knee. I will connect the lines to the ankle joint from
both sides obviously. And then over here we
can have the foot. Alright. Now we want to work
on the arm area. First. I'll create my elbow. Over here. We had a circle. So I'll bring down the arm with a slight curve and then with this light prominent
part up and down, right after each other. And over here, I would
have the rest of my hand. I want her to place her hand on her thigh
or on her waist. So also from this side, I'll be connecting this
line to the elbow joint and to the wrist joint
to create a whole are. Then I'd be erasing
all the extra lines. So I would have a cleaner image. And then I'd be having
to hand over here. Here we go. Now this is
this part of our work. This side is complete
almost. Then. I'd be adding some more
shading to the work, completing the seating area. And we also need
another leg as well. So we would have to
create the other leg. The other leg which is behind here would be the
placement of her other hand. And the lower part of her leg
would come down like this. Then you can see that
the leg which is behind, is in a position which
is placing a bit in front of the first leg. C. We are actually emphasizing on the position and on the
style of her sitting. And I've erased day extra lines so you would understand
it better and more. This would be our other elbow. And as I told you before, we cannot see the other arm completely because it's on
the other side of the body. We can not see the shoulders completely or some other parts. Okay. I'll be erasing
the extra lines again. As I said, if you even erase
some of your main lines, don't worry, you can come
back and complete it again. Here we go. I would also have some more
extra lines over here. I will erase the
chest area depressed so I can do it's the sketching. Better and more, correct. So I would not be confused
by any of these extra lines. Here we go. Okay. Now I get my B6 pencil, which is my sketching pencil. And with that, I'd be starting to create the
shading that I need. The starting from
this part of the arm. And very, very slowly
and carefully, I will shade the style
that I have created here. Very easy. Just like that. Over here, I would have some more shading just below the breasts and
even a little bit on them. Okay. Now I'm just
doing it like that. Just like this. And also from these parts, I can create a slide shadings
going to the central area, which is actually the cavity and the curve beneath the ribs. I can even show the ribs. And then I can create apps. Her abdominal muscles. Alright, here we are. And then I can even move on
to the pelvis area little. Then I can also shade the waste. As you can see, I am not darkening all the
parts in the same way, in the same amount. I'll actually keep
the prominent parts lighter and I'm shading
more curved parts. It can bring it up a little bit more or you can just create it more thinner in
the waste area. Pens on you. But as I told you, just be careful to shade
the curved areas a bit more and keep the
prominent parts a bit lighter while you're shading
your whole list style. So I'd be creating the
arms are actually, I'd be shading the arms
and that will create them. Okay. Then you should work very, very slowly and just
give time to it. Spend as much time as you
can on your shading so you can get the volume and the
style that you really want. And the other point is that
you shouldn't not only create your style once or twice, or even three times. You should try to
create the same style for over ten times. So you can get it in a
very professional way. In a node care about
the face right now. So again, I say, the more you do it, the better you get. Promise that to you. So don't just give
up after you've created two or three
of your style. So I'd be applying the
darkness over here. And then just like that would be coming
down towards the hand. As you can see, I'm just applying the shadings
wherever I need them. That's the important
thing that you should know where to
apply your shadings. And this is why I tell you it's better that you
create your style, singles style over ten times. Then I get my B pencil
in order to create even a stronger
darkness into my work. Then for some parts, I will apply a stronger shades. Stronger darkness. Just like that. This would be the back curve. And even over here, we need more darkness. And I'd be shaming
this area as well. I'll be applying the darkness for the background of my work. Between the hand, the arm, the leg, and the body. Then I create this
contrast over here. Therefore, you can divide the
body from the background. You can easily separated. So just like that, with darkening the
background and creating a contrast in
my body with my eraser. I've divided them. And I have created a great work. I mean, I, you shouldn't
move your pencil easily on the paper over here. Should just let
it leave a trace. Just like that, I'll be applying more darkness on the
background of this side, again, creating
another contrast. And this will actually make your work look more interesting. Okay? Now we want to
work on the legs. Let me just do some
touch ups here. Here we go. Here. And then for the legs from here, from the seating
area and the pelvis, I move forward, I get to the call and then
I get to the foot. So I consider the whole leg. Then I be applying a darker
shade for the lower part of her thighs and basically her leg and the back of her hips. And also at darkness over here, where is the placement of the knee joint and this would
be the back of the knee. Then I'll create a circle
our part for the knee and a lighter shade going up for the top
part of the leg. And events, some
shadings over here, the front part of the mouth
and the back part of it. I'm mostly keeping the
middle part lighter. If you can see. Because this area is actually the lowest area and the
part which is in the back, this area would be the
darkest because as I said, it's the lowest area
of the thigh or the cough. I apply it. It doesn't receive
that much light. And very here we would have
this part of the foot. Just like that. Again, with good shadings. We will consider it with
shavings on the sides and edges. And as I told you before, I tried to keep the central
part of the umbrella, say middle part of the cough, lighter comparing
to the other parts. This area would be
the sitting area. So it should also have
some more shadings. It should be dark, and maybe even
some more up here. And now I'm actually
doing the touch ups, the final touch ups and the
final edits of my work. Remember Dad's in editing, you can definitely basically, you should definitely use erasers in order to
lighten some parts up like the breast
that I've done in order to create a better
contrast and a better shading. Then again, I will apply a darker shade
right beneath them. And this will actually pop
their volume even more than day wear. Okay. And Atlas, I'll consider a
dark background for my work, for o on my work. Overall. Just be careful that while you're creating your background, you would not get into
your work too much. We do our shadings. You don't want to
miss things up. You know. It's the same on
this side as well. I'll get a darker pencil in order to do a darker background. So as you can see, I am darkening the background
even more because I want more contrast between my model on my character with
its background. Then again, I will
erase this part of the arm because might get a bit messy if I get any shadings accidentally
into the arm. So I just bring
the darkness from around my work onto background. Okay. Just like that, as you can see, the background under hill
shadings of our work is done. Again, I'll just emphasize the darkness on the
hips, a bit more. Also to darkness in this area. And we're almost done here
for doing the touch-up. So you can use any
stronger darkness or any erasers wherever you
feel like you need it. And just as simple
and easy as that, we have executed a beautiful
style and position per se. Sitting position in a
three-phase says view. Okay? And that's it. I hope you've enjoyed it
and it was useful for you.
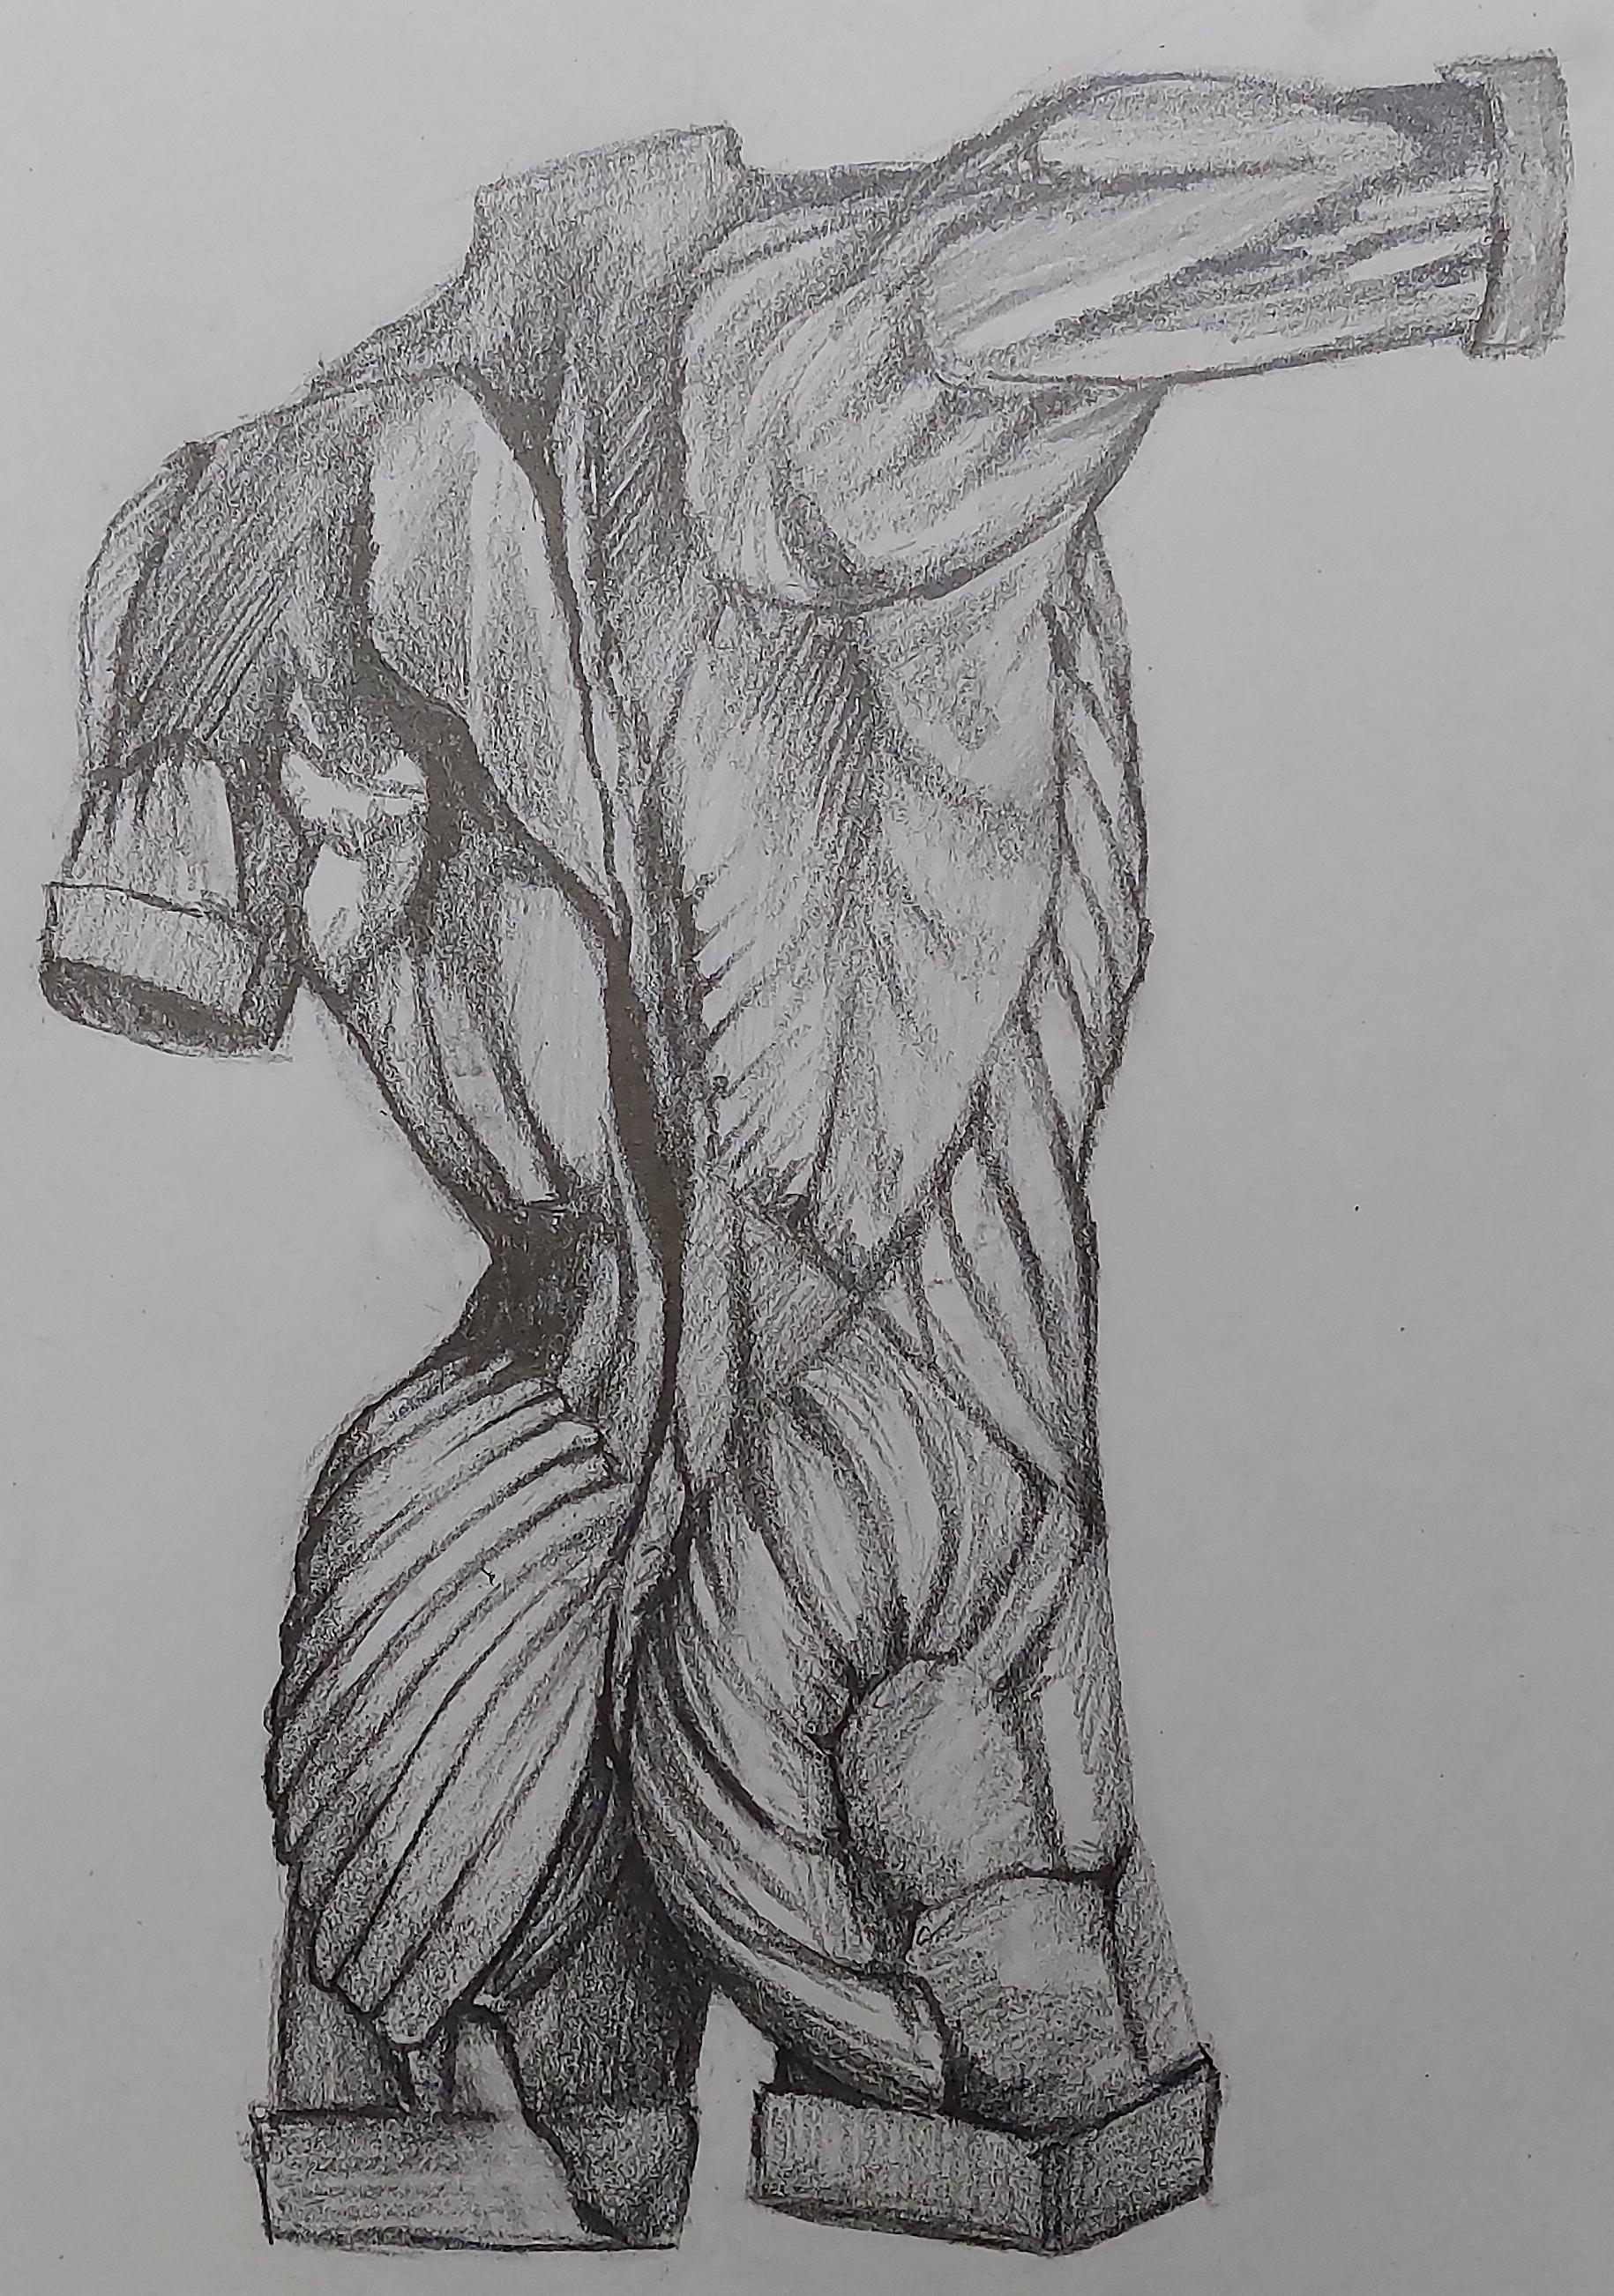
6. Draw a sketch of the back figure of a man: Hello and welcome
to another episode of sketching styles with me. In this episode we're going to work on anatomies together. I mean that we're going to
create the shape of bodies, muscles together
before anything. I'll create a simple
figuring here. And you can create disfiguring exactly as I'm
creating here for you. Well, the one that I'm creating is basically a male
character from behind. I mean, that we want to show him from his behind
to show his back. First, I will create a lightly. So then later, if there
was any problems, we can edit it and fix it. So here would be the waist. And you can create different types of anatomy
is indifferent positions. You can even search
them on the internet and you can easily
practice with them. So this is a very good practice
for the figurine style. Then we would work on the hips. Right here. I just need until this area of him a little bit
lower than the hips, so I wouldn't not move further. And that's enough for me. Just remember to complete the
general shape of the body. Therefore, we can apply the
details on our model here. Alright. This would be our spine and basically the
symmetrical line of our body. Okay, Now, from here, I will create a muscle
over here for this area. So this would be the muscle for the chest and continue
that to the back. And here we have a triangle
muscle continuing up to here. And then from here
it will move up. Just like that.
Again, from here you see it looks like an x. Basically. We have the exact same shape on the other side of
the body. And x. And the same separating
line would be applied here. This is actually
the line which is separating the back
area from the hips. I had to erase that area. And then again from here, the muscles on the hips. See over here. These would be the
muscles on the hips. And then it would have
some this sense over here. Some space better say. And then from this area, which has been
stuck to this area, and from here it will look like a snail
and it's will go down. Basically, we have. Strong curve over here and
strong turn goes up to here. This would be our snail area
for the back of the hips. And we would also have to create the shape
of the muscles on this side of the
thighs, I can say. And they would look like this. I worked on this with the
anatomy of a human being. You can do the same
as I told you before. So I just need practice on this. And then we're going to work on the other part of the leg. And we're going to do
the exact same thing, but we're doing this mirrored. I mean, see over here this area would be darker and
it can be seen from here. So it's the exact same thing. It will be mirrored over here. These will be actually the muscles for the
lower part of the foot. The leg basically. See. Just like that very easily. You'll have a snail
muscles as we had in the previous part of the
leg on the other side. Right now we don't want
to get into the shading, so we are just creating the basics and the
shapes of human anatomy. Shapes of the muscles. In their most basic form. You see the different
shapes of anatomy, the placement of the
different muscles. Just creating these shapes
would be enough for you. You should just reach parts
are more prominent and which parts are more curved
in and where are the muscles, especially if you want to create athletes models or fingerings. So if you learn this anatomy, it would be actually
very well for you. I mean, when I say you
should know anatomy, it doesn't mean that
you should know the names of each
one of the muscles. It just means that you shouldn't know where everything is. It will help your sketch. And it would be really great for you when you want to
create a whole character. This would be my spine
that I've created. Then with the help of this, I'm going to create the
rest of the back muscles. Okay. From this middle area, I'll create a muscle
toward the shoulders. I'll just drag it up. And then from here, from the armpit, I will have another line
going to this area. And from here it will go up, which goes actually
behind the arm. Okay. So it would be
the back of the arm. And it should be just
as easy as this. Over here, I'll have
a shape like this. Then. From this lower area, I will separate the back
muscle into two parts. That from here, I'd
be apply a darkness. I want to show a curve
right next to this area, right next to the spine
that has a muscle shape. I mean, these muscles are actually the things which
are keeping the spine. So they are right next to it. And the rest of this
curve just continues up. Okay? We have the
same exact thing on the other side of the body, again, mirrored because
they should be symmetrical. So we get up to here. And from here I go toward
the line that I've created. This would be the back from the armpit looking like this. Okay. To create the
exact same lines for my muscles on
this side as well. But again, I emphasize that
they should be mirrored. So I'll be creating
them just like that. Here we go. See. It's very easy
if you just spend your time on it and pay
attention to the details. I would also have to create
some more muscles for this area on the waist. So then from here on, it would be the arms. Here we will have
the shoulder and the shoulder area has
a separate muscle. So if it comes over here, this would be actually the muscle on my shoulder or
the beginning of the arm. That's from Here. It comes to the shoulder
and it gets Susan neck. I mean, these are all
connected to each other. Here we go. You only need this
part of the arm. I would not want to work
on the rest of the arm, especially from the elbow down. It's just enough
for you up to here. Then I would also have to create these muscles for the shoulder. Okay. Then again for the other arm and for
the other shoulder, we'll do the exact same thing, creating the exact same
muscles with the same shapes. Just like that. Okay. And then over here, I'll have a curve on
the bone and from the shoulder it will
connect to the NIC. Just as easy as this. We have created the primary
entity of our work. And for continuing this very, very practical tutorial, please follow us and
watched and next episodes.
7. Shading and hatching of muscles: Hello, and welcome to the continuous of this
tutorial with me. Well, here we are going to do some shadings on our anatomy
and on these muscles. Starting to shading from
the top of my work, from the neck area. So over here, I'll just
create a simple shading. Just like that. It's not very dark
as you can see. But over here from
behind the arm, I'll use more darkness. And then I moved
toward this area. I'll create a line for
their for this area. And then from below it again, I'll start darkening my shapes. And if you've remembered, I've already explained
this curve to you, right next to the spine. And then from here, because it's a curve, obviously, we would
have some are shadings. And as I move down, they would be lighter. I mean just shadings. Then from behind the arm, I will apply some
more darkness like that toward the spine. And then from here, from this side of the spine, I'll just do the same. This is a main structure
of our skeleton. So again, from here I'll be
applying darkness and now faded upward because as you
can see toward the neck, it would be lighter. And we don't want to
work on that too much. Actually. You want to
work on the muscles of the back more than that. Okay. Here on the back, I should apply some more
darkness also from here. Just be the same. Okay, and over here, I apply a very normal shading. Then I'll be expressing
some dark areas. Over here. Basically, I'm emphasizing on the muscles being curved in, in these areas
with several lines and some are shadings
in some parts. Alright? Now, also because this area
is in the shadow phase, it doesn't receive any light. It would be completely
dark from behind. This in a position that
cannot have any light. Now we move on to the next part. Over here, again, a light shade. Then I'd be starting
from these parts. Now. We have flying to darkness, the shadings. So it would go like this and come down to these
lower areas of the back. Then I'd be erasing
this extra line. Nodes get mistaken and I'll just give my finger
in a better shape. Okay? My dear friends, it doesn't matter
which phase you're in. You should constantly
looking at your work and see wherever it
needs, any editing. You should apply it. As you move on with your
work and develop it toward the end of the mistakes and problems of your work would show themselves
more and more so, plan by plan, step-by-step, phase by phase that
you're doing anything, you should stop, wait a minute, check your work and
wherever you feel like your work has a
mistake or an error, you should fix it
and correct it. Then from behind of this
muscle will shade down. It's even easier when you
check your work part by part. And then you can edit it where it's needed or when it's needed. But if you just leave that
until the end of your work, you might face a
whole lot of problem and some of them cannot
be fixed anymore. Okay? Right now, as you can see, I'm even working with a normal pencil, even
sketching pencil. This is my primary steps, so I'm going to use
my normal pencil. But in next steps
we will definitely move to work with a
sketching pencils. Then we will work on the spine, bring it up and down
shades all around it. And I come down up to here, which is the lower part of the back end would be
connecting the waste, would be coming
back to the hips. And it is called the waste. Actually. In this area, as you can see, we have the darkest shadings. Then I'd be actually editing
these muscles over here. As I told you, you should edit your
work constantly. So I'm actually showing the muscle texture all
around my work completely. And then just like that, the lower part of the hip, the thighs, the
beginning of the thighs. Then a light shading in
these areas altogether. Try to keep it the same shade. And a very, very light shade over here
because actually know the hips are one of the most
prominent parts of the body. So they would have
lighter shadings. Then from here, I'll start dark. And up to this part of the leg, I'll be shading like this. And then I'll
darken this area as well because this leg is
actually behind the other leg. So this area between
the two legs would be the dark part of my work
because this side of the leg is actually placed behind
the other leg and it doesn't receive as much
light as we want. Okay. And this would be the
ending of the leg. Then also from this top area, I'll continue these muscles. I will shape the
muscles completely. And now my work is
done on one side of the hip. Okay. So on the left side is done and now I'm going to
work on this side of the hip. So for this side, again, I should do the same. I should apply the
muscle texture on this part of the body. Okay. And then I'll work
on this side part of the leg and obviously the
back part of the hip. Okay. Here we go. Just like this easily and Smith, just shape these muscles, shape them and shape
them same time. Then I'll shade this area a little in order to
create some more curves. In this area. A bit more curves over here. Curves and dark sides
of here as well. I've done the main part and now we are going to shade
these areas as well. This lower part would be the darkest because I
doesn't receive any line exactly like this
inner part of the other thigh. And then this would be the
beginning of the muscles and I'd be dark in them. As I come to the middle, to the center, I'll be
lighten my shading. As you can see, the edges and
neural endings are darker. And when it comes to the middle, they would be lighter because that's the prominent
part of our muscles. These were also
the waste muscles and the chest muscles as well. Which I've shaped and
shaded like that. As you can see, this part is the only part
that has been left. So first I start from the
armpit coming towards the chest with a light shade and then I will actually faded
to its surroundings. As you can see. I am applying my shadings
very, very light, lemon. My hand pressure is too light. Just to leave a trace on the paper and give this beautiful illusion
of the muscles. Just like that. I'll shake my muscles
on the arm as well. And are just shade
these areas in order to get them out of
that white color. But if you can see, I've just shaded
them very lightly. Here is the muscles
for the arm itself. And these parts would be too dark because it's the
ending of our muscle. And obviously this
area is more curved in because the muscles are more prominent and they
would be above them. So the work is done just like that very
easily and very simply. As I said before,
I'll say again, you just have to spend time
on it as much as you have to. You can see the continuous of our tutorial in next episode.
8. The end of shading and hashing: Hello again and
welcome to continue the shading of the anatomy
and the muscles of the body. Here we are actually doing the last and final shadings on our anatomy and doing the
touch ups and therefore, our work would be complete. I'll be starting with my B6
pencil because I want to add final darkness and the
final shapes over here. So I'm using my basics
pencil because it's darker. And I'd be darkening
wherever I feel like it's more needed and
very, very slider. I just go through it
with a very light shade. This would be the dark
shade being the arm. And over here again, I would have to clean this
area because the waste is dark but its surroundings should be light so we can
keep the contrast as well. Area of the back is
the darkest area. As you could see. I've just erased around
it with my eraser. And over here, as
you can see, again, I'm just going
over these muscles one-by-one and I'm shading them in organizing
them one-by-one. In order just to make
them more organized, cleaner, and better looking. Obviously, if you spend time
on the muscles one-by-one, you should have a
better outcome. Alright. I will shade
this area as well. This would be actually
behind the chest area, behind the ribs, basically. And again, over here, I would also have to shade the muscles of the
hips one-by-one, again in their own direction, create these hatches
and these shadings. Then I'll make these
parts more organized. I'll apply a darker
shade over here as well. I would have more
darkness over here. And also here. You see these dark spots, these dark shades and the lighter ones are the things that make
that contrast for us. And they are basically
showing the curves and prominent parts which gives us the volume of our whole work. I should erase this
area because I want to connect these two
parts together. Show it's one muscle. Alright. Now for these parts, I would have to create more
shadings or better say, make them more organized. And again, I'm taking
them one-by-one in order. So as you can see, I'm shading wherever I feel
like it's needed more. As you can see, I'm working
on each part more precisely. We'll darken these
parts also over here. I can even add some more
darker hatches like this. And then I can start
using my eraser. With my eraser. As you can see, I am applying some
lights on some parts. Basically I'm using
my edit eraser on the parts which are
prominent in our anatomy. These muscles are prominent, so I'll be using my eraser to erase these
shadings over here and basically apply
some light on the work. Here we go. In these
parts of our muscles, we have a little bit more light which we create and
also in this Back parts. And over here. Then again, I get my sketching
pencil Walmart time, and I will shade
these areas with it. Again. I'd be applying some touch-up shadings to my whole work with my normal
pencil later, I mean. So he can use your normal pencil to add some touch ups to
your work at the end. Then I'll come
down and I'll just apply a very general shading
all over these areas. Therefore, they would get out of that completely white color. For example, over here. As you can see,
I'm using a very, very light shadings with a very low hand pressure
in order to just give it a trace of color and take it
out that white color shape. That's it. Then I'll get my
eraser and then I'll erase all around my work, making my work completely
clean and neat. Here we go. Then I can even
use my eraser and then I can erase the extra lines or
extra things around my work. You see when you use your eraser around your
work on your background, it to make it completely
neat and clean. So you'd have a
white background. So just like that. All right, my dear friends. Now the tutorial of this anatomy sketch is
finished completely. I hope you've enjoyed it
and it was useful for you. And these are the placement and the shapes of
the body's muscles. And another thing that I want
to emphasize is that you can create these anatomies
in different positions, different angles, and
do not give up on two or three times o sketching
go over more than ten. So see you later.
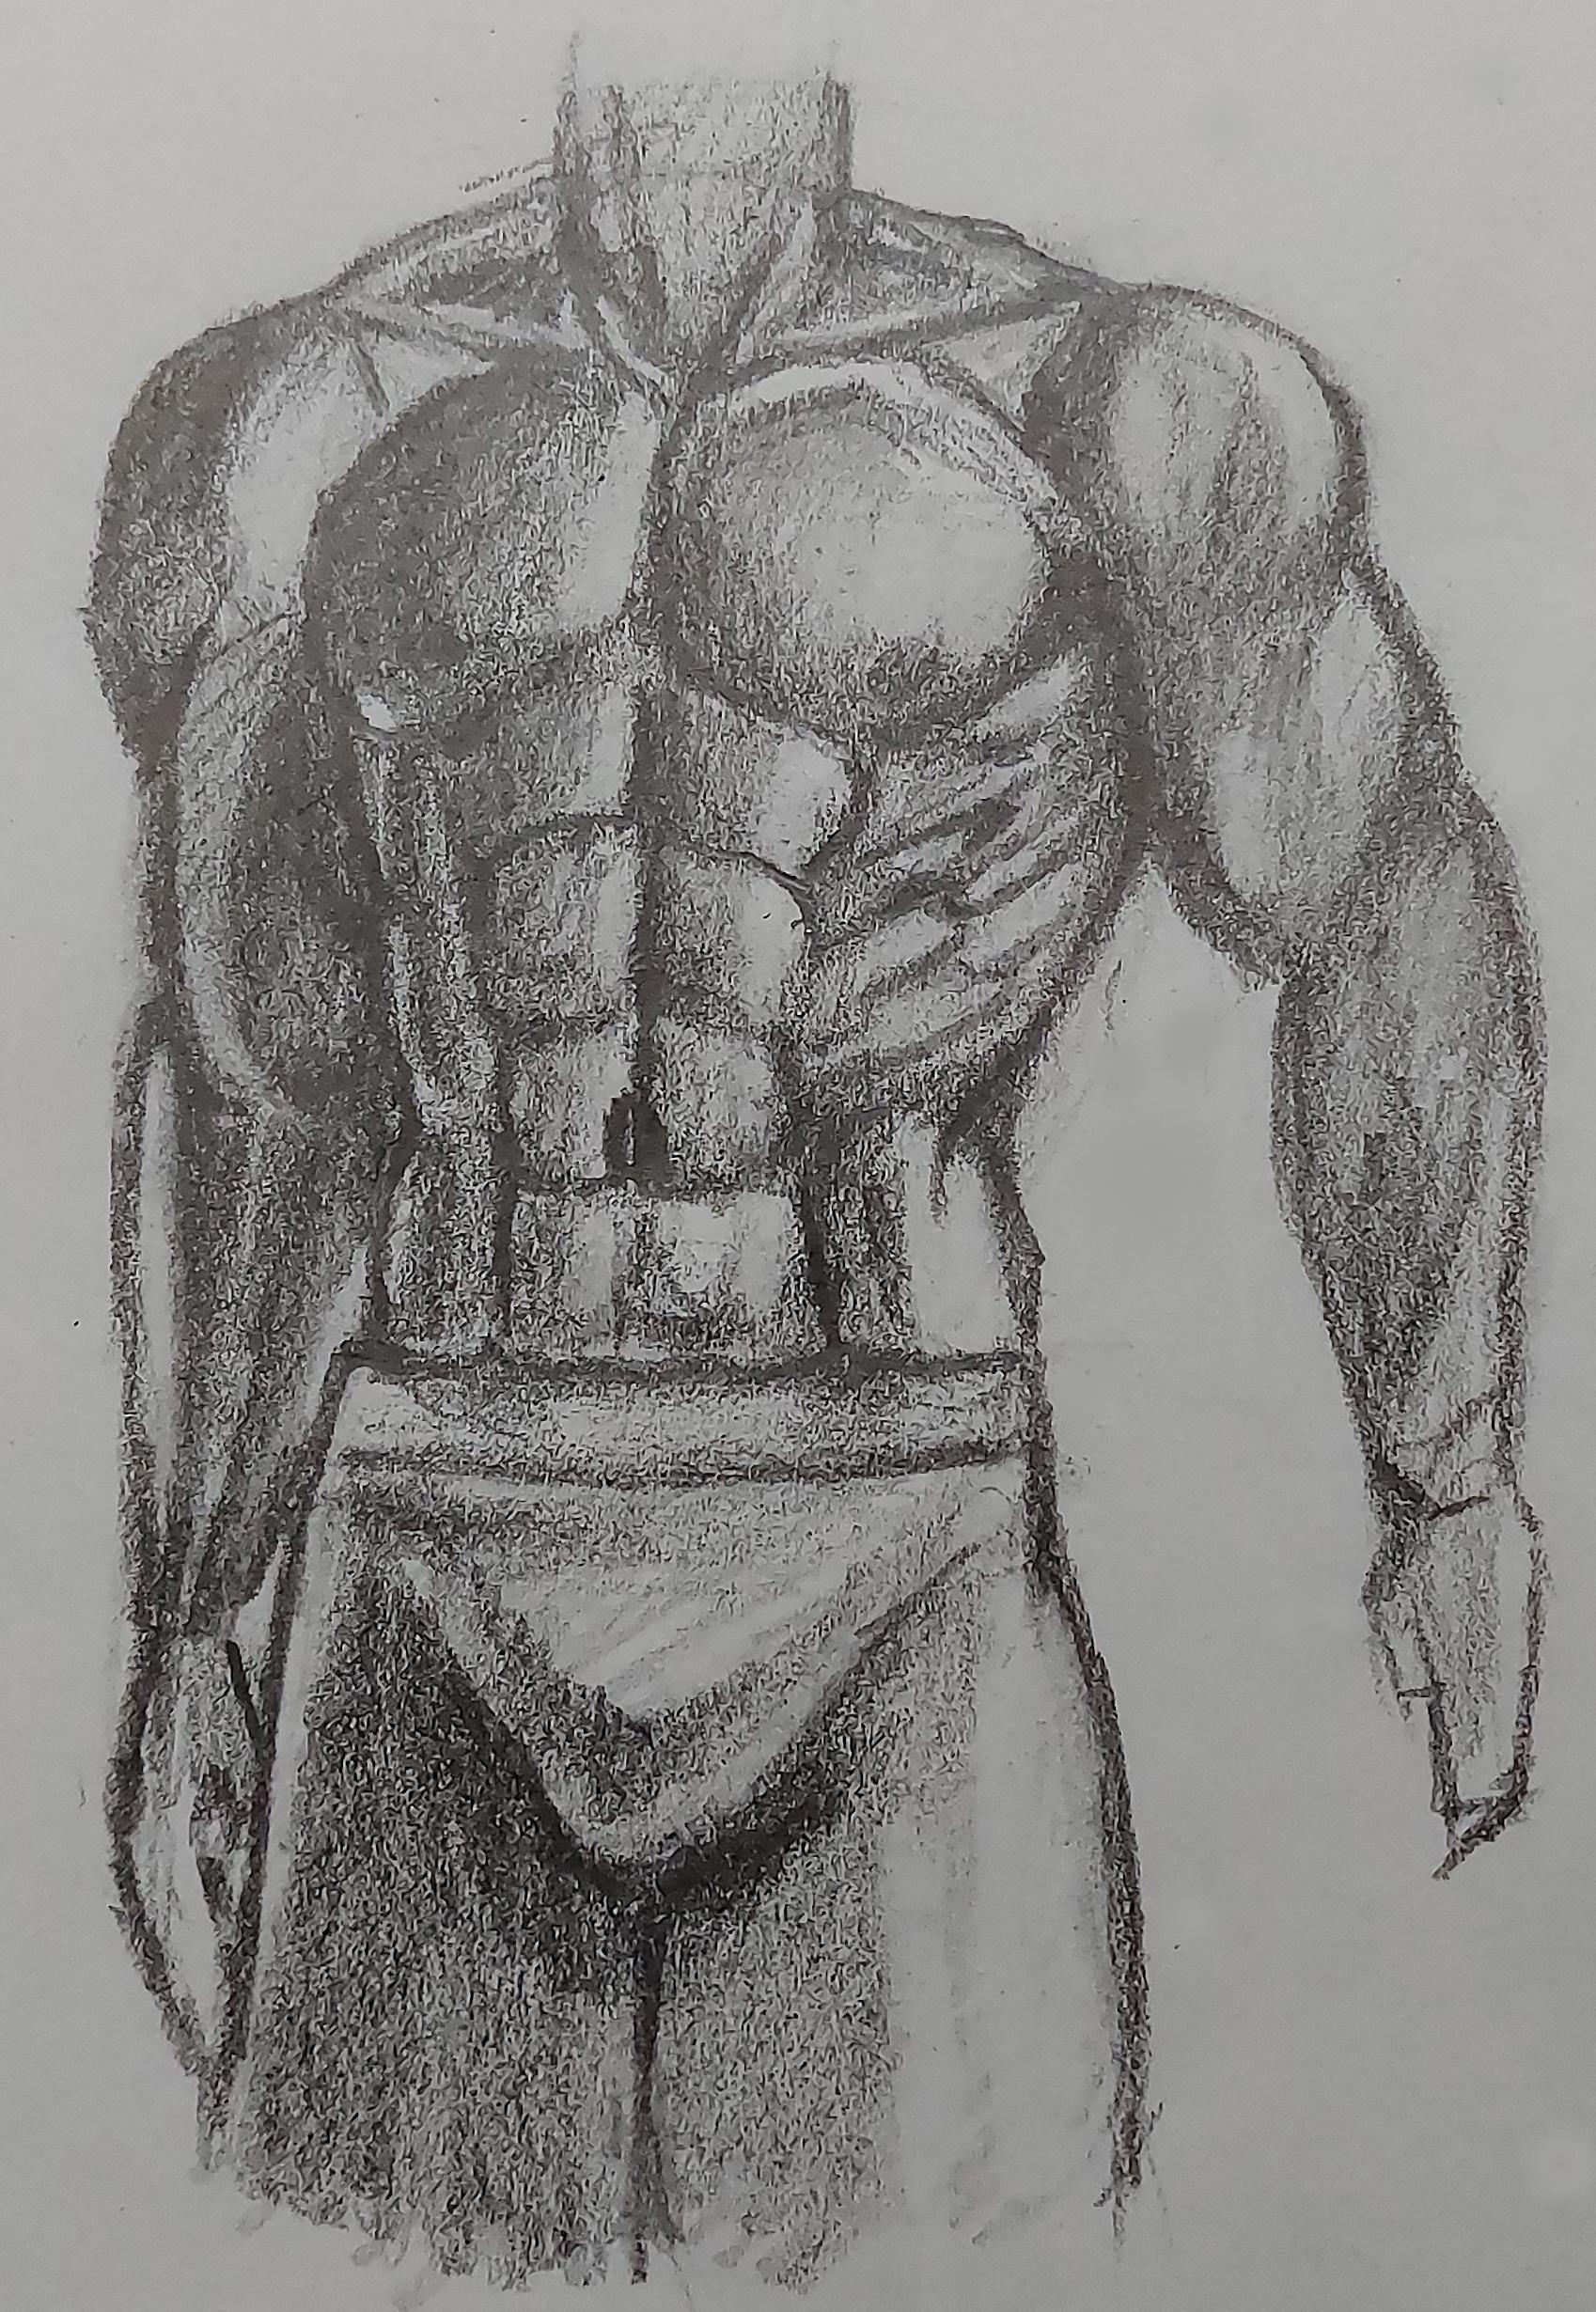
9. Figure drawing of a sportsman: Hello and welcome to another
episode of our tutorials. In this episode,
we aren't going to create a front view
of a muscular body. Basically the body of an
athlete or a sportsman. And we want to have it from
the front view this time. Okay, In order to do
that, first of all, I need to create an oval like this. So it wouldn't have may
actually do much of an oval. It's something between
a circle and an oval. Most circle. I mean, mostly circle. Then on the top of
this oval or circle, I'll have this shape, which would be the neck area. And then from these both sides, I'll bring them out, which would be the depth and
the curves on the shoulder. And then I will come down here. So this collarbone
here is made and I've just made it a bit
darker so it would be easily visible for you. Now from here, I'll
connect it to this part. You see my dear friends here would be the center of my work. So from here, I'll
create a line, almost a curved line like this, in order to give a three
phases via to my character, if it was completely
into front view, I would have to create
a very straight line, but I wanted to have more
Three Faces via therefore, this time would be a bit curved. Then from this side, I'll make a turn. We'll make a curved line. I will be coming up to here. This would be the chest area. And then I will make
it just like that. Very easy. Alright. And then again, from
this lower part, I'd be creating
shapes like this. Alright. Then from here I'll
go out like this. The sides of the body. By me just create this
line better for you. And this would be the
lower part of the body. And then over here, this side that I've created
on this side can be seen less actually because
our body is in the three phases we as so one of the sides would
be seeing less. Obviously. That's up to here. I will erase this middle line because we don't
actually need it. We just created
in the beginning, so we will not misplaced
anything else during our work. Now, I actually have to
create the abs over here. And the muscles of
the stomach area. Here we go. Just like that. Alright. And then for the shoulders and the arms, I'd be starting from here. You see, this would
be my shoulder, which I've created by a circular at first and then
I will create it like this. And then I'll continue
that to make the arm. And because it's
a muscular body, as you can see, it's a bit big and it
has all these muscles. Here we go. Just like that. And I'll do the same for this
side of the body as well. But the difference is
that we cannot see the whole shoulder or the whole arm on this
side of the body. It so that we can
not see a lot of it, but still we miss a bit of it because
it's on the other side. Up to here was the shoulder. From here to here that I've just completed would be the arm. And from here down would
be the elbow down. Like this. Here we go. Alright. Let me just
edit this part. It was done by mistake. So just like that. And again, I emphasize
wherever you think that your
work needs editing, you should definitely do it. Now, in this side
area, Let's see. We would have the ribs. So they would look like this. Okay. Then I'll bring the pants
a little bit higher. And basically I'll be
starting them from here. Okay. Here we go. Just like that. Then the neck area
is done as well. No mistakes over here. And just as easy as
that we can create our whole muscular body. You just need to research a little about the
human anatomy. Again, I emphasize
that you don't need to know each
muscle by their name, but it's good to know
where everything is. Now I want to have my B6 pencil in the hand
and I am actually going to start shading my muscles so I can get a
volume out of them. A dimension. Starting from the neck area. Here would be the collarbones
or the collarbones. Same difference and
be shading over here. Alright. Then from the center
of the chest, I will get this shape
out of its rough shape. And going. I actually got around
it with rounded lines. So it would get out of its
rough shape, would be softer. And when I start shading it, it would be smoother. Yet it would be
big and beautiful. I would also have to shade this part of my
collarbone as well. And over here, on the arms, I will emphasize on the depth on the curved
parts on the muscle. And I'd be shading them more. I mean, it's like
that everywhere, wherever you have a depth, you have two shaded more. Make it darker and the prominent parts
would be stay lighter. Okay. Here would be our
six packs on the abdominal that we are actually
creating it like this. And he has really good looking. Look at the apps. And I'll do the same
thing on this side. And I want to make sure that
they are totally symmetrical because they should be, alright. Here we go. Then these would be actually the
sides of his body. And because it doesn't receive as much light as
the other parts, it would be darker definitely. So I'd be shading it more. And you see this side of
the body is in the shadows. It doesn't receive to light. So if you want to shade
the abs and the muscles, they would be darker on
this side and as they move toward right
towards this side, day would get lighter. You see? On this side they
are darker and as I move on, I make them lighter
by decreasing the hand pressure
while I'm shading. This will gives us a more realistic look considering the light
somewhere there. Okay? So I'd be applying
shades over here. I'll consider it like that. And that's it. Okay. We want to work on this side
of our chest area. Again. We would have, you know,
darkness over here. And here we go. Then I'd be working
on the arms more. This side of the arm and the shoulder would be
darker and this part which has come forward and more in front
would be lighter. So the left side would be
almost completely dark. That's it up to here. Thank you for being with me. In the next episode, we will continue this tutorial.
10. Shading and finishing the drawing of the sportsman's figure: Hello and welcome to another episode of our
sketching tutorial. Well, you see we've worked on this figuring and this style in previous episode and now we're going to make
it more complete. See my dears, I will
erase this area little. Therefore, I can keep the shape of the
body in a best way. Then. I'll be darkening
from over here like this. And I keep darkening
from this area. The prominent part or
the bump on the arm. Bicep, you can say. Okay. I be darkening this
part of the arm. A little bit more. K side would look like this. Okay, then I can edit some parts of my
work with my eraser. And then I'll bring this part of the arm and little
bit toward inside. I mean, I'll reduce it a little. I'll put more of it
behind the body. You see, as I told you before, even in this case, you should constantly
check your work and wherever you feel
like it needs editing, you'll just take your
eraser and edit that place. I'm just going to shade
over this area generally. And then I'll use my
eraser to shape it more. Then I'd be darkening in between them so we can have
the shape of the ribs. The rib bones actually,
just like that. Okay. Now in this case, I want to get my normal pencil and I will
make the shadings smooth ER, with my normal pencil. I'll be starting from the darker parts and then I'll
move to the lighter ones. See, just like that. So when I do this, my shadings would actually
be smoother, softer. And also I'll do the
same in the chest area. Then I'd be working on
his six packs, his Apps. And that's just it.
Just like that. I went over all the
dark shading is that I've created before
and I've edit them, make them softer and smoother. Okay. Even I went through
the lighter shades too, but less than I went
through the darker ones. I would also work on his pants because we want to create
a whole character. Then I'd be applying
the darkness of this area with my
sketching pencil. Make the pants looking better. So it would be just like that. And here we go. I'd be creating the shadings and the darkness which is
necessary for this area. You see as a minute
as you start shading your work and creating these contrasts and
lights with your eraser, it will actually give you a work more dimension and it will
give it a greater volume. Then again, be using my eraser. And wherever I have
lights in my work, I'd be applying them. Basically, I'm erasing the parts which I have to create delights. And I'll give my
work didn't need it. Contrast, which will make
great volumes for me. That's the whole point. And dress like that. So I'd be erasing
around my work. And then I can shade
this area again. Here we go. And I'll be
shading here as well. Okay. Here we go. Just as easy as that you have created beautiful body
structure, or better say. You have created a great
anatomy with beautiful muscles. And you've created
them with volume, with your shadings and contrast. So this episode of our
sketching is also over. I hope you've enjoyed it and
it was practical for you. And you can practice it
and see the results. See you later.
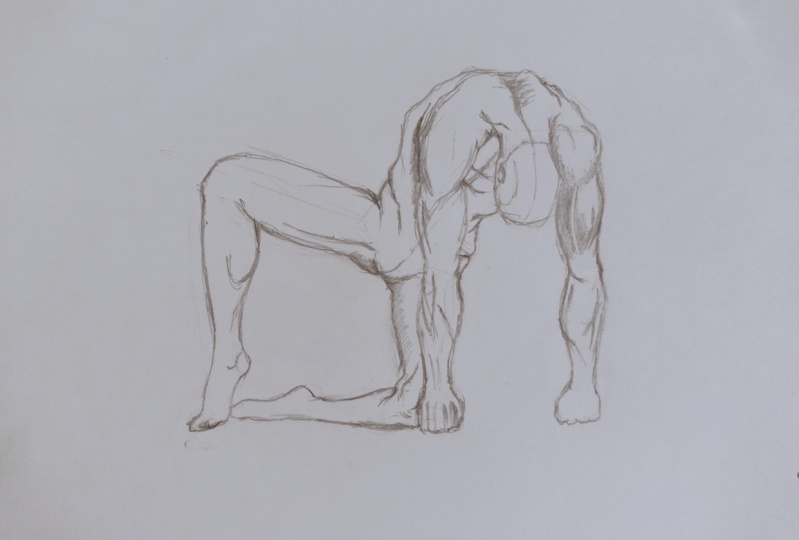
11. Sketch of a sportsman: Hello everyone and welcome to a new episode of a
sketching with me. Well, in this episode we
are going to create a very, very cool Figuring
and style, of course. Well, first of all, in order to create that, I will create a head for my character in this
part of my frame. Alright. Dad I'd be creating is
actually behind the head. So that's back of
the head and we would not see the face at all. And this area is
behind the head. And so basically it's all hair. Then from here up to here
would be my shoulders, the shoulder length area. So I would have a
shoulder like this. I'm showing it with
the circle right now. Bringing it down
to make the arms. Here we go. Then over here, I have
another shoulder, which is obviously for
this side of the body. And this would be
my characters neck. Over here. Here's the neck. Is C, dear friends, these two
where the shoulders, so from this angle
and this position, I know that there would
be the shoulders, one on each side. And then the arms, the elbows would be here. And here. We'll
have the hands in the shape of a
fist. Both of them. So you can see It's like maybe he's
doing some push-ups. And then we go to create
the back of the body. And from this part of
the neck down would be the center of my body, the central and my work. This would be his back. Alright? And then over here, it would be the same thing because the body is symmetrical. Alright. Now for the
next part of the work, let me just make this upper
part a bit better edited. And then just like that. So up to now you've understood the position than our
body is going to be in. Now I want to drag the
body toward this side. I mean the rest of the body, so I'll bring it out from here. Alright. Then this part would be the end of my upper
body part that can be seen. Now I want to create
the two legs. I want to create one
of the legs over here. This would be our knees. So basically the leg would be extending from here
towards this side, toward left side. Okay. Now this would be
the lower area. This would be at his cough. And then I get to the ankle
and I'll create his foot in a vertical shape to create the other leg like the
hands which is underground. So I will place this other
leg underground on the knees. Say my friends. You can
even only find the joints with circles and then you can apply your
work on top of it. That will be really
easy for you to do. And then from here also, I can create the rest of the knee going to
the front part of the coal fanned
ankles and the foot. Alright. Here we go. Just as easy as that
we could have created. Actually, we have created
a very cool time figuring. Now we are going to add
some details to this work. So we would be applying the muscles
on his body and bones. Alright, I'll be starting from this area, the shoulder area. Here we have the muscle of the shoulder coming
down and ending here. And from here it will come
down with a curved in. It will turn like this, turn out a little. And then very straight. I'll bring it down. Okay. Then after that, I can have 1234 fingers. And over here I can show
the fist of our hand. Alright. And it came back. And from here it
would look like this. Then we will have the shape
of the arm over here. Then for this part of our neck, we will create a line shaped like this. I'm done. I'll create the shoulders again. Of this side. The shapes are
basically the same, but they might be
a bit different because of their positions
and their sites. And this is the central
part of our bag. And I will create some
lines over here so I can show that is the center of my body and it will
have some curves in it. So this area would be the neck to going down like this. Here we go. You should be erasing
the extra lines. And over here we would have
the abs or six packs here. We can see a part of them. And I'm just going to
show the part that we can see. Alright. I'll be considering
it over here. We will have two arms and then
I'll come a bit more down. I would also be creating the fist for this
other arm as well. You'll come down
34 fingers here. And then we'll be
creating the thumb going in the back to show
the shape of the fist. Precisely. And there it is. Then again, I'd be erasing
any extra lines off my work so I can work
easier with it later. And then from here, I'll go up and I'll create the bicep, the bump on the arm over here. Just like this,
it would be over. So now we will work on application of
this area of the body. I will be creating the thighs. Going down towards the knee. We will have some
ups and downs here, so I'm prominent parts. Then it would be
curved here again. And getting to Denise. Then this would be the knee. And over here we will have
the muscle of the thigh. And this is behind the
foot, behind the leg. To call for whatever
you wanna call it. It would just look like this. And from here, we will create the leg and the
foot horizontally. Then this part of the
leg should come down. I mean, it's better for
me to start from the top. Sorry. So I will be creating the thigh coming toward
the knee up to here. It will be placed like that. And my friends, this would be actually the knee joint itself. And then we will have
the muscles over here. The thigh muscles, which
are pretty big for him. And day would look like this. Easy. Alright, then I'll come
a bit low or lower. And this would be
the back of the leg, again, back of the coal. And because it's in a vertical position and it's
pressuring on the ground. This part of our
cough has a very, very big muscle and it's been popped out and it's
very prominent. So I will just create it the way it's going to be,
It's supposed to be. Then we go to the ankle
and creating the rest of the foot event,
creating the toes. That would even help to alright, Just like that. Okay, so up to here, we could have created domain. And the primary sketch of our work are figuring
and we've created the muscles to
permanent parts and the curved parts and its
correct position and style. So this would be enough
for the general shapes, but we're going
to detail it more in shadings in next episodes.
12. Beginning of shading and hatching the body: Hello again and welcome
to another one of our episodes of
sketching and shading. Well, in this episode
we're going to do the lightnings and the
shadings on our figuring. I'd be starting with the H2
pencil and start shading from the shoulder area and dress
like Dad various slowly. I'd be applying the
shades on my work. See me do it just
really, really slowly. Rather I have lines. I will apply shadings and then I will get these
lines from notes paying, I mean, I'll get them out
of their linear shape. I turn this lines into shadings and basically I fit them
into the whole work. For example, over here, I have to get it out
of its linear shape. Alright. Now, I would also shaded surroundings
a bit more too. Then over here on the arm, I would also have
some are shadings. Just like that. Here we go. Alright. Then very, very slowly
and smoothly and softly. I'll create shadings
for my work. My dear friends, when you
want to do it by yourself, you should not do it as fast
as I'm doing right now. I'm doing it fast
so I can show you more stuff in the
time that we have. But when you want
to do it at home, you should take
your time with it. You should spend as much time
as you can on your work. Again, I say do not just keep it with creating it
only once or twice. You should do it
over and over again until you create a masterpiece. Then again like that, I would work on these curves
on his muscular arms. And then I'll just give a
general shade to this area. Alright. And this is
the elbow we have here. Will have actually
a darker shade over here for the elbow area. Because I want to show that this is a separation
part between the upper part of the arm
and the lower part of it. And they are separated
by the elbow. Over here, it has
some more darkness. And that's it. Alright. Then I will shade this
area just like that. Then from above the shoulders, I will continue the shading. Then you are shadings and
your hatches should be continuously and should be constantly going
through one another. And also they should be
very soft and smooth. You should not create
any rough shadings. And my dear friends, you should try to eliminate all the lives that you've created them with your shadings. And if it's too dark that you can not do anything with
it with your shadings. He should erase it definitely. Because existence
of the lines in your sketching actually
makes your work EBIT Ralph, and it doesn't look
good in the end. So you would have to erase them or you would have to cover
them with your shadings. I suggest you to cover
them with your shadings. The way that I'm doing
right here, see, I'm actually facing my lines
and get them out of it. They're linear shape. In order to get them right. Then I would want to
work with my B6 pencil, which is my sketching pencil. And with this
pencil, as you know, I would be applying stronger darkness and
stronger shades for my work. For example, over here, I want to apply more shadings. I would actually have stronger darkness
and stronger shades. And just like that, I'd be starting from here, the back of the head, I'd be applying these
shadings because he made some shadows and shading
on the back of the head. I would also add some more
darkness over here in order to emphasize
on this small curves that we have here and also be separating the small
prominent parts that we would have there. Then I'll just get
a darker shade. Just like that. And then put a slight distance. I will shade over
this area again. I would also consider a curve over here which has
been curved in actually, then another shading
for this area. Then it would be all
done in this part. Well, if you actually, if you cannot fade these lines through
inside of the body, toward inside of the body, you can fade the lines that you create toward outside
of your body. The way I'm doing right here. Right now. It's
actually even easier. Una just like that. It will be faded. I mean, they will be
faded and there will be no more lines visible here. Then I will create
some more veins and muscles on this part of
the arm below DL book. Alright. Then I will move up and keep applying these
shadings and these darkness. I'm actually increasing
the darkness over here. I would even go on, you know, the wrist area. And that will be it. Okay. Here we go. In this way. It's really easy to do
just you just have to take your time with
it and be patient, be careful with the
placement of the shadings. And that's it. Just as easy as that you can get what you want. Again, I choose my H2
pencil and I will fade all these shadings
and I will make all those shades to softer ones. I make them softer and smoother. My H2 pencil. When I run it over
them once more. Alright, then I'd be
adding the darkness from behind my figuring
from behind my character. Choose a background. And would be dark. As dark as you can see here. Making your background
darker would actually make your
work to pump out more. And it would make
it look better. And it will create that
beautiful contrast that you want to show the
dimension of your character, to show the volume of
your character and also separates the body parts
from the background. So it's really recommended, is highly recommended
for you to do that and do not forget about it. You can just turn your
work upside down, can just turn it
into another level. So do not forget to do it. Alright. Now I'm going
to use my B pencil. I be applying some strong, some very strong darkness. In some places you see wherever I can see very, very dark parts, like over here behind in
the back of the head, which we can also show
our model's hair. These parts are too dark
and I'm going to show this great amount of
darkness with my pencil. Here it is. Alright. Now we've created the
shape of our model's hair. I mean, we've created
a Harris soil for him. And you can see I've darken it, went my pencil, the dark
pencil that I've chose. And now you can see the whole Harris style
shades beautifully done. Then you'd be also using your eraser to create some
more hair lines as well. And that's it. Thank you for being with
me up to here and you can see the rest of the
tutorial in next episode. So stay with us.
13. Drawing the muscles and continuing to shade and hatch the body: Hello to all of my dear
friends and welcome to continue all of the
rest of my sketching. And we're going to
continue the shading basically in this episode. So I'd be darkening
this area even more. And I'm working
with my B6 pencil. And also from here
I'll come down. I just create these
remarkable shadings and I fade the lines. At the same time. I mean, basically fight
them into my whole work. And then I can even
use my eraser. And I will erase some
parts literary because I want to create the veins
on his hand and arm. Then I'll be darkening
exactly around the edges of the parts
that I've just erased. So I'd be shading all
around the edges. This way I can create the
veins appearing on his arms. And then I would also
darken some parts of it. Therefore, I can
give more volume to these veins coming out
and popping off the skin. Alright, I'll be
continuing my work with my B6 pencil the
same way, mostly. And I would also have some
more curves over here and some spots on his actual
hand and even his fingers. Alright. Now, I'd be working on the rest of my work. I mean, I want to move on further work on the
other parts as well. Okay. Let's just fix this area first and then I'll tell you again. Okay. My dear friends, I'd be putting paper over here under my hand so that when I want to work
on the rest of my work, my hand would not be dragged on my previous work and it would
not make my work dirty. So that's why I have
placed a paper underneath my hands so I would not get my previous work
dirty. This way. I can easily create the
risks of the shadings. I will create a
darkness that I need and be fading the lines and dress like that. I can work on the neck area. This curved part, right snake sue my models
is spine on his back. I will actually make
it darker to show that it is a curved part. Alright. And obviously over here where the neck
meets the shoulder. In this position, we would
have a curved area over here. Therefore, we would have
darkness and more shapes. Alright. I will
continue my shadings. Then over here I would have a curved shape which
shows a muscle popping out. Okay, then I'll be shading
toward this side from this line to dive created
over here in order to fade it and get my
shadings correctly. Then I'll get my H2 pencil
or your normal pencil. And then you can go over
your shadings and make them more cohesive and softer. Blending all these shadings together and blending
the lines into the shadings that will make your work look much more better. It'll change it so
quickly as you can see. Then I would work
on the shape of the arm or the top
part of the arm. Then with my B6
pencil, I would apply. Some are shadings over
here where the distance, again, I'll be starting
my shading from here. And also over here. And as you can see, I am shading in
specific directions, which shows the direction of the muscles being
placed on the body. Then I can continue to
shading on my work. Here we go. And then when a normal pencil or
an H2 pencil, again, I run over all on
my shadings so I can make them all
cohesive and smooth, ER, as I told you before. Alright. Now I want to work on
the lower area of that, a bit lower from here. And I just keep it like that. I will get my shadings actually on the
back of the arm and leading to the
armpit and a part of his back leading to the
chest and his waist. I'm just shading very generally. And because it's facing upwards, it is facing the light so it won't be too dark. As I move up. We just have one darker spot on the armpit area and another one over here
around the waist just to show the wrinkles
on his body because of the position that
he is in. Okay. As I told you, we
will come lower. And from here on, this would be my
characters elbow. And moving down. Bring one straight line down, almost straight up to the wrist. And from here again, I'll be shading and coming down. So here we go. We're practically following
the same procedure as we've done for the other
arm and day out our hand. But just some directions
of the shadings and some placements of them
would be a bit different. So we are doing it like this. Also, we have some
curved parts over here. This part of the arm
has been curved in. So we are going to
shade it a bit more. Even going onto bicep little, the front part of the arm. And then come over here again. So now I'll take my normal
pencil or my H2 pencil. And then I run over
the shadings I've already created in order to make them more cohesive and make
them look better, prettier. And of course more realistic. Okay. Then I be working
on his wrist as well. And then we should also
move toward the fingers, shaping them and shading them simultaneously. Here we go. And over here would be applying a general shading
just like that. And then from here, I'll go like this. I'll move on and grab my eraser. Then with that, I will
create lights on some parts. For example, these areas
or these parts over here. And maybe even there. Okay. I am creating
these lives forever. I need to, again, just like the previous arm, the other arm, we are going to create veins out of
them on the muscles. So you know that after
you've created these slides, so you have to go
on the edges around them and shape them. This way. I can create the
veins popping out. Very simple and basic. You just have to take
your time with it. Again, I say do not
rush through it. Just be patient and be precise. Therefore, you can create
beautiful sketches. Here we go. You can spend less time on it, but be sure that your outcome
would not be as pretty as the time that you will
spend more time with it. And as you can see, I'm just getting my lines
out of there linear shape. So basically I am
fading them and blending them toward
inside of my work. Not forget erasing some parts, creating my lights.
And that will be it. Here we go, Here we're done. Okay. Now we are moving
to the other parts, which is actually
the upper body part or the body part c from here. This would be the ear. I would not work on it so much. And I'll just shade
it generally. And starting from here. So in this area you
can see his abs. And I just create a
general shading for it because it's actually under the body and its source
visible too much. The shadings are not
visible as well. I mean, not as well
as the other parts. So it would be dark mostly. And we're just going to
shade it cohesively. And we're just going to create some darker lines
in-between them. See, just to show his abs. But basically again,
I say because of the position of his
body and the fact that his bending over on the
front part of his body. We would not see
much details in it. Then I can even get
my editor eraser and create several
lines over here. Are ever, I think
they're needed mostly on the top areas because that's where the
light is hitting Kim. He does look like
a Greek goddess, and he's a great God. I mean, you can create
these beautiful enemies for any character that you want in any
position that you want, if you learn it in
the basics like this. Alright? Now I want to work
on the right thigh. I be starting from here, the part which is between cuts between the
hand and the background. Then I'll be using my pencil or my normal pencil to
shade this area. And then from the corners and
basically from the edges, I'd be doing my fading for
the lines with my B6 pencil. Then I'll use my edit eraser to lighten this area up a bit. And then again
with my H2 pencil, I will apply
darkness in my work. Over here. I like this. I just keep in
mind that I should go into correct direction
of the muscles. This is very important
when you're shading. Alright, and also
from this lower part, we would have to continue the same way because
it's the lower part of our work and the darkness
would definitely be more here. I mean, I would apply more darkness and
more shadings here, so I'd be continuing
like that for now. And then later IB
even detailing to shadings as I did for the
arms and the upper body part. Then I get my B6 pencil. And first of all, obviously, I'd be fading all the lines that we have over
here because we don't need any lines
in our sketch. And I would also
create this shading, create this dark
shade over here. So I can show the
fact that this arm, which is in front of this leg, is actually applying
some shadow on it because it is
placed in front of it. So it would have a
shadow on the leg. And that's how I'm
showing it with my dark shading
around the edges. Then I'd be fading the
rest of the lines. Just as I supposed to. Then that will be the
darkness for these parts. And over here, the thigh
itself or his crunch. Okay. Then I'll come to
the lower areas. I will get to the knee and
I'll shade it like this. You just have to follow
the way of the shading. And you say this would be
the lower part of the leg, which is basically
on the ground. So it would be really dark. And over here we have
the foot and the ankle. So I'd be shaving them to alright. Got to the cove. And just like that, I'll shade the lower part of the leg and we'll
get to the foot. This would be actually
the prominent part of our leg which receives lights. And it is light because it is. And we want to emphasize on
the fact that it's prominent. And then I'll get my
H2 pencil and I'll go over all the shadings to make them smooth,
ER, and softer. Basically to blend
the whole thing into one another and
make a cohesive shading. And as I said before, it just gets your work
to another level. Alright, Here we go. Then at last, I have to start some darkness creating over here to create a dark
background for my work. And I want to separate my character's body
from the background. And as I said before, this contrast gives
it a better look. So I'll just continue
this shading until I'll have the
background blocked. Because see the rest of the
tutorial in next episode.
14. Completion of the sportsman body design: Hello and welcome back to
the rest of this tutorial. Let's go and complete
our work altogether. So if you remember, we were dragging these shadings
toward this background, a space over here, and we were darkening it. Therefore, we will
actually separate our main character and main style and figurine
from its background. And at the same time we would create a beautiful contrast
and our character, which show itself
a lot more better. Okay, that's enough
up to here now. And then we are going to
work on the left leg. So again, I place another
paper over my work. Therefore, I would know
it's dragging my hand accidentally on my previous
work and make it messy. I'll be using my H2 pencil and I will shade the
areas that I need. Just like this. I'd be shading. Shading. Again. I remember
that I would have to keep the shadings into
direction of the muscles going. It will have some
stretch over here. They'll make it like this. And here it goes. Okay. Then I'd be applying
a general shading for over here for this thigh area. Actually it's the
lowest part of the leg. And then from here, I would apply this
shading a bit darker, not too much, just a tad. So here we go. Again. I'll be using my H2 pencil and actually make all of these shadings cohesive and
blend them all together. From here, from these parts, I go up and up again. Alright, so I'll just
follow this procedure. The same process. This is actually the prominent
part of the knee itself and this would be just
below this prominent part. Therefore, it should be darker. So I'll be starting my shadings from the part below
the prominence. And then I will move up toward the prominent
area of the knee. And then I'll shade it
from dark to light. Then I'll come to lower areas. And from here I'm using
my sketching pencil, which is B6 pencil. And I apply some dark shades, especially over here in the back of the leg. Okay. So I'll just have
a general shading. And then from over here, we continuing. We will have the food itself and we'll just continue
down to the toes. Again. I pick up
my B6 pencil and creates several small curves and several small
prominent parts. And I'll be working on all of them altogether. Okay. So I would also have to do
some shading over here. These curves on
the lower part of the leg going like that. And it will be done
just like this. So here we go. Okay, my dear friends, we should also work
on his clothes. I mean, a part of
clothing that he has. It should also be shaded. So I'm just going to do it. And as you can see, I'm also creating
wrinkles on this part of the clothing and just dragging it into the right direction,
creating these lines. And then I'd be shading these lines and blending
them into the whole world. From the lower part
of the clothes, we will form the lower part
of the shorts better say, shade towards the
thighs and the leg. And from here we will be shading toward inside
of the shorts. Alright. We will work on the
background of our work. I'll be using my B6 pencil and
I'd be starting from here. I'll start from all
the surroundings and all around the edges. And I'm actually
doing a tonality. I'm starting from a very, very dark color
and as I move up, I will bring it to
the light color, actually to the lightest color. I'm creating the color palette. I'm starting with one and
I'm finishing with 12. From the darkest color, moving up to the lightest one. This will make my background. Just like that. We'll actually
apply all the shadings completely all
around our character to complete its background. And here we go. Again, I emphasize creating a dark background
for your character. Make St. Paul out,
makes them separate. It makes him be separated from the winds pay per
hour and the background. And it gives it a great
contrast for you to look at. It'll actually make the
volumes look better. So highly recommend it. And I will just go behind the
shoulders as you can see. So here we are. Just shade all of this area. K, This part has
been left untouched. We've actually done
it before a little, but it should be done more. So just gonna do it right now. Extending the background shapes. Here we go. I'll get my B pencil and wherever I
think I need more darkness, I'll go around and I'll apply this darkness into those parts. So here we are. Wherever we lack any
darkness or any shadings, a stronger shadings
wherever we need them. We can apply it with
our b 12 pencils. So here it is, going all around it. Okay. Here we go. I work is almost complete. I'm just doing some touch ups. You can do too. I hope you've enjoyed this tutorial and it
was practical for you. See you next session.
15. Quickly draw a figure of a man with a clothing: Hello everyone and welcome to another episode of a
sketching with me. In this episode we're going
to create a figure in, of a man who is sitting. Alright, this tile and
figuring I want to create, we start with the head and this would be the shape of
the head over here. So this would be the neck
and then from Nick down, we will have a sideway body. I mean, it wouldn't be
straight, sideways. Just like this. Seeing my dear friends, I'm doing an angular. And from the waist down
it would look like this. This side of his waist and
his back is bent a little. And over here we would have him sitting and there goes the legs. Over here. There are some chairs that
I don't want to create now. Okay. This is the head. This would be actually the
neck as I said before. And here would be the collarbones and
the side of the neck, and these would be the
shoulders and arms. Over here we can have chest area that would look like this. And they'll continue up to here, which is actually
making the stomach. Then we'll have the
knees over here. There would be a shape and
placement of the knees. Show. That will be it. So this would be actually the knee
which is closer to us comparing to the other
knee that we've created. So this name would be bigger
comparing to the other one, we'll create the
pants as they are. Alright. You see how easy I'm
working with it. You should do the same. I mean, you should
do It's leaner and very simple at first. Then as you move forward
in a linear way, I mean, as you progress
it and work on it more. Your work which show itself that where you should
bring your work up or where you should
bring any parts lower or move them anywhere. So this is one of the
simplest ways to work with, and it's really easy to
work with the linear way. So now we want to
work on the arms, that will be the shoulder
here we will have the elbow and I will be actually creating the shoulder and the arm connecting
it to the elbow. This would be the
upper part of the arm. So just like that,
real apply it. And then we will
also have to create this shoulder and this arm. It's real shape over here. Going down to the
elbow and the wrist. This would be the wrist and hand itself that we will
work just like that. Okay, So this is actually the general
shape of a sketching. And this is our
primary sketch with the linear way
from our figurine. And now what should we do? Now we should do the
editing of our work. It means that from a sketch, actually from a primary
sketch will make it into a complete
drawing and sketching, which is also organized
and ordered pretty well. Alright, so I'm gonna take
my B6 pencil and then I'll start sketching with that
from this part of the neck. I be starting in this way. Then I'll be shading
this part of the neck. Here we go. Then I'd be shading
these stones just below the neck in this way. Okay. Then I'll have
the shoulder and arms. Oh, there. And then this side of
the arm which is a little bit more fill
down comparing to the other side of our arm. I mean, comparing to our
other arm basically. So it would look like this. Alright. Now for this area, I will have to create
these lines to create several wrinkles on his clothes, on his top to show the
waste and the chest area. These would be the chest. And I'm just shading
it very easily. Here would be the
dark area of my work. The dark hair better say. So. That would be it. Be shading the arms completely, looking like this. So Here we go. I'll be shading wherever
I feel like there is needed or based
on the anatomy, wherever I know
there is a curve, destroying the muscles
and any ups and downs. Then I'll move on
to this outer arm. Again, we will shade the
parts which are curved in and we leave the parts
which are prominent. Lighter. No2 lives. I mean, we don't want to leave
any part to white, but we'll just
keep them lighter. So here we go. Alright, now I can
work on the pants. So my dear friends, creating the figure
in with close is always easier with
creating a nude figuring. I mean, if you don't
have clothes on, you have to create all
the muscles. Exactly. But if you want to
practice and when you want to start creating the
fingerings and styles, I think it's better
for you to start with the models that
have clothes on. So it would be easier for you. And then you can
get a hand of this and then you can move on
to become a professional. And then you can use
didn't nude models. Here it is. Just this way. Being working on Japan's
and also on the boots. Here would be done nice. Alright, then I'll be erasing
all these extra lines. This would be the
chair his sitting on are basically
he's sitting area. And it would look like this. So here we go. Okay. Alright. So this is this figurine. I mean, we've
practically created it. I hope that you would like it
and it was useful for you. So that said, I've
enjoyed it a lot. And it was really easy considering that he
had cleared zone. So practicing and take
your time with it. Don't rush through
anything and have fun with the things
that you create. So I hope you enjoyed
it and see you later.
 Amelie Braun, Artist & Cartoonist