Transcripts
1. Introduction: Y Hello, A, welcome to create a beautiful pointteristic
statue in Procreate. I'm Simon Foster, and I'll be
your guide for this class. I've been a
professional designer, illustrator for nearly 40 years. I've done graphics for
worldwide number one games. I've worked with top businesses. I've worked with scientific
laboratories, you name it. And I also have several well regarded courses
on Procreate. Now, in the previous Skillshare
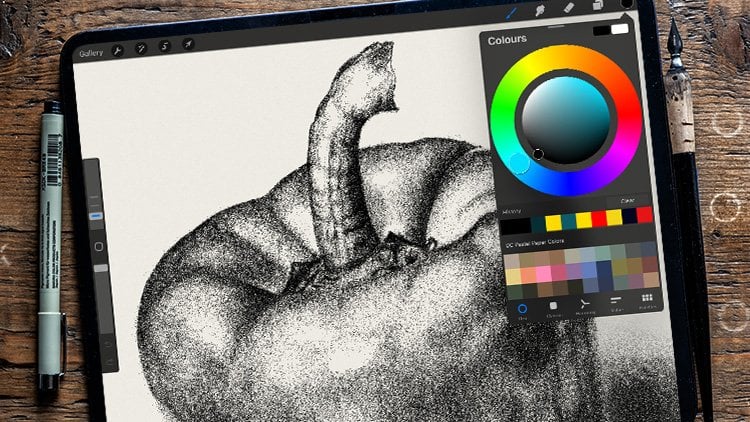
class about pointism, we created a pepper. I gave you a brush set, and we covered plenty
of basic techniques. While in this class,
where we create a statue, we will go over those
basic techniques again. But now we're going to start adding some more
advanced techniques. We will take that
jet of dots that will come flying out of the
end of your Apple pencil and we'll learn to control them in a number of
different ways because control is key with these
never seen before techniques. We will control those
dots using selections. We will control those dots
using clipping layers. Will control those dots
using layer masks to create a great pointistic
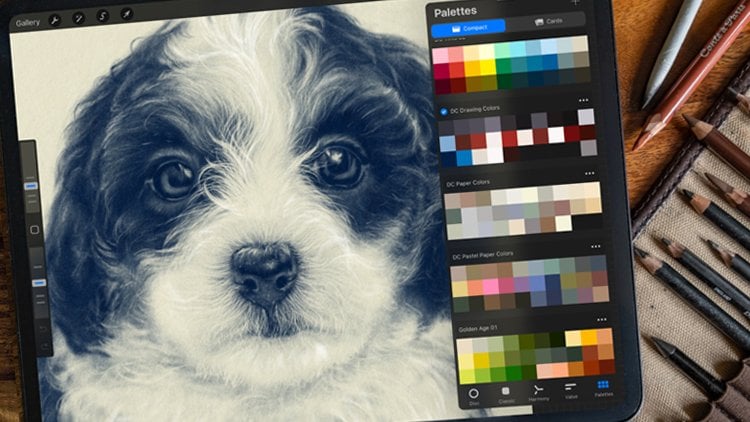
picture of this Greek statue. This class is aimed
at beginners right through to more advanced
procreate users, and if you're new to procreate, I do explain things
as I go along. You need an iPad,
and ideally you need an Apple pencil and
a copy of Procreate. And what's going to
make this class work for you is I teach you
techniques that you can use to create your own
pointistic masterpieces that you can upload a Skillshare so that other people can
admire your artwork. But also to create
poinsm artwork in hours instead of days or even weeks using
traditional techniques. Now, that's got to
be worth your time. So if you're ready, let's
go on to the next lesson. Let's download the
various resources that will come with this class, and let's start making
some beautiful artwork. Okay, I'm Simon and I'll
see you on the class.
2. Set up our Hair: Okay, so I know I
gave a big speech at the end of the previous
video about how I was just going to work and maybe you could watch
and follow along. But it suddenly
occurred to me there is another technique
I can show you, which is going to help
speed things along for you, especially because now I want to take a
look at this hair, and that is a very
complicated job. And I think trying to do
all of that fine detail by using the selection brush is not really going
to be workable. So I'm going to show you
another way to do it. Let's come to our layers panel. Layer seven. I'm not going
to merge it down just yet. I don't particularly
feel the need to do so. But what I am going to do
is create a new layer. I will rename this layer
to what shall I call it? He fine deto. And I'm going to rest my
finger on it until it pops up, and I'm going to
drag this down so it is underneath the
start here layer, which is the layer which has all these initial dots on there. Okay, so next thing
I'm going to do, I'm going to choose
a loud color. So, I mean, classic.
Let's try something here, I'm not going for subtle. I need this to be
very clearly visible. Now I can choose
any brush I want, but I need it to be
a fairly solid line like hot blocker in it that
can do the job for me. I'll take down the size of it, and I'll make a couple
of strokes like this. And yeah, I think that
could start working for me. Now, I need to come in. Luckily, I did a fairly
extensive sketch here, and so I've got a good idea where the various
different dark areas are. And let's take a look at this one right here, for example. So where's that? It's
about here, isn't it? And now what I'm going to
do is I'm going to come in and I'm going to
paint this area here. Even that is not
quite bright enough. Look, I'm not going
for subtle here. Let's go for eyewatering
yellow. Sorry. Sorry. Nice, bright, sunny
yellow. I come here. And wherever I can
see a shaded area, I'm drawing in the
area like this. Now, you can see I've gone
over. I don't mind going over into the shaded
area. That's fine. But in one or two places, that's just a little bit
too blobby for my liking. So I will tap and
hold on my eraser. What eraser, I think you
might call it in America, I don't know. We say eraser. And because they did
a long tap and hold, I get the same brush, the hard blocker inner. And I make my brush size
a little bit smaller. It's still on 100% opaque, and I'm just going to
refine this area here, so it comes to a sharp point, like I can see in the picture, and it kind of curves
around a little bit. Come back to my paintbrush and bring that
round here as well. I'm also going to come
to my smudge tool. And for this, okay,
let's choose DC dotty, which is the brush
you're getting. And I'll go for DC nice buildup, set fairly small and
the opacity about well, somewhere around
the halfway mark, so it's not too intense. And I'll just come
and maybe just smooth that edge just
a little bit, in fact, even smaller and
more powerful and just smooth that edge a
little bit like this. Then maybe come
to my erased toe. And this is what
I'm going to do. It can be a bit difficult to see what you're
doing sometimes, but I want you to come around, and wherever you can see what can reasonably called
a shaded area, I want you to paint
that area in like this. Now, we can further refine what we're doing
later on when we come to the next stage
of this operation. And if you know anything
about Procreate, you'll know the tool
I'm about to use. I won't say what it is just yet, but I want you to go
around and do what I do. Wherever you see shaded
areas like here, I want you to put in
whatever colour paint you're using as long as it is bright and loud enough
that you can clearly see it. And what I will do is fade out and fade back in again
once I've done this.
3. Meet your new Brushes: Okay, here we are.
We've got the file I was mentioning in the
previous video loaded up. Look, we'll start off simple. We'll just use a
simple black color. So come up to your colors. You will probably
start out with a disc. If you've got that and you have a different
color like this, just drag down into the bottom
left, well, the bottom, because for this exercise, we'll just use a simple black because most pointerlistic
pictures are black. Personally, I prefer to
use the classic tab. I just find that square a
little bit easier to navigate, but whatever you feel
comfortable with. So let's come up
to our breath set. DC dotty. Let's take
a look at this. Well, we can do it from
the top downwards, I suppose, but I've given
you this DC pointed line. I I draw it, there's our line. I've included this brush for
the sake of completeness. It's just a continuous line, but I never use it
on this course. Now, if you come over
to the left hand side, this is our side slider. This at the bottom is
our opacity slider. For everything on this course, I've put opacity on 100%. It's always full opacity. For the size, every single
brush stroke I make on this course will have
the brush size at 3%. And if I choose, say, let's try DC
medium scatter. And that little dot you're
seeing is just because I'm using a mouse so that you can see where I
am on the screen. But as soon as I put my pen close to the screen,
it disappears. And can you see that
hopping around? If I do a quick spray, the that's the brush
stroke I'm getting. And if I zoom right close
and personal with this, that spray is made up of lots
of little dots, 3% size. If I take the size of
something like 20%, the dots get a lot bigger. Some styles of pointism do
use different sized dots. Most don't the same dot put down in different
concentrations on your page. So I will tap with
two fingers to undo that and bring this down to 3%. No, you can see, I have
these little notches. Sometimes when you
export a broset and then you import them
onto another iPad, you get to keep the notches. Just in case you don't
me show you what to do. I will come down to my 3% notch, and you see that
little minus sign in that little squared dialogue
box that popped up. If I tap on that, I'm going to get rid of that little notch. But look, if I come
across in my pen, that dialog box disappears. I wish it wouldn't tap again, move across with a
pen. It doesn't work. So, tap, I'm right handed, so I'm holding my pen
in my right hand, so I'm going to bring any finger from my left hand and come and tap on that little minus sign and the notch goes,
so I can move around. And if I want that
3% notch again, so I bring it down
to its 3% there. Again, hovering with my pen over that notch and with a
finger from my left hand, tap on that plus sign,
and you get the notch. Just for the sake
of this course, I suggest you go through the various different brushes
we've got and notch at 3%. You only have to do it once. That is all of them apart
from the two at the bottom, DC nice buildup and
Hard block at inner. Those are utility brushes that are going to help us,
and I'll show you how. So if I just quick
pinch in to size my canvas so that it fits on the screen, let's
go through these. Now, I've already
done DC pointy Line. That is a line like this. If I come to DC pointy one dot, I am going to zoom
in again for this. This, I suppose, is your
classic pointistic brush. If I just tap, Listen, That's putting down dots like this. And you can see the denser
I put them in together. The deeper the shade I'm gonna get when I start to zoom out. You can barely see
it. Okay, again, on this course, it's there
in case you need it. But if you drag it
along, eventually, you will get a line of dots, but look, you can hear this. That's me tapping
down with my pen. I never use that on this course. I do use the one underneath it. Sometimes DC pointy
Line broke one. Let's take a look at that
and zoom in a little bit. If I place this next to that continuous
line that I just drew, you can see the
line is different. It's a line, but it's
made up of a whole series of these dots pad quite
closely together. And if I come to DC
Pointe line broke two. Again, it's a line, but
those dots are just a little bit further apart and just ever so
slightly scattered. Look, if I do this and I hold and I draw
around like this, that is procreate giving
me a straight line. But you can see the doctor
ever so slightly scattered. That is because, well, the way the human hand works, you're likely to get slight scatter variations in your line. So this brush is emulating that, and if I come to DC,
point your line, broke three, again,
the dots are a little further apart and a
little bit more scattered. Now, if I come two,
ask scatter brushes. DC very light scatter. Fady light scatter,
DC light scatter. Again, it's a light scatter, but it's a little bit
denser medium scatter. Now we're starting
to get the dots more densely packed together.
Dance scatter. Yeah, that's a lot of dots put
down all at the same time, DC Very Dance scatter. Well, you can use this. It creates a very dark effect very quickly, and if I zoom out, when you go out beyond
a certain point, you don't see the
individual dots or you don't notice the
individual dots. What you start to see is
areas of tone instead, and that's what we do to build up the different
parts of our drawing. Now, the one at the
end, DC wide scatter, this scattered dots over
a fairly wide area. That's so you can cover
large areas very quickly. But also, look, as with
all of these dots, you make repeated
brushstrokes and you gradually build
up the density of the spot in a certain
area like this. But keep on going, keep on
going and keep on going, you can see if I zoom out again, I'm starting to get an area
of toner from light to dark. And typically, what I would do here is I would come to, say, dense scatter just at
the bottom end and put in some thicker brush strokes there I might even come
to very dense scatter in the later stages of my
drawing when I put in a lot of tonal areas like this. But if you take a
look at this, well, you can see that
would take me what an hour to do if I was going fast using
traditional techniques, you've just seen me do this. In what a minute or two. Just think of the time
you can save here. But it's not all hooray. Isn't life brilliant? Because these brushes, which
work well by themselves, they don't place dots.
They spray them. And supposing I
want a hard border, 'cause sometimes I'll
need a hard border. Well, in a sense, this course is all about how to control that spray of dots, so you get the speed, but
you also get the control. Just very quickly,
let me show you this. Instead of coming to
our brush library, we come to our eraser library, which is, Look, it's
the same brushes, but instead of
putting down dots, we can use them to erase. Like, for example, if I come to DC dense scatter here, Again, set 3%, and I come
to this area here, I can start to take
out brush areas. Now, in general, it
can be easier to put down dots than it
can to arrase dot, and I'll go into that more
on the course itself. But I also have these
two brushes at the end. Generally speaking, that's
what you'll use these for. DC nice buildup set to
100% opaque always. And you can use
this to just take away Brushes around the area. It is a fairly soft brush. As I do a few more times. But the one I tend to use the
most is hard blocker inner, again, set to 100%. And with this one, look, if I come to this area
here, what am I set on? Okay, let's try 7%. If I press lightly, I
get a very hard area. If I press hard, I get
a very large area. So it's very responsive to
the pressure of your pen. Now for this, I'll use
it on part of the side. It is good for getting rid of large areas especially where the dots aren't that
densely placed together. But if I can zoom right up
close and personal with this, if I do it on this area here, you can see it creates
a very hard border. It's either on or it's off. And when you're doing
a pointlistic drawing, you tend not to have
those hard borders. So that doesn't quite
work because it's almost like it's cutting
halfway through some dots. So the way I would tackle
something like this, I would maybe use
it to come down to just the very edge of the work that I'm
doing like this. And again, you can see that's looking a little bit unnatural, but then what I will do is I'll come back to
my brush library. And these DC pointed
line broke one and broke two and broke three.
Pointed line broke one. Let's get that. We're
using it as an eraser. Again, it must be on 3%. And if I come and you can see my cursor wobbling around
there, if I come here, that slightly broken
line can help break up the hard line I've just created if I come to TC
pointed line broke two. This is going to
work even better. Now, look at that. I'm just
trimming along the edge. But because I'm putting
down a series of dots, and I'm repeating brushstrokes
in one or two places. I don't get that ruthlessly
hard line that I get. With hard blocker inner. Instead, I can make
that dark border look like a series of dots rather than Somebody created that edge by hacking away
with a pair of scissors. And the only thing I would say on this is that, look, yes, you can erase, and
often you will have to. But occasionally, if I can
write up close and personal, well, those are the pixels
that make up the picture, you'll get some stray
pixels like that, which are going to
be smaller than the dots that make
up your image. And ideally, what you want is just a whole load of
dots all the same size, but nothing bigger and nothing smaller getting in the way of the effect which
we've just created. Okay, those are the
brushes you either paint on and for this course at 3% and full opacity or you come to a razor and you can use the same brushes to take away, again, at full opacity. And if you need to do a bit
of cleanup in that area, you come down to
either nice buildup or mainly hard locker in and you do neatening and
tidying up work like that. That is the basics
of how you create your basic tonal areas
using these brushes, they will cut down the amount
of time it takes to do your pointistic drawings to a fraction of the time that it would take using
traditional media, let's move on to our
project. I'll see you there.
4. Get Started with our Statue: Alright, so for this project, we are going to do
something a little bit different because most
of the time you see pointillism done
on a very light or a white piece of paper with
a whole load of black dots. And I can kind of see the
point of that because if you had a colored piece of
paper like we've got here, then dark dots are not
going to be a problem. But if you're trying
to do light dots, then you might
have problems with opacity and whether
the light dots show through clearly enough. But this is digital, that's not going
to be a problem. So let's give it a try. So I'm going to
use my finger and thumb so two points of contact to drag over
to the right slightly, and then I'm going
to use my mouse, so I have my little circle that you can see moving around. Come to our wrench icon, come down to Canvas, and then come to reference and I get the photo that I'm
supplying with this project, this was taken on one of my many holidays to
Greece with the family, and statues, in general, tend to be very good
subjects for pointillism. Because most of the
time there tend to be one color that is either
white or a light color. Not always, but often. Also, it was a nice sunny
day because it's grease. And if I zoom in a little bit, take a look at those shadows around the
cheekbone, around those lips. Lovely bit of reflected light
coming from underneath. And so I got some really
nice shading with this, so I thought, let's
give this a try. So let's make a start. Let's come to our layers. And yeah, you can
see color swatches. Those are the colors
we're going to be using. And if I zoom in just briefly, you can see three dots there you've got the
dot on the left, that'll be our main color, the dot on the right, that
will be our highlight color. We will use that sparingly. And the.in the middle, that is the color of the
paper in the background. Now, as with the other projects, if I slide my paper layer, over to the left to unlock it, and I tap where it says, oh, it's over overlay, but also the opacity. I've taken that right down. Look, if I take it up, you get quite a strong
paper grain pattern there which I don't want for this project because
I want the dots to do the work and I don't want their paper texture
to interfere. So lock that. Again, my outline in red is there in
the background, so we are going to use
the start here layer. Now, for my brush, what
shall I start with? I think for this, yes, I will be putting down a
cloud of point pretty soon. But there are one or two
fairly sharp lines here. Like just where the lips meet. So I might put one or two
little guidelines in here. I will not use a solid line. Instead, I will come to
DC pointy Line broke two. And let's zoom in
on these lips here. Oh, for my color as well. Mustn't forget that. Just rest your finger on that
little blue dot. I get my color
picker popping up, and that little
semicircle on the top, that will be my new color when I let you can see right in
the top right hand corner, that's the color we're
going to be working with. So let's come down to here. I'm just going to put
in one or two lines. Just to get an idea of
where these borders are. Now, this is quite a
challenging piece. So I'm going to start off with the more complicated
areas first. That way, if it all
goes horribly wrong, you never have to see this tutorial because
I won't release it, and I won't have
wasted a whole load of time on something you're
not going to see. That does sound a little
bit cynical, doesn't it? Alright, but
nevertheless, come on, let's put in a few
more lines here. Just to get an idea of
where my borders are. I'm going to be adding
to this, though. I'm putting in
some borders here, and I'm saying, y there's
lines around there. But if you take a
look really closely, you can see there aren't
really any lines in this. Everything is areas of color. And sometimes, say, on this
area just above the eye, that's a very soft transition. Down around the eye, you get harder transitions
like this border here. But there's nothing there
I would call a line, and I would try and
avoid that anyway, because, well, this
is pointillism. Hard lines with a whole load of soft graduating dots. Not
sure that was gonna work. Maybe just a little
bit here as well. And look, I think that's
enough of my little borders. Often, when you're
doing this technique, you're building up the
amount of points you've got, and the temptation can be. Once you've got something
that looks recognizable as, say, an eye or a mouth, that's the point you stop, but maybe you're going
to get better results if you go in deeper and put
in slightly deeper shades, which means more dots. Alright, so let's come down
to this mouth area because I must admit I do find
that pretty fascinating. So what am I going
to use? Let's try. Well, let's start off
with medium scatter because there are some
fairly deep shadows there. And let's start off with
that area under the mouth and just put down
some dotty areas. Another reason I want to do
this first is because I put down some guidelines of what shadows there
are around the mouth. But the actual
guidelines themselves look a little bit
confusing, I think, so I'd rather get this out of the way now so that I've got the confidence of
knowing that the mouth looks at least
like a good start. And already, I'm getting
to the point now where I'm starting to think,
Oh, it's just a mess. It's just a load of random dots. That is because, one, I don't have enough
dots in there. And two, that cloud I've just drawn is basically
all one shade. I need variations in shade. Remember, this is all about differences in values and
differences in values. Well, that boils down to how close your dots are together. Dance dots, dark values. And I will be doing
the things that I often do where I'll speed up the video when I'm not doing any talking or I'm not
explaining anything new, just so that you
don't die of bom. And while I am here, as well, I'm going to put in the various different
values that I can see this is just the
beginning of the process. We'll be doing a lot
more dots than this, but it's just to try
and build up this area, not one tiny little
bit at a time, so I can compare the values
just under the nose where I am now with the area
under their mouth, which I'm just doing now. So I can get the
different values and the different darker and lighter areas relative to each other, because I think with
pointillism, well, let's face it, traditionally, you're doing one
point at a time. It's very methodical. And so out of all the other different
techniques that you can do, the temptation is to really
focus on one tiny area and not see that area in relation
to all the areas around it, and that can never lead
anywhere particularly good. But anyway, I will carry on
building up this area here. And if you are following along, and right now,
you're thinking, Oh, it's just a load of dots. There's no form, no structure. It's just a bit of a mess. That is very common. We're splatting down
a whole load of dots, which we will have to
refine and build up. But at this stage, if
you're thinking, Oh, no, it's just a mess.
Give up, leave it. No, I think with pointillism, you need to keep on working. Keep on adding these points. And I've definitely
got a darker area just under that nose compared to lower down in this particular
shade of the area. So I'm going to put
that in there as well. Also I'm being a bit shy with these dots around the lip area, they could do being
a bit darker. Same with a small area here. In fact, let's come down to DC dense scatter and
do a bit under here, a little bit under that lip, a little bit right
under the nose. I'm trying and get
some different areas. I'm trying and get some
variations in value. Now I notice on the bottom lip, we've got this nice little area which I'll zoom in
right on one bit of it. Just here, actually, though
I zoomed in too much, let's go out a little bit. There's an area
just here where you get dark and then the
light a bit underneath. That looks lovely, and I
think I'm going to get the form a little bit better if I concentrate on
areas like that. I've got a fairly sharp division between the lighter
and darker area, so I will come back to. Let's try pointy
line broke three, and I'm going to go along
that border a few times. Just so I can say, yep, there's a border there, and there's densidts
around there, and hopefully you can see
the border in all its glory. And yeah, that is starting
to work a little bit. I'm going to take
one or two bits. Let's zoom it a little
bit just on this one area here and just drag up one or two bits just
around the bottom, maybe make this area this border between the shadow of
the lip and the chin itself. Make that just a little
bit more defined. As a bit underneath. Maybe the lips part ever
so slightly just there. Also, there's another
bit. I can just see a slight darker area just where the top lip
goes into shadow, so maybe I should put that in. It's all looking quite messy, and for one reason, you can never really tell what you're doing or how
it's going to look until you take your outline
layer and make it invisible. Watch what happens when I make
the red outline invisible. That's starting to give me a better idea of what I'm doing, and the reason for that is that the outlines are
very useful for me, but the dots are
fighting with the lines. The lines are giving you one
little bit of information, very linear, just borders, no shading, but the dots are doing something
completely opposite. They are trying to do soft areas of tone with some fairly soft borders
there at the moment. And so effectively, you've
got two opposites there that aren't quite working with each
other. Don't get me wrong. Blending opposites is key to just about any
kind of picture, design, you name it,
that you can do. But in this case,
they're kind of fighting with each other rather than
complementing each other. So bear that in
mind as we go on. Yes, we're going to be using
the red lines as guide, and yes, they're very useful. But we're only really going
to get an idea of what we're looking at properly when
we turn the red lines off.
5. First Dots...: I do need some more
dots definitely on that top lip because I'm trying to build up my
values relative to each other with an area
there that is black. I've got no value
information there. I will go for light scatter, just to put down some dots here. And then maybe come
to medium scatter, because I can see that
it's slightly darker towards the bottom of
the top lip there. And here. Oh, there's lots of
different tonal areas there. I think I've gone
too far with that. That's undo a few times. And maybe come round here. You're probably going
to spend quite a bit of time worrying that you're
making things too dark. Well, if you do, like supposing. Look, I do this. Oh dear,
I've gone too dark. You can't come to your
eraser and medium scatter and try and get rid of
those dots that way, but then you're using dots to erase dots and you're getting
rather a bitty feel there, which, well, if you zoomed out, maybe wouldn't matter that much. That's pointed line broke. That could be good for borders. I just say the top of the lip, I might put some
dots there later on, but for now, I just
want to clean up some of these areas so I'm
getting a better idea. Of where my borders are.
And the thing about this, particular brush, which is
pointed line broke one. It's giving me a line, yeah, but it's a broken line. It's a dotty line.
It's the same kind of dots that I'm using to make
the picture so that can work. But sometimes you may
find nowhere in my. Let's just come
to my DC General. I want hard blocker
for my erased tool, and this is one of
these no messing tools that just gets rid of absolutely
everything like that, so I can take that
back and start again. But for now, let's take that. Go to DC Dotty, come to pointy line broke. That could be more useful
for me in general. Come back to our dot. Let's come to a straight
pointy line broke, too, which is fairly
down tonight. I just want to put on a
bit of a border here, just one or two darker areas. I'm drawing Well, they're lines, but because of the
nature of the brush, they come out as dots, which that's what
I want and just strengthen up some
of these areas here. And maybe it just here. Let's come to DC
DC light scatter, I'll be cautious with this. Yeah, that light scatter
is giving me a chance to put down various brush
strokes to build up areas. But I can make
several brush strokes and not suddenly go too dense. With this. Also, if you take a look at the
side of that cheek bone, because that's going
to be a challenge this entire area here of doing a nice soft
convincing gradation, because I'm using light
scatter, I can do this. I can put in a fairly
soft border there, and by making repeated
brush strokes, I can start to
build up this area here. Don't get me wrong. I am going to get back to
that nose and mouth area, but I want to get
some various points all relative to each other. Okay, let me just
take a quick look at what I've got so far. Which means outline off because, as I said before,
you never can tell. And yet, I'm starting to
get there starting to. But it's still at the
stage where it looks like a whole load of dots
which don't really seem to mean much because
I don't really have enough of different
values and different borders. Like, for example, that cheek area which I've been working on, there's a slight darker
area at the top, which I've drawn in, but
it's not deep enough. So much of this is
all about comparing your values relative to
other areas of the picture. And in the case
of this, I've got my slightly darker area of
shadow just on the cheek bone. Then it goes dark.
But then I start to get a little bit
of reflected light. The further I go down the cheek area here until I get this really light
area underneath, which I think looks great, but it's a bit of a
challenge to draw. I think what I'll do is I will come and I will turn
on my outline again, and I will make a start
with that shadow area just underneath just so I get an idea of where the different
borders are. Let's try Let's try
DC wide scatter. This is the widest
brush I've got, because of the way the brushes are constructed
within procreate. I'm kind of running at
the limits of the engine, or should I say what kind of brushes procreate can give to me with this wide brush. It would be nice to have
brushes which are really, really wide and cover a lot of areas so that I
don't, for example, go too much in one
particular area and then have to match all
the other areas to that, which might be a bit
difficult to do. We work with what we've got. And actually doing that
makes me realize I need some darker values definitely
underneath this chin. So let's do this.
Bring this down here. A little bit of light
right where that plat hits the shoulder.
It's a nice statue. You had a little bit of
that neck muscle which joins the ear to the clavicle, at least I think
it's the clavicle. I hope it's the clavicle, otherwise, I've just said
something really stupid, and I'll go to my
wife and say, Love, I just said something
really stupid on the video, and she will say, again, well, as I said before, it's all looking a little
bit of a blurry mess, but we will put in more different areas and do a little bit of
tidying up with this, so it looks a little bit better. And now that I've done that, I can make a little bit more of an educated guess as
to what's happening in the shadow areas under the
cheek and hopefully get a lovely graded look
that I can see there. I know what's gonna
help this along. Because, yeah, I've got some
very nice shaded areas here. And I'm getting there, but all the borders are
looking a little bit soft. I need something a little
bit tighter in there. So I'm going to
try come to Let's try instead of my wide scatter, let's try medium scatter, which hopefully will give me
some narrower transitions, just along here that
terminator, for example. And also, underneath that chin, it's just looking a
little bit too fuzzy. In fact, what I will do is, I'm going to come to my eraser, come to my hard blocker in it. Any brush will do for this as long as it just well,
let's show you what. It's just a round circle.
It's got no texture to it. It just erases
things. That's all. I'm using it now just
to get rid of some of these excess dots, just
trimming them down. But for the final bit, because I'm getting rather a hard border there because I'm using a brush with
a very hard border. Instead, I will come back. Do you see Dotty? Let's
try pointed line broke to come down and just
scribble just around here. And because I'm using a dotted
line to get rid of dots, I get a border that's just a
little bit more forgiving, a little bit softer than that very hard brush that I was using just a second or two ago. Adding that slightly
harder border there I'll definitely get rid
of some of these bits. For now, just so I get an idea of what it is I'm
doing, let's come back. Look, let's come right up to
the top and come to recent. There, I can see all the recent brushes I've used so hard, lock it inner just to get rid of certain areas where I
don't want the dots for now. And yet, you can start
to see when I do that, take the outline
there because I've tightened up that shadow
under the chin, for example, and I have a bit more
of a contrast between the softer shaded areas and
the more hard border areas, that's starting to make things work on that score, as well. Assume in a little bit more hair and a little bit more here. There's that area
just under the chin, where that soft
shadow seems to go to a fairly hard
terminator before it goes back underneath the
chin and gets lighter again. Now, I have sketched that in, but I will count I will choose let's try
medium scatter again. Let's see how we
get on with that. I need this to be fairly tight. And I think, yeah, that
does just about do it. I want that come
underneath here, come up here and it goes right
to the side of the face. I can use the eraser just to get rid of the
excess bits there. It comes underneath here.
It's a nice soft chin. I think it's ancient
Greek idea of beauty and very
lovely it is, too. Just built that contrast
to one or two areas. I've got. I have a
slight softening of the shadow just on the other
side and bring that round. Let's zoom out a little bit. And yeah, the softer areas combined with these
slightly more dense areas, I'm getting more the kind of tonal variations that I can
see in the actual statue. And now I've got the
surrounding areas with a little bit of
darkness on there. I'm looking again at
this area under the chin and thinking maybe
I can start to build up the values
underneath that chin a little bit more
and the top lip, as well. You put down a value or
a certain set of values, then you put some more
values next to it, and all of a sudden,
those values that looked okay now seem
a little bit light. This is the way this works. Do your values, do
values next to them, go back to your original values and work things up
piece by piece. You're going round
your picture to all the various different
areas, revisiting and revising. Revisit, revise. Okay. I think I'm
nearly there with this. Let's try point a line broke 02. Let's come to this area here. I can break up those dots. Now, probably everything that we've done here, I
will come back to, but I just want to take a
look at this one more time. Before I call a
halt to this video. And yet, I'm starting to
get the look that I want. There's still plenty
of work to do. But, yeah, I think that's
a good enough start. Okay.
6. I'm not Keen on it so far!: Okay, I've got to a certain
point with this picture, and I'm starting to realize
that I don't really like it. And I did think, Well, look, I can just start the lesson again and no one's gonna know. I'll try and make it better. But then I thought,
Well, no, come on. Let's be honest about it. Sometimes you're not happy
with the work you're doing. And what I want to do here is show you what I would
do to try and fix it. Just to make it a
little bit better. That way, if you find you're having problems
with your picture, maybe I can give you
one or two ideas about what to do with it. Okay, so my problems
are first and foremost, I think that blue colour I've chosen is a little bit too dark. The main detail I'm interested
in is around the face. I mean, the background,
yeah, okay, that's all very nice, but it's the face that I'm interested in. And when I look at it, there's some fairly deep shadows there. But they're not really
deep dark shadows. Okay, now I could argue
that I'm trying to talk to you as well as
Draw at the same time, and that can almost inevitably
lead to a few mistakes. But we'll see what
we can do about it. One of the things
I don't like is that line of the cheek there. So while I'm still fairly
early on in the game, I'm going to come to my eraser. I've got it such a recent. I will set it to DC
Dotty, Dance scatter. No, I won't use that.
I use DC wide scatter. It's set to erase, and I must be careful because
with all my paints, they are all set to 3% large, but when I come
over to my eraser, I have a 3% notch there,
but it wasn't set to it. It was set to 1%. I want the arrays dots to be the same size as the dots
I've just been drawing. So now that I've got that,
I'm going to come yeah, that's zoom in a little bit. I'm just gonna try and soften
this shadow area here. I can always come back in
and take another look at it once I've done the couple of
things that I'm going to do. But for now, I just want to soften it just a
tiny little bit. Okay, so, like I said, I think the ink is too dark. I want to make it a
little bit lighter. To do that, let's come
over to our layers panel, and I am on the start
here. Layer, that's good. I'm going to click on the icon just where my little circle is, and I'm going to
choose Alpha lock. Now what Alpha lock does, it means you can draw on that
layer wherever you want, as long as there are
already pixels there. You can't draw on any
transparent areas, which for this layer means any bit of it that
doesn't have a dot. Okay, so let's take
a look at this. I will choose another color. In fact, let's just choose
a very obvious color. Let's just come right
up so it's bright blue. I'm going to choose
a brush to do this. Now the right brush
for the job is gonna be hard blocker in it. Now, I've added
these two brushes at the bottom to this brush set, which you're gonna get
because it makes life easier. Hard blocker in it has chosen. Alpha lock is turn
off of this layer. So now I can very quickly and easily change the color
of all of those dots. So that's the principle.
But in practice, I want something a little
bit darker than that. So let's choose our
original color. Let's come to our color
swatches at the top. Okay, so let's change it
to the color I do want. Come. Back to my
colors, you can see, I've got a little dot showing what my color is at the moment. And if I drag that dot around, you can see the
left hand side of that circle you're looking at has got the color
we've got at the moment. The right hand side shows me the color I'm going
to get once I let go. So I was about, here, somewhere, fairly
saturated, fairly dark. I'm going to go less saturated
and a little bit lighter. So what I'm getting is
a variation of gray. Let's take a look at that. Not enough of a
difference there. Let's try something a little
bit lighter like this, and you can almost see it. It's a very subtle difference. I come in very close like this and change
all these colors, that's giving me
more the kind of tone that I want as
my deepest tone. And I'll scribble all over this area so that all the
dots are the same color. And then I would come back in, come down to the
area I'm at now, tap again and turn
off Alpha lock. We're almost ready to go, but I'm going to come up
to my color swatches. I'm going to swipe to
the left to unlock this, make sure that
layer is selected. Come up here and put down
my new color swatch, and you can see it's
a little bit lighter and a little bit less saturated
than the color I had. And I think just
that small change is starting to help me. And so now, of course, I can
back to my layers panel. I swipe to the left,
and I lock that layer again because I do not want
to draw on that layer. It's only there as a reference. Now, I might do
something similar with that very light
color I've got, but I won't know
what to do with that until I start
putting down marks. Okay, that was the first
thing I wanted to look at. The next problem I've got is
that I'm spending my time trying to build up various different shades
of dark and light. And with pontism, it
really works very nicely when you get these
lovely dense areas of dots, sparse areas of dots, and it forms some
really lovely shadows. But the problem I've
got is that I'm trying to put down
areas of dots, and sometimes it
can be difficult to judge an area where I'm doing dots against this blank
area of canvas that I have. So let's do something
about that. The first thing, I will turn on my outline because
I'm going to need it. I'll make sure my
start here layer is selected because I want to
import a file just above it. I will come to our wrench icon. I will come to insert a file. And as part of this course, I've supplied you a series of PNGs which are just tonal areas. Let me show you Fine Dots chart. This is what I'm talking
about. Look, if I come to I transform icon, if I move this just off
to the side a little bit, don't worry about those lines. It's because I have snapping turned on just down the bottom. And you can see, I have
different areas or should I say different rectangles with dots appearing at different
levels of density. So for fine.01, let's just turn off our
outline just for a second. Fine.01, there's almost
no dots whatsoever. If you come down to
something like fine.04. You're getting a few
more dots there and it's starting to form a tonal area. Fine dot six, much darker. Find dot seven,
eight, and finally, five dots nine is
almost completely dense for the very deepest
shadows you're going to get. And this is just a series of nine different swatches which show you what I'm
about to import. But these are set to black, not to the color we're using. So as before, come
to our layers panel, come to inserted image
and put on Alpha lock. So now we can come to our
brush and we can just Color these in to be the same colour we're
using to make our picture. And so now I'm getting a much
better idea of which one of these different gradations
I'd like to use as a backdrop to go
all over the face, the hair, the neck, all my image so that I
can judge values just a little bit better because most of that faces are
fairly light gray. Even in the lit areas, it's not completely white. And so I think this
could really help. Now taking a look
at the lit areas of my photo and comparing that with these various different
swatches I've got here. Well, Fine dots 04 is too dark, I think, same with fine.03. And so I think Fine dots 02, that could be a good contender for this, and I'll
show you what I mean. Let's come to our Layers panel. Remember I said fine.02, I will make my inserted
image invisible. I will pinch out so I can
see my entire screen. Then I will come back
to my wrench icon, back to insert a file. Now, we did say Fine dots 02, so click on that to load it. And I have this
rather large square, which is just a tonal area
which is made up of dots. And, believe me, those
nine different tonal areas really hard to do. But I think it's
worth it in the end. Now, I have snapping turned on. If you don't have it turned on, turn on magnetics and turn on
snapping because with this, I have my transform
tool selected. You can see the marching ants around the outside of my box. I'm going to pitch
inward a little bit so I can definitely see
all of my picture, and then I'm going
to move this texture up just until it snaps to
the top of the screen, and you can tell it
snaps because you get those little lines, the orange, and you can see them at the top and the
side of the screen, that tells me that
that lighter area has docked with the very top of the screen and the very
side of the screen. Come back to my layers panel, which commits it, I will. Slide to the left
and duplicate that. Maybe you saw it get
a little bit darker, but now I'm going to come
back to my transform and use my pen to drag
this whole thing down until eventually, I should get that
yellow line again, which lets me know the top
of this duplicated layer has snapped to the bottom of the layer I just
copied it from. Come to my layers panel
and come to merge down. Now, let's take a look at that. I will come back to my layers, and I'll turn on my outline. And hopefully you can see, because I have those
dots in the background. I've tried this before, and I find it makes it easier for me to try and knit the various different
shaded areas together. Instead of trying to do
some shading against a plain light blue background which doesn't feel the same
as a whole load of dots, I now have some dots there to just weave the
picture together. But they're all over my
screen at the moment. I'd like this to be a
little bit more selective. So what I'm going to do is use something called
a layer mask. Now, if you know what
a layer mask is, just skip the next lecture because layer mask
can confuse people, but they're also very powerful. And so what I will do is stop this video now and
in the next lecture, I will explain what
a layer mask is. And then in the
lecture after that, I'll come back to this and apply the principles to this
real world example.
7. Understanding Layer Masks: Okay, let's take a look and
see what layer masks are. I will come up to
my little plus sign and I will create a new file. Screen size, this is
purely for demonstration. And so I would choose screen size if you're
doing any kind of drawing. Screen size, which is 2752 by 2064 pixels is simply
not big enough. You want a larger screen. But for this it's just
demonstration, screen size. I have a white background
plus layer one. Now, this isn't
going to be pretty. It's just to show you what. A layer masks, I'm
going to choose Hart block it in as my brush, and let's choose a
color. Let's choose. Now let's choose a
fairly knocked back blue because it's a cool
color and cool colors recede. And warmer colors
appear to come forward. So for this background layer, I've got a blue blob. Now I'm going to
come to my layers. I'm going to choose a new layer. I'm also going to
choose a new color. Let's try a much warmer
color and brighter color. Come here and just paint
over that blue area. So now I have two layers. Layer one, that blue blob, Layer two, that
bright orange blob. I'm going to come to that icon just where I'm
wiggling my mouse. Remember, I have a mouse
connected to my eye pad just so I get that little dot so you can see where I am on screen. I'm going to click on it, and I'm going to come down to mask. This creates a layer
mask. Did you see that? If you take a look
at these two layers, you have layer two,
and on top of it, you have the layer mask. Now, you can tell these two
are connected in some way. That's because the layer
mask is bright blue. That means it's
the active layer. Layer underneath is this
kind of knocked back blue. That is procreate
telling you which layer, the layer mask is affecting. It's not affecting layer one, it's affecting layer two. You'll also notice I
have black as my color. If I come down to layer two, it clicks back to the
color I've selected, which is this kind
of orange color. But if I click on the layer
mask again, I get black. And what I will do
is double check because mistakes happen. Double check. The layer
mask is the active layer. It is light blue. Then I
will come to my brush. I will double check
it on 100% opacity. I make the brush slice
a bit smaller, I think. So now I'm drawing with a brush which is a little bit let's
make it a bit bigger. Come on. That size at 100%
opaque black, let's scribble. Ooh. Now, you know that the layer underneath
is that blue color, and you know the layer on top layer two is
that orange color. And so it looks like
what I've done here is basically erased the
orange bits on layer two. It looks like it, but I haven't. What I've done is made bits of the orange
layer invisible. That is what a layer mask does. It masks part of the
layer you're working on, so it becomes invisible. That's what a layer mask does. Because a layer mask is basically just a
collection of pixels, same as any other layer. But instead of you seeing that layer of pixels, it
does something different. It controls how visible the
layer you're working on is. And if you paint black
on the layer mask, you're going to get
invisible areas. Black conceals, white reveals. And let me show you this. If
I come back to my colors, and instead of choosing
a black color, I'm going to choose
a white color, and I draw on my layer
again, oh, look at that. I can draw the orange
areas back in because the layer mask is
a collection of either black pixels which
make everything invisible, white pixels, which make
everything visible, or gray pixels which make
things partially visible. And right there and
then you can see the advantages of
using layer masks. I didn't erase that orange area. I just made it invisible by painting in black
on my layer mask. And I can make thing visible by painting in white
or I can choose black, and I can make things invisible. White reveals black conceals. And because I'm not permanently deleting those orange pixels, it means I can show or hide
them as much as I want. Look, I could do this until the battery goes
flat on my iPad and no part of the orange layer
is permanently deleted. It's just made invisible. Black conceals white reveals. Or the way I sometimes
think of it is, look, if I draw with black, it's like space, black hole. You painting black,
you make a hole. Now, this is where it
gets more interesting. I'm painting 100%
black at the moment. Supposing I take
that down to say, let's take it down to say 23%. Now, Look at that. I've applied a partially
transparent black stroke there like this. And so you can see I can
build up the invisibility or the visibility as
I see fit so I can get some very subtle changes in what's visible and
what's not visible. But it's not just
that. Look, let's try let's try very
dense scatter. I'm painting a white,
and look how I zoom in. H. You can see I'm using
whatever brush I want to make the top layer visible or invisible as much as I want. And if I decide I
don't like that or I want something a
little bit more subtle. Now I'm using what,
medium scatter there? That's fine. Let's just choose another brush at
random. Let's try. Pastel daubs,
pastel frost large. Let's make it black. That's very large. Let's make
that quite a bit smaller. And you can see I can build
a lovely textured Layer here just by using the brush strokes and gradually build up the
effect as much as I want. And if I zoom in very close on that layer mask, well,
you can see layer two. That little rectangle
you can see is just a mini preview or thumbnail of what you
can see on the screen. It's the same with
the layer mask. You're getting a tiny
little thumbnail preview of the dark and light marks you have made using your layer mask. Now, if you want, I can even come here
and I can invert it. So the black pixels are
going to become white, the white pixels are
gonna become black. Now what was visible is now
invisible and vice versa, plus also all those lovely
little textured areas which are partially invisible. And you're going to
see me do this in the next lesson. I
will create a layer. I will add a layer mask because
a layer mask by default, comes in as all
completely white, which means you get
to see all the orange blobbiness and it looks
like nothing's changed. It's only when you choose a darker color and
start nibbling away at the visibility of that top layer to reveal
the layer underneath. That is how layer masks work. Now, I get asked a lot
by students saying, Look, I'm having a problem
with my layer mask. That's okay. I get it. They can be hard to understand. And so the checklist is, well, at the moment, I'm using
quite a bitty brush. It's getting some nice textures, but sometimes you're
just simply choosing the wrong brush and the effect
doesn't show up very well. So in the case of this, I'm going to come
back to DC darti I'm going to come back to
my hard block at inner, which is a no nonsense brush. The next thing to do
is the visibility or the opacity of
this brush is down. You bring it right up to 100%, choose the size that you want, as long as you've got a
size which is large enough. And also, you double check that if you're trying to
make things invisible, you have black selected. If you're trying to
make things visible, you would choose white, and the very last thing you do is you come to your layers panel and you make sure you are
on your layer mask layer, not on the layer
itself, the layer mask. Then when you come back in.
You should be good to go. And if you're still
having problems, go through that checklist. I've just said all over again. Check you have a good
brush to do this with. Check it is on the
right level of opacity. Check it is the right size, and check it either
white or black, depending on what
you want to do, and check you are
on the layer mask. That should solve most
of your problems. Okay, so that is layer masks. I hope you can see
the possibilities. Why you get your
head around them, they are incredibly
flexible and a bit of a must not in any digital
artists toolbox. And the very last
thing to say is, if you're working on
very large layers with a lot of pixels, and there's plenty of them, you may start to have problems with the amount of memory
you have on your iPad. A layer mask is effectively
an extra layer, so it takes up an extra
amount of memory. So just bear that in
mind when you use them. Okay, that's enough
of this lesson. Let's go back to our statue.
8. Applying our Layer Masks: Okay, we are back. So I'm going to come
to my Layers panel. My inserted image. Come on,
let's give this a name. I don't like having a whole load of layers
saying layer one, layer two, inserted image. Yay, ad, yada, because it just gets plain confusing and you
don't know where you are. So I'm going to come here, click on the name and come to rename. I'm just going to
name this Dots two, because if you remember, I had nine different shades. This was the second shade. So dots two, I know what it is. Now, do I need that
inserted image, the one with the various dots? Normally, I would just
leave it invisible, but I don't know how much
memory you have on your iPad. So let's be cautious, swipe to the left and delete it. That will free up
some more memory, which means you get more layers. But anyway, dots two,
click on the icon, and we want to choose mask. Now, at the moment, my
layer mask is set to white. And if you remember, white
reveals black conceals. I want to conceal quite
a bit of these dots. I only want them in
the statue area. So what I'll do is I'll click on the layer mask icon just where
I'm wiggling around now. I get my menu and I'm
going to choose invert. That will take my layer mask, which is completely
white at the moment. And make it completely black. Remember, black can seal, so now this layer is
completely invisible. Make sure you have the
layer mask selected. Not the dots two layer, not any other layer. You want the layer mask for
the dot two layer selected. Now, we come up to our brush, hard blocker in or nice builder, but you can use either, either. I suppose. Look, I'll
use nice buildup. I will make sure it is
set to 100% opaque. If I hover over the
area of my iPad because I have a modern iPad
with a modern Apple pencil, which means you get
to hover over things. I'm just showing you
the size of the brush. That's a bit too small.
Let's try knocking it up. What is that 30% big.
Is that big enough? No, I'll make it a bit bigger. What am I on 56%? Yeah, that'll do the job. Now because I'm going to paint
in white on my layer mask, I will reveal
whatever pixels are on the dots to layer
and there you go. How easy is this? I get to paint in areas of
dots just by brushing over the entire area with my paint brush and only
in the areas that I want. And of course, the
nice thing is, supposing I go too far. All I need to do then is
come back up to my colors. I'm painting in white. And I'm in classic mode at the moment. I could use disc. I
could use classic, I could use value. All I need to do now is come and select a black color because black conceals come to here
and get rid of that area. I'll make my breast size
a little bit smaller, so I get slightly finer control, and there's a little
bit just around here, which I missed. And so I can reveal or conceal the dots on this
layer as much as I want. Look, I missed a bit
down here, so come back. Choose white, make my brush a
little bit smaller so I get finer control and
put that there. And well, let's take
a look at this. Oh, there's a little bit
more up here, as well. I'm not gonna worry about
these little dots here. And so is that gonna make my
life a little bit easier? Let me check this. I would
come back to my layers panel. I'm going to come to
my dots two layer, and you see that
little tick mark which I'm just hovering over. If I click on that
or tap on that, I'm going to make the
entire layer invisible. That's what we had before, and with that layer of dots applied, that's
what we have now. And I'm looking, come on, let's concentrate on the
areas we've done so far, if I look at these
areas without with. And yeah, I think
that is helping me. And if it bothers me at all that I have dots in some
areas that I don't want, come back to our layer mask. Choose black black conceals, supposing I don't want
any on that top lip, I will choose 5% large
brush and I can just get rid of those dots
just in those areas. Imagine how long
it would take to draw all the dots in
this light dotty area. Just to get an
overall light texture for me to work on
and then decide, actually that
didn't really work. It's too light or it's too dark. That would be the worst one.
Basically, you'd be stuffed. But this is digital, where you don't
have that problem. And yeah, I think
that's helping me, but the only way I
can know for sure, remove the outline
yeah, straightaway. Instead of those
harsh empty areas, I've got a bit of
texture in those areas, and that's really going to
help me to move forward. And the very final thing
I'm going to do is mention the fact again that it's a lot easier to put dots down than
it is to remove things. And so at this point, I might be feeling a little bit nervous. What if I put down
too many dots, until it starts to make
me a little bit timid? So the obvious thing is, come select the layer with all the
dots that we've drawn on. Come up to the plus sign and
add another layer on top. That way, I can still work with confidence. I
can work with speed. I can take risks, I
can try things out. And if that doesn't work, just clear that layer
and start again. So let's just double
check in the top left. I have the right color selected. Let's choose a brush. Let's try just say
medium scatter. Double check,
that's all working. Yes, it is press, undo, and we are ready to start again. And so we'll carry on
in the next video.
9. Rendering the Eye: Okay, with the various
changes I've made, I do feel a little bit more
confident in carrying on. Now, let's just double check
a few things and make sure I have the right color
selected to draw with. Come to my layers
panel. Start here. That was my original
layer layer seven. That's the one I just created.
I'll do my dots there. Let's come back
to our reference, just to remind you in
case you don't have it. Wrench icon, Canvas, reference, turn it on. You will get that. Just come to where it
says, Image, Importimage. The image I've got is
in my photos album. Oh, just there, you can see a few images from
the previous course, they'll learn to draw in
the digital age course. But let's import image. Zoom in a little bit. Come back. Tell my outline on, so I've got my guides. Make sure that
seven is selected. Now what brush shall I
use to start off with? Not hard blocker in it. Really don't want that. I want to refine what I've already got, but let's add a few extra
things in there as well. Those eyes really need doing so. Well, let's start around there. Let's come to medium scatter. Zoom in. Let's zoom
in on this eye here. And let's make a
start. You know what? I'm not sure how much
more I've got to say, certainly at the moment, and it might help me to
concentrate a little bit if I just speed this
whole thing up and put on some music in
the background and then start talking again when I have something that
I'd like to say. My experience of it so far with all those dots
in the background, it's a tiny little bit
distracting at first, but once I get used to it, I think this is really
going to help me knit the various different areas of dense dots and
sparse dots together. Anyway, look, I find it very difficult to talk and do the
artwork at the same time. So I'll put on some
music that I wrote, and I'll start
talking again when I think I have anything
worth seeing. Oh, I know what I want to say. When I speed up what I'm doing, it almost feels like you've got to match the
speed and you can't understand how the
person who's doing the picture can draw so fast. At least that's how
I felt in the past. Please bear in mind,
it is sped up. I'm actually working
a lot slower. Yeah. Okay, I'm going to slow down a little
bit because there are a couple of things I
do want to say to you. The first thing is, squint. You know, that kind of
thing where you slightly close your eyes until things
come a little bit blurry, and all those dots that you can see on screen at the moment start blurring into a tonal area rather than a series of dots. The next thing, I can't judge things well at all when
I'm this close up. I need to be at this close up to get the kind
of precision I need, but you're only
really going to get an idea when you pinch outwards, so you can see your
picture as a whole. Let's pinch outwards
here as well. And turn off your
outline layer to get an idea of where you
are with your picture. And hopefully there will come a certain point where you don't need to turn
on the outline again because you've got
the areas mapped out sufficiently that you don't need that red in the background. The next thing, if I zoom
in on my eye area again, Alright, now they're roughly
a similar size on screen. One is a photograph made out
of a whole series of dots. Well, it's a series of very, very small pixels, but you
don't get to see the pixels. You only get to see the
different tonal areas. Compare that with
what we're doing. The dots are much bigger. And so you simply cannot
get, for example, if I zoom in on the
top eyelid, just here, where you get the upper eyelid meeting the underside
of the eye, you can see a very fine area there of slightly darker color, which is helping to define that. If I zoom in similar size here, you see a whole load of dots. So what I'm saying to
you is sometimes you're going to have to
exaggerate things a little bit like that
one particular area, I'm going to turn it round
so I can use the curve from my hand a
little bit better. I'm going to come to DC
pointy line broke two. I'm going to build
up that area here. I'm trying not to get a
solid continuous line, but I need to exaggerate that just
a little bit to get the effect of
what I'm seeing. I, there's an eyelid there with a very
narrow band of shadow, but just doing that with a set of dots, I can't really do that. So it's not simply a case of just just trying to record
exactly what you see. You're going to have
to exaggerate in one or two areas just to
help the image along. Now, while I'm
here, I'm going to come to dense scatter
because I think there are certain
areas around the eye which are not quite deep enough. Let it zoom out a little bit. And working at the angle,
I think is helping me. And you can see there's
a certain bit here. There's a fairly
sharp terminator between the dark
and light there. There's some deeper
areas here, definitely. There's also a softer
terminator here, but it does go quite dark
in one or two areas. I think I'm going to have
to come to my eraser. Let's come to medium scatter. Make sure it's set to 3%, the same size as all the
other brushes that I'm using. And I'm going to try to carve out a little bit of an area here because there's a little bit of reflected light there.
I want to overdo it. I'm not particularly happy
that it's necessary, but I think it is necessary. Come back to my
little blue dots. Brush. Dense scatter. Yeah, there's a shadow there coming over the
top of the eyelid, coming right down to a
little dip underneath, which is going along
the eyelid, as well. And I'm going to come
to medium scatter because this area here, well, I can see another bit
of reflected light, but it's deeper than this
bit of reflected light. So I need to get
those relative values in place a little bit better. Still a little bit of a
deeper shadow underneath, gentler transition
just on this side. And one thing I am
going to do is just build up these
areas a little bit. There's a bit of a
denser area under here. There's still areas in
which need to go deeper. All the time, I'm worrying, am I going to go too deep. But what I want to do now
is come back to my eraser. I'll come to pointy
line broke two. What sizes are, 3%, that's good. And I'm just going to
tighten up this border. Should I turn on
my outline layer? Actually, yeah, that does help. And I think I've been a little bit timid
with that border. I'm going to come
back to my brush. I'm going to come
to dense scatter. I'm going to go over this border that I can see
in the background with a slightly pink I was
drawing up to the border. I wasn't going over it.
Maybe that was a mistake, and I'm going to do it
around this side as well. And yes, it's
getting a little bit of a soft transition there, which I'm not too happy about. But now what I can do is come back to my eraser, pointy line, broke two, and I'm going to go around this area
and tighten it up. Now, if you're a member, in the previous video, we put all those background
dots on another layer, so they're not being
affected when I'm erasing. Oh, digital technology. Wonderful. I'm doing life
drawing classes at the moment, which I'm enjoying very much. It is nice to get back
to traditional media. Brodie is. But have you done this two finger tap the paper, thinking, I want to erase. And then you realize, Oh,
no, it's traditional. I can't do it. Oh, panic time. Right, let's get medium scatter, just a little bit
deeper under here. Come back to my eraser, tighten it up a little bit. Let's try that
without the outline, and let's take a look at that. I'm getting there with this. It still needs a
little bit more work. In fact, I'm going to work
with it zoomed right out. I hope you could follow
along with what I'm doing. I will come to TC medium
scatter because I need just in the corner of the eye socket that needs
to be a bit deeper, I think, a little bit tiny bit more knocked back in
one or two areas, a little bit deeper around here. And I kind of like
what I'm doing, but now I'm looking at the
area around the mouth. Let's just make this a bit bigger so I can see
more what I'm doing. The cheek and the mouth, I knew there'd have to be made
a little bit darker, and I think maybe
now is the time to start looking at that
because at some point, pretty soon, I want to
take this layer seven, and I want to merge it down
into my original layer, because the working
practice I want to follow is create a new
layer so I can be bold, I can be adventurous and not risk messing the whole
thing up and then merge it down and then create a new layer on top and
be bold and adventurous. And once I get to a
certain point that I like, I can merge that down again. So, new layer. Do what I want. If I like it, I merge
it down and repeat. So I think the next thing
for me to do is to carry on working on the layer
below my original layer. The bit that just winked out and came back in again
and see if I can darken it up so that
the color values there match the
values of that eye. And I think I'll do that
in the next lesson.
10. Balancing Tones and Liquify: Okay, so I've got to a
certain stage with the eye, and one thing I noticed
is that I've drawn the eye ever so slightly darker than the
nose and the mouth. Okay, so I was wondering what I'm going to
tell you about this. And I was going to make
the point that, look, because of the nature
of pointalism, you're always in up
close and personal, doing things dot by dot by dot. And so if you are up
close and personal, it's very difficult to
judge what you're doing here with the rest
of the picture. Now, with traditional
pointalism, you're always going to see
your whole piece of paper. But with digital,
we can zoom in. That's great, but you don't
see the picture as a whole. And so I was about to say, Look, I'm sorry about this. But then I realized something. When I drew the
nose and the mouth, I was using a darker color. I was using that darker blue. You can see right in the
middle of my screen. But then I switched to
the slightly lighter, less saturated version of blue, which I think helped
the picture as a whole. But when it came to
doing the mouth, I was drawing that
using darker dots. And so I was judging my values based upon the darker dots. And then I made the whole
thing slightly lighter, and then I came to draw the I and I tried to get the values correct using the lighter dot right from the
beginning of the eye. So it kind of makes
sense that if I'm trying to get a certain darkness
in the corner of the eye, for example, I'm going to end up using a certain density of dots. And if I'm using lighter dots, I'm going to have to pack
those dots closer in together, which I didn't have to do
with the nose and the mouth. So now I'm going to have to
come back in and revisit the nose and the mouth so that they match the eye tonally. Well, no, look, I have a choice. I can either make the
nose and mouth darker or I could try making
that eye lighter. As it is, I'm going to opt to make the nose
and mouth darker. One reason I think I've got the eye more accurate in
terms of color values. For another reason, it is much easier to make
things darker with pointalism than it is to rub away the dots to
make things lighter. So before I come back up to my layers panel and merge layer seven down to my main
pointalism layer, I'm going to use that layer
seven just to try and make things a bit deeper around
the nose and mouth area. Just maybe had a little
bit more definition. So, what am I going to use? I will use Let's try pointy line broke three and just
double check I am on 3%, just like all the other pshures. And I'll use that just
to start off getting a little bit more definition to that shadow under the nose. Now, should I put on
my outline layer? No. Let's just try doing this by looking at the picture and judging what I'm
doing from there, so Also, that shadow
on the bottom lip, that could do with being a
bit more sharply defined, and looking like it belongs to that shadow just
above the lip, because that is a shadow that's coming from the
bottom of the nose. It's all the same shadow. But I think it could
do with being a little bit better defined
around the edges. And now that I've done that, let's switch to let's try DC medium scatter and just add a little bit more
above a what I've done here is a bit of
what I call assumptionts. If you've done my
courses before, you know what that is where you assume something is true and
so you draw it that way, but the assumption was wrong. And in this case, I was
looking at that lip. Saying, Well, I
know that there is a top lip there under the nose, and so I will draw the outline of the top lip under the nose. But the fact of the matter is, there's almost no
tonal variation there. You can barely see the top lip, so I will make this area
underneath a bit deeper, and I think that is starting to help knit those
areas in together, so I have a more
consistent shadow, maybe a little bit darker on the underside of
the lips like this. That's starting to
work. I am going to come and choose DC
pointy line broke two because there's
a very dark bit just where the lips
part in the middle. And I must admit, I
do like these lips. They're very sensual lips. Let's do them a bit of
courtesy and draw them, hopefully, in a way that whoever created the statue
would approve of. I am going to come down to DC dense scatter because
just underneath that nose, that's a pretty deep
shadow. So let's do that. It comes down a
little bit further than how I had
originally done it. Now, let's try come
to medium scatter, because the edges of those
lips, they're very nice. They could do with being
beefed up a little bit. Also the other side, as
well. Some nice bits there. And also, oh, there's a nice little bit on
the side of that cheek. What would it be? Like a
dimple or something like that? Let's come to light scatter
and gradually add some of that detail in
around there because that's helping sell the form
on that side of the face. It's a lot more subtle, but it's definitely there, and I would like to include it. Also, let's see what
else? Under that lip. Yeah, that bit
where the bottom of the lip starts to form
into the lip itself. That could do with being
tone down just a little bit. I mean, it's got a lot of
reflected light there, but it's still in shadow. So it's not going to be as bright as any areas
that are directly lit. Let's come to our medium
scatter, as well. No, that's come
to dense scatter, because there's just one
or two bits around here, which I think could do with
beefing up a bit more. Oh, and while we
are here as well, let's come back to
DC light scatter because there's also a little
bit of shadow just here, which is helping to find
that cheek right now. Let's take a look at this.
Let's do it to about that so that we won't see any distracting changes
around the eye area, but let's take a look
and see what we've done. Let's move this across. Do that. So now you can see
clearly what I've got and make this
late invisible. That is definitely helping.
At least I think so. I won't know for sure until I
see the picture as a whole. Yeah, that's working. Now, because I can't help but fuss, that's just the way I am, I am going to come
back and start worrying over details,
like, for example. Let's try pointy
line broke three, and there's bit just on
the corner of this lip, which could do with being a bit deeper,
going around a bit more. Just a little bit more defined. What about the other side? That's just a
little bit rounder, a bit more dimple down there. And just to finish off because I am going to be merging
this down pretty soon. Before I do though, I just
want to make sure that I'm not putting down some
rather messy areas like, for example, here on that
dimple on the other side, that's not quite right, so I'm going to come to my eraser. I'll choose DC Nice buildup make it fairly big.
No, smaller than that. Hover it over about there, and just get rid of some of these spots because I
want some forming there, but I don't want to blobby mess. Alright. I go and add a few more points there because I'm still not happy with it. I think the problem there
was I was looking at that dimple just on
the side of the mouth, and I wasn't looking how it was connecting to other things. But I'm now going to
commit to this because I don't want to end up with
layer upon layer upon layer. And because I haven't
renamed my layers, and because it's just
basically a load of dots, I will end up with a
whole load of layers, and I don't know
what's on what layer. I will not have a clue. So come to layer
seven and merge down. Now, all my dots
apart from that layer with the layer mask we did
a couple of videos ago, everything is on one layer. I've committed to this. And so the next thing
I'm going to do create a new layer and
do the same thing again. Right. I'm going to do
the other eye plus also, I think, the sides and
the bottom of the nose, and I really don't think
I have anything to add. And what I don't want is you
paying for a video where you simply watch me draw without
me explaining anything new. So I will do the left
eye and the nose. If I think I have anything
that needs to be said, I will record it
while I'm doing it, and you'll be able to see that. Otherwise, I've already
explained things. I've already given you the
techniques that you need to do the left eye and the nose if you've
been following along. So that's your exercise. I want you to do the
left eye and the nose. And in fact, what I'll do is I'll say press
pause in a minute, and you can have a go at it. Once you start playing
the video again, you will see what
I'm about to do. You'll see the other eye and the nose in case you want
to use that as a reference. Okay, so press pause now. And we are back. Okay, let's take a
look at what I've done if I come to
my layers panel. This is Layer seven. Let's make it invisible for a second. That's where we left off. I went away, did
about half an hour or 40 minutes worth of work, and that's what I ended up with. And I'm tempted to
merge this down, create a new layer,
and then carry on. Before I do, though, there is something I want to show you because that nose turned
out to be quite hard to do. It's very much a nose
from the classical Ear. There's a certain shape to it, which is very hard to do
with a whole load of dots. And so what I am going
to do is come over to our effects and then
come down to liquefy. Now, in case you've never
seen liquefy before, this allows you to push things around, and I'll show
you what I mean. You can see my little circle
here just hovering around. I am on. Push. I can
adjust the size here. I want maximum pressure, no distortion, and no momentum. What I can do with this,
if I come to that eye, for example, I can pull
the pixels around. Now, those are the pixels
which are just on this layer. Any layers above, any layers below will not be
affected by this. I will two fingertap
that because, frankly, it looks terrible. But what I do want to use it for is I'm going to make it a little bit smaller,
maybe about there. And I'm just going to
nudge some of these pixels just on the side of the nose just by a tiny amount. Hopefully you can
see me doing this. And maybe just a
little bit down here, maybe pull that in
just a little bit, just to try and get the shape of that nose just a little
bit more how I want it. Now, I could try doing it by adding dot or taking them away, but if I can take
the existing dot and move them just
by a little bit, then great. I'll do that. Just to show you something, though, you can't
push this too far. If I was to take
some of those dots and I pull them like this, eventually, you can
see that very clearly. The dots start to stretch in
ways you really don't want, so two finger tap
to one do that. But what I can do is just alter the shape
of that nose slightly. And commit to that, I would just come back
to my paintbrush, tap on it, and I'm ready to go. Okay, so let's take a look
at that before and after. If I two fingerpress
that's it before. If I three finger press
to redo, that's after. It's just a small amount, but it's getting that nose
close to how I want it. Now, that only worked
on the layer I was on. If I wanted to change
the whole picture, then I would do what
I'm about to do anyway. I've just decided, yes, I will go with what
I've got so far, and I will come to layer seven. Merge it down, and that's
what I've got so far. Okay, I hope you're able
to follow along with that and get similar
or better results. I'll let's move on
to the next video.
11. Using Selections: Okay, next up, just around
the size of the face, where the face
meets the hairline. There's a definite shadow there, and apart from
demonstrating that it's there for the first time
in any of my videos, I'm going to use the
selection tool to draw with. I've seen other people
recommend it as a drawing tool, but I've always avoided it because I don't
like the hard edges. It's difficult to
draw a decent anyway. But in this particular occasion, when I'm putting
down a whole load of points and I have a
hard border there, this is one of the few occasions where I'm actually going
to find it useful. Well, at least I hope so. So let's come to
our Layers panel. First thing I'm going
to do is, well, you saw me merge things down in the previous video,
create a new layer. Next thing, I'm going
to turn on my outline. My new layer, my layer
seven is selected. So I'm going to z right in, I can see my guides there. Let's just make this
picture a little bit narrower because
I can see my guides. They're in red. They're
going to help me. And so now I'm going to
come to my selection tool. I have it set to free hand. Alright. So I'm going to
come right up close and personal on this area here. And I'm going to trace it along my red line like this.
Take it up there. Come round. And bring it round
until I get back to my little starting
dot, tap on that. And hopefully you can see, I have some shaded
diagonal lines that are just slowly moving. It looks like up to the left. That's letting me
know which bits of a picture are not selected, and the bits which are clear, the bits without
those moving lines, those are selected, which means I can
draw in those areas. But I'm not done yet. I want to do this other side as well. Namely that bit. I have my selection set to add. And so I can create
another selection here. I'm going to bring it
down to about there where it's merging into that
cheek area, bring it round. Then come round here, start
to add some bits here. I've gone slightly
off with this. That's not a problem.
Bring it back, tap there, and I still want
to add a little bit more, which I didn't get
last time just there. Now, how I got all of it? I'm going to pinch
out a little bit. I'm going to come
to my wrench icon. And when I come to preferences, you see down here it says,
selection mask visibility. At the moment that is 25%. I can crack it right the
way up, Oh, that is awful, but you can very, very clearly see the area that
I have selected. I'm happy with those, so
please, please, please, let's take that down before we all get terrible headaches. Before I do anything else, I'm going to come to saving load, because sooner or later, I want to move on from this mask, but I might want to come
back and revisit it. So saving load is gonna let
me save this selection. Before I do, though, I'm
going to come to feather. And I'm going to feather it
just by a tiny little amount, even 1% so that I don't have a completely
hard border there. There's going to be ever such a slightly softer border there. We probably won't even see it when we're putting
down our dots. But one of my problems with the selection tool is that you always get a very hard edge unless you either A blur afterwards or B, put a
bit of feather there. Now, I will come
to Save and Load and click on the
plus selection one. That is waiting
for should we want it at any point in the future. And now what I'm
going to do finally has come to a selection
mask of visibility and take it right down
to zero because I find those little diagonal
lines rather distracting. I can't really judge what
kind of tones I'm putting down with those little moving bars there
in the background. And so now, well, look, I will come to DC
widescatter, actually. And from here, I can
just start putting down a tonal area like this. And because my
selection is in place, I can put my shading
down very, very quickly. And because I
feathered it slightly, I don't have to worry about
really really hard borders, and because it is invisible, I can easily judge how dark that selection is in
comparison to, say, the eye. In fact, I can come to my
outline and make it invisible. I can already see
where the selection is, but with that invisible, I can judge how deep I want the shadow to go really
easily and pretty quickly. Because if I look carefully, say this bit here, I can see just at the
start of the shadow, there's a slightly lighter bit, but then it goes
deeper the closer you get to the border where
the head meets the hair. So that's useful, and
that's not a problem. And so I just carry on drawing. I'm trying to make mental
notes of where this border is. Now, when it comes down to just where the shaded area
meets the cheek, if I do it too
hard, I'm going to see the border of my selection. I don't want that, so just
be aware that that is there, two fingertip to
get rid of that, and just make sure everything
blends in nicely like this. Now, let's start
concentrating on one or two darker
areas because I think I've got the overall
tone just about right there. I'm going to swap to
DC dense scatter, and I'm going to put in some
darker areas at the top. I can definitely see it. There's a fairly narrow
band coming down, it seems to fade away. Even with that feather, I'm getting a very
hard border there. That can work, but I may
go over that border later. Once the selection's not there, just to make it a
little bit rougher, a little bit more dotty
because this is pontism. There's a lot of dots.
You start putting in very hard crust
defined borders. It's almost like
you're trying to tell two stories at once. Doesn't really work that well. Let's just come down here. There's a deeper
area around here, and I think that is that shaded area done
very, very quickly. And what about the other side
here? It's very similar. Let's come to DC Y scatter, which is what I used before. And well, let's just scribble and we will find our borders. There. Bring it down. As I say, normally, I'm not
too keen on using selections, but for this, we talk
about a time saver. No, I'm going to position
this so that I can see the darkest areas on
the other side of the face before I choose dense
scatter and just deepen up some areas just around here where they need
to be deepened. Now, I must admit that is too hard a border
for my tastes. I am going to be doing more
shading on the other side, but while I've got
this in this state, I don't really want to
have to deal with that. So what I can do is come back, turn off my selection,
and now it's turned off. You can see I can draw anywhere. But if I come back to my
selection tool again, I can come to save and load. Selection one is there.
Now, you can't see it. I made the outer
selection area invisible, but if I just come Oops, and double click to load it. You can't see it because I've made the selections invisible, but if I can back to my wrench, I can selection mask visibility, it's there ready for
us to work with. But I don't want it for now, so I'm going to turn
off my selections. What I'm going to do
is come to my eraser. I'm going to choose for this. I'm going to choose DC
Pointe line broke two, and I'm just going
to come to this border and just try
and break it up. See, I'm just roughing up that edge a little bit
because it was too harsh. That's nice and
quickly like that. And if you compare that border with the border on
the other side, which I haven't done, that broken up border is
working a lot better. So come along, just
drag along here. So I don't get any
harsh straight lines, which kind of ruins the
whole pointism effect. The fact that I have that very light area of dots
in the background, that is also helping. As I said in the previous video, it kind of helps me knit the various different
areas together a little bit better. Let's
take a look at that. And that was done really
quickly and easily. And if I compare
that with the photo, I am starting to get there. Now I can still see areas
which I do have to build up like around that cheek I've
already done, for example, that could do with being a
little bit darker in places, and I see that now more clearly because I've just put those two little shaded
areas in place. Funny the way it works. You work on a certain section
and you think, Yeah, okay, that's
good. Then you move on. And you go to another section, and once you've
done that one, you come back to the first section, and you think, Well, actually, now that I've done that, the original section
needs a bit more work. You're balancing up
the different tones. If you think about
it, pointillism is basically it's all tone. There is no color
information here. And so tone is your friend. And general word of advice, you've seen me put
down areas and think, Oh, dear, I've made it too dark. But then later on, I've
come back and thought, actually I need to
make it darker, like this side of the cheek. I would say to you
is if you have to go one way or the other way, go in the direction of risking
making things too dark. You have to take a deep
breath when you're doing it because it's easy to make things darker
than it is lighter. But all things being equal, if you can get more contrast into your picture, it's
going to look better. It's going to look more dynamic. Alright, so layer
seven is selected. I don't have a mask selected, so I'm just going to
come to DC wide scatter. And while I have this layer sitting on top of the other one, there's just one or two more
changes I want to make. I'm just coming to
this cheek area, making it a little bit darker, just in one or two places,
but just around the side. Around here. Also,
I think there's a certain bit between
the eye and that shadow, which could do with being a
little bit in deeper shadow. Also a bit under
the chin as well. This is starting to get to
the stage where I'm going, Oh, there's a bit that
needs to be darker. Oh, there's another bit
that needs to be darker. And it's just a case
of going round, looking at the various
areas and balancing up the values relative to each other and trying to go
for softer borders, harder borders, and that's
how you're going to get, hopefully, the
magic of pointism. And already, this project
has taken quite a long time. But you compare what
we've been doing now to the idea of putting in all
of those dots individually. You see what a massive
time saver this is. Okay, so as before, I'm going to carry on working, building this image up, and I've already shown
you most things. If something crops
up that I need to talk about, I will let you know. Otherwise, I will zip
through this very, very quickly because there is one more thing I do
need to talk about, and that's using
this light color to add a little
bit of highlight. Okay, so I will carry on. And I'll speak to
you when I have something that's
hopefully worth saying.
12. Drawing our Hair: Okay, I'm back. I have created a new file which uses
layers from the old file, and it's called
statue with hair. It is available for
you as a download, and you can see what
I've done here. I've also made one or
two other changes. If I come to my layers palette, there's one or two changes. My hair layer, that's
right at the bottom. And it needs to be on that layer for this tutorial to work. The start here contains all the dots that
make up the statue. I merge layers down. Apart from the fine dots layer, and you'll notice that doesn't have a layer mask attached to it anymore because I think
the drawing has moved on, and I'm thinking,
maybe I want to use those fine dots to create
the lighter areas. So there's no layer
mask attached to that. I'll revisit it later on. Then you have the outline
layer with our red outline, which has proven
to be very useful, but I think it can be
made invisible for now. Then our paper layer, which is looking rather subtle at the moment, and
then our swatches. Speaking of which, let's
come to our swatches. Make sure you have the
background color selected. Because what we're
going to do now is open our layers
panel and come down to the hair layer and I'm
going to turn on Alpha lock. Then I'm going to come
up to our paint brushes. I want the one at the
bottom hard blocker inner, and I'm going to
set this, make sure it's set to completely opaque, and I'm going to create
it. So it's very large. I will pinch in just
a little bit so I can see all of those
yellow areas and then I'm going to paint over
this entire area like this. Okay, so here comes
the fun part. Come back to our layers panel. The hair layer is selected, I'm going to come and I'm
going to create another layer. Click on the icon,
and I'm going to come to clipping mask. And so just to go over
the clipping masks again, you have your little
arrow pointing downwards at the layer
below, the hair layer. That lets you know that whatever
you draw on layer seven, you'll see all the
brush strokes, but you'll only see the brush strokes where there's already brush strokes on the layer below that it's attached
to the hair layer. So clipping layers,
they're a bit like Alpha lock in that
you can only draw where there's already
drawing and you can't draw where there are
transparent areas on the layer. The difference being
with Alpha lock, you draw directly on the
layer with the Alpha lock. But look if I take
off the Alpha lock here, if you're on layer seven, which is the clipping
layer and you can see it's the clipping layer because of that little arrow pointing down, you can only make
brush strokes where there are brush strokes
on the layer below. The hair layer,
let's show you this. Let's come to our brushes, and I'm going to come
for DC wide scatter. For my color, while
I want the colors I'm using, that's this one. And look, you know
what? Just while I'm here, come to swatches. I should have done this before. Swipe across, come to
unlock come to eraser, hard lock it inner, and I'm going to get rid of that deeper blue because
it's distraction, I might use it by mistake, and that leaves just
the colors that I'm using or I plan to
use for this picture. Come back to the layers
panel, swipe across again, put it on lock because we don't want to mess with that
layer unless we have to. Come back down to layer seven and come back to our brushes. DC widescoter is the
one we're going to use. It has set two, 3%,
just double check that. And now I'm going to scribble
over nice and quick. Can you see what's
happening now? All those pretty
bright, frankly, not very nice
looking yellow areas are suddenly turning
into a much, much nicer version
of the statue. I want to start off just by
going over all the areas. I know I put down some
areas for the robe, as well here, and I think
around here somewhere. And that gives me
a very good base on which I can start to
build up the shadows. This also helps me because I've got to a certain stage with
a bit that interests me. That is the face, the eyes, the nose, the mouth. The I'll admit it. Not so much. And well, look, up until this tutorial, the
way we've been doing it, trying to get all of these little folds and nooks
and crannies and creases, doing it the way we've
been doing so far. I'm sorry that's gonna
be a bit of a nightmare. Doing it this way, I spent what? I think about three quarters of an hour doing all
those yellow areas. And even just with this
scribble I've done right now, that would have taken me
hours and hours to do doing the traditional one point at a time way of doing things. And finally, there
is the fact that as I move away from the
eyes, the mouth, the nose out towards the outer parts of
this illustration, I don't want to put in the same relentless
amount of detail. I want it to gradually
fade into something more generic dots than a whole
load of relentless detail, which, to be honest,
is going to start to distract from the central area. People do it all
pencil drawings, for example, or
charcoal drawings. The detail is all
in the points of interest and fades
out towards the edges so that the attention
of the viewer is kept right where
you want it to be. And that's the face. Alright. Let's come in
and take a look at this. I'm going to swap two, say, let's try medium scatter. It's a little bit
finer, and I'm going to start to put in
little areas here. And I'm taking a look at the photo and deciding
where the denser areas are. And there's definitely
denser areas around here. I think the edge of
this needs blending in. Do you remember when
we did the selections? Yeah, those areas there. So what we're doing now needs
to blend in that border, while I'm going along, make
the whole thing a bit softer. And let's just zoom
out just to take a little look at that already. If you compare that bit
I've just done with some of the other borders on the side of the face where it meets the
hair, it's looking better. What we've got now is a big exercise in
marrying new bits, right now, the existing bits. And I think at some point
earlier on, I said, Oh, the edges of the yellow
bits that I was drawing, you can use a Smudge
tool to blend them in. Not really sure that's needed, because look, just say
this little bit here, which I'm concentrating on. I'm looking at the picture, deciding what needs to be done. I might come and choose, say pointed line broke three. I'm just putting in a
little bit more definition in this one particular area. I don't want a hard line there. I never want any hard lines. And then what I'm going to do, just while I focus on this area, I'm going to come to
the dotted layer above. And let's let's try the
light scatter brush, and I'm going to draw just along the edge of that border
that I've drawn, just to break it
up a little bit. In fact, let's come to
pointed line broke three. Gonna go right along
this border like this. So that I lose that very, very hard edge,
and it works very, very quickly. Thank
you very much. Keep looking at the
reference photo to get some ideas of
what I should be doing. If I decide I got a bit
of a problem with this, then okay, what am I using? DC pointy Line broke three. I will come to my eraser,
choose the same brush. DC pointy line broke three. Make sure it's on 3% like I've been using
for all the projects. Then I'm going to come
down to my hair layer, and I'm in the same area,
look I'm gonna zoom right in. On this bit here. What I'm going to do
is just go along and erase some of this border so that I don't get
that hard border. Remember, hard borders are kind of the enemy of
what you're doing. Well, that's making
it a bit too simple. If you've got a hard border
with your pontllism, hopefully, there's a
good reason for it. And if you've got a hard
border in one area, consider doing a similar kind of thing in other
parts of your picture, because if you have a hard
border in just one area, people's eyes are naturally going to be drawn to that area. Alright, let's zoom
out a little bit. And already, you can
see that's looking quite a bit better than
what I had before. And also, it is fast.
That's what I want. Let's come back to let's come back to our
general dotty layer. Come back to light scatter, throw in a few more
dots like this. Okay, this is the technique I'm going to be
going along with. At the end come to the
layer which has got all those old yellow
brush strokes and strengthen up some of the
deeper areas around here. Definitely bits around here
that need strengthening up. And that's the process
I'm going to use. Blending areas. Oh, I've
got a nice bit around here. Let's come to Pointy
line broke three. And I think I can see
starts off about here. I'm getting a little bit
of reflected light here, which is looking rather nice. I'll just break up this edge just so it
blends in a bit better. Then I'm going to come to,
let's try medium scatter. And just to the side,
let's make some of these areas a bit
darker hang around like this because I'm seeing
this nice little bit of reflected light just where the hair meets the face, and
I'm going to put that in. I think I said, right at
the start of this project, the bits of reflected light.
I really do like those. Well, let's make them
look good right now. This is a case of
just going through this building up certain areas, going to the layer above
to blend in those areas. If I have to raising
certain areas look, I've got a very dark
bit coming around here. I'm putting a bit of variety
in these shadow areas, so it's not all just one tone. But what I am going to do,
if I zoom out a little bit, you can see, I'm building
up certain areas, and one thing I haven't
done is come to the very outer part of the
statue and started building up those areas there because I
want the detail to gradually fade out as I go to the
outside of the statue. I might add just one or two
little bits, just like, say, the side of the head or the
back of the head just here, but I'm going to come
back to wide scatter, and I'm going to
make it gradual. And I'm not going to put in a whole load of detail
on that particular area. I just want people to
know where the back of the statue's head is
just in this area here. But one thing I am going to
do is come to my start here, which has most of the dots on. And I'm going to put in a few dots here just
to break things up. Almost like a
little cloud layer. Let's come and turn off our swatches or make
the layer invisible, just so I can see
what I'm doing. And I just want one or two
little cloudy areas here. This is where the detail
starts to fade out. And I'm making just one or
two fairly broad sweeps and just letting the broad sweeps mingle with each other to
create a basic texture, which fades out as you go
toward the edge of the picture. Okay, I think that's all I
wanted to say about this. Now I'm going to come in and I'm going to
start working on it. And I'll probably do a
very speeded up video for this so you can
see me working, but I don't think
you need to see me working on absolutely
everything. So I might fade out that
video and fade back in. And then when I have
something else that I think is worth saying, we'll
carry on from there.
13. Just a Little Progress Video...: Okay, so I think I've got
to the point now where I am going to stop at least
with the darker dots. Now, you may notice I
didn't say I'm finished. I'm saying I'm stopping
now because I think I've got to the stage now
where if I do any more, I can feel myself starting
to make shortcuts, which I don't want to do. Look, if you've done any
of my other courses, you may well have heard
me going on about the most important thing
is to finish your work, and that's finishing your work when you've run out
of inspiration. Frankly, you're
starting to get bored, that's when the
discipline kicks in. I know discipline isn't
a very artistic word, but it is a very important word for anybody doing
anything creative. You need the discipline
to get the work done. But I'm starting to
get to the stage now where I've been using
discipline for a while. Can feel my own mind trying to get away with making shortcuts. Not really looking at
the drawing and just making some rather lazy strokes. Like, for example, look, take a look at this
area at the side. That's some quick strokes, but I was building up a texture, and I want to be happy
with the texture. It may be loose. It
may be a little bit abstract compared to the
rest of the painting. But I still want
it to look good. And even in the time that I've been talking since
I faded back in, I'm looking at this
thinking, Oh, oh, I could work a little
bit more on another bit. But no, I think now's a good time to stop
with this and explain. The hair in some
places is a mixture of hard and soft edges because I've drawn on the
layer seven layer, that is the one which is clicked to the hair layer underneath, and some of the other
dots are on the start here layer so that I can create
more subtle transitions. But in some other areas, say, like this bit of the
hair around here, for example, I've pretty
much left it as I found it. And so what I'll do is
I'll make the next video, the final video, and in that, I'm going to have a quick
look at adding one or two of the lighter dots that this
very light color here. Alright, let's do that
in the next video.
14. Adding the White Dots and Finish: Okay, we're back.
Now, I did have a play with that light color. In fact, look, let's
put our finger on there now and pick it up. That's our new light color. And I'll show you two different
ways of applying this. And also, I'm going to
give you what I think is the best bit of the device
if you're going to do this. Now, with color pointism
think of the works of Surat, and I'm sorry for any French speakers that I
pronounce that wrong, Surat I'm not sure. Let's call that color pointism. But what we're doing here
is monochrome pointism, one color background,
and if it was traditional ink of a single
color, that's usually black. I thought just at
the end of this, I'll try adding some
lighter dots in there, just to try out something new. So what I'm going to do is
the first way of doing it. I'm going to come to
my fine dots layer. Do you remember that
from a few videos ago? It's just a layer
of fine dots that I used to knit the various
different textures together. Well, we can use that.
Let's come to Alpha lot. As for the brush, well, let's come down the bottom.
Let's come down to. Let's try nice buildup. And for this, my
paste is on 100%, my brush size, let's make
it a little bit bigger. And where are the
lighter areas on this? It's mainly on the left side of the statue as
we're looking at it, and it's in areas
around the forehead, the cheek, the hair,
tops of the eyelids. Well, look, let's start off just by adding a little
bit in the top left. That's going to be
around the hair area. And if I do that,
I'll let's zoom in a little bit so you can
see this bit more clearly. I can take all those
alpha locked pixels, and I can turn them. Instead of the
color we use them, I can turn them to a
lighter color like this. Not by much. Alright. You do a few brush strokes
and I'm getting a slightly lighter
version of that white. I want to try and
keep it one color. Not very light gray, then a little bit
less lighter gray. Let's try and stick to the whole pointism
thing where you use the density of the
dots to provide the shading rather than making the dots themselves
different colors. Just a few little
bits around here. Oh, let's make sure
that's back on 100%. That flipped off for a second. Now, we've got a little bit
on the forehead around here, a little bit around the eyes. On the nose, yeah, there's
definitely some here. I'm going to try
and focus it more on one side of the
nose than the other. A little bit on the cheek
and on the other cheek, a little bit on the lips. Maybe I'll make my breast
size a little bit smaller. Just the one, two areas
around here on the lips. There's a tiny bit just
at the side of the mouth. And, oh, I think, definitely. On that tunic. I'll make
my breast size bigger. And just around this neck area, there's quite a bit
of light there. And I'd like to have that
there just to create a slightly bigger
division between the shoulder of the
statue and that well, suggesting vegetation
in the background, that slightly darker area
just where I'm circling. Oh, also, while I'm here, I'm going to take
this whole side here because I don't have the layer mask anymore.
I can do this. Just make that a
little bit lighter, just to let people know
that on that side, the left side, that's where
the light is coming from. So I'm just helping
hammer that point home. And yeah, maybe you can
see it, maybe you can't. It is very, very subtle. Well, pretty subtle,
a little bit, just maybe on the top, but the eyebrows on the other side. Oh, also around the
upper and lower eyelid, there's a little bit
of a light there. But what I am going to do is
come up to this gray color. That is the color of the background. I'm
going choose that. And I'm going to draw over some other areas of this light dotted region
because what I want to do is leave a slight gap in between the light dots
and the darker dots, that is the rule that
I was talking about, because the whole point
of the dots is they are representing different
shades, different values. And what I don't want is to have light dots and darker dots
trying to share the same area. It just doesn't work. It's like trying to
have a shaded area and a highlighted area both in the same space. It
just doesn't work. So wherever I have areas
like this where I've got lighter dots and darker
dots sharing the same area. I want it so that
I've either got lighter dots or darker dots. So let's just knock
those back a little bit. Maybe just get rid of a
few areas around here. Now, remember, I'm just
painting in gray on these. I'm not erasing them. Let's take a look, one or two of these more critical
areas around the eyes. Underneath the eyes, oh, there's a big area here
which are sharing. Lighter dots and darker dots. Same with the other cheek, but also what I want
to do with this. Is come to my start here, Leo and this time, I could
repeat the same thing. I could alpha lock this and
paint in the same gray color, the same technique as I'm using, or I could come to my eraser
and just rub them out. I am going to go with turning on the Alpha lock and painting those areas the background gray. The reason for that
is that I'm not sure, to be honest, how I feel
about these lighter dots. And so if I decide
that, you know, what I didn't work, I want to go back to
what I had before, and all I need to do is come
back in with the alpha lock on and paint these dots the original dark
blue that they were. Whereas if I erase
them, they're gone. And I'll have to go back
in and do them again, which is work I don't want. Yeah, you can see on the slay there's one or two areas here, but two different shades,
trying to share the same space. It just doesn't
work. So, you use the colored paper to do what you can use colored paper to do. You've got your shade, but also because the
papers not white, you can use white or
a very light colour to add a little
bit of highlight. And when you're adding
highlights like I'm doing now, I would say get most of your form through shading,
which is what we've done. And just add one or
two little highlights as and when you
really need them. Now, we could keep
on and finish this, but if you want
your highlights to be just a little bit more, and what I suggest you do is come to your fine dots layer, come up and create a new layer, and let's rename this because we don't
want to end up very confused and call
this ight dots. And then you do what
you did before. You come to your brush. Let's choose, say,
DC wide scatter, where we're gonna do
these lighter areas? Well, there's quite a bit around the shoulder
around the tunic. So let's do a little
bit around here. You can see quite a bit
around the base of the neck, a little bit on these
folds on the tunic, a little bit more just
on the side of the hair. Now I'm just laying down
a cloud of dots here. I'm not gonna do it
too much because well, I'm gonna have to do what I did before come
in with my eraser. What is my eraser
use a nice buildup, and I'm going to have to trim that back the same
as I did before. But if I want these
denser dots, well, denter than that background, you can see off to the left, and this is just what I'm
going to have to do. And you'd build up
things that way. But as I say, with
these lighter dots, I recommend you
use them sparingly just to create
strong highlights. That said. I was about to say, Okay, that's the
end of the project, but I can't bring
myself to leave this little bit just
around the neck area. It's just not working for me, and I can't bear to
leave something. That's not really working
for me. But no, no. Come on. That is the final technique I
want to talk about. Let's take our reference
image, make that invisible. Quick pinch in and pinch out. And there is our statue done
in a pointilistic style, and there is a zoom up of the statue done in
a pointilistic style. And wherever you go,
dots everywhere. There must be millions
of dots there. Now, this was quite a
long tutorial, and, okay, I'm not sure I would want to
keep those lighter areas, especially that area around their neck. In fact,
you know what? I can't help myself. Come to the arrays tour, DC
nice buildup, make it large, and I want to get rid of
these bits just around here, for example, it's looking like a blob rather than a load of dots defining a form because that's what
you do with pointism. And the other thing
about pointism is, well, first and foremost,
hopefully they look at something like
this and they say, Oh, that looks nice, but
also with pointism, the thing that people say is, there must be thousands
if not millions of dots. How many days or weeks
did that take to do? Oh, my goodness, the patience of the person doing it
and so on and so on. But Okay, this tutorial
has been fairly long, and I have sped up certain areas and cut out some of the work
on the hair, for example. But I estimate this might
have taken me What? Well, a few hours. Let's say, anywhere 3-5 hours to do this. You compare that with
the weeks it would have taken you to do using
traditional techniques. Can I put it to you that
these brushes I've supplied, along with the techniques
I've shown you, means that you can do pontism or just playing great art in a fraction of the time
it would take you if you were doing it
using traditional media. Okay, those are the exercises. That's the technique.
There are the brushures. There's the paper
and the textures. I hope you got something
good out of this course, and I'm on a few
Internet forums, and it really makes my
day when I see somebody posting an image that they did
using one of my tutorials, it is good to feel that
there is somebody out there who's getting something
good from the things I do. So if you're proud of, post it. Okay, all that remains
now is for me to say, thank you once again for
investing in this course. Well done for completing it. And if you enjoyed this, I have plenty of other courses
available for you. So maybe I'll speak to
you on one of those. And in the meantime,
here's to you making some great art. Bye for now.
15. Project Requirements: Okay, let's tell you
what you'll need to create this pointlistic
drawing of a Greek statue. You're going to need an
iPad and the Procreate app. Also, you do really need an Apple pencil to get the
best out of this course. Some people say they're happy using their finger to draw with, but it just doesn't give you the various advantages that
an Apple pencil gives you. Also, there are third
party pencils out there, but the makers of Procreate have said that they
don't support those. To do this project
in particular, you'll need to
download a few things. One is the photo of the statue. Another is appropriate file
which I want us to work with. And if you ever want to
print out that file, you should get a good printout at anything up to A three size. There are also some PNG files, which are little
pointistic textures. I will show you how to use
those later in the course. The main thing is
there are a series of procreate brushes which I've created especially
for this course. You will need to download those and get those
into Procreate. If you're not sure how
to do that, don't worry. At the end of this class, there are a couple
of reference videos. One is a quick procreate primer for anyone who's never
used Procreate before, but the other one is a
video devoted specifically how to download things
from Skillshare and get them up and
working inside Procreate. So if you are unsure how
to do that, just go there. Make sure that you have
downloaded everything you need before we go
on to the next lesson, where we'll start
putting down some dots. And I will see you there.
16. Download Resources into Procreate: Okay, let's show you
how you can import various different assets into
Procreate from Skillshare. The class I'm using to show you this is one of my classes, learn to draw with Procreate. But what I'll show you holds
true for any other class. Okay, so first thing,
let's scroll up. You see a number
of different tabs. Here you want to press
projects and resources. And here, if you come
down a little bit, you can see there's various
different resources I have. So let's download a
few files. Let's try. Well, for a Procreate sketch, at the top left, all I
need to do is tap on that. Gladys sketch, Procreate. And I can also see something
here which says, save. So I'll come to save, and I'm going to save
it under my files app. Now, this is an app which
comes with every iPad, and it pretty much does
what it says on the tin. It's just a way of organizing your files, so I'll tap on Save. Now, while I'm here, let's
download a few extra things. So I've got the procreate file. Let's try the file underneath, dolphin dot JPEG tap on that. And that downloads, which took a little
bit of time and again, come to save, make sure
I have file selected. And while I'm here,
let's calm down a little bit because
I want to find yeah, where I'm circling,
learn to draw palettes. These are procreate palettes and I've compressed them
all into a zip file. So if I tap on that, come to save, so I'll come
to save save in files again. And also the brush set. I wanted to show
you that, as well. So let's come to the brush set. And yeah, I want to save
that and save that in files. So I will swipe up
from the bottom of my screen and let's just
come to my files app, and sure enough, here are the various different
files that I downloaded. If I come to this rather
small little symbol at the top, just
where I'm circling, and I tap that is a useful little button
because it will give you some information about where on my iPad these various
different files are stored. Okay, so sometimes I
have people saying, Look, I've got a problem.
I have a ZIP file. I don't know how to unzip
it. It really is easy. Let's come to this
one in the top left DC line to draw brushes
zip just tap on it, and it automatically extract. What about the learned
to draw palettes? Tap on that. It extracts. And you can see I've
got the dolphin there, and I've got the Gladys
sketch Procreate file. Now what about DC A
three paper file? This is a procreate file
that's been compressed. Sometimes I have to do that. All you do with this, again, is just tap on it
and the file unzips. I already unzipped it earlier,
so now I have a copy. I'll come to the one which has two at the end of the file name. That's the second
one I downloaded. If I tap and hold on it, and come down to the bottom,
I'll press delete. So now, well, okay, let's come to DC A three
paper file, Procreate. I'll just tap on that.
It gets imported. And there it is.
If I just pinch in a little bit, that's my file. Okay, well, that was
straightforward. What about importing a
brush set, for example? Again, very easy. Just come up to my brush
icon, tap on that. And you can see I have
various different brush sets on the left of the actual
brushes themselves. Just where I'm
circling, there is a plus sign tab
on the plus sign. And then, well, at the moment, procreate things
you want to create a new brush. You don't. Instead, you come to where I'm circling and come to import. Come to, in this case, I'll come to Chrome. So DC learns draw brushes. They unzip to a folder,
tap on the folder, and I'll come to say,
DC drawing brush set, tap on that. It imports it. And right at the top,
you can see DC drawing. Now, I already have that from one of my previous
courses just here, so I'm going to come
up to that DC drawing. Tap on a little icon, and you get a number
of choices there. I will come to delete. Yes, I did want to delete that. As for the palettes,
again, very simple. Come up to the top right where
I'm circling, tap on that. Come to palette at the bottom, and you can see I have a number
of different files here. Anything which starts
with DC is my work. Supposing I come up to the plus sign at the
top right, tap on that. New from file, let's come
to where I'm circling. Again, it shows me the path. I want the crown folder. Let's draw palettes dot zip. So let's try DC drawing
color swatches, tap on that. And again, that gets imported at the top
of my palette list, ready for me to do whatever I want with it. And
I'm good to go. And that is how you can
download files from Skillshare onto your iPad so that you can do whatever
you want with them.
17. A Procreate Primer: Okay, now, this video is just a very quick
primer for Procreate. It's just in case
you've never used the software before and you
don't know where anything is. It's more just a quick
tour of the interface. If you need more of
an introduction, than I have Procreate
the Fast Guide or Procreate solid foundations. And both courses have
got very nice reviews. Thank you very much for that.
Anyway, let's get started. There is your Procreate icon. I'm circling it
now. And if I tap on the first place you
come to is the gallery, and you can see various bits of work I've been working on. Now, yours will look
different to this. Because if this is
the first time, you won't have
created anything yet, and so you'll just
get the sample images that come with Procreate. Anyway, come to the top right. There's two icons there I want to show you. One is Import. If I tap on that, that's
where you can load up various files that you
may have downloaded from the Internet or
from one of my courses. But I'm going to cancel
that because instead, let's create a new file
for you to work on. To do that, come to the
plus sign and tap on it, and you have various different presets that you can load up. Let's just do this as
simply as possible. The very top one where
it says screen size. Tap on that, and
you get a new file. If you take your finger and thumb and you pinch it inward, you can resize it. You can rotate by moving your
finger and thumb around. And let's just move
that to there. Great, you've got a file. You
want to create something. And to do that, you
come to the top right. You've got one, two, three,
four, five different icons. Let's show you what they do. The first one is the brush icon. If I tap on that, you can see you have a whole load
of different brushes. What you're looking at right now are a series of pastel brushes, which I'm working on
for a new course. But what you will have are the brush sets that
come within Procreate. If I come down to where it says sketching and
I tap on that, there's various
different brushes, and you have a whole load
of different brush sets, which have brushes in
Okay, so let's choose one. Let's try Nico
roll, tap on that. Okay, so the next thing
is, I need a color. To do that, come to
the very top right where you can see
that yellow circle. That is my currently
selected color. If I tap on that, I have access to various
different colors, and I have various different
ways of choosing the colors. If you come to the
bottom, you can see I have palettes
highlighted in blue. Now, these are various different
squares that you can get. So if I tap on, say, this red, I can draw with that. If I want to choose
a different color, tap again in that
little red circle. And you'll notice
whatever color I choose, that little circle in the top right changes
to that color. That lets you know what your
currently selected color is. Tap away, and there you go. Now, at the moment, I'm not
very pleased with that. It's not a work of art. I want to get rid of it. So
take two fingers and tap. That's two finger tap
once, and tap again, and you can step backwards through the brush
strokes that you made. If I then realize actually
that was a masterpiece, I can three finger tap to redo. The finger redo, two
finger tap to undo. And if you hold down two
fingers on your iPad, just for a short
while, you'll start to rapidly step backwards
through the undos. Hold three fingers down
for just a short while, and you'll rapidly go
through any redos. Alright, back to these colors. So I have palette
selected at the bottom. If I go through these, where it says disc, tap on that, and you end up with a disc, and you can see around the outside all the
colors of the rainbow. And I can move this
around so you can see I'm selecting greens,
yellows, oranges, reds. And these are quite intense reds because that circle
in the middle, that controls how
intense the color is, and you can make it much less intense and lighter or much
less intense and darker. So you've got your
full fat red there. You have darker
versions down here. You have light
versions across here. But as you go across, you get less and less saturated colors. You can see that is a very, very desaturated red.
It looks like a brown. I can move it back
towards saturation, and I can move it
here to achieve more of a pink effect.
So that's the disc. The classic, this is my favorite when it comes
to selecting colors. You've got all the colors of the rainbow laid out
on a slider here, and you can see the full fat
color is in the top right. Darker versions of it
are here as you go down, and as you go towards the left, you get less and less
saturated colors until eventually you
end up with gray. White, black. Any color is available to you. And if you want a
little bit more control rather than dragging
this around, you've got your hue slider here. But underneath, you have
your saturation slider, and you can see, as I move it around
that little circle in the big block of color
goes side to side as well. I also have my value or my brightness
slider at the bottom. If I move that, you can see my little circle
in the square goes up or down to get lighter or darker versions
of my base color. Just underneath that,
you have your history, which is all the colors
I've chosen recently. Then the harmonies. You have lots of
different modes here, split complementary. I'm not going to get
into all of these. These are just a way of choosing things according
to color theory. And you can move that central
reticule around like this, and you can control
the darkness or brightness of it with this
little slider at the bottom. Next to that, value. Well, it's a computer, and any
color has a numeric value. Those three sliders I was
talking about the hue slider. Well, look, there's a value.
193 degrees, 73% saturated. Now it's 46% saturated
and 75% bright. And I can digest it that way. Also, you have red. Green and blue sliders. And you can achieve lots
of colors that way. And finally, we get
back to palettes, and let's choose a color again. That nice red. Let's come back to our brush tool.
There's my brush library. Nicarole selected. Did you notice that it seems
a little bit small, and it's not quite as intense as that color I
chose in the top right? Well, the reason for that is because of these two
sliders on the left. The top slider controls how
big or small your brush is, and you can see the brush slides getting
bigger or smaller. That's what? 39%, 40%. And yeah, sure enough, you
can see the brush is bigger. But it's not very intense. That is because
the bottom slider controls the opacity of the pressure at the moment.
It's set really low. If I take it up to
100%, and I drawn out. Oh, yeah, you can see that's
a much stronger color. If I take the opacity,
so it's way low. You can see that I can
gradually build up the brush effect more subtly. And at this point, I should say, these two sliders learn to use them and learn to vary
the opacity a lot. Learn to vary the size a lot because then you get
small brush strokes, you get bigger brush strokes,
and you vary your work. And if you alter the opacity, you can build up much
more subtle effects. Let's choose another
color for this. Let's choose a nice not very
subtle yellow and crank up the opacity and the brush
size there. There you go. Two really subtle brushstrokes. Now, supposing I want to get that red I was just
using, well, that's okay. If I just press and hold my finger up in the top left where the little
color circle is, just hold it for a couple
of seconds and you'll get the last color
you were using back. Okay, that's our brushes, but you can do one
of three things with every single brush
in the brush library. You can paint with it
like we've been doing. But if you come to
the icon next to it, which I'm circling, this
is your smudge function. And if I tap on smudge and
come down to painting again, there, you can see,
I have Nico roll. But this time, instead
of painting with it, let's come to that border. I'm zooming out by dragging outwards with
my thumb and finger. Let's come to that red
and yellow border. I made my brush size
a little bit smaller. And if I just rub
along that border, can you see what's
happening? I'm smudging. Like this. And I can blend
different areas of color. And if I come to a different
brush, let's come to. Well, let's come to airbrushing, and choose one soft airbrush. I make my brush size larger because the brush size
doesn't stay the same, no matter what brush you select. I chose a different brush, so now I have a
different brush size. And if I come to that same
area and I start smudging, can you see I'm getting
a much smoother blend because the soft air brush is a very soft,
simple blending tool. Alright, so that means we can create brush strokes
with the brush function. We can smear the brush strokes around with the smudge function, but we can also erase brush strokes using
the erase function. Again, it is the same brush. But this time, we're
using it as an eraser. So let's do this. Let's take
the apasor right the way. Let's make our brush size. But any old size, and there you go. I have now erased the paint
strokes from that area, and this is a very
important point. In traditional media, using
eraser on a piece of paper, you can always see a bit of pencil leftover and the paper has been flattened where
the brush stroke was. But this is not
traditional media. This is digital. If you wrap
something out, it's gone. There is no trace of the brush stroke to
finger tap to undo. The arrays or anything else
you've put on your canvas. That was 100% opaque. If I take this down to
a much lower opacity, say around 30, 34%, and I start building
up, you can see I'm gradually erasing in this area. If I make repeated brush
strokes or I press pretty hard, I can vary the brush stroke. And here's another nice thing. If I come to textures, let's try dove lake. My brush size, 6%. My paste is about halfway, and then, now you see that? I'm raising, but I'm getting the pattern that
the brush makes. As part of the erasing process. So you've got lots of
different ways to paint, lots of different
effects when you smudge and lots of different
effects when you erase. Alright, I'm going to pinch inwards to see
more of my canvas. Now, the one icon we
haven't looked at is this one with two squares in
there. I'll tap on that. This is my layers panel. And you can see I
have something called a background color
and layer one. Alright, well, let's take a
look at background color. If I tap on that little
white rectangle, that is the layer icon
for background color. Well, you can see, I have
my colors open up again, and I can choose
whatever color I want. For the background.
That's useful. Let's make it lighter. But for my layer one, if I tap on the little icon
which I'm circling now, I get a whole list of options. I can rename it, which is always a good idea if you can
remember to do it. And I can do various
things to it. Like, for example, if
I made a mess and I just want to get rid of
everything, I can clear it. Two finger tap to undo that
and bring back what I've got. But what I'm about to show
you is something I've seen a lot of beginners not do, which is a real pity because
it's very, very useful. Come to the plus
sign at the top, right, tap on it, and I get a new layer layer too. If I come to my paint brush, let's try oriental brush, and let's try any
color at random. Let's just try green
color so it stands out. And brush size is big
enough and I can draw. That's not standing
out very well. Let's try upping the opacity. Yeah, that's better. And yes, I know it looks like a match, but
here's the thing. See that little tick mark
right where I'm circling. That is a toggle switch,
and if I tap on it, the layer becomes invisible. Tap on it again, it
becomes visible again. See the little
ensign next to that. If I tap on that, well, I have a whole load of things
called layer blend mode. We won't talk about those, but you can see I have opacity. It's a slider, and I can make this top layer
completely invisible, partially visible or fully visible and everywhere
in between. If you decide what
you did was nice, but it's in the wrong
place, well, look at this. Come to the top left and look at this
icon with the arrow. Tap on that, I get a box around everything on that layer where there are pixels
because at the moment, we're using our transform tool. And look, if I tap anywhere, normally, it's an idea to go on the outside
and move around. Look at that. I can move this. What's more, you see that
little green circle on the top, which I'm circling now. If I tap and drag that, I can rotate this around. Like this. You notice you get
an elastic line. So if you want to
move it very subtly, drag the green line
out and you can move things very
slowly like this. If you want to
move it fast, take the little green elastic line
around and look at that. Alright, we've got
different modes here. At the moment, I'm in uniform, which means I can resize it as well as moving
and rotating. But if I come to
something like free form, I can stretch it like this. If I come to distort, I can take just one
of the corners and move it out in like this, as well as the corners
around the side. You want to do a quick bit of simple perspective,
you can do that. If you come to
warp, I get a grid. And if I drag
weather lines cross, I can warp this. And if that's too much, I've got a reset button down the bottom. Let's just quickly warp this
around like that, and say, I tap on my layers icon.
That's now committed. The changes I've made are
permanent unless I hit Undo. Now let's come
back to layer one. And the next thing we're
going to take a look at is this looks like
a little S shape. It's the selection menu. Now remember, we're not on the
layer with green squiggle, we're on the layer with those
big red and yellow marks. And you can see at the bottom, I have various different
ways of selecting areas. At the moment, I've got
rectangle selected. So if I come here,
drag out a box, you can see where
I've dragged a box. That area is clear, but I'm getting these little
moving lines, which let me know
that wherever there are moving lines,
it's not selected. If I then come back
to my selection tool, and let's just come back
to let's try freeform. I can move this whole area around or wherever
I want it to go. I can stretch it like this. And once I'm happy with
that, I can just tap on, say, my selection icon again, and that gets committed. If I come to my
selection tool again, you've got things
like free hand. And if I drag out
an area like this, if I come back round to where that little white dot is tap
on that little white dot, I now have an area selected. Which is a free hand shape. So that is the select tool, various different ways
to select things. Next to that, I have
my adjustments. I don't want to
get into these too much because there's
a lot to cover, but supposing we come to hue
saturation and brightness, I can take this entire layer and change the hue and
swap it around. Can you see that when I do that, the red are getting more pinky and the yellows
getting more orange because every color is being
shifted around the rainbow. I can also alter how
saturated it is, like, completely gray.
To pretty bright. I can also alter the
brightness, as well. You can alter the entire layer, but come to the top in
the middle where it says, hue saturation brightness. But if I come to this little triangle which I'm circling now, instead of working on my layer, I'm now going to work
using my pencil. And you can see my little brush
icon has now turned blue, and it's got little
sparkles there. And what that means is,
let's choose something. Let's try wild light. That sounds dramatic.
Check my size. The opacity is up full. I'm going to paint in a
certain area like this. You notice how I went
underneath that green area? That is because the
green paint stroke is on the layer above. So my little brush
stroke gets hidden. I've painted with
this, but I can move the hue around and
change this color, the saturation, and the
brightness just in that area. And if I take my opacity
down on my pressure, make my brush size
larger, for example, paint in a different area, you can see I can
gradually build up the effect like this. And if that's not enough, look, if I tap on my erase tool, I can erase these brush strokes while I'm painting in this mode. And if I come to my smudge tool, I can blend the effect I'm doing whilst I'm using hue,
saturation, and brightness. So tap again on the adjustments
icon to commit to that, but you can see I
have a whole load of different adjustments, and I cover all of those on
the solid foundations course. Okay, so now the final icon
is this little wrench icon, which is your actions icon. This is where you come if you want to add something
like insert a file. Okay, let's do that.
Let's come to palettes, and I'll load up
blobs of Joy 01. This is something I created
for the watercolor course, and it gets loaded
into its own layer called inserted image. Now, at the moment,
I don't want it in the middle of layer
one or layer two, so if I just tap and hold, I can drag it up to the
top of my layer stack. And when I do, watch
that green brush stroke, it suddenly gets placed behind
those little blobs of joy because whatever at the top of the layer stack covers up
whatever is underneath it, things like layer
two and layer one. Now, supposing I
like that layer, I can lock that layer so I can't draw on it,
or I can unlock it. And supposing I don't
want that layer at all, I can come to delete
and get rid of it. Supposing I want
to keep the layer, but I don't like that
green brush stroke, I can clear the layer. Various things you can do. Quickly coming back
to our wrench icon. You can add various
different things. You can cut, you
can copy, canvas. You get various
different assists, which is beyond what I want
to do here at the moment. If I decide that my
little maroon and orange blob with cutout
is a masterpiece, I can share it. And I can tap on Procreate JPEG, if you're going to place it on the Internet and
you can export it. I'll use AirDrop,
tap on my IMAP. It gets exported. And
we're good to go. You can also export videos. That's probably the videos
you've seen on the forums. Preferences, that's more than I want to get into and help. Well, what we're doing
right now is the help file. So that is a very basic
walk through for Procreate, and it's just there to give you a quick head up so that you can follow along with this course
a little bit more easily. Go back to the course,
go and have some fun, and I will see you in
whatever video you land on.
 Simon Foster