Transcripts
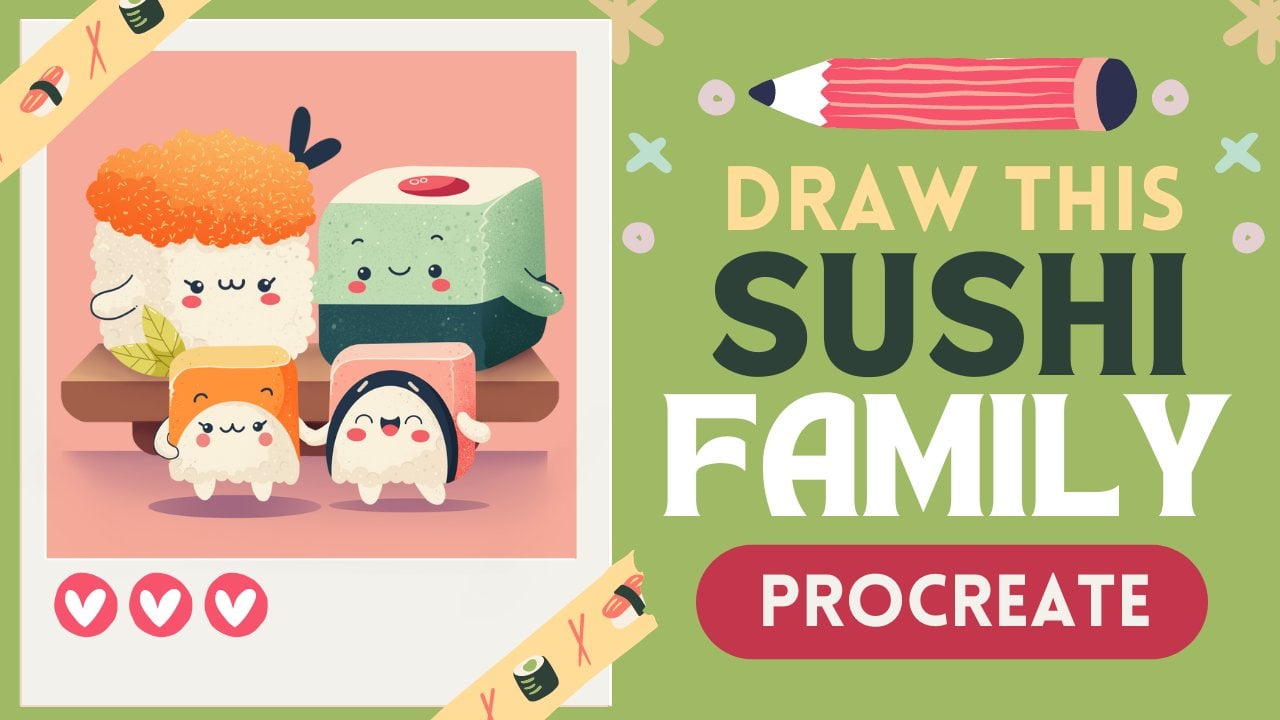
1. Introduction : Hello everyone, I'm Union
and enter this class. We'll draw a few cute
sushi illustrations. This class doesn't require any prior experience
or fancy tools. We'll start from scratch
and we'll be using simple shapes
throughout the process. Everything you will see will
be happening in Procreate. However, if you have other software or wants to
try traditional materials, you are welcome to join if
you are ready to start, Let's jump right into it.
2. Creating a Base for the Sushi: First things first,
we need to decide what kind of Canvas we
are gonna be using. You can see that it is a
square because pixel width and pixel height are
both at 2048 pixels. As for dpi, there are 300
and S for the color profile, it is set as SRGB with this loan and scary number one skill set ledgers he'd done. Now we are at our
Canvas and we need to decide what kind of colors
we are going to be using. You can go to the project
and restaurants app. You can download the
colors and you can follow along with the
tutorial when you did it. Let's go straight to our
palettes and we will see that we have two options
of how we can view. Use the colors, they
come back to you and the cards we
will be using cars because they have
all the colors names here and they are
ready to be used. When we decided on the colors, it's time to go and change
the color of the background. So let's go to our layers, and let's go straight into
the background color layer. Here you can see that you have your color palette
on the bottom, and we will need to select
the first color in a row. So let's tap on it. You will see that we've
changed the background color and now we are ready to create
our first illustration. And our first illustration
is a little sushi. But before starting, let's
go and change the color and make sure that we have a new
layer for our next shape. Firstly, we are going
through the list. You can see that
we have a layer. And when you made sure, let's go to the
palettes and select the color that is called Norway. When you pick the color, it's time to create
our first shape. And our first shape is
going to be Eric Tango. And the best way to create a rectangle is to use
the selection tool. The selection tool is this S
ribbon icon on the top left. So let's tap on it. Now you can see that we have a little panel on the bottom. And here we will need to select the rectangle option
when you did it, we are getting back
to our Canvas and we are creating a
rectangular selection, not too big and not
too small when you're satisfied with the size and
hold your Apple Pencil. And we will need to
recolor this area. We have two options of how
we can recolor this area. The first one is to go to this panel and
choose color field. So let's try to do that. You can see that we
recolor this election, but later on it might be
a little bit trickier because every time we are going
to be selecting anything, we will be recoloring
aids from the start. So probably, let's do our recoloring of this
part in a different way. Let's firstly go to Color
Field and we will turn it off. The next step is to go to the top right
corner and drag and drop the color to
the selected area. You can see that the
result is the same. Now, let's go and
deselect everything by tapping on this
S ribbon icon. And then we have the perfect shape for
our first illustration. But this shape doesn't
look very cute. That's because it has very street corners and we would like to make
them round it. And it will be really
good if procreate had this option built
in, but they don't. And that means that we will
need to do it manually. So let's go to our layers and we will need to create
one more layer above. Now we are going to
the palettes and we will need to select
some contrast colors. So for example, let's
select this yellow one. With this color selected, we will go to our brush library. We will go straight lead
to the calligraphy folder. Into the calligraphy folder, we will select monoline brush. So when you selected the brush and when you selected the color, it's time to create
elites out circle. So let's go to our
Canvas and try to do as best circle as
we can, don't want. And hold your Apple pencil at the end of the lines to snap
it to a perfect ellipse. But ellipse is not what we need. We need a perfectly
round circle. So let's hold one of our
fingers on the screen. Now you can see that it snaps to a perfect shape and you can move your Apple pencil from side-to-side to adjust the size. And when you're
satisfied with the size, Let's unfold everything that
we are holding right now. Now for the future convenience, let's fill this area
inside with color. So we will go to the
top right and we will drag and drop the color
inside this circle. So when we have this shape, what we're going
to be doing next, we will go to this arrow key
on the top and we will use uniform method and we will
need to turn on the snapping. So tap on the snapping and
toggle this snap in here. Now when we have everything set, we will need to move
this circle right to the corner and you will
need to snap it perfectly. When it's snapped perfectly, you will see two lines, one vertical and one horizontal, right into the corner. So when you see them and
hold your Apple Pencil, now let's deselect
everything and we will tap on this arrow
icon one more time. What we need to do
now is to create three more copies and put them
to the different corners. So let's go to our layers and we will make a copy
of this ellipse. So we are swiping from right to left this layer
that is selected. We are choosing Duplicate
with this new layer, we are going to this
arrow key on the top-left and we are moving
our shape to the right. If you can see on the
corner two lines, one vertical, one horizontal, and hold your Apple pencil. Now let's deselect everything by hitting this arrow
key one more time, and we have two parts done. So let's go and make
it a little bit convenient just to
repeat it one more time. Let's go to the
layers and we will merge these two layers together. So tap on the layer on the
top and select Merge Down. Now we have two
ounces on one layer. Now we need to make a
copy of this layer. So swiping from
right to left and choosing Duplicate
with this new layer, go and again to this arrow key on the top and moving them down. When you see that
they snapped on both sides and hold
your Apple pencil, Let's deselect it and let's merge these two layers together. So we are going to the layers, we are tapping on the top layer and we are choosing merge down. And now we have a perfect draft for that we're gonna be
using for our shape, what we are going to
be doing right now, we will need to tap
on this layer with an ellipsis and we will
need to choose, Select. Now I can see that everything except these four
elements is selected. That's not what we need. We need to invert the selection. So let's go to our bottom part
and we will select Invert. Now going back to the layers and go into our layer
with a dark sheet, grabbing our eraser tool. And very accurately, we will go over these corners and
we will erase them. When you're finished
with one corner, move on to the next
and do the same thing. We will need just a shape
with rounded corners. When you've finished
erasing your corners, Let's deselect everything first. So tapping on this S
ribbon icon on the top. And then we will go
to our layers and hide this layer with
yellow, our upsets. You can see that we have a perfect shape with
rounded corners. So we have the base and let's move on and create
some rice area. So we are going to our
layers and we will make a copy of this layer
with a dark background. So swiping from right-to-left,
choosing Duplicate, now go into the palettes and selecting the color
that is called Rights. Now let's go and drag and
drop this color here. And we will need to make this
shape a little bit smaller. So go into this arrow
key on the top, and we will use the
free form method to make this shape smaller. So drag it to the center first, then make it a little bit
smaller from the top, from the bottom, and
from the left side, you can readjust it. And when you are satisfied,
Let's deselect everything. We are done with our rice shape. And the last thing that
we will do into this part is adding a little
element for the feeling. So let's go to our layers and we will create
one more layer. Now go into the color palettes
and selecting the color, which is called feeling. When you have
selected this color, we will go inside the area with the rise and we will
create a little ellipse. So hold your Apple pencil
at the end of the line. Hold one of your
fingers on the screen to make it a perfectly
round circle. And when you are
satisfied with the size and hold everything
that you are a whole, then, now we need to put
the color inside this area. So let's go and drag
and drop the color. The last thing that we
need to do here is to put this ellipse right in the middle of this
shape with the rice. So we will go to the Arrow
key one more time and we will turn on snapping
if it's not turned on. And we will move this
shape until we see the vertical and horizontal line that we know that it
is in the center. So when you see this
two lines on hold your ankle band cell and you
can deselect everything. Now we have the perfect base, and in the next part, we are going to be
adding some details.
3. Adding More Sushi & Repositioning: Now we haven't base, and that means that
we are ready to make the things a little bit
more clean and organized. So let's go to our layers and
what we're gonna be doing. We will be selecting each
layer that belongs to our sushi and we will be putting
it into a little folder. So you can see that
the first layer is already selected
because it's blue. And we will need to do this same thing with the
two remaining layers. So firstly, go into the
layer with the rise, and we will need to swipe
it from left to right. Now two layers are
selected and we will need to do the same thing
with this dark layer. So go into it and swiping
from left to right. Now, all three layers that belong to associate
are selected. And that means that we
can go to the top right, and we can tap on the group. So now we have a group
and let's collapse it. So we are going to this V icon near the chatbox and
we are tapping on it. Now we have only two elements except the background color. And we can rename these groups. So let's tap on it and we will choose Rename
for this group. We will go with the title top. So we are going to be using
this top group as a base and as it's not the only element that we will have onto
our illustration, we will need to make it smaller. Let's go to our arrow
key on the top-left, we will make sure that we
are using uniform method. We are making sure
that we are using snapping and we will need to make this thing a
little bit smaller. So dependent on the corner
that you will choose, you will need to either
pull it up or pull it down. So let's go and do that. As for the size, let's make it a quarter
of what we had before. So now as we are using snapping, it will really help us to
put it right in the middle. So let's drag our
elements and we will see that we have this orange line going from top to the bottom. When it goes through the
center of our elements, we are ready to hold
our Apple Pencil. So now if you're satisfied with the size, with
the placement, Let's deselect everything by going to this arrow
icon one more time. And now we have the
first elements and done. And that means that we will need to make three more copies. So let's get back to our layers and what we're
gonna be doing here. We have this group
selected and we will need to swipe it
from right to left. Here we can find duplicates
and we will tap on it. So we have a new folder
and we can rename it. So let's tap and rename it. For this folder, we will
go with the title bottom, and now we need to do the
same thing two more times. So go in for this bottom layer, swiping it from right to left, choosing Duplicate to happen
on this new folder, rename. And this time we will go
with the title middle, left, and one last time, go into this folder going from right to left,
choosing Duplicate, tapping on this layer, rename and choosing the
name middle, right? And now you can see that we
have a bunch of folders, but we have nothing
changed on our Canvas. That's because we have
everything at the same place. We need to change this thing. We will need to put these elements and the
different positions. So firstly, let's go to that
folder with the name bottom, and we will go back to our arrow key as we are using snapping. It will really helps us to put this elements
on the same line. Let's go and drag it down. You can see we have two
lines on the edges and we have this line that
is going from top to bottom, which is orange. So let's drag, drag, drag this thing down
because we will need some space between
these elements to put two more associates. So let's just leave
it somewhere here. When you are satisfied with the placement, Let's
deselect everything. Now getting back to our layers, and now we will need to select the next folder with
the name middle left. So Select, go back to the arrow key and
firstly, moving down, position it, and
then we will need to put it a little
bit to the left. So let's just find a placements. So something like
that will work. You can put it right
in the middle. So you can such that
orange line going from top to bottom or leave
it as it is for now, then we will adjust it later. So when you're satisfied
with the placements, Let's deselect everything
and one more time, go into the layers
selected middle right? Go into the Arrow key. Firstly, moving it down until it snaps to
the previous shape. So we will put it on
the same line now, moving it to the right until
we find a perfect placement. So let's leave it
as it is right now, and we will go and
deselect everything. Now we can see that we have a perfect placement
for our solutions, but they are not
the only thing that we will have onto
our illustration. So we will need to make the
whole shapes here smaller. So we will go again
to our layers and we will select each
folder with the sushi. So again, swiping from left to right until we have
all force done. Now we are going to our
arrow key one more time. Snapping is turned on uniform methods and we
are making it smaller. We will have one more
elements on the bottom, so we need to balance it out. We can adjust it later for now, just go with a smaller size. Let's put it right
in the middle. So you see this orange line. And when you're satisfied
ledgers and hold the Apple Pencil and
deselect everything. And now we are done with
positioning our associates. In the next part, we will be adding some
additional elements.
4. Adding the Filling: In the previous chapter, we ended up with
something like that. And I promised you
that we are gonna be adding some additional elements. And we will go inside these pink circles and we
will be adding some feeling. So let's firstly zoom in our Canvas to the first
illustration, which is sushi. On the top. We will go to our
layers and we will straight away go to the
folder which is called top. We are going to be adding that additional elements right
inside this circle. And don't worry, nothing
scare will be here. Nothing you will
need to do manually. You can go to the Project and Resources tab and
you can download a folder with the brushes that we are going to be
using in this chapter. So here are the brushes,
there are stamps, there are differently shaped and they all have the
rounded corners. So that's exactly what we need. With these brushes. We will be going
inside this shape and we will be adding
these additional elements. But we don't really wants to go beyond the frames of
this pink circle. So what can we do? We have two options. The first one is to send
this layer as an Alpha Lock. And alpha lock will
let you draw only on the existing shapes or
pixels on the layer. That means when its own, you can only draw
inside your object without getting
beyond the frames. So let's firstly try it out. We need to tap onto this layer and we need to select
Alpha Lock right here. We can go to our brush library and we can select some sheep. For example, let's start
with this rounded rectangle. We can make it bigger in size and we can go and
change its colors. So for example, let's say
that it will be feeling too. Now, if we go and start creating
some shapes right here, you will see that we
are not going to be on the frames and that's
exactly what we need. But what if we would like
to erase something here, or we would like to
move our elements, for example, with the eraser. Let's just try it out. You can see that it's
not going on well, we are just erasing what
we have underneath. So this option is not
very suitable for us. We can do it in a different way. So let's just undo
everything right here. I will show you a
different way of adding the elements and not
getting beyond the frames. So with this layer selected, we will create one
more layer above. And two, we will need to send this layer as
a clipping mask. And clipping mask will work in the same way that
I showed before, but it is on a different
layer and it's clipped to a quantum
on the previous layer. So we are not getting
beyond the frames and we are not getting
some drastic results. So if we would like
to erase something, we will be able to do that. So with that said, let's just make our brush
size a little bit smaller, and let's go and
add some elements. So for example, we
can go and create four or these lead
cell rectangles. You can see that when you
are rotating your Canvas, you are changing the rotation of your little
elements right here, and you can use it when we
have these three shapes, Let's add different
colors here as well. So we are getting back
to our brush library. We are selecting the
different brush. So that time Let's
select circle. We will go to the palettes
and we will select a different color
for these circles. Let's select the
feeling number three, we can adjust this
size or firstly, try it out onto our canvas
and then adjusted after it. So let's try our circle. I feel like we need to make it a little bit bigger and we can go and create the
shapes for this circle. Let's go with just two of them. Now we have this circles. Let's get back to
the Brush Library. Let's grab the rounded
rectangle tool. Let's go to the palettes
and select feeling three. Now, let's rotate our Canvas, Justice Alito and adds two
elements with these shapes. Try not to overlap the objects. And now we are ready
with our first sushi. Let me show you one more time what we
are going to be doing on the different sushi and you can finish to rest by yourself. So we aren't going to
our, let's say bottom. We are opening our folder and we are going to this layer
with the pink circle. When you select in
this layer we are going to r plus icon
on the top right, we are creating a
new layer and we are tapping on this layer to
set it as a clipping mask. Now let's zoom in our bottom sushi and we will
go to our brush library. And for example, let's go with this rounded
rectangle tool, but we will change the color. So firstly, let's go with
this feeling three color. And we will go over one area, probably the top one, and we will add a
few lines like that. When you have these two lines, Let's go with the same brush, but we will select
a different color. This time feeling to go in-between these two lines
and adding the feeling. So now when we have
something like that, you can make it more
accurate than I did it. You can go to the Brush Library and select a different shape. So for example, let's go
with this rounded triangle. Let us go to our palettes
and select the new color, which is called feeling three. Now, adjust this size firstly, try it out here, make it smaller,
and let's go and add the details with this shape. You can rotate your
canvas to find a nicer placements and
rotation of these objects. Try not to overdo it. And when you think
that you are done, you can move on and
finish up these two. Sushi is in the middle and we will meet in
the next chapter. But before jumping
into the next part, let me give you some
general guidance. It's your time to experiment
so you can select different stem brushes and
play with the elements, combine them together,
rotate the canvas to find a different rotation of this terms and use
different colors. But try not to overdo ARAF and try not to go beyond the
frames of this circle. Even though we are
using clipping mask, we want error events will be accurate and not
chopped in the middle. And try to limit
yourself by adding just three colors
per sushi because we want to have some balance
and don't want to end up with super
colorful little mess. If you don't want
to use the stamps, you can add the feeling
elements manually. Now, get back to experiments and we'll meet in the next part.
5. Adding Cute Faces: I hope by now you have
finished your task and added a few additional
elements for the feeling of our two remaining sutures. And if you did it,
We are ready to move on and create
the facial features. So firstly, let's change the brush where I go into
the brush line break, we are going straight into
the calligraphy folder. And here I selected mono line brush with
a new brush where I go into the palettes
and selecting the different color
within the ignore it. Now with a new brush
and within new color, we go into our layers and
we are going to the bottom of our layers panel to the
folder with the name top. Here we will create a new layer. Now, let's zoom in our
Canvas to this top sushi. And what we're gonna be doing, we will go between
these two shapes, the rice one and
the feeling one. And we will create two
dots for the eyes. So firstly, let's adjust
the size of our brush. Let's say that it will
be something like 19 or 18% when you
selected the size, let's go to one of the sides. So for example, the left one. And we will go and
put the first dots. Now, when we have the first dot, we will need to move on
to the right side and we will need to put the second
dot on the same line. So let's try to do that. When you have two
dots for the eyes, we will need to create
a little Smiley mouth, but before starting,
we will need to go and decrease the
size of our brush. So let's say it will
be something like 6%. Now go into our palettes and selecting the color with
the name face details. Now what do we need to do? We will go between the
eyes and we will create a little concave shape
for a Smiley mouth. So let's go and try to do that. You can hold your
Apple pencil at the end of the line to make it snaps to a perfectly round
ellipse or a circle. And if you want to
adjust it even more, you can go to Edit shape. On the top here you
have a few handles to tweak and also you can
move your shape around. When you are done adjusting it, Let's tap on our screen with one finger and we are done
with our first phase. But if you want to adjust it
even more so for example, put it right in the center, or if you want to put it down, we are going to our
arrow key on the top. We are using snapping
and we are moving our shape around to put
it right in the center, you will see that you have this line going
from top to bottom. That's exactly what we need. So we need to follow this line. And when you see it, we will unfold our Apple Pencil. And now we are done with
our first phase completely. So let's move on and
create the next phase. Firstly, we are going
to the next folder, and here we have boughten. So let's go and create
one more layer here. Now, go into our color palettes and selecting the color and nori zooming in our Canvas
to this sushi on the bottom. And here let's create
a very sad sushi. So we will go and create two shapes that we
used for the mouth. On the first one for the ice, we already have the right amount of percentage for our
size of the brush. We will go just here and
create the first curve. Hold your Apple pencil to create a perfect shape and you
can adjust its size, you can adjust its placement if you want to
adjust it even more. Go to Edit shape over the
top, tweak the handles, find what's working
and when you are done, we will need to put this
same eye on the other side. So you can do it manually where you can use a little trick. So let's go to our layers and we will make a
copy of this layer. So you know how to do it. We will need to swipe
from right to left and we will need to
choose Duplicate. You can see that we
have a new layer here. And if we go to our
arrow key on the top, and if we are going
to be using snapping, we can move it around and we will put it
on the same line. So find the placement. And when you are done, Let's deselect everything by hitting these arrow
key one more time. Now let's combine
these two layers together because we don't need
everything to be separate. Let's go to our layers and
we will tap on the layer that is on the top and we
will select Merge Down. Now we have our
eyes on one layer, now go into the palettes and selecting the face
details one color. We will go between
these two eyes and we will create a very set mouth. It will be opposite of
what we have for the ice. Let's go between the
eyes and try to do that. Hold your Apple pencil, adjust the shape if you
want to move it around, just go to Edit
shape over the top and do whatever you want here
and whatever you need here. So when you find the
perfect placements, Let's tap on our screen
with one of our fingers. And let's make sure that
this phase is in a center. So we are going again to our
arrow key using snapping. It's moving it until we see
the line in the middle. When you see the line, Let's hold our Apple
pencil and let's deselect everything and we are done
with our second phase. So let's move on
to the next one. This time it will
be middle left. So go into this folder and
creating one more layer Lens. Go to our color palettes
and select the color nori. And this time we will go and
create a V-shape like that. So hold your Apple
pencil to create a better shape if you want
to adjust it even more, go to Edit shape or that
soap so you can find a perfect placement or perfect arrangement
of these elements. When you're satisfied,
tap on the screen. Let's create a copy
of this element. So firstly, let us move it by going to our
heirarchy on the top. And we will put adjust a
little bit to the left. And now we are going
to our layers. We're swiping from right to
left and choosing Duplicate. With this duplicate, we
are going to our arrow key and what we need to select
here is flip horizontal. So now you can see that it's
looking to the other side and we are using snapping
to move it to the right, put it on the same line, and when you are done,
Let's deselect everything. So we have our eyes, but they are on separate layers. Let's go to the layers
and let's tap on the first layer that we have here and we will
choose Merge Down. Now our eyes are on
the same layer and we are ready to add the
mouth for the mouth. Firstly, we will go to our
color palettes and we will select a color with the
name face details too. Now let's increase the size of our brush to
something quite big. And we will go between
these two eyes and we will just put a dot here. When you are done
with this task, we will need to add a
little tongue to the mouth. So what we are
going to be doing, we will go to our layers
and we will tap onto this layer with our
facial features and we will select Alpha Lock. As I mentioned before, alpha lock will let
you draw only on to the existing shapes that you
have answered this layer. So we won't be going
beyond the frames. Now let's go to
our color palette and select the color with
the name feeling three. And now we'll go to
the bottom part of our mouth and we will
create elite cell sunk. And we are done with
our third phase. So let's move on and add our last phase for
the last sushi. Go into the layers, go into the middle right folder and create one more layer here. Now, getting back to
our color palettes and selecting the color
nori with a color selected, Let's decrease the size
of our brush to 6%, or seven or eight, something similar to
what we had before. And we will go and create
a very happy Sushi. We will go to the opposite of what we had for the reset sushi. So we will need to create a
convex shapes for the eyes. So let's go and do that. Creating the first
one on the left, holding our Apple Pencil,
adjusting the size. If you want to edit more, go to Edit shape over the top. Tweak this little handles. And when you are ready, tap on your screen to go
away from this little modes. Now when we have
the first shape, we will need to
make a copy of it. So go into our layers, swiping from right to left and creating a copy by
hitting Duplicate. Now with this layer selected, go into our arrow
key on the soap, snapping is on, moving
it to the right, make sure that the
eyes are on one line. Now when we have two eyes,
Let's deselect everything. Let's merge the layers together by going through the list, tapping on the top layer
and choose merge down. And now we will create
a very happy mouth. So firstly, go into
our color palette, choosing phase details to now increase the
size of your brush. And we will go and create
a shape of the letter V. So just right between the eyes, hold your Apple pencil to create a better
shape so you can see it's looking like a heart if you want to
adjust it even more, or if you want to move it, go to Edit Shape, Move it adjusted. Find what works. And when you are done, heat your screen with
one of your fingers. And here we also will
add a little tongue. So let's again go to our layers, tap on this layer and
select Alpha Lock. Now go into our palettes and selecting feeling three color. And again go into the bottom of our mouth and creating
a little tongue here. Now, let's position our elements correctly on to our sushi. So we will go to this
arrow key on the top. Snapping is on, moving it until we see the
line in the middle. And when you see it and hold your Apple pencil and
let's deselect everything. And we are done with aging
our facial features. So in the next part, we are going to be adding additional elements that
won't be Associates.
6. Adding the Sticks: Okay, We have our associates, but it will be a little
bit sad and a little bit cruel of us just to leave
them here all by themselves. So let's just go and
add them some company. But before starting, we
will go to our layers and we will try to make
everything here quite neat. So what we're going to be doing, we are going to be
collapsed and each group by heating this V icon
near the checkbox. So let's do it four times
for each group that we have. Now when everything is neat, we will go to this top group and we will select the plus icon. So we have a new layer. And with this new layer, we will go to the palettes. We will select the color
within the feeling three. And what we're gonna be doing, we will go over the
right part and we will need to create a
very elongated rectangle. And we can do it in a
few different ways. So the first one, for example, is to go with the selection tool and
create it in that way, but we're not gonna be doing it. The second one is to go
and try to create it manually by combining four lines together and maybe
use an eraser tool. But we are going to be bold and we are going
to be very brave. And we will go over our
right side and we will create a very elongated
rectangle super menu. It. Just go for it and
create a shape like that. Try to loop it around
and try to combine the lines on the
top or wherever you are combining them together
and holds your Apple pencil at the end of the line to
snap it to a better shape. Now you can move it around, you can rotate it, you can make it bigger. It's up to you. And when you are
done adjusting it, Let's go to Edit
shape over the top. So firstly, we will go to
the top and we will combine these two dots together
so it is closed. And then we will go over
the bottom part and we will need to make the bottom
part a little bit narrower. So let's go to this
right side and we will drag this
corner to this site. When you have
something like that, Let's go over the top one and maybe make it a
little bit narrower to try to make the lines on the top and on the bottom
parallel to each other. And when you have this shape, Let's tap on our screen
with one of our fingers. And now as we are having
their closed shape, we can put the color inside. So let's just go to
our top right corner and drag and drop
the color here. And now we have a perfect
base for our Stieg, but it looks kind of blend. So let's go and
add some details. So we go into our layers and we are going
to this layer with this tick. We will tap on it and we
will select Alpha Lock. You know how alpha lock works? Let's go to our color
palettes and we will select the color
which is named Bo. With this color, we will go over the top area and we will
create a rectangle here. So again, lipids around, try to make it rectangular. Hold your Apple pencil
at the end of the line. And then we will go to Edit Shape and we will
adjust it even more. Let's try to make the lines parallel to
what we have on the top. You can adjust the
size if you want. And when you're
satisfied with it, tap on your screen with
one of your fingers. Now we will increase
the size of our brush and we will manually
recolor this place. Now it's looking better, but we can add one more detail. Let's go again to
our color palettes and we will select
this yellow color, which is called accents. So with this color, we will go to the middle part of this orange shape and we will
create a rectangle here. So again, go in here
creating a rectangle, holding our Apple
pencil and then go into Edit Shape
of Jazz this line. So make them parallel. And when you're satisfied sapling new screen with
one of your fingers, you can leave it as
it is right now, or you can add the color to the middle parts and we
are done with our sick. So what we need to do now
is to make a copy of it. Let's go to our layers and
let's wind this layer with this tick from right to
left, choosing Duplicate. You can see that we have
a duplicate right now. So we can go to our top left
and select this arrow key. Now by using uniform methods, we are moving our shape to the bottom and we
are rotating it. So find a nice placement. And when you're satisfied,
Let's deselect everything. And we are done with
our sticks almost. We'll need to combine
them together. So we go into our layers and we are
giving to this top layer, tap on it and selecting,
merge it down. Now we have them on one layer, and that's it for this ticks. In the next part, we will
finish up by adding a bot.
7. Adding the Bowl: Now we are finally
ready to finish up our illustration by
adding our last elements, which will be a bowl. So let's go to our layers and we will create one
more layer above. Tap on this plus icon. When you did it, we're arguing
to the color palettes and we are selecting the
color within named Bull. Now we will need to go to the
bottom part of our Canvas and we will need to create
a perfectly round circle. So let's go and try to do so. Don't and hold your Apple
pencil at the end of the line. Instead, just hold one of
your fingers on the screen. Now it snaps to a
perfectly round shape. And as for the width, Let's leave it as
something similar to the width on this sushi
is in the middle. When you are done with it, Let's hold everything that
we are holding right now. Now we will need to add the
color inside this shape. So let's go to the top
right corner and we will drag and drop
the color here. You can say that we have a
perfect base for our bowl, but we can see what's
going on underneath it. So let's for now go and fix it. We will go to the layers
and we will go to this icon near the chatbox. Here you can see that we
have the opacity slider. And if we drag it to the middle, we will see that it
became a little bit more transparent and
we can see through it. Don't worry, we will
get it back later on. When you did it. We
will need to go and arrange our elements a
little bit more thoroughly. So firstly, let's go to
this arrow key on the top. And we will use uniform methods. And we will drag our shape of the bowl down and put
it right in the middle. When we are in the middle, you will see this
orange line that is going from top to the bottom. For now, let's leave
it somewhere here. Let's deselect everything and we will need to get rid of art. So part of this shape, We will do it with
the selection tool. Selection tool is
this S ribbon icon. We will tap on it and
here on the bottom, we will select rectangle. With a rectangle, we
will make a selection that we'll go through the
middle part of our elements. And when you are here in the middle and hold
your Apple Pencil, and we will need to get rid
of this top part to do so, we can do it in two ways. The first one is to
make a scrap movement through your canvas with
your three fingers. Or if you didn't
understand how to do it, you can go with three fingers from top to the bottom swipe. And here you will see
the copy and paste menu. In the copy and paste menu, we will need to select cuts. So now we have a perfect
shape for our bull. And let's continue
readjusting our elements. Firstly, we can go back
to our Canvas and we can get the maximum amount of
a positive for our bowl. So let's tap on the icon and we will move our slider to
the maximum to the right. Now let's adjust our sticks. So getting back to this
layer and selecting it, go into our arrow key on the top-left using uniform methods, making it a little
bit smaller and finding a perfect placement
for these sticks. You can rotate them, you
can do whatever you want, find the perfect placement, and find what works for you when you did it and
when you are satisfied, just deselect everything and let's adjust the placement
of our associates. So we are again, go into our layers
and we will select each group that we have
for our associates. Now go into our arrow key on the top and we are going and
finding the place for them. So you can place them
right in the middle. You can follow this orange line. Or to make everything a
little bit more balanced, you can move them to the right and they will make
a perfect picture. Find what works for you. And when you are satisfied, Let's deselect everything by hitting our arrow
key one more time. Now we have almost
everything that we need, but we can add some
beautification for the ball. The first thing that we will
add is a little sanding, thinking that this
bot will sit on. So we will go to
our layers and we will go to the layer
with this ticks. When we selected this layer, we will go and create
one more layer. So tap on the plus icon. This layer will be right between the layer with the ball and
the layer with the sticks. That's exactly what we need. With this layer selected, we will go to our color
palettes and we will select the color within
the feeling three. Now we can go to their
free-space that we have onto our Canvas and we can
create a triangle. So let's try to do so. Just manually create a triangle. Hold your Apple pencil
at the end of the line, and then hold one of your
fingers on the screen, it will snap to a
perfectly round triangle. And when you're satisfied with the size and the
placement and everything, and hold ARAF and
that you are hold it. We will need to add
the color inside. So let's go to our
its own pride, and we will drag and drop
the color into this shape. Now when we have this shape, Let's put it right
underneath our bowl. So we will firstly go
to our arrow key on the left using uniform
method, using snapping. We will drag it right
under our book. Let's put it in the middle. So we will need to
follow this orange line, find the placements and when
you are satisfied with it, just and hold your Apple
Pencil and deselect everything by heating your
arrow key one more time. Now, our ball is almost ready, but let's add more
beautification. So we will go and create a little stripe going on
that top part of our bull. So firstly, we are
going to our layers. We are going to
earlier with the bowl and we will need to set
it as an alpha lock. So tap on the layer
and select Alpha Lock. Now we can create
this track by using the rectangle the same way
as we did with our sticks, but we can do it even easier. So we will go to
this S ribbon icon, which is Selection tool. We will select rectangle and we will create a selection
over the top parts. So let's go and create a selection alone,
the whole shape. You can vary the size
of this selection. You can make it thick,
you can make it's thin. It's all up to you. So for now, let's leave it as something right in the middle. And when you are
ready, we will need to add the color to this part. So we are again go into our top right corner and we are dragging and
dropping the color. When you did it. We will deselect everything. We will repeat the same step, but we will add the
different colors. So we will go again to our S ribbon and we
will add the same stri, but a little bit smaller. So with the selection,
with a rectangle, we will go here and
create a new selection. Try to make the selection even and when you're
satisfied with it, Let's go to our color
palettes and we will select the color
which is called rice. With this color, we will
drag and drop the color, and we will have
the next stripe. Let's deselect
everything by heating this S ribbon icon
one more time. And now we can go
and add the face. Let's go to our color
palettes and we will select the color with
the name nor it. Let's increase the size of
our brush and we will go to this middle part and we will start by adding
their first dots. When you have the first dot, we will need to move on
to the right side and we will need to create the
same dot on the same line. So let's try to do so. Now when you have to
do it for the eyes, Let's decrease the
size of our brush. And let's go again to our
color palettes and we will select the color with the
name face, details one. Now let's go between the ice and we will create a
little Smiley mouth. So again, just
creating the shape and holding Apple pencil
at the end of the line. If you want to adjust
the shape even more, you can go to Edit
shape over the top. You can move it, you
can adjust it in any way that you would like
it when you're satisfied. Let's just tap on the screen
with one of our fingers. If you want to go and add
some highlights for the eyes, you can go for it. So for example, we can go to the palettes and we
can select the color, which is called rice. We can increase the size of our brush and we can
go over one side of our eyes and we can add
two dots for our highlights. When they have
something like that, we can add our final
beautification for their bowl, which will be
analytical or nomads. Firstly, let's go to our layers and we will create
one more layer above. When you did it,
we will go back to our palettes and we will
select this yellow color, which is called accents. Now let's zoom in our
Canvas for some free space. And we will need to create
a little rectangle, and we will do it by
using the selection tool. So let's go to this
S ribbon icon. We will select the
rectangle option, and with every single option, we will create a
rectangular selection. So when you have this election, we will need to put
the color inside. So go into the top right corner and dragging and
dropping the color. Now we will need to
deselect everything. So tap on this S ribbon icon one more time and we will need to get back to the selection
tool one more time. We will need to tap on it
with a rectangle selection. We will go over the top part of our elements and we
will make a cut. So let's go and
create the selection. We will need to make sure that the borders at each side
are equal to one another. And when you have it, we will need to cut it out. So we are sliding with our three fingers from
top to the bottom, go into the copy and paste menu. Here we select in cuts
and we have what we need, but we also need to make
a copy of this shape. So let's go to our
layers and we will swipe this layer
from right to left. We are choosing Duplicate
with a duplicate selected, I go into the arrow
key on the top and we will choose Flip Vertical
on the bottom panel. Now by using the same tool, we are moving this copy
over the right side. Make sure that they are
at the same line and make sure that they snapped
one to another perfectly. So when you have
something like that, Let's deselect everything by hitting our heirarchy
one more time. And we will need to merge
these two shapes together. So going back to our layers, tapping on the top layer
and select, Merge Down. Now we have the perfect
shape for our ornaments, and we will go and move
it over our white area. Firstly, go into our soap and we are selecting
our arrow here, moving it here to
our white elements, making it smaller and making
it feeds to this place. Let's position it,
trying to make it equal on each
top and the bottom. And when you have it, we will deselect everything. So when you have this little
part of our ornaments, we will need to go
and make a few copies until we feel the whole white
area with the ornaments. So go into our layers, swiping the layer
from right-to-left, choosing Duplicate,
going back to our arrow key and we are
moving it to the right. Again, trying to
snap them perfectly, wants to another, trying to
keep them on the same line. And when you have it,
deselect everything, go into our layers, merging these two
layers together. So tap on the top one, merge down now again
making a copy. So go into this layer
swiping from right to left, duplicates, going
back to our arrow. And again, we will move
this shape over the rights, snapping it perfectly,
making it at the same line and deselecting
when we are ready. And one more time, let's go to our layers and let's combine these
two layers together. So it's happened on the
top one, merged out, making a corpus swiping from
right-to-left duplicates, going back to our arrow. And one more time, the last time, we will move
this over there, right? We will snap it perfectly and we will try to keep it
at the same line. Now when it is selected, we will deselect it by hitting this heirarchy
over the top. We will go to our
layers and we will combine these two
layers together. Sap on the top, merged out, and let's place it nicely
over this white area. So we will again go to this arrow icon and we will
put it right in the middle. So when you are done with positioning it, Let's
deselect everything. And we will need to snap
it to this white shape. We will go to our layers
and we will tap onto this layer with an ornaments and we will select clipping mask. Now we are done with
our whole illustration. But the very last thing
that we will do here is to position the
whole picture, the whole bunch of
elements over the center. So let's go to our
layers and we will select everything
that we have here. Now go into our arrow key
and moving it to the center. So when you are satisfied
with the placement, Let's deselect everything and we are done with our illustration. Thank you for
watching this class. Leave a review if you
liked it and consider subscribing for more Kawhi
videos in the future.
 Uni Corn, ⭐Kawaii Art Enthusiast⭐