

How to Curve Text in Canva: A Step-by-Step Tutorial
Learn how to curve text in Canva with our easy guide, perfect for adding a creative twist to your designs.
Table of Contents


The graphics you create for personal and professional projects need to be eye-catching and playful enough to hold serious interest. Canva's curved text feature is an easy way to enhance visual interest and readability in graphic design.
Curving text over a single arc or into a wavy pattern can suit styles ranging from elegant to silly. The purpose is to slightly soften formal text or enliven an image or exciting message. Because Canva is meant to be intuitive and widely applicable, you’ll quickly see how easy it is to add curved text to your projects for social media and elsewhere.
In this post, you’ll get a detailed, step-by-step tutorial on how to use Canva’s curved text design tool within the elements of graphic design. This easy-to-follow guide is aimed at both beginners and those familiar with the platform.
Step 1: Setting Up Your Canva Project
Before getting started, sketch out a thumbnail of your design to use as a guide for the digital version.
You’ll begin on the Canva homepage. In the upper right corner is the “Create a Design” button, which offers options including a new document, Instagram post, flier and other formats.
Decide where you’ll share your project–on a poster, in a PowerPoint, as a logo or in a social media post, for example. You’ll select the appropriate design type templates, which come with the optimal dimensions for whichever graphic you choose. You may prefer to set a custom size, measuring in inches, millimeters or pixels. Use the toolbar on the left to set the layout, fonts and colors.
Step 2: Adding Text to Your Design
Add text to the canvas by selecting the “Text” tool and choosing from pre-set formats, styles and font selection. You may also create custom texts or upload your own brand font (if you have a Pro account).
Depending on your project, you may want to position text in headings, subheadings and a small body of text. As you plan to curve the text, carefully consider the best place and spacing for each text box. Choose a text formatting option that lends itself to movement and won’t look oddly cramped.
Step 3: Applying the Curve Effect
The curve tool in Canva is relatively easy to find and use. If you’re familiar with curving text in Adobe Illustrator, this is similar to the Warp effect.
First, click on the text you want to curve, and a bluish-purple box will appear around it. Then:
- Go up to the text options and click on the “Effects” button.
- Scroll down in the options in the left-hand effects options and click the curved text effect.
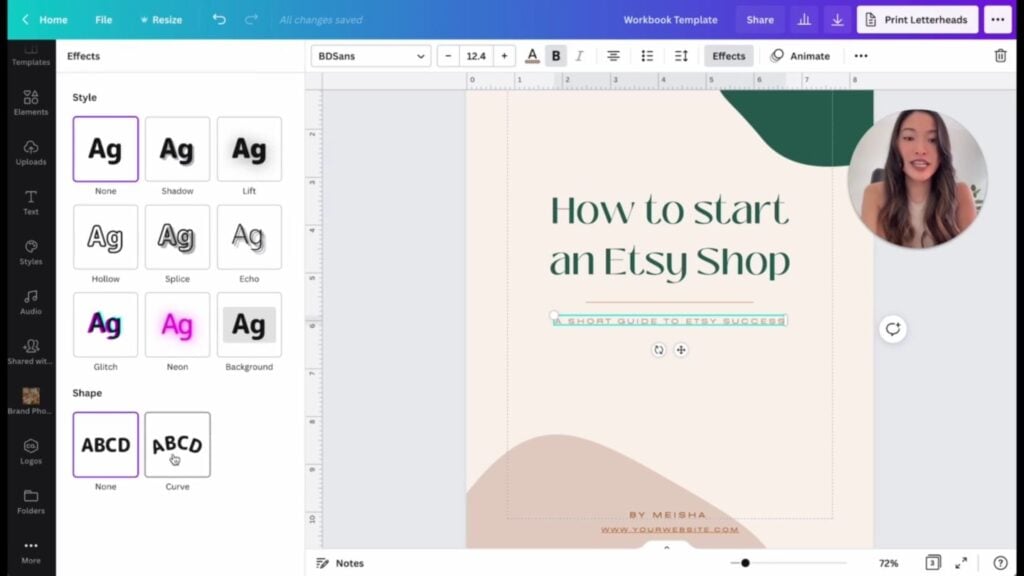
- Manipulate the text curvature (to achieve your desired text arc) with the slider beneath the “Curve” button.

- Adjust the curve radius by dragging the text box corners in and out. A circle will run through the circular text to show you the exact radius.
- Use the style effects to tweak the appearance of the text itself.
You can even create wavy lines by combining two or more lines of curved text.
Step 4: Fine-Tuning Your Curved Text
You can make additional adjustments to the text, including line and letter spacing, alignment, and color, to integrate the curved text seamlessly into your overall design. Simply use the text tools above your project to fine-tune every detail and create something truly eye-catching.
Keep in mind that you may want to add other pieces, such as a Canva QR code or links.
If you run into common issues, like text distortion or readability problems, try adjusting certain elements. You can
- Resize letters that are too small.
- Increase the spaces between the letters.
- Change the effect style to something clearer.
- Switch the font.
- Try a different layout.
Step 5: Finalizing and Exporting Your Design
Preview the final design before downloading it as the appropriate file type to ensure your project looks exactly as you want it on Windows or macOS.
- Click the “Share” button in the top right corner or the “File” menu in the upper left corner.
- Click “Download.”
- Select the best file type.
- Open your download to preview.
You can also click the two “Present” arrows in the lower right corner to preview your new design in full screen in Canva.
Return to the regular project view to tweak things like grouped Canva elements or colors and sizing.
When everything is perfect, export your presentation or social media graphics for the intended use. This could include downloading to your device, sending to print or posting directly to social media (if it’s an Instagram post, for example).
If you’d like other team members to have access to a specific design, you may share links to your Canva templates for collaboration and consistency.
Become a Canva Pro with Skillshare
Go ahead and try curving text in your next Canva project. Skillshare’s classes can help you master many platforms, like Canva and Adobe Illustrator or Photoshop, and also support skills for small business marketing and social media.
Understand that upgrading to Canva Pro will give you access to a vast library of photos, videos, fonts and templates as well as more features and helpful organization tools.
Skillshare offers several Canva tutorials, including:
- Branding for Beginners: Design Logos With Canva
- Canva Basics: Launch a Creative Business
- Social Media Graphics in Canva
Whether you’re a beginner or an advanced user and want to use Canva for personal or professional projects, Skillshare has what you need to get started and inspired. Enjoy!
Related Reading
Katie Mitchell
Katie lives in Michigan with her husband, kids and pets. She enjoys cooking, travel and live music.
Graphic Design with Skillshare – Start Your Free 7-Day Trial Now!
Start Your Free Trial Today!- Unlimited access to all classes
- Graphic design classes for all levels
- Learn offline with Skillshare's app


