Transcripts
1. Intro: Hello everyone! Welcome to our Zen Doodle
Wallpaper class here on Skillshare . I'm Phuong and I'm a surface pattern designer and illustrator
based in Finland. I specialize in creating
captivating surface pattern and illustrations that reflects
the natural beauty and rich texture of the
world around me. My works can be found on my
own website and Pattern bank, and you also can explore my Fabric and Home Decor
Design on Spoon flower. In my daily creative journey, I immerse myself
in making various patterns, but today in this class, I'm thrilled to share with you one of my absolute favorite pattern, the Zentangle inspired pattern . There's something truly magical
about the combination of Zentangle strings and
delicate doodle lines. Not only do they produce
stunning and stylish designs, but they also have a
remarkable ability to evoke a sense of
tranquility and relaxation. Imaging adorning your walls with pattern that not only
beautify your space, but also provide a moment of calm each the time you
glance at them. In this class, you learn
how to use Procreate powerful tools to sketch
Zentangle inspired layouts and add intricate doodle
lines to patterns and create a stunning composition that exude tranquility
and elegance. No prior experience with
Zentangle or Procreate is necessary, Just bring your enthusiasm
and willingness to explore. By the end of our
journey together, you have the skills
and confidence to make your mesmerizing
wallpaper in Procreate. Each one is filled with
serene essence of Zentangle. Whether you are looking to add a touch of
elegance to your home or simply looking
a creative outlet of relaxation. This
class for you. Let's embark this journey together and get
ready to unleash your inner artist and discover the joy of Zen Doodle wallpaper. I can wait to see the beautiful
pattern that you create.
2. Class project: Welcome to the project lesson. In this lesson, we will put out our new found skills in the test by creating Zentangle wallpaper
design in Procreate. Here is the task. The project
for this class is to design wallpaper pattern with outlines inspired by Zentangle strings and filled
with Doodle lines. Please follow the instruction in the class lessons
to make your work. Start by sketching
out your Zentangle layout guided by the principles
of balance and harmony. Use broker a brush
to draw the outline taking inspiration from
the Zentangle strings demonstrated in the lesson. Once you have your
layout outlined, fill each section with
indicate doodle lines. Experiment with different
patterns, textures, and brush sizes to bring
your design to life. Feel free to add your
own creative player and personal touches to
make your pattern unique. Once you've completed
your wallpaper design, Be sure to share it in
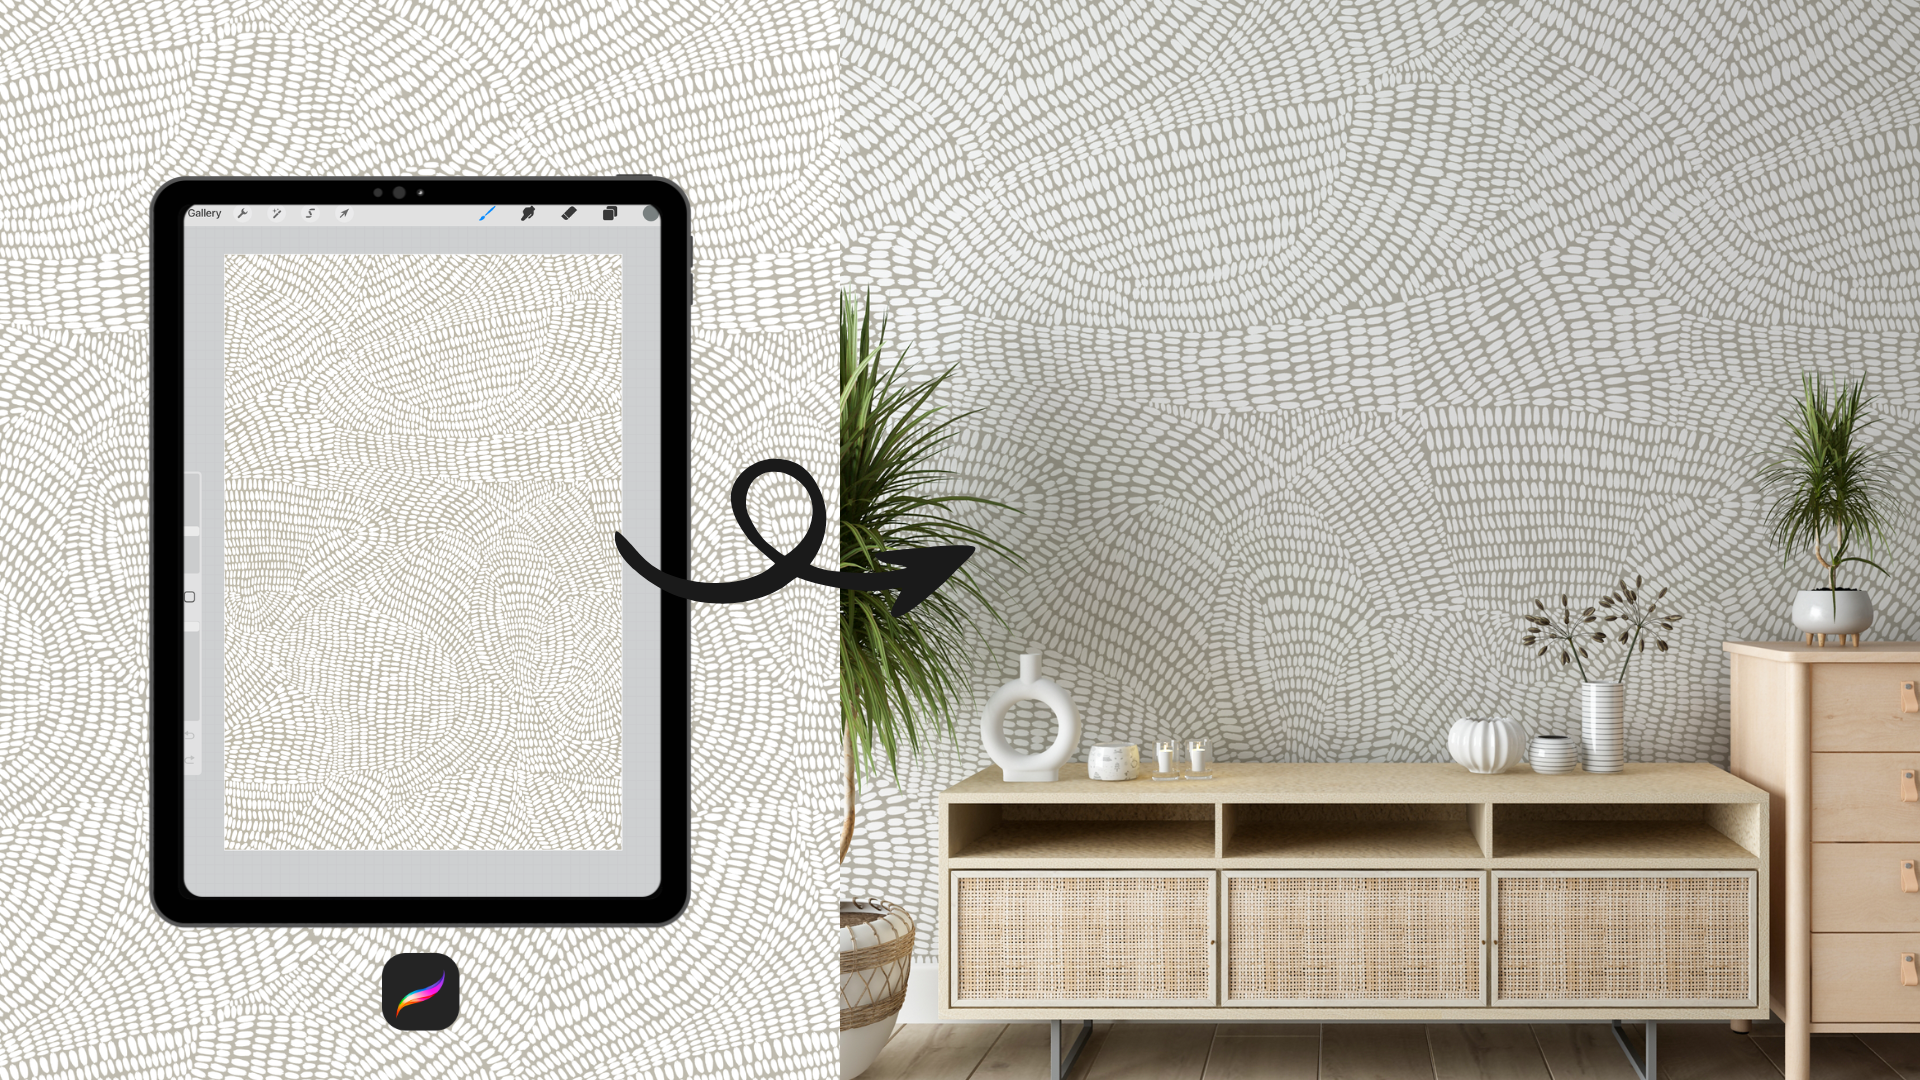
the project section. You can also add it
to a wall mockup to visualize how it would
look in the real space. I can't wait to see your
beautiful pattern. Happy creating!
3. What is Zentangle ?: Zentangle was created by Rick Roberts and Maria
Thomas in the early 2000s. They developed the methods
as a way to encourage artistic expression through structured and
repetitive patterns. Originally, it was designed as a simple and accessible way for anyone to create
beautiful art. Since then, Zentangle
has gained popularity worldwide for its coming
and therapeutic effects. Many people believe
that entangle can help with relaxation
and stress relief. The process of creating
these indicate patterns allows you to focus on
the present movement, fostering mindfulness,
and a sense of calm. Whether you are an experienced
artist or a beginner, Zentangle offers a soothing escape and a way to tap into
your creativity.
4. Zentangle strings : Now, we deal into the magic
of Zentangle strings, a key element in
our design journey. Let's uncover how to de symbolize Kdns from
our able creations. What are Zentangle strings? Zentangle strings
are flute lines that divide our canvas
into manageable sections. They provide structure allowing our creative reform serving as a brow map for our designs. Using entangle strings. Begin by slightly sketching blue t lights
across your canvas. These will form the basis
of your design sections. Embrace the organic nature
of entangle strings. There's no need for b section. Let your lies flow naturally. You can work with
separate layers for your strings in procreate. This makes it easy to adjust them as needed without
affecting your artwork. How we can implement
strings in designs? Focus on one section
at this time. You can fill each section with unique tal barons inspired by strings or just one
burton for all sections. When you experiment
with different buttons, just ensure overall harmony by following the structure
provided by the strings. Don't be afraid to
refine strings, say your design evolves. They mean to be adaptable and involve with
your creativity. Tangle strings are not
just the guidelines, but a tool for
unleashed creativity, providing both
structure and freedom. As you walk through
your wallpaper designs, let these strings guide
your hand and your heart. Remember, every lie
you draw is a step toward masterpiece
that uniquely yours. Now let's go to the next lesson.
5. Setting up your Canvas: Now that we're ready
to get started, let's dive into setting
up our Canvas in Procreate. Go ahead and open the
Procrate app on your device. Once you in Procreate, tap the plus button located at the top right corner to
create a new Canvas. For our wallpaper design, we want to use a canvas size of 4000 x 6,000px. I found that this size
works well for wallpapers. If you don't see
the size listed here, you can create custom canvas
by tapping the plus button. Make sure to select
Pixcells and then input 4,000 for the width
and 6,000 for the height. Ensure that you have a high
resolution with DPI to 300. Here you see the number of available layers with this
dimension and resolution. You can adjust other
settings if needed, but they are not crucial. Just make sure to have the
color fi set to sRGB. Feel free to change the name
of your Canvas by deleting untitled Canvas
at the top center and entering any
name you prefer. Now we all set to start
creating our final work Let's move to the next lesson!
6. Basic tools of Procreate for the class project : In this lesson will cover
the basics of Procreate, which will utilize to complete the project
in this course. If you're already
familiar with Procreate, feel free to skip this lesson. The first tool we'll focus
on is the brush library. Here you find the brushes you've recently used and on the
left side are the brush set. If you haven't imported
any new brush sets, you probably have
these fol brush sets that Brokery offers. Next, let's explore
the color palette located at the top right corner of the Procreate interface. Here you can change colors and create color palettes
for your projects. Once you've selected
your colors, you can start drawing
on your canvas. Moving on, we'll
discuss the smush hole. It also utilize the same brush
library as the brush hole. The toll can be
handy for blending and creating unique
effects in your artwork. The next importance hole for
all brushes the eraser hole. It also shares the
same brush library. I typically choose
the brush with strong opacity and a
larger size for erasing. But sometimes I also opt for smaller brushes for
more besides erasing. Next, we'll delve
into the layer toll. It can be a real sound
saver for digital artists. You can add a new layer by
tapping the blast icon, then swipe lap to lock, duplicate or delete layers. To right to select
multiple layers and you see the group option at
the top right of the box. Top group to group layer or delete to delete
them all at once. Move to the top
left of the canvas. You find the selection tool. I often use the pre hand
selection tool to chose objects and then tap the arrow to move them
around the canvas. On the left side bar, you can adjust the size and vasity of the brush as needed. Finally, let's explore
the auctions menu next to the world
gallery at the top left. Here you can insert a photo from your library,
adjust your canvas, crop, resigns, enable
drawing guide, or use the symmetry to. Don't forget the share
icon where you can export the file and
share with others. Last but not least, the video icon is where your
process will be recorded and you can also export your ideo to share
on social media. Since the baron we're
about to create only requires lies and it
procreate basic section, we briefly covered essential
tools that we need to set time to give
the better idea, less practice, drawing
some lie together. First, grab your pencil
and tools your brush. And then choose the color and
draw a line on the canvas. If you want it to be
perfectly straight, keep your pencil down
without lifting it until you feel it
straight, then stop. Means that you're going to hold your pencil until you feel
the lie is straight enough. When drawing a circle, the same principle applies. If you want your
circle to be perfect, draw it and then hold your pencil until you see
the perfect circle appear. Procreate will
usually prompt you to edit it into a perfect
circle or ellipse. Once you make your selection, feel free to make a slight
adjustment that you like. However, perfect lines and circles are necessary
for our parents, so we can skip that step. Next, let's talk about coloring. First, choose your brush, then select your
color by tapping on the color area and picking
the color you want. There are two basic methods for. Traditional coloring, just
like you color on the per Another method is drag and drop. Drag the color into the
area you want to fill. Note that this method only
works for clothed areas. If there's even a small gap, the color might spill
over entire canvas. Actually, we don't need to go into too much detail about this. What's important
is knowing how to change for layers in the canvas. For example, you've drawn
lines on one layer and want to change the co. Just go to the layer options
at the top right, select the layer
with your light and drag the color into
it one by one. C. I actually takes a loss of time. To save time, I actually prefer using a different
method with the clipping mask. A clipping mask allows you
to apply your color onto the areas you've dw without affecting the
ret of the canvas. Here's how to use it, create a new layer right above the layer that you want to change color of
the element in it. Tap on this layer and
select clipping mask. Now you can color on this
new layer and I will only apply the color to the areas beneath it
on the original layer. You can use the drag and
drop method to color this. You just choose the color and then drag the color
to the canvas. So change the
colors if you like, Now, let me show you how to change the color
of the canvas. Go to the layer section, select the background
layer, and then tap it. You'll be taken
to the color veer where you can choose a
color from your palate or a new color from des of the bcrate like
this classic harmony. That's all the basics of pros that you need to
know for discussed. O.
7. Doodle lines: In this lesson, I working through some kinds
of dual lines. Dotale refer to free form, often spontaneous l drawn with minimal planning
or structure. The tack various
forms such as curves, squares, globes, di zags, or even simple geometric ships. Dual lines are characterized by their loose whimsical nature and are typically creed with a specific intent or purpose, often serving as a form of
expresation or relaxation. In the context of
creating burdens, tines are used to add decorative elements and visual interests
to the dark ward, contributing to the
aspetic appeal. They can be combined repeated or modified to form
intcate designs, making them a versatile tool
for arthtic expression.
8. Creating layout : Let's start by selecting
our brush in pro grade. The inking russet offers a variety of brushes
suitable for our project. You can also use drawing brushes to add
texture to your dudo lines. However, for sketching
the outline, let's choose a brush
from the sketch set. I recommend the map Min
ruh for its precision. Start with the blank canvas, open the brocrate and
create a new canvas. Make sure the canvas size is large enough for your design. A popular size for wallpaper design is 4,000
by 6,000 big cells. Draw your strings. Zn tangle strings are symbol, following lines that divide
your canvas into sections. Use your pencil to draw
these lies in the Canvas. You can use curved
straight or geomatic lies, which ever fis line.
Draw guide lines. Use gentle following
lines to create a relaxing field or straight in geometric
light for modern look. Experiments with ships, be creative with
your string ships, create loops, spirals, or inters lies to add
interest to your layout. Tangle has no strict rules, let your imagination guide you. Divide your canvas into
different sections. Each section will
later be filled with detailed bans and
duals principle. Ensure the section
are eventually divide into create balance and
harmony. Keep it organic. Angle strings don't
need to be perfect. I bras imperfections and let
your lines flow naturally. Enhance the hand draw
organic for your ban. If you're not satisfied
with how the strings look, feel free to adjust them. You can redraw sections until you're happy
with the result. You can erase and sections until you're
happy with the layout. Finalize your layout. Once your strings a complete and you are
pleased with the layout, move on to the next step
filling ex section with the intricate parts to
bring your desire to life.
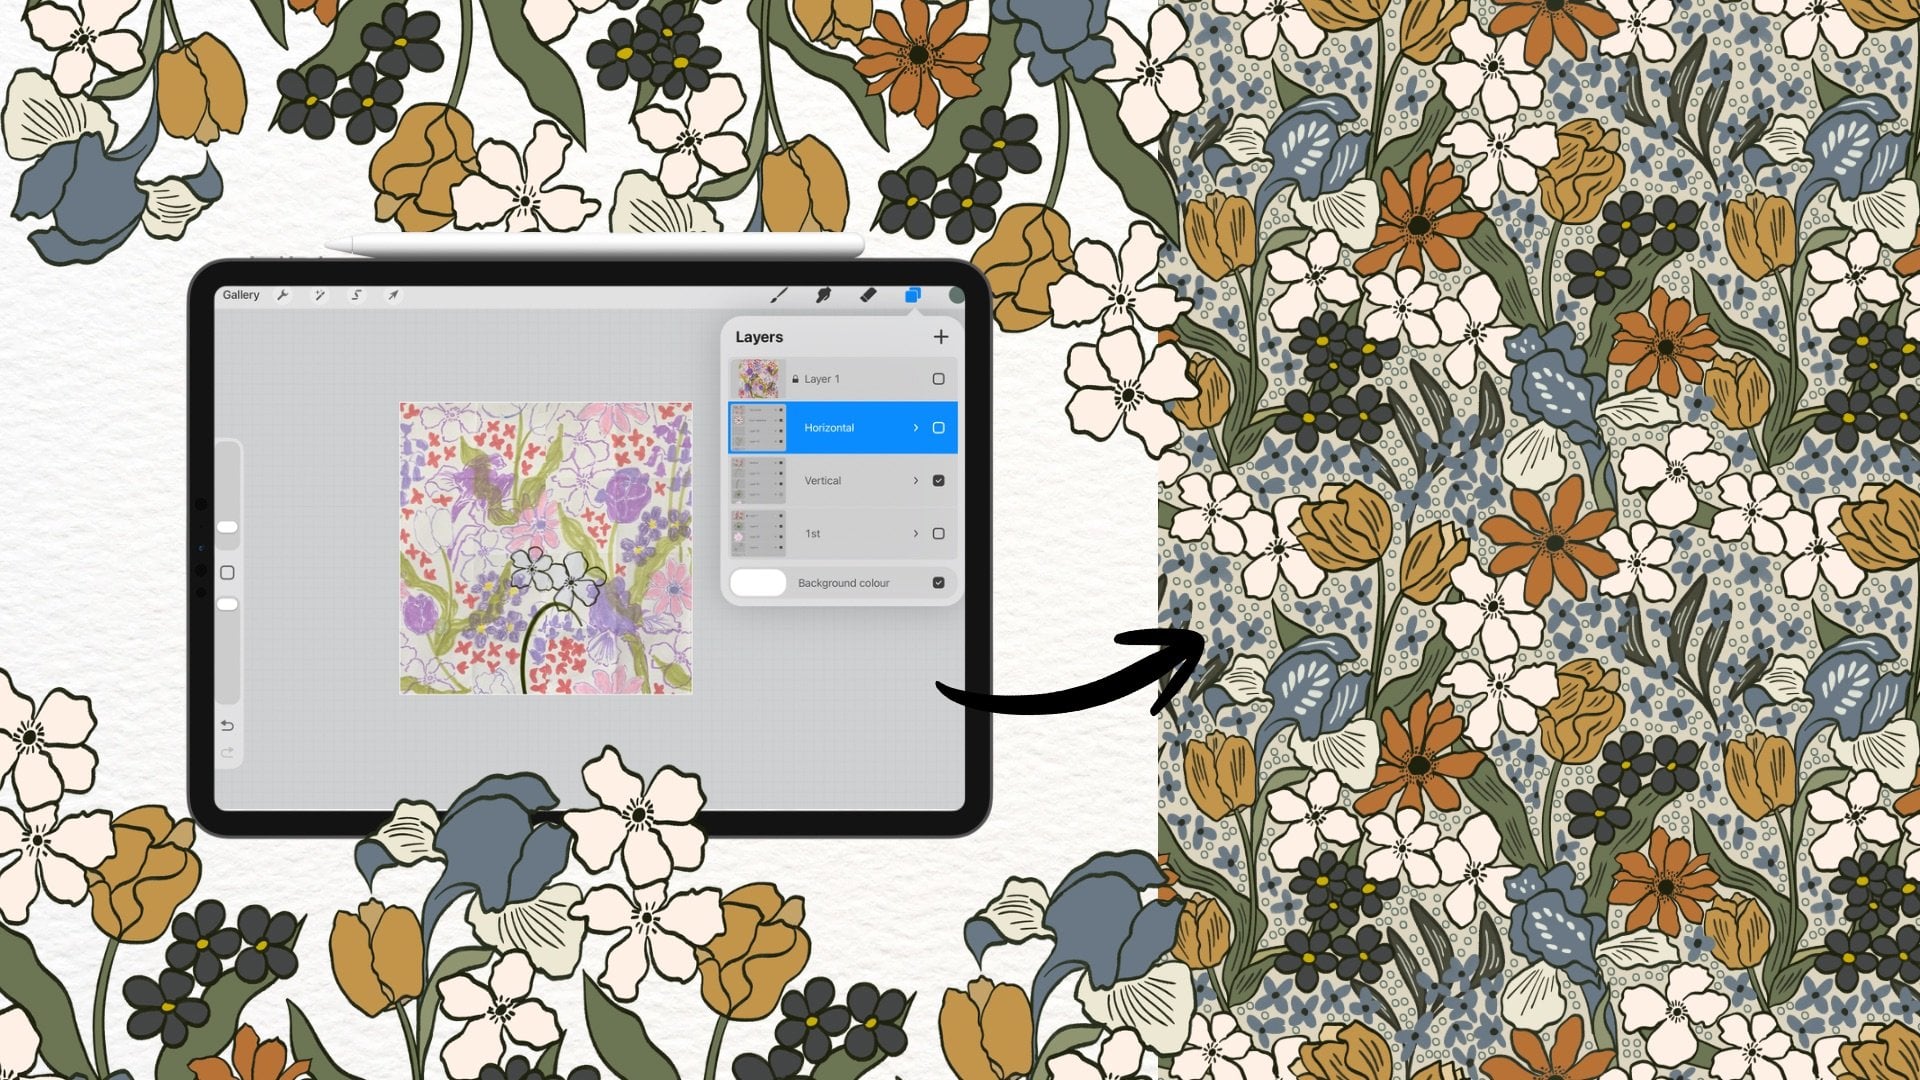
9. Making repeated layout : I father that the
repeated layout makes a good digital pardon, as it provides a balance
between those lines. Before we're going
to fill our canvas, let's make the layout repeated. Let's first set up our
layout for repetition. Start by duplicating
your document to have a backup in
the copy document, delete any layers you are not working with to
keep thing focused. If you have multiple layouts, pick the one you prefer. Next, make a copy of your original layout
by duplicating layer. You can duplicate it twice so you'd add up with
the three layers. The bottom layer will
be your original lock the original layer to avoid
accidentally drawing on it. Since our layout touches on
the edges of the canvas, we don't need a p. Now let
repeat the layer horizontally. Select the layer
you want to move. Then tap the arrow at the top of the canvas to activate
the selection tool. Make sure the snapping
tool is turned on. Move one layer to the left
and and other to the right. Hide the original layer to see the repeated layut more clearly. Now fill the space
in the middle of the canvas by connecting
the string lines. Adjust them one by one to make sure everything
aligns correctly. Use the eraser tool to clean up any extra ize zooming and out to help you refine
and connect the lie smoothly. Remember this step is just for
the setting up the layout. Don't worry too about details. Focus on getting the
repetition right and we'll add the die
in the next steps. One you filled in
the empty spaces, it's time to move on to
the vertical repetition, duplicate your final
repeated layer and repeat the same process
of the vertical direction. Remember, we don't need
a place holder for this. Make two additional
copies of this layer. Move the top two layers up and
do to allig them properly. Fill in any gaps in the sender by connecting the lights
from both sides. Yeah. Oh. After ensuring the edges are all and the
repetition look good. Duplicate the final
repeated layer again. Tap the arrow at the
top to select the layer and then reside to one
quarter of the Canvas size. Duplicate this
reside layer three more times to complete the
final repeated layout. Now you have your
full repeated layout ready for the next step. Create O
10. Adding doodle lines : In this lesson, we've
gone to add alyss to our canvas and then
complete our pardon. First, let's create
the backup of our repeated layout
by duplicating it. I'm sure you know
how to do that. Before we start
edit the details, we need to select our brush. Take some time to experiment
with the brush sets in or your own custom brushes
to find one that you love. I'm going to use a brush from
the Inking set procreate. You can choose any brush you
like is each one will give a different look to
your design due to the unique characteristics
of each one. For this burden, I'll be
using the Marker 11 brush, and this is a variation of the original Marker one
brush that you can see here. While I make a few adjustments, the shape remains
similar to the original. Remember, you can always
date any brush to suit your style by going to the brush studio and
stacking the settings. Let's make some changes to the stroke path
and stabilization. I'll increase the amount
of motion filtering, which helps create smooth
these by reducing iter. I also want to enhance the pressure for
the streamline setting, which allows for more
responsive and control strokes. Based on how hard you press. Can also increase the
stabilization amount which helps steady your
lines for a clinic. Now, let's return to the Canvas. Feel free to fill any ships with dtalize A you
follow along with me. Keep going and continue
filling in the ships. By using different layers, By using different
layers for each section, you will be easier to make adjustments if you
make any mistakes. Be mindful of the edges. Make sure your eyes
don't test them. Once you feel the
canvas with due, leave some space near the edges. Next, we work on the
repeating edges. First, let's back
up this document. When you use a place
holder to move the canvas, you need multiple layers. Since we fill the with
different layers, we need a new document
to me those layers together allowing for more
layers for the placed. Once you've merged
layer together with, group them with the layer layer. Now pay attention to how
I s for these groups. Okay. After naming and
locking the original group, make sure to duplicate it. O. Oh create a color field layer
and low ask capacity. Then duplicate this layer and move the copy to another group. Now we create a
horizontal repetition. Select the first group, top the arrow to activate it, and then move the group, do the same with
the other group, but this time move it do. Next, merge the layers
with the dude and the layout layers together and
delete the place holders. Create a new group from the new layer and
group them together. Duplicate this
group tries to have one backup and another group
for vertical repetition. For the vertical reputation
follow the same process, but this time moves the
groups to the and right. Now we have on the
edge repeated. You can double
check the desire to ensure the repetition
looks good. Continue feeling in the
center spaces until you. Oh. After you fill all the spaces, verify the repeat using a method we covered in the
repeated layout lesson. Now let's move on
to the next lesson.
11. Final touch and exporting : Great when your pattern so far. This lesson will add the final touches and prepare
our design for exporting. Let's make sure everything is just polished and
ready to share. First, take a moment to
review your pattern. Look for any areas that might need a bit more
detail or adjustment. Use the eraser tool to clean up any straight lines and the verse tool to
enhance the details. This is your chance to make sure everything part of your
design looks just right. Next, at any final details
or embellishments, maybe a few extra doodles in
adjustment to the corridor. Small changes can make
a big difference, so feel free to experiment until you are
happy with the result. Once your desire is complete, it's hard to export it. Go to the actions menu by saving the range icon at the
top left of the screen. Select share and choose
your desire file format. PNG is the c for
high quality images. While PSD is ideal if
you want to keep layers. Don't forget to save your
work and back it up.
12. Final thoughts : As we wrap up class, I hope you enjoy the
diving into the world of Zentangle in spite of
wallpaper design in Procreate. Remember, the creativities
has noble so please don't hesitate to explore and experiment with
your new fw skills. I encourage you to share
your class projects in the class project section and connect with your
fellow creators. Your unique perspective and
creativity inspire us all. If you found value
in this class, I greatly appreciate
your feedback in the form of a review
in the review section. Keep creating, exploring
and most importantly, keep enjoying this journey. Thank you for joining
me in this class and I can wait to see
what you come up with. So please share
your class project in the class project section. Until next time, bye bye.
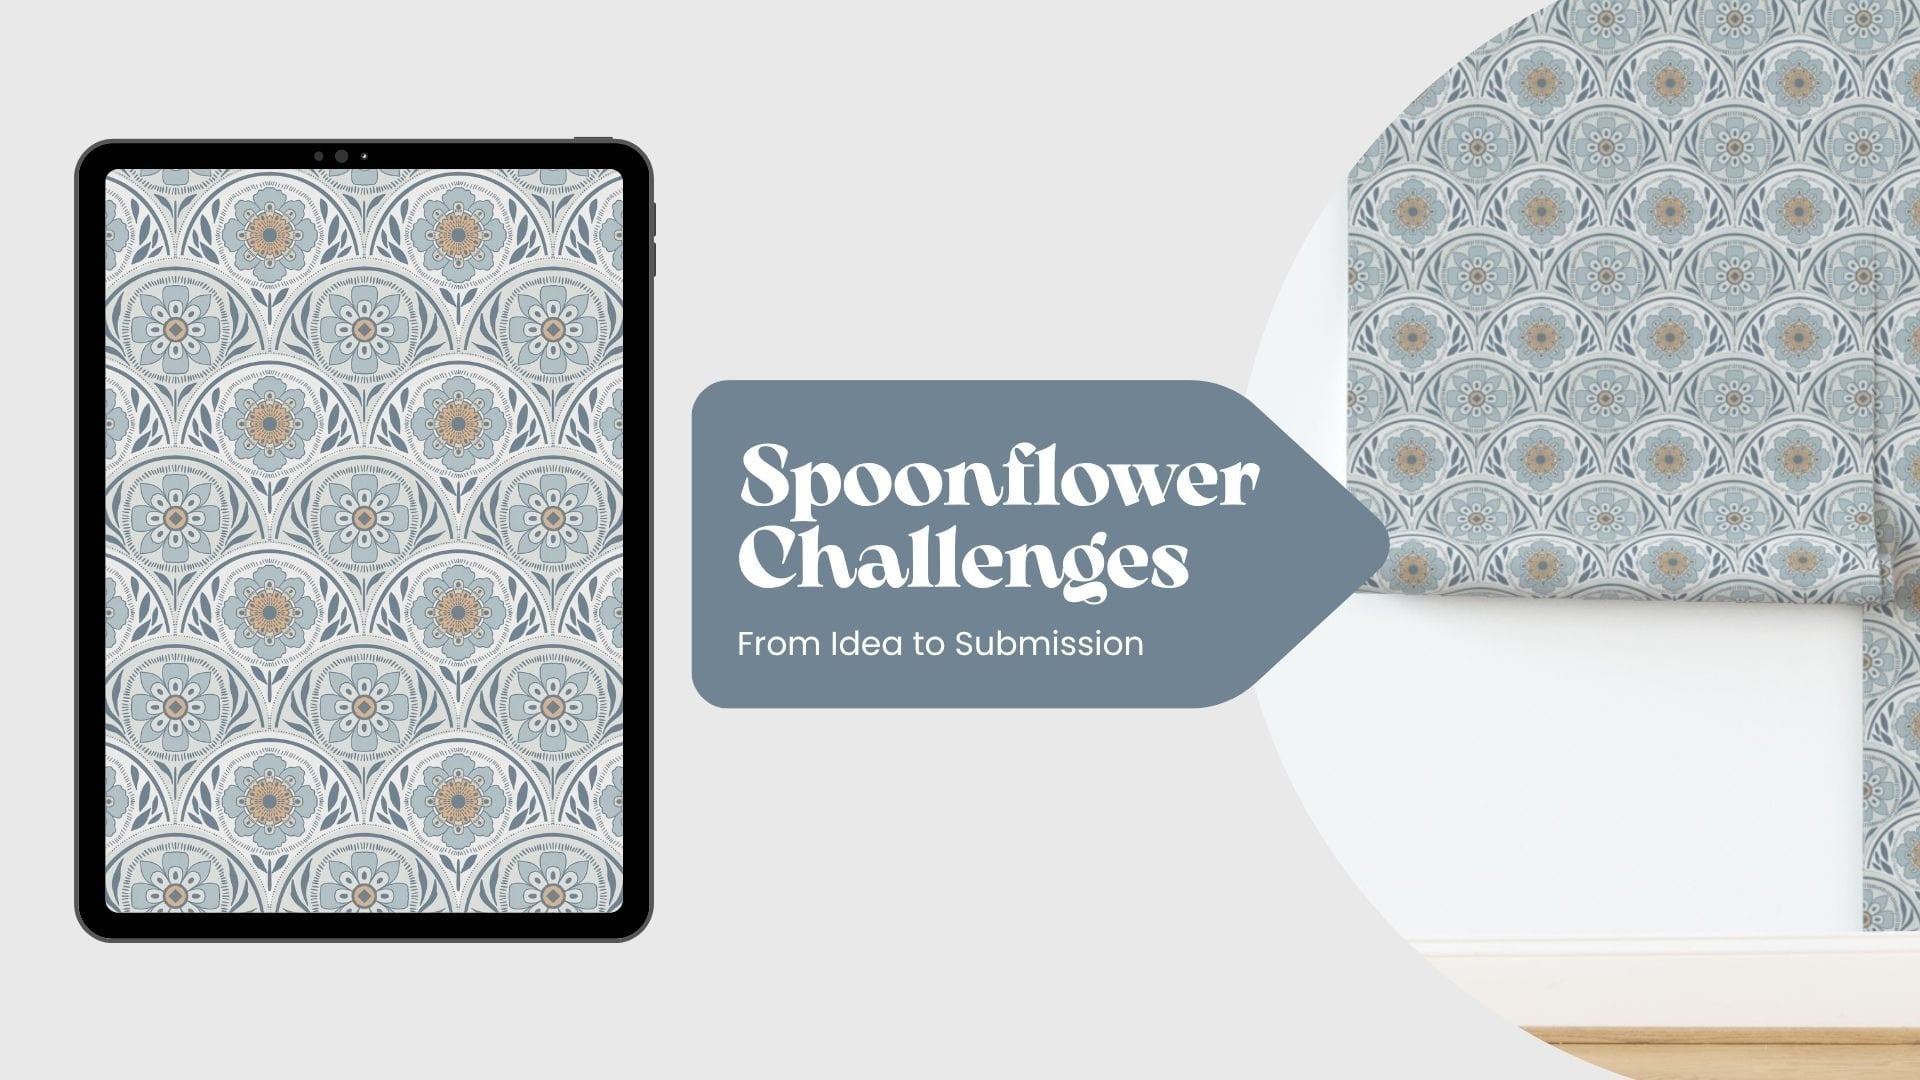
13. Bonus: Selling your pattern on Spoonflower: Let's learn how to aplot and sell your
baron or spo flower. Let's walk through
the process together. First, make sure your baron is finalized and selved
in correct mart. Sp flower accepts B&G, G back, and T pies, but I recommend using B&G
for its high quality. Show your files least 150 DBI
for the best bring results. If you haven't already create
an account on spool flower. Just go to spooflower.com and click Sign up at the top right. Follow the proms to enter your details and set
up your account. Once your account is setting up, log in and go to
the plot section, click aplot a design and
select your B&G file. Spool flower will guide you
through the plot process. Where you can just the layout and review how your
burden will look. After a, you need to set up your add a title description or added to a collection and add any tags that will
help you find your burden. To make your pattern
available for sale. You need to prove your design. Tap here to prove. Make sure your design
looks perfect at all edges and there
is no white line. After checking that
everything looks good, just submit and then. Now you need to decide what products that your
design can be sold on. To increase visibility. Share your so flowers shotns on social media blogs
or your website. Engaging with your orients and promoting your designs cans.
 Phuong Lempinen, iPad artist| Surface pattern designer