Transcripts
1. Introduction : Hi. I’m Phuong Lempinen. I’m a Vietnamese self-taught iPad artist and surface pattern designer, living in Finland. In the Skillshare class, I'm going to show you how you can make any brush in procreate to give your artwork a unique look by using just your iPad and procreate app. Okay, but first, let me tell you a little bit about my story. I love texture and I use texture a lot in my illustration because I think they make my illustration look more interesting. I used to buy lots of texture brushes from online markets and as you see, They are so expensive and I actually don't need all of them. Then later I had to research and learn how to make procreate brushes by myself. Then I can make exactly that kind of brush that I need whenever I want. In this class, I'm gonna walk you through Brush Studio in Procreate . And you’ll learn all the basics of making brushes in Procreate, we're going to make these kinds of brushes together. Custom brush. We're going to use available brushes in studio to make a completely new brush. Stamp brush. We're going to draw together to make a stamp brush that we can use the latter to make a pattern brushes. And then texture brush. We're going to make a texture from the source library of the brush studio. And I'm going to also show you how you can make a texture brush from any photos. Seamless pattern brush. I'm going to show you how you can make a simple pattern with your stamp brush, then make a pattern brush from it. At the end of this class, you will learn how to export these brushes and make your first Brush set to sell online on your website, on Etsy and other platforms. All you need for this class is your iPad, procreate app, and your stylish. I’ll be using an apple pencil And you can use anything you wish. Okay, so let's get started.
2. Class Project: Okay, so for the project for this class, I would like you to choose two brushes that you have made by following along this class. And then choose one from these ways to share your brushes with me and your classmates. First, you can share the images up the brushes themselves by taking screenshot and upload your screenshot here in the project section. Or the second way, you could share a finished project where you use your brushes here in the projects sections. And whether you use my illustration or yours, I would love to see what you’ll come up with. Third way, you could post the link if you make your brushes for sell or even if you make something for Print on , Demand website such as Redbubble and Society 6. So what ever you make with these brushes I would love to see it, so please share it with me and your classmates.
3. Downloads and Resources: To help you go along easily with this class I prepared for you some downloads and resources. You can get the link into the downloads page in the project section on Skillshare and make sure that you are using Skillshare on the web browser rather than the app. And once you click onto the link and you see you need a password to get into the page. So you’re gonna get the password right now on the screen. So now let me show you that page, First you’re gonna tap the link in the project section. Then you will see this page with password appears. Then you're gonna to need to enter the password. You already have the password, so let's do it. Tap enter here. Yeah. And, and it took you to a page where you can see this name of this class. And you need to swipe up to see Class downloads. And here are all the class downloads and resources of this class files. The files here are in my Dropbox. And they are .zip files. The brush set - they are all the brushes that we create together in this class. And other brushes, I made before this class, and I also put them into this set. That if you need you can use. To download them, You just click to the link. This is a Procreate file So, when you download this file, you can see it as a procreate file and you just tap to this file and the brushes automatically imported to procreate and in the PNG illustration file, you're gonna see we have three here, 3 llustrations here. The next is three PNG pattern tiles. In this folder, you can see these pattern that I made for my brush set that’s now selling on Etsy, I gave it to you for practicing making your brushes if your first pattern tile is not successful. Photo Textures, in this folder, you can find 3 photos that I found in Unsplash. You can find the same from Unsplash, but I just found it for you. If you like them, you can use them for practicing making. Texture brushes. But if you want to make texture brushes with your photos or the photos that you have found . That's okay. Next, the checklist for a brush set. This is a PDF file, As you see “checklist for brush set” there. So here’re all what you can see there and the last one is the link to Unsplash stock photo and it just unsplash.com. And I also put the link in the project section if you didn't realize there. So you can use this link to go to Unsplash stock photo. So let’s jump to the first lesson.
4. Set Up Your Document : In this lesson, you will learn some tips for setting up your document, for making a brush in procreate. And because procreate is a raster based software. So when you set up a document for creating a brush, you should remember these things. First, always use a square canvas, otherwise, your brushes will be distorted. Second, for a high resolution, you should make your brushes at large size. And I often choose 4000 by 4000 pixels at 300 DPI to make sure it has high-quality, make sure your document has at least 2000 by 2000 pixels and 300 DPI. For the quality of your brush, you should use pure black and white. If you use other colors, you will turn down the opacity of your brush. What do I mean by that? So we will dig deeper in the following lessons, now we're going to set up our document. So when you open Procreate, you see the gallery. And for setting up a new document, you need to click on the little plus at the upper-right corner, this's here. And then you see this new canvas box appears. You can see here are some templates sizes from Procreate. So you need to click on the little plus at the upper-right corner again. And the custom Canvas page appears. You should be in the dimension section. And you can see here you can set up the width and height of the canvas. So we need the square canvas, I'll go for my often chosen size. It's 4000 pixels 4000 pixels at 300 DPI. And then you can see here we can set up our canvas with millimeters, centimeters, and inches. If you set up your canvas with inches, makes sure that the your size should be at least 10 by 10 inches. Click Create. You see? Our canvas is ready!
5. The Brush Studio Interface : In this lesson, I'm going to walk you through the brush studio of Procreate. And you're going to get to know all of the functions of each section. I divided it into two parts with the first one is the Brush Studio interface, and the second one is the brush studio settings. Okay, so there are two ways to get into your Brush Studio. You can tap an existing brush to edit and then it takes you to the Brush studio. Let's do it. So I'm going to touch random brush here. Yeah. And it took me into the Brush Studio. Okay, get "Done". And the second way to get into the brush studio, you can tap the plus button to create a new brush. So, okay, do it again. So you tap the brush here and then the brush library appears, right? And then you can see at the top right corner, there is the little plus, you can tap the plus sign. And then it took you to the brush studio. Those options take you to the same Brush Studio interface. But the difference is the "Import "button appears only when you entere to the Brush Studio using the Plus button. Let's go inside the Brush Studio again by tapping the Plus button. And that's mean you are creating absolutely new brush. So as you see the Brush Studio interface has three parts: Attributes, Settings and Darwing pad. The first part is attributes. And it displays the 11 attributes or sections that you can modify to make your brush unique And the second part is Settings. When you tap any section in the left-hand menu, you see the setting of it appears, and you can adjust the settings to get the brush you want. And the third part is Drawing Pad, where you can preview your brush as you work You can see your changes in action without leaving the Brush Studio. And if you tap to the drawing pad in the left corner of each part, you can edit your brush. I don't know, maybe you want to see your brush with the bigger size. And you also can see your brush in another color like, I don't know, maybe in blue or red. And when you're drawing pad is full, you even can clear the drawing pad like this and try again. Yeah. We 've done.
6. The Brush Studio settings: Now we're going to dive deeper into 11 adjustable sections of Procreate brushes and discovered the variety of settings. And fine control each one offers. For me, the most important sections from these attributes are the Shape source and the Grain source, because they are really basic of Procreate brushes. And when you make any Procreate brushes, you should go to the Shape Source, and the Grain source first. Let's start with the shape source. This section determines the outline of your brush. A stroke is created by a series of shapes. And the way it works is that you drag your Apple pencil over screen and then Procreate will connect on these individual shapes. To make these path is easier to see closer like this. So let me show you that. I'm going to tap the Stroke Path and adjust Spacing here. And now you can see how the path consists of these individual shapes. Now, let's change that shape and see what happens when we do that. Tap Edit, then Import. So you can see there are different options here to change you Shape source. You can import a photo, you can import a file. And there are also procreate Source Library and it's good starting point because it gives many options. Let's choose some shape here. Now the shape of your brush is changed to this shape, not the circle anymore. And here you can adjust the behavior of your shape. The first option here, let's choose scatter the brush and that randomly rotate the brush. You can also rotate the brush at the same angle if you would like to And the Count determines how many brush stamps that are going to get placed on top of each other in order to form the stroke. So now let's see what happens when you make this change. You can see how the shape changes its form even so slightly because if got on these stamp placed on top of each other, there are some other options here and you can play around and try out all of them. Now we're going to jump into the Grain source and it works pretty much the same as the Shape source. There are also those options to input the grainn and this session is important if you want to make a texture brush, okay, Source Library. And then let's scroll down into some random grain here. Tap "Done" And you see the grain has been applied to the brush. Here are some different setting options and you can also play around with them. We're going to dive into the setting later in our texture brush lesson. So let's go back to the stroke path and it is also a next step of my brush creating process. So you've already seen it, but let's try to adjust this again. So you see when you add lots of space, you will begin to see the brush as a series of shapes along the path with gaps between them. Streamlines, a particular important for inking in calligraphy. So if you make an ink brush, or letter brush, something like that, you should consider with this session, you can turn it up for the smooth And turn it down or off for more less smooth and natural line work. Jitter When you turn it up, you see the edge of the brush is roughened it moves your shapes around. If you want a smooth stroke, you should turn it off. Fall of determines how quickly your stroke fade out. So now let's move on to tapper. This determines the beginning and end of the stroke or how they behave. So you can tapper this tab at the beginning and the end of the brush. I usually just set it a little bit. Like this. Rendering. Rendering makes the huge difference to the outcome of your brushes. You can change the way strokes and colors behave on your brush and then interacting with canvas. Rendering mode, you can control over how it renders your brush strokes and also lets you control how brush strokes interact with one another. You can actually play around with these settings until you get a brush that you want. Okay, next step is Wet Mix. And this is how it can create a color brushes. Dilution determines how much water you want to put on your page. Charge determines how much paint you have on your brush and how quickly it should run out of color. Color dynamics. You can set your brush to change colors, Saturation, Brightness, and more based on the pressure. And tilt you apply to your Apple pencil. It lets your brush shift through different types of color: values, such as hue, saturation, lightness or darkness, and shift between primary and secondary colors with each stroke. Dynamics section is where you can set your brush to make dynamic changes based on how fast you make strokes. Apple pencil, you can make fine adjustments to how the Apple pencil interacts with your brush. Set pressure ortilt or effect fundamental behaviors of your brush. Affect behaviors such as size, opacity, flow, bleed and smooth. Okay, now we're going to jump into the Properties. You can use this setting for, establish how the brush looks in preview form in the brush library. This also sets how is behaves within the Procreate Interface. And last but not least, about this brush and in this section, you can sign your name to custom brushes and at a profile photo or your logo. By this way, your work will always be credited to you. And this is great when you market your brushes. We just finished our long lesson about introduction to brush studio. Let's go to the next lesson.
7. Custom Brush: In this lesson, we're going to make custom brushes together. We're going to use unavailable brush in th Brush library to adjust and make new brush. I'm going to also show you how you can make a completely new brush with the Source Library of Procreate. So, let's jump into Procreate. For this brush, you don't actually need a big size canvas because your Canvas now it is for testing your brush. Before, before you make a brush, you should have in mind what kind of brush you want to make. And I mean, for assemble, you want to make on ink brush for fine lining your work or maybe you want to make a watercolor brush are on acrylic brush or oil brush or something like that. In this lesson, we're going to make three brushes: a pencil brush for sketching, an ink brush for fine lining and brush for painting. So let's get started. Our first brush is a pencil brush. So we're going to make completely new brush from the source library. So let's go there. If you remember how to get there. First we click to the little plus at the top right corner. And now we are in the brush studio. So the basic of your brush depends on the shape source and the grain source. Okay, So when you go to the Brush studio to make a new brush, you should keep in mind that you're going to change the basics of your brush first. And then you will make other changes in the next steps. So now let's start with the shapes source. One thing you can also do before creating your brush is, take a look at the same kind of brush, which is available in Procreate for inspiration. So let's do it. Okay, Now tap cancel here. So we want to make a pencil brush. And now we're going to look for a pencil brush from Procreate to see what it's made from. Go to brush, go to sketching, let's choose 6 B pencil. This is my favorite brush from Procreate. I always use it to sketch, Tap the brush and it takes you to the brush studio. Let's see its shape at the shape source. Oh, you see? It's made from series of these shapes, go after each other closely. Let's move on the grain source. So this pencil brush made from this grain. Okay, so let's see more example. Tap cancel and you come back to your Canvas. Let's look at one more inspiration. Tap the HB pencil and shape source. So it's made from this shape and this grain. Okay, so now you have some ideas in your mind. Let's go back to our brush. Okay, Go back to your brush set tap this little plus. to make a new brush, we are in our Brush studio right now. Go to the shape. source. As I said before, we're going to make our brush with a Source library. Let's go there by tapping Edit, tap Import, then Source Library. We have many options here. You see the 6B pencil was made with this brick, I don't know this brick shape and HB pencil with this scribble shape. So let's choose the shape you want and I'll go for this Blotch shape. Tap Done. You see? the path in the drawing pad is really changed. Now we're going to go to the grain source. Okay, the same process, Tap Edit, Import, Source Library. Now it took you to the grain source, but you actually can switch between this option Shape Source and Grain source here. Let's choose some grain here. You can choose what you like I'll go for this Pastel Board Fine Tap Done. You can see now the change in the path in the drawing pad right now, you can try your brush by drawing on this. As you see, the pencil brush often has small line. So let's make some adjustments. You can try out all the options here within the Grain source. I'm going to go to the scale and scale it up a little bit to 60 percent. And because I think I like the texture like this and I will leave other settings as they are. I don't want to change anything with the shape. So the next thing I'm gonna do is go to the Properties to change the size of my brush. You can change that by adjusting the maximum size in the Brush behaviors sections here. 10 percent? 10 percent, it good. I think Let's clear the drawing pad in this brush. You know what? I think, It's looks great, but I need more control with the brush. So the next thing I'm gonna do is go to the Stroke Path. The first section here, and Streamline. I'm going to bring it up to 35%. No, I think I need more. How about 50? Okay. I think I need more. Now. I'm going to leave it with 60 percents. I think is good right now because it gives me a feeling of real pen. Because it is the pencil brush. So I think we don't need to make any change at Rendering, Wet Mix or Color dynamics. But you can change a little bit at the Dynamics and Apple Pencil, but I don't want to change anything here. The last thing you can do is name your brush in the About this Brush section. At the top of the Settings part. Type your Brush name. Let's call it sketching pencil. If you want, you can also sign your name here or credit it's yours, by uploading your logo and typing your name. Here. it's good when you decided to market your brush but for personal use, you don't need to do that if you don't want. Okay, So I'm going to upload my logo. I just want to show you how you can do it. So ... tap Done. Great job! Now your first brush is done. Let's test it in the canvas. I want to draw something here, maybe a flower. That's our ink custom brush by using an existing brush here. Okay, Let's go to the Inking of Procreate. Let's chose Dry Ink to custom. Dry Ink is my favorite brush from Procreate, I use it a lot, First, you should duplicate it to make sure you don't lose your original from Procreate. When you make a custom brush with an existing brush like this, you also can change the shape source and the grain source. So let's go to the brush studio to see what this brush was, made from. Shape source and Grain source. This brush was made from the shape. and this grain. And you see with this shape, the edge is roughened a bit. I want it to be smooth. So I think I'm going to change the shape. Go to Edit, Import. You actually can import your shape from your photo library, but it will be another lesson. Now Source Library. And let's see what happens. Tap Done. Oh it's still roughened. it's maybe because of the Jitter. So I'm gonna go to the Stroke path. Here, the first section to bring the Jitter down to none. It look great too right now. I'm going to change the brush size. So I'm gonna go to Properties, Brush behavior, maximum size and 1I'm gonna leave it with 15 percents. I'm happy with this look, but I think I'm going to make it more controlled by going to Stroke Path. And now I'm bringing up the Streamline. Okay, So let's try it out on our Canvas. Tap Done Oh, I actually can change the name of the brush too, but let's do it later. Now we're going to test it. So I'm going to bring the opacity of my sketch down. And then I'm going to refine my sketch with this ink brush, of course, it's so good, I really love it. Now we're going to go back and name our brush. And first, I think I'm going to move it to our brush set. You know how to change the name of the brush so you can do it by yourself. Third brush, we're gonna make is a brush for painting. Brush for painting is my opinion, should have a bigger size. Let's tap this plus to enter to the brush studio. First. Shapes Source, Edit, Import, Source Library. For this brush, I'm going to choose some roughened shape. Maybe These Chinese ink, I think Tap Done. Grain source, Edit, import, Source Library. I think I'm going to choose this cotton paper. Let's try it in the drawing pad. I'm going to clear this pad. And then try my brush. I think I'm going to go to Scale here and I'm going to scale it up a little bit to 75% . Okay let's try. It's okay. I'm gonna let it with no filter. Okay, so now Properties to maximize the size of our brush. And the maximum size. I'm going to bring it up to 180%. I think I'm going to change the Tapper a little bit. I forgot to tell you that. You can make your brush a little bit more real. You can extend the beginning and the ending. The beginning and the ending of your brush. With the tapper section here, I just change it a little bit like this and then tap Done. Now let's test it in our Canvas. Yess, I think I really like it. Okay, So you did it! So now we have our pencil brush, inking brush and painting brush ready, let's go to the next lesson.
8. Stamp Brush: Here are some examples of stamp brushes that we're going to make in this class. To have a stamp brush, you should have some stamps. And we then draw something together now that we can use for a pattern brush latter, too. Let me remind you some things you should remember when you make stamp brush. First, you should use a square canvas. Second, make your stamp with a large size. And I recommend 4000 by 4000 pixels to make sure that it has high-quality , Third use pure black and white to make your brush. If you use other color, you will have a brush with low opacity. Now let's draw something together, Let use your inking brush to draw some simple floral. Okay. So is it here? I'm going to choose this black here. And now our canvas in white color. So let draw something. I'm gonna go for a flower. I don't know. I love flowers, so I'm going to go for a flower. Yeah. You can go for everything you want. Now I'm gonna save it. JPEG And then save. Now we're gonna go to the brush studio by tapping this little plus here. Before we make our brush you should keep in mind that you're going to make that stamp brush. And what does determine the stamp brush? Of course, the shape source, often we just change the shape source to see the change of the brush outline if you want to have some texture in it, you can consider to change the grain. But okay, let's jump into the Shape Source and change our shape Tap Shape Source. Tap Edit, Import. But now we're going to tap the import photo. I'm going to choose my flower. And tap Done So you see that old shape it changed to the new shape Now you see your drawing pad is still showing the stroke The next thing you're going to do is go to the Stroke Path. It's here and change the spacing. If you want to see your shape as individual shape Not the stroke, you need to bring up the spacing to maximum size. Let's bring it up. Oh, we made a mistake here. We forgot to invert our shape And the shape is in black and the Canvas is in white. And Procreate thinks the Canvas now is the shape that you want to make and behaves like this as you see. So we need to go back to the Shape Source and invert the shape. Let's do it, the Shape Source. And then Edit. Now, use two fingers to tap to the screen at the same time. And you see now the canvas is in black and our stamp is in white. And that is what we need. Tap Done. You see? Now the frame outside Our stamp disappeared and that's great. the next step we're going to do is go to the tapper. Because you see we want to bring up our opacity of our brush. In the tapper, you're going to change the size and opacity of pressure tapper and touch tapper. Let's do it. You're going to bring it up to maximum, opacity here to maximum size here, to maximum, opacity to maximum. And you're going to bring down the pressure to none. So you see now it looks better. Turn classic tapper on. The next change we're gonna make is Apple Pencil. At the Apple Pencil here. And when I bring down the opacity of the pressure means you don't need the pressure, just like that. Next step is the Properties because you see our flower is so small. So I want to, I want it to be a little bit bigger. So I'm gonna go to the, theProperties to bring the maximum size. So I'm going to leave this like this, maybe 400 Yeah. Okay. And the minimum the minimum size you can change the minimum size. I don't know, maybe 6%. And yeah, and because this is the stamp brush, so you're gonna need to use the stamp preview that it's going to show in the Brush library that it is stamp. And you can realize that when you look at the brush library, you can go to about this Brush and change the name of this brush. I'm going to change it to flower. flower Yeah. Okay Done. Tap Done. And I think it's done Now we're going to test it in the Canvas. So I'm gonna hide this layer and I'm going to change the color here. And let's test our brush. And you see now it appears in the brush library with the stamp not a stroke like other brushes. Oh, new layer. And yeah, I think I love it, just beautiful But you know, you can make a sensitive brush like this brush. Let me show you this brush. This star. This star brush. Okay. I need to make another layer like this. What is the sensitive brush? The size of the stamps come out will depend on pressure of your Apple pencil put on the canvas. So if you put it really hard, then you receive the big size of this star. And if you just slightly it, you just slightly touch the pencil to the Canvas so you receive just a little star. So now I'm gonna, I'm gonna show you how you can do First, you going to duplicate our stam, our flowers stamp to make sure you can use this version later. Okay, so we're gonna go to the brush studio by tapping to the flower stamp. And now we need to adjust the size of the pressure to maximum. We're gonna go to the Apple pencil section here, and we're going to edit We're going to bring up the pressure here to maximum. And then test it here. You see, now is, now you have it. At the Properties. You going to bring up the minimum size because I think you want to see your stamp even when you slightly touch your Canvas, Something like that. Now let's test this in our Canvas. Tap Done. Tap, tap, tap, tap. That's it. I have a little trick for you here. For the next stamp, you don't need to adjust all the things like this. You can just duplicate your first stamp and change the shape of this the first time and you have your new stamp, it could save you tons of time. So yeah, let's jump to the next lesson.
9. Texture Brush : why you should use a texture brush? First because a texture brush will make your illustration look more interesting. And the second it's easy to make. So in this lesson we're going to use the Source Library to make a texture brush. And I'm going to show you my process to make texture brush from any photos. As I said in the introduction to brush studio lesson, you need to start at the grain source because it's decides the outcome of your texture brush. Now let's go to the brush studio. This time. I'm going to custom an available brush let's use our painting brush to custom. Go to Brush Library. And then look for our painting. Painting brush. It is here. First we got a duplicate to not loose our original. Tap the brush. Let's tap the grain source. Tap Edit, Import, Source Library. Let's choose some grain here. I want some thing look like dust. Let's swipe up to find something interesting I think I'm going to go for this Recycled. Tap this. And then tap Done Okay. You see in the drawing pad, the outcome of the stroke is already a changed. And we're gonna make some adjustments here. Now let me explain you a little bit about Moving and Texturised and how they work. So with a Moving section here, it means that your grains now with your stroke So it works like a traditional brush. And now the grain is in your stroke. Wherever your brush goes the grain goes with your brush. And with the Texturerised It's going to make another effect with the Texturised. The grain will stay behind your brush stroke. It works like a stencil more than the traditional brush. Because when you move your brush stroke, it doesn't go with you . When you make a texture brush, I recommend you to try out what works for you and what doesn't. But I often set it at the Moving. Now set it again to Moving right? And then you can try to scale up and see if you like the texture. I think I'm going to bring it, ... you know it doesn't work really well actually. I'm gonna bring it to 70%, I'm gonna try it with Brightness. Okay so I'm gonna bring it down I want some dust, so I think I'm gonna leave it with 60 percent like this. Let's tap Improved filtering to see what happens. It's more grain, right? No less grain. It has more spaces right now Now, let's go to other settings. The next step I'm gonna go is the stroke path. I think I'm going to go to Jitter here to make some adjustments. You see when you adjust yourJitter, it moves your shapes with Texture inside around, you can see your texture is moving around when you're changing. So I think I'm gonna leave it with 16 See something like this. Yeah. Yeah. Okay. Beautiful. I'm not gonna touch theshape and you don't need to pay attention to it. either. But if you want another shape for the outline of your brush, you can change the shape. I'm going to go to the Tapper. They are maximum here, so that's okay. So now we're gonna go to the Dynamics. iIt's up to you. You can change or not. It depends on the brush you want in your mind. It still doesn't look like what I want. So I want to try out these options here. So I think I'm going to try to bring up a little bit Jitter here It doesn't change much. So let it be like this. And I'm going to try the size here. But actually it doesn't it doesn't change either. So let's go to the Apple Pencil and see what we can change here. I want to change anything here. So let it be. Now we're gonna go to the Properties. So this is not the stamp brush so I don't need to turn on the Use stamp preview I'm gonna leave it about 30 percent. And I'm going to bring up the maximum size to... like this. Let's ... I think it's fine. and the Minimum size because this is a texture brush, so I don't want the too small texture and bring it to the maximum. Let's test it in our Canvas. So I think I'm going to delete this layer. And then I'm going to make another layer. And then I'm going to show this color for the background and then another layer. I'm gonna choose this blue that you can see it better. Okay, let's bring up the maximum size. Yeah. I think it's exactly what I want. But now I'm going to show you how you can make texture from any photo. So first we're going to find some texture photo from stock photo. And I'm going to use Unsplash. Just go to unsplash.com and find some photo you want, then click Download. So let's go to search and type: texture. You see there are many options here that you can choose from. And I'm sure that you can choose by yourself Just tap the photo that you like. Then tap this arrow . That means you download this photo. So I found this photo and we're going to make texture from this photo. But first we're gonna go to Edit here at the top right of your photo. We need a black and white photo. So let's go to Edit and then you can try it some filters here. So this one, and I often choose the last one because it looks closer to black and white photo. And then I'm going to go to other settings, can make sure that you don't make it too bright or too dark. I think I want to bring up the exposure a bit, like this. And then this one, brilliance. I'm going to bring it up a little bit like this. And highlights. I'm going to bring it up. Also bring it up a little bit like this. Shadows, shadows. Shadow. I don't need to change shadows for sure. So contrast, I'm going to bring the contrast to stay the same. And then the brightness, I'm going to bring up the brightness, brightness like this, maybe And how much the texture behaves is up to you actually. So I'm going to leave it like this, that thing. Or maybe I am gonna go to shrapnels and bring it up a little bit. So the last thing you can do before you go to your Brush studio to make your texture brush is you're going to turn this photo into a square photo. So we can go to this crop and and we're going to drop it with templates here. So tap this. There are many options here and you're going to choose Square. And it's cropped You can try to move your photo, photo around You can even make it a little bit bigger like this. Tap Done Now. Now your photo is ready. So this time I want something interesting for shading So I chose this particular photo with these grain. But let's go to our Procreate and I think I'm going to use the dust grains setting. It's gonna save us more time. Just duplicate this brush. Anow we're gonna go to the Grain Source, Edit, Import. Now import photo . this one. Okay. And then tap Done Okay. This is so big, I'm going to scale it down a little bit first. So when you see the line in your texture is because the top and the bottom are not the same tone, but they don't have the same textures. And it's because when you import the photo tile, Procreate automatically repeated and because they are, because your tile is not repaired for a repeating, so it caused which line in your texture To fix it, we're gonna go to Edit. And you see. next to the Import is the auto repaet. Tap it And then you see it took you to the page where you can make adjustments to see the best result of your tile. and it has no rule here, you just make changes until you see It's good. I think I'm going to try the grain. I'm going to scale it to 1.6 . And then try the Mask Hardness. Here. You see, when you make a change is also changes there. I think it's good like this, I'm gonna leave it with 27%. You can also hold the screen and move it up and down until you have grain look closer to the edges as much as possible. I think look good right now. You can also try this Pyramid Blending. I think I'm going to turn it off. So when you tap Done Procreate creates your repeat tile. And now we're going to test our texture, for example, is look much better. Now we're going to adjust to setting a little bit. I'm gonna go a bit quicker. Okay, I think I'm going to scale it down a little bit to 20% like this or 25% Since like this I think. And then I'm going to try this brightness. I'm going to bring it up a little bit. I think I'm going to turn off this Offset Jitter. If it looks a little bit better, I'm going to leave it. I'm gonna leave it with Improved filtering, okay. And now let's go to the tapper. Everything is good now. And now I'm going to go to the Properties. I think I'm going to bring it down a little bit. Now the Preview section and it is not the stamp brush, so we don't need to use the stamp preview. leave it like that. We're going to bring it up to . Six hundreds. And I think it's good right now. let's try our brush in the Canvas. Tap Done You can see this preview in your brush library. I'm going to choose another brush here. Blue, then I'm gonna set it
10. Stamp Brush Adjustment : In this lesson, we're going to make a pattern brush. Pattern brush is some kind of like this brush. let me show this brush has the grain source with the pattern tile and is repeated automatically by Procreate. First, we should have a seamless pattern. I'm going to show you now how you can use your stamp brush to make a seamless pattern. And the document set up is the same as you do with the stamp brush. Square canvas. 4000 by 4000 pixels and use true black and true white color. Now, we're going to make our pattern tile by using our stamp. Then we're going to copy the setting of that stamp to make our brush. Now I'm going to show you how you can make us simple pattern So let's clear this. There are many types of patterns and the pattern we're going to make in this lesson is called scattered. the elements which come together in a pattern like this, this, this... called motifs And because we are going to make our pattern brush with our stamp. So in this case, our motif is our stamp. And this is called scattered pattern because the motifs are around the canvas like this. The motifs can have the same sizes or different sizes. Something bigger, something smaller like this. Okay, now we're gonna make our pattern tile. So we have our document setups. I'm going to find the black color for my brush. And now we're gonna go to burst library and we're going to use our sensitive brush. sensitive stamp brush to make our pattern I'm going to use the sensitive brush because I want to have the variety of the sizes of my motifs. You can tap your pencil, you can tap your pencil around the canvas like this. And you now, one thing you can also do is adjust a little bit for your brush to have a different directions. Let's tap the brush, sensitive brush and then go to the shape source. And then you need to bring up the scatter here. I'm gonna leave it with 65%, something like this. And then you see every, every time you touch the screen, your flower has another direction. And the sizes depend on the pressure of your Apple pencil. Okay, so tap then.
11. Making Seamless Repeat Pattern Tile: First, I think I'm going to delete this layer. We're going to try again. So let's make our pattern tile by tapping around the canvas and make sure your motifs don't touch the edges of the canvas. For more variations, I'm going to tap a little slighter to have smaller flowers Hi there. And now your canvas is almost full. The next thing you're gonna do is bring the edges to the center part of the canvas. And your repeat pattern depends on the edges. You need to make one edge match another edge at the other side of the canvas. So let me show you merge them first. And then I'm going to duplicate the original layer to make sure that I'm not gonna lose the original. So hide this layer. Now I'm going to add more layers. You have the new layer now. Now you need to fill your layer in another color by tap to the color section here. And then choose color, I'm gonna choose this orange, and then drag it to your Canvas. Now, you have a rectangle. Now, bring down the opacity of this layer to 70 percent that you can still see your flowers. Okay, so now you need to group these layers by swiping them to the right Like this. And like this, make sure that they are in blue. And then tap group. Let's bring the edges at the top and bottom to the center first. You need first duplicate this group to make sure you have two groups now. Now tap the arrow here at the top left of the canvas and this little board appears. You need to make sure that your magnetics and snapping are on. Okay, So now you're going to drag your rectangle up to the half of your Canvas. You can hold it like this. And you see the orange lines and those white and blue circles. There are telling you that you touch the corners of the canvas. And the orange guidelines are telling you that you touch the edges in the middle lines of your canvas and that's great. Tap the arrow to turn off. now go to twins squares again. Now you see the first group has been cropped a half. And now do the same thing with the second group. Tap the second group, then go to the arrow. And then now you're going to drag your rectangle down to the half of your canvas. Now, you can understand why we needed to turn down the opacity of the rectangle. It helps you see easier if the top half match the bottom half. Okay. I wanna check a bit. Tap to turn off the arrow. Okay? Yeah. And we're going to delete our rectangles right now because we don't need them anymore. So just hide them and then merge . And merge these groups together. And now you see you need to fill out the center of your Canvas Okay, go to brush and then your sensitive stamp brush Make sure that you have the black color Now tap, tap,... and make sure that the new flowers don't touch the edges We're going to scale it down like this. You see when you have new layer, you can have just one flower and you can scale it down easier. Okay, right now and then I'm going to merge these layers together. The next thing you're gonna do is you're going to bring the left and right edges to the center with the same method. Okay, so make a new layer. And I'll choose another color. I'm going to show that orange again and fill your Canvas to make a rectangle. And now bring down to that layer to 70 percent. Now you're going to group these layers together, group them, and then tab. And then you're going to duplicate them. Okay, Turn on your arrow, and now let's see if the magnetics and snapping are on. Okay, so I'm going to swipe it to the left, like this. And then tap. Okay. And now I'm going to swipe it to the right. Like this. That has, okay, Turn off your arrow. And now you again. And now you can delete these rectangles and merge these groups together. The next thing you're gonna do is the same as you did. You're going to fill out the center with your with your stamp brush. Now we're going to test our tile if the edges matched perfectly with each other. So let's duplicate this one. And then now, because I don't like to rename these layers. So it looks a little bit messy there, but it's okay. Let's do after me Oh, I forgot let's turn snapping and magnetics on. And now like this then you can, you can duplicate this one. Like this. Need to have four tile to test next going to go here. Okay. Yeah. Perfect. I think is good for right now. I think. So. We're going to delete the testing tiles Okay, so turn on our original tile and then we're going to export this. Go to Actions and then Share, and then save image.
12. Seamless Pattern Brush: Now go to Brush Library and then we're gonna use, we're going to use the setting of our Standard stamp. So I'm gonna duplicate this stamp, This's our flower standard stamp. So duplicate it. And then I'm gonna, I'm going to change the copy stamp brush, First we're going to change the shape source go to the shape source. And because we want another outline, for our pattern brush, so we're going to change it. So Edit, Import, Source Library, so you can change something. Here. I'm going to go for this Hart Shape. Top Done. In the drawing pad, you just can see an individual shape. It is because it's based on a stamp brush. Do you remember that we bring the spacing to maximum now, when we need a stroke we need to bring it down to none, So let's try. Now is it's a stroke here. Go to, now we're gonna go to the grain source here and import our pattern tile. Okay, Edit Import, import your photos choose this Now you need to tap Done. Is this so..., I have no idea why, tap texturised you see, you see a brush like this. When you use the Moving... I don't know why it doesn't work. Let's try to go to Edit and tap two fingers at the same time to the screen switch it like this. And tap Done and see what happened here now So now we see our brush is a kind of ... Let's test it with another color. Yeah, this one, so like this And so now you want to go to the Apple Pencil and bring up the opacity. Properties, so you're going to turn off the use stamp preview and tap Done. We're gonna test it in our Canvas Now we're going to hide this layer tab to make a new layer and our color, we're going to go with a blue. And now we're going to test it. You see this? And it is too small. So if you want to make a bigger, you can scale it. Let's go to our brush and then go to the grain source and then scale it up Yeah, maybe 70% that you can see your motifs well. now we're going to delete this andmake a new layer and try again. Now it looks very much better. You see. We've done. one thing I don't like about this brush is that it doesn't show what we did in our pattern Or it doesn't look like our parttern I think I'm gonna go to Brush Studio again to see where is the problem. So let's go to brush studio. Our pattern brush. And then I'm going to just try it with the texturised, texturised here. It's so big here. So I think I'm going to bring down the scale, It's going to scale down this. I'm going to clear the drawing pad and then try again. Yeah, it shows our pattern like what we have made. So let's try with the brightness here, what happens. Oh why it has the thing like that? But maybe, Let's go to the shape source and see, maybe we forgot something there. Oh, I actually forgot invert shape source. And so did you remember that? So when we make our stamp, so let's go to Edit and then use your two fingers and tap the same time to the screen. So now your shape is in white and your canvas in black. That's what we need. So tap Done. So the problem isn't from there, so let's go to our grain source again. And we're going to bring we're going to bring down the brightness. Let it be like this I think is good. Let's try it into Canvas. I'm going to hide this layer and then I'm going to tap to make a new layer. And then we're gonna test, yeah, you know, this's great, yeah. I think this looks better than the, than the moving, moving effect. So yes. But actually you can make 2 pattern brushes. one with texturised And one with the moving then you're going to decide what you love This one doesn't look like our pattern, but it's also good in some way. Good job! So remember, it is the same with the stamp brush. You can make the whole brush one time and then just copy all settings of that brush and then make some adjustments at the grain source and you can have a new brush. Okay, so let's jump into the next lesson.
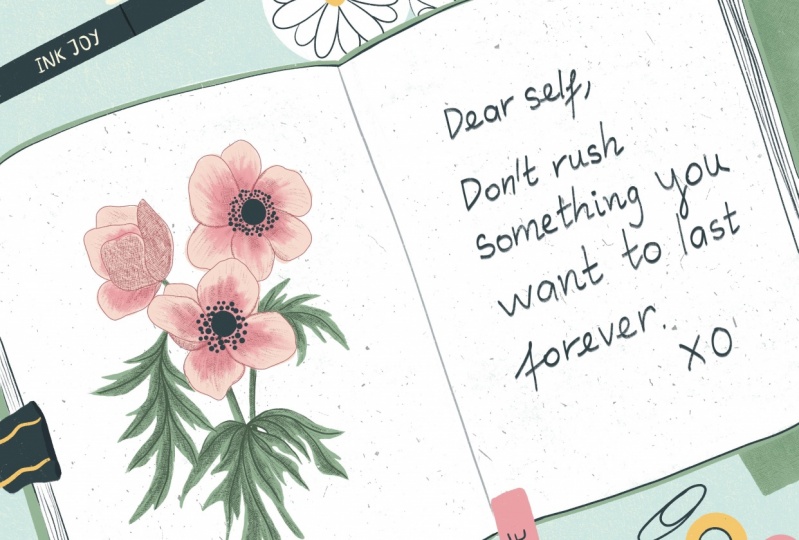
13. Making Illustration with New Brushes: Okay, so now you know how to make all kinds of brushes by yourself. And in this lesson, we're going to test our brushes. I'm going to show you quickly my process of making an illustration from start to finish with these brushes and... Let's get started. Here is my sketch for this illustration that we're gonna use in this lesson. You can also use your own illustration if you want. I'm going to show you my mood board now. So the idea was that I wanted to make some quote illustration. And then I found this quote first from my motivation app in my phone, Dear self, Don't rush something you want to last forever. I went to Pinterest to look for some inspiration by typing "quote art illustration". And then I found this photo with book and flowers. And I think it's really great idea. Maybe I'll make an illustration with some kind of book like this and with this quote in it and flowers. And then I went to Unsplash to search for some inspiration, photos of books. And then I found this photo. I had Some photos of flowers that I took I visited a garden. So I put them together like this as my mood board. And the last step, before I jumped into creating my illustration was I chose a color palette for it and I wanted to have a joyful colors or I went to Pinterest, actually searched for that color palette. And then I chose my color palette. And I put it together with my mood board here. So you actually can find a photo with that mood. Or you can find a color palette on Pinterest like I did. Or you can actually just Google it. And Google will give you a tons of sites that have available color palettes that you can choose from. You can also use your own photos or photos from Unsplash. I don't know, or from everywhere to pick up the color palette. But in my opinion, if you are a beginner, you don't have much experiences with color, you may not pick a good color palette as you want. And so finding an available. color palette is also help you learn about color combination. And a palette with less than five colors is the best, you can use different tones of the colors in the palette for variations. And the next steps, I did was gathering these photos together to make a moodboard. And you see here is a final sketch. I sketched it with the pencil brush that we made in our lesson. Now I'm going to use our inking brush to refine this sketch. You can find this PNG file in the download page. Hi. Hello. Hello. This is exactly this.
14. Export a Brush Set: I'm just thinking, maybe you want to sell your brushes online later. So this is a bonus lesson that's gonna show you how you can export those brushes and make your first Brush Set. And I also prepared for you a checklist "All the thing you need to do" before you upload your brush set to sell online. So go and get it. First. I'm going to show you how you can make a brush set and it's super easy. You just go to the Brush Library by tapping this little brush. And then at the left side, scoll down. Then you see at the top of this column is a blue plus button. Tap this button and change the name. Let's call it texture brushes Done. And do just created a folder for your brushes. Now you can drag the brushes. You want to market to this folder by holding the brush and just move it to the folder. Let's do after me. So let's see, I want to market this texture burst here. Of course, I need to rename it, but I'm going to do it later. So I want to move it to the Texture brushes. So I'm going to just tap. So I think I'm going to duplicate it and then I'm going to hold the brush and then move it up like this, like you see on the screen right now. And then you're going to drag it like this. It's a little bit hard. When it is in the top, You can do like this. You can move this folder down like this. And then you can drag your brush like this. My goodness, why it doesn't work? Okay, Let's do another one. So let get another one there. I'm gonna get this. Duplicate and then move it to the texture brushes again. not there. No, it doesn't. So yeah. Okay. Now I'm going to show you how you can share it or export the brush test file. Let's do after me, Tap our brush set. And then you see here this little board appears. You're going to talk to share here. And it's going to export. You should decide where you want to save it. You can sell it to your Dropbox or you can save to files. So let's have it two files. So this is a procreate file. All the brushes by a have I think. I'm gonna... uhh... Okay. Um, yeah, I think I'm gonna save it here. Okay. Let's save. And now go to where you saved it and we're going to compress it before upload it to sell online. So let's go there, I saved it to files. So I'm gonna go here to look where it is. Oh it here. So let's...where is my texture, yeah it's here. Texture brushes. Yeah, it's here. So you're going to tap this Select. And then you're going to select our texture brushes file here. And then you gonna see at the bottom of this page, there are some options here to share, duplicate, move, delete or more. You're going to tap more. And then you see this little boards appears, tap to compress set. Now, now your texture brushes is the .zip file So you have your file Ready to upload right now. You can upload it to sell on Etsy or on your website. But this class is not about opening an online shop on your website or on Etsy. So if you are interested in it, you can check out other the classes on Skillshare and check out the checklist. I prepared for you about all the things you need to do before you upload your file to sell online and you can find it in the download page. That's it.
15. Final Thoughts: Congratulations, you've just finished this cause and got your new brushes for your illustration. I hope you had a really fun time making your own brushes and learn new things from this class. I'm really looking forward to see your class projects, so please share them in the project section that all your classmates can also see it. And if you would like me to share your illustration with your new brushes on Instagram. So please tag meat @lemfindesign and I'll be very happy to share your art. Okay, So if you have any question for me, please go ahead and ask me in the discussion section. And if you have any feedback for me, please, please, please let me know because this is my first class and I really want to improve my skill. So if you like this class and you've learned something from this class. Please leave me a review in the review section and I'll be very grateful for that. And it would be a motivation for me to create next class. Thank you so much for taking this class and I had so much fun and learned a lot of things new by creating this class. So see you next time. Bye.
 Phuong Lempinen, iPad artist| Surface pattern designer