Transcripts
1. Part 1. Introduction: Today I'm gonna be teaching you the basics of blender. Blending. Blender is incredibly
overwhelming. So I decided to create this blender friendly tutorial
for you that will guide you through the
process and give you the confidence to start
your blender journey. My aim is to give you a tutorial that is fun
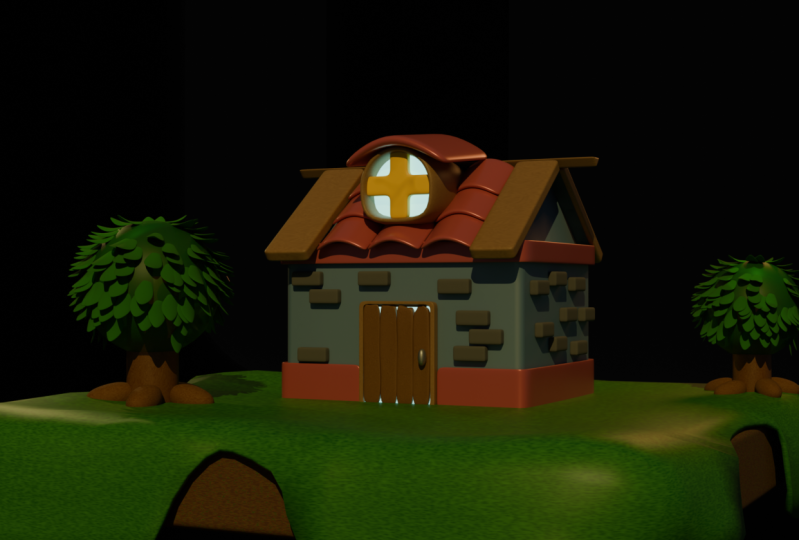
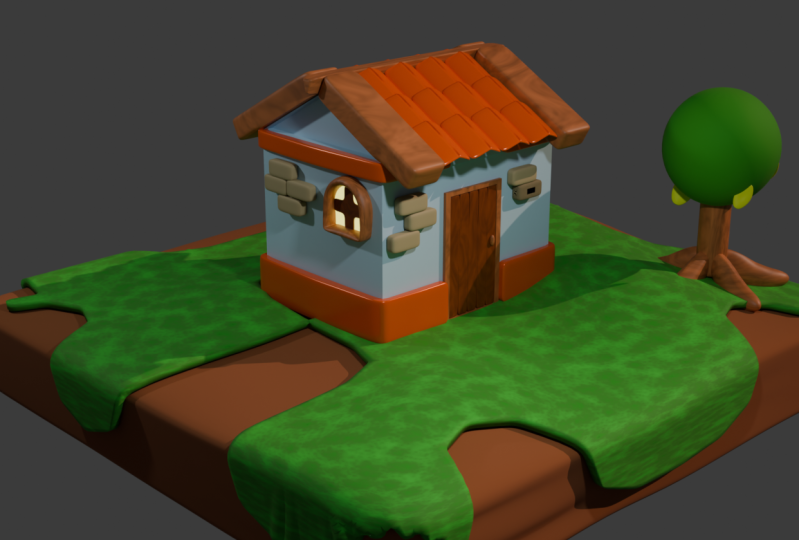
and easy to follow. And at the end you will have a house that looks like this. There are five parts
to this series. One is going to introduce
you to the viewport, but two is going to
introduce you to the functionality
of the objects. Part three is we will
start modelling the house. Part four is where we
will model the landscape. And part five is
where we would take strands everything
and render it. So let's jump straight
into Blender.
2. Part 1. Movement and setup : So when you open Blender
for the first time, you will see this
little thing here. And you will basically
be able to choose what type of file
you want now today, or we're just going to
be going with general, so just click that. So here we are in Blender and this is what it's
looking like just here. And this seemed to right here. We have the camera,
which is this one, the light and the standard cube that you've tried to
learn blender before, you're probably familiar
with how this looks. You probably didn't know how to move around or do anything. So we're going to teach
you everything today and make that beautiful house. So let me show you how to
pan around to start with. So you can just use your
middle mouse button and just pan around like this. I'm using a magic mouse
so I don't actually have to click on the button
and move it around. But just, you know, if
you can just go like this and that's how you
move like that. If you hold Control and
the middle mouse button, you can actually zoom in
and out just like this. So we can go around
and then in and out. Now if we hold shift, you can go side to side just like that. So you can go in and we're like, Oh, maybe we'll go over there. And then we can
also turn around. So that is the basic
movement here. And if you just look down here, you'll be able to see
what I'm actually doing in the buttons
I'm clicking as we go, which hopefully helps with this tutorial so you don't
actually get confused. The only thing is,
is because I'm using the Magic Mouse you're
not going to see in the middle on being clipped. But if you're seeing me do this, I'm just around with
the middle button. So hopefully that's
not too confusing, but the ego, if I'm holding control and
zooming in and out, you can say What's going on. There.
3. Part 1. Viewport axis: These are the viewport axes. So this is what we're
looking like and you can also click them like this. We can go to top view. Bottom view. If you want to quickly get
somewhere like that, you can also click the hotkeys. So these are the first hotkeys. And so if you click one, you're going to
go to front view. If you click Control one, you're gonna go
to the back view. You can click three
for the side view, Control three for the
opposite view of that. Stephen for top view controls, even for the bottom of
view, just like that. And I'll pull us back. Those hot keys are
really important and that is why
you need a numpad. Because those alkenes
and the numpad, and I honestly can't
get it to work on a normal keyboard
without an unpaired. So I always use the
numpad for that, but you just go
through it again. One front view control, one back view, side view, control free the other
side of that view. Semen for the top and control
Stephen for the bottom. And then you can
just move like that. But the middle mouse button, and you can always,
if you get stuck, just click to what axes you after you wanting to be at them.
4. Part 1. Object movement: If we now go to this
left-hand panel here, if you don't have it, click T. So you can disappear, click
taken and it comes back. I am recording using loans. I have this awkward button here, but just, just ignore that. So this is your select box. So you can select
everything like that or individually select
just like that. We also have the Kazaa. This is the 3D cursor tool. So you can actually
individually place it and you can see him just in
the scene tibia. You can place it around so I
can pick it up and move him. If he clicks shifting S, you can actually move it
back to the world origin, which is really
important to notice. And that's how you can
just move it around. If you get confused
where your cursor is, you just shift Janice, Bringing back to
the world origin. Next we have the Move button. You can click Move and
then you can click your cube and you can
move it up and down. There are also other
ways that you can move. This is just like one way. I don't usually do
this like this, but you can if you want to. So click, you can
move up these XID. It can move across
the y and then you can move across the X like that. So just a really
easy way to do that. You can also move
diagonally across the Xi's. I'm All the other way as well. This is the rotate
tool works very similar that you just
rotate on the axes. You can rotate across the eggs. They may have rotating
a cross the y and then rotating across the
Zaid just like that. And you can also see
the lines appear as you do it to know what x is
you're actually working on. This is the scale tool, so you can scale
across the wide scale across the AX and
scale across the Z. In blender, you make a lot of things out
of the starting Q2. So these things are
very important to know how to scale,
how to move around, and how to actually work with your cube or whatever
object we put in.
5. Part 1. Modes: The next thing in the
viewport is up the top here. In object mode, you can click it and you can
change the mode. You can also do that
by clicking tab. So we basically usually go to Edit mode and go
back to object mode. And that's what we will be
doing for these tutorials. We want to actually be going
to any of the other modes, just the basic months here, object mode, the mode, you can just tap
through them like that.
6. Part 1. Workspaces: Top here of the
different workspaces, we're not going to
be doing modeling. We're not going to be
doing sculpting or UV Editing or texture painting, but we will be using the shader
tab, which is just here. And then also there's
an animation to have Rendering tab compositing, geometry, nodes and sculpting. So we're going to
be in layout if you're confused
about where you are and your workspace
looks different because make sure
you're in layout.
7. Part 1. Viewport controls: Moving on over here,
they currently on Transform orientations of global when you want it to
be global for this, so as you get more advanced, you can go through and change the transform orientations
if you want to. Are we going to be working
with global today? Here we have the snap tool. We're gonna go through
how to use this later. And then we also have the
proportional editing tool. If something is going wrong and you are doing stuff and it doesn't look
like what I'm doing. And a lot of things are
just looking crazy, just actually is not turned on. You can just say when they're on their Blue Monday
off their gray, so make sure they
just want to dog. We need them off for now.
8. Part 1. Viewport shading: Over to the right-hand side, we have the viewport shading, so we can actually
turn it into X-ray. The X-ray mode, as you can see, the little cube here
turns into an x-ray. And if we go into edit mode, you can actually see all the individual vertexes like a bat. We can turn that off. We can go into the
wireframe mode, so you can just
see the wireframe. This is really helpful
if you've got a lot of objects going on everywhere. This is the solid mode, so there's no texturing
or anything applied here. This is the mode that
I usually ended and then we have the
material previews. So if the weight
materials applied, you'd be able to see
them applied just here, but this is just a
white cube to stop it. And then we have
the render previews and see what's going on here. We have the lives, so phi
is just to move the line. You can actually see it. Move live. So this is really good if you're wondering what everything is going to look like rendered without having to render it all, you can pull it into this mode.
9. Part 1. Scene collection: Next, we have the
same collection and it's important to
always keep this clean. I do struggle to do that, but just you can name your different things so the camera will come
through as a camera. But if you have,
say, four cubes, you can name them what they are. And then you can also
have high beam like this, or you can hide them by just
selecting them and pressing H and then bring them back. You can also hide them
from the viewport render. So when it's rendered, they
don't actually turn up. So you can just do
that by clicking the little camera button here.
10. Part 1. Tools: Here along these
cute little buttons. So we've got item, which is basically the location
of everything. We have the toes, which I'm not really going
to go through all of this. But the one that is really
important is camera to view. I use this a lot because
you can press Zero, go into your camera
and you can actually move your camera, we want it. And then you can sleep it off
and go out of camera mode. And it's moved. It's very handy
that you don't have to manually place your camera around and move it because I find that really frustrating. So I always use camera
to view just there. We also have create, we
won't go through that. And this is my screen case. We have this so that you can
see what I'm actually doing.
11. Part 1. Properties: These are the properties just here and we'll go through
it and they started them. These are just the
workspace settings. This is the rendered properties. I'm going to read it
in cycles so we can actually change this and I
can explain a little bit. So if we go to cycles and
we're gonna go GPU compute, and then I'm also
going to change the max samples just
a sound width to 200. And then just means
when it's rendering, it's not going to read
to like 4,000 samples. It's going to render a lovely assembles though, render faster, but the more samples you have, the nicer the render
will turn out. We have de-noise,
which will ding noise, make it less blurry. And that's kinda all of
the ones we're going to uses so many things you can
do here and play with that. This is just like the bisects, this is the viewport. So when we go to Viewport now and you can see
like it's a little bit blurry because it is rendering
only samples for us. A little bit different than Av, where it was just like
a box that I usually go in this mode so that
my computer doesn't cry. This is the output properties. So if you go back to the camera, you can change the size of the camera and you export there. You can also change
the frame rate if you are going to be animating, you can also change the frame. So down here we
have the timeline. So you can choose
this tot any defect. This is the output sittings. If we're exporting
animation scene, we have the layer
properties just here. And I'll just keep all of
this as just standard. I don't usually play
around with this too much. This is the same
properties as well. And once again, I
wouldn't fill in here as a newbie in Glendale. But you see, you know,
where it'll lens sees a world sitting so you
can actually change the color of your
background if you go back here and say we
want it to be blue, now your background is blue, but I'll just keep it on the standard gray just for now, um, but you can also change a
bunch of settings in here, but just standard lazy or
collections in and save. This will the same Feizi object properties and I
will show you how to use these when we go into object mode is your
physics properties, so you can actually click this. I'll show you a quick example. If I go into this code, I realized we miss
the modifiers. These are the modifiers and
there's a lot of modifiers. I probably use
about six of phase. I don't use all of them. And what they do is that they
are automatic operations at a feed and objects geometry
and a non-destructive way. So then my best friend and
I will be your best friend. And yeah, there's
a huge list here and we've got
particle properties. We probably wouldn't be
doing any of that today. We've got these
physics properties and these can tell
the behavior of the object in a simulated
physical environment. By applying these
properties to navigate, you can create realistic
simulations of movement, collisions and other
physical phenomena. So if these are
objects constraints, they control the attributes
and settings of a mesh. Objects such as this shape
topology, and UV map. These properties
are unique to each object and can be modified independently from the
objects transform properties. The last one is
material properties, and this is where you will add in different
materials to object. And I will go more in depth
when we had texturizing. But just to show you right now, we can change the color of the cube if you want to
see that just there. So that is everything
that's going on here.
12. Part 1. Preferences: I do have a couple
of extras turned on, so we'll go up to
eat it and we will turn on these extra preferences. So if you just go to extra objects and you
just want to make sure that extra
objects is checked.
13. Part 2. Adding your first object: So let's now go
through the cube and the legs and just
the basics of them. So if we delete the
starting Q2 go shift, and then you can add in all
of these different objects. You can add in these
different curves as well. You've got multiples and here we want to start with a round cube. So just here, and
as you can see, this box here has popped up. It hasn't popped up. Don't click off the Round Cube. You want to click down
here where it says add round cube and it'll
bring up this pop-up. I usually turn the
radius to one because now it's very round
for a round cube. And you can also change all
these other settings in here. But this is what we're
just going to do for now.
14. Part 2. Vertices: We're going to tap
into Itamar to click tab and then go to in a mode. Now you can see,
you can see all of the little vertexs to a given. One of these is a vertex and all of them together
at vertices, I struggled with
moving between them. So I'm sorry, if I'm
not cohesive for the weight with what I'm saying when I go out for disease. So as you can see, you
can see all of them here and you can actually just
move everything around. Tap the top here
currently receiving a vertex or we can
select all the vertices. If we click x-ray mode, you can select them through. And if you're not an x-ray mode, you just select the ones
that you're actually facing. You can also do each syllable. So you can select
the edges instead. If you hold, if you
hold Option or Alt, depending on what type
of keyboard you have, you'll be able to select
quite a few of these. And you can also hold
Shift at the same time. Then you also have
face select like this, and then you just
select the faces. So all of these are
really important depending on what
you're trying to do. They just have up here
and you can also click 14 vertices to FALIGN and
then three for faces, so that just the hotkeys there, those ones and not
in the numpad, not just at the top
of the keyboard. If you accidentally click a W, you will be selecting randomly. So you've got this one
which has a face leg. You've got this one which
is like rounded like this. You've got this one which
is just like individually. And then the last one is
like where we were before. So if you aren't,
mouse turns crazy, You've probably clicked W
and just keep clicking W2, you're back to normal. If you also want
to see the marks, you can go up here
just in case you're confused when I
keep saying tab and then go to object
mode or in a mode, you can also manually do it
if you are a manual person, but I would recommend
using the hotkey.
15. Part 2. Object properties: So as you look down the
side hand skews my time, you will be able to see a bunch of different buttons
as well that we can use to
manipulate the object. So we'll just go
through a few of them already through
and through these ones, we've got annotate
when you can just write a little note to yourself. If you want to like this, then you can just get
rid of that if you want. We've gotten majors
so you can measure the distance between things. Don't know if I can click
this one. We've got this one. We can make crazy looking
objects satisfying you selected all and
then you will just extrude them out of
this one as well, which is the inset faces. You just click J. You
can say all of that. We've got this one
which is the bevel, which is so controlled b, and then you can
bevel everything. I know that's crazy. Look caught, which
is just control. You can add and lift costs,
which is just adding in more geometry,
is going to one. You can see the geometry edit and then we've got
the knife tool, so you can use it by clicking, Okay, and then you
can click this, you can click K. And
then to interrupt, you just go into, and you've entered in all of those extra vertices
adjusted there. We've got the poly
bold TO as well, and we have a few other
tools at the bottom as well, but we will not be using
any of those for a while. Yeah, that is the basics of
what is going on in Blender. I hope it gives you a little bit more of an understanding of the software itself and
how everything works. Everything is, it is incredibly overwhelming to start with. My first 30 days
in Blender where very scary and I did cry a lot of it does get easier and
I really encourage you to keep going because
once it's good, it's just amazing.
It's so, so good.
16. Part 3. Modelling the house: The reason why we are going
to be modeling the house and blend it has when I first
started learning 3D, I found it very overwhelming to take us all the information. I found the best way to learn was to model at the same time. We will be worldline
it has today. While we also go
through different techniques and tips and tricks, I've learned in order to create a beautiful renter or right, so here we are in Blender
and I know you are very excited to get started and come out with your first row jagged. So I think we jump
straight into it. So this is the cube just
here and this is going to be the little house put there and
do is we're going to scale it down and cross these indexes. And you can actually
see me click visit, but I M, and you'll be
able to say what x is. I'm actually using by the
line that's going up. Um, I don't know
why it's not coming up in the corner there, but there we go. So this is what the little
houses going to look like. And they make it a tab into
edit mode just like this. What we're gonna do is
we're just going to sub-divide it once,
just like that. And then we're going to
Paris to go to edge select, which is also just
here in the corner. They're going to sleep, but
it's like these two edges. We're going to then move them up along the z-axis,
just like this. And now it looks like a little
house, which is very cute. We going to add in a loop cup, just control plus
toe on the side. And then we're also going
to add in two on this side, just like that,
I'm going to go to Face Select which is up
here, or click three. We're going to select these
two faces on this side. We're going to go Shift
D to duplicate and then pay to separate the selection. Now when we go out
to object mode, we have this house
and then we have these little plank
suggests here. So you can rename
them if you want to. And these are going to be the supporting veins on
the top of the roof. So we're gonna do
is we're going to tab into edit mode for them. And as you can see now, we can just edit them. If you press a, it will select all of the vertices in here. So very easy way to
just select everything. What we're gonna do
is we're going to extrude it along the normal. So we're going to go option E, but it also might be Alt E
for you one or the other. So we're going to extrude faces along the most, just like that. And as you can see, we
can now pull them out. So I'm going to pull
the mad about this. We're going to go Alt T again, and then we're going to extrude the faces along normals emerged, going to pull it out
a little bit more just like that so that
it is overhanging. That is looking really good. I'm going to select a, I'm going to select everything, Right-click and go sub-divide. And you can see down here is
the subdivision properties. And we can actually
say how many numbers of cuts we want to do. They gonna do about
three and you'll see why we do this in just a second. I'm going to tap back
out to object mode. We're going to go over here to then modify its properties. And we're going to add the
subdivision surface modifier. And as you can see here,
everything is rounded. So I'm going to
add in two levels to the viewport just like that. And I love the way it's looking. We're going to right-click
and go Shade Smooth. And then you can see
it's completely smooth. We've got the round edges
and it looks so good. Now you're probably
wondering, how do we get the supporting beams on
the other side as well. So we're also going to add a mirror modifier and we're
just going to put it above the subdivision modifier
as am I going to change the x's from X to Y, gonna go to the
y-axis like that. Now we don't want to merge them. So I'm going to uncheck
that because if we check that then they merge and
they live very funny. So I can take them
just like that. And then it's going to create
the space and the top, we'll put the top P, But then
that's what they look like. So what am I do is I
might go back in and I might even just scale
them just a little bit. So I'm just pressing
S and then just moving them cross the
y just like this. I just wanted them to
be just a little bit bigger and a little
bit of an overhang. So that is what they
are looking like. So this is the really simple, basic shapes and we're just going to work with
everything in here. So next thing we're gonna
do is we're going to go Shift a and we're
going to add in a cube where you just
going to move it up along the seed and then scale it down. Just going to see by pressing stephen what it looks
like from the top. And then we're going to scale it along the x axes like this. And we want a little
bit of an overhang at the end as well. I'm going to press one so I
can see what it looks like as I pull it down and then
I can align it properly. And so that is what
we are looking like. Now, as you can see, there
are a couple of issues. It's clipping lot and we don't really want
that to happen. We're going to go into unimodal, going to go into X-Ray mode. Now I'm going to click
three for side view. I'm also going to go into
the vertices that selection. So we're just going to scale across the why in Britain
and just like this. And then we also want to do the same at the top of you
also might just bring it down a little
bit and then we can just get it sizing, right? Pull this one out into the beam, is just like that. And you can ignore
the gap because we are going to be adding
roof tiles to it. But we do want this to look
the same as the other beans. We want it to be a
little bit rounded. So I'm gonna go back
and select all by pressing a right-clicking
and subdividing it. I'm probably going to sub-divide
it to go three times. And then you can type
account object mode and add in that the
subdivision modifier, I click shade smooth, and that is the top thing. Just there. Now is a very good time to go
file and save your work, because blender does not
automatically save your work. So just go out there and save.
17. Part 3. House modelling: Next we're going to go
in and edit the door. So we're actually going to go
into the house to do this. What am I do is just add
in two more loop cuts, one here and one here, and then go to face select, select these ones just here. I'm going to Shift
D to duplicate and then pay to see for
it to be selections. Now we have this
beautiful door I going to tab into edit
mode of this one. And then we're going to
select all by pressing a. We're going to extrude
it by pressing a, and then we're going
to extrude it across the y-axis, like this name. We are going to intersect
it by pressing. Just like that. We're going to click
a and Y again. And now as you can see, we have a door and
a adore foramen, very quick to make that one and I think it's very,
very effective. I also want to add a
couple more elements to the little house just to give it a little
bit more dimension. So what we're going
to do is we're going to select the bottom one by just pressing
Option and clicking. And it will select all of the line or press Alt or
Option is not working, but it's going to tell extreme, I don't want to
duplicate these ones. So what are we going to do
is Shift D to duplicate pay to go back to object mode and
then go to Edit Mode here, select a they want to go option
E extrude along normals. As you can see, we're
just extruding isomers to give the house a little
bit more dimension to it. So as you can see,
this line is not actually in line with
everything else. So what we're gonna do is
gonna go into Select and then we're going to shift
and select it. So it selects all of it. I'm going to go for scale. We're going to click it. And then we're going
to click zero on an unpaired and that just evens
it out just like that. I know it's magic. I want to add in
another loop cut here. I'm actually going to do the
same thing, just like that. I usually want one
more loop cup. Instead we will look
up, I think we cut it. So click K, like the
lunacy up via you can hold Shift and just pull it
along to the other side. So just like that again two, and then we can also do
that on the other side, I'm doing it like this. Get familiar with the tools
and into dress like that. Now we have this section,
in this section, which is the triangle sit June and then all the other vertices, chest alike, bad mood
if I select this one, mostly going to
face like this one. So I'm going to extrude
and then we're going to just scale it a little bit, just to add a little bit
of dimension to the house. Also going to select this
little section here, and we're going to
extrude it along the normals and just pull
it out just a little bit, I reckon Now we go back into just this
little bottom piece. We selected all, I mean, we just subdivided three times and then we had this
subdivision modifier to it. Save that. And
then shade smooth. I'm thinking for the door, we might do the same thing. So we'll go subdivided a
couple of times and then add a subdivision modifier
to it just to round out the door and then you can
shade it that smooth.
18. Part 3. Roof tiles: So the roof tiles,
we're gonna be using the array modifier. When I first started
out in Blender, I found the array modify
M theory intimidating. I struggled with using it, but it truly is one of the most important and
powerful tools in Blender. Today we're gonna be
doing some simple arrays, so you can use these in future models to
speed up your butt's. I'll pay. Can we going to add in a plane? You can do is you can
press the button and we'll go straight into that and erasing asked would disappear, but it's still there and
come out of that mode, you can press Slash. Again. We're going to be
adding the tiles. We're going to tab
into edit mode. And I want to subdivide
this three times. I'm going to go, we're
going to select that row. And we're going to turn
off proportional editing, and we just want
it to be smooth, so it makes sure
this is blown out. You can go G and then
I'm gonna move it up. See, and you can see this circle has appeared on my screen. If you're so close, not here. Scroll up and down because it might just
be really begging newness colon or might be really small and you
need to scroll out, but it won't be there. So we're just going
to have it about this big and then we're going
to move up this scene. I might even make it
a little bit bigger. I'm wanting to make a curve. Turn off your proportional
editing select all, and I will extrude
down just like this. And I'm probably wondered
about this thickness. I'm going to add in the
subdivision modifier here just like that. And this will be
our roof tile name would just shade it smooth. We're going to pull it out
to the side just here. So we want to put
it on an angle. As you can see, the center point of it is actually at the bottom, this data in the meadow. So we're actually going
to change that to sit Arjun, Arjun to geometry. So I'm going to go to
the object properties and I'm going to put it on a
45-degree angle along the x. We might go fishing. You might even actually
go through five degrees. That looks lumpy day and we'll
just move it to the side. That is the first one we're
going to do is we're going to select it and we're going to
pluck the array modifier. And I'm just going
to pull up a hint of this subdivision
modifier as well. We want it to be here. We only count to be
three so that they have three across just like that
as you move it like this, I can change the
direction of it. I just want it to be one pen. Then what we can now do is apply the array modifier at an
a secret array modifier. I'll let the heat
of the subdivision, we want three of them and we don't want
that across the year. We actually want to
actually want to cross the y like that. But you see it's gone up. We want to down so it
can go negative one. And we also want it to overlap
a little bit like tiles, but as you can see,
maybe we haven't made a long enough time and data mode. And what we'll do is we'll
just select these faces. Then we would just
extrude them just to make them a little bit longer. Now picture emerges so you
can see a little bit better. Now they're a little bit longer. We wanted them to other hand
is a little bit and we also want them to go under each
other just a little bit. So to do that, what are we
going to do is we're just going to pull it
down along the seed. So it's about 0.3, as you can see now,
there's a little bit of clippings when she just going to move them up a little bit. You can apply the array
modifier just like that. You can select it. And I would go Control a, applying the transformations,
apply a rotation scale. You don't do this. The mirror modifier works. So now we're gonna go to add
modifiers and then mirror. You want to edit on the y. Now you see it's just
predicted along the Y. So we don't have to
do all of that again. The next thing we're going
to do is make it the window.
19. Part 3. Modelling Windows: The next thing we're gonna
do is make it the windows. We're going to go
Shift a and we're going to add in a circle, you can click the
little slash button. And to introduce this mode, we're going to rotate it
across the eggs by 90 degrees, one for front view. And then go to Edit mode. And we want the
vertices selection. So we're going to get
rid of all of these and just go weeks into
those vertices. And we're also going to delete
all of these ones as well. We're going to add in
the mirror modifier just like so again, asleep all of them by clicking
a and then we're going to extrude along BY like this. We're then going to select
these two vertices. And then we're
going to extrude it down just so that we're creating a little bit of a mirror AND going to extrude them
in just like this. And then they should
join at the center. And you can also select
Clipping adjusted Thea. So this is what we went
out should be looking like they actually needed
to be a little bit wider. We're going to apply
the mirror modifier. So what we need to do
now that we've applied the mirror modifier
is we just need to select these vertices, will go to extreme
mode, click him, and then just go emergency
and Tetris to merge those vertices and fear can
take off the X-ray mode. Now, we're going to go to subdivision surface
and we're going to add a few subdivisions just yet. You're going to go in and
edit, solidify modifier, pull it up from poverty
subdivision and then adjust the thickness
so you can go out, you can go in just like that. What we can do is
go to object mode. We can apply the
solidify modifier, apply this subdivision
and then go to mode. And then one can all
those vertices we have, we're going to select a
for loop just like that. One. We're going to go Shift D
and then pay for selection. And then we're gonna go
out into object mode, select it, go back
to eat a mode, select all by pressing a
and then select if fulfill, because this is going to be a chlorine like
inside of the house. So just like that, we also just want to shade smooth the windows
so it looks like that just because like both
of them unselect slash, so we come out of that mode and then we're just
going to place it. Here. Makes me want to go in and make a
little bit more of the frame of the window just because like day
and then go plane, Priscilla slash,
scale it down and then rotate it
across the x-axis, just like that, then you
can go into edit mode. So we're just going
to go around and then just extrude
out these vertices. Now one thing, just
add a little bit of dimension as I'm going
to go back in the day, extrude and then extrude along the y. I'm
then going to sleep day again to select
all of it and then sub-divide it two times. So in an add a subdivision
surface inquiry, settling on the view port by two colored object mode
and then go Shade Smooth. Now we need to go in and add
in the roof tile to that. And I forgot to
duplicate one of these. So I'm going to show
you now how to do that. A lot of Blender is
just problem-solving, especially when you're trying to do so many things
at the same time, you forget how to do
things or you just, so we're going to
click on the tiles, are going to go into edit mode, going to select this one, field vertices and press
L. If this doesn't work, do it again, select all the vertices and
press L in bulwark. Just sometimes it doesn't
work, but it should. So it's like the vertices. And then press L. We're going to go
Shift D to duplicate and impede to see
bright the selection. Then we're gonna go
out to object mode, again asleep at tile. And then we're going
to start to move it. As you can see, the center of the geometry is
like way down here. So we're just going to add
the origin to the center.
20. Part 3. Decorating the house: So what we're gonna do now
is we're going to go back into object code for the house. Now, I don't really like
this little bit here. So we're just going to
go around and select all of the vertices that make it up the top
and the bottom, we're just gonna go
pay and they might going to pull that
selection away. Now what we can do is
go into here, click a, and then right-click,
sub-divide it a few times. Then we're just going to
add a subdivision surface just to round everything out. And then we're going
to shade it smooth just to kind of go
in with all about round objects are going to now make the planks of
wood for the door. And I do want to talk to maybe
just be a little shorter. I just think that's more
like proportioned the house, maybe actually a
little bit bigger. Alright, so go and shift day and in a plane and click your slash, scale it, and then rotate
it across the X 90 degrees. Just like that, you can scale
it down a little bit more. We might even not even
go into the slash mode. We might just go here just so we can see it next to the door, then a silicon three just so I can get it quite
close to the door. And I'm going to
pull it down here, scale it across the SSID. We're going to go
into edit mode, and then we're going to
extrude it along the y, just to make it a little
bit more playing key a and then add in a
few subdivisions. I'm going to add in the law and then add in the subdivision
modifier as well. And then you can just
shade that smooth. We want a few planks, so we're going to use the
array, modify it again. And I'm just going
to pull that heat up the subdivision modifier. We probably won't fall
through or you can do is you can apply that same. It looks very good. And you can go into
innermost vertices and you can go to
proportional editing, turn it on, and then go random. And then you can select a few of the vertices painting
how you want to do this. And then you can either you go G and then you can move it. So my thing is quite big. Move things around just a little just to add some variation in the world because we're
not going to be sculpting. So I know this looks crazy, but it's just an easy way
to do it. Not sculpting. Go ahead and now you can see not all the wood panels
are completely the same and it has a little bit of variation into it,
which is nice. We're going to add
in the door handle. So Shift a and we
might even just make it a cube bullet
for and make it small, handling scale it up and add a subdivision modifier to it, added a couple of
times Shade Smooth. Jazz is looking at veering very good though
we give them too, because I made the error of this pod here and then
we'd like selected it off. We're just going to go
slash to go into this mode. And what we're gonna
do is we're going to select the vertices like this and then go
if it's like that. Perfect. Now we're gonna go back here
and we're going to edit the bevel modifier,
modifiers just here. And we're just going to increase
the sequence like that. And then we can shine it
smooth just to run this code is now you can see we
are clipping just here. So it is going to
change the origin to the senior of the geometries. So then when we scale, it scales evenly just
around like that, lovely. This house is tuning
out urine good. So now we're going to go
in and add the bricks so we can add a cube scale, thinking across the y
and then we want to scale it across the x as well. Then we also want to add
a subdivision modifier, go into edit mode, and then we're going to
sub-divide it twice. I reckon that's a good amount. Then we're gonna go back out and share that smooth,
nice little break. I might actually just make it a little bit smaller as well. What we can do is we can
go back into edit mode. We can click three
for side view, zoom in on it. Just like that slight goal. Move it along the Y via. And by doing that
where HE changing where the center point is. So now we're gonna go out here and we're going
to use the snap TO have firstName going to make sure that
this brick isn't too big for the house because it is literally beginning of the dog. That's kinda like the size. We're often don't
use a snap tool. It's just this button here. Like this. We're gonna
go face nearest, align, rotation, target, and
snap to same target. If we go, gee, you pick it up. You can see it like snapping
around, just like that. So that's just to ensure
that we can actually snap it to the wall just like that. So this is what the
house is looking like.
21. Part 4. Modelling trees: So we went through
using the array modifier for the roof tiles. But now I'm going to show you my favorite trick which is using the array modifier to array
an object around a curve. That's when I found very
challenging to start with, but I can tell you it unlocks so many different options for you in this technique
will let you create anything that displays this technique will
that you create anything that displays
around a circle from orbiting planets
in the solar system, too realistic looking plants
from previous experience, the hottest part of this
is remembering to apply the scale and transformation
before we start the array. Well, let me show
you how to do this successfully while
we model the tree. Now what we're gonna do
is we're going to make the tree and the
literal platform. Let me show you how
to make a fist. We're going to add in
a cylinder, shift, Hey, and just a cylinder. We don't need 32 vertices, so we'll just change that to 16, just like we will also click
it and we'll press Slash. So there were in the mug they're going to scale it
down and turn off snap tone because I
still have it on it from last time and then
I'm just going to scale it up along the bay. Is it actually
just move it here. Now what we're gonna do is
do the roots of the tree. So we're going to go
in and edit code. We want to add in a circle. And then what we're going to
do is we're going to add in a round cube and we want
the radius to be one, going to scale it down,
pull it along dx. We might even scale it along the x just like that first one. So we're in this mode and then
we're gonna go into in it. And what I'm gonna
do is turn off proportional editing a change of vector smooth and on x-ray
mode and then bring it up. What I will do is now
bring this guy down. I don't want it like that. And then we might scale it
along the y just so it's a little bit more plump shoe and then shade that
bad boy, smooth. Now going to go from Troy, we're going to apply the rotation and
apply the transform. Now we're going to go in and add the array modifier and pull that ahead of the
subdivision modifier. I want to turn off
relative obsolete and see turn on Object Offset, open it up, select the object, and we want it to pay
this circle here. Now we want five of them. Then you probably seen
there is nothing happening. That's okay. You're okay. So in the objects properties, we're gonna go to
Z it am I gonna go 360 degrees divided by five? And now they're all placed
around just like that. So you can definitely still fiddle with them if you
want to go into edit mode. And what we wanna do is because we're going
to end up wanting to move it as we want to
apply the array modifier. And then we can delete
this yellow circle. We then want to go
into the trunk. We just want to add in
a couple more loop cuts just to the top and
the bottom is go in and add a subdivision
modifier and then shade smooth for then going to go in and add a round cube. And remember the
radius should be one. And then we just want to
scale it just a little bit, had the subdivision modifier
and pia shaded smooth. So this is the basic tree. We're going to add
a couple of little leaves to it as well. So math is put it
into collections. We select all of it, click in, and then we'll go tray. Now it'll be an old collection
on this side panel here. Alright, now we're just
gonna go in and make some leaves for
the little trace. I'm going to go Shift a and
then we're gonna go plane slash and then scale that down. I'm going to go
into mode and we're going to sub-divide it. I'm also going to
scale it along the x. We're going to bring in these
photos by scaling them. It's like these ones and
bring them in as well. You may want to select
these vertices, turn off proportional
editing and then go, Gee, I may want to pull
it down across the sea. And then what I like to do
is select these vertices as well and then pull that up a
little bit just like that. There's not a lot
of vertex is here. So I'm gonna go, I'm gonna go E, and we're gonna make this
boil a little bit thicker. Then we're going to add in
the subdivision modifier, and we're going to look at
what this leaf is lucky like. I want to make it a
little bit bigger, so I'm just going
to scale it along the y and I'm going to
turn off my proportion. We'd assume go out of that
mode and then shade smooth. We wanted the origin
point to be the top here. So what we can do with it, she just had back
into it a month away and then move it
to where we want it. So now we have this. We can pull it out, scale it down because it's bigger
than everyone's houses. And then turn on our snap TO
face numerous align rotation and Target and snap to the same target as you can
see, it hasn't rotated. So you can add in as many
leaves as you want to as well.
22. Part 4. Modelling the base: So we're gonna go in and add the cube and we're
going to scale it down. And then we're going to scale it down just like this beautiful. And then what we're going to
do is add in the collision to it by just selecting
that going to shift a and then we're
going to add in a plane, my kid, just a
little bit bigger. Alright, so we have our plane, which is a cloth modifier on it. And they may have
a cube which has the collision modifier on an organ and deal
with the plane is we're going to go into edit mode and we're going to sub-divide it a bunch of times. I'm going to scale
it up a little bit just to be a little bit bigger. We're going to go in
and delete some of the faces were going to add in our subdivision surface to
apply subdivision modifier. Now we're gonna go down to the timeline and make sure that you are in the timeline and
you're at the first frame. If you just shade this
smooth and then press space, you will see that it has flopped around the dirt, which I love. I love doing this effect. So I'm really happy
with that. You can leave it like TO a little bit longer and see what
do you like the best. But I think we just
leave it at that. Then what you can do is
apply the Gulf modifier. I like to edit in a
subdivision modifiers, you can go out and
you can go in. Just like that, just to give
it a little bit more depth, I think it looks really good. And then we could also add in another subdivision modifier at the bottom is gouache
to round out everything. What I'm gonna do here is we don't need the collision
modifier anymore. We can apply that. We're going to go into edit
mode and we're going to subdivide this just
a bunch of times, maybe sit and then add a
subdivision modifier to it. I just really like
the rounded edges have been irritating
that as smooth as well, while we might even do it, just make it smaller. Yeah, I think that looks right. So really happy with that. The house looks
good, the tree looks good, just like that. So you should have something that looks like this
cute little house.
23. Part 5. Texturising: Now what we're gonna do
is we're going to go in and texturize everything. And this is the base path. Just make sure you've
saved everything. So to take strides everything
and change your viewport to the material preview
and you'll see everything is white
and it looks right. So we're going to
start with something, maybe a little bit easy. And we might start
with the roof tiles. Just click down here to material properties
and you want to go in, you can we want to
name this roof tile. You can change the
base color here. So we model with 11
to purply color. There are all these options down here that you can change. What we're gonna do is
we're going to turn down the roughness and we're going to turn up the
metallic just a little bit. Is you can say if we turn the
roughness all the way up, really rough all the way
down to a plastic case. It's a little bit then a
little bit of metallic to it. You can click these
tiles and then you can click roof tile just like that. So now you can see that there's a few ways to
do texturizing as well. Like we can go in and add nodes
and change up the colors. I think we doing at
that now for the wood. So we'll just click the
word and we'll go and you want to say this
is what we want. We're going to go a
bit to the shading tab because we're going
to end in some notes. So you'll see here that
principled deep BSD F, which is what is over
the side as well. We're going to add
in some notes just to add in the wood texture. So we're going to
go to Color Ramp. And then we're going
to also add an angle. I'm going to plug
the vector into the factor and then the
color into the base color. We are then going
to change this. I'm wondering like
maybe a lighter around this one and wanting to be like a little
just like that. So we want it to be on 3D. Turn up the scale. Because you can see the
colors are changing there. And we're going to
add in some detail. And we're also going to
start to distort it. And I want a wood texture, so I'm actually going
to turn down the scale. So click the top here. We can select would
want on that one as well through the door frame
and the wood as well. And they will do maybe like two. And we'll make this one darker. So same thing again. No color ramp and
then we can go noise. Actually leave it like
that, vibing with that. And then also just to add a
little bit of cohesiveness, you can add in the
extra wood elements will do a very similar
technique for the grass. Roots codes, cross,
lighten the color ramp. Then we're going to add
enough for noise texture. We're going to keep
this on three days. We're going to change
this to smooth F1, and then we're also going to
change in the colors here. Well, like I eat a
little bit of a license. I usually keep it like super random and then also
the smoothness. So this is what my grass is looking like and now we'll
just go on and do the dirt. And I'm just gonna do
it one that color. I'm just gonna go in and
do perfectly that color. I'm going to turn
up the roughness because you can
see we can turn it into chocolate
plastic looking dirt or we can turn it right up. So I'm just going to
turn the roughness up just like that. Which looks as
something I like to do, is reuse a lot of the textures. So say this house is
made out of wood. Maybe they built this house
out of the local trays. So maybe we also make this tree with the
same wood texture. Because this tree is linked, they will share properties. Now you can see the beautiful
wood texture on there. And I kinda brings in a story, makes it a little
bit more cohesive. They have a lot of
light green down here. So I'm going to add in maybe like seemed to be intriguing. And I think it's going
to just be docket. Then we'll also
just to leaf green. And we might just
make this whole little bit lighter like that. So now we can go in and see what we wanna
do and everything. Like do we want a
cohesive purple goings? I think I do. So I'm going to just
change a few of these to the roof tile purple. And then I want the house
to be a creamy color, I think. Well, yeah, like that. I quite like that. Very cute. We're going to go
in and also do the bricks. Bricks could be maybe like a gray and then just
turn the roughness. I like that. I might also just
reuse the stone. Maybe the door handle is also made out of
the same material. That and yeah, I'm really
liking that it looks very good. I am going to add in
because we're just going to add in the
light coming through. I'm going to go to base color. I'm just going to tune it
a little bit of yellow. Gonna go into a mission
that's the way down. We'll listen to yellow and tune out the emission
just a little bit. We just save it. Now you can see it's glowing. So if you've just changed your Moses was probably
the first time. It's like old felt really real, but yet that's what it's
looking like. I'm very happy.
24. Part 5. Camera and lighting: So now we're going
to play around with the camera and the light chain. You can go and decorate
as much as you want, add whatever you want you house. And I would also love for
you to send me your houses. You can tag me on
Instagram or wherever. I'd love to see them, but yeah, you can add whatever you
want, you can keep going. You can add more
trees and just using similar techniques
that we've been using. So now we can go into the
lighting and the camera. We select the camera, we're going to go into View and then we're
going to go into camera mode and we're going
to click on our numpad. Now, that is not exactly the angle that I've
been dreaming off, but this is, I
like it like this. Then I'm going to de-select this so that the cameras stops
moving with my maths, but I just find that
easiest way to do it. We're going to
delete this slide. We're going to go into
Edit Preferences, add-on, and make sure lighting, try lighting is on. This is an easy
way to understand. Lighting is a beginner. I'm still learning lighting. I feel like lighting
is somebody who just always developing in. But yeah, try lighting is
definitely really helpful, especially when you're starting. So I'm going to select
the main house. I'm gonna go shifting,
going to go down to light, and we're going to add in
these three point lights. Now you will see it's added
in all these three lights. What I'm gonna do is I'm just going to bring
them a little bit down just like that. This is an area light and you can change the lighting
properties of just here. We're going to turn
this up to maybe 250 and you can actually
put it in this mode. Hopefully this doesn't
start making you feel sick as you're watching. We're going to turn up in
this area light as well. That's maybe a little much. And then this one, they might turn up to hundreds. What I might do is turn
this one to a son, tune it to maybe two, and then change the
color to a little bit. Orange is the sun
is not just wide. That's a really nice color. And I might even just
move it a little bit forward like that. They usually during
this process, what I do is I'll turn
down the renders, the currently like 200. I can then down to about 20
and I just start to finger it just to see what it looks like and
what I need to change. Obviously when I add in more samples that were
in dialogue speed at it. But that just gives
me a good idea of what the lighting
is looking like. And I'm actually quite
happy with the lighting. A little bit of
shadowing going on, but I think it's
looking quite good. I do think I want to
change the camera angle goes because zero
back to camera. I just felt like the
side of the house was like the main thing on display. I'm just going to move
this one behind that. I think it's really good. I'm gonna go back over to the render properties and we're going to
change this back up. You can change it to
whatever you want. I usually put it at 200 and
then when I do the final one, I usually set it at about 1,000. I just takes longer to render. That's why I do that. So it's currently also sitting on a like
a gray background. You can change the color of
the world if you want to. I don't wanna do that. I'm just going to
end in a plane. And this is a technique that I feel like everyone
uses because it's so good and applying
them is going to press one just to bring, and I'm just going to scale
it and then we're just going to rotate it just a little bit. We're gonna go into a mode. We're going to go
to each select, I'm going to select that
age, extrude it and we're going to pull
it up just like that. But you can also do is
you can select this one, Control beta barrel bivalent, and then it rounds it out
and then it's a backdrop. And we're just
going to render it.
25. outro: Congratulations on
making it to the end. I am so proud of
you and I blend. It can be very overwhelming. There's so many things going on and it's very different
if you've come from a different software like
Adobe or anything like that, like the hotkeys
are different and everything is just
a little bit crazy. But I'm very, very proud of
you for getting this far. I'd love to see your renders. You can tag me up on
Instagram if you want to, and I will definitely come in on them and show them some love. Let me know if you
have any questions or any other tutorials
you want me to make and just leave
that in the comments. But thank you so
much for watching. I really appreciate
it and I will now see you in the next video.
 Brittany Hart, 2D/3D Designer