Transcripts
1. 1. Introduction: Today I'm gonna be
teaching you how to create an isometric
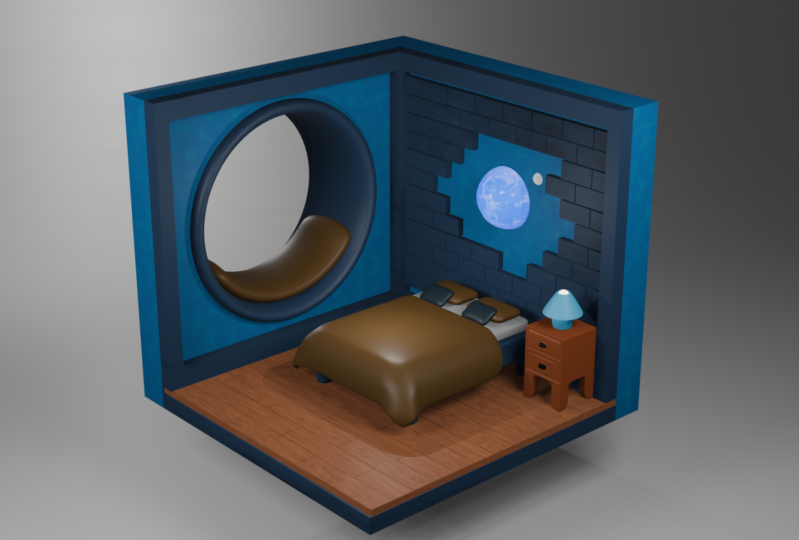
room in Blender. I've created a bunch of isometric
rooms now and blend it. I'm going to show you
a bunch of tips and tricks on how to
accomplish this. In this class, we'll
be using Blender 3.4, which is a free software that
you can easily download. Welcome to follow along
with what I'm doing, I'll use the techniques to
make your own masterpiece. Let's jump straight
into Blender.
2. 2. Modelling isometric room part 1: Alright, so here
we are in Blender. And the first thing we're
gonna do to just make everything a lot
easier as we're going to turn on to Add-ons. And so if we just go to
Edit and then Preferences, so you just go to Add-ons. We want loop toes. This is going to enable us
to do the round windows. And we also want images, planes. We're going to do this
if you want to add in photos or anything
like that to the rooms, are valid to add-ons
that I would recommend for this class. So you can just take them
here and then you can also go down here and you can
save the preferences. So what we're gonna do to get started is we're
going to tap into edit mode and go into face
select these three phases, 0, and we're going to say
the faces on them as well. What we're going to
do as well is we will select the bottom one
and delete that face. This will be the isometric
heart of the room. What I'm gonna do
is I'm going to select it all by pressing a right-click and we're
going to sub-divide it, but probably going
to do it about Stephen times. I
think that's enough. Now the reason we're
doing this as we are about to make the window. This is my biggest tip. I learned how to
do this by myself and to even try to
do round windows. This is how to do it.
Well, this is how I do it. You don't have to
do it this way, but this is the way I
would recommend. Just select where
you want it to NCAM, just going to insert
it about this much. We want to right-click and then we want to go to Loop toes. We turned that on Boolean and
then we want to go circle. Now you can see
there is a circle if yours is rotated like
this or anything, you can just rotate
it and move it back. I'm going to scale mine
down just a little bit, and I'm also just going to bring it out along these indexes. So it's a little bit
higher than what I do is I actually
deleted those faces, so we haven't actually
just a circle in them. Well, you can do now is you
can go into the modifies tab, you can add in the
solidify modifier. And we're going to give this
just a little bit of dip. So probably, maybe
four by one Steven and we're going to click even
thicknesses as you can see. But if you go at the top, it's not even so if
we just click that or even it looks great. Now what we're gonna
do is we're going to create the window frame. So go to each slit up here, and then you can
option select or might even be hold, select this edge. Just hear. What I'm gonna do is
I'm going to Shift D to duplicate and pay to
separate the selection. We're going to go to object mode and then we're going to select that little circle that
we just separated within. Gonna go to Edit mode,
press a to select all. And what I'm going to
do is I'm going to extrude it and then
scale like this. As you can see, I forgot the solidify modifier
is too long, so we'll just turn
that off just there. I'll go back and select this ring extruded
bad, dislike them. What we can do as well,
we can just move it. You can play around with
this however you like. What I'm gonna do is
extrude it back, pick them. And if you want the bag
to be done as well, you can do that. So that is the window. As you can see,
it's a little bit bumpy and I might
even just scale it in and just change the origin to
the origin of the geometry. I'm going to add a subdivision
surface like that, as you can see with clipping a little bit so we
can just scale it in. But that is how I do the windows and then I just
shared it smooth, super easy and super effective. One thing you might
wanna do is you might want to make this
a little bit thicker. Maybe. We might want to just scale them along the x, move that back. And now what we can
do is we can actually turn this into a window seat. So now that it is a little bit. So I'm going to
leave it like that. You can do whatever you
want with it as well. What we're going to add
it now is the floor, and the floor is
going to be a cubed. We're going to go Jay, scale
and scale it along the z. Then we're going to move
it down just like that. Press Control one on your
keyboard and you can actually see if it is in
line, just like that. I love wood planks. So I'm going to
show you how to do wood planks using
the array modifier. This is a tip that I have
developed over time. I used to do on a
very different way, but this is the easiest
way to do wood planks, wood flooring, and
anything like that. So just add in a
cube, scale it down. We want to scale it
along this year as well. And then we want to
scale it along the eggs. We're just going
to move them down. Then I'm just going
to move it back to the wall and we're just going to move it along just like that. So that is the first
plank we have there. And what we're gonna do is
you see a ray modifier. Now the reason that I do
this is that a duplicates them as many times as you want while using the same geometry. So instead of having to
manually duplicate everything, this is just a really great
way to just get it all done, but also be a lot easier on your machine because you're duplicating from
the same geometry, so has the same properties as
the original parent of it. So it's actually
gotten the wrong way. So we want negative one will probably issued
negative 1.5. So that is a little Gaddis
to L0 much so maybe 1.005. And just like that, what I'm gonna do is I'm going to scale how long the hicks and just
bring it along like that. Wood panels aren't aligned, they're not symmetrical,
anything like that. So we want to shift D, this one and then we want
to move it along the y. And what we'll do is we'll
also move it back like that, but going to add in two more. And then we'll,
we'll do is we'll apply this array modifier. That means we can tap
into mode and I would go into X-Ray mode by just
clicking this button up here. And you can just bring these
in so that they align. And then just bring
this one back along the px jazz like that
in turn off x-ray mode. Now, now what we're
gonna do is you can double up your race and
we can do another array. So we want to actually do
it on the y, want to do it. Negative one, at least ten, you can just pull
and drag where you want it as we'd probably
want a negative two. I would say we go negative
2.04, just like that. And we want a few of them, so we're just going to increase the count just until the 10th. The law, we're going
to do the same thing with this plank as well. So we're going to be moving
at home the white again, and I think it's negative 2.4. And we're just going
to be going like that. And now you have the plank floor done and it looks so good. So we're going to do now is
we're going to add the bid. So we're going to add in a queue and then we're just
going to scale it down. We're going to scale it down
along the sand as well. And then we might also
scale it out along the y. Play around with this depending on how big you want the bed. And I'm just going to bring
it down a little bit. Awesome. Let's now make
the bed frame for it. So the tab into inner mode, what we're gonna do
is just subdivide this will go seven times. I think that's great. And then what we would do is if you press slash
on your keyboard, we will just go into
a mode where we can just see the bid, which makes it really
easy to work with. I'm just going to
select these faces along here for the legs. And I'm just going to extrude
them down just like this. You can go out and see if you've made them long enough as well. But that is what I'm wanting
the legs to look like. I might even add in
a Bevel modifier, Navy just like them. So we have the little legs
there and the rest of it. Now what we're going to
do is we're going to select all of these
faces by going to Shift D to duplicate and then Peter's
your brain, the selection. So I'm gonna go out and then
we're going to tap back into edit mode of the
selection we just made. I'm going to make it a
little smaller because this will be the mattress. Now what I'm gonna
do is extrude it out tithing, that's perfect. What we're gonna do is we're
actually going to duplicate the top face again and
separate by selection. So now we have the blanket. Now what I'm gonna
do is I'm just going to make it a little bit widen, but they ingest a
little bit shorter. Now, this is a technique
that I've loved to use, especially with
anything that all for anything like that
is ever going to select where the cloth will be just on the mattress here
what we're gonna do is add a subdivision surface to it and then we're just going
to shade it smooth. But we're gonna go over
physics properties. I'm going to add a
collision modifier to it. Then we're going to go to the
sheet or the duvet cover. We're going to add a
subdivision surface just to round those corners
a little bit. And then we're
gonna go to physics properties and we're
going to add cloth. Then what we're going to do is we're going to
press space bar. And you can say down
the timeline down here. When we click Spacebar is
going to go like this. And then we have the
blanket going like that. Now one thing I didn't do,
so we will just undo this. We just want to shade it
smooth so that when it drops a lot smoother
to deal with, we're just going to add
the solidify modifier to Dubai and we can just increase the
thickness like that. And what we might do is just put these guys the cloth simulation, then we can put
it out like that. And now it looks
more like a blanket. It's a lot softer. It gives it a very
different look. I quite like what
we've got here. I'm gonna do while we're still
looking at the Buddha is add the subdivision modifier to the base of the
bed as well and then shade that smooth and I
might even increase that. So that is what we have there. It's looking very good. Now what we're going to do
is go in and make pillows. So we're going to go
in with a cube. Again. I'm going to press Slash and we're just going to
make them a little bit thinner and then a little
bit longer, just like this. Now there's a few ways
that we can do this. We could just add a subdivision
modifier like that. We can have really
cute round pillows. They could tab and we
could add a loop cut here, the loop cut here, and then we can scale
in them like this, whatever way you want to do it. If you want to do
it the way that I just did it, that's great. And then I just shared that
smooth and it just gives it a little bit more
dimension to be pillow go out of
slush mode or down. And then we're gonna go back. And I'm just going to make
them just a little bit bigger. We're also just wanting to
apply the claw modifier. Just saw if we want to move
it, they can move it easy. We just have this pillow. Once again, I'm going to
use the array modifier to put the other pillow
on the other side of the bed, just like that. So you can add as many pillows
as you want if you wanted to duplicate this shifty Chris, and then just make
them like this so we can put two little
pillars on the bed or we can even make them smaller just like that
and make him like that. So just adding a
few more pillows there and then you
can just rotate them however you need them and then bring them down
at the theory Cue.
3. 3. Modelling isometric room part 2: Now we're going to work on
doing the bedside table. So once again,
we're going to add a cube and we're going
to scale it down. I want to move it along the y. We're going to just bring
it down to be a side table. Here. I'm just using slash to go into it so that we can
see what we're doing. Then we're going to
tab into edit mode. What I'm wanting to do is just subdivide this a
couple of times. That is what I'm after them are gonna go down to the feet. Very similar technique for
what we did with the PFM. We're just going to select them. And you can go out of slide-show mode if you want
to see what you're doing so that we can extrude those feet down,
chest like that. And then I'm just going to place them but they're going to slash just so we can
see what we're up to. So we can see the top one. Hi, and then you can insert
the bottom on it as well. Just like that,
we're going to take these faces and then we're just going to extrude back
just a little bit, just to add a little bit of depth than I extrude
and scale in. And then I'm just
going to extrude out just a little bit more. What you can do if you want to is you can extrude
this drawer out the hallway and then you
can pull down these phases, this, and you can
never have been draw. But I think I'm going to
make the journal is closed, but you can do what you want. Next, we're going to
do the little handles. So what you can do is
you can see you can select these vertices
precise, just like that. And then we're going to extrude
it along the y like that. What we're gonna do is add
in the subdivision modifier. And as you can see as quiet, brandon, maybe a little bit
more rounded than we want. So we might add in a few little
cuts to the legs, say V2. And then we might add
in a loop cut here to support the base of a couple
of cups up then yeah, I'm loving how it's
looking and then shade it smooth and he's
looking right. I love the texture of hair. I just love him perfect. We're going to slash and I
think he's a little small, so I'm just going to scale him up and move them
up a little bit. It's our tables are usually
about in line with the base. I'm having him like that. Perfect. Next we're going to
make a little lamp for the bid so you can move your cursor just to the
top of the bedside table. We're going to go Shift a and we're going to add
in a cylinder, we only need 16
vertices for that, so you can change
that down there and then we're going
to scale it down. I'm also going to
scale it down across the zero slash so we can
not see what we're doing. And then we're going
to get these vertices. Am I going to extrude it out? They may going to
maybe extruded up, pull more time strewed, and then scale out like a play. And then what you
can do is press J and then pull it down. And you can just
play around with how you want this to look. I usually add a subdivision
modifier to it. You can see it looks a
little crazy right now. It's just looking a little
bit more mushroom like, and I do love a
mushroom and lamp. While we can also do is we
can add in a little light. We could probably
just do a UV sphere. We don't need a tip that much geometry and we can
just, we can select it, press L and we can just scale it all the way down and then bring it in the
top just like that. Perfect. What I'm gonna do is
I'm just going to add the texture to this now
while we're already here. So I'm just going to go
mute and textures just say line and then turn the
emission all the way down. Neely, just change the color just a little bit nervous
and attend the emission. Then I'm going to select
this one. Personnel. Can we might make this one
maybe like in my screen, sign does change the
mode of the top there is a sign so you can actually
see what you're doing. I'm I make it just a
little bit metallic and pull down the roughness
just a little bit. We are going to shade it's
worth just like that. And that is the little line that we have got a slash mark. And you can have a little
look at how that is going to bring that up there. Now we're going to add in
a cushion to the Windows. What I would suggest you do
is you go in and you just select the faces where you
want the cushion to be. So I don't want that
one thing shifts d p for this to
separate the selection. Now we're gonna go into
a mode for that one. And I'm gonna go
Option or Alt T to scale the faces along
normal like this. Then we're going to go to a, and then we're just going to
scale it a little bit. And I'm just going to
scale it in as well. And that is how to
make them really soft looking at cushion. And what we can do
is we can end in the pillows to that as
well if we want to, we can make it thinner
or bigger role when it but we want
to do with that, but that's just what I'm
gonna do with the cushions. Next thing I'm wanting to do is I'm wanting
to add a little bit of decoration to the wall. So I want to hit in
maybe some bricks. So we'll go scale this
one down and then we'll scale it along this
stamen for top view. And then we can bring
it back into the wall. And then we're going to add
the array modifier to it. So we went negative 1.05 is to leave a little
bit of a gap. And then we will scale it
along x, just like that. And we will do a very
similar technique for region for the floors. So we'll go Shift
D to duplicate and then we will bring
it down just here, hold on along the
wall just like that. I'll actually go back and do it. Then we will apply this
one tab into edit mode, go into X-Ray mode, and then pull them
back so that they fit. Now what we're going to
do is we're going to add in another array
modifier to the top one. And we want it to
be on the ears. We're going to go like that. And then we're just going to add them all the way down the ball. Don't need that many. And then we're also going to
do it with this one as well. Just going to add
the array modifier. Food along the
SSID and then just add them all the
way down the wall. Just like that. You can't really
see it just yet, but it'll be easier to see
once we texturize everything. I'm also probably wanting to add in some pink along
the top of it. We can add in another
loop, cut just there. And then when we can do
is we can select the top. We can aggress Alt or Option E and extrude
faces along the walls. Now it's looking a little crazy. So what we're gonna do is we're actually going to duplicate it and separate it,
correct object mode. But we're going to
do is we're going to add in the solidify
modifier and we're going to just do the
thickness and then go even thickness
just like that. And I might even just make
it a little bit smaller, just like that, just
to shape the room. What I might even do
is just hope day or shift D and just duplicate it and put up for the
bottom as well. Then what we can do is
we can just move up all of these books
just like that. But I'm also going to do
is just add an a beam down here just to divide up the
wall with just a little bit. So to scale down this
beam, Chris Stevens, I can see what I'm
up to and then scale it up just like that. You see how it's
shaping the room? Well, we can do is just apply
the arrangement of fire. It's like this, and as you
can see, it's duplicated. And another one,
who does what does apply them tab and data mode. Press L to select all of it, makes me want to delete
the whole thing. And now we just have the
three, just like that. Now we're going to add in
a couple of photo frames. So up here on the wall. So we're just going to
go Shift a and we're going to use a queue
and we're just going to scale it down for how we want it. Just like that. I'm going to tab in face, select just the front
one and save it. And then extruded back
along the y-axis like that, just so that it actually
looks like a photo frame. And then I'm also going to
add in the people modify it just to round it out
just a little bit. And then I'm going to
shade it smooth like that. Now the way to add an
image is to go shift pay. Then we go to Image, and then we go images playing, and then just choose
what image you want. I really want this image. If you just change
one view urine, I'm just going to rotate it 90 degrees,
essentially backwards. Rotate it 190 to scale it, and I'm going to move it, have made the photo
frame not a square. So now what I wanna do is
just make this work square, can bring this back
just like that. So now you can see it's framed. And what I'm gonna do now
is I'm going to put a bunch of photo frames around and I will see you
after I do that. Alright, so this is what
we're looking like, but those pitches on the wall, you can just see them
Thea and you can do this however you lie on
in your own images. It's so much fun to do and it just elevated serum so much. So what we're looking like now, we're going to move on to
making flour cushions. And I love making
class cushions. So it's very exciting for me. So we're gonna do
is go shift is, and we're just going to move the cursor back
to the world origin, just so he pops back in there, we're going to add
in a round cube. I'm going to turn the
radius up to one and then we're going to scale it down. We're gonna go into
slash mode just so that we can see what is
going on there. And I'm going to add an a
subdivision modifier to this hand, then shaded smooth. Nice. What we wanna do
is add in the petals. So we're going to duplicate this center and we're
going to pull it down. And then we'll also can
scale it along the Y. They can do this
however you want. Go Control a and do all transformations and
rotation and scale. If you don't do this, the
next part won't work. So it's very important. Next we're going
to add on a curve and we will the circle, and we're going to make
that a lot smaller. Now we just want to
apply the rotation and scale to that as well. I'm going to select the peso. We're going to add
the array modifier. What I really, really like about this
technique is that you can actually array the
petals around the center. So it's really important
to do this if you're making flowers or anything
and saves so much time. And it's honestly my
favorite technique to do some very excited,
to be shiny. So we want to array before we sub-divide and we
are going to go, we're going to select
the curve as the object. Then we're gonna go
into Object properties. We're going to go 360/5. As you can see, all of the
little petals have populated. Now if we go into the
one that we made, initially select the
center of the thing. We want, just these
vertices just here. And then we're just
going to pull them down just like that. You don't really see that. I wow, but now you can see there's just a little
bit more texture to it by going to the
array modifier. If you don't do this,
when you move it, it's going to just not move with itself and we're going
to move that up. And then we're going
to delete that. What we do is we going to sleek both of them and go
Control J to join them. And now we have a
flower cushion. You can also just scale
it up a little bit more if you want it to be a
little bit more plump shirts, I'm gonna go out of slush mode
and I'm swap them around. What you can do is go back in. You can go into edit mode, select all by pressing
a can press one, and then you can
move it up along. The origin point is
just at the bottom, you can just see it there. Then when we go back in here, I can show you this technique
which I really like to use. Where are we going to
snap the cushion around? It just makes it easier
to move it around. So I go faced Harris, align rotation to target, snapped the same
target, press G, and as you can see,
it snaps to it. Once it's there, you
can just rotate it. How ever you want. Have the little
flowers like that so you can do it however you like. But that's how we're
going to do it by going to put the 3D cursor
just down here. And we're going to go
Shift a and we're going to add in a cylinder. Then we're going to
scale it down and then scale it down here as well. The center bring it up
and I'm gonna go into slash mode just because
I find it so easy to do. We're going to extrude it, going to press. Just like that. We're going to extrude a data, maybe a little bit extruded in, extrude it up like
that, scale it out. So we're just making
a little pop long. So I'm just extruding and again, extruding down scaling and then I'm just going to
fill it just like that. So we're going to add a
subdivision modifier to it. And then we're just going
to say where it needs a little bit more geometry. So I'm going to add
a little bit more geometry down the bottom. And I also might add a little
bit more geometry chest and just shine it smooth. So we'll see what
that's looking like. That isn't very cute. It is a little big. So we might just make
it a little smaller, but then like a little bit
taller, just like that. I want to add in a plant. So I'll just put
the cursor back in the center and we're
going to add in, Hey, poll lane scale that down, press Slash, go to top
mode, scale it along the y. We're going to eat a mode, going to sub-divide it. And we're just going to scale on these ones scale and these ones, we might even pull that
one out just a little bit, select all of them, extrude
them up just like this. I know what his whole cuddly
looking like a coffin. But now it is looking
more like a leaf. So don't worry. We're going to select, use Edge, Select and
select those two. And the evil gas like that. And then we want to
just bring down the 0. I'm going to select the
whole scale, it like that. That's looking great. We're going to select
the middle vertices. Turn off proportional editing. We want on smooth.
If you can't see it when you press G and
might be really big. So you just need to
use a scroll wheel to scroll it up or
scroll it down. Then we're going to move
it along the z axis. And we want to be just
a little bit like that. I'm going to select
these vertices as well, but I'm just going to
bring that like that. And we're going to move it back. Turn off proportional editing. I'm going to use Face Select. I'm going to extrude and then scale and then
extrude, cross. And then I'm just
going to pull that down just a little bit and then just rotate
it just like that. Then just hadn't another
loop cut just yet. So this is the leaf that we hit. We're going to move
it up to be centered. And then we're going to add the origin to 3D cursor Tambo, just shade it smooth
while we're there. Now what we're gonna do is apply everything we're going to
add in the array modifier. And I want to make
maybe seven of these. And then we're going to add in, Hey, make it a circle. So just like how we did
the flower cushion, play, all of the scales then
go back to this one, go Object Offset,
select the circle. And then we want
to do say 360/7. So now that all like that, you can even take
it a step further and twist them around
a little bit more. And then you can,
then you can pull them up using the z-axis. Just like that. Do you see how that's looking more like a little
bit of a palm. What I noticed though is some of the like stokes don't
reach the bottom. So I'm going to tab
it contain a mode. It's just going to extrude
them down just like that. So they all go to
the same point. They're going to apply
the array modifier. And then we're going to
tab out of that mode, we can delete this
little circle and then we're just going to
bring this palm. And I'm going to make
it smaller because it's huge, just like that. And I love how this is looking. We might just add in
some dirt though, so we'll just do a round cube, put it up to one, scale it down, then we want to
just move it along.
4. 4. Texturing: Move it along. Now what I'm gonna
do is I'm going to go on and texturize everything. You can do this
however you want. You can follow what I'm
doing if you'd like to and learn a few
more techniques, this is why we
have to work with. So what I'm gonna do
is I'm just going to work with the floors first. I'm gonna go over
to the shading tab, and I'm just going
to call this one. Sometimes we do
more than one word. Would want. It's
always good to start. You want to do a noise
texture and we want to do a cholera and the
color to the factor. Just like that, we're going
to add in some brownie tones. And then I'm just going to
scale the border a little bit, a little bit of detail
and then just distorted. They can play with
this however you want to add in the wood texture, the other bits of wood. And I'm going to add in that wood texture so that instantly
brightens up the room. We're going to use a similar, we're now going to do the brick. What we can do is
use something very similar or we can use
them for a night shift, pop that into a color
ramp just like that. And then I want it
to maybe be a little bit change it to
smooth a fungus there, increase the scale,
decrease it, increase. It might even do that technique. We'll see what it looks
like in the room. Yeah, so I think what we'll do is we'll just
bring down the color, this one, and then we'll add the texture to the
other side as well. So it's looking like that. Then I'm going to add in a new, what it takes to call this
one would tooth decoration. So we want to add in a color ramp and then
a noise texture. And then we're just going
to make it a little bit of a darker wood,
something like that. The teach out just like that. There might even be
like a little red, but we'll sort it out. We want to add in to texture to the top and
the bottom as well. We might even do is edit
around the outside as well. And we might even
add it to the base. As you can see, it's changed. This wall color would happen. And we're actually going to
go to the texture panel, and I'll click the plus here. And we're going to
do a new texture. So I'm gonna do a color ramp and I'm going to do a noise texture. Once again, color
into the factor, color into the base color. And what I'm gonna do is I
want it to be light like that. I'm just going to
select all the faces. I want it to be on. There is an assignment
just so that we can see what is happening with it. So I think this color
maybe just his and talking about the scale and then turn
off the roughness of it. I'm happy with that tone. And then when we go
in, you can just select these vertices here, probably on that one,
probably not that one. And then we can
apply this material. Yeah, I quite like that. We want to add in the
word to this one as well. So we're just going to
go in and edit pins. Yeah, For the frames,
I'm just going to add in the first word that we
did from this point and you've made a few different
shaders so you can go around and really do
whatever you like with it. For the Dubai, I'm just going
to make a chicken, a phage. So you can just go to
chicken or that color into the base color and you can see the chick is just
appearing there. We might do this, has a green chicken just
like that. Can we mine? The roughness that
you can change the chiggers size
them is really big. Chickens just because
we have a lot of like striped effects going on with the bricks and the panels
down here as well. I'm going to click the
little pillows and I'm going to add in the same effect. Now what I'm gonna
do is I'm gonna go in and color all of the acids. And I will see you after that.
5. 5. Lighting, Camera, and Rendering: All right, so this
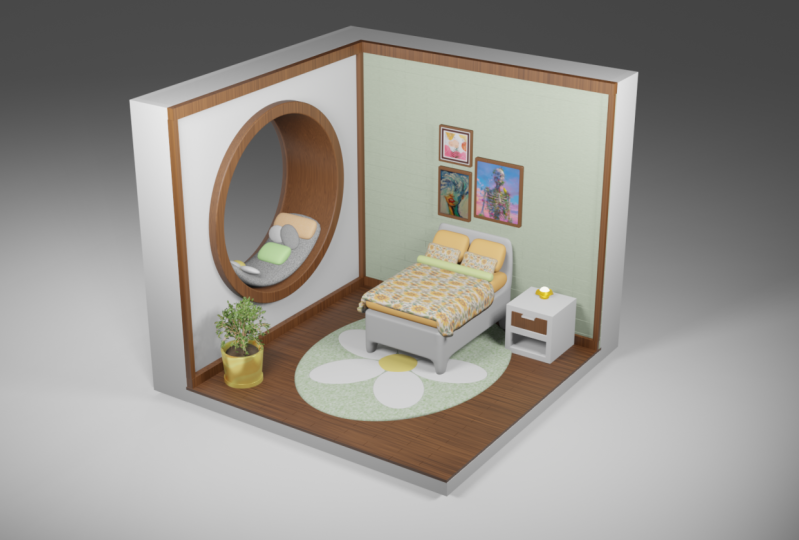
is highly decorated. My isometric room. I'd love to see how
you do try yours. Now I'm just going
to show you how to set up the render we're gonna do is we're just
going to add in a plane, going to bring it down again to make it a little bit bigger, I can rotate it just like this. I haven't taken a mode,
select the back vertices, and then extrude it
off like this one. Control B2B will make a bunch of failing and then shade smoke. Next, we want to
end on the camera and zero on your numpad. Come over to camera
two view and then just zoom out to how you
want it to look. I'm happy with a
dandy selected so you don't keep moving
the camera around and I'm just going to add in, you probably want to, in an area lies, I would just go into Edit and then we're just
going to rotate it towards see room
just like that. I want to make it, hey, Eclipse. And then I think he
will make it about 100. I'm rendering currently and EB, just because it's
easier to show you and I'll switch it over to
cycles in a second. But if you just select
the button up here, you'll be able to see
what it's looking like. Would that lighting
I quite like that. I'm going to duplicate this one. We're going to bring it over
here and we're just going to rotate it like that. And I'm probably just going to bring this one down to maybe 85. I'm going to edit
in a point lot, bring it up and I'm just going
to put it in the batches. They're making maybe 150 like that just so that it gives
us the look that it's 3D. Sometimes it can look today, we might even doing it
200, just like that. I want to bring this one back. Then from this point, I just keep rendering
it came looking at the image and
going from there, I'm quite actually happy
with how this looks. What I'm gonna do now
is show you how to render it all in cycles. We're going to go into here to the renders properties
and we're going to change it from ME two cycles because there were gonna go CPU compute. And I'm just going to turn
it off the rendered mode because my computer
won't render it fast enough and you start to
feel safer max samples, I'm going to do about 600. You can do the full amount, but I usually do about 600
just to see what everything is looking like and I want
to denoise it as well. And then that's really it. What I'm gonna do now is rendered and then I'll show
you what it's looking like.
6. 5. Outro: So this is what
my isometric room is looking like Britain did. I'd love to see what
you created two, and if you have any
other requests for tutorials, please let me know. But thank you so
much for watching. I really appreciate it and I will see you in the next video.
 Brittany Hart, 2D/3D Designer