Transcripts
1. HELLO & WELCOME: Out of all the seasons
we have in India, winter is one of my
favorite seasons. And if I tell you the most
favorite part of it is that to be in your blanket and wake up early
lead in the morning. Though we don't feel a little
bit lazy during these days. But painting is something
that I can never skip on. So I thought let me create a beautiful glass
for all of you, in which we are going to be in three beautiful paintings
based on winter. Where all the
paintings are willing to be easy, simple, and elegant, heavy buddy myself,
metric by de Lima, self-taught independent artist
based in Gujarat, India. So people who might
not be knowing me and, and join me recently
can find most of my art bonds being
displayed on Instagram. I go by the name
should Raja rotations. We are going to paint
three different paintings with increasing
level of difficulty. We are going to talk
about the quality of watercolor paper
that you will need. I'll be giving you
all the details about the art supplies that you will
need for the entire class. We are going to talk about
the 12 colors in detail. So before starting every
individual BIM team, there is going to be a little
bit of practice session, which I'll be teaching
you how to paint every individual element that
is used in the painting. We are going to learn
different techniques like wet on wet, wet on dry. How to give a nice reflection
effect in water body. So we're going to start
with a basic sketch with your Benson and then we'll be working on the background wash, where you'll be learning how to blend all the colors together. We are going to be
in some beautiful, nice snowy mountains. And I'll be teaching
you how to give a nice texture to
the entire mountain. They are going to paint
every individual element in detail like pine trees. We're also going to
learn how to make a beautiful water body and gave some amazing deflection effect. I'll be also teaching
you how to give my new details to the elements. And I'll make sure that you come up with an amazing output. So the first painting is a winter house than
they are willing to bend over into forest and a beautiful winter
lake. No need to worry. The classes suited for all level artist and beginners
can learn a lot from this. So yeah, without any delay in grab your art supplies and join me in creating these
beautiful winter paintings.
2. ART SUPLLIES: So before we start painting, it is very important
for all of you to know the correct art
supplies and that we will need in this entire class. So now let me give you
a basic grief about all the art supplies
and only two Wudi in case you do not have
the same art supplies, go for any other
good alternative. So now let us talk about
the watercolors first. So the watercolors that I'm
having high from Gusto. So these are basically
artist grade watercolors. And it does not adopt compulsory
to have a same brand. And in fact, if you are a
beginner, I would suggest to, to start with US students
in grade watercolors first. So whenever you are
working with watercolors, it is very necessary to keep a paper napkin side light so that you can clean up the
excess amount of water. So now let us talk about
the watercolor papers, which is the most
important part. The watercolor papers that
I'm using are from Canson, and these are 300
GSM and 140 and me. So the GSM me or plays
an important role. This is about the thickness of your watercolor paper so that you can apply
heavy washes on it. Let me just take one out
and show it to you all. So as you can see, that this is our
watercolor paper, and it is really vague,
nice in thickness. So it is not at all compulsory
to have the same brand new can get another bunch of
nice watercolor papers also. Now talking about some
basic stuff like arrays. I was in sharpness, which
everybody must be having. So now let me talk about
the color palette. So this is basically a calm backed watercolor
ballot enrich you and these literals had meant to place your
different watercolors. And you can also see bad
knees are very nicely arranged and you also have
our nice mixing space. No need to worry
at all in case you do not have this
kind of palette, you can use a simple
watercolor palette as well, like the one I'm
showing you right now. So this is basically a
simple color palette and which you can pull
your fellows and use it, or you can use as imposed
ceramic palette also. So it is absolutely
really necessary to keep a spray bottle handy so that you can loosen up your
watercolors and gaze. They are very much
Titan or dried up. Now the most important part, The handy materials like the bend and brushes
that we're going to use. So let us talk about the brushes paused and then I'll
be giving you a brief about the bends. So the first one is a
mop brush of size eight. So this is not from
any particular brand. It is symbol local
brand, I guess. And you can find it very easily in any nearby ON supply store. The second one is a flat gush of half-inch and those
brushes from Campbell. Now, another brush
is round brush, which is basically a
detailing brush of size 0. And doesn't Russia
is also from camel. And the last one which is an alternative to
your mop brush. So this is basically
add-on rush of size eight. You can use this in case you
do not have a more pressure. And that's it. So these are all the four
brushes vacuum will need. Now let us talk about the bends and simple Benson that
definitely everybody has. So leaving lead to
Ben's basically one as a black man and another
one as a white pen mode. The bends are from
Sakura Gelly Roll. And it is absolutely
fine if you have any other good black
pen or a white men from any other bland and
assemble Benson that you will use to
draw basic sketches. So yeah, these are all the art supplies that you will need. I will also be mentioning them
in that class information. Now without any delay, Let's move towards
the next segment.
3. MAINTAIN PRACTICE JOURNAL: So it's been awhile I have been producing artwork
on regular basis. And if I have to give you our best advice and
your art career, it would be to maintain practice
journal always with you. Now you might be wondering
that why to keep a blacklist book when we can
paint directly on paper. So now let me show you
my boss know Jonah. So this is basically a book
that I'm adding for awhile. And I tried to practice on
this book on a regular basis. Now, the major reason
behind keeping our practice journal as
not to show anybody else. This is for your
own satisfaction and your own
day-to-day practice, which will make your perfect day by day. Trust me on this. Now, having our practice
journal doesn't mean you have to paint our particular
painting on it every day. Knowing that is not true, you can paint
different elements, tried to practice the different
types of washes you have. You can mean different elements, sketches with your pencils. You can use your pens, use some extra scribbling. So now as you can see that
for this particular class, we are having these three beautiful paintings
based on winter. We have these little
elements like the pine tree. Mountains are little house
with a nice background wash. So before starting every
individual painting, we'll be practicing all
the difficult elements and then we'll be moving
towards the final painting. So now I hope that you
will also maintain an art journal for your
day-to-day practice.
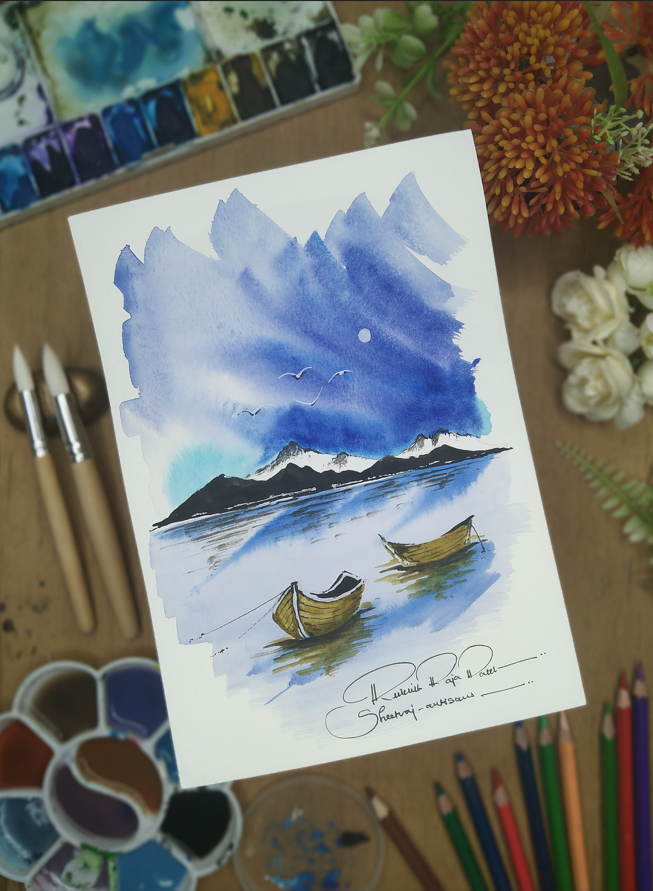
4. PAINTING 1 - LETS PRACTICE: So here we are with
our first painting, which is w0 internally. And let us back to us all the elements that we have in this
particular painting. So take a rough watercolor paper or any kind of rough
sketch book that you have, or if you are maintaining and
determine for yourselves. So this is the fourth painting
that we are going to have. So the elements that we
are going to practice for this particular
painting is this guy, which is having a nice blend. So you can see there's
a darker patch on the right side and it isn't going to be lighter
on the left side. Now after the sky, we have the mounting that
we are going to practice. And the last one is the
reflection effect on the board. So let us start with
the sky forest. So as you can see, there's a nice blend on the background. So use your simple pencil and start to draw with
the mountains. So this is not at all difficult. You just have to draw a simple horizontal line
which represents the origin. And you have to draw
these little mountains. So the mountains are
basically in two layers. There is a front portion
which is in black, and these again
portion is in white. So that White Mountains
represents mountains. Now what we're going
to do is that we are willing to take
our flat brush and simply apply nice wash
of simple plain water. Use your half inch flat
brush and simply make sure that you do not
coincide the mundane line. You just have to simply
apply a thin layer of water. So now as you can
see that we have applied a nice thin
coat of water. So to check whether you have applied the code
correctly or not, whatever light you are having
in your particular area, just simply move your page and see whether the court
is perfect or not. Make sure that you do not have water pools in
your entire paper. Now let's start
with ultra marine. So I have taken some
nice ultra marine in my flat brush and we are just giving a nice outskirt
to the mountains cost. And then you have to just move your brush in the
direction I'm moving. So now we are blending several in blue with ultramarine
as you can see. So there isn't a perfect
pattern to do this. You just have to simply move your brush and there's
random manner. Just make sure that you have darker color values
on the right portion. Now what I have done is
that I had simply taken lightly by napkin and
cleaned up my flat brush. And when you move
obtained up land rush, you get these little
light strokes also. So as you can see that we
have paint in the sky. And one thing that I want all of you to take in
mind is that it is not at all necessary that you
get a same land every time. Watercolors are not
meant for that. This is a natural medium. So you will get different type of natural blending
all the time. So what I did is that I
just took some solid black and Mike Whalen brush and
paint in different mountains. So these are the mountains
that are coming in the front portion and the back
ones are snowy mountains. So only two Bain back. We'll just apply a little
bit of black patches. Just simply take your paper
napkin and dry or Gold Rush. They wouldn't be some color
remaining on your gold rush. Knew just how to
make these little scribbling on the door
of the White Mountains. So as you can see, we have
applied a nice texture to it. So now let us start
with the board's first. So take our black pen
and try to practice scribbling this little
boats on the vent portion. So now as you can see, what is the benefit of having
an art journal, practice journal,
you can definitely use it for your
day-to-day practice. So I have just simply scribble these two modes which we are
having in this painting. No need to worry, we'll be
drawing this in detail. Bendy moved towards
our final painting. So once you are done
with your scribbling, what we're going to do is
that we are going to apply a nice coat of water
below the boat. So now just simply
take your flat brush, have them sertraline blue in it, and have these little strokes coming out of the horizon line. Now using the same address, you have to apply a little
bit of horizontal strokes just below the board
so that we can apply some nice
reflection effect. So initially I have
applied some ceremony in blue below the water modes. Now what do you have
to do is just wait for a while so that
the water settles. Now, I had taken some
gamboge and NyQuil brush. And we are going to make
these little strokes. Basically these are
horizontal strokes. And you have to move this and the direction I'm
moving right now. So as you can see, the damage is getting a nice blend
when DC drill in blue. What you're going do is
that you can just tap your paper napkin to dry
extra amount of color. And now simply again, take your quill brush and start to make these little
horizontal strokes. So at times in watercolors, what happens is that you
might get a little bit of access amount of water.
So no need to worry. That's why I told you
to have a paper napkin handy so you can buy
about the extra amount. Now what I have
done is that I had taken some lighter
values of black. And I'm making these little
horizontal strokes again, and some darker patch below the mode so that you can
get a nice shadow effect. So now let me show you the reflection effect in
a little bit more detail. You just have to move
your quill brush and less horizontal direction phi in case you are not having a
quill brush around rash. As you can feel,
this is very easy. You just have
domain these little horizontal strokes
in a random manner. So these are all the
elements that we got to practice for this
particular painting. I hope that you got
some help out of it. Now let us move towards
the final painting. That would be
really great if you practice first and then move towards the final paintings
to get a better output. Let's recall for one's
li elements that you need to practice
are the blue sky, mountains and board reflection.
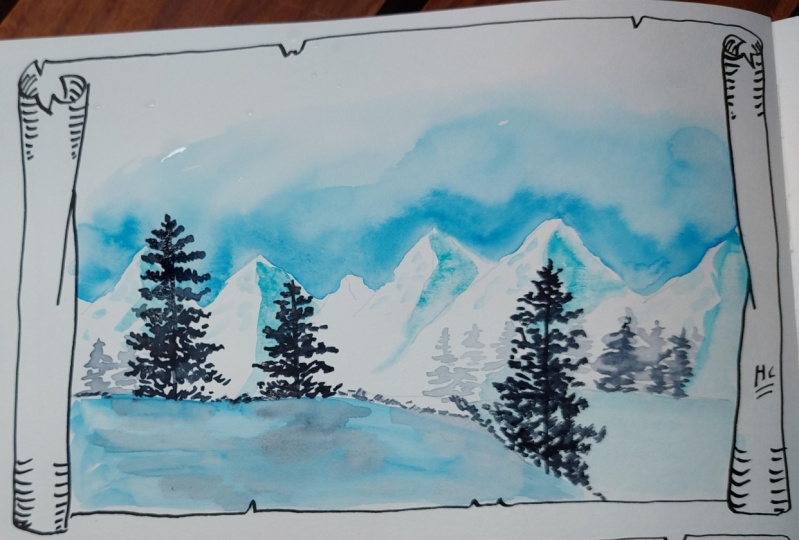
5. PAINTING 1 - THE WINTER LAKE: So I hope that you got to learn from the practice session. And now let us move towards
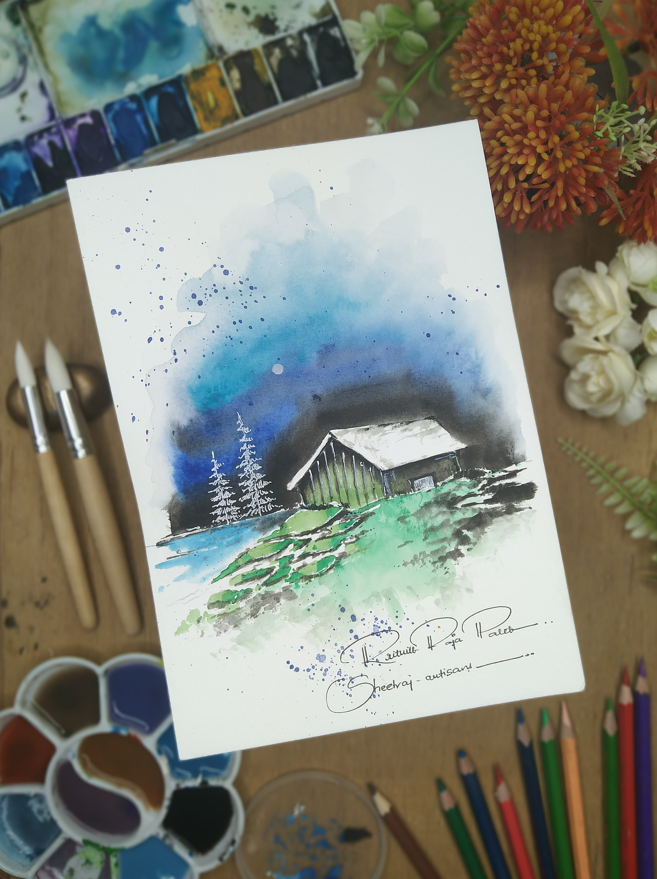
the final painting, which is the winter link, and which is our first painting. So let us talk about
the colors first. So the watercolors that you
will need as ultra marine, several in blue and black, titanium white, and gambit. So here I have a plain
sheet of watercolor paper, which is 300 GSM. And these watercolor
papers are from Canson. So let us start with our
basic sketch forced. So simply draw a horizontal line on the center of the page, which is the horizon line, and try to make these
little mountains. The mountains are
basically in two layers, the 401 and the back one. So what we're going to do is that different
membranes are going to be black and the background Danes
are going to be white, which are basically
these normal attains. Since this is our
winter based painting. Now let us start
drawing the boards. So again, using our
simple pencil and what we're going to do is
when we are willing to draw two modes. So these are basically
the reference sketches on which we are going to paint. Sandy dry domain, the modes, the way I'm trying to make. So we are having default mode,
enter perspective manner. No need to worry. This
is not at all difficult. Does try to practice it first and then come to
the final painting. And what you can do
is that you can give these little horizontal lines to let you know where
to give the reflection. Now the second boat is just
behind the first port. So it is going to be a
little bit smaller in size because this is
basically a perspective view. Now we are going to
have a little bit of details in the modes. Right now. You can just scribble
it with pencil, but we are going to
make it even more perfect with our painting rash. That is always
good to start with the top portion when you're
working with watercolors. So now simply take
your flat brush, which is a half inch flat brush, and take blame
clear water in it. Use the edge of
your flat brush and apply a thin coat of
water on the sky. Make sure that you do not apply water inside the mountains. That would spoil
your painting in case you have a little
bit of water inside, just take your dry
brush and wipe out the external torque
water that have come inside. Now what we are going to
do is that we are going to take several in blue first and simply take it in
your flat brush applied on the outskirts
of the mountain. So as you can see,
there is a nice blend already happening because we have applied water initially. So this is basically known
as wet on wet technique. Now what I have
done is that I had taken darker values
of ultra marine. And I'm making these
little strokes which are coming towards
the right portion. So whenever you
glean that you have access amount of
water in your brush, just dab it in your paper napkin and try to blend all
the colors together. So as you can see, we have got a nice darker patch
on the right side, which is coming towards the left portion and it is
getting lighter in tone. So again, I'm taking some
little bit darker values of ultra marine and trying to put it on the outskirts
of the mounting, make sure that you do not
go inside the mountain. And we are done with
the sky. So let it dry. Now simply take your
flat brush again, have some lighter
values of a chromatin. And making these little
horizontal strokes. No need to worry initially your water code will be
above the pencil line, but that is absolutely fine.
That is still visible. Now what I have done
is I have taken some darker values of
ultramarine, as you can see. And just below the horizon line made these little strokes. So these are basically
the shadow vector coming from the mode
and the horizon line. Now what we're going to
do is that we are using our quill brush and we are willing to take darker
values are in black. So just take a look at like
Alabama at I had taken darker values of black and make sure that you do not have
access a lot of water in your brush. Painting. The first layer of mountains which are willing to be black. So this is basically an
advantage of a quill brush. You can use the dip of
the quill brush to get into the details and apply
color and difficult areas. So I'm just filling up
the mountains with black. Don't need to hurry at
all in case you find the video a little bit faster,
there's an option below. You can definitely slow it down if you are
painting with me. Now using the same quill brush, what we are going to do is
that we are going to add a little bit of texture
on the White Mountains, which are these
little mountains. So I had just simply taken my gouache brush and
I'm cleaning it up. Tap it on your paper
napkins so that you do not have lambda values. And just simply mean these little textures on the top portion on
the White Mountains. As you can see, we get
a nice contrast between the mountains and the mountains that are on the back portion. So now what we are
going to do is that we are going to
pay him the boats. So I deepened my girl brush and we have taken some
darker values on Gambia. Tried to apply a nice thick coat of water color on
the boards fast. So both are basically having
a wooden texture generally. So we applying damage on it. So as you can see, we've got a nice darker patch of
gamboge on default mode. Now similarly tame the
same gamboge color and apply it on the second roll, which is on the backside. So as you can see, I'm
using the tip of my brush. And the major advantage of Gilgamesh is that
that you can use it. Step 2, add my new details, but no need to worry in case you do not
have a quill brush, you can use a round brush. Now what I have
done is that I had simply taken some darker values. I'm black and I'm adding it on the inner portion of the board which is visible right now. Now simply add these
darker values on the edges of the board also so that
you get a nice depth. So as you can see,
I'm just adding these little strokes from lack. Now what you can
do is that you can apply a little patch of black just below the boat so that we get a
nice shadow effect. And if you are focused
on the practice session, this is how you got to make a nice reflection coffee
or boat on the water body. So just simply tap
your round brush, otoconial brush that you have. And just make these
little horizontal strokes that are vanishing as they come towards the bottom portion. So now as you can
see that the boards look even more attractive
and realistic, then the ad, ad and biggies, lennon reflection effect
on the water body. So now what we're going to do is that we are simply going to add these little deflection effect
on the mountains as well. So again, simply add taken Mike Wellman brush and I have taken some darker
values are black. And you have to just simply mean these little horizontal strokes. So similarly, like the ones
which we did on the board, we are adding horizontal
lines more towards the horizon line and make them less as you move
towards the bottom side. So again, we have given the mountains a nice reflection
effect on the water body. Now what I'm doing is I'm having my black pen from
Sakura Gelly Roll. So we are using this
black pen to add the wooden plank
detail for the boat. So as you can see, I'm just
pulling in the direction. Now you can add these
little minute details to enhance your paintings so that it looks even
more attractive. Now let us attach a
nice rope to the lake. So I'm just adding
these rough strokes. So as you can see, I'm just
making a speed stroke. Be very much careful
while doing this. No need to hurry at all. Now using my white pen
from Sakura Gelly Roll, we are adding some
details to the mountains. So you just have to tap your white pen near
the horizon line. Now what you can do is that
using the same light pen you can draw the moon sends
out tonight view. So we are taking a moon. Simply draw a circle as you can see and try to give
it our solid patch. Now using the white pen, we're going to add
some birds in the sky. So no need to worry,
this is very easy. You just have to make
these kind of shape. As you can see. Also, if you find it difficult in
drawing for the first time, what you can do is that
you can practice it on a graph sheet of paper and then come to
your final painting. So now to enhance
the white color and give it a good contrast, use your black pen and
add these little depth to the board so that it
looks better in the sky. So we are almost done
with the painting. It is always good to add your signature,
mellow the painting. So that basically as an
identity of an artist. If you are running
a label, you can add the name of
your label as well. So I hope that you
enjoyed this painting. This is absolutely a very easy
and simple painting to me. And I'm very excited to see all of your projects in
the project gallery. Feel free to ask any
questions or dao to add related to the painting
in the discussion section. And now let's move towards
our next painting. I hope that you
learned something new and enjoyed this painting.
6. PAINTING 2 - LETS PRACTICE: Hey everybody, welcome
to the second painting. So before starting
the final painting, Let's practice some
difficult elements in this particular
painting as well. So this is basically
a winter house. And the element that we
are going to practice for this particular painting
is the background wash. So before starting,
let me give you a basic brief and the
color palette as well. So as you can see that we have our nice small winter house and behind that we have our
nice dark background, which is basically a night view. So that is black, that is
Prussian blue, and ultramarine. So we are going to combine all these three
colors and create a beautiful night
and background. No need to worry at all. This is not going to
be difficult at all. So this technique is basically known as a wet on wet technique, where we first apply
a coat of water, which we did in our
first painting also, if you have remembered
or noticed. So let us start with
the basic sketch first. Let me draw the house in a
rough manner with my pencil. So the reason behind drawing
the house first is so that we do not enter our background
color in the house. We have to make sure that
we leave the house in front and keep our
color behind it. So if you might have observed, I'm using my practice
journal again, and I would suggest you
to keep one as well. That would be really
helpful in your art Korea. So I'm almost done
with the basic sketch. Let me just give it
some darker values so that it looks
in different part. So once we are done
with the house, let us add the background. So what you have
to do is that you can simply take your flat brush. Before that, let me just
label it for you guys. So the arrow mark basically
shows the background. Now what we're going to
do is that simply take your flat brush and dip
it in clean, clear water. So this is basically a
half inch flat brush. Now the how to apply the
water on the background. Make sure that the water does
not go inside the house. So you can use the tip of your flat brush as you
can see very carefully. I'm just trying to apply
it behind the house. Now, once you are done
with the house area, you can simply move your flat brush in the
direction I'm moving. As you can see, we have
applied a nice coat of water. The light reflection
is very much visible. So make sure that you do not make any water pools in between. The water should spread evenly and it shouldn't
be a uniform court. Now what we are
doing is that we are taking some solid values of black and you have to apply
it on the horizon line first. Make sure again that you do
not move inside the house. You have to be on the
background leaving the house. So as you can see how I'm
moving my flat brush, don't need to worry,
this is very easy. So yeah, we have applied
the black color forced. Now, just simply
clean up your brush. And once you are done
with the cleaning, take some darker values of Prussian blue and apply the flat brush just
about the black coat. So you can see that you get a nice blend because
we have applied the clear water on
the paper initially. Now after applying a
court of Prussian blue, we're going to apply our
quota of ultra marine. And you can see how I'm
moving my flat brush. So once you are done with
this, as you can see, we have a nice blend of black, Prussian blue, and
ultramarine altogether. One thing that you can
take in your mind is that whenever you
use watercolors, the values that you
are seeing right now will be one shade
lighter when it dries. I'm so it will look similar to the one which
is on your left side, which is our final painting. So you can see this is how
you can blend the colors and the technique is basically known as wet on wet technique. That is very important
that you practice paused in rough
scrape of papers. Or if you have a practice book, then you move towards
your final painting. Once you are satisfied
with output, wait till it dries
up and see how you get the result of
the blending colors. So that guy is the
only difficult element that you need to practice. Now let us move towards
our final painting.
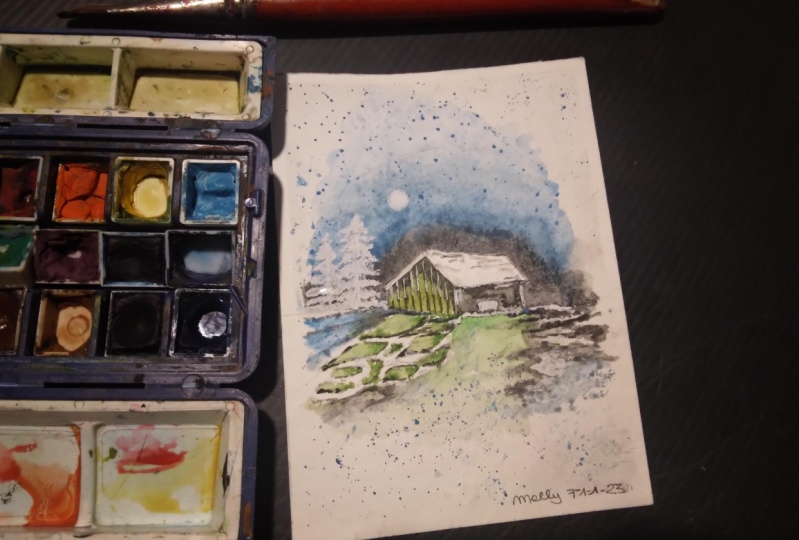
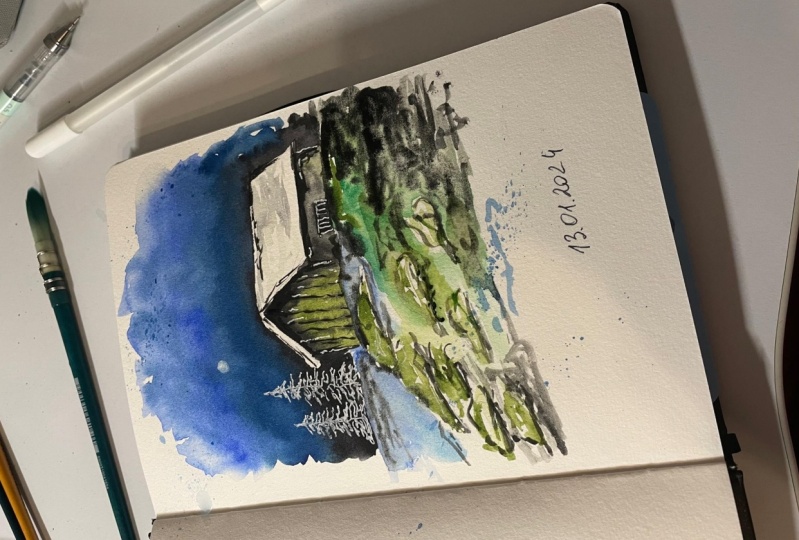
7. PAINTING 2 - WINTER HOUSE: Hey everybody, welcome
to the second painting, which is our winter night owls. I hope that you
learn something from the practice session for
this particular painting. As you can see, I have my
watercolor paper ready, which is our Canson
watercolor paper, 300 years. And so this is basically
a file size sheet. Now, as usual, we're
going to start with our basic sketch for
the entire painting. So we have a small house. As you can see, I have just simply drawn into pet my pencil. So the reason behind drawing
a rough sketch initially is so that you get a nice
idea where to paint. So there's houses basically
going to be on a green bed, which is our landscape. And that is going to
be as morally behind. So the major important
element in this and try painting is going to be the night sky that we
are going to make. If you haven't taken the
practice session first, I would recommend to take that first so that you know how to blend all the
three colors together. No need to worry, I'll be
telling you that and this also, but it would be really
great if you practice first and then move towards
the final painting. As you can see, I have just
drawn these little scripts of land pieces where we are going to paint some nice green grass. And the horizon line that
you can see right now is going to be a little
portion of our lake. Make sure that your
sketches darker enough so that whenever
we apply watercolor, it shouldn't create away. So accordingly, you
can darken it up. Also make sure that
you do not apply that much pressure that your pencil overpowers
the watercolor. So since the vendor houses are generally made out of wood, we are making these little
vertical lines to show the wooden planks and a literal door on
the right portion. So yeah, this is the basic sketch it out and we will need. Now let me talk about
the watercolors. The first one as ultra marine. The second one is Prussian blue, light green, black,
and titanium white. These are all the watercolors
that you will need. Now simply take your
half inch flat brush and take clear water in it and apply it on
the background. Make sure that you do not
move inside the house. That one definitely is.
Call your painting. So now we are going to apply a thin coat of water in
the entire background. No need to apply the entire
water to the complete page. We are going to keep it
a little bit abstract. So just make sure that you
apply a thin coat of water. Now, take a look at Michael, a ballot on the right side, I'm digging some
darker values of black and you have to start applying
it on the horizon line, forced to use your flat brush to use its edges and angles too low in
the difficult areas. The house. Now once we
are done with the black, knew just hard to
clean up your brush. Now again, take a look
at the color palette. I'm taking some darker
values are Prussian blue. And we are blending
it with the black. So you have to just simply
apply it on the upper portion. Now similarly, you how to take some ultra marine and blended
with the Prussian blue. So the reason behind of blending these three colors is
the wet on wet wash, we applied a thin coat of water, if you remember initially. So due to that, the color
is blending together. So you can see how beautiful the color blend looks together. If you still have any
confusion or doubt about this, you can take the ductus session
and get it all cleared. Now let us move
towards our house. So what you're
going to do is bad, leave the white portion
of the roof and simply add a thin coat of
water on the vertical walls. So initially I have applied some darker black
values just below the roof so that we can give a nice shadow effect
to the vertical walls. Now once you have applied some color on top and
black on the walls, they are going to blend some
nice light green color. So just simply take your quill brush and
add some line cream. Try to blend it with
the black color that we have applied. So the reason behind selecting our Green is to
show the effect of whether during winter
times B are a lot of moisture and there are going to be algae called the walls. So now just simply take your
quill brush and dry it up, add some little
values of gray in it, and add these rough
texture on the roof. So this basically
represent these low. Now to enhance the dove, I'm just adding a thin line
of lag that migrated brush. And using the darker
dawns of black, you can bend the door. So since these are wooden planks on the
left side of the house, we are going to add these little lines which
are going to be vertical. So we just simply DQ DR. Quill brush and add
these little lines. I'm just taking some darker
values are black and I'm moving my brush and
less nautical direction. So as you can see, me got a
nice blank kind of texture. So we are having a little bit of leg just behind the house. So I have simply added
10 coat of water. Again, this is basically
our wet on wet wash. Now just simply the exam ultra
marine amniote quill brush and add these little color
tint on the horizon line. So one thing that
you have to keep in mind while using watercolors is that the code that
you can see right now will be one shade
lighter when they dry zone. So accordingly,
apply Ocala badges. So by the time you can see, our sky is almost dried up
and it looks beautiful. The blend is absolutely amazing. So now what we are
going to do is band. We are going to be
in the landscape. We have these little
green scripts of garden in front of the house. So we are going to take some darker values
of light green. And we are going to be mm. So this is going to be
basically wet on dry technique. So we haven't applied a thin
coat of long-term fast. Yeah, directly
applying watercolor on Nidre sheet of paper. So lonely Duan, just simply colored pencil portion that
we have scribbled initially. So that is the reason I told you that keep
your Benson and darker so that you are scheduled
to land gets lighten up. Once you have applied the
lime green on this trip, you have to apply some darker
values of light green also, so that it looks even
more in depth and detail. Now using the same light green, I'm just trying to make some lighter badge of new green so that we can represent
some landscape around. So now what you're going to
do is that the exam darker values of black in
your quill brush. And add these little
scripts showing some depth to the landscape
area on the right side. So this is basically the rough
texture on the ground area and nonideal mean that was perfect because there's
basically an abstract painting. Baby do not move
towards perfection. But it looks at
only elegant venue being these elements
in abstract form. So I'm just trying to enhance the garden area a little bit. I'm adding these
little black strokes just below the green area. So now let us made the color values a little bit
darker as I told you that, watercolors becomes one shade
lighter as it dries up. So take your brush and add
darker values of black. Bear robots and moon so that
you'll get it even more darker and don't comparatively
to the dried ones. You can give these
little rough textures also on the Cloud area. Now assembly dq, ERD
dealing brush of say 0, add some solid
light color in it. And being our smallest alkyl, just about the house
to represent the moon. And using the same
detailing brush you can enhance the
wooden planks also. Just add these little
graph vertical lines. One more thing I
would like to tell you all is that no need to be painting in the exact
same fashion I am painting. You can create your
own styles also. This is just to give
you a basic idea about the techniques and
coloring styles. So we are almost done
with the painting. And now let us take a rough brush that
everybody is having. So we do use this kind of
brush to splatter some color. So I had simply taken
some ultra marine and add some water to it
as you've been seeing my color palette on
the right side and splatter some color drops
around the bending. So now using my white pen, I'm going to draw two
by increased just behind the house through
these pine trees. I'm going to be just above the link on the left
portion called the house. So we just have to detail by men and add a simple vertical line. Once you draw the vertical line, tried to use Kimberly or right
Ben in the way I am doing. You just have to
show these leaves for the boundaries
are for laughs norm. So we are building into, right. So now you can see how beautiful
the composition looks. And I hope that you enjoyed this painting and gone to
learn something new from it. I'm very excited to see all of your projects in
the project gallery. Feel free to ask any doubts or questions you have
related to the painting. I would love to answer them
in the discussion section. So whenever you are painting, beautiful watercolor painting or any type of painting in art, it is good to have your
signature just below it. And there's basically an
identity of your artwork. You can also put
your label name just below your signature so
that you can promote it. Now without any delay, Let's move towards the final
and the last painting, which is in the winter forest.
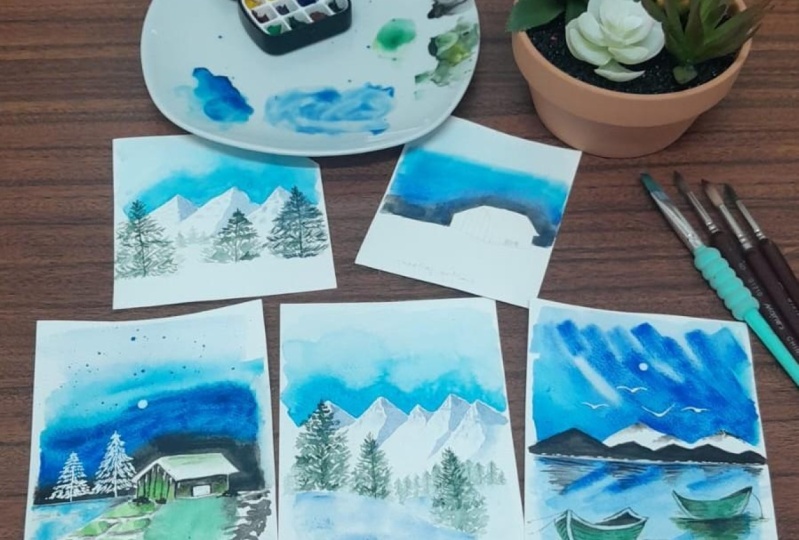
8. PAINTING 3 - LETS PRACTICE: Hey everybody, welcome to the final and the last painting. For this particular painting, we are going to have certain
elements to galactose first and then we'll move
towards the final painting. So for this particular painting, we are going to have
three major elements. The first one is the sky, then we have the mountain
and the pine tree. So all the three
elements are willing to be absolutely very easy to bend, but you got to
practice it first so that you can make it even
better in the final painting. So now let me make
a rough sketch for the mountains first. So just simply dq or Benson and tried to make
these little mountains to lizards mythically back to things who learned to mean the exact same moaned in Baghdad
and any planar painting. On the left side. There have just assemblies
commode Doolittle landings. And you can also add the darker values
in the mountains so that you can recognize where
to get the darker shades. Let me add one more
mountain so that you'll get a very clear idea about how
we are going to be in them. So we are done with
the entire sketch. Now let me just label it fast. So they are going to
be in the sky first. So I'm just adding a label her. Now simply DQ DR
half inch flat brush and add some little
ultramarine in it. And what you're wanting to do is that we are willing to
be in the sky first. So I'm taking my
half-inch flat brush and using this grass, you have to just apply
it on the background. As you can see, we
have just applied it on the outskirts
of the mountain. So this time we have used
wet on dry technique, if you remember in
the first painting and the second bending, we bent in the background with
our wet on wet technique, which is this guy basically now simply dry up your brush using paper napkin and apply it
on the vanishing area, which is on the top
portion of the sky so that you'll get an
eighth grade end value. So as you can see, these guys looking darker near to
the mountain dense. And as we moved towards the above portion and
gets lighter in tone. If you find the darker dawns on the on-demand team a
little bit lighter. You can apply a second coat. So you can see that
garden when the sky area. So this is how you have to be in the sky using a
wet-on-dry technique. And this is not at all
difficult as you can see. So now let me tell you how
you can mean these beautiful. It's normal events,
not at all difficult. You have to take
your quill brush and add a little bit of
light blue values. On the right side. Better we hadn't given some
benzene or depth volatile. So what I did is that I just took some ultra marine and add maximum amount of water in it so that I get a lighter
value of blue in it. And I'm just making up
bad on the right side. So applying a darker
badge on the right side basically means that
the sun is falling from the left portion and the
shadow effect is coming on the right portion solely on mountains looks even more
beautiful and realistic. So you can see how I'm making these little rough strokes to enhance the beauty
of the mountains. Now what you can do as bad
using the same quill brush, you can add a little bit of
badges on the left portion, ISO, so that you can replicate the mountains
even more beautifully. So apart from snow that
is also willing to be rocks and some rough
texture on the mountain. So by applying these
little rough strokes, we are trying to replicate that. So as you can see, this is
also known to dial difficult. So this is how we are going
to paint the mountains. So this is the second element
that we have practiced. So now you can see
what is the benefit of having an art journal
or a practice book. You can anytime
referred it to get the idea of how view
backtest it earlier. Now let us move towards the
last and the final element, which is the pine trees. So I am non Windows the bat, there's learned to be difficult
to paint these paintings. But you are when do we need a
lot of patients to do this? So now simply dig darker values of black
and your quill brush. Instead, our round brush. If you do not have
a quill brush, then you can use a detailing
rasters and matters. So what we are going to
do is that clause to have to decide the position where you are going to have
your buy-in tree. So we are not going to
paint it exact same. We add on the final
painting on the left side. We are just painting it on
the toner for practicing. So to decide the
position occupying tree. Thank you. Draw a vertical line variable volunteered
by entry to be and start adding these
little strokes from the dark portion and
come towards the bottom. But now what do you
have to make sure is that when you come
towards the bottom part, tried to make the bushes
of the pine trees even more broader
as you come towards the bottom portion and try to make as much as
in bushes possible, use that courtyard detailing
brush or a round brush or whatever you're using so that it looks even more
realistic and beautiful. So as you can see, that I'm almost done painting
the entire entry. I'm trying to make it even more broader on the bottom portion, since pine trees are basically
in the form of a triangle. So you can see that
I have applied maximum strokes in a single
binary, the lattice. Why I'm telling you
you got to have some patients so that you can come up with our
beautiful output. So this is a good example of
painting a big pine tree. Now let me draw it once
again so that you'll get even more clear idea
about the pine trees. So again, I have taken symbol vertical line
on the left side. So there's pine tree is going to be a little bit smaller in size. So the process and absolutely. Then you've got two more
towards the down portion from the above bad and very moving towards
Midtown portion, you got to broaden
up the bushes. I'm just using my
clone brush and drying to me in these
little strokes. And you can see
these, they can bind tree is almost ready. So now you can see
that we are done with all the three elements. The sky, the mountains,
and the BY entries. And in all the three elements, we haven't used
wet-on-dry technique. We haven't applied a
quarter court initially. So there's going to be in the category of a
wet-on-dry technique. So you have to crack down on
Earth asthma jazzy again. And now let us move towards the final painting which
is given to a virus.
9. PAINTING 3 - THE WINTER FOREST: Hey everybody, you are most
welcome to the last painting, which is painting
the winter forest. And I hope that you got to learn from the practice session all the elements
that you need to practice for this
particular painting. So now just simply take your pencil and start
with the mountains. This is going to be
our basic rough sketch so that you'll get an
idea of where to paint. I'm just making these
triangulated ships. And you can just follow if
you are painting with me, in case you find the video
a little bit faster, you can definitely slowing down. There's an option below. So I'm just trying to make a rough sketch for
the mountains post. Make sure that your
pencil line is visible so that whenever you apply
watercolors, it shouldn't vanish. Hurry. Though there is going
to be a little bit of landscape in front
of the mountains. So I'm adding these lines and we are done with
the entire sketch. So now let me draw
the vertical lines. Barely are going to
paint the pine trees. So this is just to the location. That's why we are dragging
these vertical lines so that you do not forget
where to put the binaries. So since we are done
with the sketch, I'm going to talk about the
colors that you will need. The first one is
ultimately in collusion, blue, light green, and
black and titanium bike. Maybe they might not mean using lime green LED. See how it goes. So always keep a paper
napkin side nine to lie above the extra
amount of watercolors. Now let's start
with the sky falls. So take your half
inch flat brush. Day exam. I'll try marine in your color palette and simply and be plaid brush
with ultra marine. So since we are going to
use a wet-on-dry technique, make sure that you have good amount of ultra
marine in your flat brush. Now, take our
half-inch flat brush and more towards the
outskirts of the mountain, make sure that you do not move inside the mountain network. Finally, our mountains. Now I'm just adding the
ultramarine and a lighter tone. Initially. You just have to
move the plaid brush in the direction I'm moving. Tried to blend it
with the background. So you can see we have got a nice lighter tone
of ultra marine. Take some darker
values of ultramarine and added on the edges of the mountains so that you get a nice gradient from dark
or dark to light tone. So you can already see the difference between the
darker part and the lighter, but it will look even more
attractive when it dries up. Now use your quill brush or your detailing
brush of size 0, brush as of size eight. So now just take a look at Michaela ballot
on the left side. We are going to take very
light adorns of ultramarine. So try to add maximum
amount of water in it so that you get a nice
lighter tone of blue. So you have to apply
the ultramarine on the right side of the mountains. You can already see the line of defense without rehab
drawn with the pencil. Now simply repeat
the process and add these values of blue
on the right portion. So the reason behind doing
this is that we are trying to represent the snow mountains
in a realistic manner. So on the left portion that
is sunlight falling on it. And on the right portion, we are trying to give
it a shadow effect. Time, just simply
repeating the process. And as you can see that
the mountains will look fairly beautiful and
nice when we color dries up. Causal. One more thing to
keep in mind while using watercolors is
that the dawn bad? Because visible currently
when the watercolors are red will be one shade
lighter when it dries up. So you can observe the
movement of my quill brush. You can do this with
your round brush also. Already dealing brush. To just have to mean
these little strokes on the lighter blue dawn to give
it a nice textured effect. Since mountains are not
only covered with snow, there are going to be rough
textures of grok also. To just have to repeat the same process and
all the mountains. Now only invite portion
of the mountains where we are going to have
maximum amount of low. There also you can add these little strokes
of ultramarine, but make sure that
they are not that much as we have been done
on the right side. We want to write to
be more visible. So the reason behind
doing this is to give a nice natural texture
to your snowy mountains. As you can see. No need to worry. A dial in gaze your friend is difficult. You can definitely go
do the practice session and repeat the process of
painting the mountains. I have done there in detail. How to do that? Now let us
begin the landscape area. I have simply applied
lighter tones of ultra marine on
the ground area. And now let us take some
darker values of black. So we are going to have
some boundaries on the backside which are going
to be in a lighter dorm. So I have taken
some lighter tones of black and my quill brush. And I'm representing
these little BY entries, but some vertical lines. Once you are done with
the vertical lines, you can add bushes to
those vertical lines. You just have to normally are quill brush in the
direction I'm moving. As you can see, the outgoing to be in the bushes this way. So since these trees
are on ready fire escape and these are behind the mean by increased that
we are going to bend. So the advent target analyte codon and also
smaller than skin. This is basically our
perspective view. So that's by the adult
day care of that. So you just have to simply
being Gaussian process and add these little
bushes on the pine trees. Let me add some trees on
the left portion also. So now we're done with
the entire smaller by painting which
are on the backside. Now let us move towards
the main by entry, which is the bigger one, and which is coming
in the front portion. As you can see in
my Gullah ballot, I have taken some darker
values of lab together. Now draw a vertical line first. The reason behind drawing a vertical line foresters to assuredly position or
if you're buying tree. Now using the quill
brush, round brush, whatever you are, CLI
domain these little bushes. And make sure as you move
towards the modern portion, you have do not end
up in the tree. So if you have observed a
boundary gave when he thereby increase our agenda me very
10 on the top portion. And as you move towards the down part, as
broader insights. So if you observe
this in detail, I'm trying to make the leaves as much as
realistic as possible. This is not difficult. You just need to
have some patients. You have to use the tip of
your detailing brush so that you can meet
these little leaves come out of your buy-in tree. Now you can also see bad as I'm moving
towards the bottom, but I am trying to mean the pine tree even
bigger and broader. And trust me, I love to be
in by increase both merely because these makes
your painting even more attractive
and beautiful. In case you are finding any difficulty in
painting the pine trees. I would definitely
like to suggest to take the practice session
for this particular bending. Better I adopt AND deal bed. You can learn how to be in
this beautiful pine trees. So now let us add
some darker values on the binaries or that then gets even more depth and shallow. So that is going to be another
binary and just decided, but it has a smaller scale. So again, what you have
to do is that simply dig your detailing
brush, colloquial brush. The pencil line is
already visible, which is smaller
than the first one. And repeating the same process, we are willing to add
these little bushes. So as you can see, I'm just
repeating the same process. And it's also really fun
painting these binaries. And one more thing that
I would like to suggest, feel bad, that is
absolutely fine. A few factors or
landscape of paper or a practicing Look
for us and then come towards your final
painting so that you can save your good-quality
watercolor paper. So now as you can see that
we are done with moda by increase which are on the upper portion on
the landscape area. So that is also willing to
be one more buy-in tree on the lower bought pitches, somehow equivalent
to the force by increase in size as well. So repeating the same process, the pencil line is visible. Initially. And would be really great
if you didn't get that. As you move towards
the bottom part, you have to broaden
up the boundary. Then only they will be more
natural and realistic. In case you are painting with me or you'll find the video
a little bit faster, you can definitely slowing down. There is option below
to slow the time-lapse. So using the same detailing
brush or the quill brush, you can add some grass
or neuron level also. And you can add some darker
values to your buy-in tree. So now let us add the landscape
area and simply applying a thin coat of water on
the ground area forest, which is the body of our
wet on wet technique. To once you are done with the thin coat of water
on the ground area, take some ultramarine in your trash and have some
darker values of it. Tried to apply on
the top portion first in a random
manner as you can see. So we are trying
to replicate snow, a lot of snow basically. So once we are done with this, we have to apply some texture to the ground level five
deconcentration blue in my brush. And we are willing to just
simply dab it does below the binaries so that you'll give a nice shadow effect
to your pine trees. And the same time you again and these rough texture
to the ground level. So as you can see that it isn't effective manner of doing this. You don't have to be perfect. Just simply randomly, you have
to remove the odd English. Dido, he was that
depth so that you get nice pen strokes and place it wherever you
want to have textbooks. And we are almost done
with the painting. So this is basically my favorite painting
among all the three. I hope that you got to
learn something new and creative from this
particular painting as well. Every on-hold Manchu
produce it as basically the identity
of your artwork. You can also put the name
of your label that urine. Feel free to add your projects
into the project gallery. I would love to see them. Also if you have any doubts or questions related
to the painting, you can ask me in the
discussion section. Make sure that
you're not missing the final thoughts
for the entire class. And I hope that
you enjoyed making these three mutable
vendor bindings.
10. FINAL THOUGHTS FOR THE CLASS: Hey everybody, welcome to the final thoughts
for the entire class. I hope that you enjoyed
the entire process of making all the three
beautiful winter paintings. And I would be really happy if you paint all the
three paintings. Feel free to add your project
into the project gallery. I would be really
excited to see them all. In case you have any doubts or questions related to the class, feel free to ask them in
the discussion section. Also, the most important point that you have to keep in mind is to maintain an art journal for your day-to-day practice. Don't worry, I'll be leaving the reference images for you all in the class
project section. In case you are on Instagram, do dag mean I go by their
name, should charge auditions. I would love to
repost your walk. You can take the screenshot on the following image and share it with your friends and family who aspired to be an artist. It would be really great if you leave a feedback for my class as it encourages me to come up with even more creative
classes like this. And my glass can reach many
more students like you. Thank you so much for
joining my class. Stay tuned for the next class. And Abby, bending rays.
 Rutvik Patel, Artist and Instructor