Transcripts
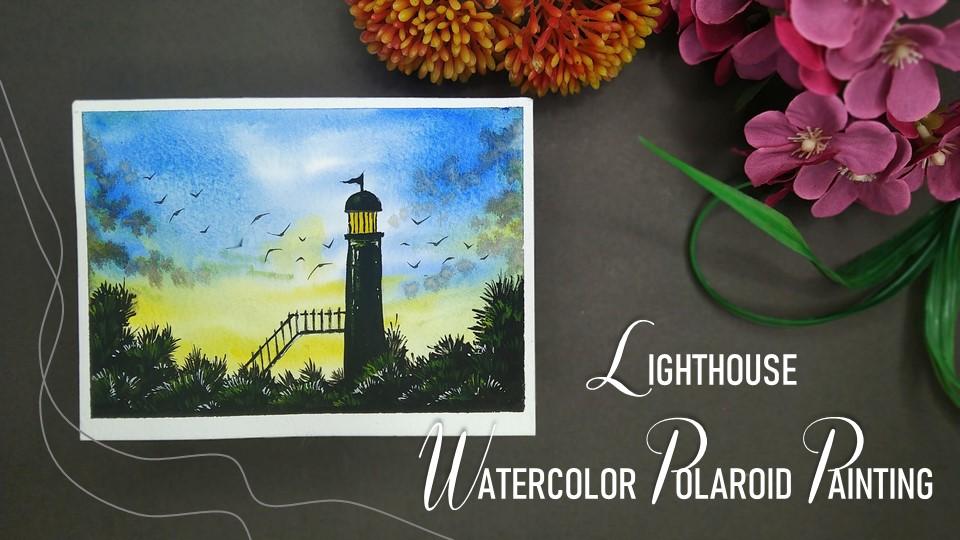
1. Introduction: Do you know that watercolor is an artistic medium that
anybody can try as a beginner. I started practicing on
exploring watercolors. I just completely
fallen in love with it. Generally, I used to work
with acrylics alone, but nowadays I'm trying to explore watercolors
as much as I can. If you want a beginner and
wondering where to start from, I would suggest that watercolor Polaroids would be
the best for you. Hey everybody myself, I'm a self-taught independent artist and a professional
interior designer. So people who might
not be knowing me and hadn't
joined me recently. You can find most
of my art board is being displayed on Instagram. I go by the name, should
throw out our patients. In this class, we
are going to paint a beautiful watercolor
lighthouse Polaroid. We are going to start with all the art supplies
that you will need. I'll be talking about
the watercolors that we are going to use, MDD. It is very important to use
the correct watercolor paper. I'll be giving you the
details about that as well. Be talking about the brushes
that we are going to use. Initially, you're going to
start with a basic sketch. That is going to
be a little bit of practice session before applying it to the final painting. No need to worry at all. We are going to paint each
and every element in detail. The class is best suited
for beginners and also intermediate and advanced
level artists can try it. Also, no need to worry at
all that loss is recorded in real time frame so
that you do not miss on any particular step. We are going to learn
different techniques like I don't wet wash, wet on dry wash. We
are going to add my new details so that your painting looks
even more beautiful. I will show you how
you can incorporate little buds into your painting. In case you are a beginner, I would suggest you
to take the glass in a particular sequence so that you do not miss on
any particular step. Without any delay, grab
your supplies and join me. And let's create this
beautiful watercolor Polaroid.
2. Art supplies: So before we start, it is very important to know the correct art supplies that you will need. Nothing
to worry at all. You will find all the
art supplies very easily in any nearby
local stationery. Let me give you a
basic brief about it. Let us start with
the watercolors. Watercolors that I'm using are basically an artist
grade watercolors. These are watercolors
from Rostow. In case you are a beginner, I would like to
suggest to you to start with student
grade watercolor. Those are actually cheaper
than the artist grade ones. In order to get both and
border and double-sided tape, your watercolor paper,
we are going to use this one inch masking tape. Don't worry, I'll be
teaching you that as well. We are going to cut on a
sheet into two equal halves, so you will need a
pair of scissors. Let us talk about the
watercolor papers. So it is very important to use the correct
watercolor paper. Watercolor papers
are from Canson, and these are 300 GSM, 140 LB. And these are basically
cold pressed sheets. Let me just take out
one and show you. The reason behind using watercolor paper is
that these paper are generally thick and it can
stand with heavy washes. That's why it is very
important to use a good quality of
watercolor paper. Now let us talk about
the basic Andy stuff. The first one is
definitely a pencil that I know that
everybody will be having. Now there are going to be two pens that we
are going to use. The first one is a white
pen from Sakura Gelly Roll. You can apply a nice light
thick stroke from this pen. Second one is a black pen. We are going to use
this black pen to add some manual details and
benefit from link ketonic. No need the wedding gaze. You do not have the same brand go for any other
good alternative. Now let us talk about the brushes which are
very important to paint. So these are all the
brushes that you will need. The first one is around rash, which is basically a
detailing brush of size two. Then the second one is
again a round brush, which is also a detailing
brush of size four. Then we have a flat brush
which is of size one inch. After that, I'm going to
give you two options. The first one, which you
can see is a quill brush, which is of size eight. In case you do not
have a quill brush, you can go for a round brush, which is of size 12. Basically both the brushes will work well for the
particular painting. These are all the
brushes that you will need to complete the
entire painting. Now let us talk about
the color palette. So this is basically a
color palette that I use when I am working with
many different colors. In case you do not
have that one, you can use a simple
ceramic palette as well. So sorry for the DoD palettes. After that you will need a
small cup and which you can take some clean water for
cleaning up your brushes. Then we have a small
spray bottle to lose an appeal watercolors
in case they are dry. And we have simpler
sharpener and an eraser in case you make any mistake while
working with your pencil. Then we have a steel edge, basically also known as a scale. On the scale we are
going to use it to cut the A5 size watercolor paper
into two equal halves. Then at last you will
need a tissue paper, which is very important while
working with watercolors. You can just simply
wipe off extra amount of water in your brushes
annual painting as well. These are all the
basic art supplies that you will need for
this particular painting. And I am telling you
that it does not non-compulsory to have the
same gun that I'm using. You can go for any other
good alternative as well. Now let us move
towards the next step.
3. Lets prepare the paper: Before starting, it is very important to prepare
your watercolor paper. So here I have my size. She'd watercolor paper. And we are going to cut this
paper into two equal halves. And we are going to
use one of them, since this is a mini
watercolor Polaroid painting. Let me give you the brief
amount, the watercolor paper. Once again, I have
already talked about it in the art supplies section, but let me repeat once again. These aren't from Canson
and these aren't 200 GSM. These are cold pressed sheets and you can apply
heavy washes on it. I'm only to worry in case you
do not have the same brand, you can get any other
good alternative also. Now let us simply just take half of the longitudinal side. I have my steel edge
and I'm going to place it approximately on the
center of the page. You can see we have
0 on the left side. And the another measurement is, I guess 21 centimeters. The half of that would be 10.5. Just simply take your pencil and point a mark on
10.5 centimeters. As you can see, we have a
small point on the center. Now simply place your steel
edge and vertical position. Try to maintain the alignment. Align it with the paper edge, and simply draw a line
on the center part. Simply use a pair of scissors. You can use a catheter also, but I would suggest you to use us as a that would
be a better option. Now if you're not that
much good at cutting, then you can use a Qatar
and Ostia ledge assembly. I'm just using my scissors to cut it into two equal halves. Be very much careful
while doing it. Do not hurt yourself.
And we are done. So as you can see, I
have got to equal bonds. Now we're going to use
one of them to paint. We are ready with the
watercolor paper. Now let's tape it down and
move towards our next part.
4. Lets tape down the paper: In order to get both
excited borders, it is very important to tape
down your watercolor paper. As you can see, I have placed my watercolor paper on the desk and now I'm using my one-inch masking tape
to tape the models. Before using watercolors,
we are going to apply the masking tape on the sides of the paper so
that when we remove it, we get a nice model. Only to worry, just simply place your watercolor paper wherever
you find it comfortable. And you can see we
have four sides to place the masking tape on. Now take one off the masking tape and place
it on the bottom portion. Make sure How much as you want and try to align it
with the paper edge. Now simply tap your finger on it and be careful valuing it. Makes sure that your tape
isn't on an inclined angle. Now, use another piece of masking tape and place
it on the above portion. Now generally what we use to do is that in watercolor polarized, we tried to have more space on the bottom portion that you can put your on-brand,
our signature below. Now again, I'm using the
other piece of masking tape, putting it on the right side. I'm just trying to align
it with the paper edge so that I can get
a parallel border. Make sure that you are masking
tape is properly stuck to the paper or else you won't
get nice and perfect right? Now I'm placing the last one. Just simply place it on the
left side and we're done. This is how you
have to tape down your watercolor paper generally when you are going
to paint a Polaroid. And I hope that you'll
find it helpful. Now let's move towards
the next part, which is basic sketching.
5. Lets draw the basic sketch: Hey everybody. So I hope that you already
with your watercolor paper. Now let us start
with a basic sketch. So as you all know that
before starting any painting, it is very important to
draw a basic sketch. For this particular painting. We are also willing to
make a basic sketch. So let us start with
the lighthouse post. The lighthouse is not basically on the
center of the page. It is going to be a little
bit on the right side. So let us start with our small semicircle
on the top portion. Always make sure that whenever you are
drawing goes sketch. Dry it in a very lighter
tone because we do not want it to overpower
over your watercolors. I hope that it is also visible. So let us draw the light also
just below the semicircle. Try to have a
little square area. Then we have our
rectangular kind of structure just below
these squared portion. Then we are going to make two lines which
are not parallel. You have to make it
diverging manner. As you can see that this
is not at all difficult. We are drawing these little vertical members
in the light area. In case you are not
that much confident drawing on the final
watercolor paper directly. You can always use our
rough scrape off paper. You can talk to us
on that first and then you can come towards
your final painting. Now let us draw these decades. That is going to be a little stack is coming
out of the lighthouse. You can just simply draw these decades in the
manner I am drawing. There are going to be
these little value stores. Just have to simply draw
these vertical lines. These lobe as well. We had done with the
lighthouse completely. That is all that you will need. Now let us draw the
landscape area, which is going to be the grasses that are
coming on the front area. As you want. It might
be knowing that plants generally have a
very random form. They do not have a specific
symmetrical shape. You can also draw the planters and this randomly as I'm trying. No need to worry
in case you do not dry it in the same
manner as I'm drawing, you can dry it and you
don't want V as well. Just make sure that the landscape EDA is
on the bottom part. That's it. I'm almost done. I had taken it in a format, so I have taken the shrubs
a little bit more on the edges and these jobs are
less on the bottom area. And we are almost done
with the basic sketch. I hope that you have
understood every step clearly. And this is how you have
to draw your basic sketch. And it is now ready to
go from the watercolors. Now let us move
towards the next step, which is painting these guy.
6. Lets paint the sky: I hope that you are ready
with your basic sketch. Now let us start with
painting the sky. The watercolor is that
you will need for the entire painting
is ultramarine. Then the second one
is cobalt blue. Then you will need
cadmium, yellow and black. These are all the four
watercolors that you will need to complete
this entire painting. As you can see that the
entire basic sketch is ready and you have a
beautiful white background. We're going to use this particular background
and painting the sky. Before moving towards
the final painting, let us understand how you
have to paint the background. Here I have my rough sheet of paper and I'm going to show you how you have
to paint the sky. Just take your one
inch flat brush and apply a thin coat
of water forced. Make sure that you do not
have access amount of water, you just have to
apply an even coat. So you can already see
the light reflection. Let me show you clearly. So we have a nice ten called off water applied on the
rough scrape off paper. Now I can just simply
see on the right side I have my colors ready
in my ceramic palette. I'm using my size
eight quill brush. And we are going to mix the ultramarine with
cobalt blue together. And you just have to make a
nice watercolor consistency. What you have to make
sure that it should not be that much darker also, just it to make it a
little bit watery. I'm adding some water and
you can see I've made a nice color
combination together. Now just simply use your acrylic brush and
apply these strokes. So that isn't a
particular format of applying this stroke. You just have to apply
this random strokes coming towards the
center portion. As you can see, the darker
patches are on the edges. So that technique that
we have used right now is a wet on wet
technique in which we have applied and then cooled off water first and now we are applying the color patch
that when it dries up, there is a nice blending of
all the colors together. So as you can see, we have
applied the blue color. Now let us move towards
the cadmium yellow. Again, I have just simply
cleaned up my brush and dig and some darker
values of cadmium yellow. Since it is a lighter
color than blue. And just try to blend
it with the upper area. I'm just applying the strokes. Wavy applied on the blue. Simply you have to move your quill brush and
the direction I'm moving tied to come
towards the inner portion. And you can also combine
both the colors together. One thing that you
have to keep in mind is that whenever you
are using watercolors, the color patch that
you are seeing right now will be one shade
lighter when it dries up. You have to apply your
color codes accordingly. So this is basically the
background blending. And this is how you have to use the techniques and apply
it on the final painting. You can always practice
on a rough scrape off paper first and then come
towards your final painting. Now let us paint the sky
in our final painting. So again, I'm using my
flat brush of one inch. I'll be taking some
water from the top and we are going to apply a thin coat of water in
the background area. It can already see that
this has to be ten code. No need to form water pools and have access amount of
water in your people. Just simply apply a thin coat. Let me repeat once
again for all of you, this is a wet-on-wet
technique in which we are applying a 10-point
off water initially. And then we'll be
applying wet coat off colors that you get
an amazing blend. Now you can see on
our practice people, both the colors have been
dried up and it looks amazing. We're going to start on the
final painting has been. So again, I'm using my brush
onside eight AND gates, you do not have a quill brush. You can use a round
brush of size 12. That would work perfectly. Again, we are starting with the ultramarine and cobalt blue. I have taken some darker values
of the color in my brush. And I'm starting
to apply it from the edges and coming
towards the inner portion. So what you can do
is that you can leave some white spaces in between so that you can
have a nice cloudy effect. Just have to simply
repeat the process. Now we will just simply clean our brush and we are going
to apply the cadmium yellow. I have taken some cadmium yellow in the ceramic palette,
as you can see. And I'm going to apply
it on the lower portion. And you can also in turn mix it with the blue area a little bit. You can just simply observe the movement of my grid brush. Now the major advantage of using a quill brush
is that you can apply the cutoff watercolor
in a bigger area at the same time you can use to apply on a
smaller area as well. But it is absolutely fine in case you do not
have a quill brush, you can definitely use a
round brush of size 12. That can also work perfectly for this
particular painting. As you can see, the
background is almost done. I'm just applying a little
bit of darker values on the edges so that when
we remove these ID, it looks even more attractive. As you can see, we are
done with the hello. Now let us take a little bit of darker values of black
and my color palette. As you can see, I'm
just trying to add a little bit of cloud
effect on both the sides. You just have to simply tap your brush and it will spread automatically
since W bar is already wet. That's why it doesn't want
as a wet-on-wet technique, it gives you a nice
spread of colors. Similarly, we'll be doing this
on the right area as well. Again, you have to simply tap your brush and add well
spread automatically. Don't worry, it might look a
little bit dirty right now, but when it dries up,
it will look very nice. We are almost done
painting the sky. Now let us move
towards the next part, which is painting the landscape. I hope that you understood
each and every step clearly in case you have any
doubts, feel free to ask. In the discussion section. Now let us move
towards the next step.
7. Lets paint the landscape: Hey everybody. So I assume that you already with this guy. Now let us paint
the landscape area. Initially when we were
drawing the landscape area, we just have drawn the plant, those on the front portion. Here. I have my dealing
brush of size two. And this is basically
a round brush. What I have done is
that you can just simply observe in
my color palette, I have taken some black and we're going to
take the solid values, which are darker in tone. You just have to use
your detailing brush and you have to make
these little strokes initially. No need
to worry at all. This is a very easy
and simple technique. So you just have to
simply use the tip of your round brush and try to
make these little grass area. On the bottom version,
you just have to simply fill up
solid black color. Let me show you this in our practice on paper where we have painted demand around. Just simply take your
detailing brush, add some darker values
of black in it. And you have to make
these little strokes on the outer portion. This is the reason behind
using the detailing brush, pen tip of your brush. It'll help you to make these little grass area on the outdoor portion,
as you can see. Once you are done painting the outer portion using
the strokes of your brush, you have to simply fill
up but solid black color. And your landscape area
wouldn't be ready. I hope that you
understood it clearly. Now let us move towards
the final painting. I'm just simply
continuing with the step. So again, take your
detailing brush, add some darker values
of black in it. You have to assembly men
these little strokes. Just have to simply
repeat the same steps and make sure that you
do not do it in a hurry. I have just simply fast
and I'm the video, since the method is saying
you can't do it in a calm and slow manner so that you come up with an amazing output. Also, as I suggest always, that in case you're not
that much confident and asked to paint it on
the final painting. Want you can do is just singly take off, scrape off paper. Practicing notebook in which you practice on a regular basis and bend it on that forced practice first and then come towards
the final painting. As you can see, I have almost completed the strokes on
the right area as well. And I will just simply
follow up the steps and finish it by applying solid badge off black
on the bottom area. Make sure that you do not have access amount of
water in your brush that will make your black color a little bit lighter in tone, tied to have more amount
of color and less water. As you can see, we are almost done painting the
landscape area. I'm just completing it. We are done. Now let us
move towards the next step, which is painting
the lighthouse.
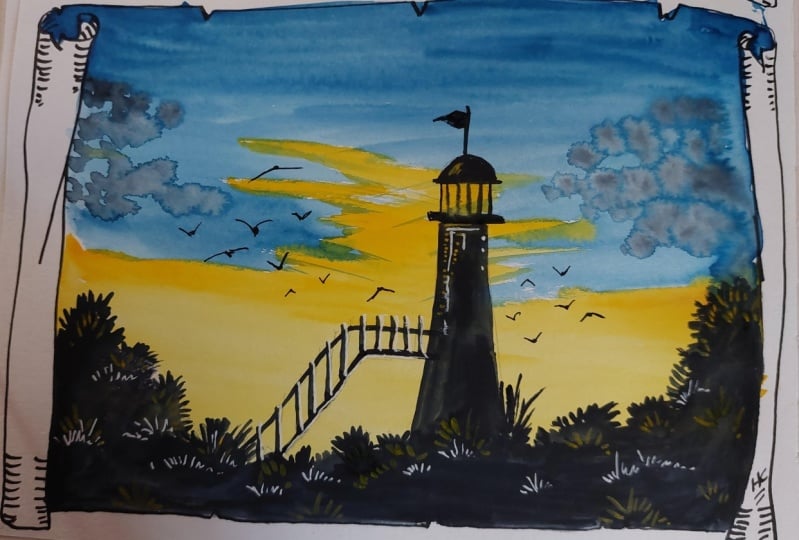
8. Lets paint the lighthouse: Hey everybody. So I hope
that you have been paid your landscape and you are
ready to paint the lighthouse. As you can see that the
painting is almost ready. Now we are going to add a
few elements that are left. So what you are going
to do is that just simply take some cadmium
yellow in your color palette. Dig these solid values, make sure that you do not have access amount of water in it. Daycare detailing
brush of size two, and simply paint the square area which we have drawn initially, which is basically the
light and the light house. If you have ever observed
a lighthouse carefully, the light basically is
rotating continuously, showing the directions
to the shifts. In order to make it a
little bit vibrant, we have painted it yellow. Now again, I have simply taken my day dealing brush of size four and we have solid
black values in it. Let me do not have excess
amount of water in it. You just how big symbol,
solid black color. And we are painting the
topmost portion which is flag. Then we have this
semicircular area. Again, just simply
use the tip of your detailing brush
to outline the shape. And then you can simply
fill the color in. Whenever you are painting these little elements which are very much smaller in area, make sure that you do not leave
any space while painting. And be very much careful so that you do not
spoil your painting. Order to keep the light vibrant we have
painted at the yellow. Now let us being the vertical members that are
coming in the light area. Again, I'm taking
some darker values of black and my Healing Brush. And you just have to simply mean these little
vertical lines. I'm using the tip of my
brush so that I can get a very thin and
beautiful vertical line. And we're done. Now let us paint the bottom area
of the lighthouse as well. No need to worry at all. That is going to be
our solid black color. The darker values of
black and your brush. And you can just simply apply these solid black strokes
inside the lighthouse. You can observe the movement
of my day dealing brush. That you can apply the darker
patch and correct manner. Make sure that you
do not go out of the line that we have
drawn with the pencil. You can always finish it up with the tip of your
detailing brush. Now let us add a little bit off landscape near the
lighthouse as well. Let me just make the line a
little bit Mobile effect. And I will be adding
a little bit of a smaller strokes and
the right portion. Fats. You can see that
the landscape area and gets nice and blend
with the lighthouse. Now we have these
little stickies which are connected
to the lighthouse. You just have to use
your detailing brush. Again, I'm using
the tip so that I can give a nice
clear trend line. I'm bending the railing forced. And then we have these supporting members
on the bottom side. Be very much careful while
bending the detailing elements because this could definitely small your painting if
you are in a hurry. We have almost painted
the bottom part. Also. You can add a double line to make it
a little bit thicker. Now we have these
vertical value stores and you just have to, again use the tip off your detailing brush and
make these vertical members. Now you have to just simply
repeat the same method. I'm taking some solid black
values again in my brush in case you find that your color
is finished in the brush, you can definitely take some
more color and finish it up. We are done painting
the entire light house. Now let us move
towards the next step, which is enhancing the details.
9. Lets enhance the elements: Hey everybody. So I
hope that you have enjoyed building the lighthouse. Now, let us enhance
the elements so that our painting becomes a
little bit more attractive. So as you can see in
my color palette, I'm just taking some darker
values of cadmium yellow. And what you can see is
that the lighthouse is going to spread the light
on the landscape area. What do you have to do
is just simply take your detailing
brush off size two. And you have to just make these little strokes just
below the landscape area. In order to enhance
the plantation, we are just adding these
cadmium yellow so that the landscape Ariane becomes
a little bit more vibrant. Only to worry at all. This is a very easy step and the way you have painted
the landscape area, the method is same. You'll just have to make
these little strokes. But non-minimum manner. I have just zoomed a little
bit in the practising paper. So as you can see, I have taken my cadmium yellow and
you have to just simply take some solid values of
cadmium yellow and make these little strokes just below
the landscape are blends. No need to hurry.
You just have to do it in a slow and steady way. By adding these little details, your landscape area will
enhance a little bit more. The painting would look
even more attractive. The metal is same and you have to repeat
that same process. I have assembly faster and I'm the video so that we can
see a little bit of time. You can just simply
observe the movement of my brush and the angle
in which we are moving. We're just simply going to
repeat the same method. And I'm taking the
darker values of cadmium yellow again and
again from my color palette because it will get
used up since there is less amount of water
and solid batch of color. In case you are a beginner, I would like to suggest
to you that you can just paint this entire binding on a rough scrape
of paper first. And then you can come towards the final painting once
you're confident enough. Let's would also scale
your practicing ability and make your drawing and painting skills
even more perfect. Binding on a regular
basis is quite difficult during these days as v all
have a very busy schedule. But painting is really
beautiful to me forever. Whenever you get a
little bit of free time, I would suggest that
watercolor Polaroids would be the best art form for you to paint in practice
on a regular basis. Since this is an art form
that won't take you much time to paint and it will
also enjoyed while doing. As you can see, we have almost completed and answering
the entire landscape area. We are just completing it on
the right side a little bit. We are done enhancing
the NDI landscape area. Now let us enhance a
little bit near the taus. So you can see that the bottom portion
near the light will be a little bit enhanced
because the light will have some certain
amount of reflection. So I have simply taken some darker values
of cadmium yellow. And I'm just simply rubbing
my day dealing brush near the vertical member of
the entire lighthouse. Only do What do you
just have to do it in a little bit portion only that it looks a little
bit more attractive. And it's done.
10. Lets add some details: Hey everybody. So we are almost done with the
entire painting. Now it's time to add
some little details. Here I have my white pen
from Sakura Gelly Roll. And as you can see
that we have enhanced the entire landscape area
with cadmium yellow. Now it is time to enhance
it a little bit more. So what we are going to
do is that we are going to use our white pen and add these little strokes on the grass area so that it looks even more beautiful
and attractive. As you can see, you
can just simply observe the movement
of my white pen. I'm just moving it
in a random manner. Sue just have to simply
repeat the entire method and you can enhance it
as much as you want to. We are almost done. And now you can just simply take a look at the
entire landscape area. It looks even more
attractive now. We can also add a little bit of white area near
the light portion. So I'm just adding these little
vertical strokes and the vertical member
of the lighthouse. We can add these little
vertical strokes and the values does
in these decades. Just have to simply add
these little strokes. We are going to use a black pen to draw the buds and the sky. And trust me, these
are little buds which are willing to look really beautiful annual painting. So the painting method of the boards is going to
be a little bit random. You have to start
with little buds from the left portion coming
towards the right area. Let me show you this and are
practicing paper in detail. So you have to make a little dot forced
with your black pen. And then you have to
make two strokes on the other side and then two
strokes on the bottom side, which replicates the wings
size you can take accordingly. So this is how you have to simply draw the bonds,
as you can see. For the smaller ones, you
have to make little strokes and for the bigger one you
can make longer strokes. I hope that you found it easy. Now let us come towards
the final painting. I have already drawn
the smaller buds. Now let us draw a
little bit bigger buds. So this can be a combination
of buds outlining together. So we'll be coming from the left portion and we are moving towards
the right area. I'm adding these little buds
near the lighthouse as well. And I'm increasing
the size also. It does not at all
necessary or compulsory to draw the buds in the
same manner I'm drawing. You can use your own creativity. You can draw the meds
according to your preferences. Let us add a little
bit of modes on the right area, as well. As you can see, all the buds together looks really beautiful. And our entire painting is done. Now let us move
towards the next step, which is removing the site
dates and the final thoughts.
11. Removing the side tape and final thoughts: I hope that you are ready
with your final painting. And now comes the last step which is removing the site tape. So it is very important that
you remove those I did in a very careful manner because you might
end up tearing it. What we are going to do is that start with the
bottom part and try to remove your side tip and an angle the way I'm
removing right now. You can already
seeing how beautiful the edge looks when you
remove the tape carefully. Now let us remove the
right side tip as well. Again, I'm just simply
removing the day and make sure that you remove
it in a very slow manner. You can already see how
beautiful the edge looks. Now let us remove the tape and we are done. Now comes the last day, which is the deep on
the above portion. There's try to remove
it in a careful manner. Just simply taking it off to have a nice grip and make sure that you
remove it and an angle. At times what happens
is that value removing the day you might take off
a little bit of color. But that's okay. You can just
assembly balance it out. As you can see, we have taken
off the entire site tip and there is a
little bit of color off from the top
portion, but it's fine. You can simply balance
it out by putting some color on the top portion. And you can see the entire
lighthouse painting is ready. I hope that you enjoyed painting this beautiful Mini Polaroid
painting of a lighthouse. And I'm really
excited to see all of your projects into the
project gallery AND gates. You have any questions or doubts related to the painting
or any painting method, free to ask it in the
discussion section. I would be very happy
to answer them all. If you are an artist and you
do not find enough time in your busy schedule to
paint on a regular basis. Watercolor Polaroids will be the best art form for
you to start off with. Try to explore the medium, and eventually you will
get great results. Literally grid if you leave
a review for my glass as Ben courageous mean
to come up with even more creative
classes like this. And my glass can reach many
more students like you guys, you are on Instagram do that me. I would love to repost your work and share
it with my audience. I go by the name ****
Raj annotations. Happy painting. And thank you so much for joining my class. Stay connected for many more
creative classes like this.
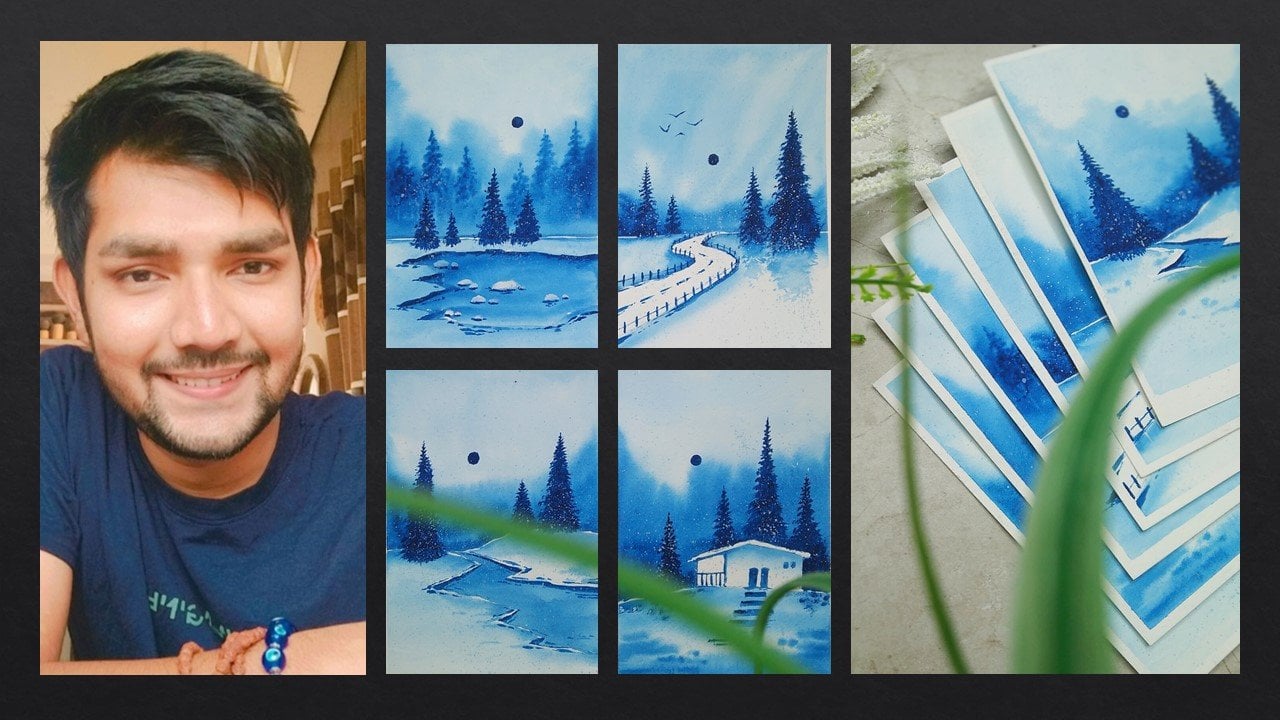
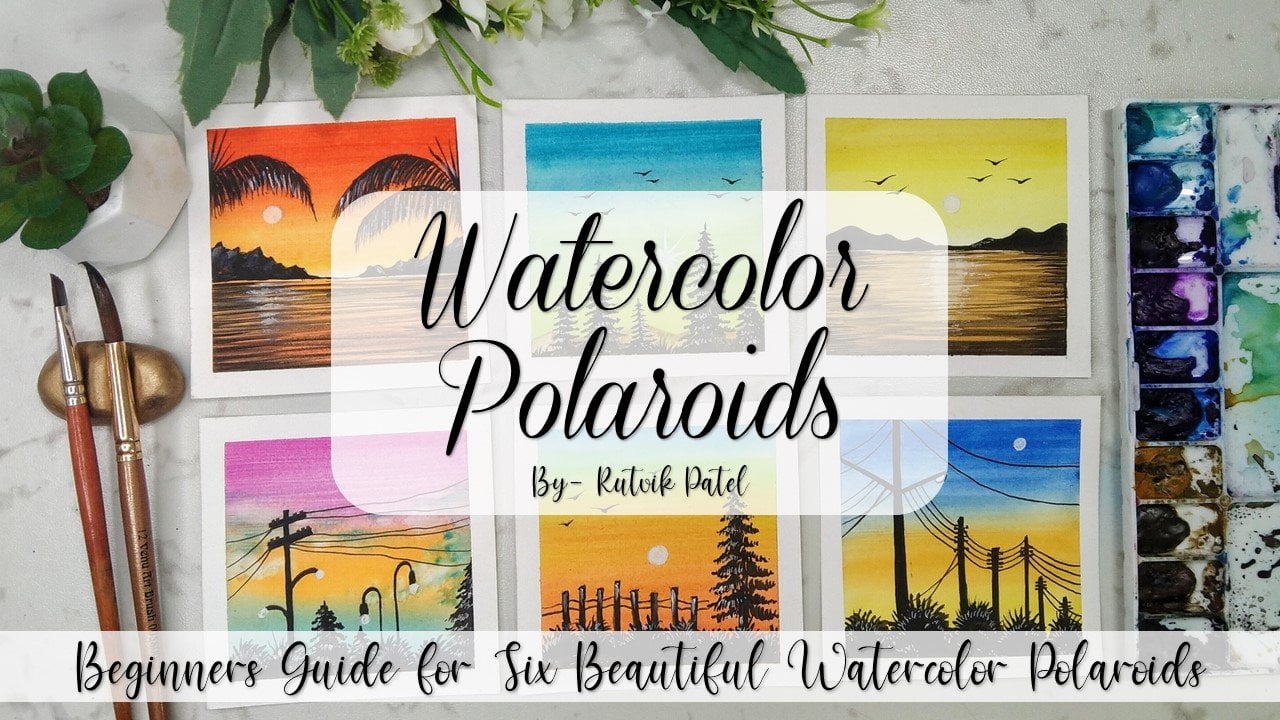
 Rutvik Patel, Artist and Instructor