Transcripts
1. HELLO & WELCOME: Not binding on moon is so fascinating and easy
that anyone can bend it. And I think that creating
many Polaroids wouldn't be the best way for a beginner
to explore watercolors. I'm very sure that if you
might have already started R, If you are going to
start watercolors, you are already in
Logan, this medium. The most amazing
part is not that becomes with an
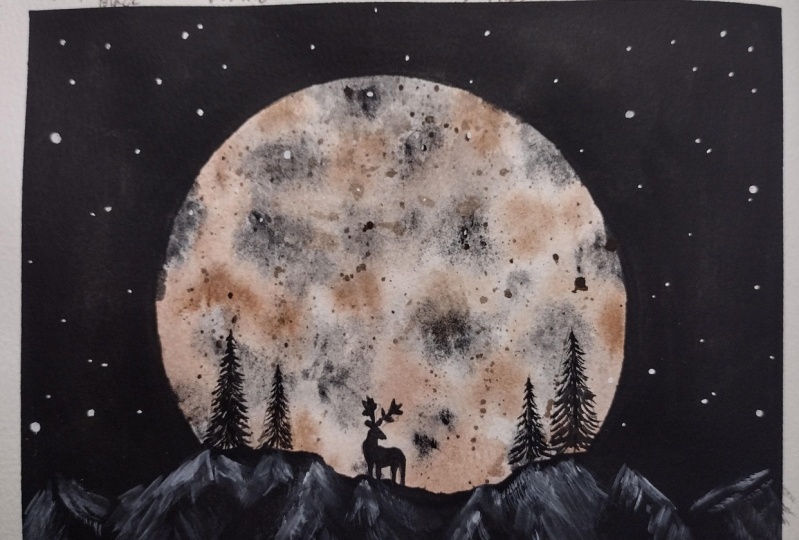
unexpected output. Not even might surprise you. In this class, we
are going to paint a beautiful magical moon
watercolor Polaroid. Having some little
elegant elements that won't add values to our painting with easy
and different types of techniques that
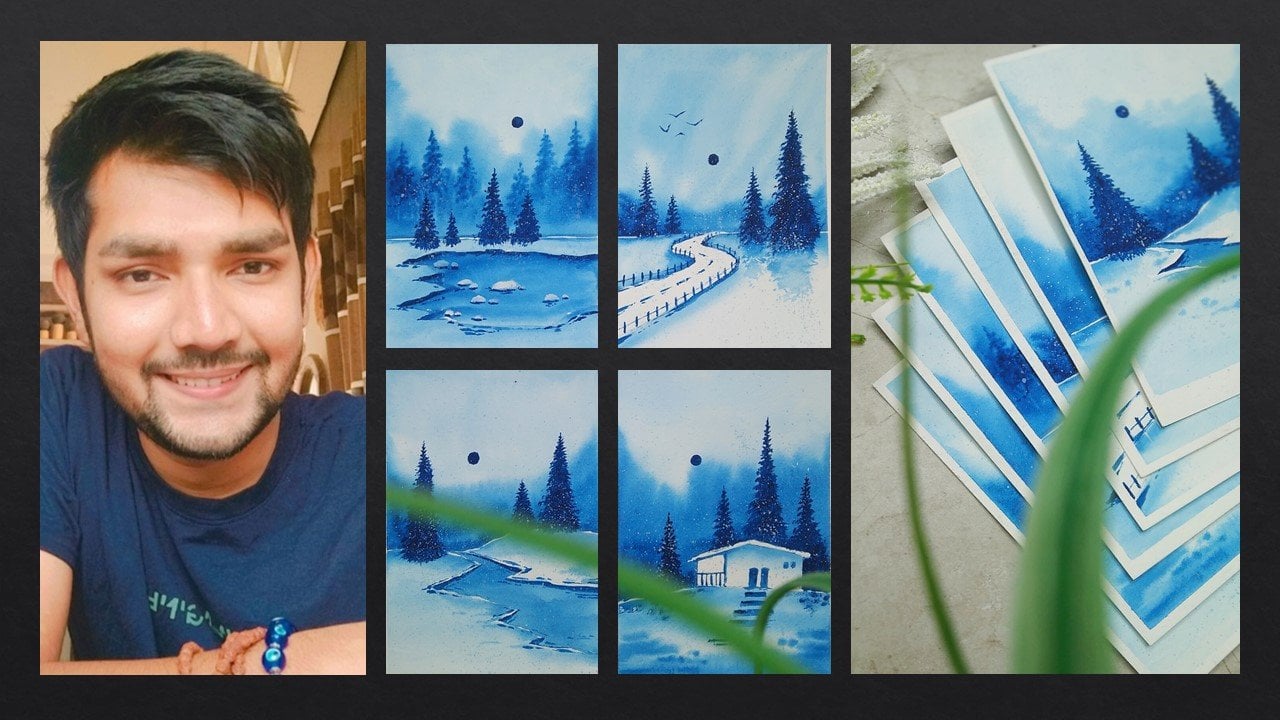
we are going to use. Hey everybody, welcome back
to my new class myself. I'm a self-taught
independent artist and an interior designer. So people who might not be
knowing me and hands-on me recently can find most of my artwork is being
displayed on Instagram. I go by the name
shut Raj auditions. So I'll be talking about
the watercolor paper that you are going to use in
this particular painting. We are going to make
an A5 size sheet into two equal halves. I'm going to use one of them. I'll be teaching you
how to tame down your paper using a masking tape. We are going to talk about all the art supplies that
you will need to be in this particular painting
and only to worry you can use any other good
alternate him also. I will give you all
the details about the brushes that we
are going to use. So we'll be starting
with a basic sketch. Then we are going to talk about all the watercolors bad
you're going to need. And this particular painting, there are going to be
different methods and techniques like wet
on wet, wet on dry. And we are going to implement that in this
particular painting. And I'll make that very easy
for you all to understand. We are going to work on my
new details and then we are going to implement that my new
details into our painting. I'll be teaching you how to
paint beautiful pine trees. No need to worry at all. This is going to be
a single painting on which we are willing to work. And I'll make sure
that everybody comes up with an amazing output. At the end, I'll show you how
to remove your site tapes carefully so that you do not end up tearing
up your painting. I'm really happy to share
this painting with all of you and would be really excited
to see all of your projects. And case you are on Instagram. Do Dabney, I go by the name
should Rajan patients, I would love to repost, do a walk with my audience. I believe that anybody
campaigned and don't worry, you are low for odd, well, never die if you stay
connected with me, would be really
great if you leave a review for this
class if you like it. So yeah, without
any delay and grab your supplies and join me
and let's paint together.
2. ART SUPPLIES: So before we start, it is very important
for all of you to know the correct art supplies that you will need while painting. So here I have all my art supplies that I'm
going to use while painting, and no need to worry at all. If you do not have the theme
art supplies that I'm using, you can go for any
other good alternator. That is absolutely fine. So let us talk about
the watercolors first. So the watercolors that I'm
using are from Bristol. And these are artist
grade watercolors. In case you do not have an artisan grade watercolors
and is absolutely fine. You can go for us students range version if
you are a beginner. So I'll be giving you the
details about the colors that we are willing to use
when we start painting. Now let us talk about
the masking team that we are going to use. So this is basically of
an inch masking tape. So using this masking tape, we're going to get a nice
Lauder for our painting. Now this is basically as simple plastic palette
for using watercolors. So we do not need a
bigger ballot because we are going to use minimum
colors in this painting. So you can use any
other ceramic palette also are ways it is
very important to keep, obey bar napkin side by
when you're working with watercolors to wipe off
excess amount of water. Now comes the most
important part, which is the watercolor paper
that we are willing to use. Now the watercolor paper that
I'm using is from Canson. And these are artist
grade watercolor papers. So the thing that you have
to take in mind is that GSM. So these are basically
300 GSM and 140 LB, and these are A5 size sheets. So the GSM basically
means that thickness of people so that you can
apply heavy washes on it. Let me show you that paper also. So as you can see, this is a nice thick paper
and me are going to cut it into two equal halves and willing to use one of them, sends it some mini
watercolor Polaroid. Now let us talk about
the handling stuff. I'll be giving you the
details among the brushes. The first brush
as a round brush, which is basically a
detailing brush size eight. My brand is keep smiling. No need to worry
if you do not have the same brand goal for any
other good alternative. Now the second rash as acquittal
branch outsize, dwell. In case you do not
have a quill brush, you can use a round
brush outside squared, and that would be
also a better option. And the last one
as a planned dash Lapland brush as of size 12. So yeah, these are
all the four brushes that you will need for
the entire painting. Now no need to introduce
this as a symbol benzyl that you will need to draw amazing sketch before painting. Some basic art supplies
like sharpener and Elisa. Then you will need a cup of mortal clear waters so
that you can clean up your brush and use it to
loosen up your watercolors. So we'll just keep it
inside my vile painting. Now, this is a tool which
is known as a rounder. Some people also
call it as a campus. So this is basically
used to draw a circle. So it has a nice needle and you can place pencil
on the other side. So using this tool we are
going to draw our moon. You will need a pair
of scissors to cut be a fi size for the color
paper into two equal halves. At last we will need
a ruler or a scale. So this is basically as to ledge on which BY
hand dimensions in centimeters so that we can
accurately cutting up paper. So these are all the
basic art supplies that you will need
while painting. No need to worry
if you do not have the same Dan goal for any
other good alternative. Now let's move towards
the next part.
3. LETS PREPARE THE PAPER: Hi everybody. So before starting any
particular painting, it is very important to
prepare your watercolor paper. So here I have my A5 size
sheet of watercolor paper. And we're going to cut this
paper into two equal halves. And we are going to
use one of them, since this is a mini
watercolor Polaroid painting. So let me give you the brief
about the watercolor paper. Once again, I have
already talked about it in the art supplies section, but let me repeat once again. So these are from Canson
and these are 300 GSM. These are cold pressed sheets and you can apply
heavy wash has on it. So no need to worry in case you do not have
the same brand, you can get any other
good alternative also. So now let us simply just take half of the longitudinal side. So I have my steel edge
and I'm going to place it approximately on the
center of the page. So you can see we have
0 on the left side. And the, another measurement is, I guess 21 centimeters. So the half of that
would be 10.5. So just simply take
your pencil and bind a mark on 10.5 centimeters. So as you can see, we have a
small point on the center. Now thankfully, place
your steel edge and vertical position. Try to maintain the alignment. Align it with the Bay Bridge, and simply draw a line
on the center part. Now, simply use a
pair of scissors. You can use a cutter also, but I would suggest to do users is and that would
be a better option. Now if you're not
that good at cutting, then you can use a Qatar
and US Steel edge. Now thankfully, I'm just using my scissors to cut it
into two equal halves. Be very much careful
via doing it. Do not hurt yourself.
And we're done. So as you can see, I
have got to equal bonds. Now we are going to use
one of them to paint. So we are ready with the watercolor paper
now let's tape it down and move towards
our next part.
4. LETS TAPE DOWN THE PAPER: Hey everybody. So
I hope that you have prepared your
watercolor paper. Well, now it is time
to tape it down. So as you can see, I have
placed my watercolor paper on the desk and now I'm using my one-inch masking tape
to tape the models. So before using watercolors, we are going to apply
the masking tape on the sides on the
paper so that when we remove it we
get a nice border. So no need to worry,
just simply place your watercolor paper wherever
you find it comfortable. And you can see we
have four sides to place the masking tape on. Now take one off the masking tape bond and place
it on the bottom portion. Make sure how much edge you want and try to align it
with the paper edge. Now simply tap your finger on it and be careful
while doing it. Make sure that your tape
isn't on an inclined angle. Now, use another piece of masking tape and place
it on the upper portion. Now generally what we use to do is that in watercolor Polaroids, we tried to have more space on the bottom portion so that you can put your on-brand
our signature below. Now again, I'm using
the other piece of masking tape and putting
it on the right side. I'm just trying to align
it with the bipolar edge so that I can get up
by a little border. Make sure that your masking
tape is properly stuck to the paper or else you won't get nice and bold effect, right? Model. And now I'm glazing
the last one. Just simply place it on the
left side and we are done. So this is how you
have to tape down your watercolor paper generally when you are willing
to paint a Polaroid. And I hope that you
find it helpful. Now let's move towards
the next band, which is basic sketching.
5. BASIC SKETCH: Hi everybody. So we are finally starting
with the banding. So before starting any
particular painting, it is really important
to draw a basic sketch. So let us draw the moon first. We will need a little
bit of calculation for that so that we
get a perfect moon. So what I have done is I have
simply taken my steel edge, place it on the border
on the bottom side at four centimeters and simply
put a dot on one centimeter. So now simply take your rounder, or you can also call
it as a campus. Now we're going to take a
radius of 4.5 centimeters. Simply take your
pencil and zeros AND meters and the needle
at 4.5 centimeters. Now leave a much
carefully via doing this so that you get a nice
and crisp circle. Let me show you again. This is basically a
4.5 centimeter radius. Now simply place the needle
at the point where we have given a dark
pencil mark and rotate the benzyl in the way I'm doing media image carefully
while doing this so that you get a nice and crisp circle. So as you can see, we have got a nice perfect circle layer. Now simply use your pencil and draw our rough mountane line. This is going to be
very much random, no need to be that much profit. So we have this
nice landscape area where we are going to
paint our little elements. So we are going to just simply draw it so that we
get a nice reference. And yeah, that's it. You
can remove the extra lines. And that's it because there's the basic sketch
that you will need. A few find using a
rounder difficult. You can use it on a
rough sheet of paper first and then come towards
your final painting. Now let us move
towards the next part, which is painting the moon.
6. LETS PAINT THE MOON: Now, after drawing
the basic sketch, we are willing to pain
the magical moment. And I am in love with
this particular moon, which is going to be
really elegant and fun. That does talk about
the watercolors that we are going to use. These are very minimum colors. So the first one
is titanium white, the second one is crimson, red, and burnt umber and black. So these are all the four
colors that you will need in this entire
painting is ended. Amazing. So before
applying the colors, what we are going to do is
that I'm using my quill brush upsides to L. In case you do
not have your quill brush, you can use a round brush also. So now simply take
your quill brush. Use some clear water as you
can see on the right side. And you have to simply
applied on the moon. So what we're going to do is
that we are going to really carefully apply the
water on the moon only. So we pay much carefully, make sure that you
do not move outside. Use your colon branch around, brush whatever you are
using very carefully, use its tip to move
towards the edges. You can already see
the reflection of the light as I'm painting, the water layer is getting deflected so that
you can also get an idea of where you have applied
water or not tied to apply uniform layer of water
and make sure that you do not form any
water pools in between. Now the reason
behind doing this is that now we are
going to splatter some color on the
moon so that we get a nice textured effect. This technique is
basically known as a wet-on-wet painting
technique and watercolors. So that what happens is
that you apply coat off waterfalls and then you apply
your watercolors on it. So we are almost done applying water on the entire
moon surface. Now what we are going to do is simply take your color palette. I have a small plastic
color palette here. And I'm taking some black and my gouache brush and
make sure that you have more of water
rather than color. Because we do not want it
darker patches to form. We just are going to
take lighter values of black and simply tap it
randomly on these Alphas. So now you can see the result of applying a ten quarters
water initially. You can see the spread of the Black Hat is
looking really amazing. Trust me, when you
are going to do this live or instead you are
painting with me only. You can already see the results. So I am just simply
dabbing my brush and less random manner to get
a nice textured effect. And generally moon also have this kind of rough
texture on it. If you have observed carefully. Now make sure that you do not apply black on the geyser phase. You just have to read,
tap it randomly, leaving some white
space in between also, because it is not going
to be completely black. So now we are done
with the black. Now, again, take
your color palette. And the same day we took black, we're going to take some Clemson and burnt umber together. So again, you have to make
sure that you have more of water and your quill
brush rather than color, you just have to dig a
little bit of DMD of both. And now once you're
done with that, you have to again tap it in
between the whitespaces. Just like we did it
with the black color. So again, I'm just tapping
it in a random manner. So there isn't any perfect
way of doing this. You can do it very naturally and randomly so that you get a
nice texture on the moon. Also, one more thing that I would like to tell you is that the color that you
are seeing right now, there'll be very different
when it dries up. So make sure that you
apply a nice coat of water initially only so that you get a nice
spread of colors. So we are almost done applying
the texture to the moon. You can see the white
spaces in between, and you can also see the
blend of the colors. Now just wait for
it to dry up and you can see the amazing
output once it dries up. So we are done with
the painting the moon. Now let's move towards
the next part, which is painting
the background. Also remember the
watercolor technique. This is known as a
wet on wet technique.
7. LETS PAINT THE BACKGROUND: So I hope that you enjoyed
painting the moon. Now it's time to paint
the black background. And v are going to
start it by applying a thin coat of water again
on the background first. So again, I'm using
my equivalent rash. So as you can see, we have some water in our cup
on the right side. And simply you have
to apply a thin coat of water again less
than below way we did it on the moon and we are going to apply it
on the background. So make sure that you
apply a tentacle dog Frodo very carefully and do not move your brush
enzyme the moon that will spoil the amazing
texture that you haven't got. Now once you have done applying a 10 Goldwater in
the background, I'm taking my lab does size
12 and take some solid black. Now simply use your flat brush to apply it on the background. We have already applied
a thin coat of water so that your black color
can spread evenly. Now the reason behind
using flat brushes so that you can apply
more color at once. And you can use it to cover the complex areas like
the moon surface. So you have to be
very careful while applying it near to the mode. Just move it in the
direction I'm moving. Now you have to simply
the beam does seem process tied to apply a solid Bajaj black so that it looks
really cool when it dries. So you can see that I have
used the tip of my flat brush so that I can get nice and
smooth edge near the moon. So we are almost done covering the entire left area
with solid black. Now using the same method and applying the same
quarter of black, we are going to cover up
the right area as well. Now, just take your
flat brush and make sure again that you
get a perfect edge. So I'm just using the
tip of my flat brush to get a ball effect edge on
the moon, as you can see. And now you can just covered up the entire AD on
the right portion. Now that is going to
be this paragraph, landscape BAD on
the bottom bond, where they are also
willing to apply the black color to just cover the entire AD on
with the flat brush for us. And then we'll use
study dealing branch to give it a nice detailing. So I'm now using my
John branch of size eight and yellow and go take some solid black in it as well. You can always add a little bit of color to
loosen up the colors. Now using the round brush, which is also basically a
detailing brush labeling to define the kind of
rough landscape. I won't say that
these are mountains. Knees are going to be irregular surface of
the ground level, around rash and add
the edge is remaining. And we are also learned to
do this on the right side. Now you're going to
observe that we have almost paint in the entire
background with solid black. So air comes and interesting, but what you can do is that you can take a drafting brush, which is kind of a
raised to branch, which is generally
having these kind of brush strokes
which are damaged. And using this brush we are
going to splatter some color. Just simply take a look
at Michael appellant. We are willing to
take some solid black width Access
amount of water. To apply this kind
of splatter effect, you will need more amount
of water rather than color. Did this in the yard
and damaged crash or whatever kind of ratio app in case you do not have
this kind of brush, you can use round
brush also of size 12. Now to show you this attack, let me show you this eNodeB
scrape off people first. So we have solid
black and burnt umber together in our rough brash. And you have to use your
finger and simply dab it on the branch and you can splatter this beautiful dark
effect on the paper. So as you can see, we've got some nice amazing texture showing this beautiful
little dots. So using this method, we are willing to apply this texture effect
on the moon first. And then we'll be using the same method to
being these stars. Sam just simply dabbing this on my brush and we
are going to apply this effect on the moon. So you can observe the
tiny little dark effect on the moon already. So this is basically the
kind of texture you'll find on the moon if you
have observed it live. And this will also
enhance the value of your painting has it looks
even more attractive. I would suggest you do this method on adult
scrape off people forest. And then you can come towards your final painting so that
you do not make any mistakes. So as you can see that we have
got a really nice output. Now using the same method, we are going to be in
some beautiful stars on the solid black background. So again, take your rough brash and take some solid
titanium white. Use your palette and
mix it well with water. Now once we have taken the
titanium white in our brush, we are going to splatter it
on the black background. So the technique is
absolutely same. You have to simply
use your finger, tap it on your rough brash and
lateral these little dots, which will give you
a nice start effect. So you're going to
observe bad these little tiny white dots represents nice beautiful
stars in the black background. And we're done painting
the entire background. Now let's move towards the elements that we are willing to paint in this
particular painting.
8. LETS PAINT THE PINE TREES: Carrier buddies. So I hope
that you have been bend your background
well now it is time to being some beautiful
buying trees. So these are going to be amazing value addition
to your painting. Before that, what you
can do is that on the bottom portion where
we have the ground area, you can just simply take yard
the dealing brush and add some solid black on these dyes that have come
onto the ground area. Now using the same
brown brush of size 8, we are going to take some solid black and the color palette
as you can observe. So now before building any buying treated
as very important, don't know the correct position
where it is going to be. So let us begin the pine tree
on the left side for us. What do I have to
do is that you use your brown range and draw
a vertical line first, decide the height of the
binary that you want. It is not a compulsory to use the same height
that I'm using. You can use your own random
heights for the pine trees. So on the left side, the
forest line is bigger and the second line is
smaller than the first one. And then on the right side I'm drawing tool another
vertical lines. The first one is bigger and the second one is against molar. So drawing these vertical
lines will tell you, fair to being the
entire by entry. Now using the same brown brush, we are going to pin these
little beautiful buying trees. So what you've got to do is that just simply take
your down branch and add these little minute
strokes from the top portion. And as you come towards
the bottom side, you have to just
spread the branches. So if you might have observed
or binary carefully, what happens is bad. You have appointed
area on the top bar. And as they move towards the bottom side and gets
journey more bushy. So you can basically
consider this as a triangle. On the top boundary
have less than Bush area and on the bottom boundary got to
spend the branches mode. So you can already
observe that it is looking really
beautiful and elegant. And just trying to make solid badge on the
central portion. And I'm trying to
spread the branches on the bottom bar as much as I can. So the pointed tip of
your detailing brush art, brush acts earlier, you can add these little branches with
this particular brush. Also can enhance a
little bit more. If you wanted to, you can add some more branches on
the bottom part as well. In case that you are not
Batman's confident enough to being the binaries directly
to the final painting. What you can do is that you
can simply Descartes up, scrape off B bar, and practice the pine
trees on bad forest. And then you can come
towards your final painting. So yeah, we are done
with the first bi entry and it looks fairly beautiful. So now using the same method, we are going to paint all
the other three pine trees. I'm doesn't engage you are painting with me
today then option below you can
definitely do that. We have just the same process. The final and the
last pine tree, which is a little
bit, but no need to. What do you think causes? And we all love? I hope that you find
the next element.
9. LETS PAINT THE REINDEER: So I hope that you've
painted your buying trees well now let's
paint the reindeer, which is my favorite element
in this entire painting. So before painting the reindeer
on the final painting, it would be really great if you painted on adult
scrape off paper first so that you do not end
up boiling your painting. Simply take our landscape off
B bar and your round brush of size eight and take some
solid black color in it. You have to start
painting the arms first. So you have to beam the Ahrens like a branch
and you can just simply paint the remaining
body afterwards. So you can see how ten
the legs are and you can just simply being the deal with your day dating
rush as well. I would suggest due to
being the reindeer three to four times on our rough
scrape off paper first. And then move towards
your final painting so that you do not
make any mistakes. So as you can see here, I have my final painting and I'm trying to draw the reindeer
on the centered portion. So I have started
with the horns, which are in the
form of one branch. Then you can just simply paint a tiny ear and the head first. Now again, take some color in your detailing branch.
And being the neck. And from the entire
neck you have to paint the entire body bond. That would be great if
you put the outline first and then add the solid
black color inside it. Now once we are done
painting the entire body, we'll be painting its legs, which are lowly 10 to
the detailing brush will be acting perfectly while painting this
particular element. So you just have to add Bolton
layers on different bond. Just mean these little
vertical lines. And then we want to add to
ten lines on the back part. Again, I'm drawing these
two little vertical lines. And then we'll be trying or
10 deal on the back portion. And a little bit often Bush
on the end of the tail. So you can see that dn, dy reindeer is ready. So now what we're going
to do is that we are going to enhance
the ground area, which is kind of
a mountain area, but typical mountains, just our rough kind
of ground area. So just simply take
your titanium white NER detailing brush and make sure
that your brushes and dry. We don't want access amount of water in the detailing brush. Leave on more off light color. I'm just trying to make rough texture on the ground area so that we can enhance
the landscape. Now simply take
ERD dealing branch and tap it on the ground area. So there isn't a perfect
method of doing this. You have to do this
in a random manner. So most probably we
are going to enhance the area on the left portion, which is going to be like depth area where
light is falling. And the right area would be
where light is not falling, so that will be darker. You can observe on the
elliptical areas also you can enhance using
your detailing brush. Now you have to simply
repeat this process and there isn't perfect
manner of doing this. You can do this in a random way. Now, I'm also enhancing the ground area on
the right portion. So you can already see that the ground area looks
even more attractive now. And it gets our definition. So this is going to be
a night view basically. So the light which is falling on the mountains as
coming from the moon, which we have painted
on the background. So to give it greater contrast, let us add some more solid white on the tips
of the mountains. I'm just taking
some solid, right? And I'm just going to
tap it on the edges. And we're almost done. So as you can observe, this is how you can enhance
the value of your painting. And it looks even more
elegant when you add these little minute
details to your painting. So the entire painting is ready. Now let's move towards the most important part
which is removing this idea. Do not forget to take that
part so that you know how carefully you have to remove these items without
tearing it up.
10. LETS REMOVE THE SIDE TAPE: Hello everybody.
So I hope that you enjoyed creating this
beautiful painting. Now it's time to
remove those ideas. So this is basically
willing to be a little bit of task to do. So it is very important that you remove this I tapes
very carefully. Because at times what happens is that by removing
those eight dibs, you end up tearing
your entire painting. So now let us start
with the first date, which is on the right side. So what do you have to do is that you have to
remove that side deep in an angle and you have
to remove it very slowly. Make sure that you do
not tear your paper. Now let us remove
the left table. So again, you have to
be very much careful. Dust slowly remove the tape in an angle and we
have took it out. Okay. Now let us remove
the bottom date. Tried to get a good grip on the tape and just
simply to move it. So you can already see how
amazing edges we are getting. And this looks really
beautiful when you remove the entire day. So as you can see,
I've also maintained an angle by removing
the bottom t. Now, the final and the last
tip is on the dog. I'm trying to get a grip
and just simply remove it. Again. What we are going to do is that we are
going to remove it slowly and an angle. Okay. My hand is coming in between, but you have already
observed it. Okay. So now I have it the
more the final day. And yeah, we haven't
gotten the final painting. So you can see how
beautiful the Debye model looks and depolarize
is Jolie amazing. Let me take a closer look. So I hope that you
enjoyed painting this beautiful magical
moon polarized. And you can observe
the details already. And also the side edges
are really amazing. And I'm very sure
that you are going to try this particular painting. And I'll be really
excited to see all of your projects in
the project gallery. Don't forget to take
the final targets for the entire class.
11. FINAL THOUGHTS: Hey everybody, welcome to the final thoughts
for the entire class. I hope that you enjoyed
the process of making this beautiful magical moon
watercolor Polaroid. I wouldn't be really happy and excited to see your
painting as well. Feel free to add your projects
into the project gallery. I would love to see all of them. Also in case you have any doubts or questions related
to the painting, you can ask it in the
discussion section. Keep practicing
and have patients while painting with watercolors. You might be surprised when
the output at the end. Also, it would be really
great if you maintain an art journal or a
practicing book for yourself. I hope that you got to learn something new and
creative sense. This is our very short class. Do leave a feedback
for my class as it encourages me to come up with even more creative
classes like this. And my glass can reach many
more students like you. In case you are on Instagram, do tag me, I go by the
name shutter notations. I would love to
repost your walk. Thank you so much for joining my class and stay tuned
for the next class.
 Rutvik Patel, Artist and Instructor