Transcripts
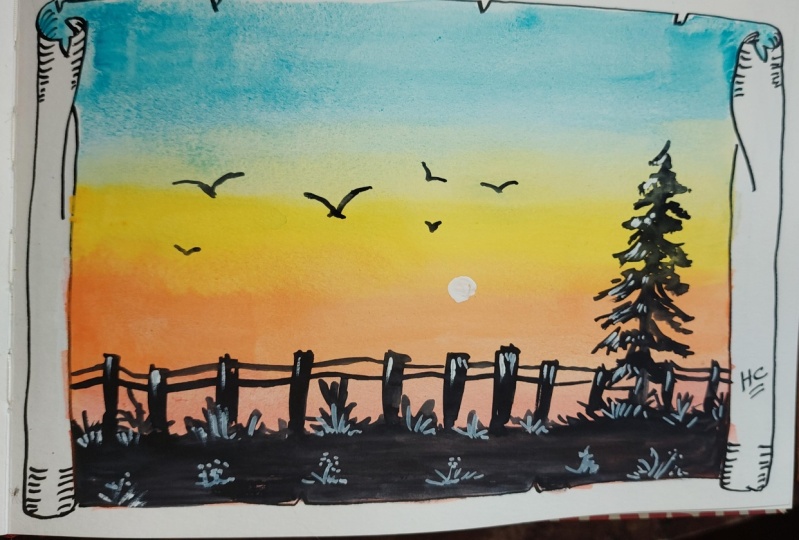
1. Introduction: One of the most amazing scene that I always loved to witness is a sunset. The most interesting part that I had absorbed as the variation in the sky and the beautiful colors VC with the glowing sun about to set. What if we tried to create this beauty into miniature paintings like this? Hello everybody, myself from thick bundle. I am self-taught independent artist based in India. I'm also a professional, indeed a designer. And a lot of you who might not be knowing me and had joined meetings and CLI can find most of my art boards being displayed on Instagram. I go by the name children's ambitions. In this class, we are going to learn how to make six watercolor Polaroid based on growing sunset. We will be learning about all the materials we will require for painting. We will learn about taping down the paper all the colors that we will be using by painting every individual painting. I will also be giving you a nice brief about blending and the backgrounds we will be painting. Before we start every individual painting, I will be giving you a full detail, brief about the techniques that I'd used in each and every painting. The class is best suited for beginners and also intermediate and advanced level artist can enjoy it. Whole class is divided into several parts. And it is recorded in real time frame so that you understand everything easily and in a proper man. No need to worry at all. These paintings are very easy and it won't take you more than 20 minutes to finish. Painting this Polaroids. Really peaceful. And I'm very much sure that you would enjoy this class. So without any delay rambling on art supplies, and let's get started.
2. Materials Required : Sorry guys, welcome back again. So far, this video, I'll be telling you every individual material that we are going to need. No need to worry. You'll find these materials very easily in any local stationery. So he and I have been shop not an annuity is a simple stomach ballot for mixing the colors. Always tried to keep paper napkin handy so that you can remove X amount of water. So this is a simple color palette which I had used to bore my colors. No need to worry. I'll be giving you all the basic brief for the colors which I had used for the painting. And this is very good ballot to organize your colors. So now I'll be talking about the brushes, pen and the pencil that I had been using. So this is a byte Ben from Sakura. It's having a very fine tip. It's not necessary to use the same. You can use any other white pen as when. Then I have my black pen. That's also from so cuda. Now I'm talking about the brushes. So this is a half inch flat brush which we will be using for painting the background. As simple normal benzyl, which I know that everyone would be having for drawing. Then I have a simple size two brush for painting that he didn't. So this is one inch masking tape, which we will be using for taping down the paper so that we have a nice border as ISO, which we will be using for cutting the paper. Now, the very important part is that the kind of watercolor paper you are using. So these are my watercolor peoples from SCADA. These are hot pressed and it's 300 GSM. You can find it from any nearby local stationery, and it's not necessary to use the same Dan. You can go for any other brand as well. So it's basically A5 size people from which we are cutting it down to two Mini Polaroid sides peoples, these are 10 centimeters by 10 centimeters. So I have two glass jars. One is bigger in size and another one is model. So both the glass jars are required while painting. So that one would be with dirty water and another one would be clean water. Now we're almost done. And yes, one more thing we require is a spray bottle to lose an appeal columns. So that's all. These are all the materials that we will require.
3. Taping the paper: Hey guys, welcome back. So now we will be talking about how you will be dipping down your paper so that you get this nice bite edge. So from the AIG, which I showed you in the material section, I could edit down into this ten centimeters by 10 centimeters people. So this is our watercolor paper on which we are willing to paint. Now just simply take your masking tape and put it on one edge of the people. Make sure that you do this very carefully. Keep the spacing very much equal on every edge of the paper. Now take another piece of your masking tape and paste it on another edge. While basting. Just rub your finger and use your new so that you get the perfect edge that you want. Also main shown that, that isn't any air bubble in between the tip and the people. You can absorb how nicely we have, tape it down and now comes the last edge. And it's almost done. So this is how you can tape down your paper very carefully and it's not a difficult task, gets very easy. So we are good to go and now we'll start the painting.
4. Techniques for painting 1: Hi everybody. I'll, before starting our painting, I'll be taking you through all the techniques that are being required of painting the beautiful gluings onset. No need to worry. These techniques are really easy. So as you can see, I have many rough sketch book on which I practice. You can use any scrape off paper or you can also work for any mini sketch book like this. Now as you can see, we have this coconut leaves just in the upper portion of the painting. And drawing this is very easy. Just take your pencil and draw these branches. Always try to draw in a lighter tone so that your pencil doesn't overpower on the people. So by joining single line, we're deciding that where the branch is going to be and the leaves which it has are very much detailed. So just draw these lines with pencils or not. You get to know that this is how it is going to be in the beam. So now, once you draw the and dad leaves and you are somehow satisfied with it, you can just finalized by giving a little bit of darkness so that you can paint on it. So now I have somebody dealing branch of science tool and I am taken black color in it. Start to paint from dark portion always so that your hand doesn't splatter the color which has been done. On the downside. Now, I'm just using the pointed edge of the brush and I'm trying to paint the leaves. Just observe the strokes which I'm making. We have to just make R and very much free and loose so that you get these kind of strokes as you can see on the screen. Also, what I would like to suggest to you guys is that please don't be scared. If you're not able to draw it for the first time. You can always practice it on these sheets again and again. And then you are satisfied. Then you can move on to the final painting. So since this is the process by which we are going to repeat for the leaves. So I had just made WTO By little bit faster as well, that may save some time. The method is same. You will just have to take your detailing brush, take your black color and a certain amount and start getting these little strokes on the leaves. So now we are almost done, as you can see, believes are looking. Some work exactly like the ones which are drawn in the painting. So I'm taking a little bit of Titanium bite and make sure that you do not have a lot of water in your brush so that we can get a nice bold white color. The reason behind getting this Biden's, that lesson, which you can see just below. The coconut Lee, will give this leave a little bit of shine effect. So there is the sun placement. Now talking about the water which is being drawn and the bottom of the painting. So as you can see that the background color which we are taking for the lake is simple combination of orange and yellow. No need to worry. I'll be giving you all the details about the colors. This is just for getting you the knowledge about the techniques which are being used. So after painting the background we are taking assembly are detailing brush again and we'll take some black color and we will start drawing these horizontal lines as you can see. So try to keep the brush very much steady and hold it in a prop Bowlby. You can take the strokes and very rough manner also, but it has to be horizontal. Now on the sides, we are going to make the stroke a little bit darker so that it gives a nice debt to debating. And at last, we'll draw some sun rays on the left portion with titanium, but while we are doing the paint. So these are all the techniques which we will take a while, while painting.
5. Painting 1: So everybody, welcome back to the first painting, which we are going to draw for the growing sunset. So for this painting will be needing certain colors. So the first one is lemon yellow. Then we'll need cadmium orange and Ramadan. No need to worry if you do not have colors from the same Dan are, you are not using an artist grade watercolors. That's absolutely fine. As a beginner, you should definitely start with a student's grade watercolors. So before starting the painting, I would like to tell you that you can go to the techniques needed for painting one, so that you know all the small techniques that are being used in this particular painting. So now we'll start the painting. I had drawn a simple horizontal line. I led a little bit below the middle of the page. And now we'll draw small mountains on it. So we'll draw a little bit of mountain on the left side. And then we'll repeat this kind of mountains and the right portion. We are not keeping the amount genes in the end diet horizontal line. We are just keeping the mineral portion link. Now as you can see you that we are keeping certain pointed edges on the mountain so that it looks very much clear while they are painting it. So now I had drawn a simple circle to show the position of the sun, the settings. I'm actually now ready to draw the position for Toko kind of leaves which are coming from the right portion and John the left potion. You're not supposed to draw the end died leaves. You can just simply give this goes so that you'll know that here is the position where it is going to come. So now I'm using half-inch flat grunge and I'm applying or even coat of water did the horizon line so that we can apply the background color on it. Make sure that you apply even dream of water through that there are no water pools in between. Now, scribbled people, I'll show you all the merging of background galore, who falls. I'm adding over million on food on the table. Then we'll be having cadmium orange. And then at last we are adding lemon yellow. So this is how the mandibular is going to walk on the water layer and applied just now. So as you can see, this is how we had done the Baghdad. So the same techniques, you have to apply, a thin coat of water that we had, just put it up on the paper. So we are starting with the watermelon and the dog. Try to keep the intensity in between. Don't be too dark in tune, and also don't be too light also because the shade you apply on the paper right now, Good. Come one. Don't. Lighter when it dries up. Make sure that the color that you apply do not have spots in between. You have to maintain our event dawn, and also observe the movement of my hand at a simple horizontal movement. And you can see that I had merged cadmium orange and lemon yellow with the warmer Leon, which we applied falls. And if you feel that the water amount is more on the paper, just use your paper napkin, dab your brush a little bit on it so that the access amount of water will get dried up and you'll get amazing blend of the background colors. Also a drone below the grid that you uses peoples, people, try to blend these three colors for practice. And then you can come to your main painting and do this. Let's would help you and getting confidence as well. Now, after painting the sky, we have these beautiful water body having amazing effect called the setting sun. So below the horizon line, we have applied attend coat of water again. And we are taking cadmium yellow on the upper portion. Make sure that you do not merge the guideline and B liver line together. At the bottom, I'm taking some mammalian so that in the front portion we have our darker dawn and going towards the back. Thank that. A little bit lighter in tone. So as you can see that we are again merging these colors together. Now, I think that in front portion of these water bodies and not finding the color that much dark. They'll dig a little bit of more vermilion. And now I will have less amount of water in my brush. And just And then blaming your brush in this horizontal direction. Now you can see the difference. We are having a great tonal effect and the front and the back portion. So now we are quite much done with the background. Now we'll start painting the mountains. We are using a size two detailing brush and just make sure that it's dry. Take some amount of water and mix it with your black color. I didn't mention the black color in the required colored section because it's a common color that everybody would be having. So we are just drawing the horizon line, forced to keep your brush pretty much steady and known keep your hand too much. Do. It shouldn't be loose enough so that you can bend this horizontal lines in a random fashion. Also, make sure that you do not have more amount of water in your detailing brush. Because if you are adding more amount of water in your brush, it off on your painting. Now, you have to just simply continue this process Unless you find the water body darker in the front portion and lighter in the back portion. The darkening the edges from the left portion and the lite version so that you get a nice depth of the river. So as you can see, we have got palladium, nice effect for the label. And we're almost done. You can always dig darker dawns in the edges so that it gives a nice depth to the painting. If you want to do, it's not compulsory thing, but it would really be nice if you give this nice deadlines on these ice ages. So you can see that we are having a darker effect on the border, Bolton and the river is being lighter on the middle of the ocean. So if you find the lines that you had drawn on the background, lighter and dawn, you can definitely go for one more quote. That's absolutely fine if you do not find it that much darker. So now we'll start painting the mountains that are just above the horizon line. So you can see the benefit line is very much visible. Start painting the mountains were doing dealing brush and make sure that the edges you give on the DOM then very much carefully. And here's a tip that that the healing brush pallet of adding fine tip on the top portion. So make sure that you keep your brush on an angle and these edges very much carefully. Now fill up the portion that is remaining with black. And again, I would say that tried to apply even hold. So just simply finish up the mountain which is in the left side. And similarly will be the mountain which is drawn on the right side. One thing that I had absorbed about watercolors is that it's more about controlling the capacity of water you're holding in your brush. And that is very much necessary because if the amount of water which week adding in our branch as an axis, then again, definitely spoil your painting. To get a very good solution for this is that always tried to have our scrapbook paper side-by-side value or bending or a paper napkin, which is very much essential so that you know that your brush is having the right amount of water in it. So I'm just finishing up the mounting which is being done on the right side. Then the process is same. I had just fast enough the video. And if you are painting with me or if you want to paint with me, you can go to fast-forward section and lower the timeframe. So it could get slower. And you can paint with me easily. So now we are going to paint the coconut leaves which are coming into our painting frame. Just think that you can observe that I had drawn the COGS. Pause so that we know the position of the leaves. And again, I'm mentioning that if you're not that much confident that you will be able to paint the leaves in one go. You can definitely go to the techniques required for painting one. Let me do is just about this video. And I had talked about all the details you will be needing by painting these leaves. So you can see how we are moving our brush strokes, which we aren't doing. And it's very much easy, no need to worry. And the same V is on the left portion as well. After taking some amount of black, again, I'm drawing one more call on the left portion, as you can see, but here we are having only one leaf. So I personally love coconut leaves a lot because it brings a very natural and my new details to your paintings. You can see that we have just the gun RD dealing brush and we are moving it in our Humana. And I'm just digging a little bit darker tone so that the leaves get an answer from the bag down. Again, make sure that you are not having access amount of water in your detailing brush because it can definitely fill in the background. So I'm quite satisfied with the leaves that we had drawn. Although if you want to draw more leaves and do your painting fame, you can definitely go for that. I find it that three are convenient. So now I'm taking some titanium white to enhance the leaves and painting the sun which is going to set. So just take some titanium by the nerdy dealing dash. We are not using any wanted in our brush because we want an opaque surface. Simply draw a small circle just below the leaf which we had drawn on the left portion. Trust me, this is so satisfying. And so you can see that does not is looking really great. Now, taking the same brush and some white in it, we are drawing sudden reflections on the water body. So you have to take the titanium white and just roughly draw these horizontal lines just below the sun. So you can see that that reflection is looking really great and I'm finding it so peacefully. While doing this, trust me, you have to try this painting guys. Okay, So we are done with the database. Foremost. We can just give one more layer to the sun so that it looks even more Gaetan. Now we can take some titanium white and can apply it on the leaves as well so that, you know, it gives that deflecting effect and enhances the coconut leaves as well. Just sometime Damien bite on the initial time digging some more titanium white and I'm announcing the mean. So we are just applying some final details. And we are almost done with the painting. So you can also give some highlighting elements of titanium white and the mounting that we had drawn the case, the sundries would also reach those mountains which we had drawn on the night volition and on the left portion. And we are done with the painting. Then very much satisfied with the painting and it looks really amazing. So now comes the most fabulous buying bond, but I loved the most, which is removing the day. So here's a trick that while you're removing the tape from the edges, they move it at an angle so that you do not tear up your paper. Be very much careful while doing this. Because, you know, at times I have seen the blue tearing up their paper if they are in a hurry by removing the day. So be very much careful by doing this. Also, if you are trying this painting, do leave off the bat as it encourages me to come up with even more creative glasses. Also, feel free to add your projects into the project gallery. I would love to go through your books as well. So here is the final output and our watercolor Polaroid painting one is ready for the glowing sunset. Now we'll be going to the second painting. So stay tuned.
6. Techniques for painting 2: Hi everybody. So before we start our second banding for the glowing sunset, I'll be taking you towards all the techniques that are being used for this painting. So we have three major elements. The first one is the buds that are above the sun. Then the second one is the binary. And the fans that you can see. Painting the flank boards just above the sun is a very easy technique. Just absorbed the sketch book on the right side. We have drawn these V shapes and different sizes from bigger to smaller. And I'm just taking a black pen and putting some ink on the same DOM and just leaving the strokes on the either sides. Similarly, you can do this to the smaller portion has been. So if you are not comfortable directly with your band, you can use your pencil first and then use your band on it. Or you can directly use your black men as I'm doing right now. So this is just our tutorial, are a practice for you guys, which you can do on your sketchbooks. So a few find difficulty in painting this box directly to your painting. You can practice this on your sketchbooks and then use this method or technique to use it on your painting. So this is just a one stroke technique, but you have to draw on either side and you are able to draw these bonds very easily. And this is the basic tutorial for drawing the flying birds just above the sun. So now let's go to our second element, which is the pine tree. So you can see how beautiful it is buying two locks and no need to worry, it's really that easy. So let's just recall it once we have a main spine, which is the stem of the tree. So we'll draw it forced usual black pen again, and we're going to be drawing the main stem. So I'm drawing it with the bend forced, and then we'll draw it with our detailing brush. With Ben, we are doing it because you will require some practice to learn the strokes of the pine tree. So after drawing the main stem, you have to just simply move your bend in the direction I'm moving. So these are our random rough strokes which we are making. Make sure on vital moving down and you increase the size of the bushes that we are creating. No need to hurry at all. You can draw very slowly and with a steady hand. So we have somehow drawn the pine tree exactly like the one which is drawn in the painting. Now, as you can see, I had drawn a little bit of the bush on the right side. So you know how you have to move your Ben. Now with RDD named brush, we'll be drawing the pine tree. So the process is same, but instead of Penn, we are having our black painting color. So again, we have drawn with the main stem vertically. And then I'll be moving our detailing brush in the manner be the RPN. So the advantage here is that while you're drawing the pine tree, but they are detailing value to get the bushes even more denser. And it looks beautiful. And B are almost done with the pine tree. To draw a ground line has been to know where the basis. And this is how we are going to draw the below cross. So here I'm showing you with opposition of sun. And from there does sun rays are going to come. So on that position we are going to place some titanium white or will be using our simple light pen to draw that. Adding this element would give a nice glow to your tree with the background behind. So these are all the techniques that you will be needing to paint, this Polaroid painting. And we are almost done. So I'll just give a quick labeling.
7. Painting 2: Hey everybody, we'll be painting our second polarizer for the gluings and said, so far this painting will be needing sudden color. So the first one is cadmium glue. Then they will be needing cadmium yellow. Cadmium orange. And the last one is, well maybe on. So these are all the colors that you will require for painting this boiler right? Now, we are applying 10 go to all water in the entire sheet. Make sure that you apply. Even goat and there are no water foods in between. Make sure that you do not leave any bought on the paper. If you find that there is any portion with less amount of water, you can reapply on it. Now simply take your mode and move it in a detections or then the light reflections can tell you if there is any space left. Now we are starting with our first column, which is cadmium blue. So make sure that you do not have a lot of marker amount in your brush. I'm just using my half-inch flat brush for applying the background color. So I'm simply moving my brush in the horizontal direction as you can see. So now we are merging our cadmium yellow with blue. So for this particular painting will be on having those guy from lighter Dong to or darker tone going below. Now will be taking cadmium orange and B to be merging it with our cadmium yellow. And at last we are having Romanian on the base. And you can observe how beautifully the colors had been lodged together. Always keep a paper napkin with dual side-by-side. So that what happens is that at times we have access amount of water in our brush and B do not know it. And you can literally boil the people. So you can definitely that your brush on your paper napkins or that you can give it a nice blend as I'm doing right now. So I'm quite happy with the background. They're just let it dry. And I'm just giving you a basic genes again on a scrap of paper or the Babylon. So the first one which we use rods cadmium blue. Then we then call cadmium yellow. Then we added our cadmium orange, and finally Raman neon. So if you do not want to directly go onto your final painting, you can definitely try the background colors only scrape off people or any rough sketch book you're getting with you. So I hope you understand how we are merging the background close. Now we are starting to draw the bushes we are having in the bottom of the painting. So these are just little strokes that you have to draw it with your pencil. Now, I'm drawing defense. Again, the fence do not need to be in a symmetric manner. You can draw these wooden fence in a random manner as I'm drawing diagonal. Also may join that you do not apply a lot of pressure from your benzyl by drawing. Just draw a lighter. Don't going just for visibility by painting. If you apply a lot of pressure on your pencil, it can tear up your people because it's still bad. So here is the stem of the binary that we are going to draw. Just to locate the position we had drawn this simple line. Now we are drawing a simple circle to know the position of the sun. Now I am taking my simple detailing brush upsides too, and really start painting the bushes in the bottom portion. Make sure that you do not have a lot of water in your brush. So the bushes are having a solid batch in them. And the top portion has to be sharp and NG so that you get a better definition for the grasses. So use the tip of your detailing brush to do this and move it in a random fashion. So as you can see, we have got a very nice edge on the bushes in the modern portion. And now we'll just watch it. And that's all it batch of black and colored it down. So as you can see that we have got a very nice definition for the grasses and bottom portion. So now we're going to be painting the fence. Again, we'll be using the same detailing brush tool. I'm taking some black again on my brush and I'm making sure that I don't want to have a lot of water. So you just have to draw these vertical lines. So you already have these pencil lines for reference. So we'll make sure that your color does and goes outside to see how easy and effortless it is to draw these fans. So now we're going to be taking some more color and we'll be drawing the pine tree. So if you find any difficulty by drawing the pine tree, you can definitely will do that. Techniques used in painting to video. I add dot all the basic details and techniques for this painting in that. So you'll just have to simply draw these loves true. So these are basically the bushes on the binary. And moving down, you have to increase the size of these bushes. Absolve the manner I'm moving my brush. Only do one thing if you are not able to draw these protocols time, you can definitely practice it on your sketchbook and then apply it on your paintings. Once I would suggest that if you are finding difficulty to paint the pine tree initially with your paint brush, you can definitely try it with a black pen forest, and then you can try it with European brush. The only difference is that drawing the boundary with a paintbrush won't give it more depth and a bushy look. So as you can see that we have completed our pine tree as bad. So I am just giving from my noon due due to the fans that we had drawn. By working with our detailing brush, always make sure that your hand is very much steady. So I think the bending is looking great. Now, I'll be using my white pen from Sakura to the sun. So it'll be just simply overlapping those alkyl which we drew with our pencil and give it a nice opaque batch of byte. Apply very light and low pressure, do your pen and simply colored it out. So as you can see, we have painted doesn't completely. If you find that the size is not that much visible, you can draw it in a bigger size as well. So now I'm giving some details to the offense and the bushes that we had been maintained on the bottom portion. So using your white pen, you can just give certain depth to the offence, to the pine tree and the bushes, which will come from the sun rays. So. This is just a simple technique. You have to use your white pen and give this random strokes. Again, see that how beautiful it looks while you are applying your white pen. So this basically defines that, that our sun rays, which are about to set now. And there'll be drawing these by details on the tree also. So we are drawing this on the left portion because the Sun is being basically placed on the left side of the binary tree. Then just giving some basic D days. So after painting the sun in with our white pen, I find it a little bit lighter and dawn. So I had taken some titanium white in my day dealing brash and given the sun opaque patch again so that it is more visible again on that dual lenses and touch it up with if you find it. So adding and attitudes you'll painting leaving lunch makes it even more realistic. Drawing our last element, which is the bullets just above the sun. If you find any difficulty while painting this. But you can definitely check out the video of techniques being used for painting do you'll get a nice practicing exercise there for painting this beautiful flying birds. So now I'm using my black pen from school down and we'll be painting the buds. So it's very easy you have to make these shapes in the form of V and automobiles. Your boards are done. You can see how beautiful day looks. So we are almost done with the painting and the final output is very amazing. I'm quite satisfied with the painting and now we're going to be removing the date. So be very much careful while you remove those ID. You have to take it out. And then angle so that you do not tear up your paper. So as you can see that I've got a nice edge and v There will be taking off the bottom tape as well. And now the last one, which has been based on the top. So our painting is ready and it looks really beautiful. To add your project into the project gallery. I would love to see your polarized as well. And I hope that you loved this painting as well. Also, one more thing that I would like to add is that if you find any color out of the edge line, you can definitely fix it by using the byte Ben. And you can just give it that finishing. If you think back to your white pen as not that much opaque to cover that color. Now, you can definitely go for titanium white and your brush and you can give definition details for that set. And we are almost done.
8. Techniques for painting 3: Hey everybody. So this is our third painting for the glowing sunset. And we'll be talking about the techniques required for painting this Polaroid. So we have these flying birds and the pine tree, which is required to draw. And I'll be very much specific. You can go to the techniques required for painting. One, where I had explained how to draw these beautiful pine tree and the boats. So if you find any difficulty in drawing these elements, you can definitely go to that video and learn how to draw these.
9. Painting 3: Hello, hello. Welcome back to the third painting or the glowing fanfare. And I hope that you're enjoying my Polaroid class. So for this particular painting, we will be needing certain colors. So the first one is cadmium blue. The second one that you'll need as raw umber. And the third one is cadmium yellow. So this particular painting is more about pine trees, which we are going to draw in the front portion. And if you want to learn how to draw buying trees in the deal, you can definitely go to WTO of techniques required for painting one that I had taught how to draw by increase in detail. So you can check out that we do if you are not moving in sequence. And if you're taking this class and the order of sequence, then I assume that you have already learned to draw the pine trees. So now what I had done that on the bottom portion, I had drawn some mountain but very low height. And these vertical lines that you can see on the location for the pine trees where we are going to paint it. And I had drawn a simple circle to locate the position of the settings. And so now on the scrape off people on the right side, as you can see, I am just showing you the background color. So it's simple blend of cadmium blue and cadmium yellow. Petals are really good practice. If you check out the background on his paper of people fought harder than directly painting it to the final paper. As it gives you a good idea about how it is going to look fine really. So now, as the process repeats, I am applying a thin coat of water on the paper. As you can see. Make sure that you do not make any water pools in between. Just apply an even coat of water. And if you find axes among got water on your paper, definitely you can use your tissue napkin and you can run your brush on it to dry up the paper. So you can see that we had applied a nice even go dogs water on the paper. Then I'll, I'm starting to apply the background color. And we are starting with cadmium blue. Always give the background from the top portion so that the movement of your water being applied on the background as to what's the downside? You can also observe that I had to hold my board vertically so that I can give a nice moment of color towards the down portion. So now we are taking some cadmium yellow and they are blending it with our cadmium yellow. You can observe that we have a line of defense and between cadmium blue and cadmium yellow. To make it nice blend, just use your dry brush by applying your bed brush on tissue napkin, which I had placed. So you can see that now the blend is looking quite good. Job this presents unless you find the exact blending. Also, make sure that you apply a nice vibrant color. Because when your color is red on the paper and when it will be dried up, it will definitely go one shade lighter than it looking right now. So now I'm taking my round brush of size 2, which is detailing brush. If you want to know the brand gets our camel size two brush and it's not about unnecessary to use the same, then you can go for any other brand as well. So now we are starting to paint the mountains, which we had drawn on the bottom portion, time taking some raw umber and we are going to paint the mountain. As you can see. We already have the pencil line. You just have two, colored it up. Make sure that you follow the pencil line and color it properly. Also, take care that your brush do not have access amount of water. Because if you will be having access among dogs, water in your brush, then you're bending would designate this point. I'm just using the tip of my brush to give this pointed edges, as you can see. So we are just filling the cholera. So as you can observe that we hadn't gone palladium, nice texture for the mountains and it looks amazing. If you are thinking that it is looking very dark right now. Definitely look one shade lighter when it dries up. So now I'm just drying up my brush and we'll be giving some depth to the mounting. As you can see, that I had dabbed it on the napkin and litter just give one stroke on the left side so that it looks a little bit too realistic. Yeah. So you can see that we had lot Chloe, great mountains there. Okay. So I hope that you exactly know how to paint your mountains now. So we'll be starting with the binaries. So as you can see that the lines which we drew with our pencil are still visible. So we just have to start painting the pine trees. So you can observe the movement of my brush. We are just trying to draw the bushes in this manner that we have to increase the size of the leaves as we move down so that it gives a very nice effect of the binary. And we are done. So you can see how the pine tree look. I think it looks really nice. And we had lose black to show that it's in front of the mountains. So we have four more pine trees to pain. I had just faster and up WE DO because the process is same. But if you are painting with me, you can definitely slow down the video. That is an option below. Also, to remind you that if you find any difficulty in painting the pine trees, you can definitely go to the albedos of techniques required in building one, where I had shown how to draw boundaries with very easy technique. So you can definitely check out that video. It's really amazing. And as you can see that we are finishing up all the binaries. So it's very important how you use your detailing brush, pen. You have access amount of color on your brush. Make sure that you use that dip and not the entire surface. Fam just utilizing the end, the tip as you can see. And we are just painting this Bush's very simply. At the same time. You can also observe the movement of my brush. So vital moving down, I'm just simply increasing the size of the leaves which are scattered. So that bigotry is also done. And now I add the last one which I am painting. Also one more advice I would like to give you guys is that if you are a beginner and you had started painting reasonably, so you can definitely did adopt page and you can practice painting these binaries so that you become export endless. Also, to be very honest, I actually practiced a lot on scrape off people's false. So that I improved the techniques major Linda movement of the brush that we make. So now just to cover up the ground area, they will just draw some simple bushes where we had not begun trees. So I'm just drawing these multimodal grasses on the bottom portion. As you can see, that we had almost painted before, unfortunately with the trees and the bushes that are coming in front of the mountains. So now I'll be just marking where we are going to draw our tree on the left portion. And we will be having three on the right portion. And do about this. So I would also recommend you that market with pencil first and then apply your black pen on it. So here is my black pen Trump supporter. This is a really nice benefit with a fine tip to give a nice opaque black color. So we are just simply drawing these small boards. Again, I'll recall it once again that if you wanted to learn how to draw these modes also, you can definitely go to the techniques required for painting one video that I had also taught how to draw these flying boats. So as you can see, these randomly flying boats are looking really nice. So now comes the last element, which is the setting sun. For painting the sun, I'll be using my white pen. It is also from supporter. So this also gives a nice or being sad face. If you do not have a bite pen, you can definitely use your bite watercolor. Just make sure that you do not have much water on your brush. Just use the color directly so that you get a nice opaque self phase. So as you can see, I had just colored the circle and we are just drawing these J's so that these analogs and growing. So it's really easy. You just have to leave your band while drawing these drugs. Do not apply much pressure. Just leave them in random passion coming out of the sun. As you can see that we are also done with the sun. So we are just enhancing the trees which are in front. Just use your white pen and give some random strokes on the binaries. Adding these minute details enhances your Polaroid. And trust me, it looks really beautiful when you add these minute details onto your painting. I hope that you liked the painting. If you find any difficulty in painting, what you can do is that you can first observed the entire video and learn how the painting has been done. And then you can again start dv du and paint with me. So now we are just simply removing, does IT be very much careful by doing this? You have to take off the tape and an angle so that you do not end up by tearing your polarizer. So as you can see that we had gone out early, nice edge while HDR moving this masking tape. Yeah, it looks really amazing. So now I had last one and we're done. So this is how the final painting load. And I'm pretty much fat, that's fine with the painting. I'll just take it a little bit goes up for you guys. So I hope that you like the painting. See you in the next slide.
10. Techniques for painting 4: Hey everybody, welcome back to the fort Polaroid painting for the gluings sunset. And now we'll be talking about all the techniques that you will require for painting this particular prototype. So this is, again, a very easy painting. And we have two major elements, a warrior. One is the smart boards that you can see, which aren't flying, and the sky, and the water body. So just to remind you guys, if you are taking this class in a sequence, then you will be knowing how to draw these beautiful little buds, which I had already dark and let techniques that a glide for painting one. And just as a division, we will take this again. I'll just remind you again how to draw these beautiful BAD. So you are only supposed to draw an IV, V-shape from your pencil and you have to give some darker value at the body of the bond. And you have to just simply leave the pen strokes. And no matter what I'm doing right now. As you can see, this is how we have to meet these mini billboards. And trust me, it is looks really nice in your painting. So now I'll be telling you how we are going to paint the water body. But before that, you can see that these are the three set up but that I had used in my folder right here. And two are separate be drawn on the left portion of the settings on. Okay, so now maybe starting with the water body. So what do you have to do is that simply put a layer of color on your graph. Scrape off paper for practicing. I'll be giving you the brief about DACA law in the next video. So now after applying authentic or dark bottle, we have a little bit of TMD of color and water so that you can just have a nice batch in the background. So we have winging up particular shade. The front portion that you can see, which is in bottom, is a little bit darker. And then as we move up, it is getting lighter and dawn. So now you can absorb be horizontal movement of my detailing brush, MD bottom. This is how we are willing to give the water effect to the background which we had painted right now. So for doing this, you can just simply practice the method I'm doing right now. And you do not have to keep your brush very stiff, lose it up and do it very gently. So this is how we are going to apply the law darker values and lighter values to the water waves, which you can see on the water body. I would also recommend you that we are using a black color for applying this horizontal lines. So make sure that you do not have a lot of water in your brush because it could definitely spoil your paper. So I hope that you understood the method of doing this. So now we'll apply this technique on to the background back we got painted right now. I'm basically starting from the top portion and I will come slowly towards the bottom part. You can see the movement off my day dealing brush. Observe it very carefully and definitely you have to practice it on a scrap of paper false. And then you can go to the final painting. As you can see back due to access among both Laudato, these talks that I had painted are a little bit lighter in tone. So we'll adjust the water capacity a little bit less. And now you can see that I'm having good doc stroke. Okay? So you can see that we have somehow gone to a little bit of resemblance on depolarize. Now to give them the exact depth and the front portion. But you have to do is that you have to give a little bit more darker values on the bottom portion and on these Hide Edges because there would be mountain shadows falling on water body. Time applying some more black color. Make sure that you do not apply a solid batch. We have to just give these lines simply. And you can see that we have somehow achieve the same effect as it is drawn in the polar guide. So if you are a beginner and you had recently started exploring watercolors, what I would suggest is that always tried to practice on our rough sketch book flaws. And then we'll do your final painting. And this helps you to improve your hand skills and the movement of brush rolling him clue. So to give the reflection of the sun on the water body, I had just simply used some titanium white. And that is very little water in my brush. And I'm just giving this reflective sulfates on the water body as you can see right now. So again, this is also where it easy. You have to just move your brush in this horizontal direction. But this time we are not painting the entire line. We are just giving it in a shattered manner. So we are almost done. And these are all the techniques that you will be requiring for painting this particular polar, right?
11. Painting 4: Hey everybody, welcome back to our painting or the gluings sunset. So these are the colors that we'll be requiring. The first one is burnt umber, and the second one is cadmium yellow. So that's it. We will be needing only these two colors for painting this particular Polaroid. So as you can see that I'm ready with my baby being dumbed down. So will it be simply starting with drawing the picture? I'm drawing a horizontal line, which is the artisan line, which separates our sky and the river. As you can see, I had drawn the artisan line a little bit down from the middle portion. And now we'll be drawing mountains. And once you are done with the mountains, will draw us in bows out button to locate the position of our settings on. And this is the abortion where our water body is going to come. So well, this painting, we only really glad to draw on this much team. So now I'm using my half-inch flat brush. And we are going to apply a 10 go-tos water on our table. Tied to apply even gone so far as time and just giving the water cold on the Guy Bolton because we are willing to paint, forced this guy. And then we'll be going to the water body. So you can use your light, are any source of light from there, you can just figure it out. If there is any bush and left, then the water has not read. And now I had used cadmium yellow to paint our sky. You can see it is such a vibrant color that it gives Ronnie peaceful guy appearance. Since we had already applied a Geldof mater in the background. Don't have access among both water in your brush. Otherwise it will spoil your painting and create some water foods. So I had taken some burnt umber on the top portion to give certain depth to our painting. Just observed the momentum of my brush. It's simple horizontal movement. We are not moving the brush in some other direction. We just have to do it back and forth this way. Or you can also move your brush in one direction only, it's fine. So now you can see that we are somehow done with does nine. So now I am applying a 10, go down water on the water body, which we are going to paint. So again, I would tell you that make sure that you do not apply a lot of water because it will definitely create some water pools in between. So you can see that we had applied a nice golden Fanta again. So now we'll be using some burnt umber to give depth to our water body. Again, observe the movement of my brush and you can do the same. But I had used some darker values so that our water becomes a little bit more dense. And we'll be using a little bit more darker dawn and the barn so that it gets you the idea of bada bing Near and water being filed. And we are done with the water body. So now I have Dagan. Theists do flat brush and it's very dry. Make sure that you do not have any water on any color on your brush. And you have to tap it the way I'm doing right now, from top to bottom portion. So this is basically to give a nice reflection on nice reflecting surface on Yolanda body, as you can see. So the reason for using a dry brush is that it will absorb all the water which we had recently applied for that water body. And it will give you a nice bite color. As you can see, once you are completed with this step, you can definitely take your thighs dual detailing brush. And now we'll be painting the water layers. So I'm taking my size to be dealing brush and will be again, trying these horizontal lines may join that you do not have access amount of water in Jadi dealing bash. Because if you'll have more water than it will definitely is while you're painting again. Also, if you are a beginner and you are very new boats and do watercolors, then you can definitely go do techniques required for painting fall. And I had thought every step in the data for painting these elements, for this painting. As you can see that we are just following the moment. You just have to take care that the layers region or drawing in these trend on DACA and the latest budget drawing back side are a little bit lighter so that you get a nice perspective view and don't stop shade as well. I'm just following the steps. We are trying to give darker dawns on side so that it gives a nice depth to your painting as well. And you can see that we are almost done with giving nice layers to the water. So the line which I'm painting right now is on the site. So I told you that we are going to give some nice darker values on the edges. So while you remove the tape, It will give depth to your painting. Also lead the horizontal lines come over the invite batch, which we created with our detailing dry brush. And it will give the reflection of the sun, also already nice realistic look. So I'm quite satisfied with the layers which we had drawn for our water body. And now I'll be showing you the background once again. If you have any confusion for the background colors that we had used, just taking my round brush. So this is how our first layer works. So the blend is for our cadmium yellow and a little bit of bond on where the skyline and the water line as the mean differentiated. And I'm just giving a simple black line to show you the different line. So if you want a big naught and u dotted vertical loading recently. So you can definitely try to blend your backgrounds and subgrade them on, scrape off people first and then go do your final painting. For the purpose of doing this on this scrapbook paper you can see on the right is this only i'll, I'll be painting our mountains that we had drawn on the horizontal line. Simply dig ERD dealing brush, have some black color in it. Make sure that you don't have excess amount of water. And I'm just simply giving it a solid bench. And we are done with our left mounting. Similarly, you have to paint your right mounting as well. If you find that your color is getting done, just take your detailing brush again to your black color and add some color in it again. And now I'm painting the right boundary as well. My yard. Overlapping your pencil or your just outlining it with your paintbrush. Make sure that you use your tip off your detailing brush so that you can have a nice edge on your mountains. Now, I am again taking my day dealing brush and just enhancing the ocean below the horizon line to give these nice shadows falling on the water body. The mountains as well. So yeah, just darkening it up. I'm also getting some darker values and the bottom. So we are almost done with the painting that are two elements left. One is our setting sun and the bads. Now for painting the sun, we are using titanium byte value. We take our brush again and we'll be using are titanium byte. So the reason behind using titanium by doing that, we wanted a nice solid batch and this cadmium yellow back down. Now using your titanium white, do not have any water in your brush. Because if you'll be having water in your brush than the batch would be lighter in tone. B12, a nice, solid badge of design so that it looks beautiful. Yellow background. I'm just filling in this outline version. And you can take some gelato outside the benzyl as well, so that you get a nice blurry effect of your son as well. So as you can see that our sun also looks beautiful. Now what will be simply giving the Viper deflections little bit enhancement by applying our titanium white. Again. Just simply move your brush and this horizontal direction and let it slowly get disappeared. So now I'm using my white pen from support and it has a very nice fine tip from which you can get a nice solid color. So we're just finishing it up by giving some minute details. So now with benzene will be drawing the position of our bonds. If you are having any difficulty in drawing the boards and painting them, you can go to the techniques required for painting for where I had taught how to draw these boards. Very easy. Laughter locating the position of the boards from your Benson. You'll have to use your black pen or you can use your color also watercolor. So I'm just using my black pen from SAP hana. And it is looking really nice as you can see me are just leaving the strokes and V-shape. So our painting is almost ready and we are ready to take down the side date that you take off the deep end an angle so that you do not end up with dirt in your paper. I'm just bleeding, moving that apes do not dream all the devs in a hurry because it will definitely follow your painting. And this is the most satisfying step that I love the most. And removing the tape is those satisfactory plasma. And okay, now we are done with the last day. Also, if you use a nice bad for taping down your painting, allows you to rotate your painting in any direction you want. And you can see how beautiful this Mini Polaroid looks. But as you can see that we have these distorted side edge does happens by doing watercolors. Don't need to worry. Just take your detailing brush, have some black color in it and you can give this by finishing it up. So I'm just giving it these finishing touches so that you do not know the distorted edge. And this is how you can make your painting better. So I hope that you liked this particular Polaroid and definitely you have to try this. In the next painting.
12. Techniques for painting 5: Hi everybody. So now for our painting, we're going to talk about all the techniques that you'll need for painting this particular Polaroid. So now for this particular painting, we have these nice lamppost with virus being scattered in less time and some nice call lamppost as well. So just simply use your pencil and draw these lamppost. Paused. I'm just making a rough sketch so that you know how the diagram looks. And we have some random buyers on its own which we can detect the painted or you can use your black pen to draw that. So we have two lamppost on the side, all its own, which you can see I'm drawing right now. Drawing with pencil first and then applying the paint is early amazing because it gives you a nice reference. And also you make minimum mistake. As you can see that we had drawn the lamppost. Now I'm using my size two detailing brush down brush basically. And we'll be using our black color to paint the lamppost. Just apply, assembles all it batch. You can see it's very easy. You can observe the moment of my brush, symbol vertical movement. And now we'll apply paint to be horizontal elements of the examples. And these elements play. We had these dynein light, the millennium have to paint the lamppost on the right. And I'll I'm using my black pen from Dakota. It's not necessary to use the same, then you can move on. Any other black men has been so on little tiny details, but I do want to find your brush documents all day. Well, you can use your black pen. So there are these little elements and this lamppost which you can draw with your black pen only. That's always good to have all mini sketch book for yourself. But for now, for drawing the random bias which are being scattered from the main lamppost, we are using our pencil. And I would also recommend you that if you want to be non definitely draw with the pencil falls. Don't go with bended. Actually. That's not necessary that you roll with the same momentum of the wires which I had done. Buyers are randomly scattered so you can go for your method as well. You can draw it in any way. It's not outcome function. Bam, just simply moving my Ben on the pencil line. And we are almost done with our Biot. And i'll, I'll be showing you that how you'll be drawing these little buying trees, which are being drawn on the bottom part. If you are taking the glass and proper sequence, then you will be definitely annoying because I had already covered it up and techniques to glide for painting one. So now let me do a quick revision for you guys. If I had drawn these vertical lines, let me draw it with our black pen falls and then I will show you how to draw it with the detailing brush. Simply draw these bushes as I'm drawing and make sure while moving towards the bottom back, you increase the size of the binary bushes so that it gives you a nice triangular shape. Which pine trees gender they have. So on these smaller vertical line, I'm showing you how to do this, both design. And this is how you can draw your pine tree. This is symbol practising exercise which you can do in your sketch book. On the bottom part, I'm just showing you how the movement-based walking. Now I'm showing you how to draw it with our painting brush. Just simply draw the vertical line but resonance. And then I'm just drawing the pushes. The only difference between using a brush and append is that your bushes would look more intensive and nice rather than using a pen and gives a nice depth to your tree. So this is the portion that we had drawn and now I draw a little binary. So as you can observe, that the one which is drawing with the pen and the one which is drawn with the all detailing brush have real difference. So I guess the one which drawn with our detailing brush looks more beautiful than D1, which we have drawn with a pen tool again, select any one of them. I had done the detailing brush, one in our polarized. So these are all the techniques bad dude immediate quieting for painting this particular polarized. And now we'll just shift to the painting. I hope that you want to learn something from this video and feel.
13. Painting 5: Hey everybody, welcome back to our fifth painting, followings and set. And for painting this particular polarized, you'll be needing certain colors. So the first one is Godwin blue. The second one is Rose Mendota Lake, and the third one is cadmium orange. And that's it. You'll be needing these three colors. So I think this is one of the most favorite paintings of mine because it has a very nice back down in it. So I'll be showing you the background on these scrapbook paper on the diet. As you can see, I'm applying the force layer of art, prose Medallia. Then we'll be applying a layer of cadmium orange. Just dry your brush off. You can see how nice the colors blend together. And the last one is our cadmium blue. So these are all the three colors that we are going to blend in our back down. If you find any difficulty by painting the background colors on your final painting. Rather than you can just simply take scrape off people factors on that fault and then apply it to your final painting. Now I'm just applying our thin gold of motto on our deep down paper. Make sure that you do not leave any space. Also do not give a thick layer of water so that you do not form any water boils in between. Use any source of light nearby you so that you know where any space is left in the paper. So now I'll be applying the force layer of rows Madonna using my half-inch flat brush. I'm giving the bag down. If you want to know the details of the brush I'm using, you can definitely go to the description section and you can find all the details for the stationary I had been using. Although it's not necessary, Use the same band which I'm using. You can go for any other good alternative. So I'm using a gamble brush. And you can see that it is getting a nice blend with the orange. Now we are having the last layer of cadmium yellow. I'm just giving some rough strokes with my flat brush so that we can give a nice cloudy effect to the background. If you find that you have access amount of water in your brush, you can dab it and do your napkin at will absorb all the answers amount of water. Now I'm just using some cadmium blue. And I'm giving these random badges on the blend of rows, Madonna and God, mmm, auditing. So we'll be giving these nice effect so that we can give our clouds some depth. So here is a trick. You with your round brush outsize six and you have to just simply have no color in it and dry it on your napkin and tap it randomly that we I'm doing right now. It will absorb the background color and give the batches. As you can see, it is getting a nice bite badge, which gives you a clouds depth. So we are just trying to enhance the Cloud. This way. You can do this step. And it does done. So now we'll be starting the bottom. But you can see that the background which I showed you on these people matches with the background which we had fainted. So now I'll just leave you with your pencil and locating our lamp post. So first one is bigger lampposts to produce on the left side. I'm just drawing it with my benzyl. Don't make it too dark because it will tear up your paper if you apply more pressure on your pencil because your paper is still wet. So draw the horizontal members as well. So I have these two lamps Also on the bottom bar. So I had drawn that as well. And we have Duke of the lamppost on the right sign. That'll draw that also. So that's it on the drawing. The only declined as much. And we have some bushes and the bottom, but you can just give some random strokes with your pencil to locate those. So now we'll be using our thighs today dealing brush, which is around brush. My brush I'm using right now is also from gamble. Now we'll start painting the Bush's. It's very easy. Just use the tip of your detailing brush and give nice drops. Tried to give solid batch and have less amount of water in your brush. Repeat the same process in the entire bottom bought bread, we are going to draw the motions. No need to hurry. You have to draw these bushes very slowly. And between I'm drawing me find DRI as well, which we learned in that technique for the client for painting. So if you have any difficulty in drawing these, you can definitely take that up and learn how to draw these mini buying trees. You can observe the movement of my brush. And now we will finish the other half portion. I'm drawing some more motion in between. So we are almost done with the wishes. At last, we will be drawing one more fine tree, which is you can observe the movement of my brush. Also, one more thing I would like to recommend you guys is that if you are a beginner and water coloring and you are not that much fond of the medium. You can definitely observe that there'll be it has been painted. And then you can take it up again and start painting with me. So by doing this, you can observe maximum details and you won't miss out on any point. But James seem. So now we'll be painting our lamp. Can be follow the line which we had drawn with our pencil. Make sure that do, do not go outside the line which we are drawn. Tried to apply a nice solid black batch. And it's almost done. So now we will be painting be horizontal members and the lamppost. And these horizontal members are, are little bit land in position so you can move your brush accordingly. Again, I would tell you then give a nice solid black patch and painting the light and the bottom part as well. We are painting that as well. So our painting gets ready. I'm just giving some basic details. So this is my black pen, drums. Nice tip. It's not necessary to use the black pen. You can move any other black pen as well. So we are drawing some minute details and the lamppost. From the lamppost, you will have to take the wires and random fashion towards the left side first, and then we'll draw it towards the right side. So these electrical wires, which I'm drawing right now, are generally very much random and real life. So it's not necessarily that to draw it in the same fashion I'm drawing. You can draw it in a random way also. And you can see how beautiful they look in the background. So we are done with the virus has been. So now we'll be painting the light. I'm using my white pen from Sakura at Sandec dealing Ben, no need to worry, you will find it from any local stationery. So now I'm just using the main mode. So on do your bushes. And our painting is ready. So we're going to be moving the slide decks. Be very much careful while removing these side. Did just demo the tape on an angle and very slowly so that you do not end up by tilting your paper. I will not do the Mini Polaroid and definitely add your project into the project gallery. I would love to see your paintings as well. The last day. So our painting is ready. And you can see how beautiful colors in the painting.
14. Techniques for painting 6: So everybody, welcome back to the technique applied for fainting, which is our last painting for OWN content. So I would recommend you to go to the video named as techniques declined for painting one. And this particular class that I had given all the details and techniques which will be required for this particular Polaroid, and you can save your time. So let's get started.
15. Painting 6: Hey everybody, welcome back to the final and the last painting of our blowing sunset budgets paintings. So for this particular painting, you'll be needing certain colors. The first one is ultimately, the second one is cadmium orange, and the last, but not the least, is cadmium yellow. So now we'll be starting our painting. So I'm just applying a 10 Goto water on the people. Just make sure that you do not apply axis amount of water so that, that are normal water woods and between just simply apply water and ten layer. So I'm using a half-inch flat brush, which is from gunman. So as you can see that we had applied a nice coat of water. Use addition napkin. If you find access amount of water on your paper and use the light reflection to see whether you have missed any part. Now we'll be giving our color, which is our ultramarine. I'm just drying up my brush and trying to have less water and more color. So take ultramarine onto a flat brush and to apply it from the top portion. Just observe the movement of my brush at a simple horizontal movement. So now I'll be taking cadmium orange. And again, apply a nice bought off and mm-hm. Orange. Just beneath our ultramarine. Dab your brush onto your tissue napkin so that you can get a nice blend between your ultra marine and your cadmium orange. And then we are having our last color, which is our cadmium yellow and in the bottom. But so these are all the three colors we are using on the background. Dry your brush on the tissue napkin so that you can lend all the three colors together. And this technique is also known as blending. Shouldn't be any line which defines that separation between all the three colors. As you can observe that we had got a nice background. If you find the colors applied a little bit lighter and dawn, you can definitely apply a second, vote on it, but be very much careful while doing that. And also remember that in water coloring, the Collaborate you had applied initially, but will come one-to-one lighter when it dries up. So now you can see that our blenders looking really amazing. So this is how the background close books altogether. I'm just taking my addition napkin and cleaning up the edges. This is just because for the last painting I hadn't used masking tape. I was Old.stuff line, so I had used our simple plastics dilutive. That alter balls doesn't matter, but it is better to use your masking tape. So now we're starting with our painting. After painting the background color, it is time to draw all the elements that are coming into our painting. So the first one is the bushes that are on the bottom. But so just use your pencil and draw these random stroll plays WCS value want them to. That's not necessary to draw the same. You can draw WGS and any random fashion. It's absolutely fine. This is just a natural paintings so it can go anyways. So now we have one big lamppost and front portion. So I'm just drawing two vertical lines to denote that. And there are these two side lamps on this main vertical bone. So we'll be drawing that out. So make sure that you do not apply a lot of pressure on your pencil because your background is still wet and it can tear up your paper. So now will be locating our other electrical poles. You can do this with your pencil only. So taking the perspective and notice we are taking the electrical poles from bigger to smaller size from left to right portion. And then we'll be having one last poll bitches, little bit bigger in size. Also, you can draw the wires which are scattered from the bowl from your Benzer for their friends. And you will find it convenient to draw it directly. You can draw it directly also from your black pen. It's always better to have definite lines from your Benson. I'm giving some minute details. The horizontal members in the light pole. So all the wire from the electrical poles are connected to each other. I'm just simply drawing these and are called manner. And the last one. So now we are almost done drawing the elements for this painting. So now I'll be taking my thighs to be detailing brush for painting the elements. So this is size tool down branch bar painting all the elements which we had drawn just now. Down brush, I'm using black color. So take little amount of water into a detailing brush and mix it well with your black color. They're not have access amount of Florida because it will spoil your painting. We just want a nice big batch of black. So now we'll be starting from the bottom part, which are our bushes. You just simply have to see that strokes I'm making. Use the tip of your detailing brush to give a nice look to your motions. So now you have to just follow these steps. We are just finishing the bottom bushes. If you find any difficulty in finding this thing, you can slow down. We DO. That is an option below. I had just faster NAEP up because VR1 to repeat that same process. Time making sure that I'm not having a lot of Rwanda in my detailing brush. I'm just having a nice dark black patch because the bushes RN portion and we have to make it a contrast with the background. And I'm also using the tip of my day dealing dash and giving some nice stroke on the top portion so that the grass elements enhances. You can see it's very easy. You have to just simply loosen up your brush and give this nice stroke. So now we are almost done painting bushes in the bottom part. So now we'll be moving to what the electrical poll. Again, we'll be taking our black color with less amount of water in it. And I'm starting to paint the electrical. Does the moment of my brush, I'm not moving out of the pencil line which we had made. Move your brush in this moment. Take the bottom part. And you can simply finish up the poll. So the reason behind using black color bar electrical poles as well, is that the have to enhance the major elements in the background. And black would be best suited to give the amazing contrast. So I'll be painting the other electrical poles. Again, you have to just simply move your brush in the vertical direction. So as you can see that we had located on our electrical poles Bay nicely. Let's try to give a nice solid opaque batch. Painting the side members, all of us are willing to have the light and then the other member as well. So now we'd be giving some details to our electrical poles. I'm using my black pen from Sakura editors having orderly fine tip. It's not necessary that you will use the same brand. You can go for any other black panel is all just at, should have a fine tip and attribute bar. Nice thought that black patch. So now going to be drawing some detailing elements to the painting, which are the horizontal members and the electrical poll. So just simply draw these details as I'm drawing right now. Adding up these many details will give you a painting. An amazing values. I'm repeating the process and all the other poles which we had drawn. So now it's time to overlap the pencil line for the buyers. It's always very much useful to tape down your paper on a board so that you can rotate it accordingly. And you can have your hand movement very nicely. Just simply rotated my PVC board. And I'm drawing these lines with my black pen. So you can absorb it. Go momentum, which we are making with our hand. And for that you will need to rotate your bad. So again, I had just rotated it in the way I wanted. And I'm drawing these buyers randomly. That's not necessary that you draw the buyers in the same fashion I had drawn. These wires are generally in our random and scattered based, so you can draw it according to your wish also. So now it's very important, but we are going to connect all the rights to the electrical poles. So I had taken the ball. And then similarly you have to connect it with all the other balls. So you can see the utilization of the PVC board. I'm just rotating it according to my requirement. And it makes your animal meant very easy. And the last one. So now we will be drawing some other random buyers. The policy, after connecting all the balls together, have some random lives which are scattered on the ground. As you can see that we had drawn the wires and it's not at all difficult. You are just supposed to practice it on your sketchbook. Or if you are not that much confident TO painted directly on your painting. Now, I'll be using my white pen from SA quota. And again, it has a very nice tip and it gives amazing solid white patch. So this pen is generally used for detailing, but it'll be false to giving an opaque patch to the light, which is on our first electrical boy. Then we'll be using it to draw the setting sun. Simply just make a smaller round. And you can use this pen to give some additional details to the bushes which we had drawn in the front part are nice and amazing depth to your bushes. And simply you have to just repeat this process and the entire bottom part. So we are almost done. So we are almost done with the painting and comes down last step, which is the moving down bedside date. And you can see that all our elements looks relatively amazing and enough contrast with the violin background which we had drawn. There'll be very much careful by removing the side tapes as it can tear up your paper if you wouldn't be bad, much careful. Just remove that tape with an angle and a very slow manner. And then comes the last date from the bottom and the above ocean. So as you can see that we haven't got a very nice edge. And we are done. I hope that you liked the paintings. Do add your projects into the project gallery. I would love to see your paintings as well. Thank you.
16. Final Thoughts: So everybody, I hope that you enjoyed the class. And I also hope that you are going to try all these mini Polaroids for the growing sunset. If you are on Instagram, do dag mean as shut Raj rotations as I would love to repost your stories as well. Feel free to ask any doubts or any questions related to any particular Polaroid. Also, I would like to request you to leave a feedback as it encourages me to come up with even more creative classes like this and do annual projects into the project gallery. I would definitely love to see your artworks and I will definitely give you my feedback on that as well. Happy being demonized and see you in the next class.
 Rutvik Patel, Artist and Instructor