Transcripts
1. Introduction: Take time and smell the roses. Hello, it's done. I'm a Filipino
French watercolor. Is they scan data
residing in Spain. And I am also an illustrator. And I welcome you to this class. In this class, you will pay why roses in intuitive
and loose style. You will practice
basic techniques and learn the basic
principles of watercolors with special focus in mixing the techniques that you've
learned all in one painting. We will also go through the importance of
composition and sketching. You will learn to
trust your intuition. Relax, and of course,
enjoy the process. I'm a self-taught artist and I've learned in the most
challenging situations. And my goal is to
inspire others to keep pursuing their goals
and never lose sight, no matter how bumpy
the right could get. I had sold paintings
all over the world, partnered with calories, features and exhibited
in different countries. And every day I tried
to be a better artist. I believe in you and
everything that you can do. So without further ado, let me invite you to
share this painting, roses class with me. And I hope to see you soon.
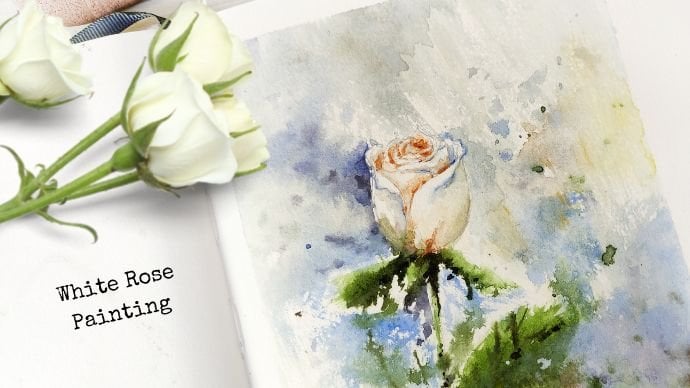
2. Materials: Welcome to the material
part of this class. And we will be using the following materials for
this White Rose painting. I'll be using Arches, 100% cotton, rough surface. And I divided them into two equal parts and then cut
them up and made a square. And of course, you can
have any size that you wish as long as they
are rough paper, which I definitely advise, and a big bucket of water. And of course your tissue paper. And I put them in a small
jar so that they want row in my table and a
small water spray. And of course, I have
to painting palette, and they're made of ceramics. And they are wonderful
to use paint brush. So I'll be using only
one paint brush, brush number two, mop brush. And of course, feel free to use any small brush
that we have. All the materials will be made available for you to download. So please download them
along with all the tips. Okay. So you have
optional that C-O-L-O-R. Then the one we're going to use a lot is burnt sienna
and of course, a lot of sap green
and cobalt blue, all in 25 a male. So please buy them
in a bigger tube. And then we have Van ****
brown and tan is white. And I were in war
and neutral tint. So these are all the materials
that we're going to need. Feel free to download
them before painting and also the tips
that I give for you. So I can't wait to
paint with you. I'll see you in the sketching
and painting process.
3. Sketching : Welcome everyone and thank
you for joining me in this class and we are
at the sketching part. This process. As you can see, my my camera cameras
skipped a little bit. But don't worry, I'll do
it all over again for you. I'm using pencil number five, and please notice the position of my fingers while
I'm sketching and drawing some really
light sketches and just enough to see during
the painting process. Also, I'm trying to sketch
in a circular motion. And every time we sketch, we have the sketch first,
the biggest subject. So the focal point of your painting and all
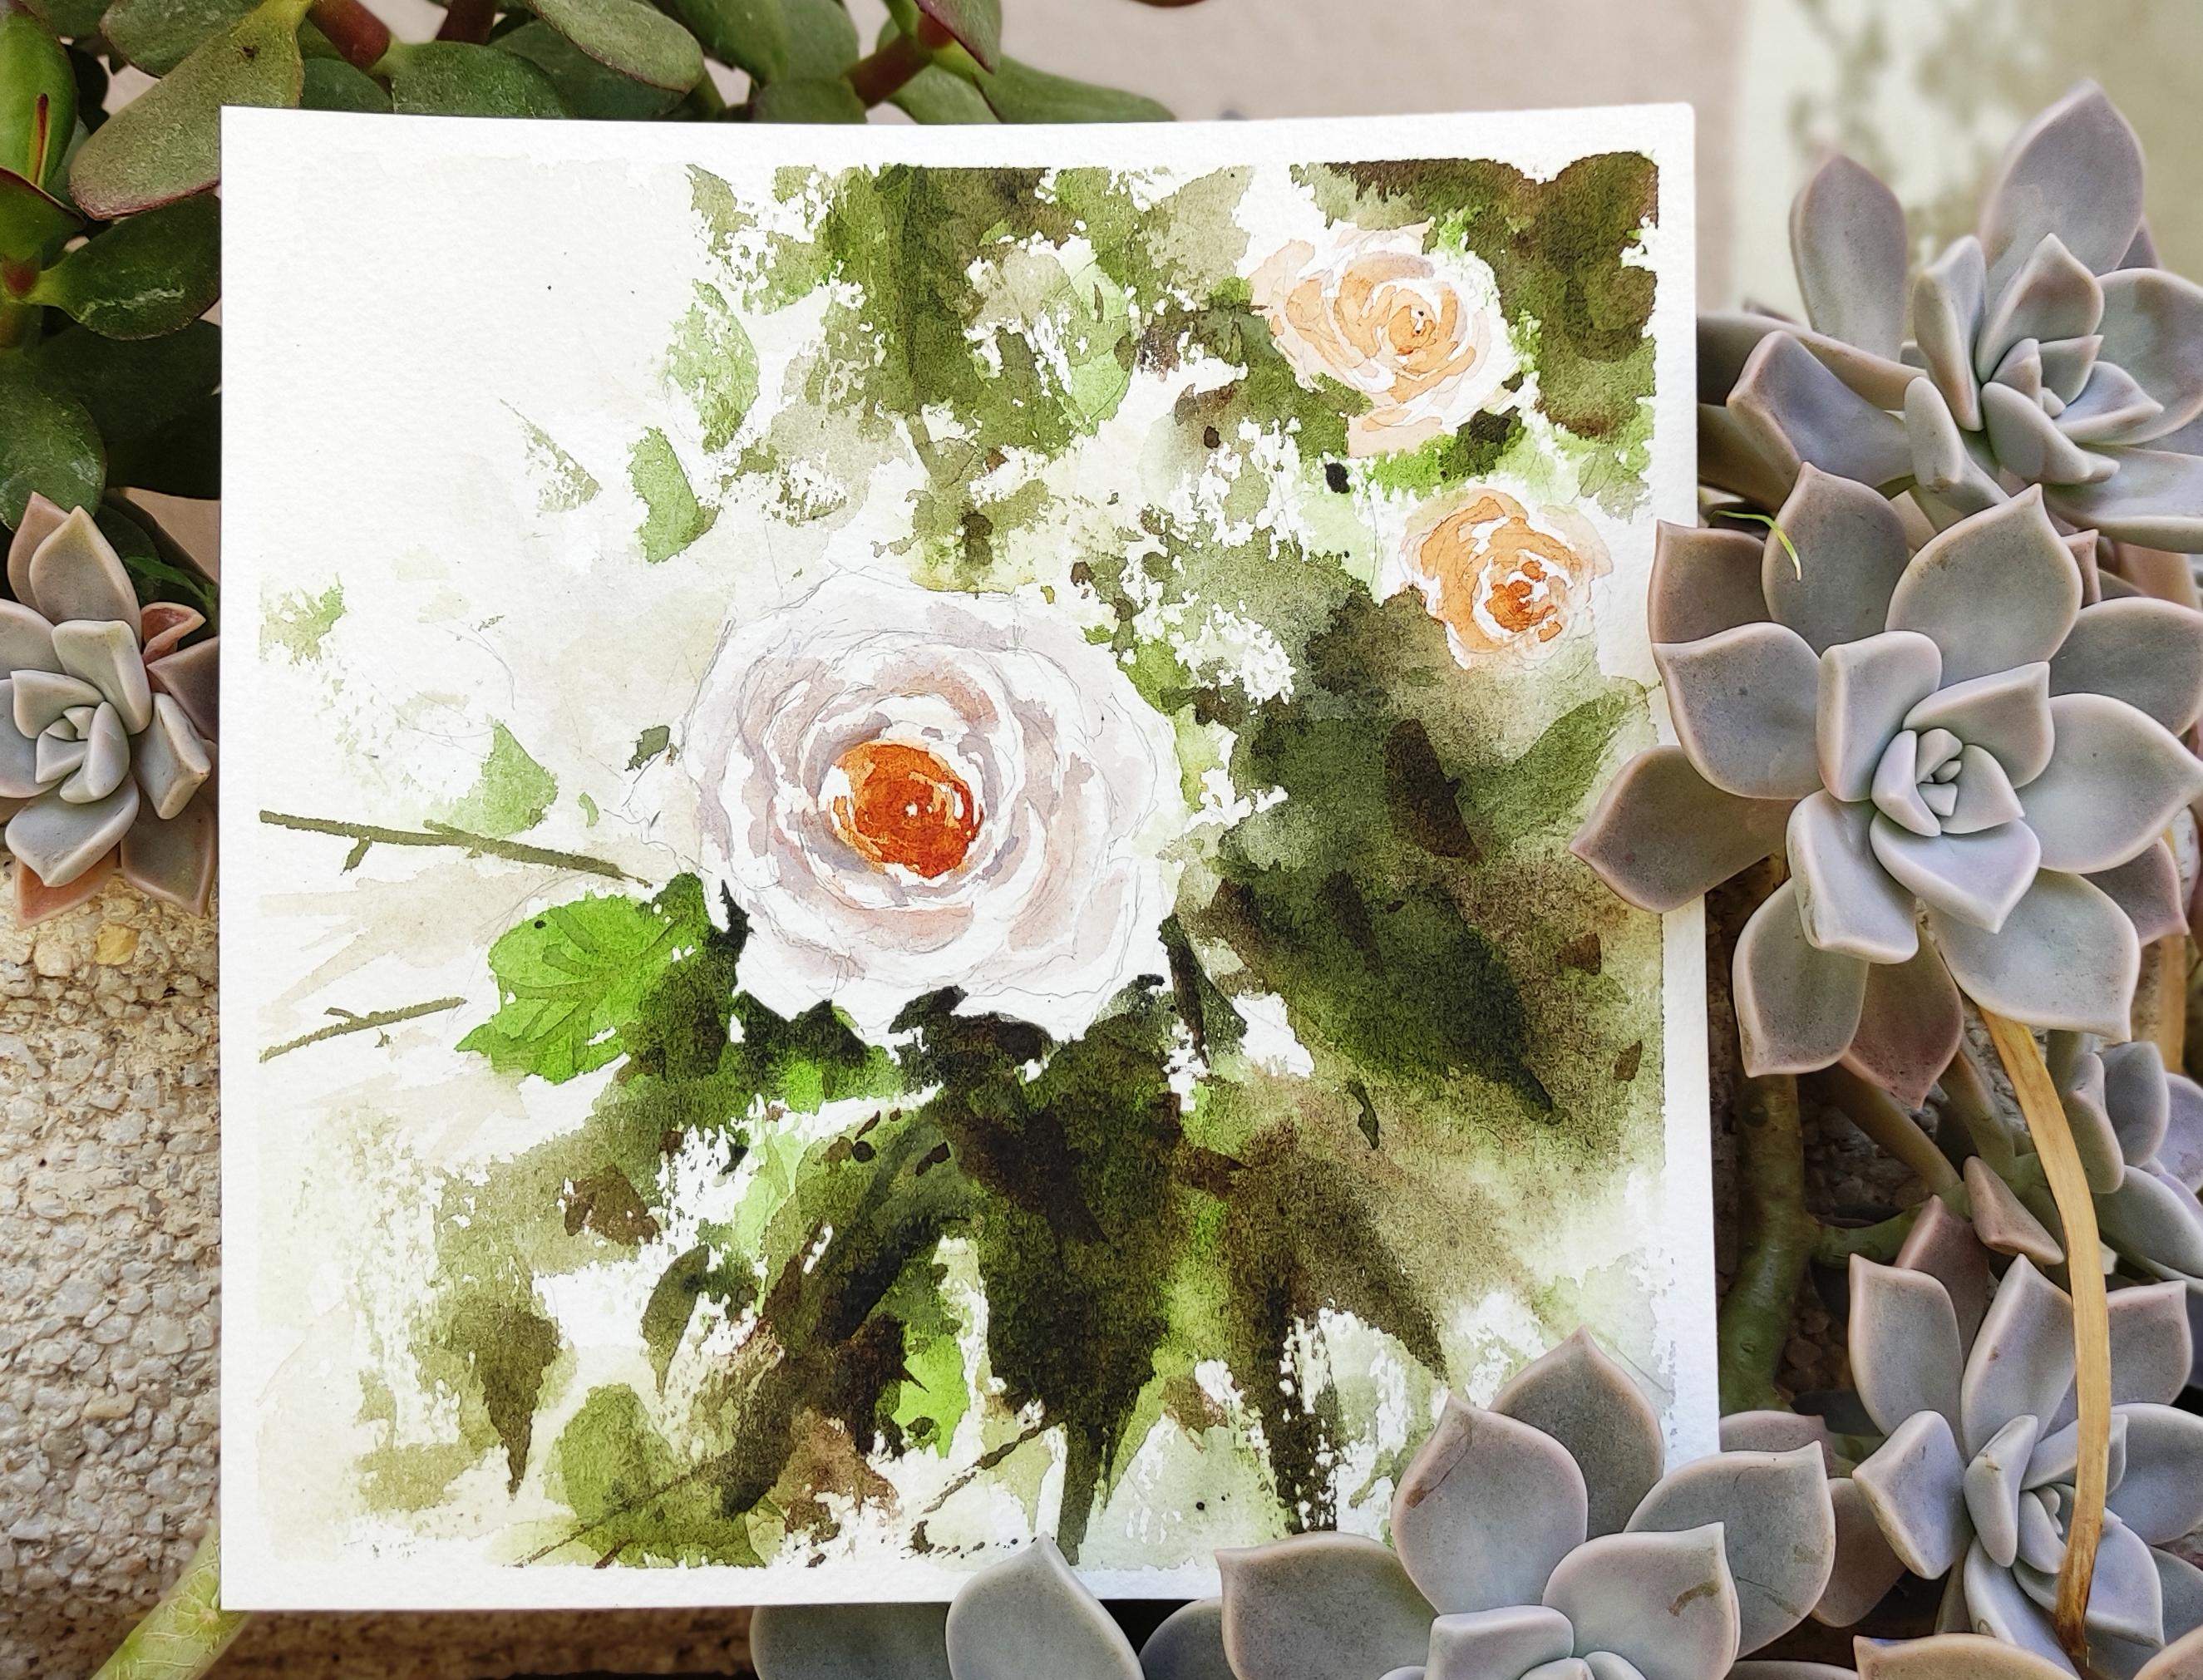
the rest will follow. Roses could be intimidating
in painting and sketching. So all you need is a good habit of practicing every day and
learning from others. Learning from all the
help that you could get, like videos, books,
and all the others. So just keep on doing that and I'm sure your painting
will improve. Their composition is
the most important part of your painting process. So this will be learned through constant practice
and constant learning. So we learn from
experience, right? So all of these
materials and tips and other things for this class will be made
available for you to download. So please download
them before starting all this class, this
painting process. So in an improving
your sketching, you have to grab a pencil and as sketching bad and do your best to sketch
anywhere that you can. And you can also sketch every morning and just try to sketch
really short sketches. And this will definitely
improve your drawings. So here we are
going to Jesse No, draw or sketch some leaves, but I will probably not follow these
during the background and the painting process
because I will be doing an intuitive way of
painting the background. But I'm still going to sketch some leaves just in
order to give me a guide on how the composition will
be for the background. And in this part, I really encourage you
to play along with your imagination
and do experiments. And for this, you will definitely learn a
lot and improve. So every time you sketch, although I have some rubber
besides me just in case, but try not to erase on watercolor paper because
they are a bit sensitive. So if you can avoid erasing, that would be really perfect. So here I'm adding small roses, but this is optional. If you want to draw
or adds another site, another type of flower, then you can go
ahead and do that. And if you want to add more colors later or
other small subjects, then you get always add. Just so you know that our
focal points, of course, in this painting
is the White Rose. So we're still looking
at the reference photo, and I hope that you
have them while you are sketching and painting. So I really hope that you will enjoy this
painting and sketching process with me and
I hope to see you in the most exciting
part of this class. The painting. Well done
for the sketching. And if you have other
questions, just let me know. Let me know in the
discussion forum. So I'll see you then
next part of this class.
4. First Wash : Hello again, and thank you so much for
joining me in this class, a white rose
watercolor painting. And I'm super excited to
have you in this class. So welcome and thank you so much for joining
me in this class. White arose watercolor, and I'm missing brush, brush number two. And I'm wetting the
middle of that paper, avoiding the white of the paper. So we will be using burnt sienna and we're
trapping it in the middle. And because you've
already wet to dry the beginning so the
watercolor paint bulges, move freely on its own. Okay, so notice that tip, I'm using the tip of my brush and trying to avoid the
white in the middle. So it's very important to leave the whites in the middle
in this painting. And you will see that later. You'll understand why later. So as you can see, I'm spreading the burnt sienna
outside and a little bit. And now I'm cleaning
the brush and we will be using Chinese white, neutral tent and cobalt blue
for the shadow of our rows. We will try to make it
as light as possible. So this is more on white because we are
painting white rose and we artists working and
using the shadow to make the White Rose pop-up and to have the White Rose
shapes and shadows. And I've also added the scarlet red to make it look warmer. This is just a
drop-off, scarlet red. Okay, So following the sketches, we're going to move in a circular motion to work
on the shadow of the rows. So the shadow and the white
is the petal of your rows. The light of this painting
is coming from the left. So the right side of your
painting is a bit darker. So planning your painting ahead where the light
is coming from, the composition,
all of these will make the difference
on your end result. So I'm slanting my watercolor
brush a little bit. And I'm using as
much as possible on the one brush stroke to
make our painting loose, loose and more natural. So in the past, if you feel like you're
painting is tight, that's probably because you've used a lot of brushstrokes. K. So now you can see, I'm painting outside the house and it's sunny and it's windy. And it's always
sunny here in Spain. So the butter color, the watercolor paper, is
drying faster than its own. But I still prefer to walk outside because it's
just wonderful to work outside k. So feel free
to download your reference, photo and painting
reference before doing this art class because it will guide you all
throughout the process. So we're still adding and
following the sketches and adding shadows on our rows. And I'm doing it slowly, but at the same time, I'm doing my best to make
only one brush stroke. Okay, so notice that
I'm also pressing the brush so that there
will be some whites that's, that will be left. Our paper is 100%
cotton and it's an RAF. So with a rough paper, whites usually just leave when you're doing
some dry brushing. Okay. So I just
continue their brushes in circular motion
with our shadows. And as you can see, we are getting lighter and lighter as we move to the outside
layer of our rows. So to have lighter pigment, this is the less water, I mean more water and
less watercolor paints. And I'm just letting the
watercolor move on its own. So now this is more on white. So I hope that you are enjoying
this process and we're super excited to finish
this watercolor rose. And now I'm just adding another bit darker tonal value of our rows using
the reference photo. So that when I do this, it will make a
watercolor rose I'm painting pop up a
little bit and now I'm adding Barcelona in the middle while the
first wash is still wet. So I'm mixing it well and more pigment to add more shadow. And I'm still trying to avoid
the white on the paper. And I'm using the tip of my brush in order
to achieve that. Rows painting is a bit tricky. It's a bit challenging
at the beginning, but I think the
more you practice, the more you will get used to the shape and the brushstroke, and the more your painting will appear more natural and fresh. So to avoid overdoing it, do your best to do only
one brush stroke again. So we'll continue to paint these watercolor,
watercolor rose painting. And I'm adding darker tonal
values and the petals using the parser Yana that be
used in the middle to have more details and to
add it while the shadow, I mean the paper is still wet. K So to have a loose effect. So we're getting very close
to the second part of this painting and I'm super excited to
finish it with you. Okay. So another tip is that
tried to clean your brush as much as possible and try to change your
watercolor water bucket. If you have two case, I'm still using the same brush. It's brush number two. And I'm adding warmer color, yellow or for a background
to this is wet, on dry and I'm avoiding
some whites of the paper. I always challenge myself to use only one brush and
every painting that I do. But here, if you
feel like you need, you know, I wanted it faster. So I'm going to use a bigger
flat brush while go ahead. Do your own experiment in Cuba Definitely,
and learn more. Okay, so we are almost done on the first part
of this painting. Now, we're going to the
next part, this video. So I'm super excited to see you and let's go ahead and
finish this painting. Gay, so I'll see you.
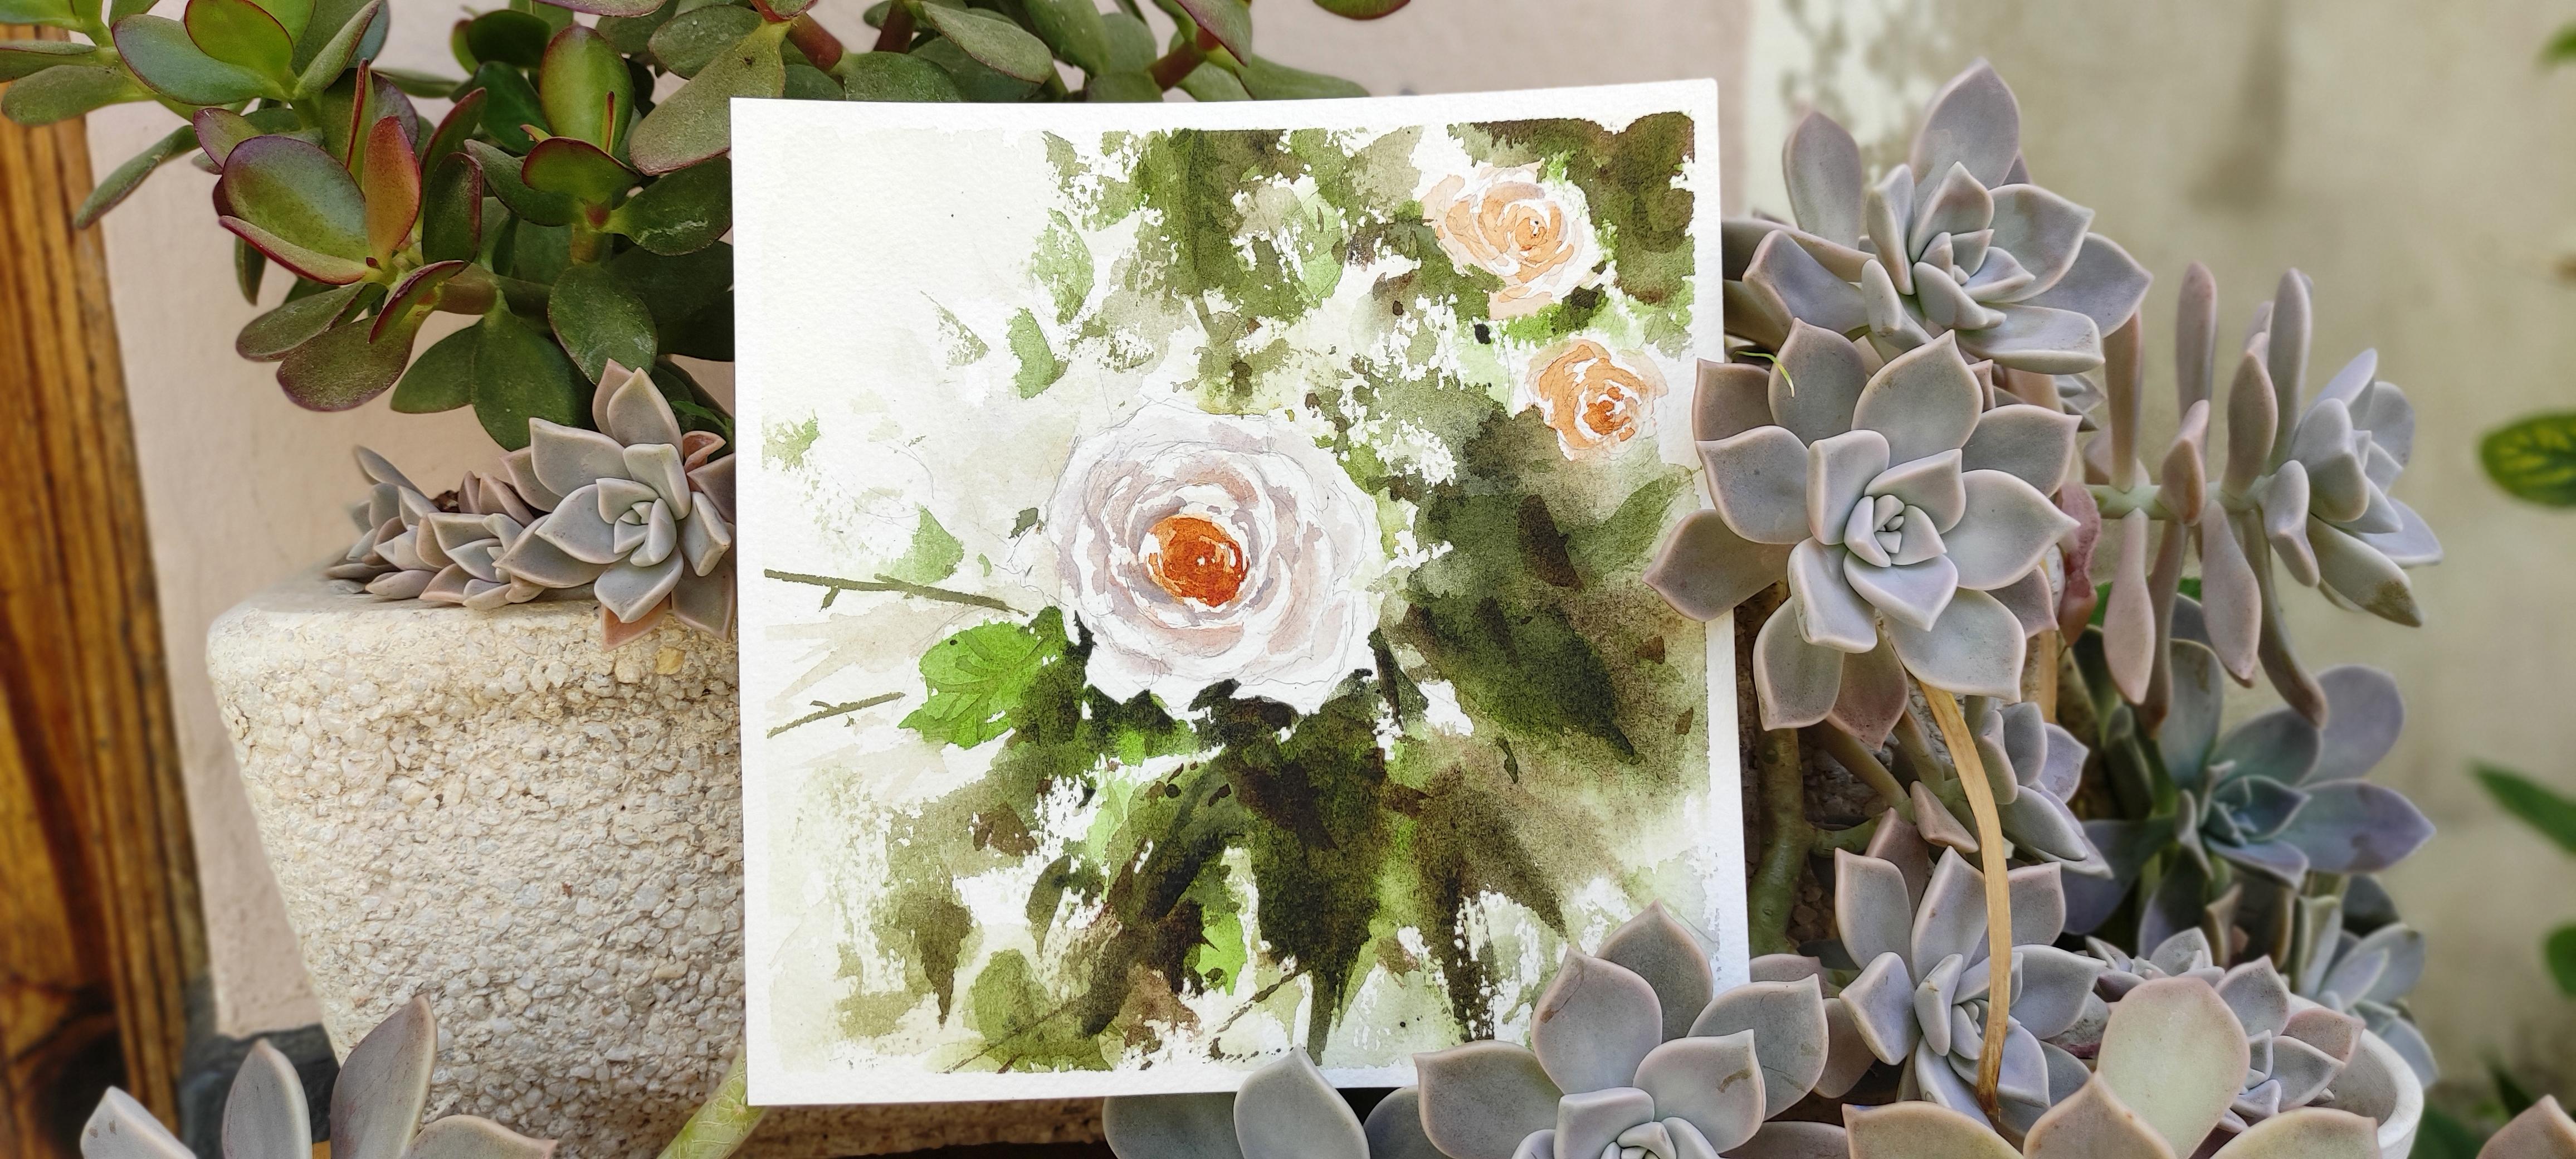
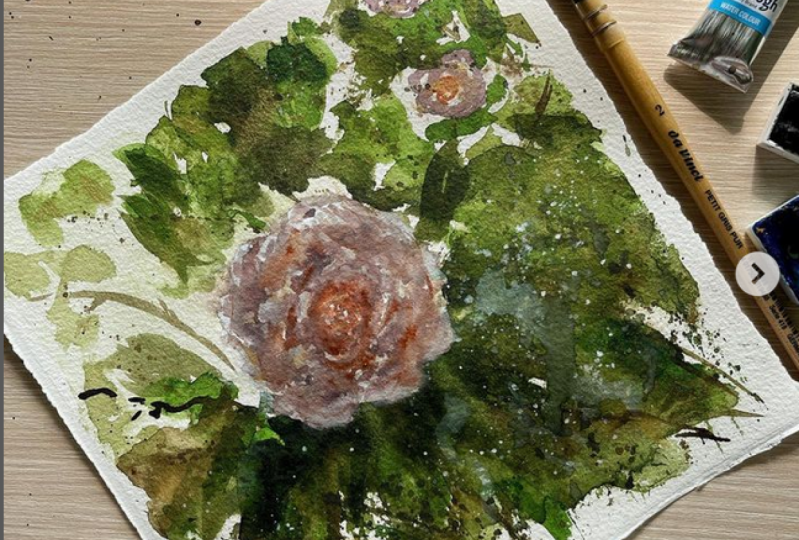
5. Background: So let's continue painting
this wire houses. And now I'll be working on some small roses
in the background. So they're not very important. They are not the
major focal point, which is the biggest roses that we have, rows that we have. So they will be light. So it's the same process. I'm using the same paint brush, brush number two, mop brush. And I've wet the
middle of the rows. And Kahlo did painted
it with sienna. And then the same color again on the petals as we go along
in circular motion. These are cobalt blue, Chinese white, and neutral tint. So we're doing in
circular motion and doing the same process to
create the rows k. So these two are, they are there for
the composition sake so that our painting
will become balanced. So they are just background. And in this part, I'm encourage you to change the color of your
background roses, those two small
roses if you want. So now greens, we're adding
the leaves of the roses. So this is Sap green. And we are doing wet, on dry. Okay, so, wow, following the sketches that
we have, and of course, we have the reference
painting and reference photo to guide us
all throughout this process. So I'm just adding
more sap green and adding more leaves
in the background. And I'm just paying
attention to add the leaves, the greens in the
background of our painting. Okay, so within the
boundary of the rows and the background is more
dark gray, so it's darker. Here. I want my green
to be a bit darker, so I'm adding sap green with a little bit of ivory
black and Van **** brown. So this will be a little bit darker and a little bit
of cobalt blue as well. So this makes you can try them in when you're doing
some practice and you will see that I'm doing
this on a wet papers. I'm here. The paper is already wet because I've added
sap green before. The watercolor paint is
just flowing it on its own. And now I'm dragging
it some parts of the watercolor paints
and dragging it down to our background. So as you can see, it, it leaves some whites, which is a very nice
effect when you are working with
flower paintings. So if you call are
all your background, it will make your watercolor
painting a little bit dull. So here at the
edge of the Roses, We're adding more contrast
and highlight so that your white watercolor
rose will pop up. And it will be more dramatic. So here this is wet, on dry. Now we are adding
the same color. It's sap green, cobalt blue, ivory black, and Van **** brown. And I'm continuing the
process is almost like halfway of the
shape of our rows. Okay, So here is actually like playing with
three colors with sap, green, Van **** brown,
and cobalt blue. It's more like four colors. I'm just dropping the
backgrounds, the leaves. Anywhere in the paper. So please observe and follow. I'm still using the
same paintbrush, That's brush number two of a mop brush and some
parts of this paper. You can have it lose. So go ahead and spray,
but be careful, and that's the spray on the
petals of the Roses itself. Okay, So we are working in the background and the
second part of the video, and we are mixing wet and dry, wet on wet process. Okay, so here I'm spraying
some parts of the background, especially on the right side, because I want this side
to be wet and loose. And since we are working on a rough watercolor
paper in 100% cotton, Ralph is very rapid. So when we have lots and lots of big
men are either brushes, the white of the paper will appear because of
the rough surface. Okay. So most of the time
this is my favorite paper. It's always rough. I like using rough
paper because he can have more whites
on your painting, which is very dramatic and white is very important and
in every painting. So as you can see, I'm still using the same
watercolor paint mixtures. And I'm just
dragging it all over the paper with the
combination of wet on wet, wet on dry and a little bit
of dry brushing as well. So it's just really like mixing all those techniques
in your backgrounds. So this is the part where
you can actually go ahead and play around
with the techniques. Because now we're safe. We are finished with the
focal point of our painting, and that's the rows. So here we're still adding
more contrast with the rows. But we don't do, we don t try to overdo it. So if you notice when the paper is wet and we
add another pigment, another color, the
watercolor paint just blend on its own and it has
this very loose effect. Also notice the way I
hold my paintbrush. So here my my paintbrush is high and I'm holding it on that on the top
of my paintbrush. I'm not holding
it like a pencil. I'm actually holding it
like when I'm working with acrylic or oil. So yes, it's actually,
it this way, it's faster and it's
more spontaneous. I would say. Go ahead and play along with
this different techniques that I also have a lot of videos on how to learn
these techniques. So go ahead and you know, you can watch some
classes that I have in some techniques that we're
using in those classes. So you see or getting really, really close in finishing
this painting of White Rose. And I thank you so much and
I congratulate you for, for reaching until this
part of the painting. It's a lot patients, so congratulation, well done, well done and keep it up. And always remember
that practice makes everything better
as we already know. So here I'm just
combining Van **** brown. I've already knew our
sap green, cobalt blue. While some reds to have
a warm Mars is just, we're still using the same
range of watercolor paints. If you're using the same
range of watercolor paint, It's actually uniting
your painting. So it's very important that your colors,
they are blending. So it's blending the paintings and everything as a
whole on your painting. So now, as you have noticed, now is getting really, really warmer because the sun
is actually following me. So I'm sorry about
my hands position. I haven't noticed it yet. We're still working on the
background of a paper, as you can see in the reference. I've added it so that in case it's not easy to see
what I'm doing right now. So go ahead and look at your reference photo and
your reference painting. So I'm still using the
same brush and I'm just holding it a little
bit far and higher. Here. Go ahead. I want you to play
with your imagination. I'm adding leaves. I'm adding branches. I'm mixing wet on
dry and wet on wet. So let's continue
because the sun is following me and we just
have to wait a little bit. So thank you so much. I'll see you in the next
part of this painting.
6. Details, Light, Depth: So thank you so much for
staying with me until this part and the sun is still
following me a little bit, but it's going away. Guys. So I'm still using the same
brush, brush number two. And we are working on the
wet part of the background. So some parts are wet, some parts are not wet. And we are using Van **** brown, sap green and cobalt
blue ivory in war. We are using the tip. I mean, I'm holding the brush by its n so that
the brush stroke is more quick and more fresh. And I'm adding more
darker tonal values and a background to
indicate that this is, this part is darker
and there's less sun. So please notice how
I'm holding my brush. So here you might have to
cover your focal point, the rows when you're splashing. Color, watercolor paint,
especially if it's dark pigment. We are actually adding more darker pigment
in the background. And I've combined wet on wet, wet on dry and
some dry brushing. So in this part, you can play around and
enjoy this process. Play around with all the
techniques that you've learned so far and
just feel free. So this is really the
most enjoyable part, I would say in the painting because you can play around
with the background. You just have to remember
that we should try to avoid the white part of the paper that we've avoided
right at the beginning. Because it indicates the light. So the light is
on the left side. So here I'm adding lighter tonal value to
indicate some, some shadows. Here, I'm splashing water and to the background and
actually in the paper. So since we have already
dried the focal point, the big flower, so it
will not do anything. It will not ruin your flower because it's
all completely dry. But just remember,
don't touch it. Okay, so I'm cleaning
up because we are in the garden and we have
flowers flying everywhere. Okay, So I wish that you are
enjoying this part and is very less stress because it's
actually very intuitive, is an intuitive painting. So I hope that you
are not distress. And we've done the
most difficult part, which is the flower here. Just play around and invent color mixtures that
you would like to try and enjoy doing
some experiment. So I'm just adding here darker tonal value of
a more pigment of sap green and Van **** brown in cobalt blue and a little
bit of scarlet, red. Of course, as I've said, you can use other
colors, the optional, so we have yellow or neutral, ten other colors
that you would like. And if you want, you can mix them
with ivory black and cobalt blue and they
will look darker. So never use the black
straight onto your paper. I've never used it. But you, of course
you can do your experimental but always try to mix it with other
watercolor paint. So you can see, I'm dragging colors
on the left side and the paper is dry. So we're trying to avoid the white and we're trying to
make it as light as possible. So if you notice the composition is really
important in every painting, I'd say that it's
the most important. You're painting is going to make the difference once you have mastered
your composition. So it's the way you design your painting where you're
going to put, for example, on this one where I put
the biggest water rose, which is the focal point, and where I put
the smaller rose, roses and the leaves. So this is your composition. And these can be acquired
through practice. A lot of sketching
and of course, learning from others and
learning from books or anything that you can learn
from like audios and videos. Here, as you can see
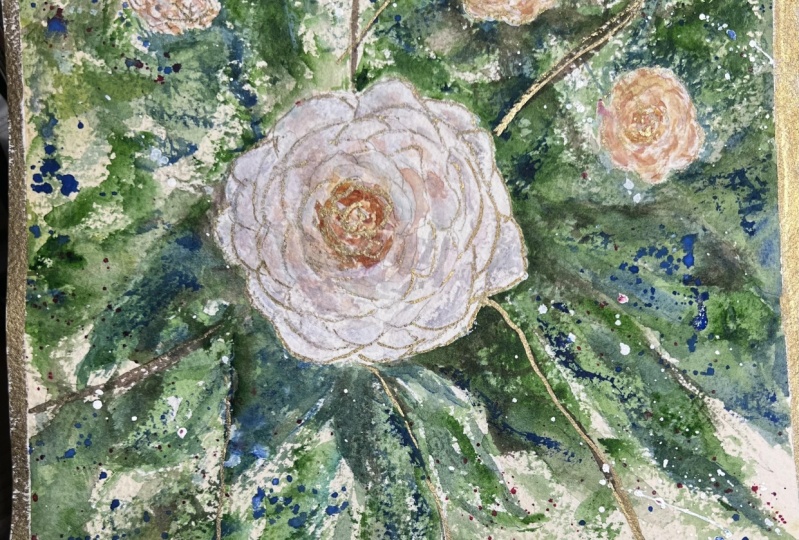
already that I'm adding a little bit more of a contrast and details
onto the rows. So these are the really last, almost the last details that
we're adding in the rows. Try not to overdo this because
it will make your rows, you're painting tight and we
don't want that to happen. So I'm still using the
tip of my brush. Here. I'm adding warmer tonal value
of burnt sienna to make the petals pop up just a
little bit so that it's not completely light against
the dark background. Here. I'm still dragging
and blending the color. So if you have noticed, we've makes a lot of watercolor techniques
in this background. So this is really the part
where you can use all you've learned and understand
how it works, how the watercolor works. So I would also say that
although the watercolor, I mean the roses at
the backgrounds, they are not the focal point. I still want them to be visible in the
painting as the whole. So I'm adding more contrast and more details using
the foreign sienna. And in this part, please play around with the watercolor paints
and keep experimenting. And since we've done with
the most difficult part, which is the rows, a middle, then you can now take a
brace and just play around. Okay, So this part, please don't overdo this. And as you have noticed, the middle part of the flower, the orange burnt sienna, with a white in the middle. Now you will appreciate
that it looks a bit shiny and it's popping up. It's because of
the white that we have left tried
at the beginning. I really want to
congratulate you for staying with me until this part of this painting and we're
still not finished. But thank you so much
for your patients. And I really hope that you are enjoying it and
having a good time. And of course, you are learning. I hope that you are learning
a lot from this project. So please post your painting
so that I can see them. Everyone can see that, so that the world can see it. And we can share our
knowledge and how to improve. So I will try to,
if you post them, I will do my best to respond
as soon as possible. If you have any question, feel free to write that
in the discussion. And I've also got videos, so please feel free to look
at them and practice on them because there's a lot of exercises there that you
will definitely learn. Also, I'd like to tell you that if you want to improve
your painting scales, you really have to start
with your sketches. So grab a pencil and as on a bat and a pad
or a sketching book. Anywhere you go and sketch
as much as possible. That's the only way you can
improve your drawing and you're in your painting
result the fastest. So we are drawing is your fundamental part
of every painting. So if it's accurate
and correct and the painting end result
will definitely improve. To here. I'm still
using the same brush. I'm adding darker. Sap green. I'm adding more
contrast sap green, Van ****, brown and ivory. In war. I'm mixing, I am
actually mixing colors. I never use black, ivory black directly
onto the paper. If I use it, it's really
little and I'm always mixing it with other color k, So I'm adding a little bit
of yellow arc as well. So thank you and
congratulations, and we're going to
finish this painting and I'll see you in the
next part of this project.
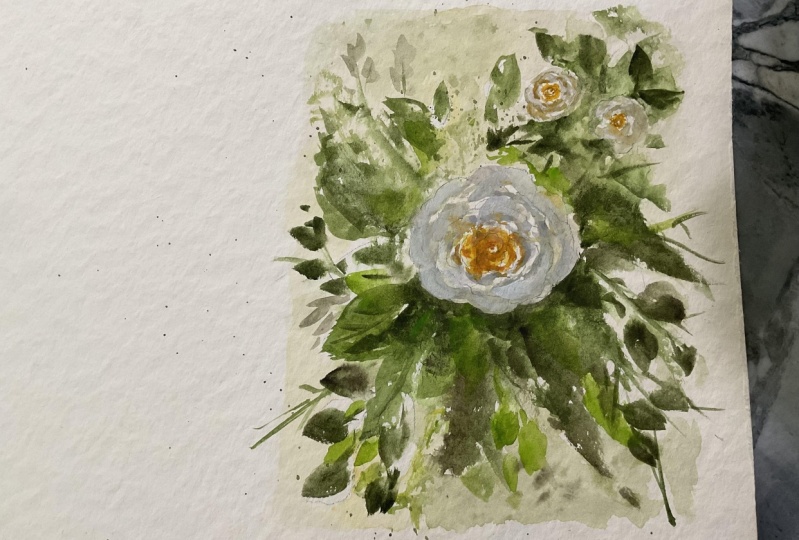
7. Project: Okay, so we're almost there. We've finished the painting. So before I finished that, please sign in with your signature to
say that it's yours, so be proud of it. Congratulation. And then now we're going to pillow there, the packing tape. Okay. So magic is
coming here you go. While where I peel it off, I notice and peeling it off from the from the
inside to the outside. Okay, so make sure that
your watercolor paper, it has completely dry. Before doing this, gay, I've learned that
in the hardest way. Whoops. Okay, so as you can see, we painted completely flat
and I didn't use the ECL. And I'm doing this
if the painting is only small k, So well done. And I really hope to see your
painting posted in there. Caching. Well done and thank you so much and I hope to see you
in my next class.
 Dawna Mae, Watercolor Artist & Illustrator