Transcripts
1. Introduction: Hello. My name is China and I'm a watercolor artist
and art teacher. I'm here to show you how to use your tools because maybe you've never picked up
watercolors before, but you want to know
how to use them. It's really important that we know how to use our palettes, how to use our brush,
how to clean our brush, and how to mix our colors. I'm going to show you the fundamental
things that we should know to paint exactly
how we want to. In this class, I'm going to show you the equipment
you should use, how to use your palette, how to make different tones, how to use wet on
wet wet on dry. We're going to look
at some gradients. I'm going to see how to use our brush and how to
clean our paints. Now, this class isn't going to have you walking away
with a masterpiece. There are other videos for that. Instead, this class is going to show you how to
get familiar with your tools so you know how to approach your next
painting in the right way. If you want to know how to
be an expert in your tools, then grab your equipment
and let's get started.
2. Step 1 - Your Equipment: Okay, folks, the most
important thing before we begin our course is to make sure we got the right materials. So you might have them already, but I'm going to talk to
you about why we need them, why they're important,
the price range that we should be paying so that
you are ready to go. Now, if you have them already, feel free to skip this video. I'll take a couple of minutes, but it is worth just sitting down and making
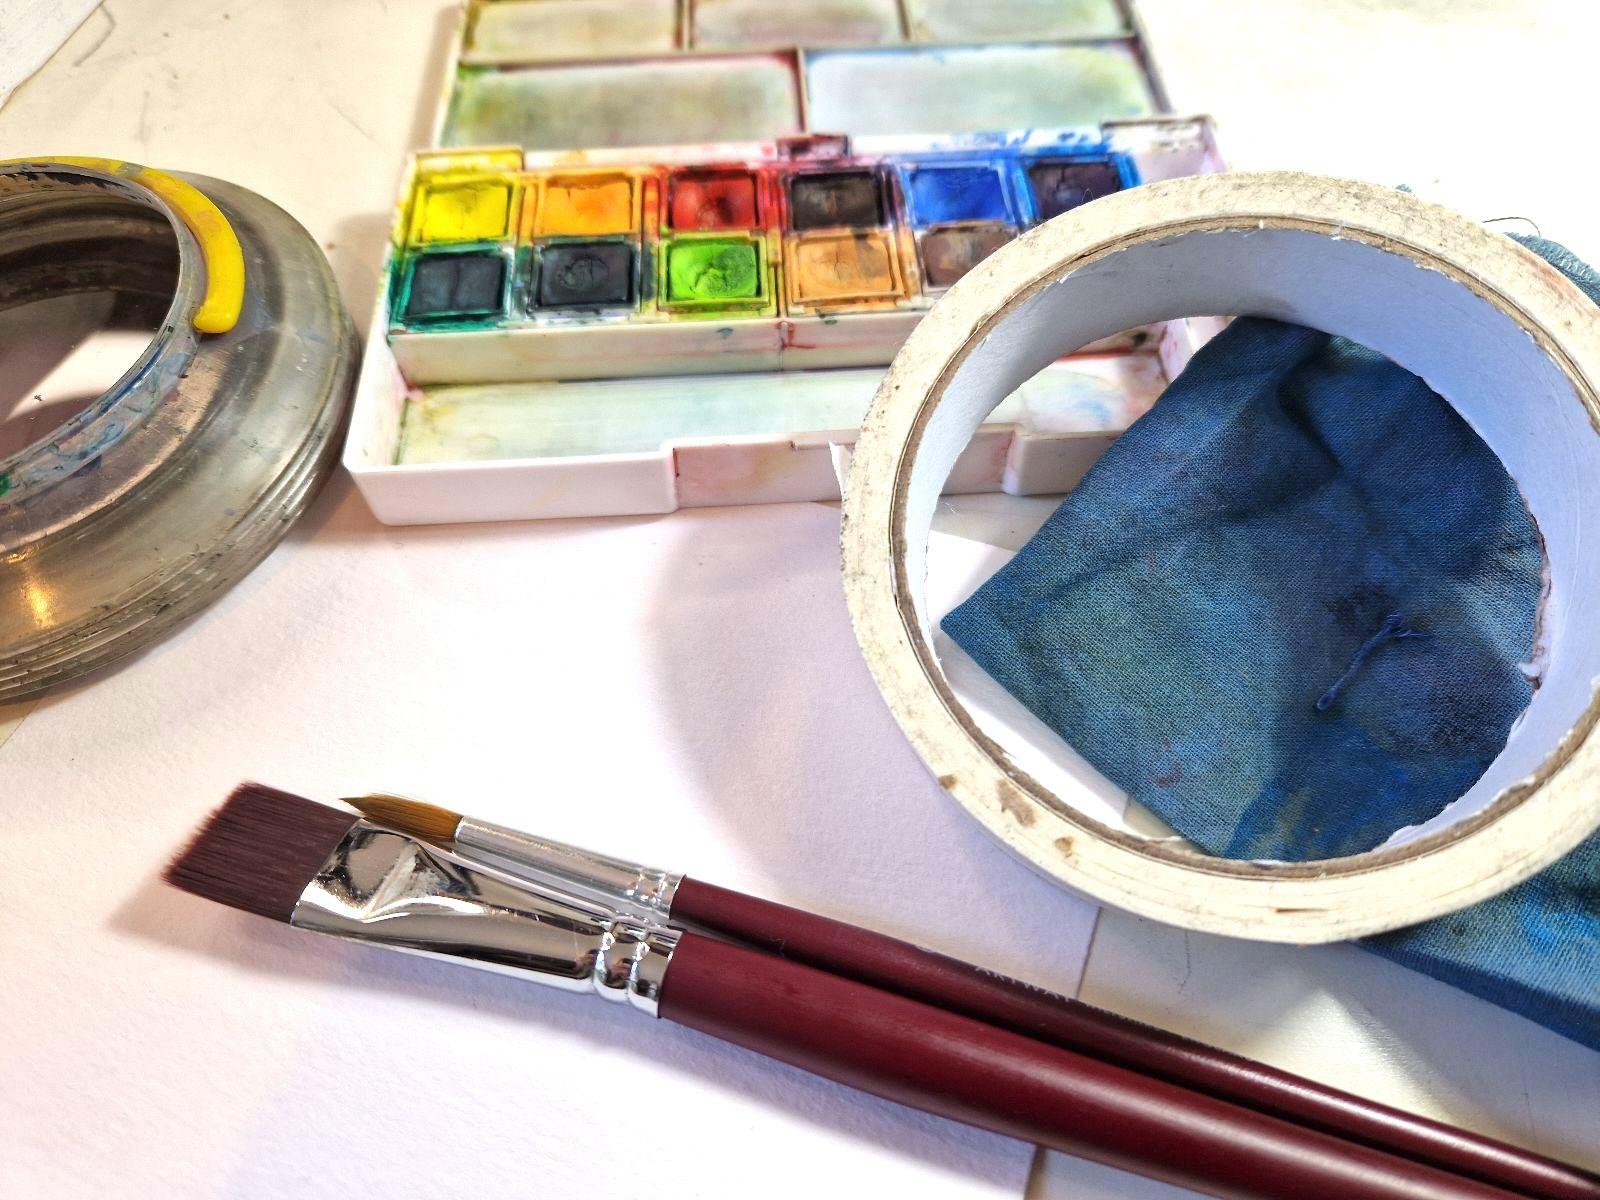
sure we're ready. The most important thing are
the watercolor palettes. This is the Derwent
ink tens one. This palette is just under 20
pounds when I bought them, and it's really lightweight. It travels super easy. So if you want to do
watercolors abroad, this is a great one to get. It also comes with a travel
brush and a travel sponge, so you don't need to carry a brush and a rag if
you don't want to. And the colors are
really, really nice. We have all the primary colors, so yellow, red and blue. And then we have
some darker virgins, so ultramarine, a purple,
some lovely greens. Some earthy colors and a black. So this is all you need to make any painting that you want. The lid is nice and wide. You've got a few
different sections. So if you just need a little mix of color, these
are good for that. If you're making a lot of
color, you can use this. But also, if you
run out of space, you can use this little
plastic bit under. The material is great because the water and the pigment
isn't clumping together. Often with cheap sets, it's hard to actually
spread the paint around. So I would really recommend this for beginners. It's affordable. It's it's good quality, and it's really easy
to travel with. So Derwint ink tints one. Now, your brushes, there are thousands of different
brushes you can get. In this class, we are
just going to use two. We want to make
life simple for us. This brush can do everything. It has a nice point. Some people ask me, Have
you got thinner brush? You don't need it. See how
thin that brush can get. And when it's wet,
it can get a little bit thinner and a bit
more accurate as well. So, this is a size six, and I'm going to link
the different brushes in the comment section. So
make sure you have a look. It's a round headed brush,
really common to get. These can just cost
you a couple of quid from Hobby Craft or Amazon. But these really
should be able to do anything for your painting. Next one I like to use is
a big flat head brush. So this is a size 14. It just means when we're
covering the paper, if we need to do backgrounds
or anything large, it saves us so much time. So please get
yourself a big brush. Honestly, it pays for itself. Next, obviously,
you need a pencil. Mine's got a pencil extender because I've used it so much. And I just like to use a tube because it
doesn't harm the paper. And it is nice and light. So if you need to rub it out, it's super easy to remove. You will always need
a watercolor jar, so you can just use a glass or an old jam
jar, that's really good. Clean your brushes. And then
we need watercolor paper. So there's a huge variety
of watercolor paper. You can get sheets or you
can get a sketchbook. Depends on how you
maneuver them. So I'm often moving
my paper around. I'm sticking it to the table, and then I peel it off, and
then I put another one down. So having a loose paper
for me is preferable, but you might want to
have it in a sketchbook, then they're all together. So it just depends
on what you want. Again, I will link some
in the descriptions. You will also need an old rag, old pair of socks
or kitchen towel. This is just some
spare fabric I had. I don't know why. I
actually don't like it. But this is really
important to get rid of excess water from our brushes and also to clean the table
when it's a bit messy. You will need masking tape. This is good for
creating harsh edges, especially if you
want to frame it. But also sometimes
you might want to just tape your paper down if it's loose just to help the
warping be under control. Finally, the last thing
you'll need is an eraser, for where we make mistakes,
and it will happen. It's absolutely fine.
It's totally normal. So grab yourself, your eraser. Make sure you've got
everything, paper, your paints, your brushes, and we'll be ready to start. Alright, Team, let's go.
3. Step 2 - How To Hold Your Brush: Team, let's look at
how to use your brush. Now, bristles can
be quite delicate. Depending on how
expensive your brushes, you really need to pay attention to how we treat it
and how we use it. A lot of my brushes
are used by beginners, so I can often see people using them in a
really dangerous way, and they're playing with it like four year olds might paint, but we want to be like adults, and we want to paint in the best way to preserve
all of our paint. So when we use our brush, we first of all, want to
hold it the right way. So I'm gonna get a
little bit of water. And I'm going to show you
how to not use your brush. We don't want our brush
to be high in the sky. If we have it high in the sky, this is going to create
loads of bubbles. Let me just show
you what happens. I'll make sure I've
got enough water and I'm just going to keep
that high in the sky. You see these bubbles are
forming right in the middle. So when I paint, there aren't a huge amount of
bubbles in this one, but you can see. If I till it to the side, you can see all
those bubbles there. And that's not ideal. What we actually want
to do with our brush, I'll just clean in my water jar. We want to use the
side of our brush. So you see the difference here. I'm just tickling
it at the side, and then as I paint, there are less bubbles
in my picture. And I'll just show you
that from the side. It's a little bit
of dust, clearly. I need to clean something. But there's no bubbles. This
is drying with bubbles. And this is drying without. So it's really important
how we use our brush to benefit the artwork
that we're painting and also just to preserve
the bristles to live a long and healthy
life because we don't want to throw these
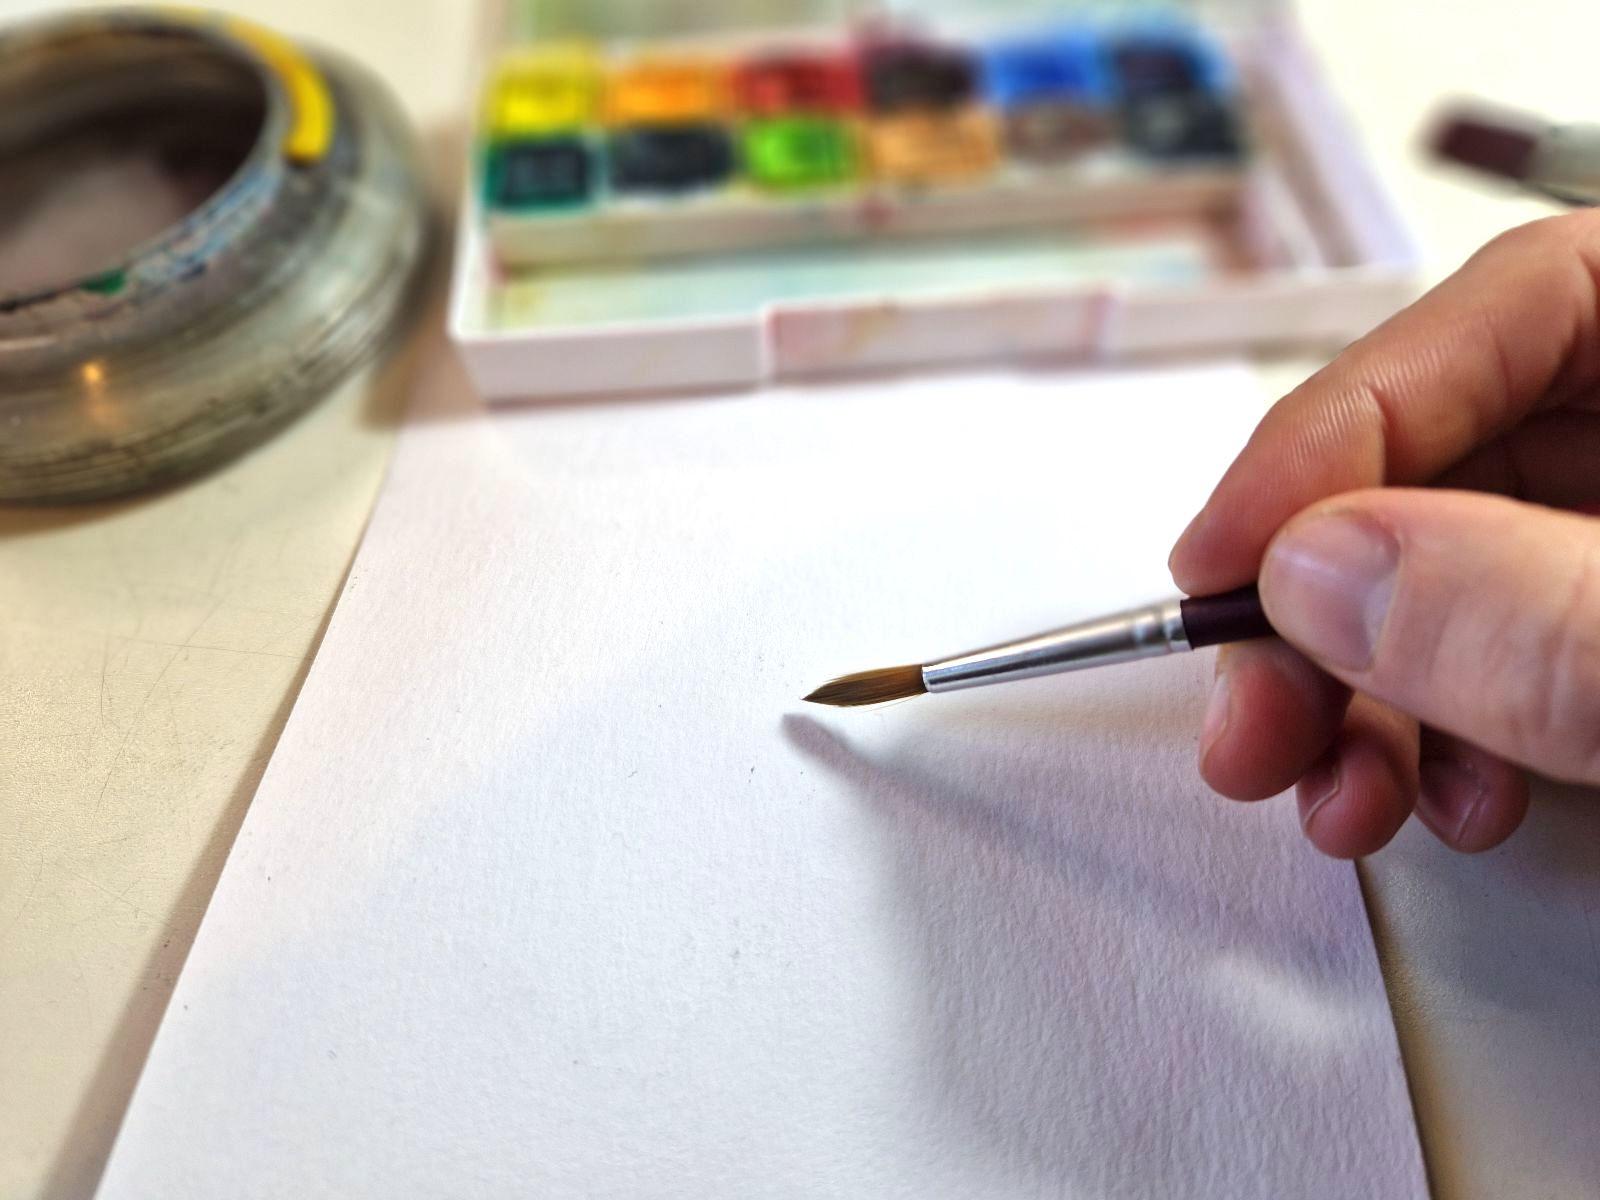
away in the landfill. Another way that we can
hold our brush to improve our artwork is trying
to hold it like a pen. So you see I'm really
close to the tip here. I'm just waking it up with little strokes that go towards my hand. It's not going away. It's not going around in
circles, going towards my hand. And then when I
come to my paper, I want to hold it like a pen, and it allows me to
create nice thin lines. So, that was a bit
tricky because I stupidly put my
paletteunderneath me. But I want to get a
comfortable position, and then I just want to
kind of pull up to the top, and I can create really
delicate thin lines. So always try and make your hand as easy as it can get yourself in
a nice position. If I'm loose and my hand is in the air and I've got
my brush far away, it's going to be
really hard for me to get a nice thin line. So always get
yourself comfortable. Hold your paint brush
nice and strong, and then try and get
yourself a little thin line. So hopefully, those little
techniques will help you in your painting journey
just to get a nice angle, and then hopefully your
painting will be less frustrating and you'll
have no bubbles. We don't want bubbles
in our artwork. And we want to keep our paint
brushes nice and forever. So I hope that was useful, and I'll see you in the next lesson.
4. Step 3 - How To Clean Your Brush: Lot of people ask me, should I have one clean
jaw and one dirty jaw? And my response is, why? So you might see on videos
or someone saying, Yes, always have a dirty one to clean your brush in and then mix it again
in the clean one. It's a bit pointless to me. The only time you really need super clean water
is if you're doing wet on wet and you don't want to put a random mixture of
colors on your paper first. So for me, I just
tend to use one tub, and it lasts me for a while. And then after a while, I'll
just go and get a fresh one. But there's no harm in
having a slightly dirty jar. If people say this is
what you should do, I think they're
just trying to make a point and look like an
expert they probably are, but what's the point? Let's make life
easy for ourselves. Let's not make it hard.
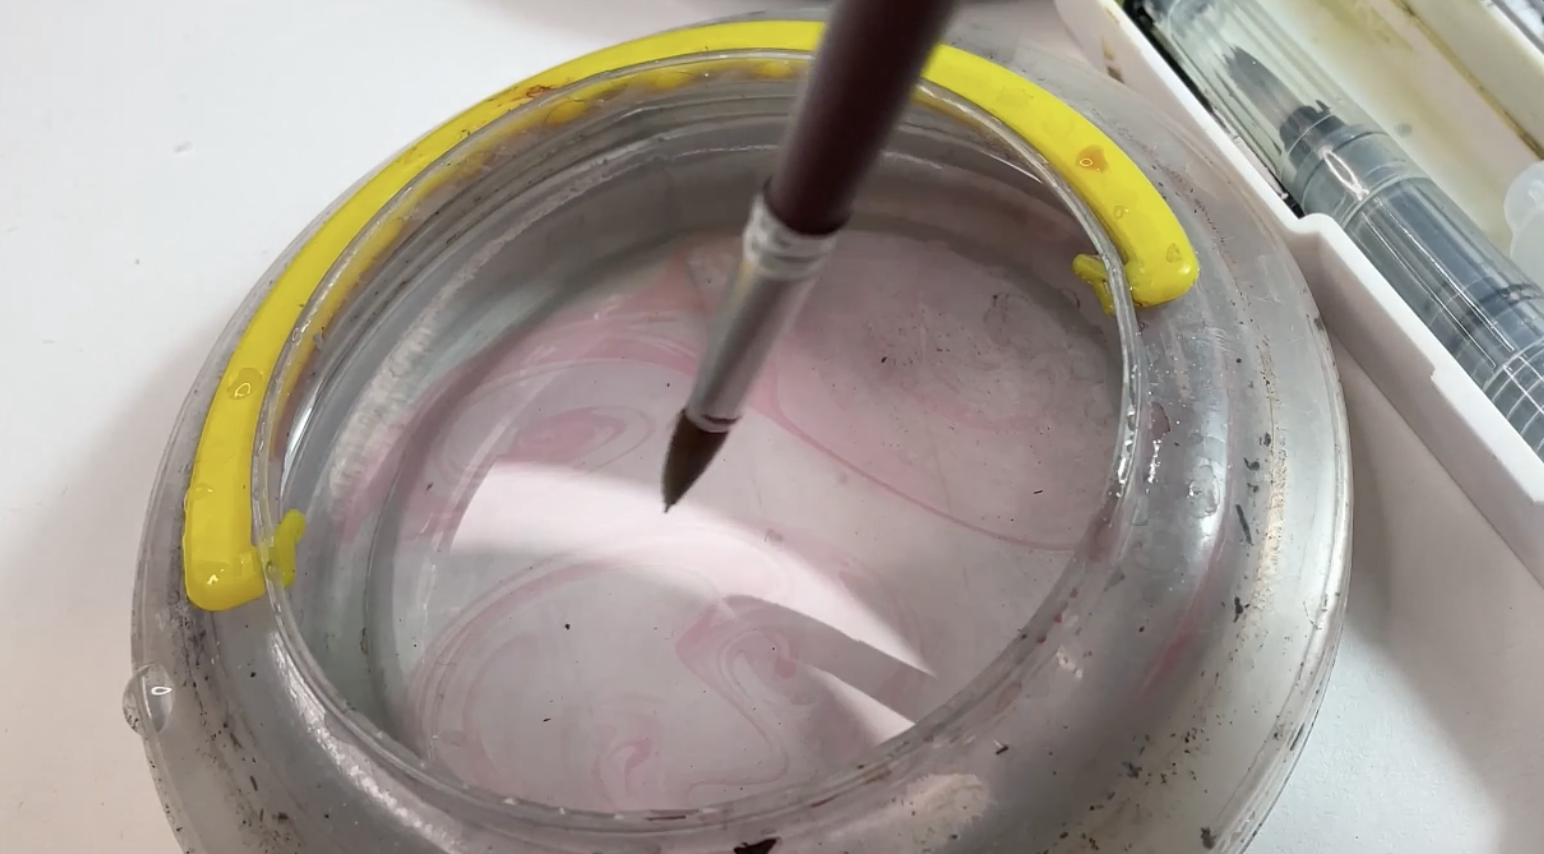
So I'm going to show you how to clean your brush
because it's really not hard, but I have seen some crazy
things in my career. So, first of all, let me pick up some paint. I'm gonna wake up
this nice bread. It's a bit thick and there's
loads of paint on my brush. What you don't want to do is
lick the top of the water. I have seen it many a time where someone just did
it a little lick, and then they start
painting again. I'm going to show you
what happens when I put my brush on the paper. So you see, it's full fold
to the brim of pigment. What I want to do
instead is I want to bash the bottom of the jar. Just three or four times, and that gets everything off. Then usually I just stroke
the excess water off. So three or four
strokes on the excess, and that should give
you the perfect amount of water ready to go again. Beautiful. But you see, I went
straight from the pigment. Bad habit. This was just
for cleaning perhaps. So when you clean your brush, you want to go dab dab, dab, tap, tap, tap. And let's just test it. Clean. And that can last for
a very long time. When you want to pick up water and you're going
to paint on here. Ooh, then you're
gonna paint on here. If that becomes a
little bit dirty, that's when you need
to clean your dar. So just take it to the
sink, pour it out, little swish and then
refill it again. So cleaning your
brush super easy. Dab, dab, dab, tap, tap, tap. What's more like a
stroke. Stroke, stroke, stroke. And then you're done. Okay, team, I hope
that was useful, and I'll see you in
the next lesson.
5. Step 4 - How To Use Your Palette: Team. It may seem daft, but I'm going to show you
how to use your palette. This isn't just a lid to
close your paints away in. This usually in
most, I would say, 99% of watercolor palettes, this is where you
mix your colors. You can have a separate
one, of course. Sometimes they're not great. Sometimes you'll find
this clumpiness. So usually what they give you in the palette is
very, very good. Now, some of them are separated. Some of them are just smooth. It doesn't matter which
one's good, which one's bad. A separated one definitely means that your paints won't slip
into different sections. And also, you can keep color
themes in each pocket. So this is a really good kit. I would highly
recommend, as I've said, in a previous video, that this kind of ticks
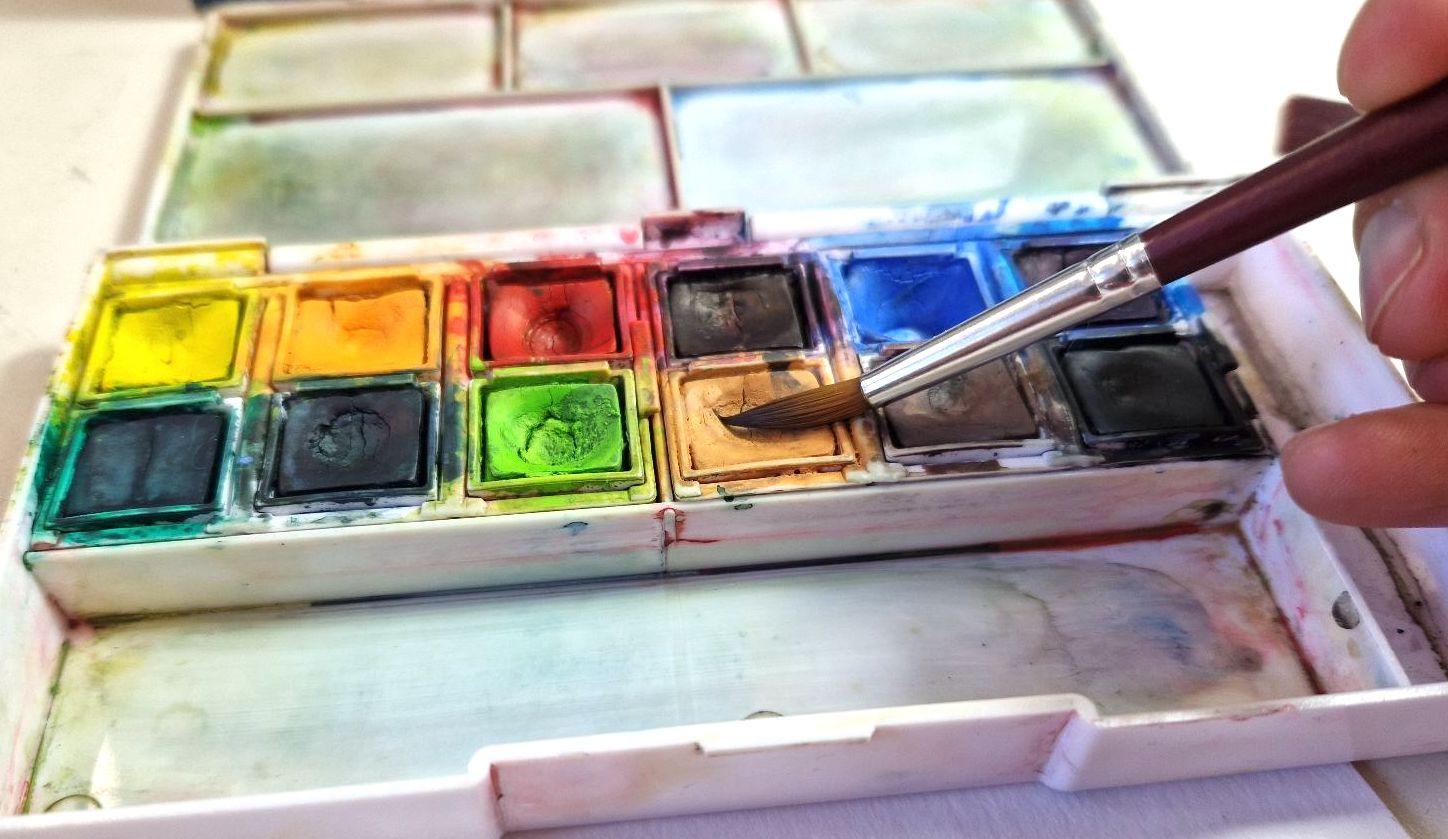
all the boxes. Now, when we use our lid, we should use this for pure colors and for
mixing colors as well. When I want to choose a color, I want to pick my pigment, just a couple of strokes and
pop it straight in my lid. This will help me to see
how much pigment I have. If I want a dark color, I'm going to keep
wiggling on my pigment, and then I'm going
to go in the lid, and that's going to
make it nice and thick. It's going to give me
exactly what I want. But when I go onto my paper, I've seen and I've
watched the journey to make sure I can get the
colour that I'm after. What we shouldn't do is we shouldn't keep our
pockets really small. So I sometimes see
people do this. That is not gonna last
you very long at all. So when we mix our colors, we want to be nice and big. We want to see how far this paint's going to go
and we want to make it last for a long time
because most likely you are going to paint something
much bigger than a dot. If you want to do a background, you want to really take up
as much space as possible, add loads of water, so just keep dipping my brush in the water and picking it up. And this is pretty much going
to last you a full page, depending on your brush size, but don't be afraid
to make too much. I have mixed loads of paints with this palette,
and it barely goes down. This is a wonderful
thing about watercolors. They last for so long. So if you make a
little bit too much, all you do is wipe it up with your rag and
then start anew. So make sure you
make too much paint. I always want to see it juicy. Nature is going to try and dry it because, well,
that's what it's about. So make sure you
just got enough. Don't make too little. The next thing we want to do in our palette is just
think about mixing. So if I want to mix
two colors together, let's go with some red. And then let's mix
some of this blue. I can either go from
my pigment pure or I can go from my
watercolors in here. If I pick that up, yeah, it's mixed a tiny bit there. But to be honest, it gives
you the same amount of ratio. So I have seen how much
water I've put in this one. I've seen how much water
I've put in this one, and I know roughly this
is going to be 50%, 50%. If I went straight
from my pigment, so I'll just make a
nice mixture there. And then I just wake this up. You see already that that
is a little bit darker. So because I'm going
from a pure pigment, which is highly saturated with the pigment
rather than the water, it's going to be a much
stronger mix there. But I can balance it out. I can pick up a little
bit from the red, a little bit more
and obviously add more water because I've
added loads of pigment. Notice that I just dipped
straight onto them. I didn't clean my brush in
between because that's okay. We'll spend ages here, otherwise, trying to
clean every single one, but it's not going to make a
huge amount of difference if I just take straight from
here and pop it in the red. Well, sorry, try
and make a red pile up there. It's still red. It has a tiny bit of blue, but it's not drastically
changed the composition. So always use your lid
to mix your colors, dip from one color to another, or you can dip straight from
your pigment into there, but just be aware of how
much pigment you're going to have on the brush from
the direct paint source, and just be aware of
what you're doing. So have a play around
with mixing colors, mix them all in the lid, have a play with your paper
and pop them on your paper, and then you'll soon get to know and get to
familiarize yourself with how much one dip takes and how much a dip from
another pile takes. I hope that was useful, and
I'll see you in the next.
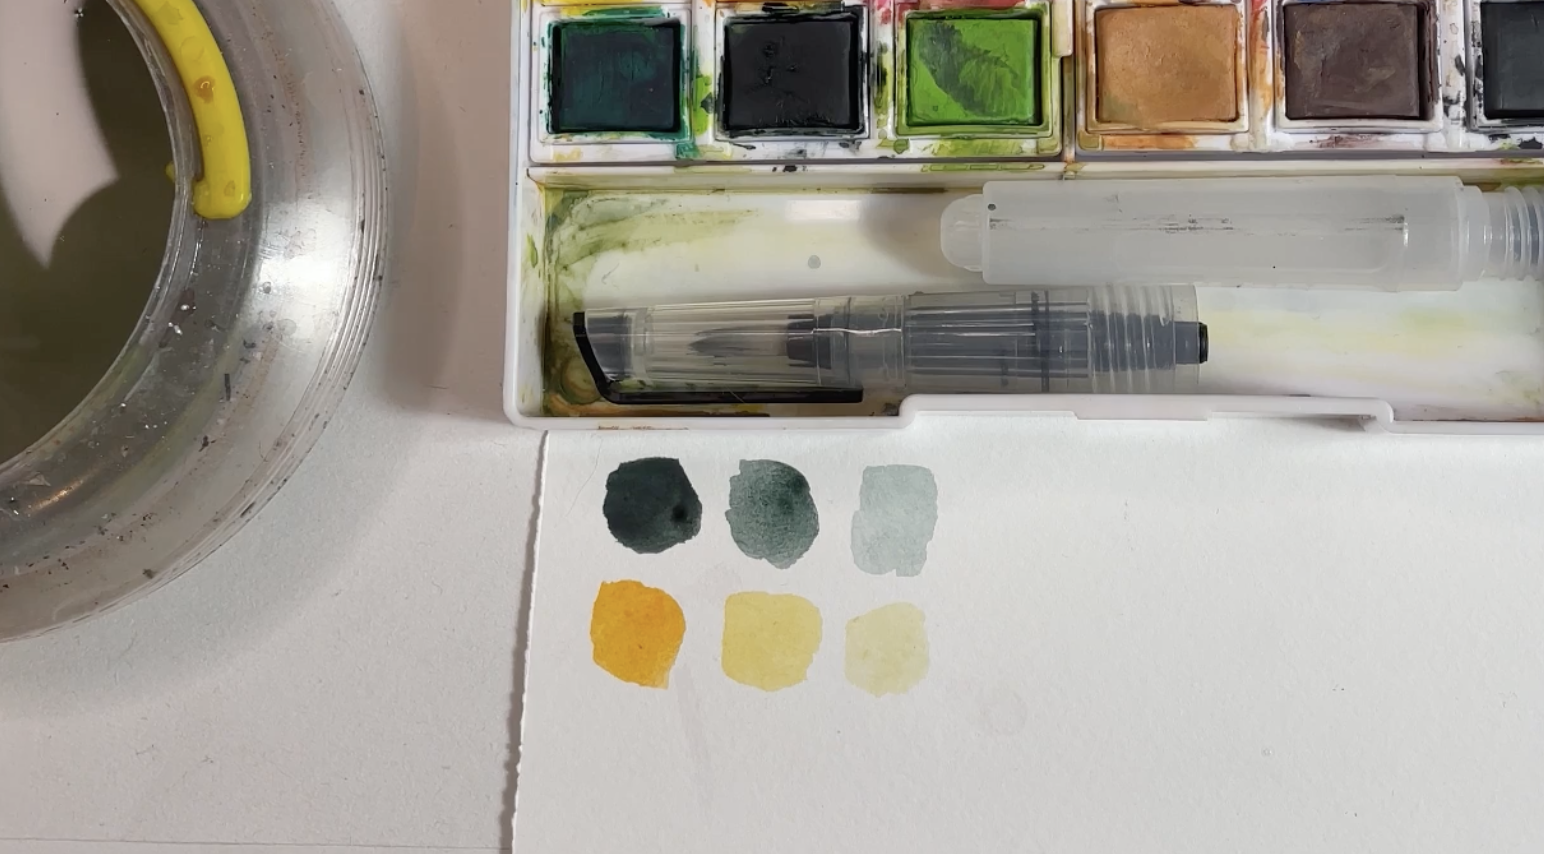
6. Step 5 - Learn To Paint Different Tones: When it comes to painting, our most important job is to get as many
tones as possible. As an artist, a
drawer, a sculptor, we're looking to give the
audience high contrast, and that means dark and all the way down to light with
some shades in between. So our first job with our watercolors is to see if we can get some different tones. It's all about how we clean our paints, how we
clean our brush, and how we use our palette lid to bring those
techniques together. So first of all, we're
going to wet our brush. Then I'm going to
choose a colour. I have lots of dark colors, so I'm going to use a
dark color to wake it up. And then this will give me a nice bigger contrast
because we're working from dark all
the way down to light. So I keep wiggling in
my palette so you see, I'm just doing a little wiggle and then popping it in my lid, making sure it's nice and thick. It's almost like acrylic. And my first job is
to do a dark square. So you can see that is the
same tone as a pure pigment. It's nice and dark, and this pretty much
looks like black. But actually, this is
surprisingly a green. Go to clean my brush, and
hopefully you remember dab dab, jab, stroke, stroke, stroke. Then I go back to my paints, and most importantly, I
don't go in the middle. I'm pulling some
pigment to the side, mixing it with my brush, which is already wet, and then just trying to control
how much pigment, how much water I have on there. When I'm ready, I'm going
to do another square. So this is my medium tone. Clean my brush, dab
off the excess, and then do that one again. So I'm pulling from the side, making a nice new little pile, and there I have three tones. If you want to, you could try
and make more than three. Maybe you want to try
five, six or seven. It's very difficult when
you get to high numbers. And you can try with a
few different colors. Maybe you want to try with a light color just to
see the difference. So again, get yourself
a nice thick pigment, paint yourself a square,
clean that brush. Pull the pigment to the side, get that medium tone. Pull that pigment to
the side once more, and then you have
that light tone. So even light tones are naturally really
light on the scale. They can go down
in tone as well. So try and practice a
bunch of colors with this. It's really important to see
how the pigment changes. And also just as an
aesthetic effect, trying to get as many tones
in our painting as possible. I will change your
painting career. So have a practice with these and I'll see you
in the next session.
7. Step 6 - Learn Wet-On-Wet: Wet on wet. This is one of
my favorite techniques. You can do so much with
wet and wet on your paper. It means that you can
create soft edges, that you can blend colors without seeing a sharp
line in between. And you can do lots of different
textures with it, too. So wet on wet is all
about having your paper wet and then adding wet
paint onto it, as well. So let me show you
the difference between different amounts of wet on your paper and then
different amounts of wet with your paint, as well. If I dip my brush in the
water and go straight for it, you should see that there
is quite a wet surface. If I just scoot over there, you can see the
difference there. If I then just try
and get rid of some of that excess paint,
and we see it. I want to hear. Let
me tilt this up. You can see the difference
between my first drop, my second drop, my third drop
is pretty much dry already. So we need to think about how much water and how much
paint we put on our paper. So let me just try that again so we can have
a fresher look. I'm just getting them all over, trying to stretch the paint
or the water appropriately. And then we're going
to pick up a color. So I'm just going to
do a few dots so you can see what happens
to the paint. There's three different
types of control. I like to call this one chaos. This one is a bit more medium, and this one is super tight. So imagine your
friends you got chaos, normal tight we've all got them. So it depends on what
you're painting, what you might want
to do with them. If we try and mix a
few colors together, let me turn my paper around. We want to think about what type of wetness we're going
to have underneath. Most of the time, it's going
to be this medium one. So it's not like a puddle. It's something a bit
more controllable, and it gives you more time to make sure that you
can soften the edges. So I'm going to do
the little area here. So I'm painting up and down, trying to make sure it goes nice and even across the paper. And then I'm going to
choose two colors. So as you know, we mix these in our lid, and this is going to be wet too. So I have to think about
applying wet che wet. Is it going to turn into
chaos or will it stay medium? I'm going left to
right until the end. Don't worry about this for now. I'm going to pick
that up in a second. And then I'm going to
pick up another color. So I'll pick up blue. And then I'm going for the
bottom, left to right. In the middle, I'm
overlapping ever so slightly and just going
left to right a few times. I can go all the way down, and then I'm just
going to leave that. So in that time, when I
went to get more paint, you can see that this pedal that was here disappeared,
so that's great. And it now is starting
to blend nice and soft. If I go back into it
with a dry brush, it's going to start
picking up the paint. So the best thing to do is to let it dry and see what happens. So let me go wet on dry so
you can see the difference. Now, bear in mind, I've
been painting for years, so I might be able
to do it first time. I might not be able
to do it first time, but I'm going to try and
blend it with wet on dry. So my paper is dry,
my brush is wet. And I'm going to paint
this color first. You can see already
the middle has a dry edge or
sorry, a hard line. And then because
I've worked quickly, let's see if I can
blend them. Yes, just. But there was a risk
there was a risk that this had dried by
the time I got up there, and then that would be
really frustrating. It's always good practice to have a bit of damp
paper underneath, even if it's a small amount, it's going to help and just to make sure you can
blend the middle. Now, there are pros and
cons to both of them. This one is a little bit more vibrant because we're not mixing it
with water again. It has some nice edges
on the side if I wanted a contrast of
hard edge and soft edge. But it does mean it has
to happen really quick. So unless you're confident
you know what you're doing, it is much, much harder, but definitely
definitely try it. This one gets a bit lighter because you've
got water underneath, and sometimes you
can end up adding too much water and then you
end up with these puddles. There's is downsize,
but it does give you more time to make sure
you have a soft edge, and it's nice to blend
the paints with. It does come out
really, really well. Now, another thing we
can do if I just rotate this paper is we can be
more playful with it. So I'm going to add a damp
sploge in that middle. I think my water is
ready to be changed. And then I'm just
going to pick up pigment straight
from the palate. So I'm going to go
for a thick pigment. It's not going to be too wet. And I can just add a few
dots just some random dots. It's so satisfying to watch. I'll clean my brush, and then I'm going to pick
up that red again. Straight from the pigment,
as well. Add those in. Look how magical that is. When it dries, it will look
a little bit different. Sadly, because sometimes
it's like, Ah, this would be so cool
if you try like that. But the different amounts of water can affect how it dries. So let's try a really, really wet section here. I'm actually going
to add a base. So I'm just going to add
a little bit of purple. Move that all around, try
and get it nice and even. But because it got loads of water on it, it's
warping the paper. We're creating puddles. But I'm just going to try
that technique again. See what happens. So is there a difference? A little bit, it's
harder for the paint to move because there is
so much water in there. When it dries, it will
eventually pull it out, but it is quite tricky just
to get that paint to move. Up here, as it's drying, it's looking a little
bit more, like, chalky. And that's because I didn't
mix it in my palette. So I wanted to play around. Play around with wet on wet, dabbing the paint in, stroking the paint in. Also, what happens? Let's say you've got an edge. What happens when you
paint one line across as opposed to doing little
lines in that same area. It gives you a totally
different result. So I will show a little
clip of this after it's dry so you can see the
differences in all of them, but have a play around,
see what you enjoy, see what you think could
work well with paintings, and I'll see you in
the next lesson.
8. Step 7 - Painting Hard Edges: Okay, folks, let's
start to apply what we've been learning into
some simple shapes. There is no point in us going straight for some
difficult things, so bear weathers and let's just practice getting
some curvatures, getting some nice flat surfaces, and then we can apply
them to bigger things. Grab your pencil. We're going to start
with some simple shapes, some simple three D shapes
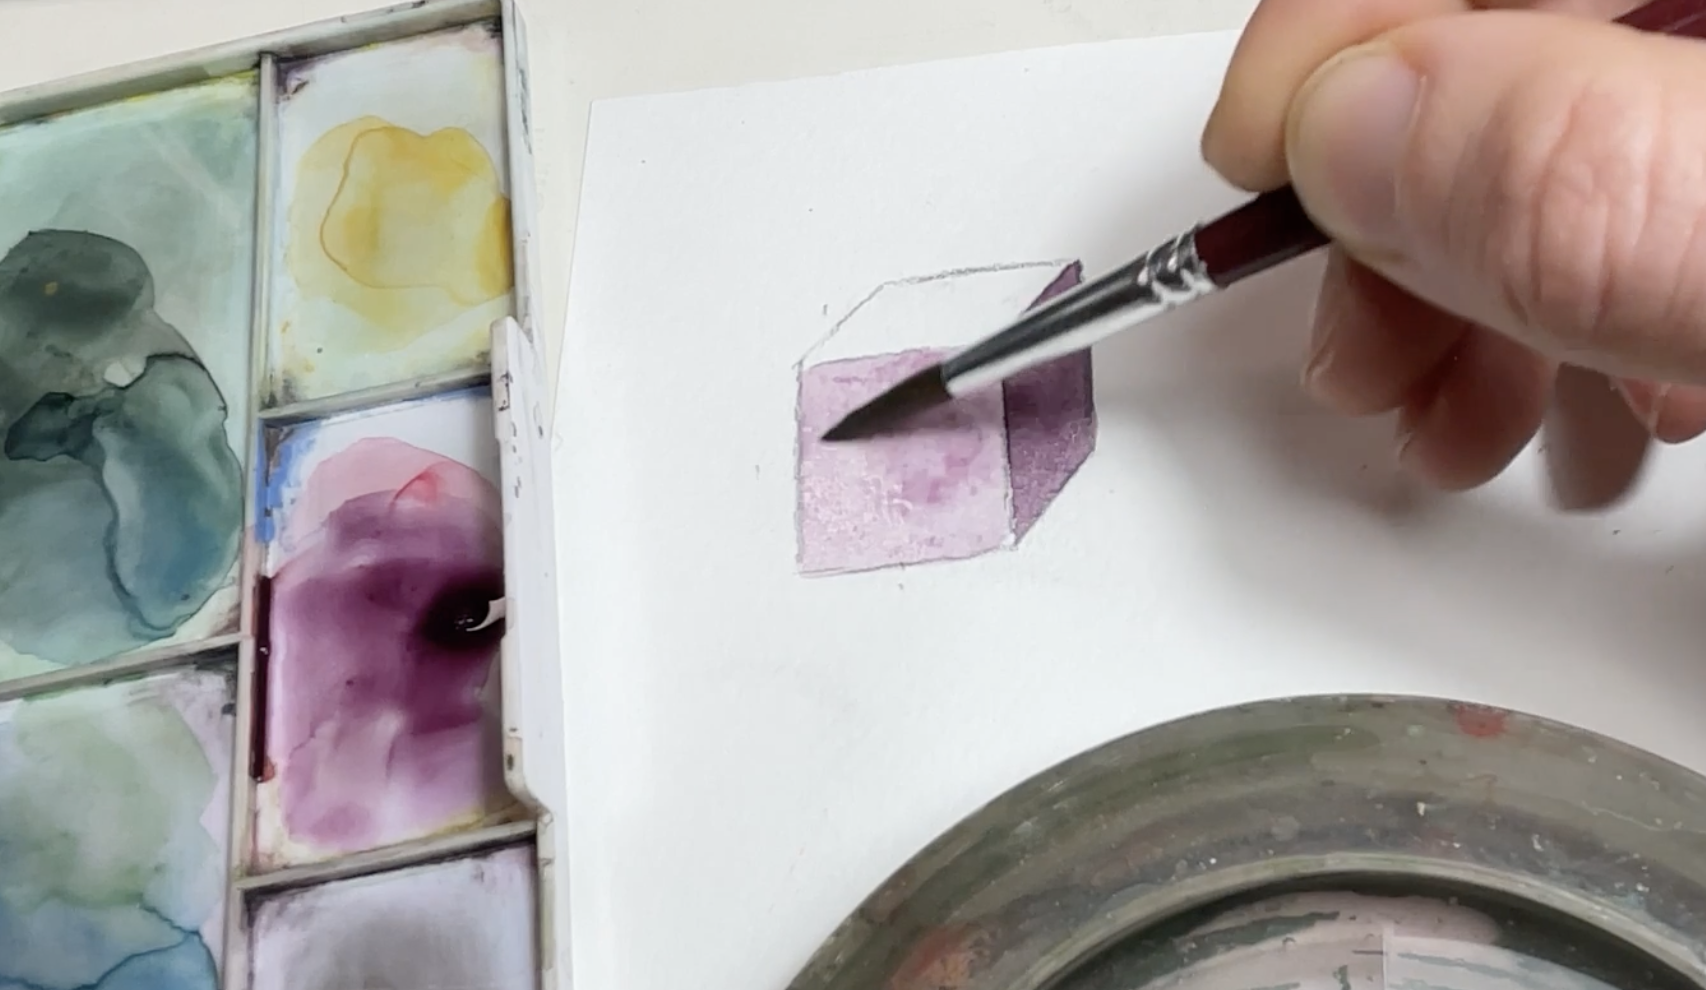
and we want to make them look realistic and interesting. We're going to start
with the cube. I am going to do a
vertical line here, a vertical line on
the right hand side. Horizontal line on the
bottom and one on the top. I've drawn a square. In order to make this three D, I want to go angle,
angle, angle. All three of these are
exactly the same angle. Then I'm just going
to draw upwards, try and make sure
that they match, and that has to be parallel
with the left side. Final one is a horizontal line. This one is parallel
with this and this. Essentially, you've
got one, two, three, which are identical. Then you've got one, two, three, they're also identical, and then you've got one, two, three. All of those little pairs
are matching and parallel. I've just broke my eraser. Okay, let me rub these
little fellas out. We do not need them. Okay. What we're going to
try and do first is just paint three
different tones. I want to paint them so that they're not taking ages to dry. I'm going to get
a thicker paint, and I'm going to
use the same color. My light sauce is
coming from the top. Let's say it goes
from the top left. I'm going to go
light because it's closest to the bulb or the sun. Then I'm going to go medium and then I'm going to
have my shadow here. I'll start with my shadow
because if it's too dark, then it's absolutely fine for it to be too
dark in this box. Just try and get
it nice and even. Try and be a bit careful
as you're going round. And then we're going
to let that dry. Give it a minute or so. We'll have a look at the edge, see if it's dry, and then we'll come back and do
the medium tones. Check the edge is dry. You want to touch it,
make sure it doesn't come off on your fingers and make
sure that it's not cold. If it's cold, that means it needs another 30
seconds, another minute. If it's the same temperature
as the rest of the paper, then you know it's ready to go. I'm going to pick some of this
pigment over to the side. I'm running out of
space, you might have a slightly more
spacious palate than I. But as I'm painting this, I'm trying to see, is it medium? Is it light or is it dark? I can probably go a little
bit darker actually. Let's spread that around. Maybe a little bit more
whilst it's still wet. A can make sure I'm adding
a bit more pigment. Good. Let that dry, give it another minute,
and then let's do the top. Folks, a final one, just a little bit pigment. If I spread that around,
it should become lighter. I've just made sure
my medium was dry. I'm spreading around to make sure that it's lighter
than the medium. Fab. This looks like
a three D cube. We can push it even
further and get a nice thick thick pigment, I might even add a touch of
black just a little bit. Then I'm just going
to suggest a shadow. I'm going over to the left because our light sauce
is over on the right. It has to be darker
than the face I'm just going to
add that over there. There we have a lovely, easy three D cube. Now, in our next
lesson, we're going to apply that to a cylinder, so we're looking at
a round surface, seeing if we can
push that and make that three D as well. I
hope that was useful. I hope you got a good cube
and I'll see you in the next.
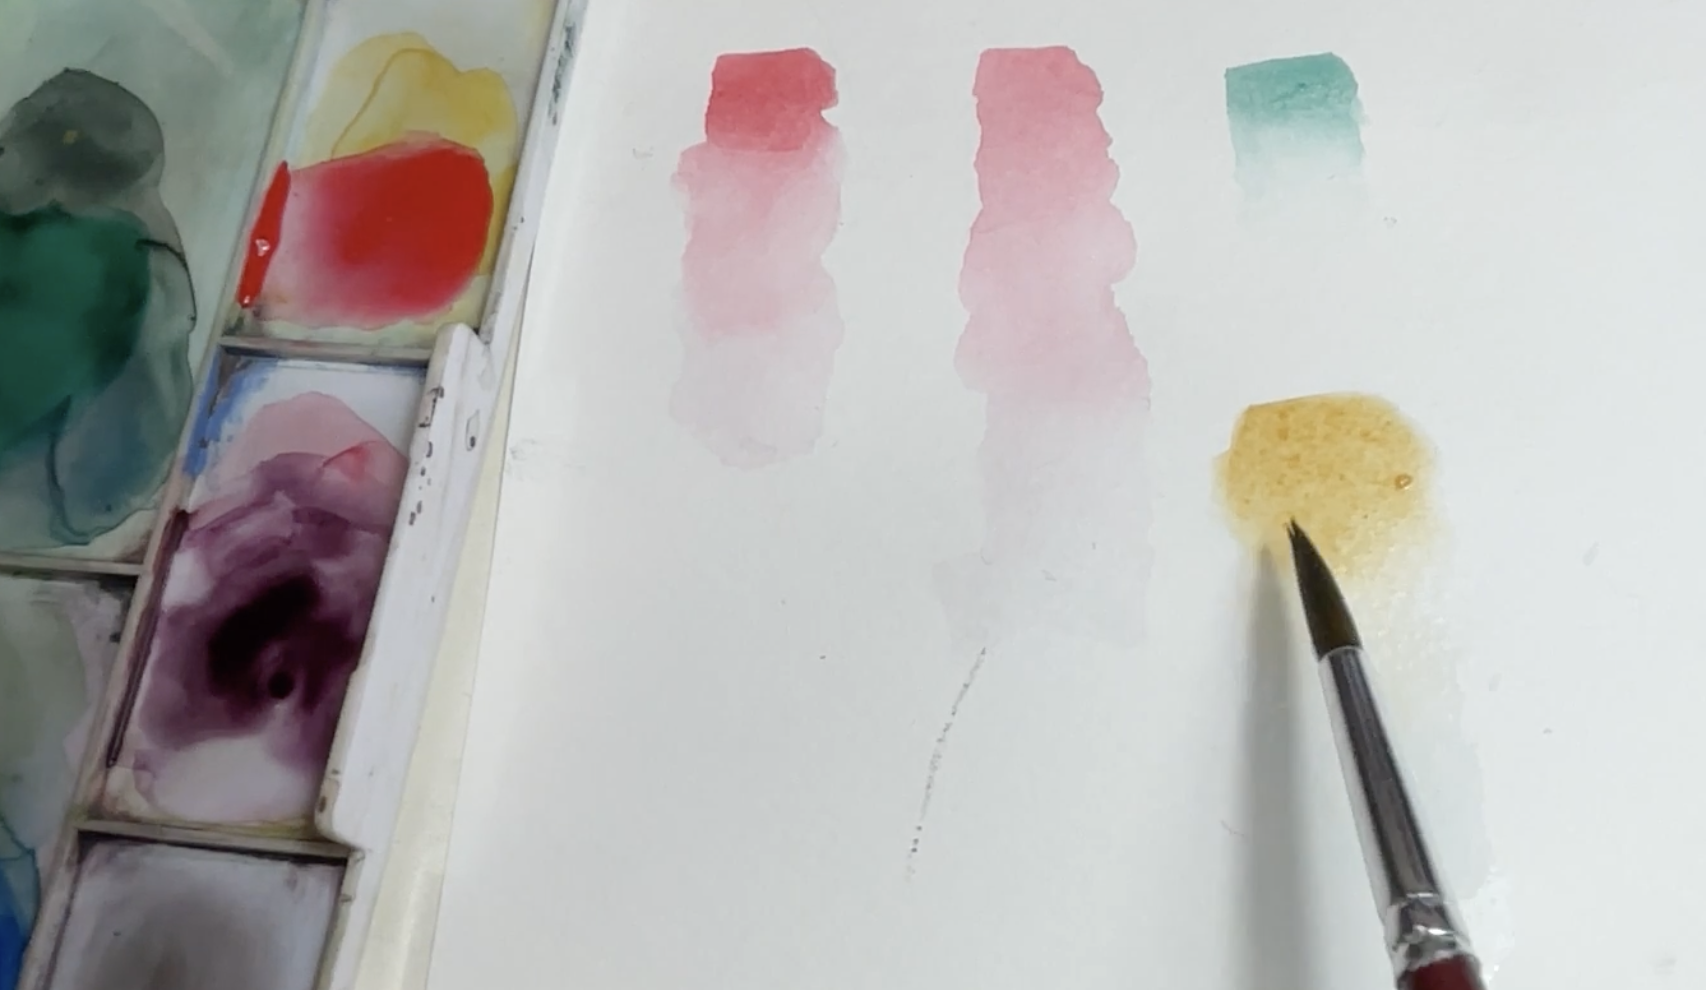
9. Step 8 - Learn To Paint Gradients: Before we start the cylinder, it would be good for
us to just practice a little bit of gradients. Gradients are when you've
got paint that is dark, then it goes to medium,
then it goes to light, and then it disappears
into white. We can do that a number of ways. We can do wet on
dry or we can do wet on wet. Let's try both. Wet on dry will do
first and I'm going to choose red, to
have that ready. If my pigment is dark, it's going to be a little
bit harder to blend the edge because the paper will absorb that pigment
very quickly. What I want to do and
I would just advise you to watch for a second
before you do anything, I would add my pigment clean
my brush very quickly, scrape off the excess water
and try and drag that down. You see that if I just
move that pigment away, you can see a bit
of a harsh line. But if you're very, very quick, you should be able
to just catch that. Now, in order to blend it, I have to clean my brush
at different stages. I'm just going to try that again so you can watch
it one more time. I'm going to add the
paint clean my brush, stroke off the excess, wiggle around to the middle, clean the brush,
stroke off the excess, wiggle down, clean the brush, everything's attached,
wiggle down. You got to keep going
until it becomes white. This is a lot easier
than a small gradient. This is really long. To get a small gradient, you want to make
sure your pigment is a little bit wetter. It gives you more time, and
you don't want it to be super dark either because you'll
avoid getting any harsh edges. So I'm going to do my paint, clean my brush, and then I
just want to dry a little bit. I'm just pushing that on my rag, and then I'm just gently trying to stroke it, clean it again. Dry it again, and then just use that dampness of the water
to blend that through. I can go back up and just scoop up a little
bit of that pigment. You see there, we've made
a really short gradient. It is very, very tricky, so I would imagine all your paper is going to
be filled with this. Another thing we could
try is wet on wet. This gives you more
time, but it does mean that your pigment will be lighter because you've
got water underneath. I'm just going to add a
medium amount of water here, make sure it's even, and then I'm going to
choose a color. I'm just going to give
a different color, spice it up a bit. I want to go nice
and thick and then I'm going to start at
the top, clean my brush. I could just dry it because
there's already water there, and then I could
go left and right. Then it's not my
favorite method, to be honest because we've got it's drying and it's
wet in different places. So I think maybe I should just add a little
bit more pigment. Basically just do it
over again. There we go. That's better.
Actually, the brush, I'll make it a little bit damp. There we go. Sometimes when you have a wet brush
and you go over it, it's going to push those colors
in different directions. So we don't want to overwork it that much. Give that a go. Wet on dry with a really
thick pigment at the top. Then we're going to
go wet on dry with a medium pigment.
Try and blend that. Try and do a short
gradient and then try and do wet on wet and see if you can
blend that as well. See what they look
like at the end. Now let's apply all of
that to a cylinder.
 China Jordan, Art Teacher