Transcripts
1. Introduction: My name is China. I'm an
artist based in London. I create work that absolute
beginners can achieve. I believe that everybody can
draw and everyone can paint. You just need to be given
the tools to show you how, and as an art teacher, I know exactly how
to get you there. For me, art is more than
just copying a picture. Art is about giving yourself that time back so that you can relax and you can create something that
you're really proud of. I've always drawn and
I've always painted, and for me it's been the only
time I can really meditate. With quite an active lifestyle and a very overactive brain, I find it hard to
switch off and relax. So in this session, I'm
going to show you how to paint water and have a big
Y carp swimming in it. You'll need your
materials to check the materials list
and make sure you've got everything you
need for water colors. Take the time to
relax as I show you how to paint something that
looks quite challenging, but actually it's super simple. Just remember that it won't
look perfect from the start. It takes layers
and it takes time. And then the final 10% of our session will start
to come together. So trust the process, grab your materials
and let's get started.
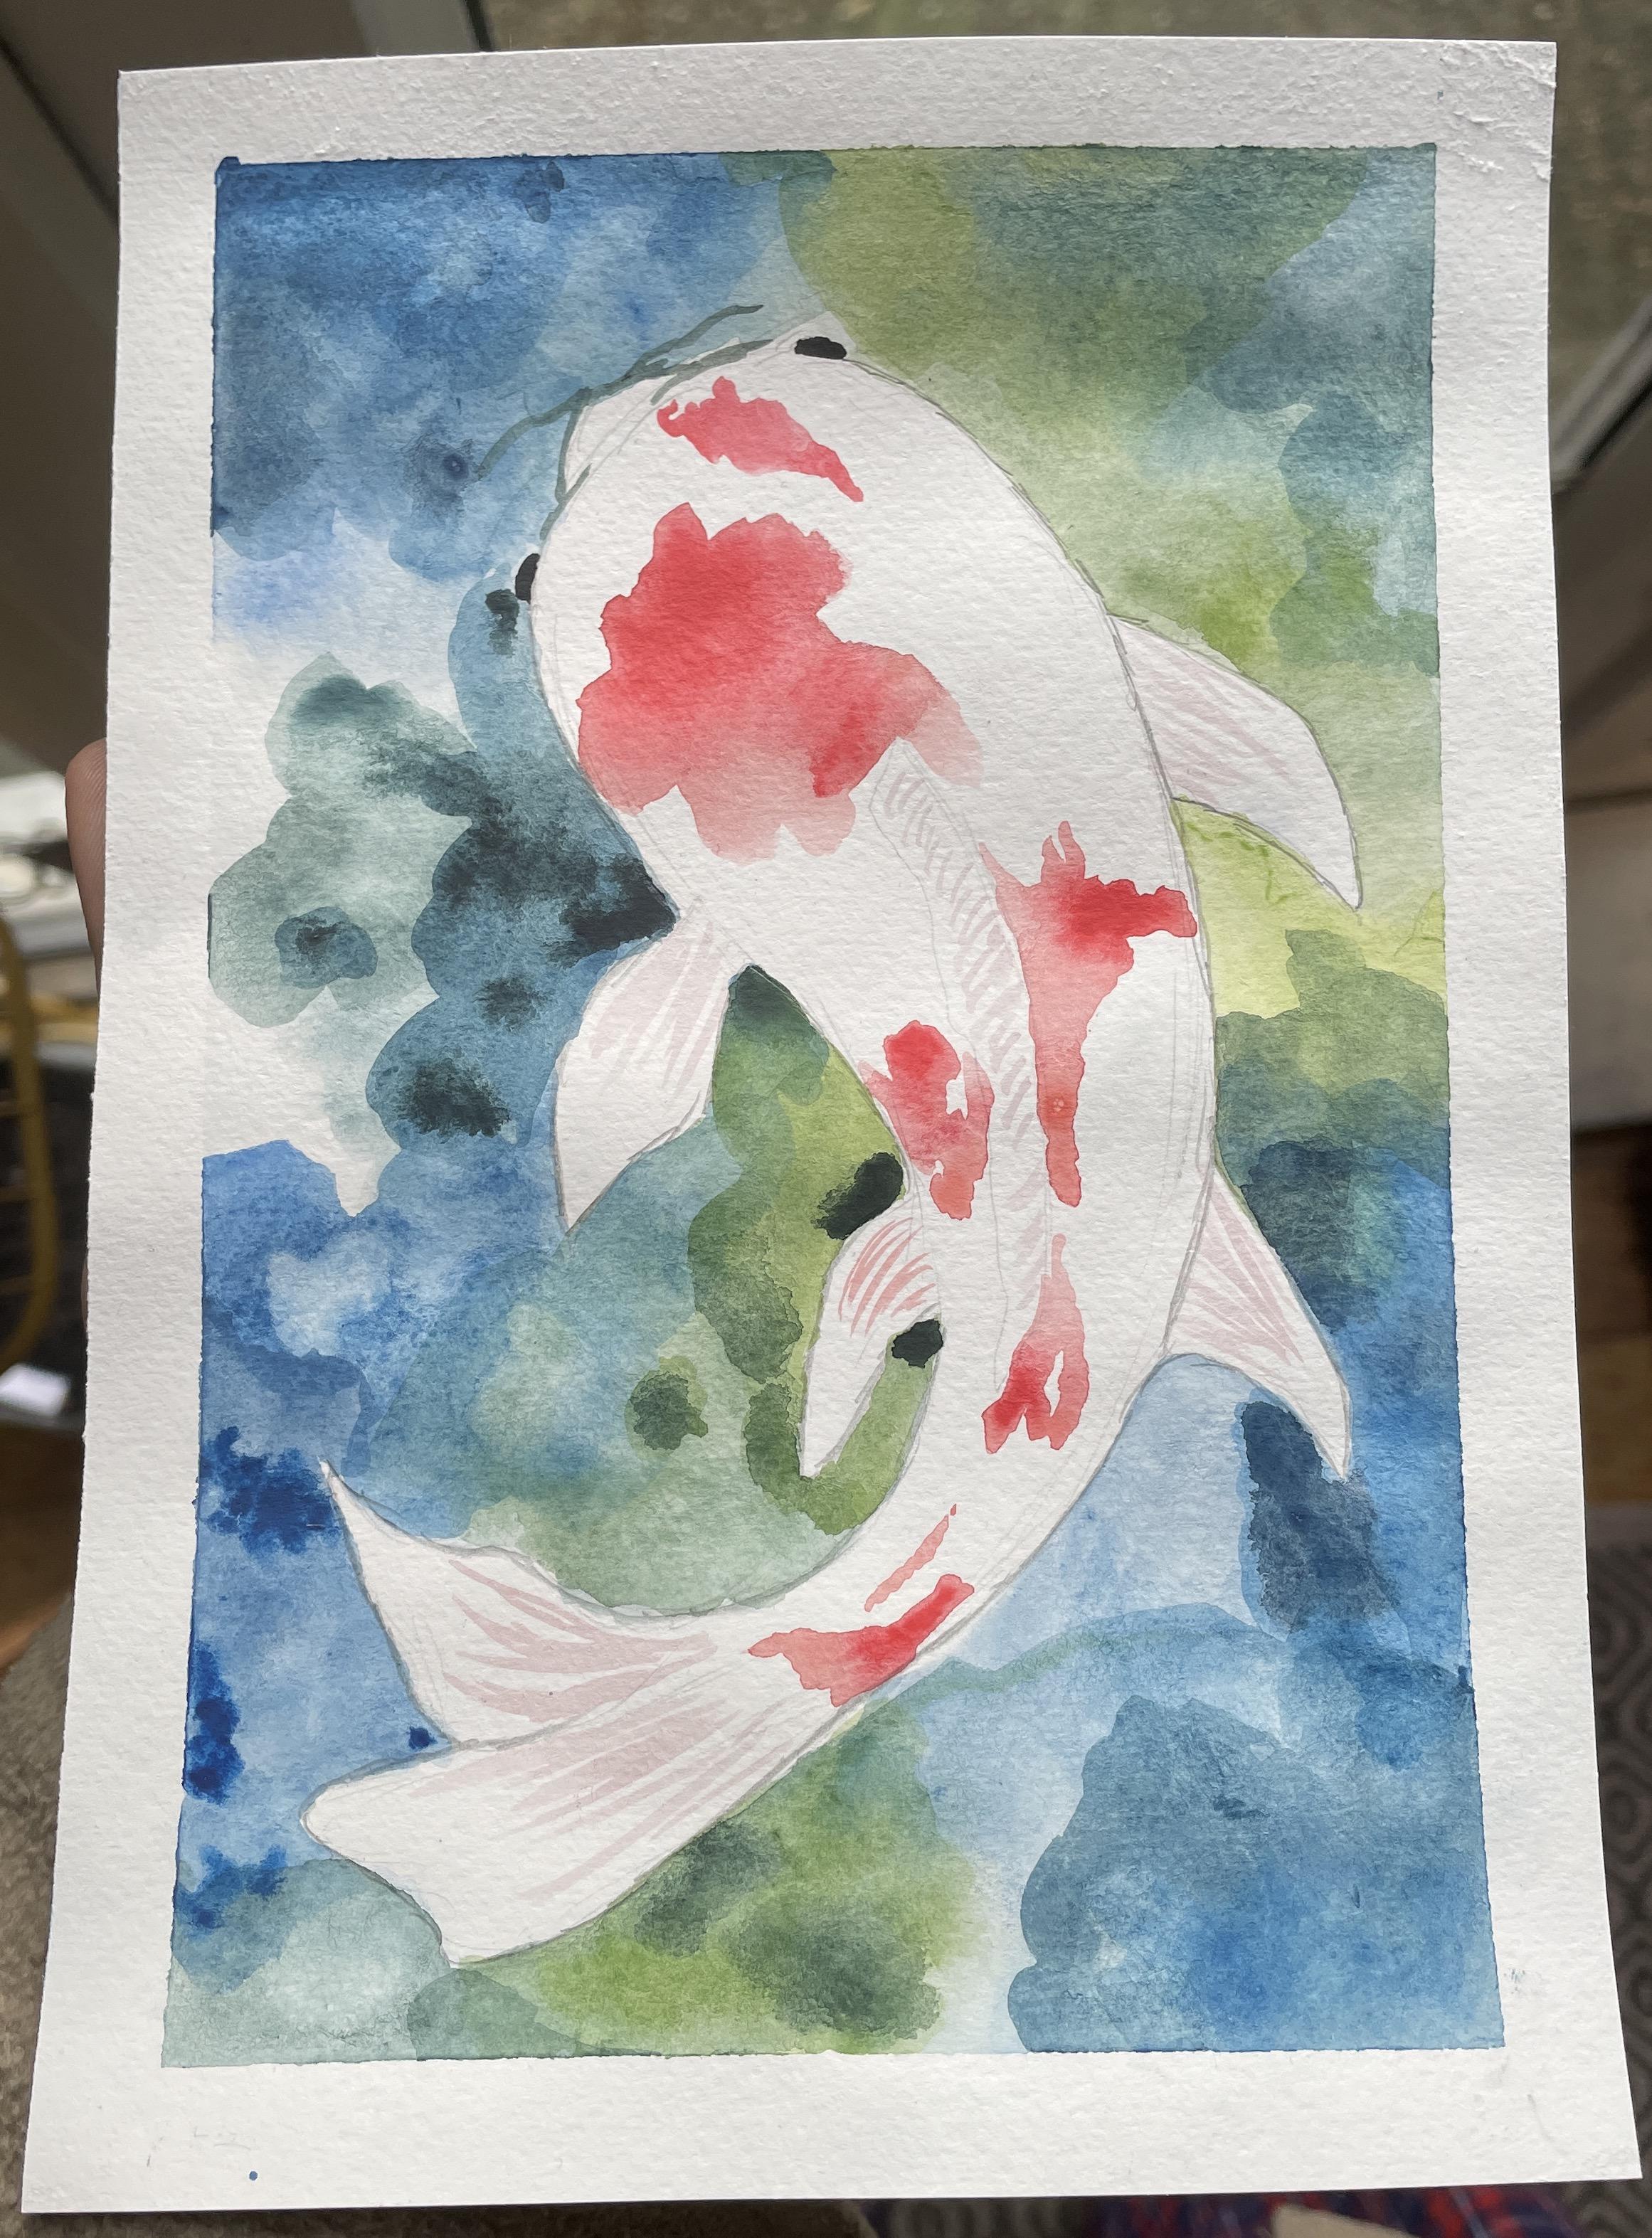
2. Stage 1 - Draw The Outline: We're going to start
with the outline. This fish is going
to have a bit of a curve because it's
swimming and that's what fish tend to do to
make life easy. I'm just going to try to go
for a round ahead and keep the back line curving and
the curve inside as well. The fish will have a
little bit of a point over at the top and then
down at the base. We want the tail to
be really swishy. We can add some
curly bits there. Then go around like actually I want to make that
bit narrower at the base. There we go, That's good. Then I think this is a cop, I don't know what
these are called. If anybody knows, let me know. Back, back fins, back
legs, front legs, arms. Make sure they all have
a bit of a Sw on it. And the left on this will
be a slightly more of it shape because obviously that helps with
the turning point. Then we will have spine and the fin and
pre nail that one. And then we can add some eyes, so the eyes are just going outside of the head
rather than inside. And then they have
these little tashes'll. We don't need to do any
other outlines now, it's just all about
the fun stuff.
3. Stage 2 - Wet on Dry (add water): We want to work bit by bit because if I tried to
do the whole thing, then this would dry. Instead, I'm just going to
take a little section at time and I'm going to make
it a little bit damp. If I just spread this water out, you can see if I move it
across, it's just damp. It's not piling up with water. Then I just want to pick a blue. I'm going to add a little
bit of black in there and I'm just going to
go along the side. I don't know what that hair is. Very no, I just want that
to where it wants to. If I want to, maybe I can
do some circular motions. It's bloody hair. We'll deal with the
hair when it's dry, then I'm just going to
leave it like that. Let's work into
another section now, let's move a little bit and
do the same thing here, But when you move up a section, I want you to change the
color ever so slightly. You can have the
water connecting. Our main goal is to make
sure we see a contrast between the fish and the
actual water itself. Now I'm going to go for this green and I
might just give it a texture of blue
because otherwise it's white, ugly green. Just dull that
brightness down a bit. Go around the fin again, I can add some swishing motions for technical terms this month. Let me go maybe just
like a round bit there. Let's move up into the top. So again, get it nice and
damp but not soaking wet. We can connect the water. Maybe I'll go for
slightly darker green. With the green, that is nice. I'll just get those
connecting there. My pigment isn't too strong yet. It's quite a light
pigment because we're going to lay
this quite a lot. Maybe I'm going to pick up a little bit of
blue mix that in. Just let science do
its thing there. Feel free to go
at your own pace. And just continued to try
and get the base layer, a nice light layer of paint, letting colors bleed.
Keep changing it. As you move across, make sure you're going around
the outline of the fish, so let that dry. As always, in most of these
paintings that I show you, it's all about the
layering and getting those lovely layers
and adding the color. So we'll let it dry and we'll come back
to it in a minute, grab a capet, and we'll add some more in a
much thicker paint.
4. Stage 3 - Wet On Dry : Okay, so most of it is dry. It's a little bit damp here. You might be able
to see the shine, but this is definitely dry. When I put my finger on it, it's the same temperature
as the rest of the paper. If it was cold or feeling
a little bit damp, then I know it's not ready. What I want to do now is add
a slightly darker layer. Let's go for dark blue and
a little bit of black. I love this color so much. Let's add, attach
a green as well. Then I'm going to go
for swishy motion. But this time I am not
going to dampen the water. I'm not going to dampen
the paper first. I'm just going to try and
go over this in layers. Still trying to mix up
those colors a bit, but this time it's wet on dry. Meaning paper is dry, my paint is wet. Be really loose and
organic with this, trying to just add
splodges here and there and we will go around
the whole thing again. Let's mix those two together, add our second layer,
I'll speed this up. It's always that don't want to bore you and you
probably just want to jump in and start doing it, which is what I
always want to do. I'm a terrible
student. Yeah, got it. Let's go. I'll let
you enjoy this. I'll see you at the end when we talk about
our next layer. Another option you
can do when this is still slightly damp, so it might just
have a shine on it. You can pick up some
clean water and then just add a
little dot of water. Just push that in. What you're doing
is just pushing the pigment away and
adding a bit of texture. It won't always work, but sometimes it can look
really, really nice. Then if you want to, you can suck up some of the juice from the side and
then just let that dry. So I'm going to do this
on a couple of mine now. Let's see if this one's ready. I'm just going to pick
up a little bit of water this in so maybe this one push that
clean water around. The science, that should be my tag
line, how to paint fish. Let the science happen. This one's a little
bit dumb still, so I'm not sure if it will work, but let's try it. The sound reminds
me of like if you, if you could hear fish nibble. Okay. Let's try this one. A lot of pigment in this one, so that could be very good. Don't, let's spread
that a bit more. Okay, let's see here. I'm not sure about that one, but I got some there. I got soak some of that up. Nice. I had another
little one here. Final one just sat right
to the edge. Okay, cool.
5. Stage 4 - Fish Flakes: It looks really weird at the minute because we
need to do another layer. But for now, we could do a little bit of the orange
work down the middle. Make sure we're not going to
touch any of the wet sides. We could just do a
few patches that aren't touching our
previous layer. And then that should
look really nice. I'm going to mix this red and I'm just going to
add a touch of orange. Then I want to make it
a little bit thinner. Let's go for nice, juicy bit on the head. So I think my edge is
just about dry there. This can literally
be any shape at all. Then I'm going to pick up some pure red straight
from the palette. Dab that in because they are
quite speckling these fish. Nice. Let's pick up a bit more color and
let's go along the fin, go down there and
along the spine a bit. And maybe I'll
leave a little gap. Go out to here. Nice. Then let's add
a little belly patch there up to the
spine there maybe. Wait, that's nice. Add some dashes down here and then let's
pick up some red. It's really watery, this red. And just do that in. That's going to add
some extra bits and maybe I'll do a
little bit on the face. Anything else? No. I think I'll leave it like that for now. We'll let that dry. I think everything else is still drying. We'll come back to that
in a couple of minutes. Now that it's all dry, I'm going to do a similar thing, again, trying to
layer all the colors, But instead of adding
a drop of clean water, I'm going to add a drop of darker pigment and just
see what that happens. See if we can push
the texture in a slightly different
way. Let's go.
6. Stage 5 - Wet On Dry Add Paint: Let's head to this area, I might do a lighter green, a little bit of light
blue then swell, swirly. That's quite nice. Then
whilst it's still wet, I'm going to pick up a
little bit of dark green, just a few dots around here, and let the science happen, then let's move to this area, so I'm going to use
that navy blue, just keeping it quite
pure this time. Okay, nice edges lay in the over layer and then I'll
pick up it's only a bit of black and blue there as well. Cool. Let's go there. Nearly went on
just a pure color. The mix. My color. Um, blue. Maybe if I do some blue, I wonder what
that'll do arrived. Cool. Not against that. We don't know what I just like. Yeah, it's a tiny little Doc, doc, doc will make
all the difference. Ok, let's go. Still
get wet there, maybe I'll go this area. So I'll go blue set black. Bring it all the
way to fish then. Okay, cool. I want to go
in this area I think so. I'm gonna mix the green and the navy blue together maybe. Let's take that all way to the odd thicker fig. Dark, cool down in this section. Maybe just to pick up
the green a bit more. Mix the light from the
dark green together in the corner and then
bring that down here. I guess you can go there
as if you're really behind the fish skull in there. And then pick up
some dark green. Throw that in there, let it
do its T blue into this one. Nice. That's gonna
look really good. The outlining the fish. I want to make sure
that the edges are nice and smooth there. Okay.
7. Stage 6 - Fins: Okay, we'll let
that dry one more time and then we're
going to do a final wash with a similar layer to what
we had at the start just to tie everything
together because at the minutes quite patchy. But in the meantime
what we can do is the little fins because
they're not touching anything. All you want to do is use that previous color
that you had. Just make it really,
really light. Then we're just
going to think about the direction of each fin. We're just going to
do a few strokes, some of them can be quite long, some of them can be quite short
to go in both directions, whether it's from the right
to left or left to the right. But try not to make
it too stumpy. This one might be a
little bit easier to go from the fish itself. And then we'll go up here. Let's go around the
shape in this one. Nice. And then we just have
a little finny bits the top. Don't have to be
precious with this. Okay, good. And then let's see now
the eyes are the dry. Yeah, so my eyes are dry
so I'm just going to get a really thick black
straight from the pigment. And then just fill
in these eyes. Don't need to bother
with reflections. And then, do I want
to do the tash now? I'm gonna wait for the tash. Okay, let it dry folks.
8. Stage 7 - Wet On Wet Final Layer: This is actually the driest
part for me at the moment. I'm just going to add some
clean water just like before. Then all I'm going to
do is get some color. Literally just that
when it dries, it's literally going to
bring everything together. I pull that across here. Let's just stop. Stop. Could be really
wrote. There we go. Splash that out a bit. Try I leave up a little
bit of live virtually. Colors down here can tail. That's a good decision. I
want to leave that light. Not a bit of color, a
bit of green, nice. And then this part
does look a bit weird. Even it out a little bit. That's even it with
what was on my palette, to be honest, a touch. Okay, cool. You know,
I'm happy with that. I think I'm going
to leave this part lighter and let it dry and I'll see if I want to do
anything more to the fish. I'll give it a
couple of minutes. I'm actually quite happy
with the fish as it is, so I'm going to leave it, and the last thing
I'm going to do is peel away the tape so that we can see the
crisp, crisp edges. And it will just bring
the piece all together. Peel off your tape, and
let's see how it looks.
9. Stage 8 - Remove The Tape: Well, it's a little bit, a little bit wet over here, so it's going to
be so satisfying. But also a little bit scary because you don't want
to rip the paper, so peel it away from your artwork just in
case it does rip. And just do it really
gently, nerve wrecking this. Okay, good. There's one down now I'm going to do the top one because that's the next letter. Okay, let's get this one. So satisfying. Sods low P right at the end. Oh, slow it down. Good. Good one. Please, please do. Perfect. There we go. I did forget one thing,
the bloody tash. So a little bit of black little wibble on the other
side? A little wibble. Just do a little sketch of the front part
of the face there. Do I want to do an outline? No, I don't want to do outline. Okay. I did forget a
thin as well. Not great. Okay. Do a thin voi Poisson lam. I think that Anyway,
what do you think? So there we have it. A lovely
y carp situated in water. Really fun to do and yeah,
I'm really pleased with that. So have fun. Let me know how it goes and I'll
see you next time.
 China Jordan, Art Teacher