Transcripts
1. Festive Card Painting Intro: Hello, welcome to
artists and my name is China and I'm going to be your tutor throughout
this workshop. Now, it is a festive time of year and that means that
we want to get creative. We want to be
sending the people, we love some homemade gifts. Now, in this workshop, we're actually going to be
painting our own cards. If you like watercolor and you like gift and something
to your family, this is the perfect
cause for you. You're going to need a few different things in this class. And I would recommend that
you do have them all. If you don't, then
you're just going to be painting something
slightly different, but that's okay too. Feel free to pause the
videos at anytime. If you want to slow it down. If you want to spend some
more time on the drawing, is completely up to you. How much time you spend on them. Some of the drawings
might be sped up just because there's a little bit boring listening to
me talk all the time. But feel free to pause it
while you get yourself to the right stage and then
continue the workshop. In this workshop, you have
four different cards to make. You've got that Robin,
the Christmas tree, you've got the snowflake and
you've also got the reef. The reef will take much
longer than the rest of them. So make sure you're
sat down with a really nice cup of
tea or mulled wine, I give yourself a chance
to really get into it. If you are a beginner,
I would recommend just having a scrap piece
of paper on the side, just so you can practice some little bits before you
apply them to your cards. Now, you can get blank cards
from many different shops, minds from hobby craft, and they seem pretty good. You might also notice
that I'm actually painting on scrap
pieces of card as well. And they're fine to stick on your gifted cards
if you want it to. So without further adieu, good luck for the workshop. I hope your cards come out beautifully and do make sure
you show us at the end. I really can't wait
to see what you make. Good luck and Merry Christmas.
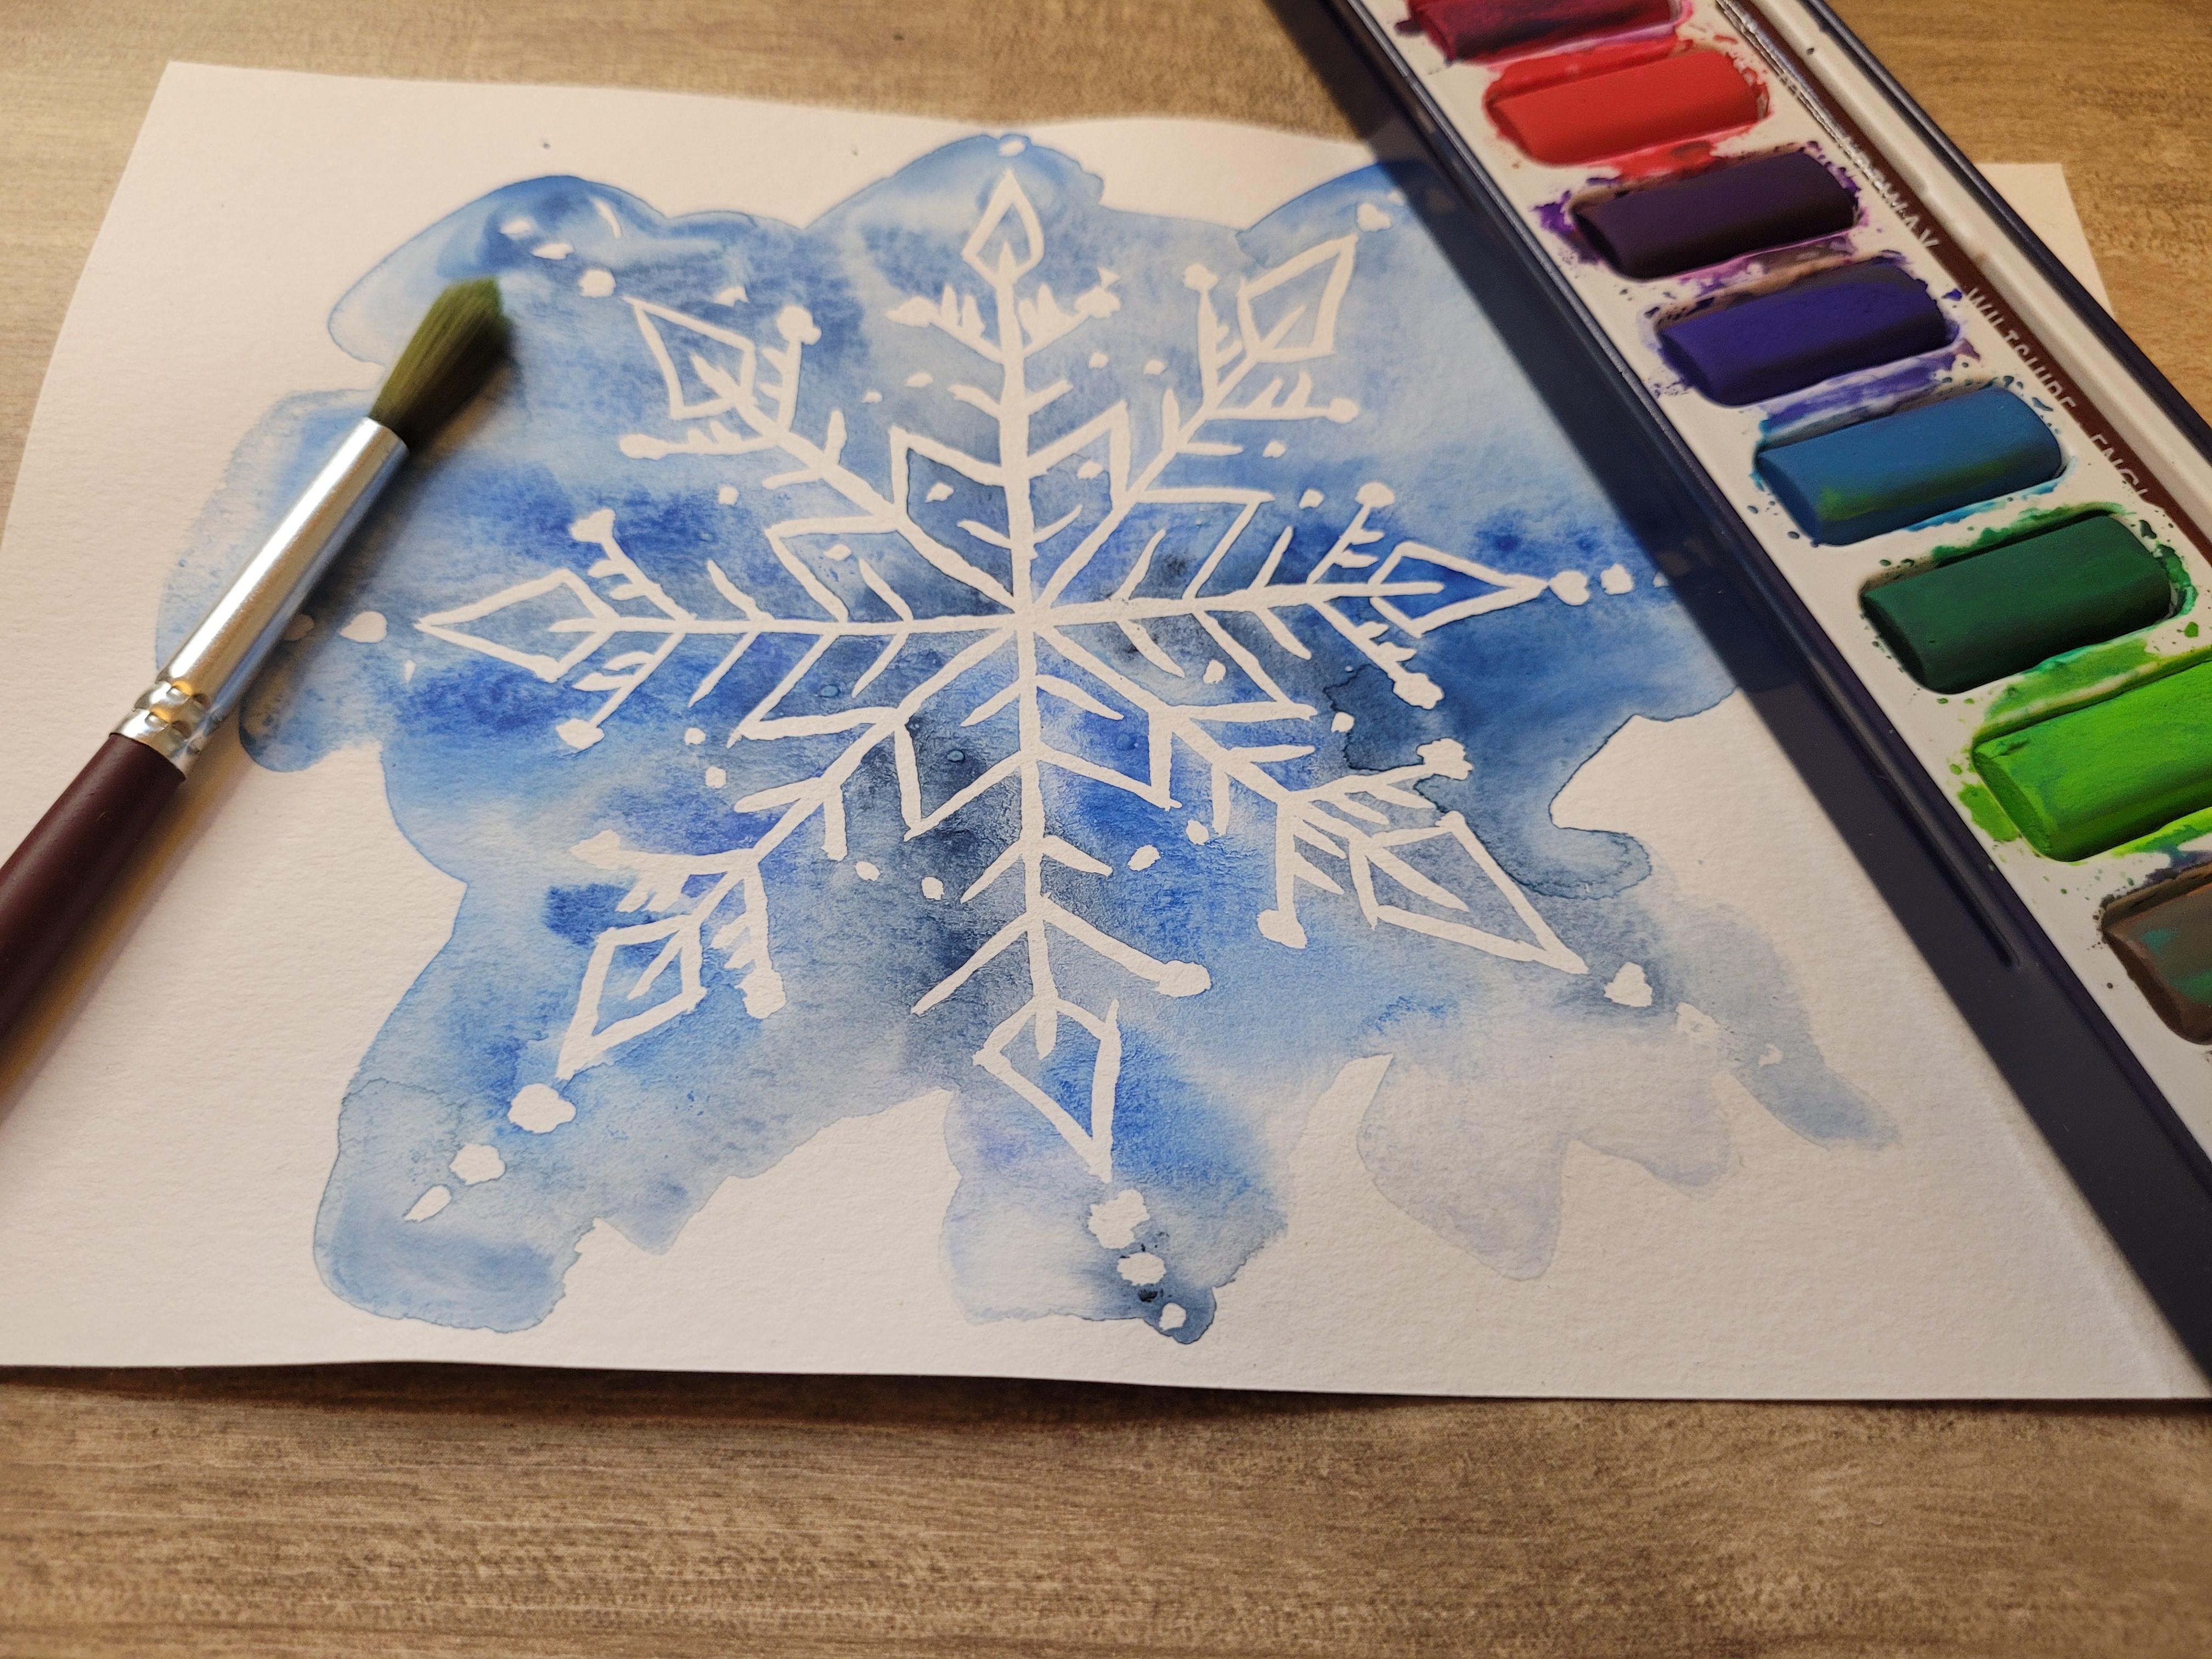
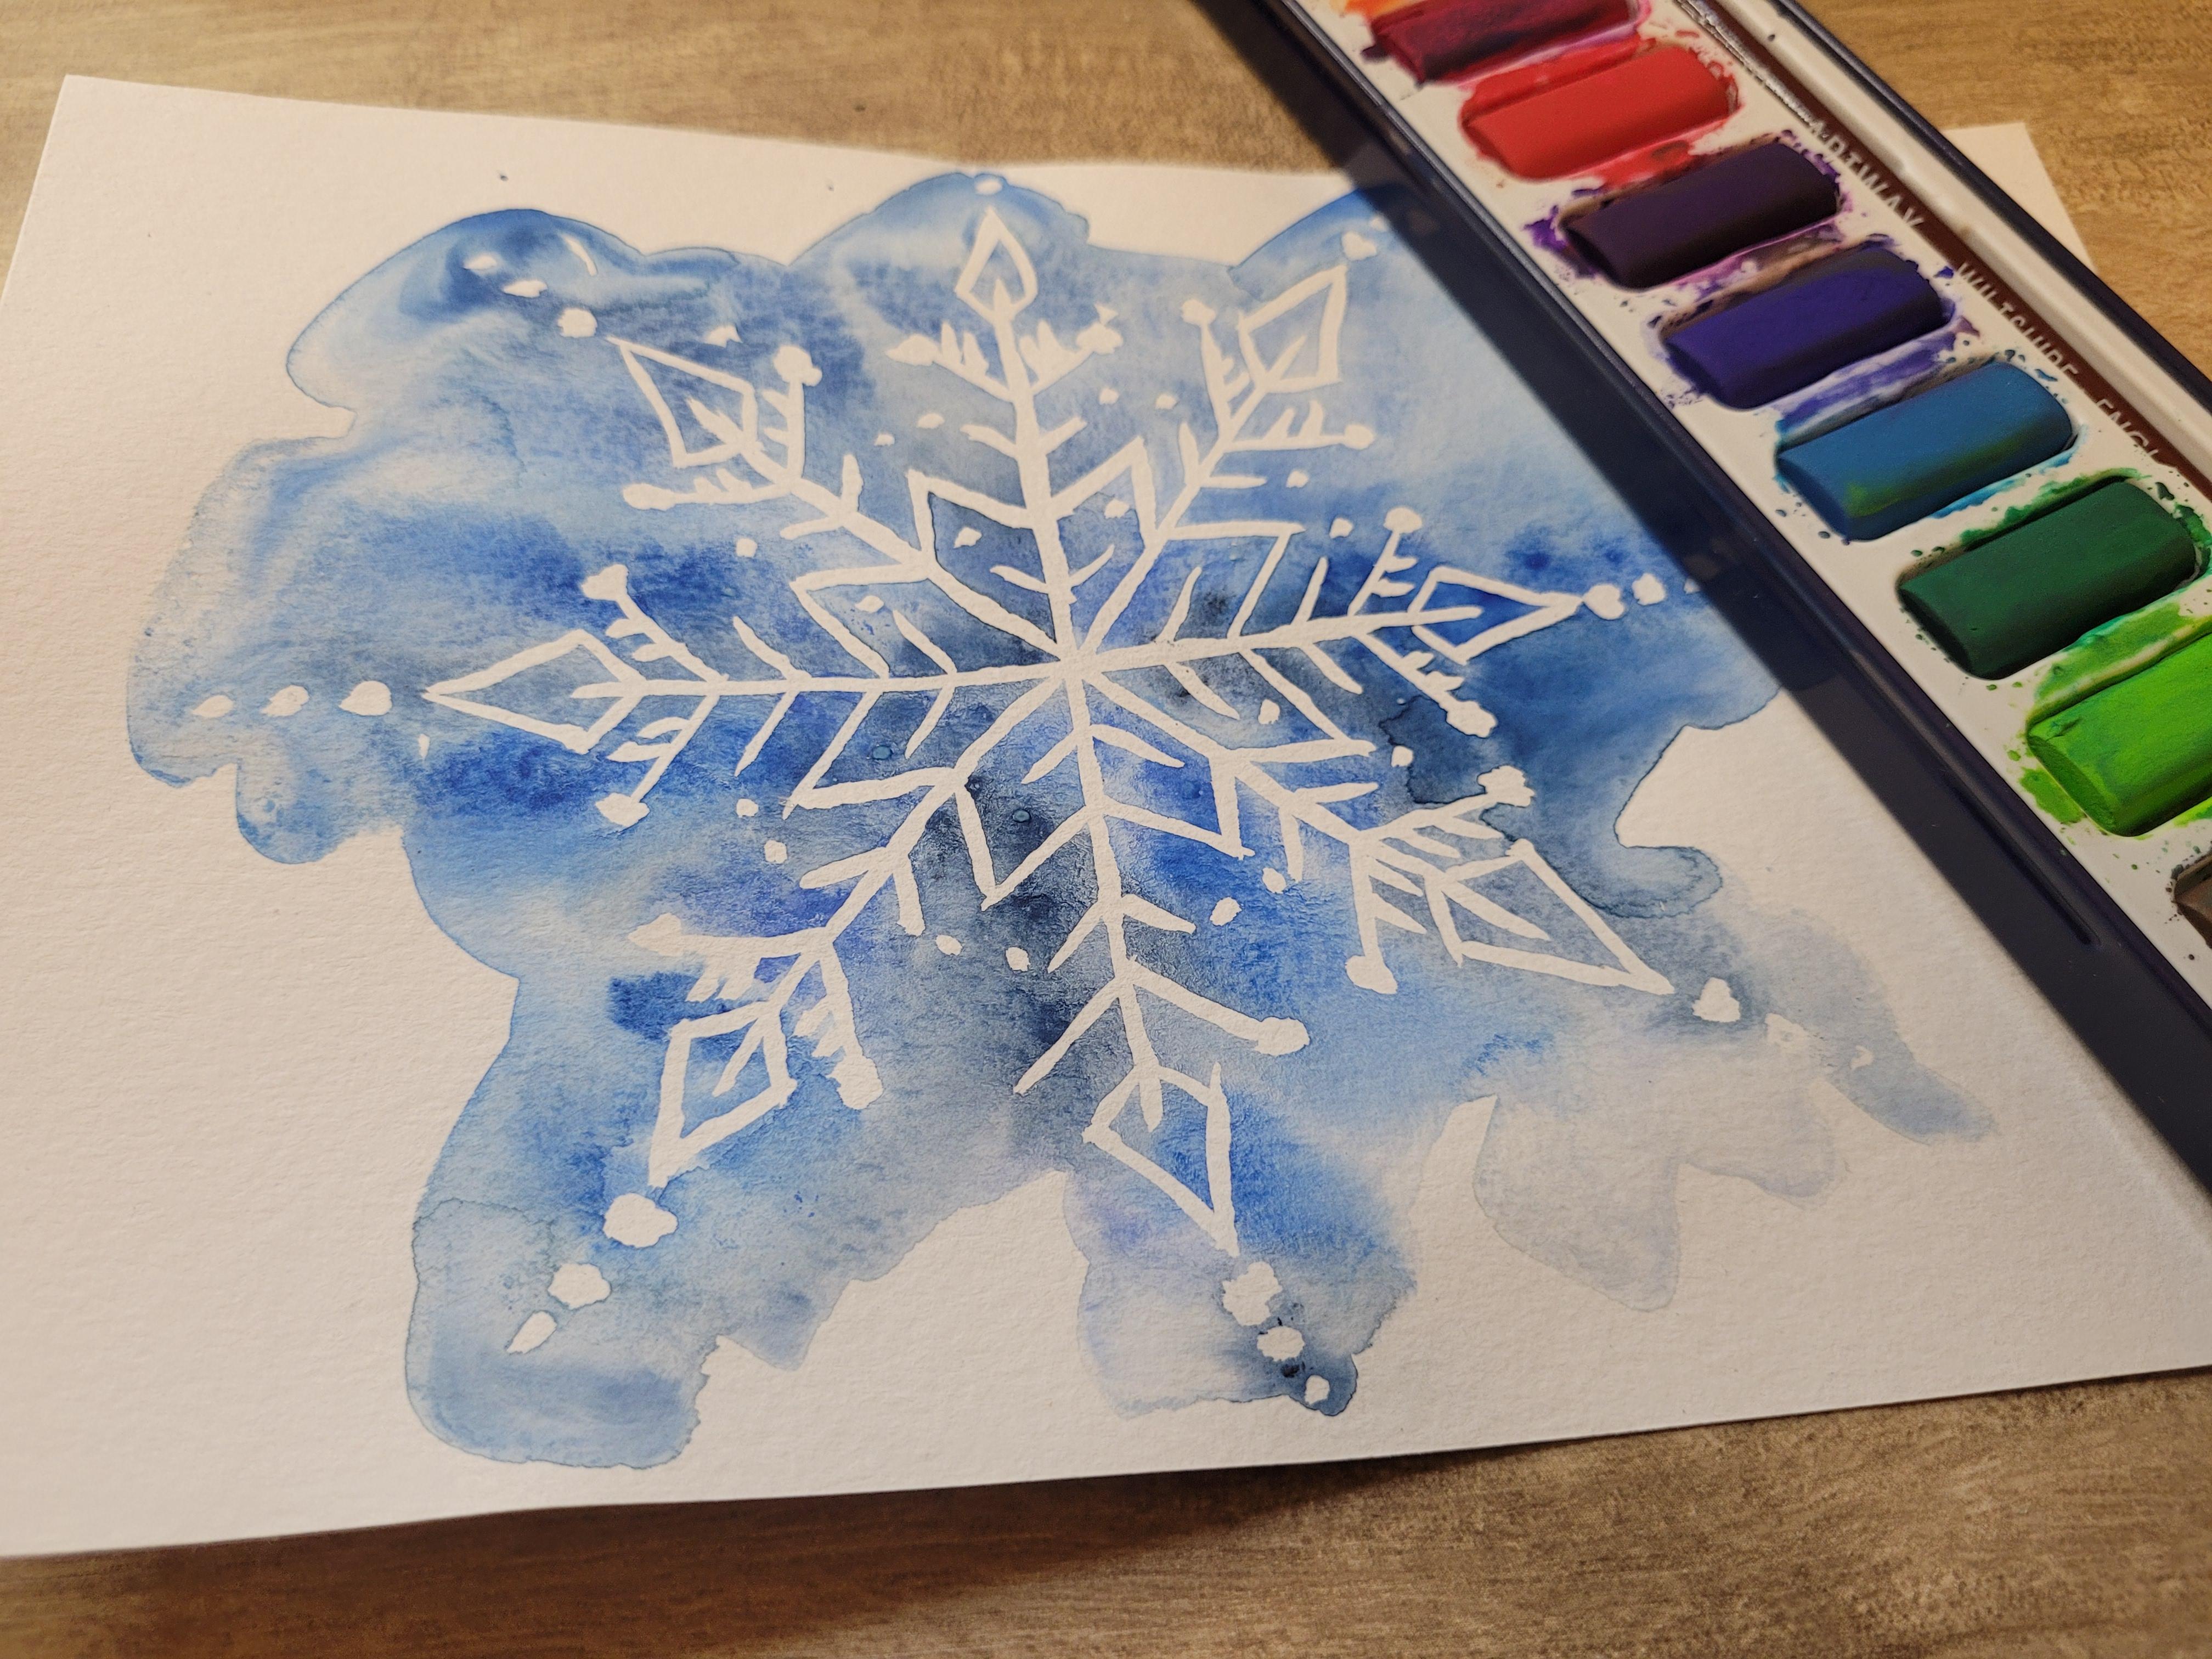
2. Snow Flake Demo: Hello everyone. In today's class, we are going to be
looking at how to make a snowflake using masking
fluid, watercolors. This is great if you
want to gift people anything for the festive season, but you can also use it
for anytime of year. Now, feel free to do something
other than a snowflake. You can do a penguin, you could do literally
anything you want. But I'm going to
do a snowflakes if feel free to do
it along with me. You can use a pencil to draw
it beforehand and a ruler, or you can go free
hand like myself, completely up to you. So grab your equipment, you'll need your masking fluid at your watercolors and was
there and a paintbrush. Let's get started. Okay, so to make this card, you're gonna get
your masking fluid. Now, I like to separate it from the big jar
and just put it in something small just
so it's easier to reach. Then what we're gonna
do is we're going to apply this to our card. You can use any brush you want. I'm using the little
plastic watercolor brush that came with my
palette just because it's nice and strong. It has really strong bristles and it's nice and
small and pointers, which just means I can get different variants in
thickness in the line. So to start our snowflake, we're going to just
start with a cross. And you want this to be
equal in length and height, ideally straight, but mine
is a little bit wonky. Snowflakes, perfectly
symmetrical and balanced. So aim to do that
throughout your drawing. Now you can add
anything you want. You can add lines, you can add little circles. You can look online and
find your own design, or you can copy mine. So I'm just going down each of these strands with
alternating legs. I've got a short
one along one of short one along
one is short one. This is basically
going to mirror on either side and the left and the right side of
that vertical line. I want to try and get this
pattern on both edges. So that means that it's
going to have 12345 dashes. If you want, you can
start in the middle. There's no real reason why
I started on the outside, in hindsight is
probably a bad idea. So start in the middle and
work your way outwards. That might just help
with the symmetry and getting the right
amount of lines. I'm not sure what you call them. Arms, legs, like bits. Either way. Hopefully you get the gist. We're looking for
symmetrical areas and symmetrical lines. Just keep doing this
with the masking fluid. If you really wanted to, you can, you can draw
with a pencil underneath. That's absolutely fine. Now, once you've done that, it shows you how much space
you have in those quarters. So I've decided to
pop another line. So it's as if that cross
is tilted in the middle and it's gonna go slap bang in the middle of each quarter. So four lines, again
trying to keep that symmetry within
those shapes. Pop those on, and then we
can add a bit more detail. We can mix up a little bit. Now, we can connect some of those shorter lines
that we originally had. And you see I'm skipping the
first dash from the center. So I'm leaving those small
v shapes in the center. Then all I'm doing is extending those
branches so that they stand in the next level up
so that they touch that new, new crosses tilted. So this creates a really
cute little star. As I move up, I'm just going to alternate
some more little dashes. So again, making it interesting
thinking, what can I do? To make it fun? You might want to add diamonds, you might want to
add thicker Vi's. It's completely up to you. But I really liked this
simplistic look with a bit of a star in the middle
because I think that is quite classic of a snowflake. Just remember whatever you do. Keep doing it around
the same pattern. So you're following a rule is a little bit like him and dollar, which we also have
a video off in our mindful drawing class
if you did it, right. So going back into that store, I'm now just adding some
dots in those points. Just to add a bit of variation because there's
a lot of the same dashes. So circles are really, really nice once they've
done those in the store. And then just adding
some randomly, so some of the dots
aren't actually touching the lines at all. It's just a little
bit more decoration. I think dots work really
well with this kind of card. So you can pop those
on there if you want. Then after that. Well, I decided to make these, they're not quite dive
is not quite dry. But if you imagine there's
an upside-down V-shape just closing off the top
of that snowflake. It is quite difficult
to get them the same. And you can see that I'm not, not so great at it. But actually I think it looks, it looks fine so you can take
the pressure off and think, okay, it's not perfect. Oh, well, it's fine. It's a handmade card. Actually looks quite good. And if you really wanted to, early stages, if you wanted
to draw out with pencil, you can use a ruler to
really get that super, super crisp and clean. I'm following up on those
shapes with some more dots. These dots, I'm actually
varying in size. I'm going for a fat
dot near the tip and medium-sized dots and
then a very small dot. So again, it just makes it
a little bit more dynamic. Then I think the
final bit is just to make some of those initial lines a little
bit more interesting. So adding some circles
just on the tips of those. Now, you could go all the way down your strands, your legs, arms, or you can just
do one of the rows. Just make sure it is
following that same rule. So you could alternate one. You could alternate up and
down, whatever you fancy. So in mind, I'm just
doing the ones that are underneath those
triangle diamond once. Then I'm getting carried away. I'm actually adding some
perpendicular lines just underneath as well. I don't think it
adds much to it, but it also doesn't
take anything away. So I think I just really
liked the, the masking fluid. It's so fun and right at the
end is gonna be even better. So, yeah, this is really fun. I think that's, that's
it now for this drawing. So you want to wait
for this to dry. And it does dry really
quickly, which is great. Once it's dry and it doesn't
come off on your fingers, I want you to get clean water
and just rub that on top. You don't need to push hard. You're literally just
pushing water on it. You don't need to be perfect. I think actually the
looser the better. But you need to
think about where's my paint I'm going to go to. So you definitely want
to make sure it covers all of the masking fluid. A second, we're
going to add color. You want to start
applying really, really wet watercolor paint. You can do this either by mixing a little bit of pigment into your palette
and adding water. Or you can add the water
straight to your pigment, but make sure it's really wet. And I've got a couple of
variations of blue here. I've got a very vibrant blue, very cool one, and
a very warm blue. And all I'm doing is picking
up that color and then just dribbling it into that wet liquid and you
can see how it disperses, how it mixes into
the other areas. And I'm just trying to put
the warm in one place, the cooling one place. So think about what
colors you want and just tap your brush
a couple of times. I try not to push your brush around as if
you were painting it. You just want to dribble it on, tap it on because that's
what's going to give you these dynamic dynamic puddles. Some of it is going
to be darker, some of it is going
to be lighter. And that's what we want. We want it to be
super, super dynamic. Make sure that you're getting it around all of the masking fluid. Because we're going to
rub the masking fluid off and it's going to leave
a great contrast from the white of the paper
to the color around it. So think about, think about
getting it everywhere. Now the next little bit
of blue I'm putting is a blue with a
tiny bit of black. So it's just making it again
a little bit more dynamic, loads more color, and
keeping it interesting. It's looking pretty good. I'm really liking that is moving around in that
water that we left. Some of it, you can
see nice swirl, not top-left is not quite going
to the edge of the water, but it still looks
really nice if that dries out that
that will look sick. So when we're nearing
the end of it, you basically want
to let that dry. So this needs to be completely dry before you do anything else. So make sure it's dry to the touch because when we
rub off the masking fluid, we don't want we don't
want the paint coming off. Once it's dry, you'll see
it looks quite different. The paint has settled. You can see all the
different colors. And what you wanna
do is just gently rub with the side of your finger all along the masking fluid. And you'll see it
start to peel off. You'll see the white
starting to come through. And it's so satisfying. Oh my goodness, this is
the most amazing part. You just gently rubbing
through and you can see why if your paper is
wet at all underneath. You can see why that
could be a little bit dangerous for the artwork. So just gently rub along to get all that masking fluid off. And it looks really nice. It's such a simple and
effective technique. So it's something you
can easily do at home, something that you can make for somebody else and
absolutely love. I really hope you enjoyed that. I hope you found that
really therapeutic. And look at that. Look
how cool that is. Amazing. Well, thank you very
much, everybody. Thanks for joining me. And yeah, if you want
to share your work, I'd love to see what other
variations you make.
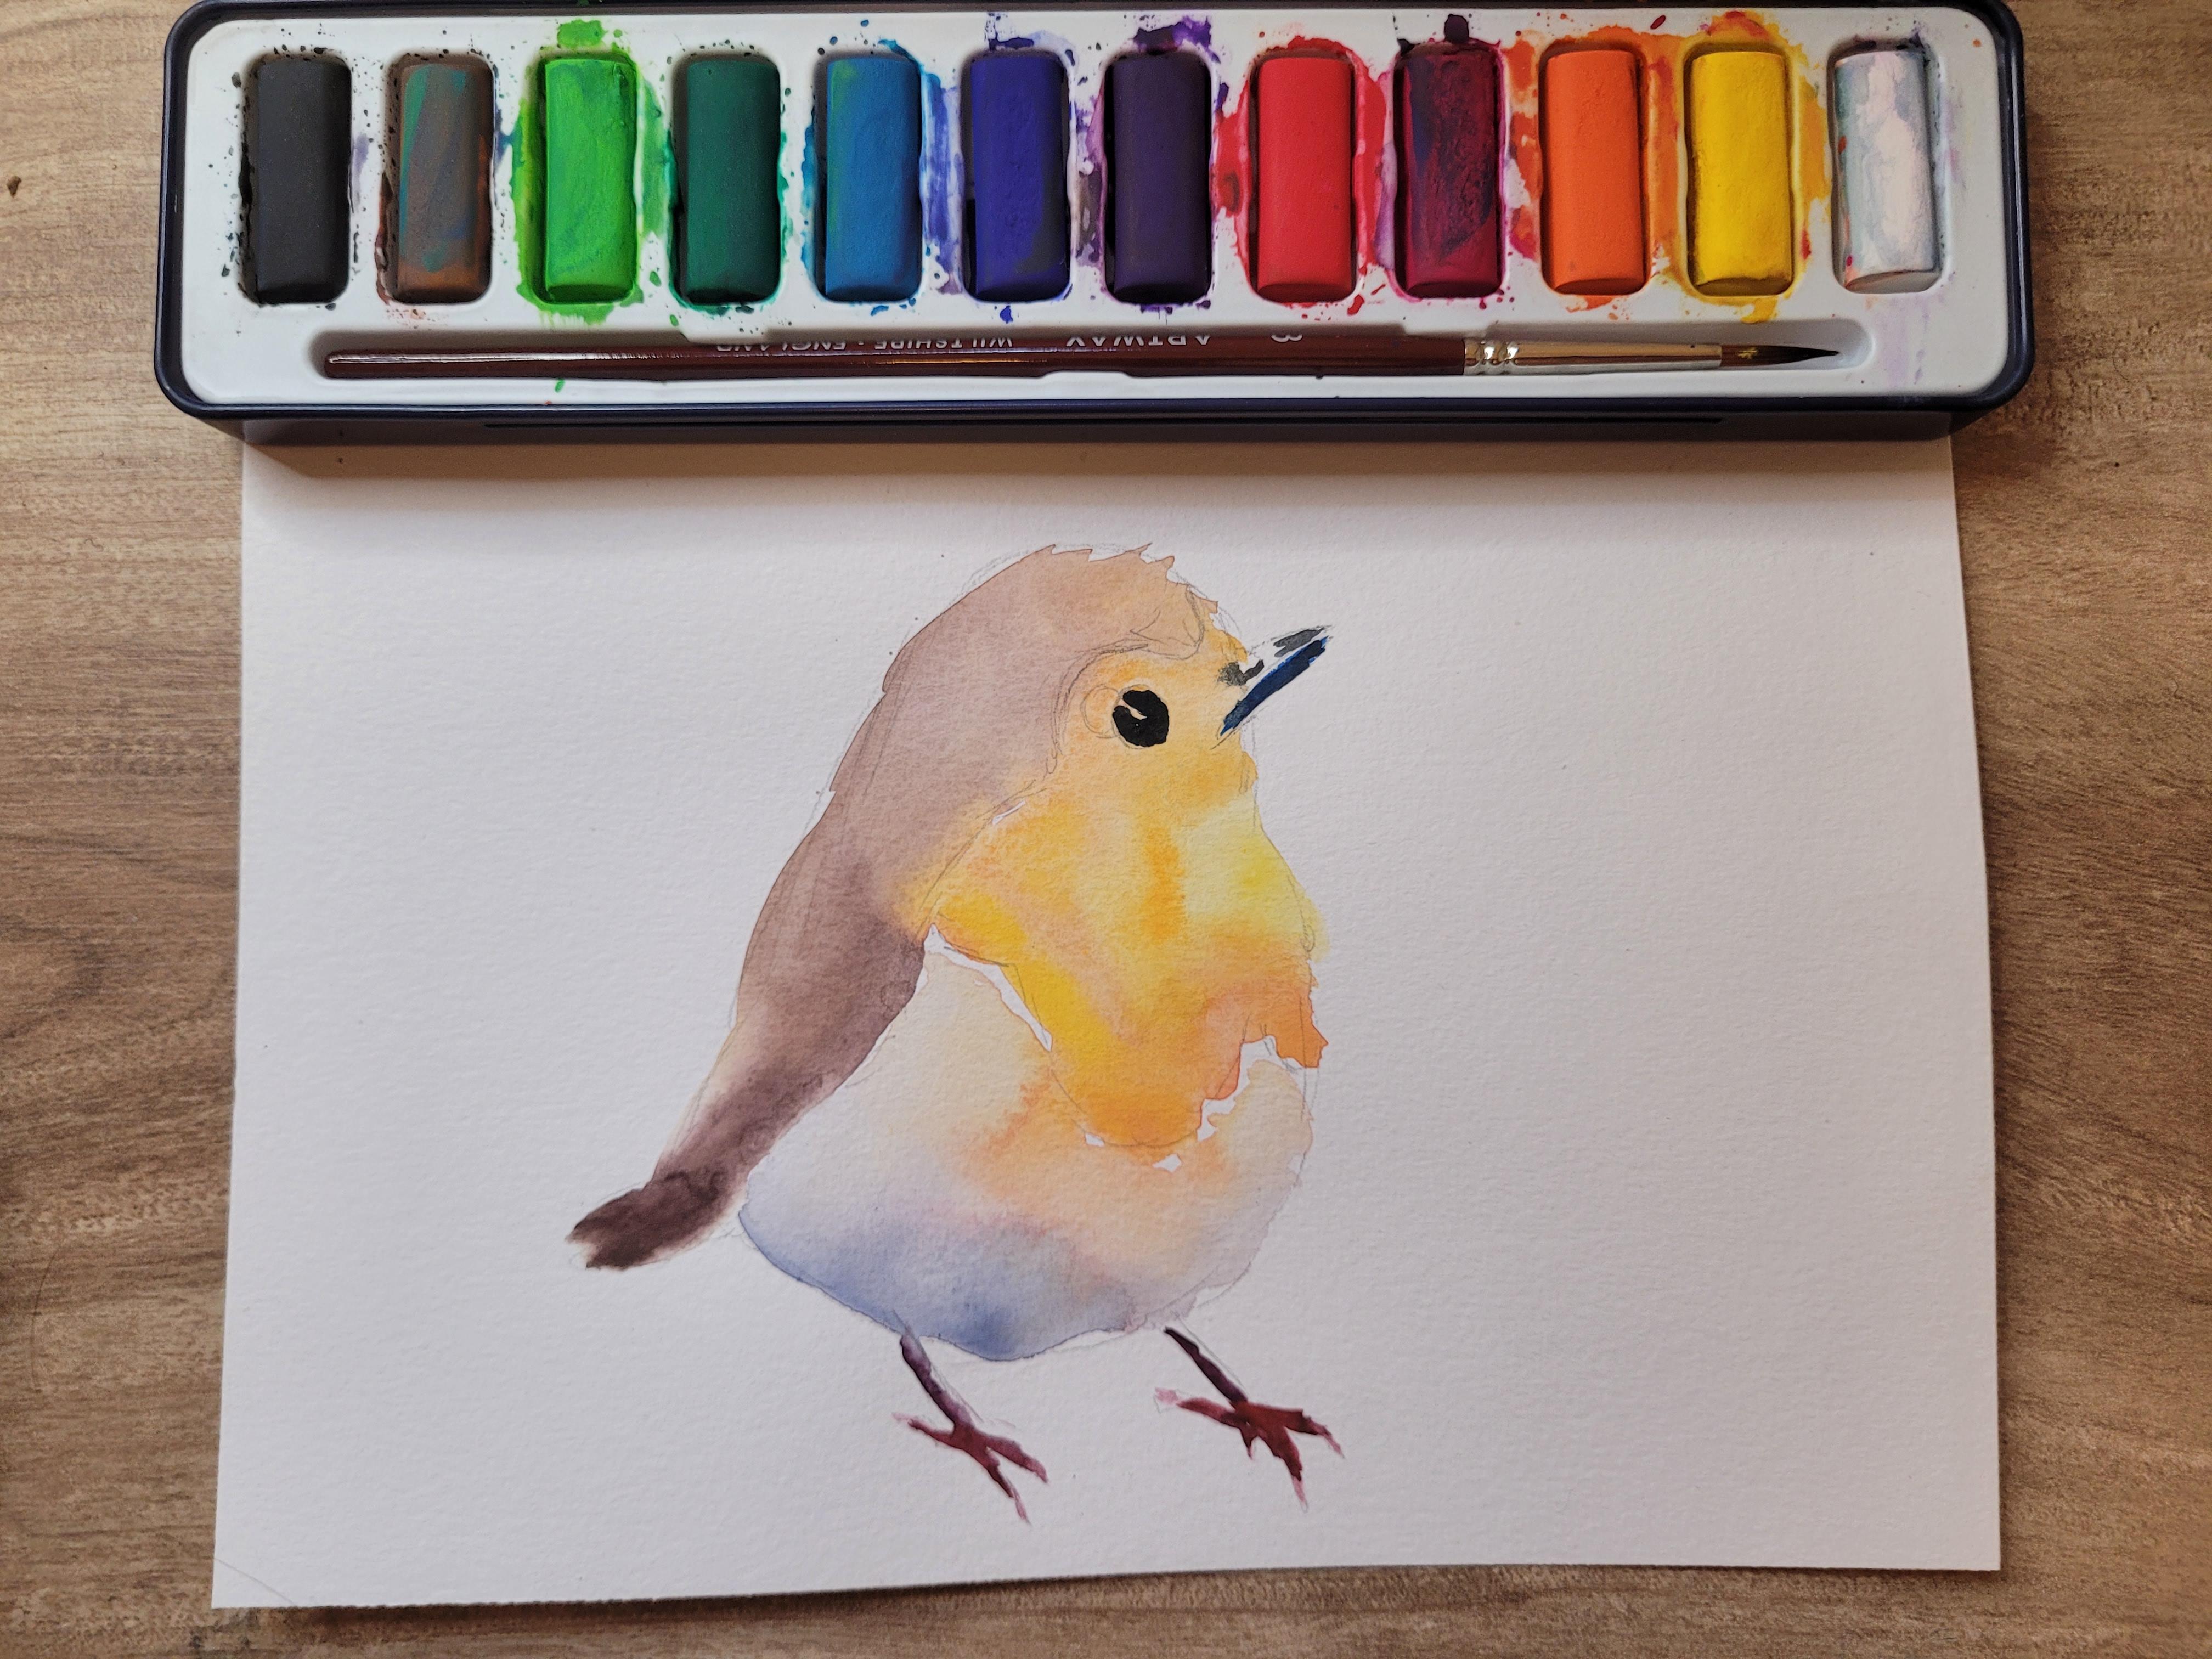
3. Robin: Hello and welcome to the
robin painting class. We're going to use warm
colors in this one. We don't need anything else, just your watercolors and
your brush and a pencil. We're going to start off
with a bit of an outline and then we're gonna be
working wet on wet. So that means lots of clean
water in your sections. And we're hoping for
those edges to blend naturally without having
to do any work to itself. So just watch out
for your colors and makes sure that bright, makes sure they're
super, super wet. And makes sure you're leaving different areas of
light and dark. Feel free to pause
the video anytime. Hopefully, that will help you just to make the
rubbing your own. And I really can't wait to see what you
make at the end of it. So in this class, you are going to start
off with an outline. So grab your pencil. I
would recommend a to B, HB, just a box ended pencil so that it doesn't blend
too much with the artwork. We're going to start off
with the shape of it. So you'll see that the spine is fairly straight because that's where the back of the bird is. We want to emphasize the curvature of the
bird on the front. So really try and round
off the head and make sure that belly is much
bigger than the head. Once you've done that,
just add a little bit of a tail and you want to
have a bit of a beak. So making sure that it comes into the feathers
itself on the head. This just shows that the
mouth is on the bird. Next you want to add the feet. So you've got two
little lines that are pointing towards
the bottom right. And then the feet are
a little bit tricky. So take your time with them. They look a bit
scary to be honest, and a little bit
like tree branches. But what I'll do is I'll post this video just for a few
seconds when the outline is done and definitely download the attachment as
well just so you can spend a bit of time. I'm getting the outline ready because that's
the most important. Now once you done the
outside of the bird, you want to work in the middle. So we just want to get a very
faint outline going across the back that this shapes around the head and
shapes around the back. This just shows a bit
of separation from the dark feathers on the back and the light area
in the middle. So just add some lines there. And then of course we
go to add an eyes. So just draw yourself
a little circle in that gap on the head. See that there's a space
that fits it perfectly. Now, don't draw
it too low like I just did. Which is fine. I've just put mine a little bit more to the right and then I'll just rub it out very shortly so that I can have a nice-looking bird rather than one that's had a
really tough winter. The phone of it is just to get a little bit of outline
there on the belly to separate the feathers
on the head to that lovely belly underneath. So pop that in. I'll pause the
video for a second. You can pause it as well
if you need a bit longer. Okay? So once you're happy
with your outline, you can stop painting. So all I'm gonna
do is wet my bed. And I'm just wetting that light areas so the bit
where the eye is and you'll notice that I actually
haven't rubbed out any of the mistakes because the
paint should cover it. So if you've done the same, then it's probably better
idea to rub out to be honest, but you'll see that
it can blend it once your your area is wet
or you're going to do is pick up a very loose
yellow and just dab it on. I'm not spreading my brush. Just dab, dab, dab dabbing
in a very, very wet surface. You'll also notice
that I've just picked up a slightly darker yellow, so it's more golden yellow. And that's just going in there
as well to create a bit of texture and a bit of dynamic
illness within the area. We're looking for. Very textured. And it just making
sure that you'll paint when you're
adding it in is nice and wet because this is going to give the
illusion of feathers. And when it dries,
it's going to, well, it's going to actually
help to blend in a little bit better
with its neighbors. So I'm just adding a
slightly dark yellow now, more of a yellow ocher with
a tiny bit of dark red, so not brown because Brown
can really kill the colors. Again, just dabbing that around, trying to make that a little
bit more interesting. And then finally, just
going around the edge with a nice red so you'll see what
you can see quite easily, how red and how
wet the paint is. I've just gone over the eye
but I can still see it. But you might notice
that we can't really see the mistake. Well, the pencil mistake
that's underneath. So it's really,
really nice and we've got the lightest bit
right in the middle. So when it comes to the
red and the dark areas, just do that on the line
that meets the inside. Edges of the other
sections of the bird. So not on the right hand side
but just the inside edges. Next we want to do is wet
the back of the bird. And I'm only just
gently knocking into the area that we've
just done that pose, some of that paint that
we've just applied pulls it into that section so
it makes a nice blend, but you'll see that I'm
not overworking it. I'm doing a couple of strokes. And then I'm putting
my paintbrush back to get some more paint. The color I've mixed
here is a bit of purple, a bit of dark blue, a tiny bit of yellow ocher. So it makes this nice. Purply brown rather than
just straight brown, is nice and dark on the tail. And then it's a little
bit lighter near the top. So that's mixed in really
nicely with the edge. Once you've done that, you want to move into that
button belly of the bird. Again, we make it
nice and wet and I've not quite touch the
orange that we first did, but that will come in a second. So this bit because it's white, I don't want to leave it just white because that's boring. It doesn't really do much. So instead of just
adding a very, very light, light relu, purple. And again, you'll see
that I'm just touching the edges of that
orange that we did. It just blends ever so nicely and I don't want
to overwork this again. I want to let the
water do its thing because that's naturally
going to try and mix itself. It's going to pull
from the pressure of the orange and then pull
it down into the blue. So try not to go too dark
with a blue here and try not to touch too much along the border
there with the yellow. You just want to gently, gently encourage it
to do its thing. And then it will naturally
create a really nice area. Now you don't have to
do this in one go. You could do it in a couple
of different stages. You can let it dry and
then you can repeat it again if you find that your
colors aren't vibrant enough. So it depends how
you've done it. When you're happy
with the belly, you'll see that there's a lovely light area right in the middle. You can go into your feet. So with this one, I
don't actually want that to blend too much, so I'm being a bit more
careful with the edge. Make sure it doesn't go
into the bird itself. But this gives you a
nice thick dark color. It could literally be any dark, so long as it is way darker
than the rest of your bird. So once you've done your feet and you're happy
with the little close. Remember the quite
skinny at the end, much thicker towards
the middle of the foot. We want to just finish
up the detail now, the beak and the eye. Now I just touched
it to check that it was dry because I actually, again, do not want
this to blend in. So do make sure your yellow
is completely bone dry. Before you do this.
Then you're just going to paint really dark
underneath the mouse. So I experimented
with a dark blue, not the one, but a dark purple. Maybe a little bit of black
would be good into there. That's going to help
with with your beak. And then just a tiny little
bit of a nostril there. Then moving on to the eye, you just wanna get a nice dark black for this and
you can fill it in, but you could also
leave a little glint, so a tiny little
space just to show that it is a shiny surface. Then that my friends is the
end of the robin video. I hope you enjoyed that.
I hope you're gonna make lots of festive cards
with the people you love. And I hope you really
had fun with it too. So don't forget to show
your picture to the class. I'd love to see what you've done and enjoy the rest of your day. Thank you so much.
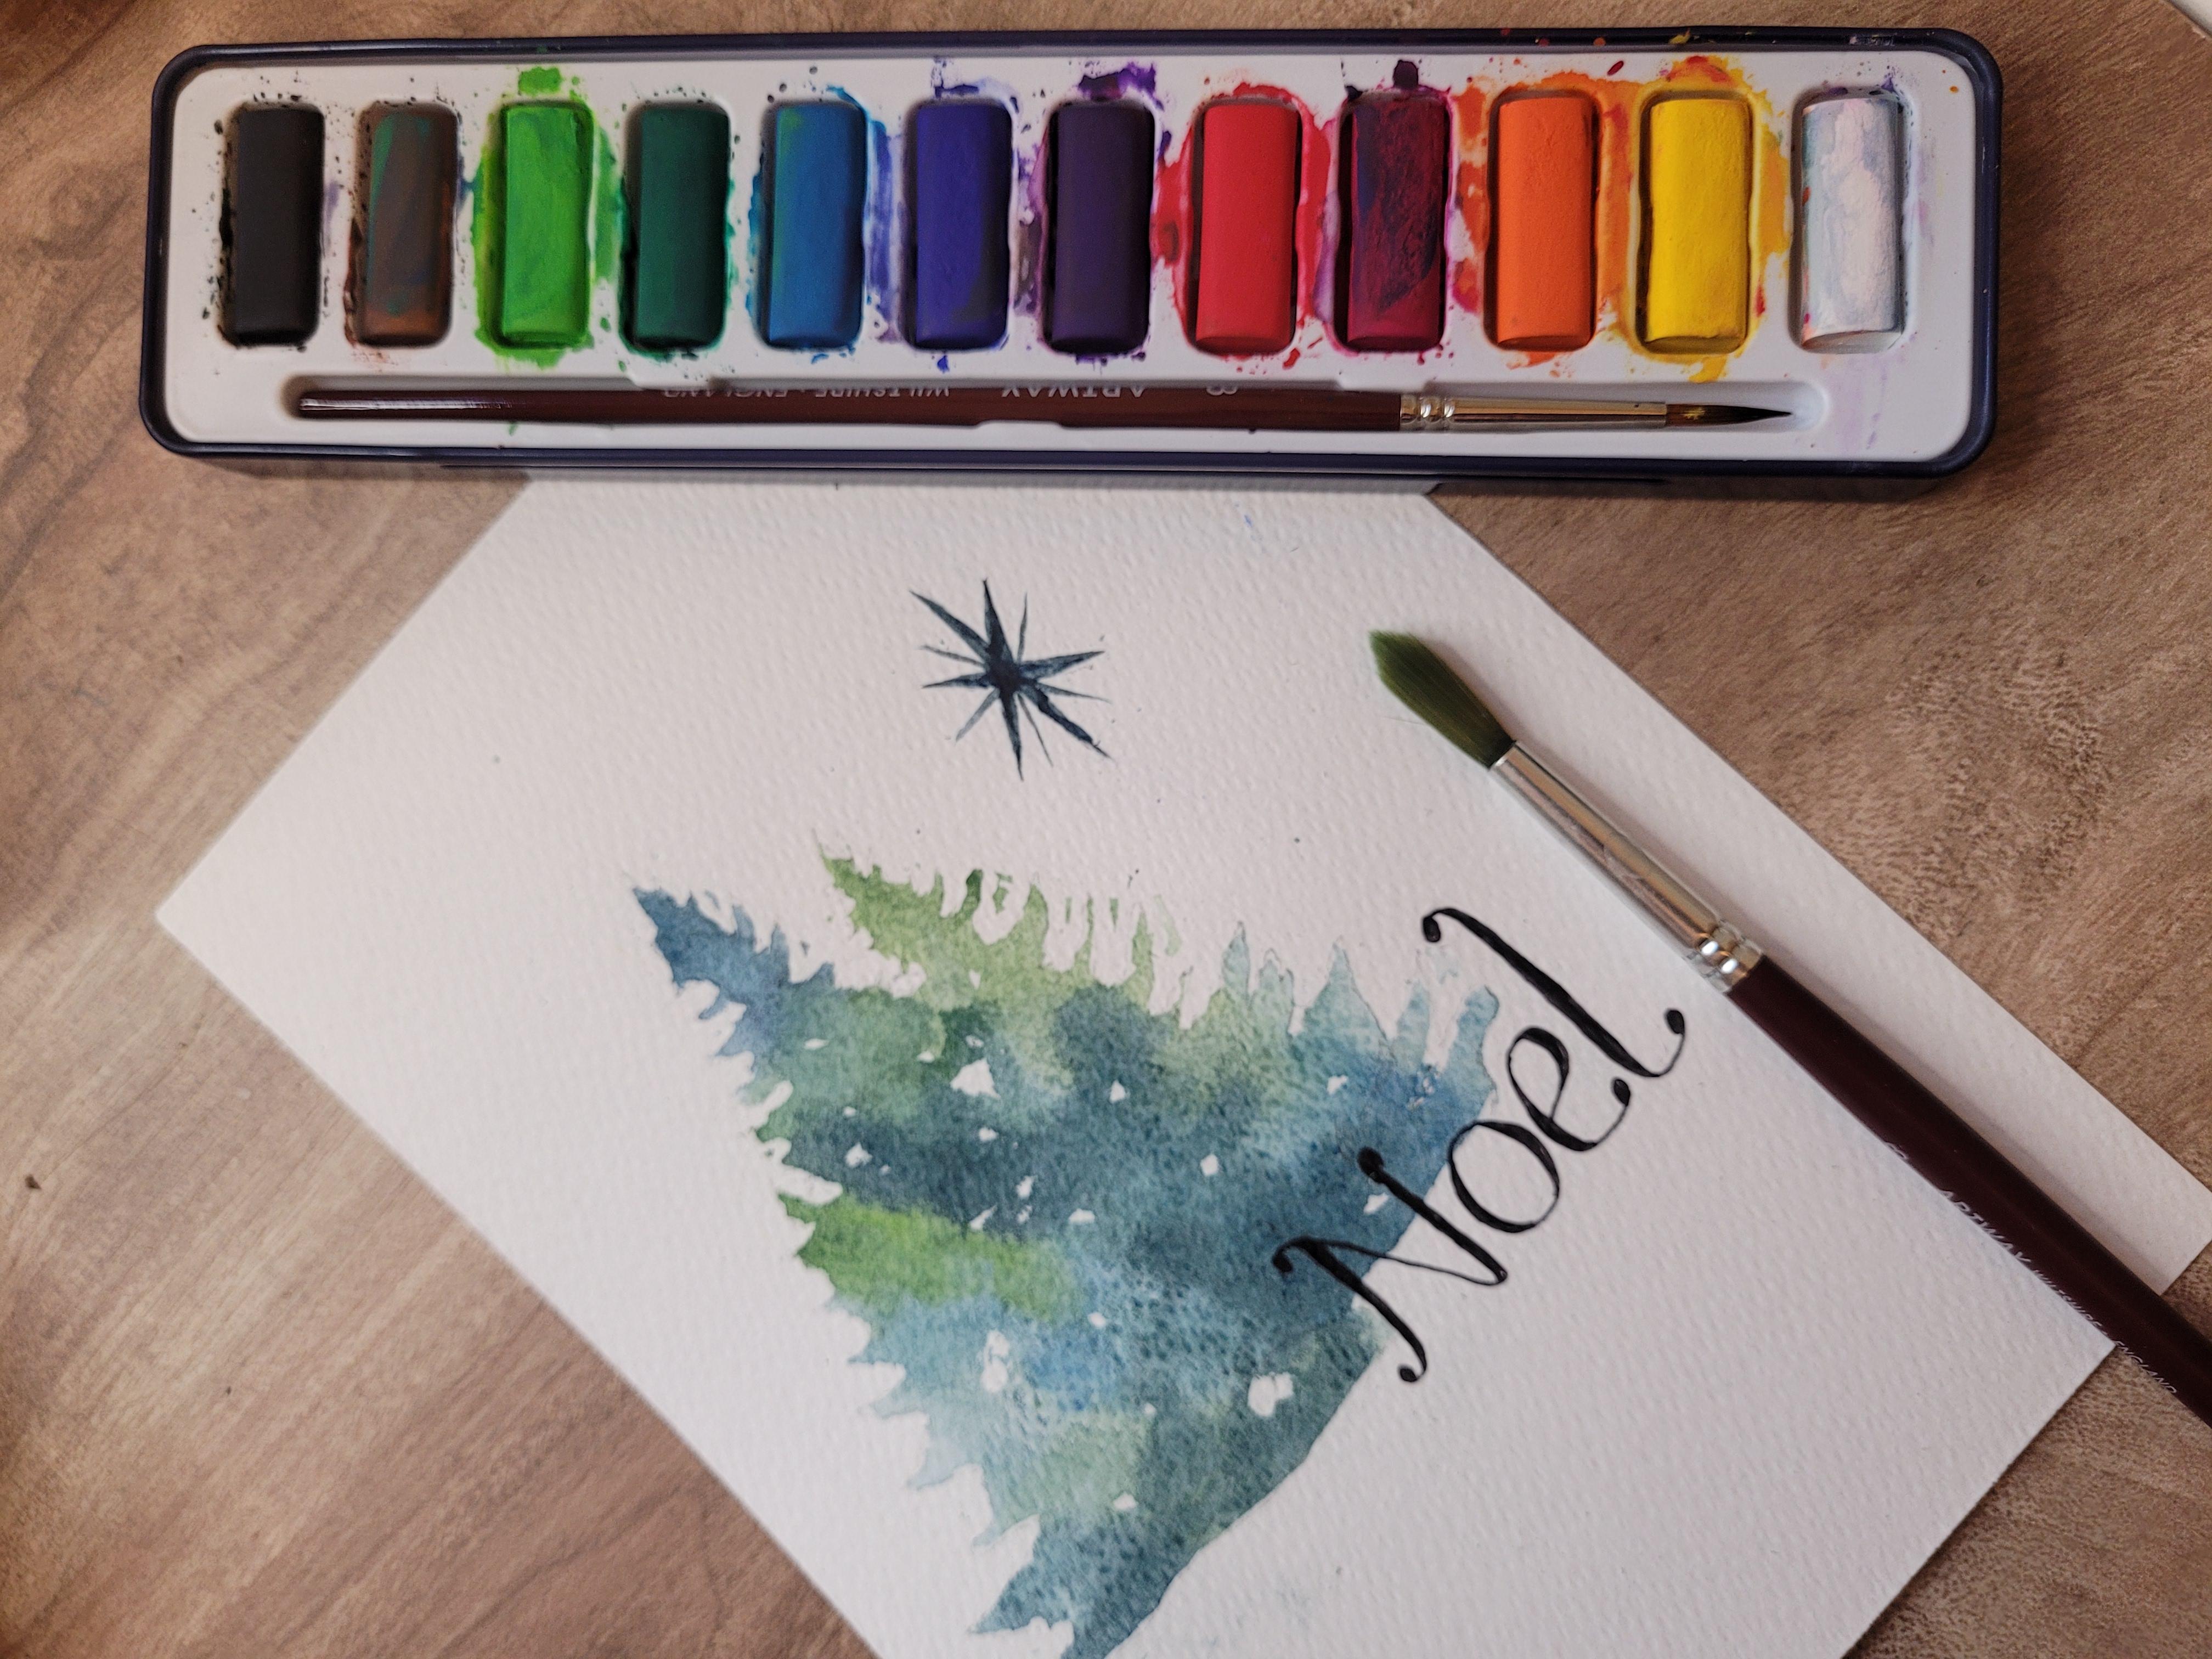
4. Christmas Tree Watercolour: Hello, Welcome to this festive tree painting
watercolor class. In today's session, we're
gonna be using masking fluid. So if you've not
used this before, you're in for a real treat. If you don't have masking fluid, you can just do it free hand, but you have to be
very, very careful. But I would advise you get some masking fluid because
it's super cheap. It's like two or three
pound for a bottle and it will last you
such a long time. So grab your paints, grab your wards colors, tape your paper down, and let's get started. Okay, so let's start. Make sure first of all that
your paper is taped down. Grab your water colors. And your kit might
come with one of these brushes where it holds
the water in the bass. Now you can use this. There's nothing wrong
with using this *******, but I'm going to have that on standby and
I'm just going to use a normal brush
as I usually would. I have my dry rag and
my water set ready. So make sure you have a pencil
and let's start with that. So make sure you've got
all your materials ready. And then we can begin
with the outline. Now. For the Christmas tree, we don't want it
to look perfect. So just pay attention to the direction that the
branches are going in. And you'll see that I'm
almost curving upwards and there's a slight bend
in some of the branches. Now I'm going to do two trees. So I want them to
be different levels and I'm just
starting at the top. Just to get that nice point. Remember, a characteristic of trees is that they are nice and skinny on the top and they are quite wide and fat
on the bottom. So we want to make sure that as we're traveling down
without branches, that the base of both of the trees is getting nice
and chunky at the bottom. Now, I like to work with both my edges at the same
time because it just helps me to make sure I'm getting that thickness
that I'm after. If I do one at a time, sometimes my brain can't quite work with that. But
you might be different. You might prefer to do one
tree fully and then you might prefer to draw the other tree behind that in its own right. So do it whatever feels
most comfortable to you. You'll notice that mine is
just slightly to the left. It's not ideal to be fair. But I'm actually going to pop something on the
right-hand side later on. So I'm not too
worried about this. So if you'll just
slightly to the left like mine, don't worry, because we're going to
add a little bit of decoration in the
right-hand side on the gap. Now, I just wanted to make
sure that both of my trees are different levels because we do have one in the foreground. I'm actually,
there's three trees, but you won't be able to tell. So I just wanted to
add a little bit of leveling and I've
been a bit lazy. I didn't know about
my messy law. So apologies for
that one that cuts through the middle and
the right hand side. Then finally, we have a star, so just drawn a nice star
on the right hand side. And this is going to
look a bloody lovely. So you're just looking
for that to be quite symmetrical, if you can. Now, once you're happy
with the outline, feel free to rub out any
lines that are messy. But with mine, you won't
be able to see it. So I'm not too
worried about that. You want to grab
your masking fluid. Now, if you haven't
worked with this before, the trick with this is to work fairly quickly because it
does draw incredibly quick. Because it's blue. It
means that we can see it nice and easily on our drawing. So I'm just using my brush
here to go around the edges. And I want to make it fairly
thick so that if my brush, when I add color
later goes over it, it gives me a bit
more of a buffer. Apply this around the
outside of your tree, not the inside, so that we can put loads of
paint in the middle. The thing with masking fluid, it does like to stick
to your bristles. So that's the main reason
why I want to work quick. If my brush is constantly
wet with the fluid, then it's not going to
just draw and keep this, I guess is a plastic
base liquids. But when it dries
in your brushes, a real nightmare to get out. So if I just keep
dipping it in the fluid, then it's just going to make
sure it's still active. And as soon as I'm
done with the outside, I can then give it a quickly and that means the brush is
saved and won't be damaged. I really hate it when
I damage a brush, so do be careful. But oh my goodness, this is such a
satisfying technique. So you can get masking fluid from anywhere -0 Mojave craft. It was quite cheap. It might have been three pounds for a very decent portion. I like to just decant
into smaller jars and use it from the lid because it's just much easier to get to. Having to dip your brush in
anything big is dangerous. First of all, you don't know how much you're going to
put on the brush. It could be way too much. But second of all, it
means you can easily knock it over and cleaning
this would be a nightmare, so try to avoid it if you can. Now we're getting narrower at the end of the tree,
which is great. After this, which is going to
pop some around that star. Half of it is for
fun just to add a little bit extra
of masking fluid. But the other half is because
it's quite a skinny star. So I wanted to just create
some barriers for myself. But you could also draw this star with a marker
if you wanted to. But I wanted to just keep
using the fun stuff. So I went around the
store that now I did notice that my brush has stolons get a little bit congealed. So all I'm doing is
giving it a good clean, taking away that water so
that it's not gonna go into my masking fluid and then
my legs a little bit dry. So just pouring the excess
back in because the final bit that we need to
do with the masking fluid, it's just a couple of
little snowflakes, but all I'm doing is
getting a bit of masking fluid and dotting
it around my tree. I'm trying to get
different textures. So a thick size and thin size, slightly different shapes
so that it looks really snowy and really unique. So I'm trying not to get
things too symmetrical. So just some little
snowflakes around. Don't think about them in terms of like perfect snowflakes. Just try and get some
different textures and then wash your brush. As I said, it's
super quick to dry. So I bet that literally
have to do in your brush, pop your finger on the masking fluid and see if
it comes off on your finger. It shouldn't do, but if it does, just give it a few more seconds. Now, once we've done that, we want to add a layer of
clear water to our tree. So you can see on the camera at how much
water I'm putting you on, you can see that there's a
solid shine in that area. I am being careful in
my branches to try not to go outside of
the masking fluid. Even though it is
creating a barrier, I still want to be a little bit careful not to get
it on the outside. So work your way around the tree just adding
some clear water. This means we're
working wet on wet. What I wanna do on the side
is just get some colors. So I've just selected a
few colors that I'm going to keep to make sure
my tree is consistent. The first one is a nice blues, so it's an ultramarine blue
with a tiny bit of dark green just to soften that color a little bit because obviously a tree isn't blue. But I just wanted
to throw a bunch of different colors in there that are dynamic but not too crazy. So starting off with a
blue patch up at the top, and then I'm just going
to start to add some green so you can see
how the color changes. But because I've mixed it in with a little
bit of the blue, it still works because it's basically saying that
we're in the same family, but we've just had
another child. I didn't know if
that makes sense, but if you keep the same colors, but you add more blue, we add more green, then it just keeps a consistency that you don't have
any crazy colors that are just not quite working and keeps him
keeps it quite nice. I keep working your
way around the tree and the water
underneath that just basically gives us
festival a bit more time. If we have a wet base
and that means we can keep those soft edges. If I'll paint dries, we end up with these
really strong, hard edges. So that's not what we want. Really soft blending
between the colors. We want to go right
up into the branches. So try and make sure that
you do have enough liquid on your page and it's never too late at a little bit more water. So keep working around this and just play
with the colors, play with the balances. Do you want more green? Do you want more blue? Do you want it to be darker? Because remember,
when this dries, it's going to be quite a bit lighter,
significantly lighter. So we want to make sure that
at this stage we're adding enough color and we're
adding enough texture. So I'm really pleased with it at the minute
actually because you can start to see the paint is blending
in with each other. Sometimes you do want to
just clean your brush to get a fresh fresh coat of color depending on
what you're after. Or maybe you just want
to have a bit of a, a bit of an empty brush as well. So that's looking really
nice and just adding a few more flex because
you can start to see where the color is
becoming a bit dull. So make sure you're not
afraid to make things darker or mixing those
colors a bit more. I think that's gonna be
a really nice touch. When it all dries. That's gonna be the fun stuff. So definitely make sure you make the most
of your time now. I'm really happy with
that green at the end. Oh, is it blue? So I could talk? Aqua. Bloody lovely. Okay. Once that's done,
clean your brush, you can let that dry. We can just start. On the star, so we want
a nice dark color here. I've mixed a dark version of that blue that
we will use in. Again, it keeps it consistent. But actually I'm going
to add a little bit of black as well, just so that it does
stand out a bit more from the
actual tree itself. So I'm just going
to pop that in. And luckily, I've
got those edges in the masking fluid because
that really helps, especially in a very small area. So let that dry and you
can see the difference. When I switched to
the dry version, you can see it just takes away a little bit of that color. So this is why it's really important to get that
from the get-go. So once it's dry and
it has to be bone dry, you will start to rub your masking fluid off
so you don't need to rub too hard just in case your
paint is a little bit damp. And so sad, my style is
actually a little bit rubbish. But I'm going to use my
other brush lay around. So I'm not too worried. Just enjoy rubbing
the masking fluid off because it is so satisfying. I cannot tell you
how satisfying is. No need to get your
nails involved. No need to do any weird peeling. Just gently rub it as
if you've just got a little bit of tomato sauce on your leg and you're just
trying to wrap that up. That's the consistency
we're looking for. Nothing too aggressive. You can see some really, really nice edges going on. And when we start to
rub in the middle, that's when these
little flecks of white come through
from the paper. So really, really good effect. It's like Christmas has arrived. So I'm just going back to that brush that we
had at the start and you notice I
didn't have to dip it. I'm just gently squeezing the
top of the brush and that's releasing a little bit of water for me to mix
into my colors. I'm just using this brush because it's quite
a sharp point. And because it's not soft, it doesn't really
ruin the bristles. So I'm just going to use that
to go over the star itself. This is a much nicer effect. So just pumping that on and just adding loss and that a couple
of extra little lines. There we go. That's
quite nice, isn't it? I didn't know is that there
was a few little snowflakes in the middle that I
actually couldn't see. So it's best just to rub your finger over probably the whole thing
if you can't see them, just to get those little white
splotches coming through. Now, you can leave the painting at this
stage if you want, um, or you can get a hero or
felt tip or something dark. And you could just write a
little message underneath. I think with mine I
wrote nowhere else. So I'm just going to pop
that final picture at the end just so you
can see an option. You could write somebody's
name whatever you want. But this is a really, really fun technique
and I do hope you enjoyed that because
I bloody loved it. Has a nice BIG shot
of Noel at the end. So hopefully there's
a bit of inspiration. Feel free to check out
the other types of festive cards that we've
done for this year. And if I don't hear from you, I'll see you next year. Happy Christmas.
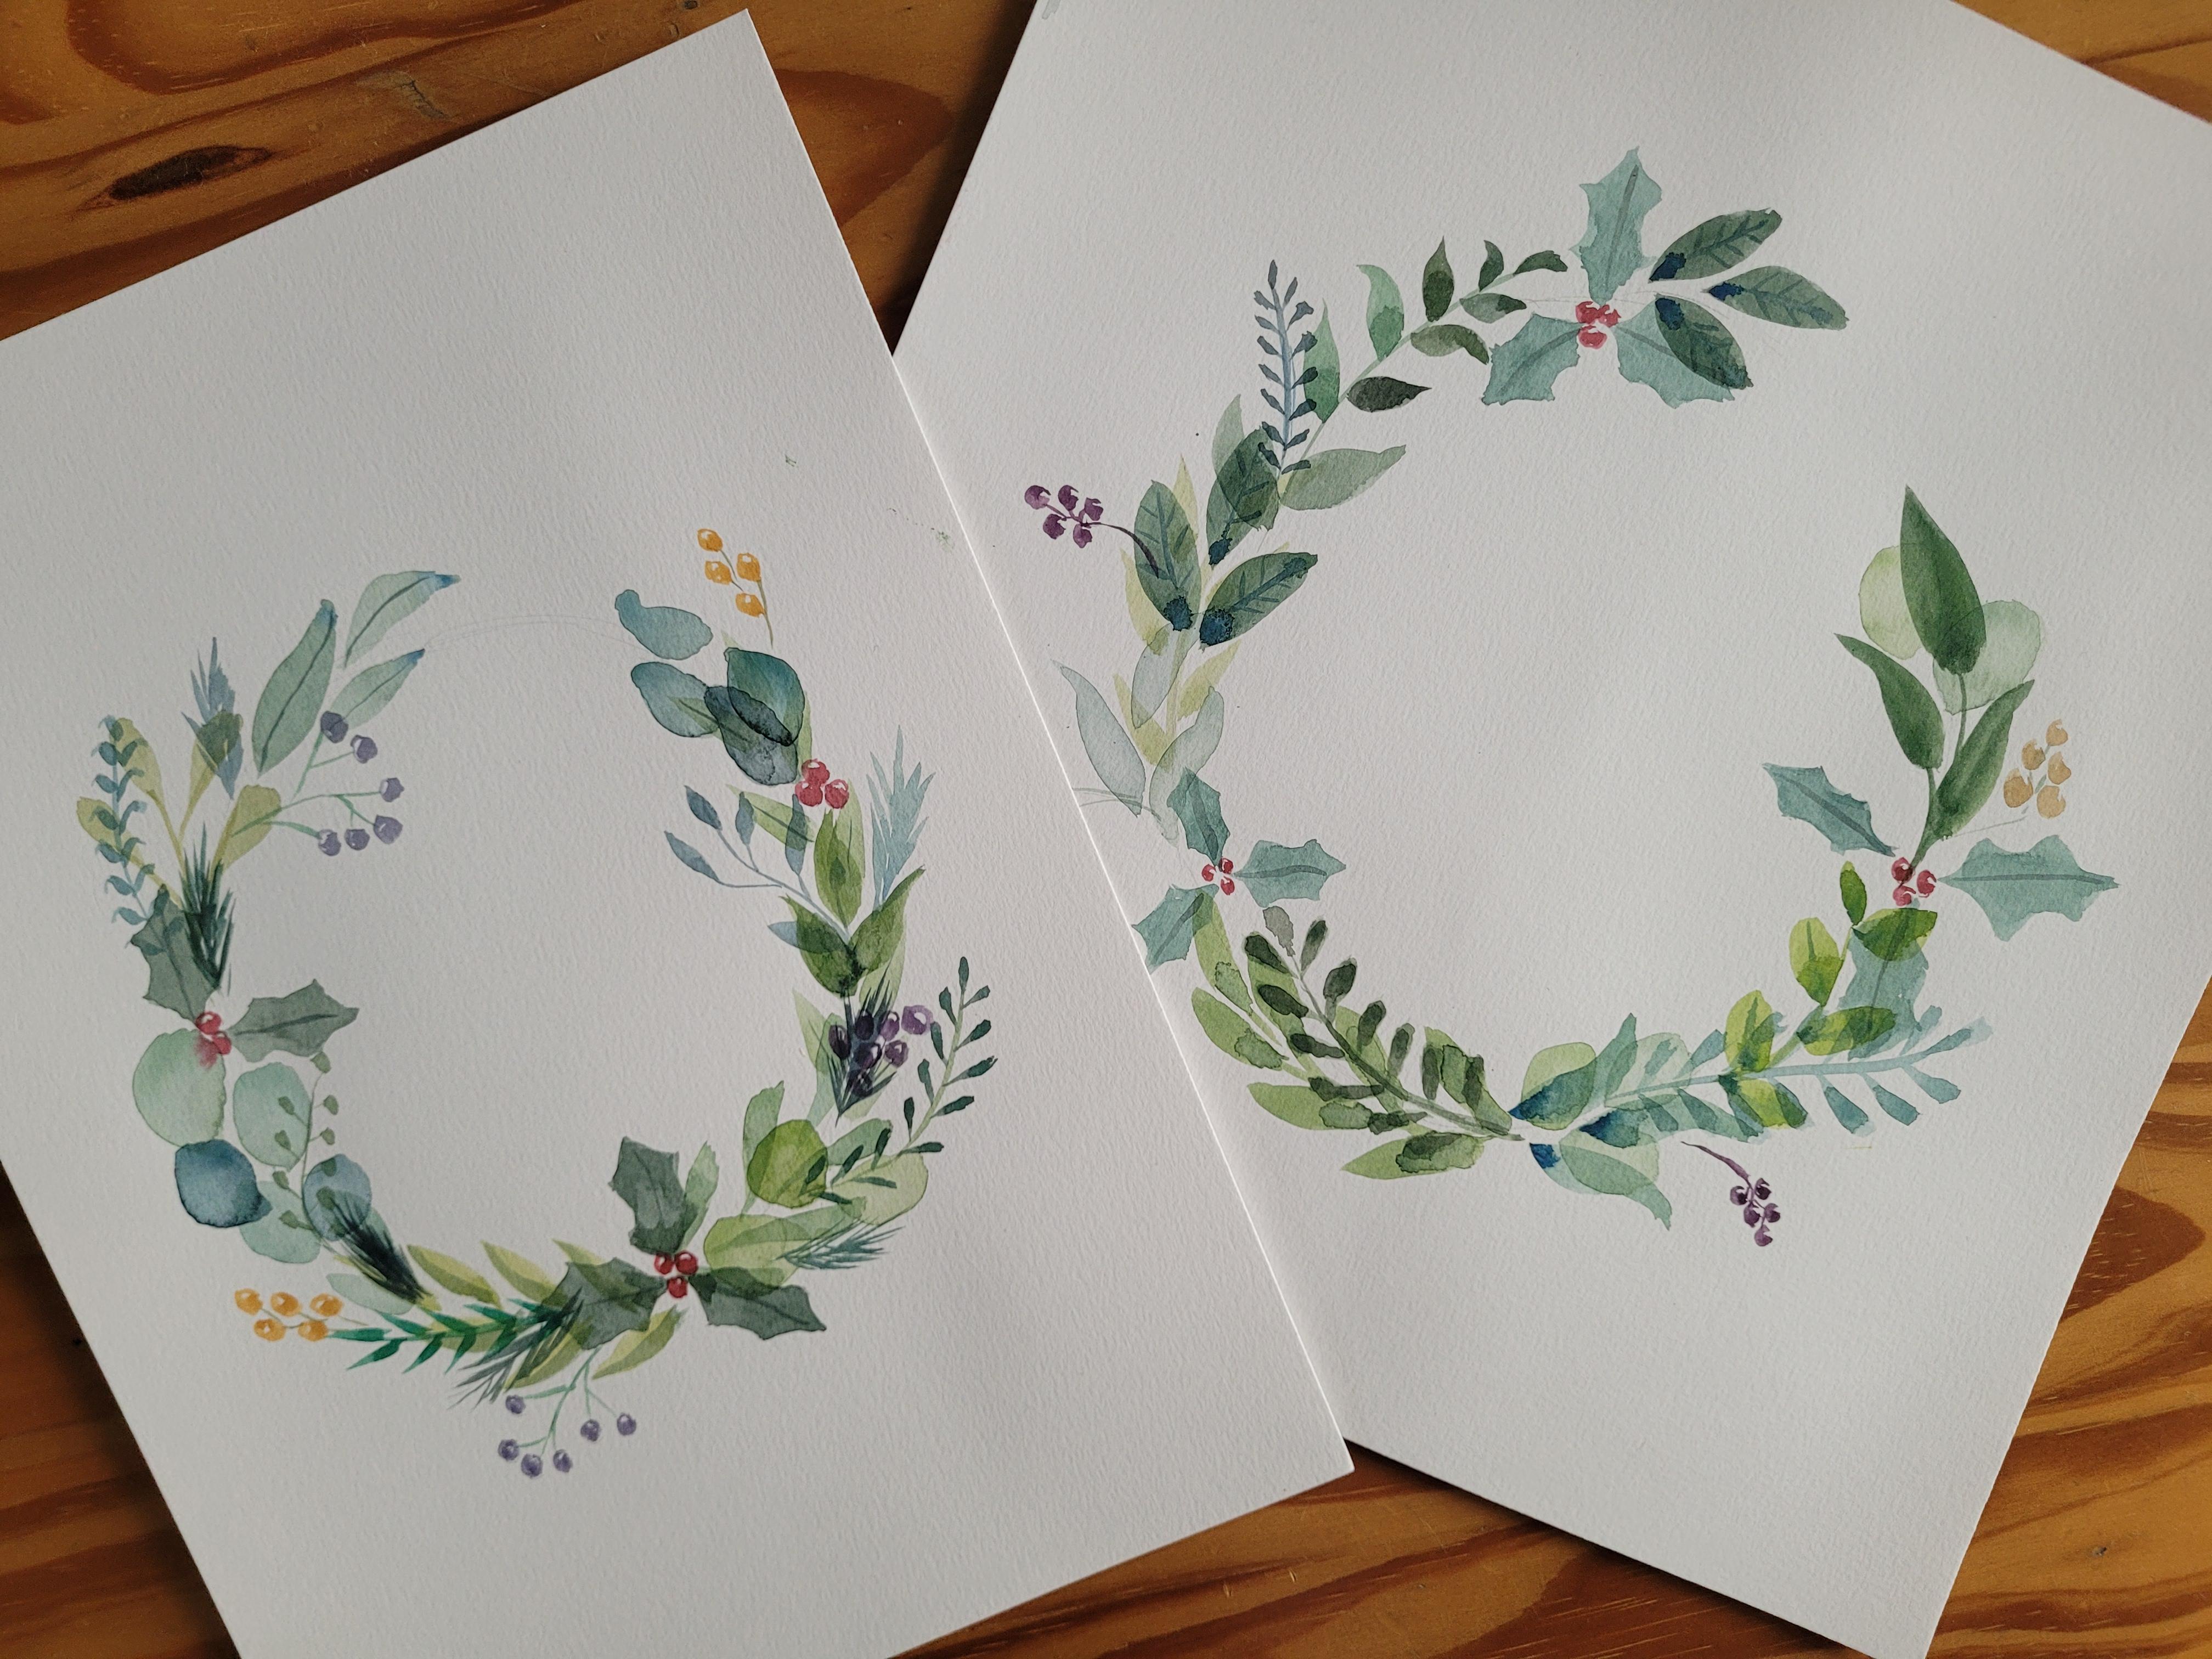
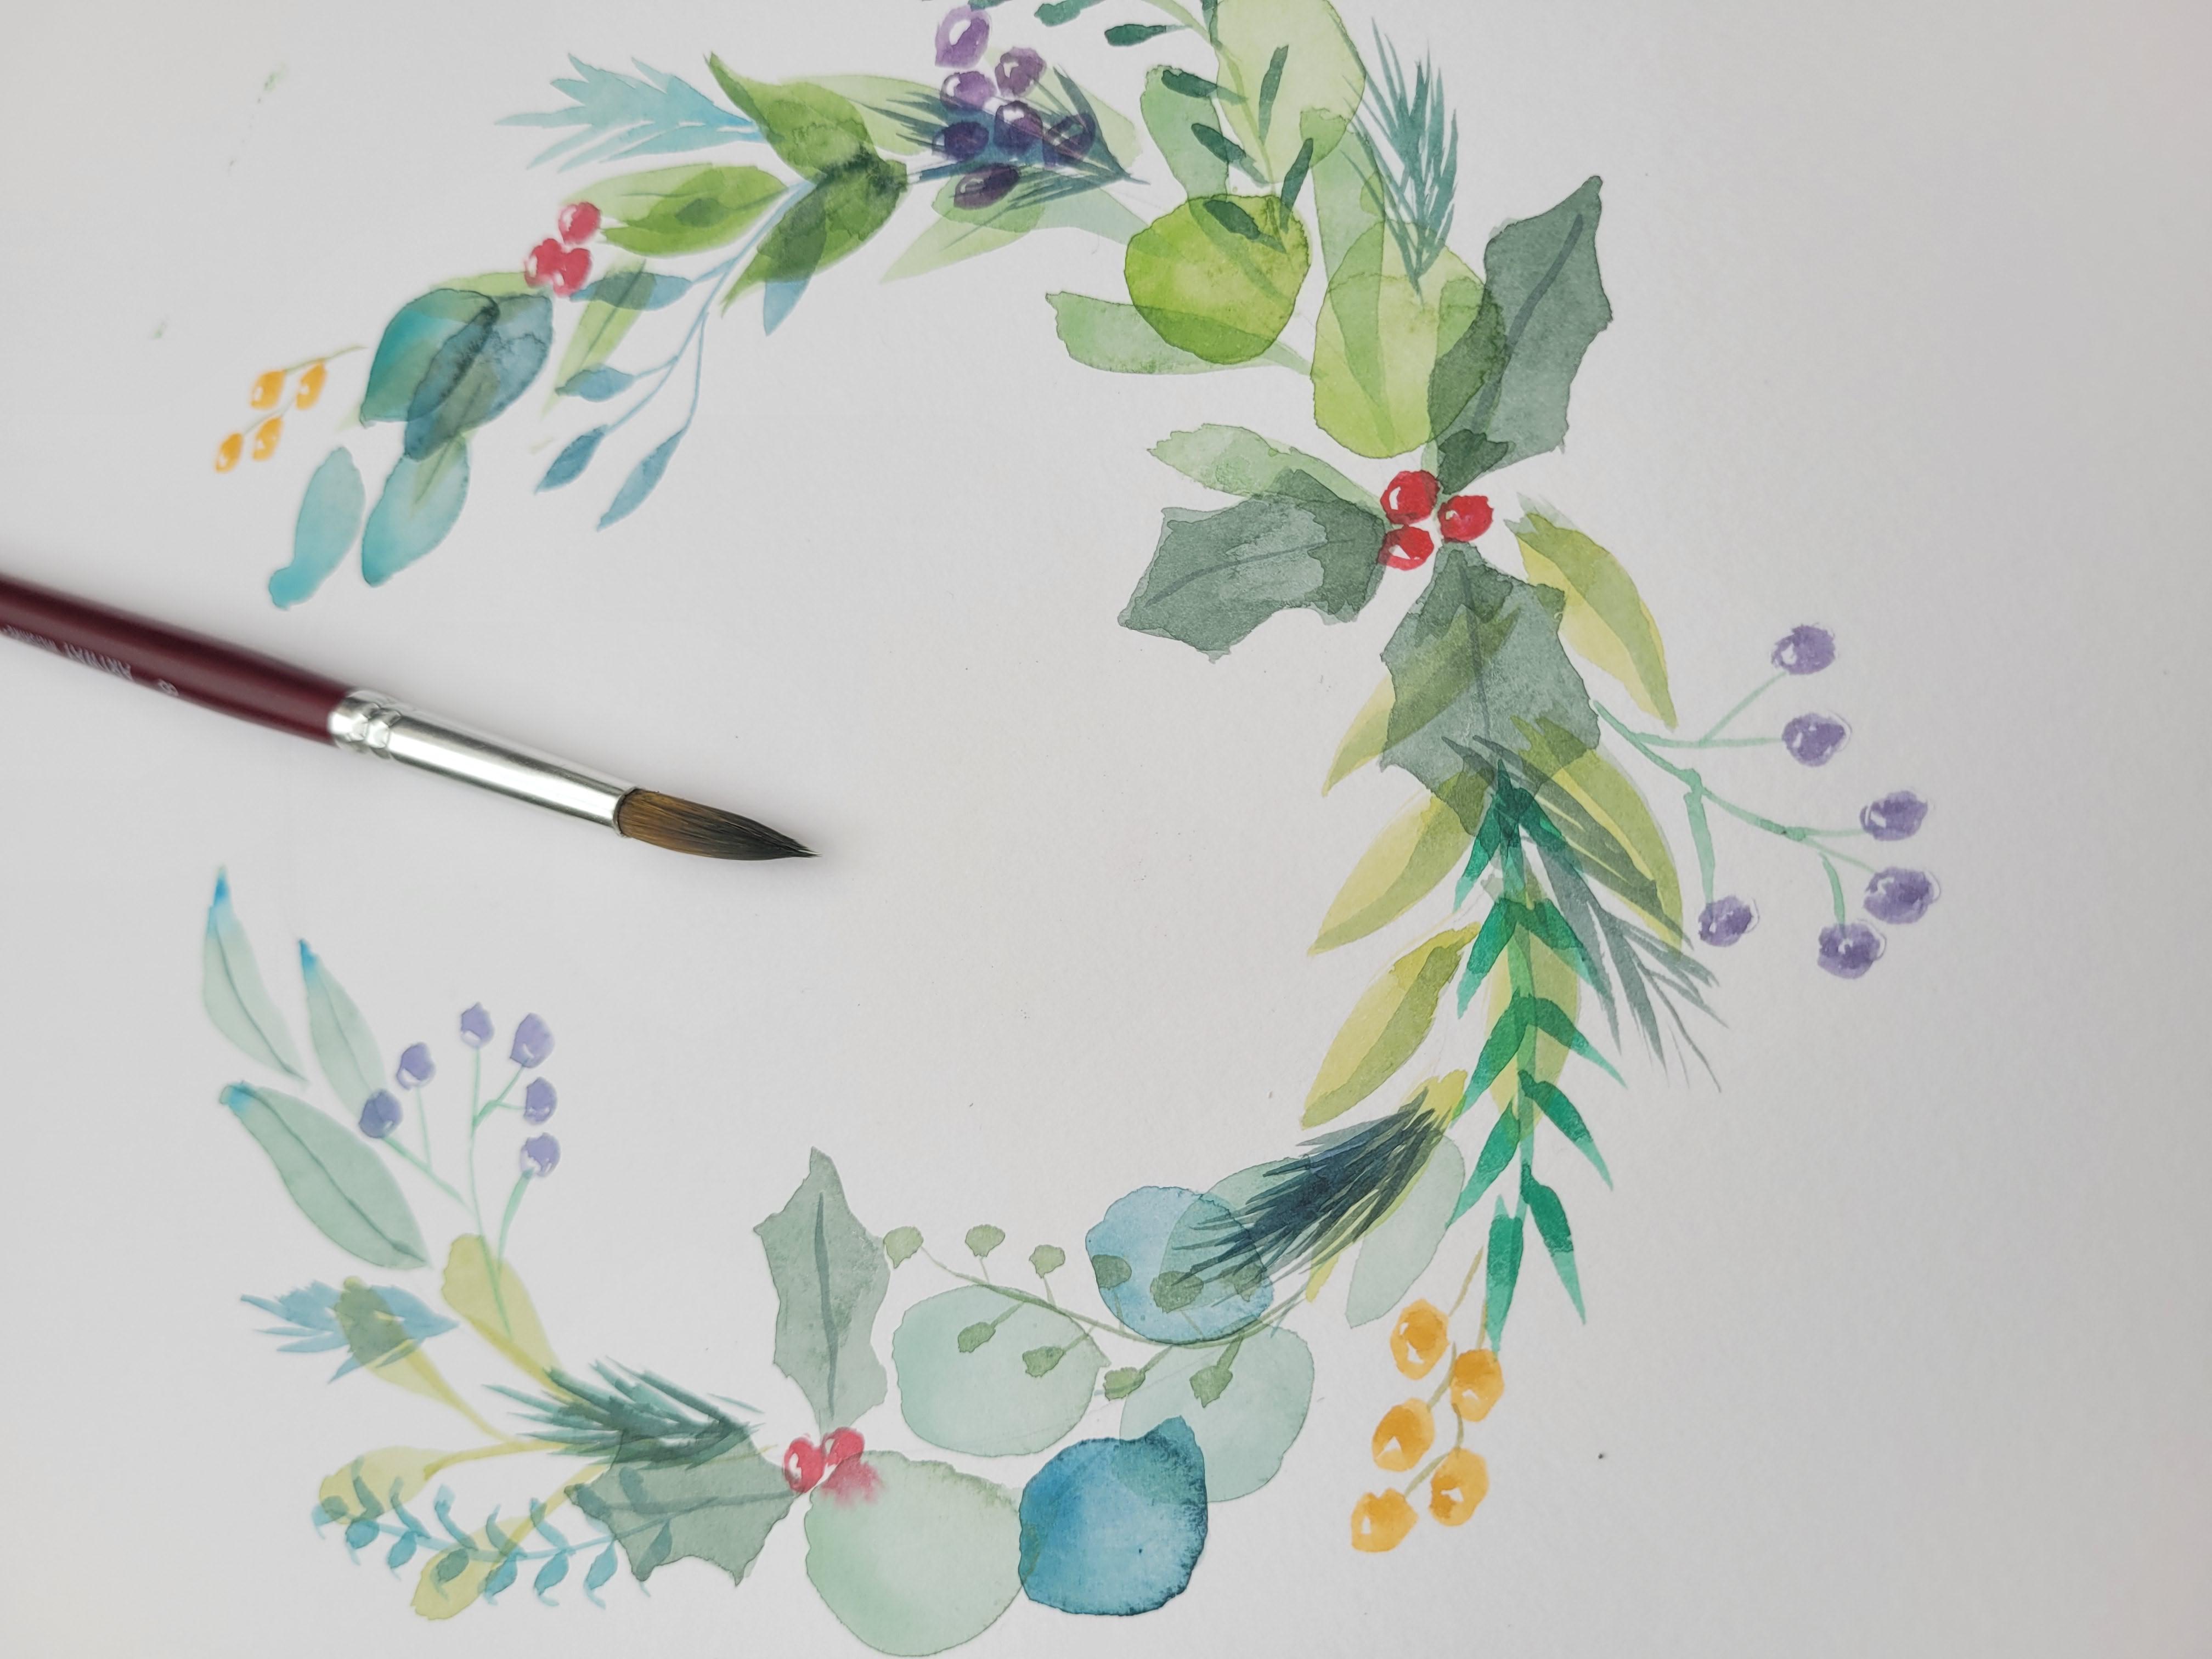
5. Wreath Painting Vide: Hello, my name is China
and welcome to Authors. And in this session
I'm going to show you how to paint a wreath
using watercolor. This is great if you
want to gift it to someone as a present
or as a card, or if you just wanna
do it for yourself, you're going to learn
lots of techniques and how to actually
paint leaves. So I'd recommend that you
have a piece of paper on the side to practice your leaves before you commit
to your artwork. The last thing you
wanna do is practice your leaves on the artwork and actually I'm not too
happy with them. So give them a go on a
separate piece of paper and then you can apply
it to your painting. So make sure you've got your equipment and make
sure your water is clean. You've got your dry rag, you've got your brush,
your paper is taped down. Finally, have fun with this. And I do hope that at the end, you're going to show us
exactly what you've done. I always say to my students, things look better the next day. So let it dry,
walk away from it, grab a cup of tea, come back and you're
going to be super, super proud of yourself. Good luck everybody. And I can't wait to see what
you've made at the end. Once you're all set up, grab your pencil and
we're just going to draw a circle on a page. This is just a reference point
for us to paint a circle, so it doesn't have
to be perfect. You can do it free
hand or you can grab a plate and you can
draw around that. But I'm going to leave
a little open-end in the top-right corner just to make it a little
bit more dynamic, you can obviously closures, but I think this
looks really nice. Once you've done that, you are
going to grab your paints. Now for our first layer, I want you to make your
colors really, really watery. So I'm applying lots of water. And then I'm just
making a mix of colors from the range
of my greens and blues. Nothing too bright,
but nothing to Dell. So think of a
medium-sized of green. Now, when you're ready, you want to add these leaves that are just
using one brush stroke. The tip is placed
down on the brush, is then pushed further
into the paper to create these round ends and
pointy beginnings. Feel free to practice that
on a side piece of paper. Before. If you're ready,
we're going to make the next bit of our painting. So I'm making this
a tiny bit darker, but it's still nice and wet. So just watch as I apply the brush so I get
the tip on the end. Then I push the brush further down and give it a
little bit of a wiggle. So this creates a
thinner and both the top and the bottom and the
middle is nice and fat. So I would definitely
recommend practicing this one on a side piece of
paper is really nice, really, really nice leaf to do. I'm just moving up on the
right-hand side after that and adding
little bit of blue. These are just gonna be
normal shaped leaves that you might see or you might
paint naturally. So we want it to be nice and chunky in the middle and
pinched at either end. So you can literally
just draw this with a brush and some leaves. You can leave a little line
in the middle because that just looks like
there's a highlight which I think is really nice. It doesn't matter if
you have paint that's a little bit thicker at
the top or the bottom. I think it adds a bit more
of a dynamic element to it. So feel free to make either
end a little bit more denser. Now we've got three
different layers. So whilst the first
two are drying, I'm just going to start with
this technique on the left. So first, I want to get a
really rough circle with paint. And immediately I want to fill that with clean
water so you can see that I'm just picking that up and I'm just
dabbing it in there. That's basically pushing
the paint to the sides. So once I'm happy with how
much water is on there, I will draw my brush
and then just place the brush in the middle
to soak up that paint. We're going to do a few of these so they're not gonna
be the same shape. We're imagining that
leaves are on this side, that they're facing
different ways. But it's that same technique. So apply the color
with the watercolor, dip in some clean water
to make a really, really heavy water bubble, and then soak it up
with that dry brush. Then if you want to
add a little bit more of a dynamic touch, you can pick up a bit of
color that's darker and less water and just dot that right
on the bottom of the leaf. So this is going to blend into your lovely watery leaf there. We're going to do
a few of these, which is great practice. Hopefully you've tried this on the side piece
of paper first. And we're just changing
the shape of these leaves. Then not the typical
leaf shape that we just did there a
little bit round. They're a little
bit unsymmetrical. They're not perfect. And I think that's
really nice about this leaf and also
this technique. So we're starting to also overlayer on the previous
layer that we have. Now to make sure that
you can do that, do make sure that your wards
color underneath is dry. And you can tell it's dry it by touching it with your hand. If it comes off, that means it's still wet. And if it feels damp, that means it's still wet too. So do make sure that it's room temperature and is not
coming off on your hands. Okay, so let's jump to
the right-hand side. Again. We're layering
just like before. And it was starting off with
a bit of a central branch. All I'm doing for
this is getting the tip of my brush
on the stem and then pulling back ever so
slightly on the other side. I'm just going to
match that so that it's almost creating
like a V-shape, pulling back from where it
connects at the stem and then the ends are tiny bit
fatter than the center. And this is gonna be quite
natural with your brush. Again, you can add a tiny bit of darker paint just in the leaves to make it
a bit more dynamic. Or you can leave it and let the natural paint
do what it wants. Now the next part, you will notice the color
is starting to get a little bit thicker and a
little bit more bright. So the saturation has
increased a little bit. All I want to do is
basically fill in this gap. I'm just taking away some of the paint in some
of the color at the base is just to try and make it a little
bit more dynamic. So let's add something
that comes off the reef. So this is just a branch that is slightly bent and
it's coming downwards. You'll notice that
I'm staggering my mini branches so they're not touching it
together at the stem. They're actually alternating. After that, I'm just adding some tiny little dots just to make it different to any
leaf that we've done before. And I think that's
quite a nice touch to once we've done that, we can just start to fill
in some of the areas now, I don't really
know what this is, but it was a really nice
technique that I saw. It's almost like little bundles
of hay and they've just been dusted around going in slightly different
directions facing the way that the reef is going and
it's a little bit lighter. So I quite like that
because later I'm just going to make that
darker on top. It's going to get a little
bit more interesting. So we're going to
add some berries. I've gone for a bright
orangey yellow. And I'm just drawing these
three little circles that actually have a tiny bit of white of the paper
showing through. Just to show that
this is reflective. Once I have that, then I'm just adding a few
little branches that don't quite touch the berries because they didn't want the
green to blend in. We will do some more
later, but for now, we're actually going to
add another layer of this watery technique that we had just in the
bottom left there. So add a few more leaves, spice up your color
a little bit, make them slightly different. The layering, and this is
going to look stunning, but just remember, you do
have to make sure it's dry. And to be fair, it probably will be by the time you've
got round to it. So just make sure that your leaves aren't
looking perfect, but they are nice and
round and chunky and staying With the technique
that we have underneath it. Once you've done that, we're
going to mix a darker color. So we're going to
add some holly. This is going to go right in
the bottom of our painting. Now I remember painting Holly at school or at
least drawing it. And it's this weird
six curve edges that kind of fit together
like a jigsaw puzzle. But just find a
holly leaf on line, maybe give that a
little practice, but they're super nice
and easy to paint. And then you just
want to fill them in with a nice dark green. Obviously, Holly has berries, so I'm just using the same technique as the
yellow barriers, but with a bright red
That's going to drive. But you see how
nice that kind of fits in at the
bottom of the paper. Once I've done that, I just
want to actually close up the top of the reef
a little bit more, so not fully, but just
a little bit more. I'm going for some
organics of waves. His, I'm just using the tip of the brush to make the drawing. So I'll let that dry. Now let's move to the right
and I'm actually going to add some more of
those yellow Berries Just to pick up
the color a little bit and keep it
quite interesting. So I'm just going to do full
berries in the top right. And then I'm going
to add some of those little stems as well. So they're not touching
the barriers and keeping a little bit of a gap and they all coming
out of the reef. Once I've done that,
I'm just adding a very faint line
in the middle of my holly that just makes it
a little bit more dynamic. And once I've done that, I'm actually going for a purple. So this berry section
on the bottom left is slightly more obscure so
you can put them anywhere. Then you can make your
stems fit around it so nature is unpredictable and so are all stems
and our berries. So just a little bundle
there on the bottom left. Moving on from that, making sure that
my layer is dry, I'm just going to do another
branch that's reaching out. This one, I'm doing the tip of the brush on the left and
the outside of the stem and then pulling that towards the center with a little
bend halfway through. So just missing the angle
of the camera head. But do look at the
reference pictures that are attached to the video. And hopefully you can see
that style and technique. Once we've done this, we'll move back over to
the right-hand side. You'll notice that
I'm actually just jumping from left to right, top to bottom to try
and get a nice balance. These leaves are really cute. They remind me of
Mendelian leaves, so it's a nice fat base and then it's a very curved
and pointed top. So I just want to
take away a bit of color from that to
make it fit in. You'll find that there are
a couple of gaps like mine. What I want you to
do is just fill in these gaps with
random leaves. You can look online or you
can just make them up. And you can also go darker on these little bundles
within your painting. So nice and dark to
get a bit of contrast, you can add a couple more
to fill in the gaps. But you can see it looks really nice and really,
really colorful. You can also think about adding different types of berries. So I'm gonna go for one of those long droopy barriers which I think are red and I have
no idea what they're called. But just adding to
these really gives it a little bit more color and
a little bit more structure. Then even going to
add more Holly. So a tiny, wholly different
color in a different place. I think Holly really is
a Christmas Eve touched. So you can add more
of these if you want, or you can add lesser
than you could take it away completely. That's up to you. Work around your
painting now thinking, okay, what can I add in? Do I want to add
some more stems? Do I want to
alternate my leaves? Do I want to get
some more layers? Is there any colors
that I can increase? It's completely up to you, how you work it. This is your reef.
This is just a guide, but I really do hope that this
guide was helpful for you. If you paint these
for your loved ones, I promise they will
absolutely love them. And just remember to
let it dry because things always look
better the next day. So happy Christmas everybody. And I do hope you have a very wonderful festive
time however you celebrate. I hope you enjoyed this
repainting class or do share what you make because
I cannot wait to see them. Have a good one folks.
 China Jordan, Art Teacher