Transcripts
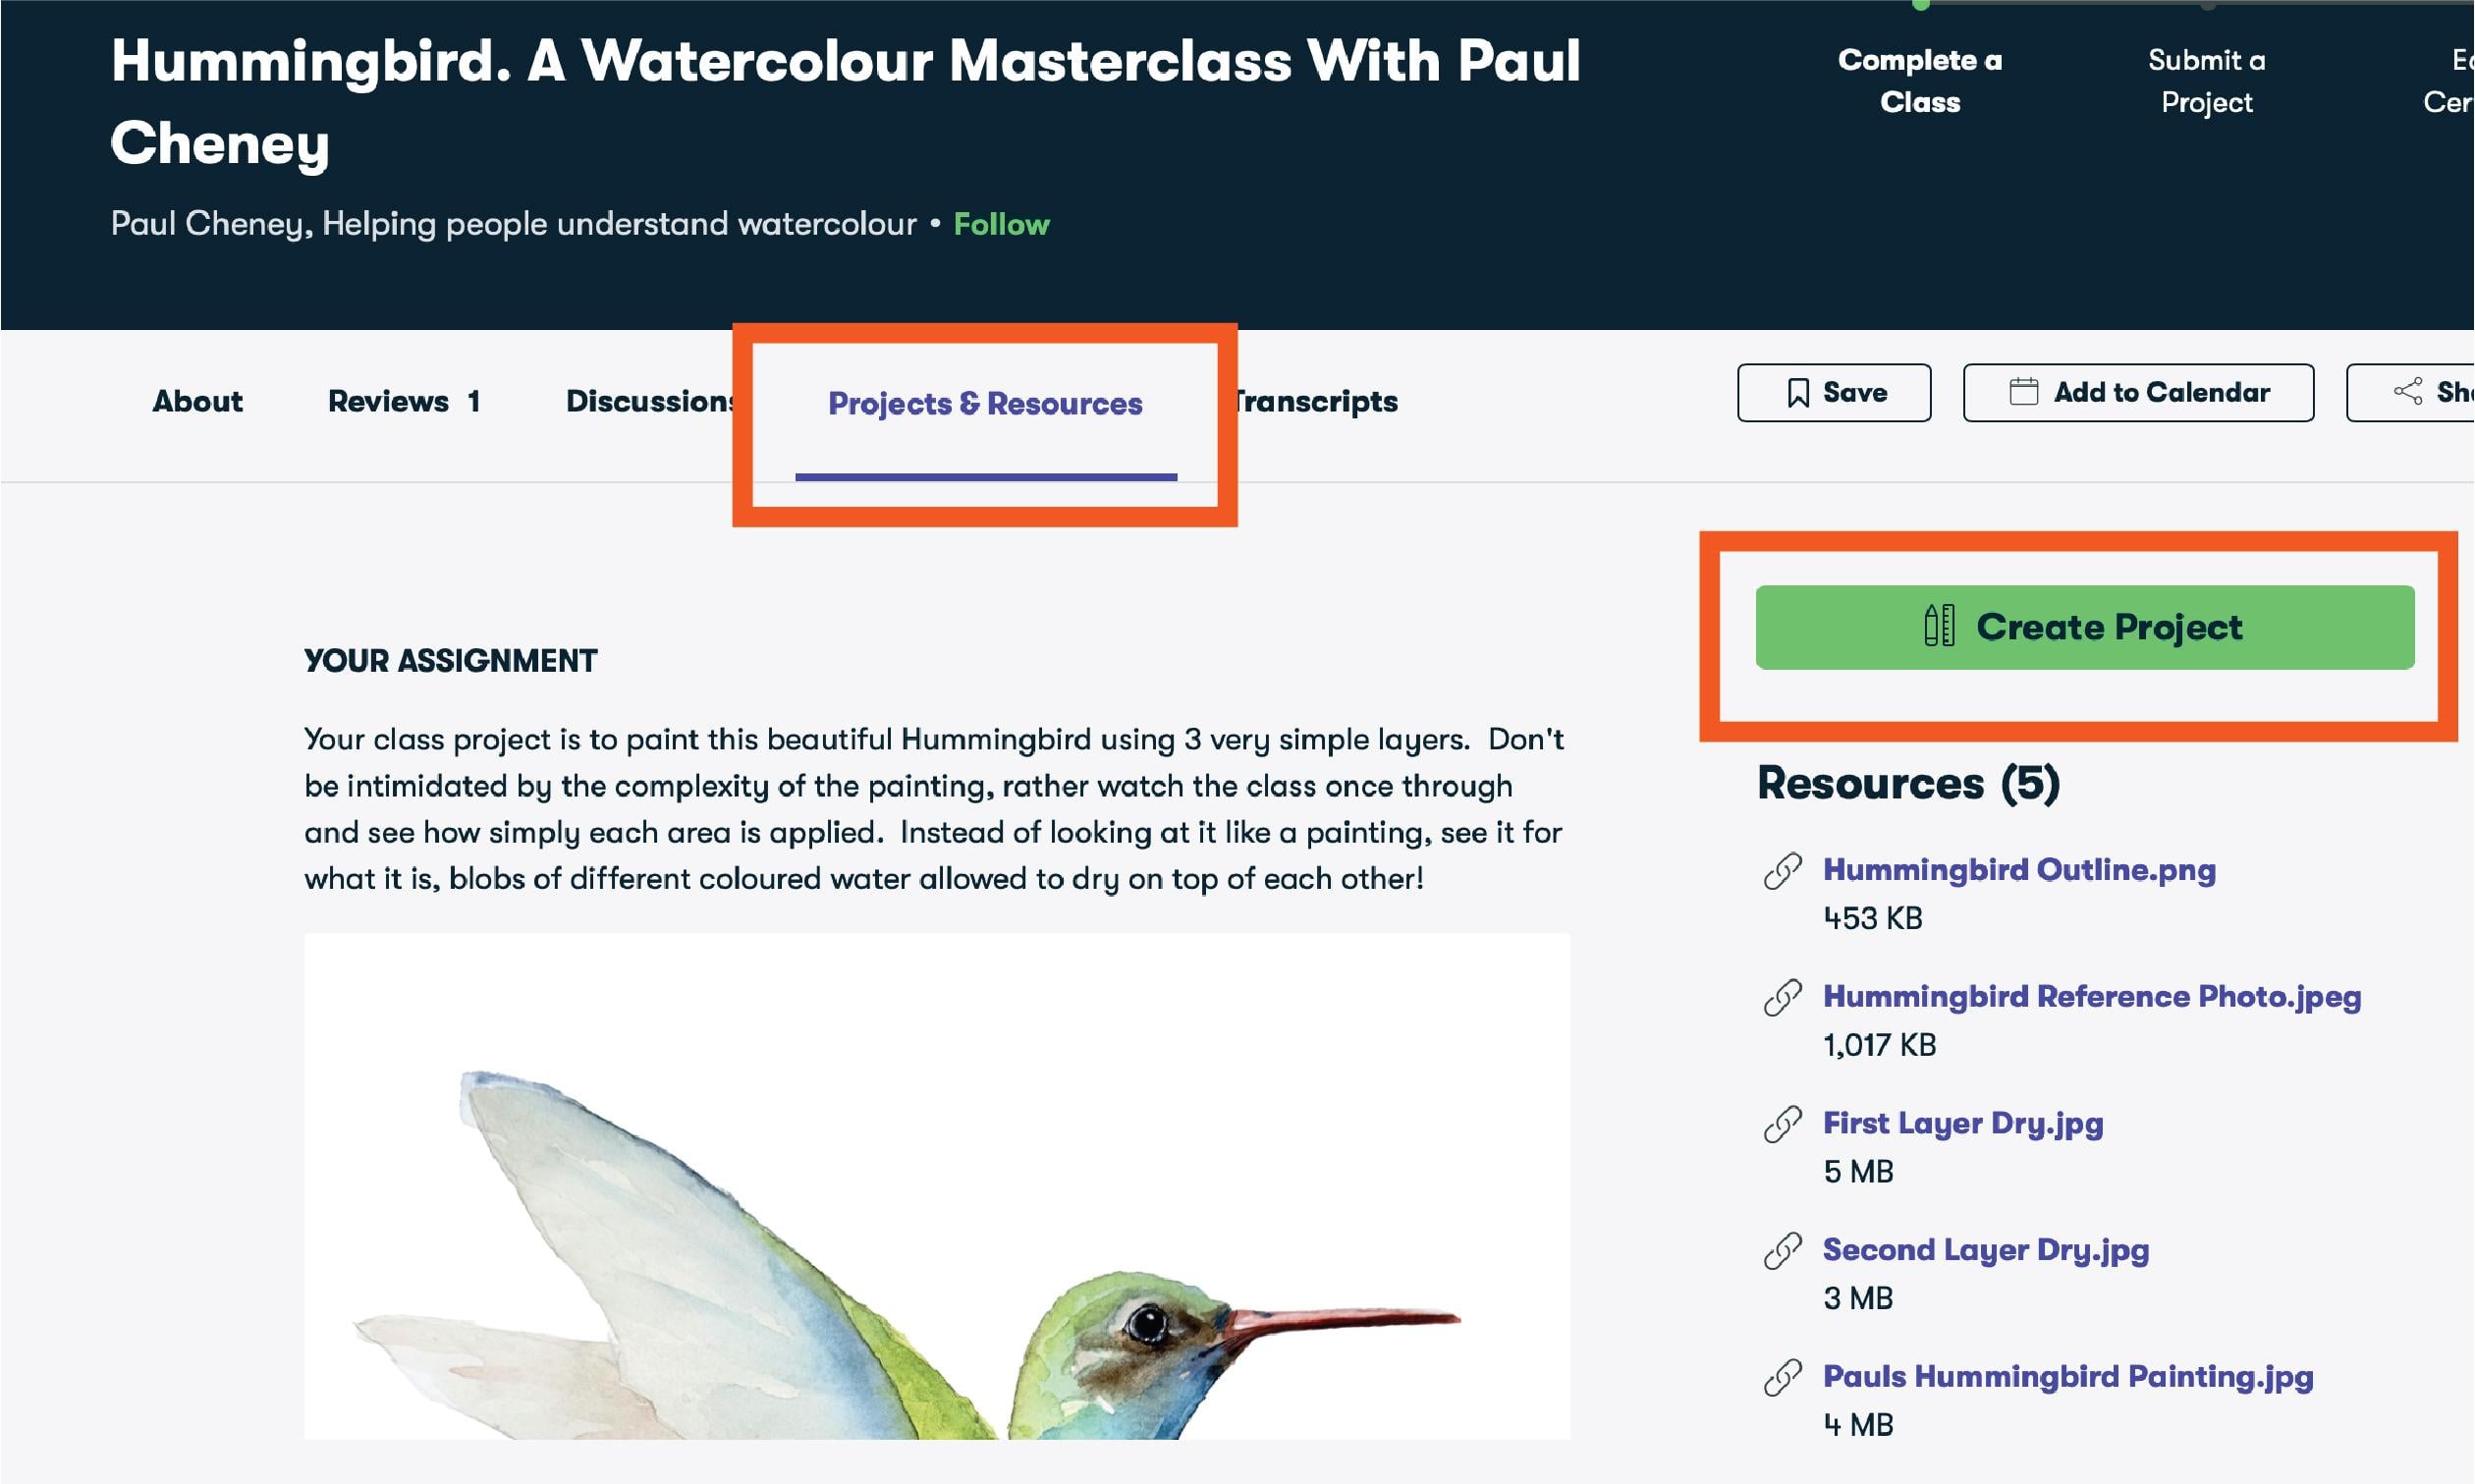
1. Introduction: Welcome back, Skillshare
People. It's me, Paul. For those of you
that don't know me, I've been a Skillshare
teacher for six years here, and I paint both
traditional watercolor and digital painting on
the iPad using Procreate. Today we are focusing
on digtal watercolor, and we are going to
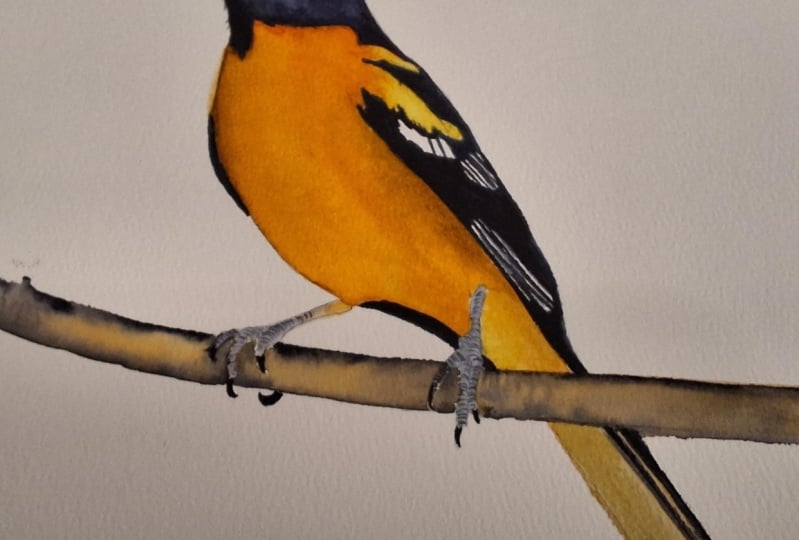
paint this Oriol. Yes, Oriole. It's right in front of me. I
should remember that. I've got my painting
here all sketched out. What we're going to
do is we're going to break this down into sections. So the first thing we're
gonna do is we're gonna do the black areas of the bird or the brown, whatever
you want to call them. They're very dark
brown or black, ready black. I don't know. Whatever they are the
dark areas, the head. We'll start at the head up here, and then we're going to do the other black areas down here. And we're going to try
and just work with the painting, letting
it dry as we go. If I have to stop and
dry it, that's fine. Once that's done,
the black areas, then we're going to
start with a yellow base because there is yellow
undertones in there, and there's actually
yellow areas like here on the wing and such. Then we will proceed to add in the orange and then
the shadow areas, and we'll move on to the feet and then finally the branch. Oh, and we'll do the eyeball and the um the beak
separately, as well, because those will
get messed up, and if we try to, you know,
do it well, it's all wet. The technique that we'll be
using is mostly wet on wet. Basically, we're putting
down a wash of wet paint, and then we're going to
add in colors to that. That will be the just of things. Again, with the
exception of the beak, the feet, and the eyeball, because those require
finer details. Okay, let's get started.
2. Painting the blacks: Okay, so we've got I've
already wet my palette here, you can see here on this side. You know, I've got paint
from a previous painting, but I'm going to use
those again, so whatever, it's all wet, it doesn't matter. The first thing I'm
going to do is, if we look at this head area
up in here and the face, there's some lighter areas, and there's some darker areas. It's kind of a reddish
undertone in there. So what I'm gonna do
is I'm going to take some magenta, paint
here, pigment. I'm not sure which one it is. It doesn't matter. You know, you'll see they're all
very similar here. I've got three of them. One
of them is quinacridone, one of them is a
lizard and crimson. They're close enough.
Just a reddish color. It doesn't matter.
You can use red. You can use whatever
reddish color you have. I'm going to take
that, I'm going to put as much water on as you can. I could use a larger brush, but I've been painting with
these smaller brushes, doing a series of paintings
lately that I really enjoyed, and I'm just going
to stick with them because they happen to
be here in front of me. So I'm trying to keep as much
water on here as possible, and I'm just going to fill in this whole black area up here at the top with this Um, and you're probably
thinking, Hey, Paul, the bird isn't red. Whoa, easy dude.
What are you doing? Um, you're right. It's not. But like I said, the undertones
are reddish in color. So that's why these are here. Okay? So stop bugging me. And, uh, just listen
to what I'm saying. Okay, so filling this
in, blah, blah, blah. If I stop talking,
just just watch. So you see this small
brush doesn't have a huge doesn't carry a lot of
pigment and water with it? That's okay, because
we're gonna cover it up. We're doing this in
two sections here. I normally stick my face
right in my painting. Makes it so much easier to see and I feel like I'm
slowly going blind. But my camera's in the
way. And I can't do that. Thanks to some head
in the painting, you're not here to
look at my head. You're here to look
at the painting. So, okay, now, what it is, I picked up some indigo
here on the same brush. There's a drop of water
there. Get rid of that. And now I'm gonna
come in and start filling in these
darker areas in there. Now, watch how this bleeds
around really nice like that. And here we go. And I will pretty much
cover up all of the red. What I'm just trying
to do is give, like, a hint of that reddish
color that's underneath. Really important that
we do this while the paint is still wet,
we want it to bleed. We don't want, um we
don't want to have, like, watercolor marks in this part of the painting.
I mean, maybe you do. I don't if you choose to do that differently,
let me see how it looks. Okay. So now I'm just gonna grab some cleanish water here, and then try and pull these
pigments in with this water. So you see now we've got
this wet and wet area there. We've got our lighter
areas at the top here. And we're covering that up, but we still have
those darker areas. Okay, now we can grab the
darker pigment again, and we can come up here and
we can start to drop this in where we think it's
going to make a difference. Now, one thing if you're
using a large brush for that, you're gonna carry
a lot of pigment and a lot of water
on the large brush, and it makes it more
difficult to control. So I've now got this
tiny little brush here. Can you see this? I put my hand
underneath it so it focuses properly. Very small. And I'm going to use
that to just have more control where some of these lines and
things are in here. See that how? Even
though it's wet, it's not flowing as much as it would if it were
a larger brush. Okay, so we'll get
some darker areas, and we'll get all the
kind of this parts out of the way here where
these details are here. You see how nice
and dark this is. I printing, we have, uh there's a thing
called a super black. And what that is
essentially is, like, an underprinting
of usually cyan. And what it does is it makes
your black blacker, right? 'Cause black itself is a
very dull kind of color. It's not overly saturated. It's very dull and flat. So now I'm pulling some
of these pigments, you know, again, we
don't want it to be red. We just want a red undertone. But I don't want to
lose that light area. So I've got a kind
of damp brush here. And you see what I'm
doing is I'm pulling these pigments in over top. So I'm really not
adding paint or water. What I'm doing is I'm
just basically making this gradation as
subtle as possible. You've still got our
undertone in there. You can still see a
little hint of the red, but not too much. It's very, very subtle. Try to see this as something that's relaxing and enjoyable. Okay, so we've got
some finer lines here. I just picked up some of the
pigment on my brush here, and I'm just putting it in where I think it needs to be
a little bit darker. Again, I'm going to use my
brush just to dry this off. And I just want to
feather it out, we'll call it feathering. I
think that's a good word. So just like in the picture, see those details are
so subtle, right? Like, how it becomes
super, super soft. And getting these gradations
on your painting, it takes a lot of practice. So don't beat yourself
up about this. And a good exercise
to do sometimes is actually just make
a sphere and try to paint that sphere so that
you see the dark side and the light side and get those gradations to be
as soft as possible, okay, which we've done here. Yay. Alright. Now,
the other parts, there are some lighter areas
in here with undertones, but there's a lot going on, too. So we've got some
light areas there. We've got these whites in here, and then we've got
some down here, we've got some white
lines as well. So we're gonna paint
in and around that. And for that, we're going to use a different
combination of colors. We're gonna mix in I'm going to use Pains gray and indigo, just to make it as
black as possible. And I'm just gonna fill that in. I just want it dark, right? And then I'm going
to lighten it a little bit after with water. So why do it differently
here than on the head? Well, the head is
where that eye is. That's where the connection
in the painting is. That's where it drives it home. I could spend I I could
do it the same way. There's no, you know, and
there's no reason why you can't just not that worried
about it, to be honest. I'm just whatever.
It's just a wing. And it's more of like
a dark area, right? And the other thing
is too, it's gonna be so overrun by the yellows and such that you won't even see
it. Don't really notice it. So basically, I don't have
any masking fluid on here. I I would like to, but I left it somewhere else, and I don't have
it here with me. I've been meaning to go
get some 'cause I've been doing this 30 day
painting challenge thing, and I can't tell you the amount. I've used crayons. I've
used everything else. And it's just not the
same as masking fluid. And I hate masking fluid. It's terrible stuff
to work with. It's just I find it
too fussy and whatnot. Um, I just filling in some
of those lines in there. And you can just do it the old fashioned way,
just paint around it. Which is what I'm doing.
3. Painting the yellows and oranges: Now we will move on to
the orange and yellow. So I'm going to get a
little bit bigger brush for that because we've
got a bigger area. And again, this brush is smaller than I
would normally use. But, yeah, it's what it is. So, okay, first thing
I'm going to do is I'm going to start
with yellow undertone. That's like I said, I was. So I've got some cadmium yellow
hue, not cadmium yellow. And just like we
did with the head, probably get more water on there, just like we
did with the head, I'm putting down a base layer. Of all yellow. I want
this to stay wet. That's important.
I'm trying hard not to touch the dark areas here because I don't want them. They will bleed a little
bit, and that's okay. But I don't want to contaminate
my paint and then put a big dark streak across where the bright
yellow areas are. Okay, so I'm trying
to go quick and talk. But I don't want
this to dry out. So let me just speed
this up a bit. I missed some details over here. We'll fill those in
later. Okay, now, we got a base yellow color down. Nice and bright yellow, ya. This up here is very bright. Might even grab a
lemon yellow in there and try to throw
some of that in. Or you know what? We
can also do is we can dab in some fresh water in here, clean water, clean ish water to get a little bit
more white in there. Okay, good. Now, we've got some dark orange
colors going on here. I'm going to mix in
some cadmium orange with the cadmium
yellow to start. We're just going to build
it up. These orange colors. Just like we did with the head, we're trying to
blend in this area. I'm gonna clean off
my brush or some of the lighter areas and
just pull in some pigment there and don't want. So this kind of comes
down like this, and then there's a shadow area under here where it gets darker. Okay. So for that area, we can put in as much
orange as we want. But it's gonna be
a shadow anyways. Same for over here, we can darken this up with a
little bit more orange. It's a shadow anyways. We need that white
section there. So this is starting to
dry, which we didn't want. Okay. Alright. Looking
good. Clean that off. I'm just gonna pull push a little bit of this orange out of here because there
was yellow in there. I'll grab some
yellow and plop it in instead or add
it in, I guess. It's gonna darken
it up. Hey, will. Now now we've got some shadow
areas in there, right? Were we have I'm gonna leave that little
hard line in there. I kind of like it. I'll
soften this one up. Um, now I'm gonna
use some Panes gray. It makes a good shadow color, and I'm just mixing it
in with the orange. So orange and Paine's gray. Now I'm gonna come over
here to these shadow spots. Well, it's still wet, and
we're gonna get our shadow in. So where the wing sits there, there's gonna be shadow. I
mean, you can see it, right? It's plain as day, where the shadow and
the dark areas are. So just paint them
darker. That's all you got to do darken it up. Wherever you see the
dark, put it in the dark. Easy, peasy. Okay. Again, let's get our brush
as dry as possible so we can just sort of try to
feather this out a bit. There's almost more
red to that orange, isn't there in this area here? I'm gonna try and
make a new orange. That's what I do. A
new orange there. We go, it's too dark. Oh, well. Here get
what I'm trying to do. Trying to make it darker. Okay. We do a little bit going on down here. We also have that black there, and we have a shadow
area on just the yellow. So I'm just gonna grab
some Pain's gray here. And right down this side here, we've got a shadow. Actually, this whole area is
kind of shadow, isn't it? Because of the branch
or whatever's there. So we'll just darken
that whole thing up. A bit more dark for the shadow. They're always going
to have darker areas where things are behind or in front or basically
they're being blocked. The light is being
blocked there. Okay, now you can see my painting is starting
to buckle a bit. I do have a taped down,
so it will dry properly. But I'm gonna stop
the video here. And actually, you know,
before I do that, I'm just gonna fill
in this dark area that I missed on the back, grab some pain's gray,
mix it in with my indigo. And whatever was going on down
here, this was just dark. So I'm just gonna
make this dark. I'm try to smooth out
some of these lines here. There we go. Of course. Now I got a little
bit of orange bit I need to fill in there.
Well the world. Okay, we'll let this dry here. Now we'll let this dry. Now
we'll let this dry here. I keep looking where the
cameras, new setup and all. And we'll be right back. And we will then do either
I don't know. We'll see. Surprise.
4. Painting the eye and the beak: And we're back. Our painting
is dry. We can touch it. Yay, there's no
water, wet spots. And for the first wash,
it looks pretty good. We got a lot of details in here, and I don't know that I
would change too much. What I will do, I'll tell you, is I will add in more contrast in some of the
shadow areas and maybe just maybe put in another
layer of orange in these parts just to make it more orange so it
doesn't look so flat, but we've got some
pretty good coverage, all things considered
for the first wash. I'm very happy with
that. Let's move on to the eyeballs and the beak.
I don't have a beak. I have a mouth, this beak here. And so we'll do that now. So when we look at we look at our reference
picture nice and close, you'll see in the eye, wish I could zoom in
on my painting here. I can't you know many
times I do that? I actually take my
fingers and try to zoom in on my painting.
I like, What? No. It's the world we
live in. Crazy. Get your tin point hat on. Okay, so first thing we're gonna do is we look at our
eyeball underneath here. Inside this area, there is
some brown on the bottom. You see that? The brown. Over
here. Stop looking at me. And look at the eyeball. I'm gonna get some
quinacridone gold, even though I did say brown. I'm gonna get quinacridone
gold anyways. And I'm gonna paint in
underneath that eyeball. I don't want that
much water on there. I'm just gonna paint the
whole eyeball brown. I'm gonna leave the little
white spot at the top. If I can, if I
miss and screw up, or if you do not the
end of the world. Um, you can always
fix it later with a gel pen or some wash or something like
that, whatever you like. Now, you'll notice that I
made my eyeball, white area. I left too much space, which I didn't do for any reason other than I was
just being very careful. But now I've got this big
white area around here, which really isn't that color. And it's going to be difficult. There is white around the eye, but not as much is there. So I'm just going
to try and close that gap down a little bit, and still, while at the same
time leaving the white area. Trying to keep my head out
of the top of the camera. So yeah, just focus
on the eye for now. Okay, I think that
looks pretty good. It will when it's dry
right now, it's wet. So when we're looking
at it, it's wet. There is a bit of a dark
area around the eye, like, almost like an outline. Gonna try and add that in without hitting the
white. Too much. Too much. Reinforce some of these areas in here. Okay. Good enough Let's not overdo it. I always do that, and
then I make a mess. Now, I'm gonna turn this this way because I need
to paint the beak. Don't be alarmed.
The bird is okay. It's gonna be fine. But I have a hard time drawing
straight lines this way, so I like to turn
things, so I'll go up and down sort of sideways. Now, for the beak, we've got kind of
gray blue color. And if you look at
my palette here, you'll notice I just
happened to have gray blue color by Daniel Smith. That's not actually a real
color, not by Daniel Smith. I have a bluish I have a
mess here on my palette, and a mess always makes gray. Someone's gonna swish
around some colors there. You could use ultramarine blue, mixed with pains gray, you know, something like that, and
nice and watered down. You don't want too
much too much. And I also don't want
too much water on there. So I'm just gonna give
a little dab there. We've got a shadow area
underneath the beak here. That comes up, we're
gonna paint these in, and we got another one
up at the top here. Themes down that
way a little bit. But for the most part, there's not a lot of color in our beak. So let's not overdo it. Okay. Got that in. Now clean brush, some water, and I'm just trying to drag
in. No, not gonna work. It's already dried.
Look at that. Too dry, too fast. Alright, so what
we're gonna do is we're gonna just
get some really, really light blue, and
we'll paint in too much. I just clean it off
with my fingers. Okay. All right. So if we look at the values that we
have here, which is, again, light and darks, my values are a little
bit on the pale side. So I'm gonna grab
my small tiny brush again and I'm going to
grab some darker paint. And I'm going to just dab
that in along the bottom here and up here at the top. And we're gonna come straight line straight line.
I made it crooked. Um, our straight crooked line, which kind of does another
weird little thing here where it goes up and
then down, up and then down. And I got some now we can do
some of this shading here. That's what I'm gonna clean off my brush, and it's just damp. No, it's wet. And I'm just pulling some of the
pigments from underneath, trying to, while keeping it. No. Okay, we got a little
dark spot here. Hm. Be careful when you're
doing this that you don't accidentally hit the
eyeball with your hand. More than one painting has
gone in the trash because of that. Okay, how are we looking? Looking good. Alright,
keep in mind, now this white area around
the eye isn't really white. So what I like to do
is just kind of dab around and soften it up a bit. I'm just pulling
my brush through the dark ring that
we just put around. And just slowly breaking
up that little dark area. Okay. Good. Let's zoom
out a little bit here. I'm zooming out
on my iPad there, is what I'm talking about. And I want to just emphasize some of that shadow
area in there. So I'm gonna grab some of the orange brown color
shadow that I made, and I'm just gonna drive
that home a little bit. So I'm gonna put on
the paint. I know, I know it looks
dark. Hang in there. I'm gonna wet my
brush, clean it off. Actually, I'll just
use this other brush here it holds more water, and I'm just gonna dab
that along the edge here. Just to soften it up a bit. And while that's
wet, if I wanted to, I can now grab some really dark, like some indigo, and just come right up
along the edge in here. Just to drive that shadow
home a little bit. Okay. That looks good. And what else did
I I was gonna do? Oh, I was gonna add
in a bit more orange. For that orange, I'm gonna
grab some cadmium yellow, and I'm gonna grab some red. I'm just gonna
'cause it's more of a deeper darker orange. And we're gonna put
that in up here. And we also had a little
boo boo right there. You can see that right there. So we'll just fix
that kind of fix it. We can round out our bird a bit, hopefully, and just putting this in where the darker
areas warrant it. I don't want this to
dry. I don't want any hard streaks
too many, anyway. So we've got some,
and that's okay. But that's not what
this painting is about. This painting is more detailed. So clean that off as
much as possible. We're just very, very, very lightly damp brush, and I'm just slowly
blending that in. Pushing, pulling, however
you want to call it. Clean that off as
much as possible. And keep in mind, I'm using
a synthetic brush here. I wouldn't be so hard
on a real hair brush. I'd use a cheaper synthetic
brush like this one for this. Okay, so we got our
darker area there now. Yeah. Probably should
have used more water and looks a bit funny, so I'm just gonna plop in
some water over top of that. What I'm doing is I didn't like the streakiness that I was putting on that came out there. So I just put on
some clean water, and I'm just blending it
all over everywhere I had that so that the pigments
will bleed a bit more. And I think it's working. I'm gonna grab some dark here
here now just 'cause we fix this here our heads
kind of not lining up. Oh well just make it
a little bit thicker. And we can bleed some
of these colors in. That's always nice. I'd like to clean up this white wine so it doesn't look so streaky. It does look a little bit on
the streaky side right now. Just adding in a bit
more dark. Okay.
5. Painting the feet and the branch: So let's move on
to our feet, okay? I've got to remember I
got paint on that brush. I grabbed my tiny brush again. This would be a number zero, zero, zero, triple zero,
in case you're wondering. It's also known as a tiny brush. Okay, so what have we got
down here on this feet? We got a little area there
where the foot comes to meet, and then we've got
dark on the top and dark on the bottom. It's pretty much
always the same. So what I'm doing is I'm
kind of outlining this, like, almost like
drawing around it. I'm going to fill in the nails because there's just too fine of a detail to get
that much to worry about. Okay. Did that. Now I'm gonna grab my
brush without any water, and I'm just gonna see if
I can't pull the pigments in sometimes if it
doesn't dry fast. No, not this time. So
what color are the feet? The Cafet are a little bit on the purply purply
blue side, I guess. Uh, yeah, and we'll
just grab make it up. So I took some, um, magenta. And some blue. And I mix it
together with water, and this is the
color that it made, which is close enough
to the feet, I think. I don't like those
lines on the edge. I'm gonna grab my
small brush here, and I'm just pulling
the pigments in. I might have to add a bit more. That's okay. I just want it to bleed in more
and not have lines there. Now, lastly, we've
got a branch here, which I'm going to paint brown. Even though it's very light, I'll paint it a
very light brown. I'm using my same brush that
I've always been using. And what I want to do is I just want to
again, same thing. I'm just putting this
underlay underneath. And once we have that on, then we can fill in
the shadow areas. We want to keep it
wet so that it keeps that lovely watercolor effect. So we're gonna be
dark on the bottom, the lights coming this way. And for this, I'm using sepia. You could use burnt umber. You could use raw umber. You could use mixed orange
and black together. Orange and sorry, blue together. They give you also the
same kind of thing. Usually, when you look at wood, this one here is very pale. In the reference photo, which you could do, it's
up to you, really. I just want it to
look like a branch. I'm gonna throw in some yellow. There's some different
colors in there. A bit of the orange because
we got it in the bird. Always nice to harmonize
things that way. Now that we've got
our colors in there. Okay. I'm gonna come back
here a tiny brush again, and I'm gonna get these
dark shadow areas. Gonna be shadow underneath
where the bird is. Le me shadow areas
up here, under here. Gonna be shadowing here. Me shadowing here. Shadowing here, shadowing here. Shadow under here.
Go clean that off. Gonna wash these
down a little bit. Just running some
clean water over them just to break it
up a bit so it's not so strong of make this shadow darker under here and
darkness up in here. So it's all uniform.
Basically, this whole thing should be a shadow area. There we go. And do, there's a bit of an orange
bit up here are going on. Some clean water. And, yeah.
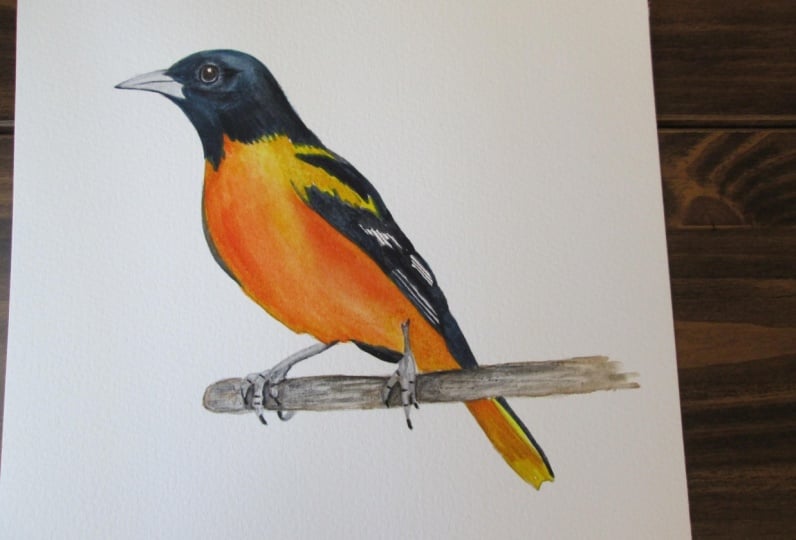
6. Recap and final comments: We're good. What do you
think? We painted a bird. An Oriole. All done. Zip zip. Finished. So let me know what you think
in the comment section. Make sure you paint
this, first of all, put it in the projects
and resources section so that I can comment
and critique on it, and you can help inspire other people to paint this
Oreo bird, which helps me. I'm helping you paint it. You help me by posting your picture in the Projects and
Resources section. Thank you very much. Have
a lovely day. Goodbye.
 Paul Cheney, Teaching watercolour and digital painting