Transcripts
1. Introduction: Welcome back, Skillshare people. For those of you
that do not know me, my name is Paul and I have been a Skillshare teacher here
for approximately six years. I teach both traditional
watercolor painting as well as digital
painting on the iPad. Today, we are focusing on the watercolor painting
side of things and continuing on with a very
valuable lesson that we did in our loose watercolor
flower painting. If you have not
watched that video, I really suggest you do
because it lays down the fundamentals of
what we're doing today. I do cover everything in
detail in this class, so it's not mandatory, but
I do strongly recommend it. I also strongly
recommend that you watch the video all the way through before starting
your painting. The reason being is that we paint this painting
fairly quickly, and knowing what's going to
come up next will really help you put down your paint and do it correctly
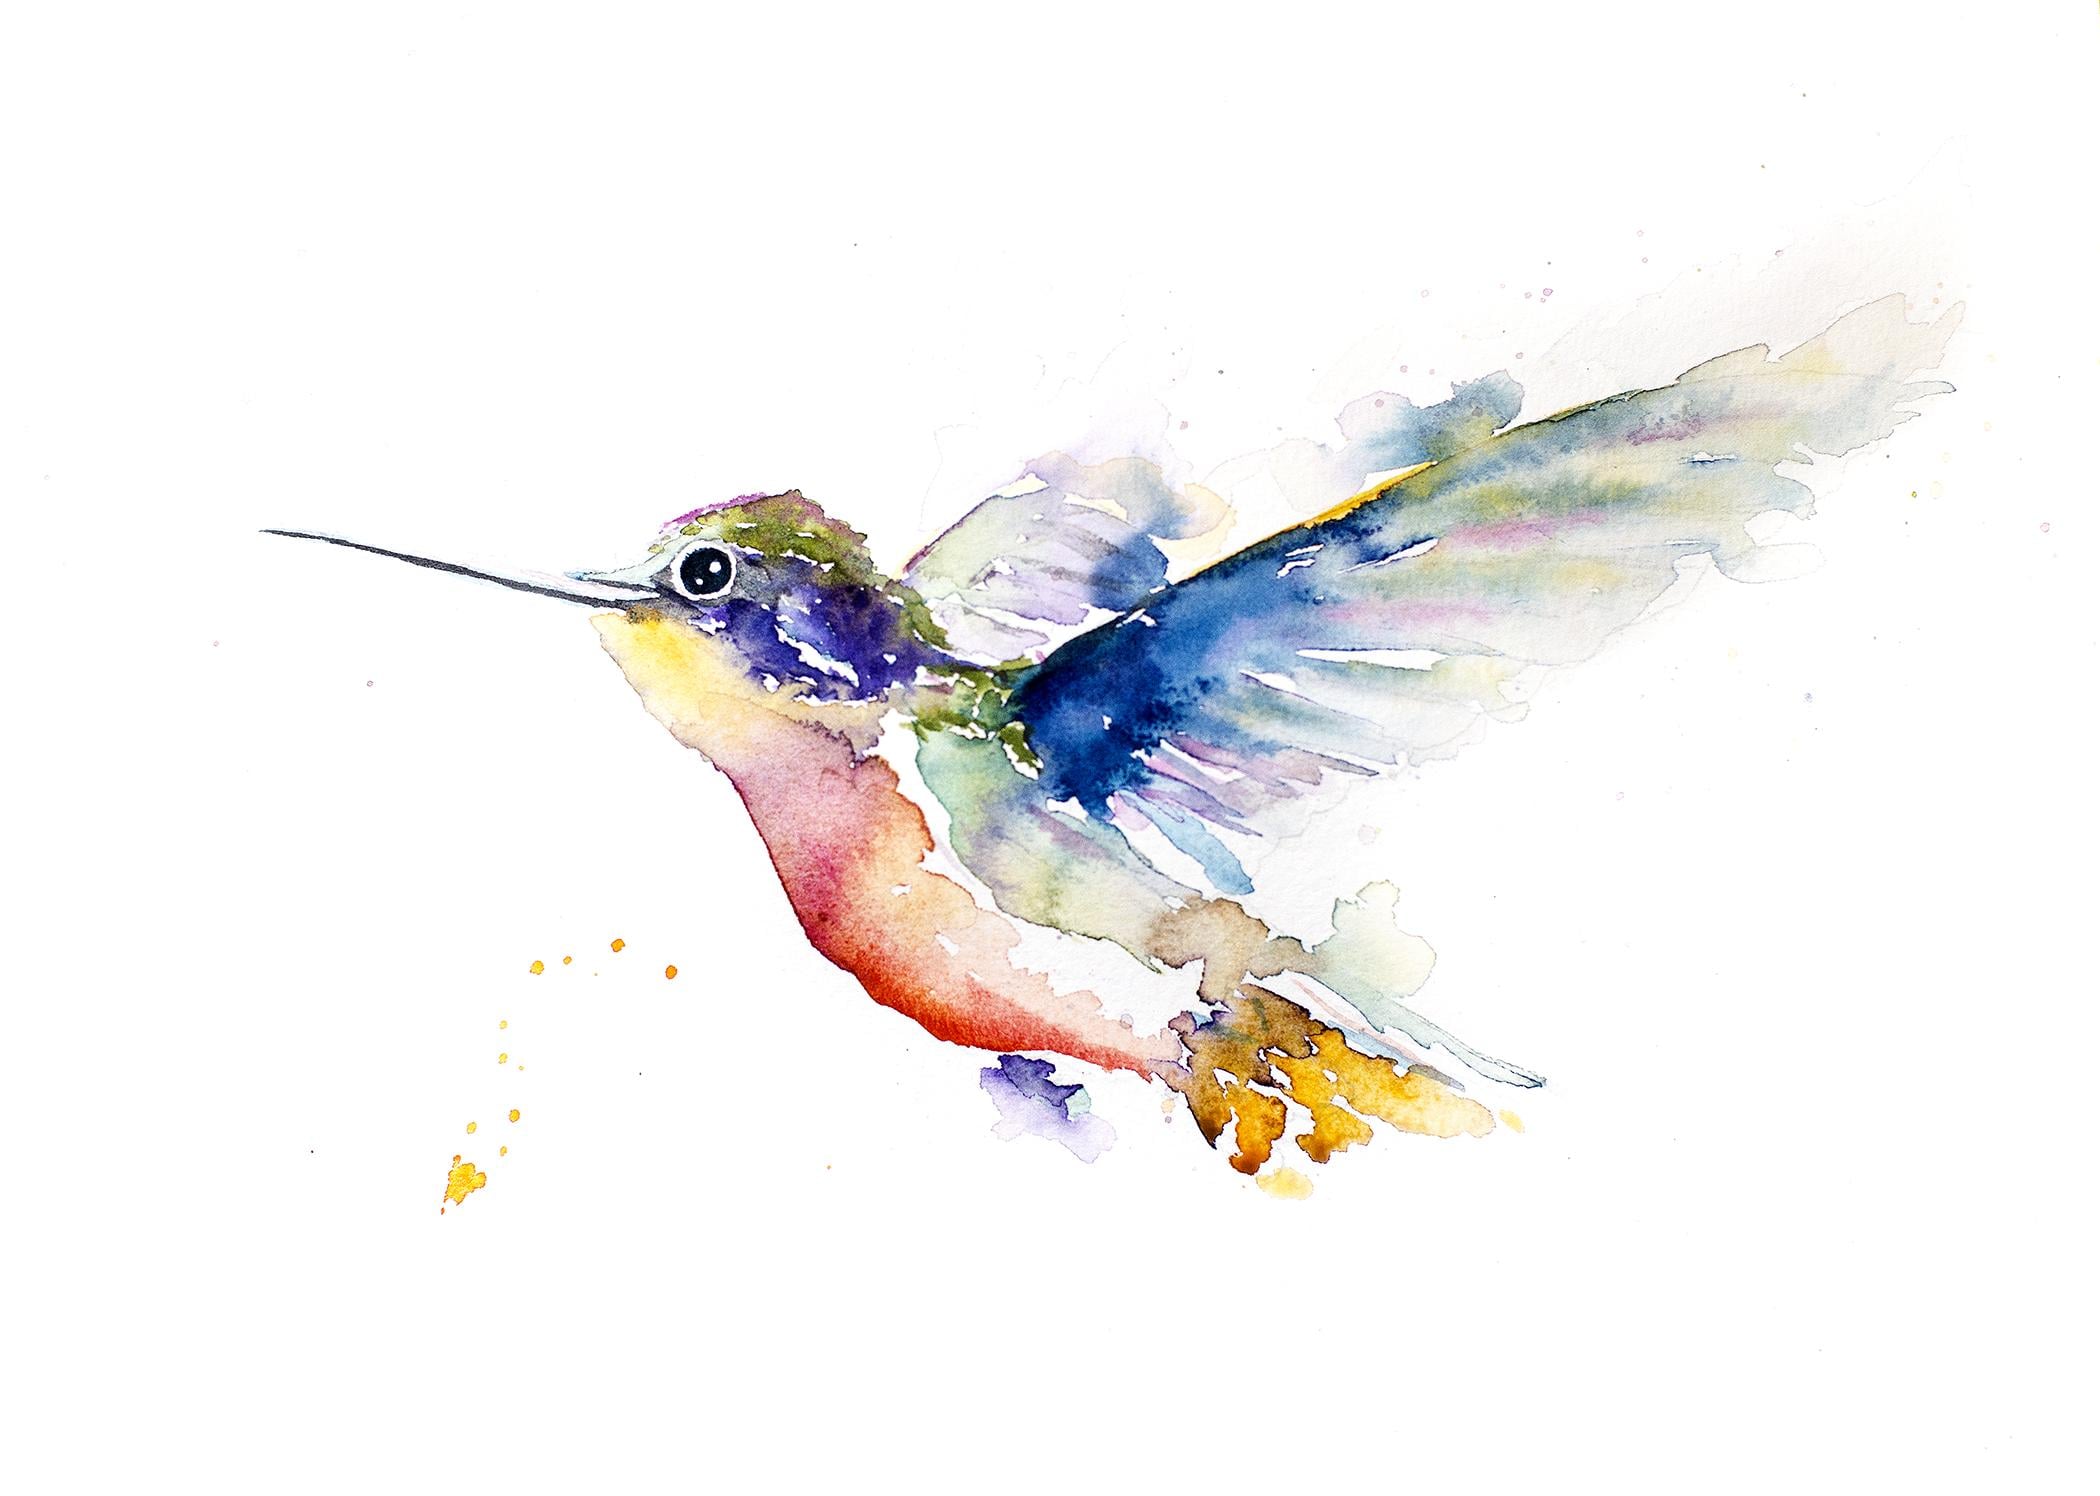
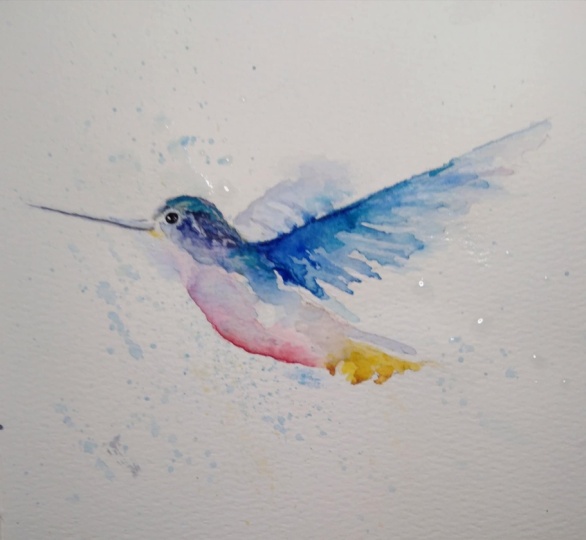
without making mistakes. This is the painting that we
are going to paint today. This is a hummingbird painting that I made quite
a long time ago. I have painted it countless
times since then, and I've painted countless hummingbirds since
then, as well. So do not get frustrated. Always remember you
can do it again. And people say, Oh, my painting didn't work. Well, do it again. So here, I've done it again today when I filmed this,
here's another one. Anyways, I have lots and
lots and lots of them. So I do suggest doing
it more than once. Go through, paint the painting, get an idea of how it is,
and then do it again. When you're drawing it out, draw it out two or three times. That way, you're
committed to doing so. And just stop put one aside
and move on to the next one, or even better, let it dry, see how the paint dried, and then move on
to the next one. This is definitely
a class that is meant for all levels.
Anyone can do this. There's really
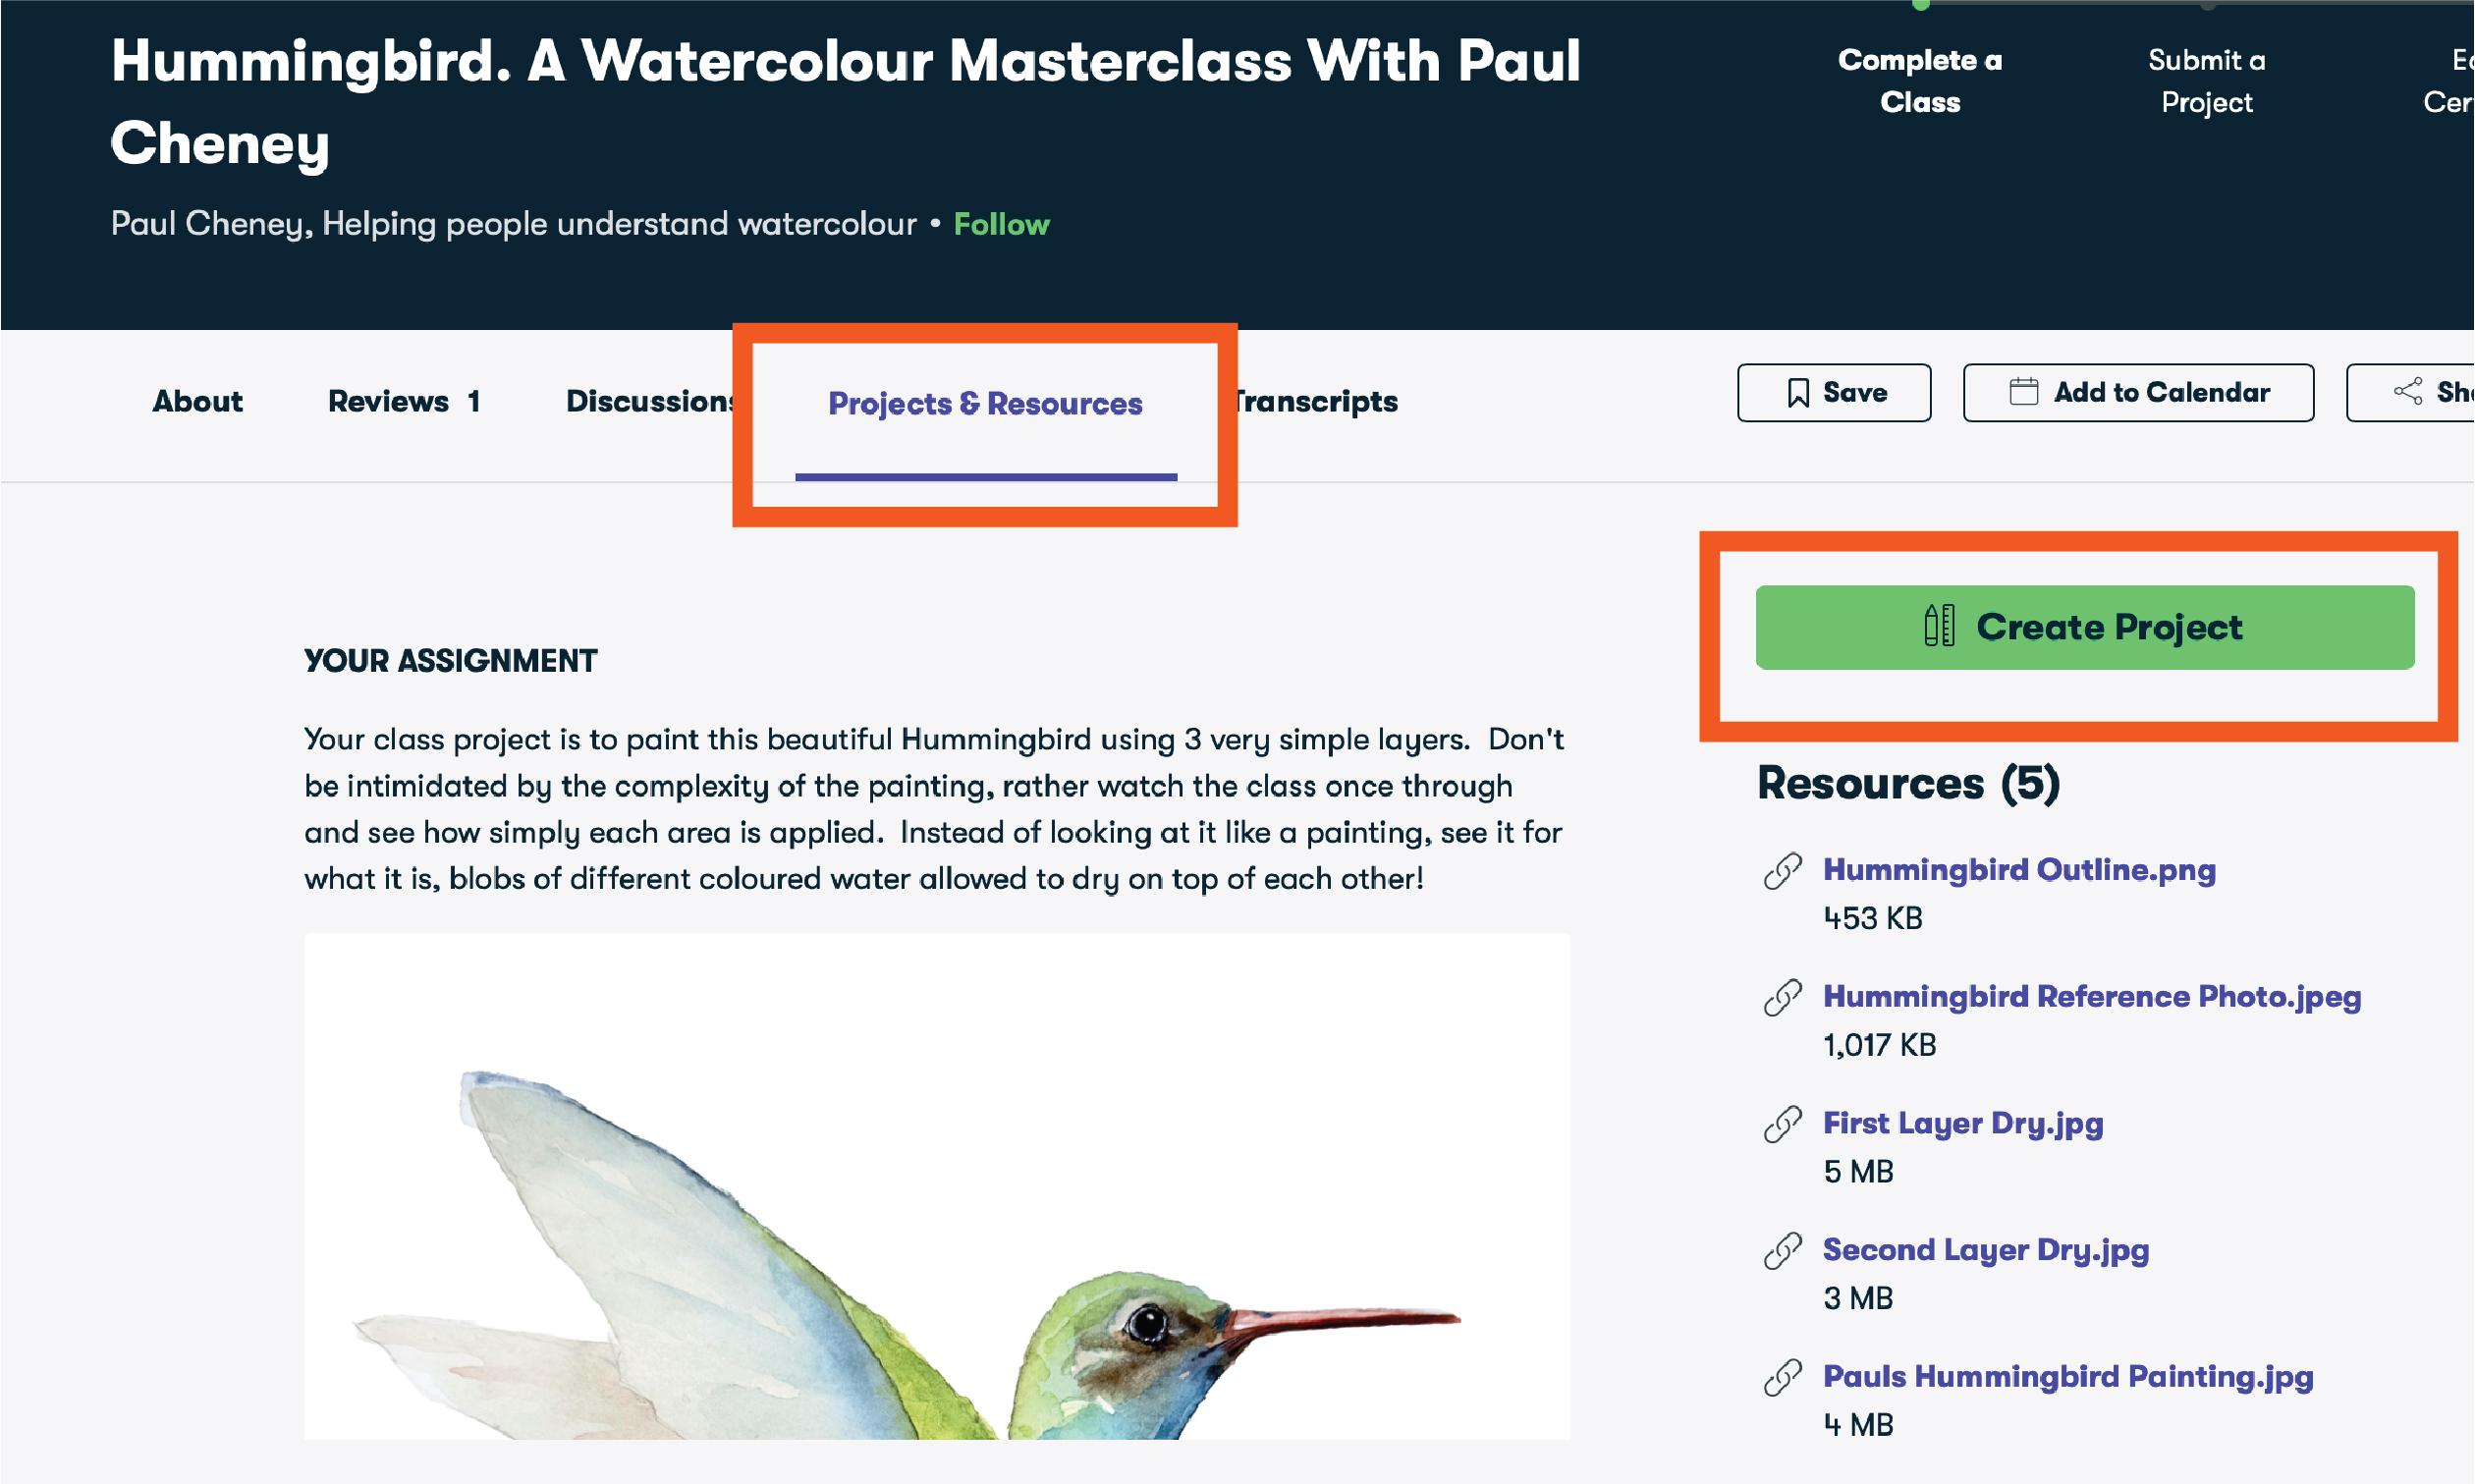
nothing to it. You do not need to know how to draw. I've provided you
with an outline. I've provided you with
a reference picture, given you everything you need so you can just focus on painting. The paints that I'm using
today are Daniel Smith paints. That's what's on my palette. My palette sits here
uncovered all the time. Never whatever when I want
to use it, I just re wet it. I don't specify
particular colors because it doesn't
really matter. You can use yellow and green and blue and pink or
purple, whatever you want. If you don't have
these exact colors, just use what you have. You don't need to run
out and buy new ones. You can mix any color from
the three primary colors. We've got yellow here. We've got red here. We've got blue. We've got some green. If you don't have green,
mix yellow and blue. If you don't have an
orange, mix yellow and red. Easy peasy. Okay?
Don't overthink it. Most importantly, when
you are finished, take your finished
painting like mine here and upload it to the projects
and resources section. That really helps me.
It also helps you. I can give you feedback
on your painting, and it also inspires others that might be nervous
about trying this out. Anyways, that's enough
talking for me. Let's move on to the
painting side of things. I hope you enjoy it. Please let me know what you think
in the comment section. Thank you very much.
Happy painting.
2. Painting the Head and the Body: Let's get started. The
first thing we're going to do is we are going to
put our water down, similar as we did in
our flower painting, which is what we're
building on here. We're going to use a
similar technique. We're going to do wet on wet, various versions of wet on wet, I guess
you would call it. We're also going to do a lot of painting with value
instead of color. It's a very colorful painting, and hummingbirds
are very colorful, but not necessarily
these colors. We're using darks and
lights to make the shadows, the round areas, the three
dimensional aspects of it. We're going to put it
all together and make a beautiful
hummingbird painting. So the first thing
we're going to do I'm going to take some water, and we're going to
put it on the areas where we want our paint to go. So I'm going to avoid the
white areas around the eye, and I've also marked
out white areas here that I'm going to
leave because I will talk and get distracted and accidentally make
mistakes, whatever. You know, you know how it is. I'm also, if you're
looking look down here, what I'm doing is I'm
trying to leave a bit of space for my initial
colors going down because I don't
want them all to run into each other and turn
into a big muddy mess. So let's just start. I already put some on the
head, but for you, let's start with putting
down here on the bottom. We're going to fill in this
section right in here. And if you went ahead
and made the little, you know, marks and lines, like I did, which
I mean, like here. Like, I actually drew out exactly what where I
want the paint to go. Normally, when I made
the original painting, I just painted it and then let the water go where it went. And I'm trying to
recreate that here, and it's a good exercise to
sort of slowly introduce, like, how wild and
crazy you want to be. You just start throwing
paint everywhere. You're going to end up with
a mess until you really get an understanding of
how it's going to dry, how the paints are going
to mix, and so on. So we've got some water down
here on this area here. And if we look at our
original painting here, we've got some yellow up here, and then we've got some red, maybe orange color down here. It doesn't matter what yellow,
doesn't matter what red. It doesn't matter what you use. Just keep in mind the value. So yellow is generally a
very light value color. Red somewhere in the middle, blue, purple, you know, can be very dark, depending on the hue or the pigment used. So we'll start off with some
yellow here on my palette. I've already pre wet my paints, same as I did in the last video. I don't use paints
out of a tube. My paints just sit here on
the palette all the time. Okay, and then basically, just like we did with our flour, I'm dabbing these in, okay? And so you can see there, I want to be careful
up top here. I don't want this area here to mix in this
area here, okay? Let's just get some
pigment in there, get it, you know,
nice dollop in. And you can see it's
already starting to run down into this area here where we have our reds and whatnot. Okay, what
have we got here? We got some red. I'm
gonna plot that in. See how quickly this
starts to come together. It's darker along the bottom, so that's where I'm going
to put my pigments, and I'm going to let
them do their own thing. Now, if they're not
running enough, you can come in with your
brush and pull a bit. Don't overwork this,
though, you want. You got to learn to trust the
paint, trust the pigments. Get them to do what you want, but not what you don't Okay, I want to grab some orange now
'cause I got orange there. I might mix my orange
with a bit of yellow, and I'm looking in here, and I'm gonna dab that in. Now, you'll notice in
the original painting, there's some lighter areas
and some darker areas. So what that is is where there's more paint or less paint, right? And then where
there's less paint, is kind of like
where it ran off. So like, in our flowers, we had the pigment
in the middle, and we tried to bloom, like, get that to come out. And this is the same thing
we're doing here just on a more complicated
painting. More shapes. That's all. Really,
different shapes. I wouldn't say more. I
mean, but there are more, I guess, so definitely
there's more. Very hard to talk and
paint at the same time. Okay, one thing I don't like here is now I've seen
my yellow drying. It's very solid. It's
like a big solid. So I'm gonna put
a bloom in there, which is basically
as your paint starts to dry, I'm putting
in clean water. What that's doing is it's taking your pigments that
are there and drying, and it's like dropping
a blop of water in, and then those pigments
like little grains of sand will spread away
from that water. If it doesn't do it enough,
you can also lift some out. There we go. Just a couple
dabs. Nothing too crazy. There we go. Now we've
got a little bit of lighter area in there and it's pushing some of
the pigments out, making the other areas even
darker, which is cool, right? And we don't have
enough water over here. Ooh, that's cool. Um, there's another
bloom going on there. We'll do another daub down here, we're sort of pushing
some of those pigments out, getting wild and crazy. Okay, let's come up here to the top and get
my smaller brush. Make sure that I've got the shape with the
water that I want. And so not where
I don't want it. I need to leave some
white around the eyeball. Got lots of water in here, and that's cool right on. Okay, let's grab some green. Again, you don't have
green. Mix blue and yellow. Which blue and yellow?
Doesn't matter. Whatever ones you like.
That yellow that blue, that blue, that blue, that blue, whatever,
doesn't matter. Use what you have.
Okay, now, same thing. Dabbing my paints in here, slowly going around, letting
them run down on their own. I I want them darker
on the bottom, I'll put some on the bottom, leave some white gaps in there, just because it looks cool. On mine, I had a little bit of looks like a magenta
or something on the top. Just for fun. I'll add some in. I don't normally
paint with my arm, like, stretched
around like this. It's just for the video. Also gives me an excuse
if I make a mistake. Well, it's not my fault. I was trying to make
a video. Okay, we got some nice textures in there. Now, what have we got? We got some blue
going on down here. Alright, let's get
some water down here for the blue.
Look at our yellow. It's already gone. Hey, I'm coming up. I'm coming up there. Back off, yellow.
Stay in your lane. Round out my head a bit
there. Let's get some blue. Now, blue, very strong.
Certain blues anyway. So I've got Palo blue here. Very strong pigment.
In my original, I've got some blue, and
I've got some purple. So I'm just putting
some in here, seeing how far
it's gonna spread. Nothing too crazy
gonna try and leave that white area around
in there that I had. Now, I am recreating
this painting. So I'm also showing
you how I think you should paint it to get the
painting that you want to get. When I painted this originally, it would have been with
a larger brush, faster. I wouldn't be painting these tiny little details like this. But, again, we're recreating this painting, and
I'm trying to, you want to have
a win, you know, you don't want to get
frustrated and think, Ah, my painting doesn't
look like that, right? So as much pigment in
there as you like. Well, come up close
to this eye here. It's some darker areas in there. Ooh, that's nice.
Don't overwork it. Once it's on, just leave
it alone. Walk away. Okay, bring this down here. We'll bring down the
back of the head a little bit. Perfect. Very nice. Very nice. A little bit of texture into there. Now,
what have we got? Our body down here, we have some Well, the blue, basically,
this is the wing, right? So this is kind of like
an armpit in here. So, you got to have
some shadows in there. That's gonna be like
the darkest part. We'll leave that till later.
Let's focus on this down here. Get some water in there. Now, if we come
up here and touch the blue, it's gonna run down. So be careful. Be aware of that. It doesn't mean that it's
wrong. Just be aware of it. Like, if you're gonna do that, then that's up to you, you're painting. Don't care. Okay, I'm gonna grab some green. Throw some green in there. Now, how much green do I have on my brush? Enough, right? You know, it's like, if you
look over here on my palette, like, you know, basically, I'm using a porcelain
palette too, so it gives me a
good idea of what my pigments are gonna look
like on the painting. So there's some more
dark. That's even darker. I'm just grabbing whatever. You can always you can
always dab in more. That's the nice thing about this kind of painting like this. You can always add
in a bit more. You don't want to
overwork it, though. That's critical. Can't
stress that enough. Alright, so we got
some pigment in there. Now you'll notice it's
very light down here, and that's because there's
just running down. We're just kind of building
off of what we have here, and we're just running down, and they're changing into a
little bit of blue down here. This is like the
tail part, right? And again, this is a
very minimal painting. Not a lot of, you know, we're not trying to overwork it. We're definitely trying
hard not to overwork it. I'm gonna grab a little
bit of magenta in there just because
it's nice for balance. Okay. Now, what
have we got here? We got something
funny going on here. Our chin got a little
bit big, went a bit out. Oops, I had some blue on there. Um, I'm just going to
fudge this a little bit, I accidentally made
my head too big, and the water ran out
this way, is what it is. Okay, what else we got? We need a little bit of I'm go
grab some purple in here, and just along this
edge, I'm just gonna a little bit of shadow. I just want to separate
the underneath of the hummingbird, like the feathers underneath
and the tail part here. Okay.
3. Painting the Wings: Now we're on to the arm,
hit, and the wings. So basically, we've got this
big dark blue spot here. This is dried enough
in the green that I can run this up here, come down. And I'm intentionally avoiding
the white areas again. Again, when I did this
originally, I just painted it. So if you're feeling brave and courageous and you want to do it that way, by all
means, go ahead. Um, but I think it's a
good idea just to try and, you know, paint within
these crazy lines, even though they're
essentially not really lines. They're just dried watermarks
from the original painting. But just so that you get an idea of how it all works, right? Because this is a bit, you know, it's a big step up from the flower petal, and it's
more complicated. And it's a nice painting. So we got our water all filled in. Now we need some paint. Alright, so in the corner here, in this section where
the darkest value is. We're gonna go around
the white areas. Come out, let that fade off a bit and just get more
and more and more paint, more paint, more paint. I got some purple in there. Getting crazy now with
all these colors. I got some purple in here. Look at how they blend
together like that. Isn't that nice? So really what we're doing
here, similar to the flower, this is imagine where we
put our paint originally, and now we're trying to
blend it out, right? We want these wings to have that kind of fluttery
effect, right? When you're looking at
a hummingbird flying, you can't really see the wings. You just see, like, really fast, even faster than
that, and I'm pretty fast. Like, Whoo. Okay. So that's what we're trying to do is
we're trying to get that, like, blurry invisible part. If we paint a big solid paint the same all
the way through, well, it's just gonna look
like a frozen hummingbird. We do not want to freeze
our hummingbirds. That is not nice. Engine. Okay. Now,
got some clean water, and I'm coming in along here, trying to avoid some of the
white areas that I had. I'm not sure how good
of a job I'm doing it, but matter, some
words are tricky. It is early here, so you
don't have to forgive me. Now, in here, I've got some other colors in
the original one. I can't remember what my
rhyme or reasoning was. I think I was just trying
to make it look cool. Which is fine. Go ahead and make your painting
look cool if you like. Try to keep your colors very diluted in here.
So I put that down. But now I also let it I also added some water to it just to
break it up a bit, right? Okay, we're starting
to look good. I think what I need though
is I need some more value. I mean I go up here,
I'm grab indigo now, super, super dark value. And I'm just gonna try to
drive this part home here. Where it's like coming
into the armpit. This is more from memory. I've learned this painting 1 million humming
birds since this one. Also just gives some shadow
along the back here, so the bird is like a
round bird and behind it, the lights being blocked
there, so you're gonna see more shadow. Okay. Now, what have
we got going on here? We can try for this
back wing to try and pull some of the
pigment from the head. Doesn't always
work, but it might. We don't want 'cause we're just trying to get just
a little bit, right? We don't want too much,
but we're just trying to get just enough. And see the little bits coming
out there, but not enough. I mean, that being said, it might just be
enough when it dries. It's hard to tell sometimes. Now, here in the original
one, I touched the wing, and it brought some of that blue up there. Do I want
to do that now? Sure, why not? So
basically what's happening there
is to bring water down and touch the bottom wing, you're gonna pull
some of that blue pigment up into the top wing. Pretty cool, huh? Okay, we'll grab a little bit of blue here. And we're just going
to go on the top. And then I'm pushing water
up against it fromneath to keep I'm basically trying to push those
pigments up in there. Get a little bit of green in there 'cause it's
in the original. Not too much. There's also a little bit of purple going on. There's all the colors in this
wing up here. Isn't there? Oops. I'll be too
dark. We will see. And up here in the original, I think what happened was
this kind of came up. It's hard to see
in the painting, but we just got this kind of little fluttery
bit going on in there. There we go. That's cool. Just an illusion color. Let's see what we got up here. Let's grab a little bit
of magenta in there. Okay. Alright. Pretty cool. Now, again, this is a very look how fast
this is going, right? We're almost done. We're
in the final stretch. We're gonna stop it here. We're gonna let
her painting dry. We're gonna come back,
and then we're gonna do the head and the Beak, beak, the beak. But first, I'm just
going to finish. Oh, I didn't want to do
that. See, I always do that. I was like, Oh,
I'm going to stop here, and then I don't stop. I just wanted to
make the eyeball a little bit more small. And I should really stop 'cause I'm just
messing it up now. You know how you
are painting, and, you know, I say, I can't
talk and paint at the time. Make the eyeball more small. Really, Paul, more small?
Like, how about just
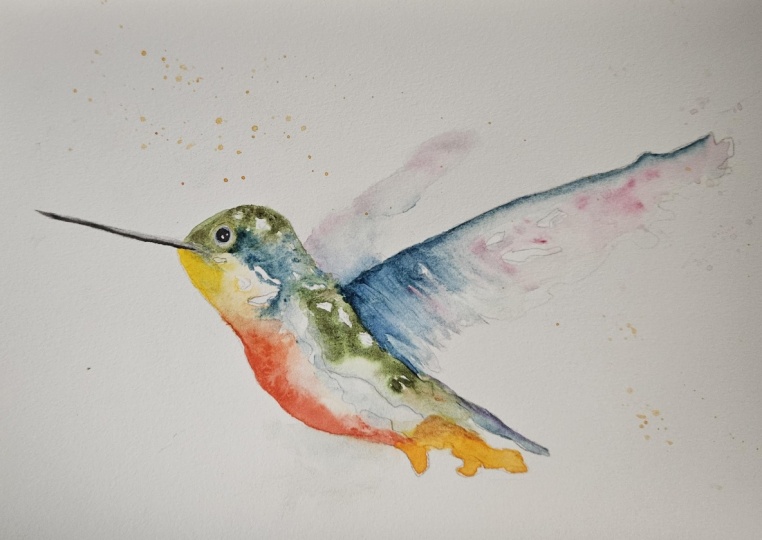
4. Painting the Eye and the Beak: So our paintings dry so far. It's not done, but
it's dry so far. And it looks fantastic. I'm very happy with it. Very
similar to the original. I think I must have put more than one layer
on the original. I'm not sure. It's hard to tell, especially or remember
that long ago. If we look at what's going
on in here, we've got, like, a nice subtle blend, but I would almost want a bit more
something in here. It's almost too flat, right? And the colors are
almost too washed out. We can easily add another layer. But again, we don't need to. We could stop right here. But there's a few things
that I notice from myself. I'm a bit, you know, finicky
about things like this. Under here, this area, this wing comes out
from behind the body, so there should be
some shadow down here. Um, technically, this
is probably fine, but this might be a little bit less up in this way,
but I don't care. I like it. But other than that, look at how our wings
have dried here. So it's lighter than the original pencil
line that I drew. But it really part of that is the water edge on the paper. But look how subtle that is. So here's the white
value, here's that. You know, I'm gonna
try and edit this to show you like,
better what it is. But it's still pretty
it's very light, very subtle, which is
exactly what we wanted. There's a few more colors
going on in the original one. I had some greens up here.
I've got some yellow up here. You can add those in or not. Doesn't matter. Maybe
I will. Maybe I won't keep it. You'll find out. Now, for the beak and the eye, which is what we're
moving on to now, basically what we've
got is very simple, we've got one line here. Then we let that
dry a little bit, and then we run some clean water up here and let that
pigment bleed up. The key to that is
letting it dry just enough so that it's still
malleable, still moves. And but not too much that it just you lose that straight
edge underneath, okay? So the first thing
we're gonna do is we'll put that
straight edge on. Then we're gonna
leave the beclone. Then we're going to
paint the eyeball, which is essentially
just painting dark around the light areas. Nothing big. It's a
circle, a circle. Don't overthink it. I've got
a number two brush here. This is an eight by ten
size piece of paper. Use whatever you're
comfortable with. It doesn't matter for this. So first things first, I'm going to use indigo underneath, and I want a high concentration of pigment, not a lot of water. Okay, I might just turn my painting bite because I'm terrible at drawing
straight lines, and I'm going to
come up here and go down along the bottom. Try not to make this too thick. Now keep this comes up
here or to the eye, okay? And then there's also
another bit here that kind of comes
out over the beak. And then you've got you can paint this part
into now if you like. Some roundness there. Just remember you have some white around the eyeball, okay? And there's a very, very, very fine line around
that eyeball there. Which if this brush is too
big, get a smaller one. Okay. If you mess up the little
dots or highlight areas there, you can always, um, fix them later with some, uh, the gel pen or gouache or something,
don't stress about that. I do it all the time. Make
the eyeball, you know, start small, step
back and think, how does that look, right? Because once you put this
paint on, it's pretty dark, and it's hard to and for
the edge around there, you can dab your paint on. You don't have to draw like
paint, like, a solid line. Now, for that edge that
we just put around it, I'm gonna clean off
my brush, damp, not wet, and I'm just gonna
blend that out a bit. Okay. Starting to look good. Now, again, so I filled in some of the white
areas around there, like I said, not a big deal. I can come in and
fix those later. I am technically
putting another layer on up here, and that's okay. I just want to add a bit
more depth to my painting. So I'm grabbing some of that
indigo, putting it up here. And it also helps form that eyeball and draw
attention to it. The key to this, though, is not having two
those hard shapes. So I'm just damp brush, little bit of water, just
softening that out a bit. We can let it dry. Okay. Looking good. Alright, because we didn't put a lot
of water on here, it was mostly just
pigment in the brush, we can probably now come up and grab our damp brush. We
don't want it too wet. Like we don't want to be running water all
over the place. Just touch it and see what's
happening. Yep, there we go. So you can see now this is just try not to touch
the painting here. And again, it's always
harder when you're filming 'cause I keep
my head out of the way, and I got to angle it so that
you can see what I'm doing. So I'm just running the damp
brush along the beak there. To pick up some
of that painting, and I don't want too
hard of a line there. Okay, good. I probably
put too much in, so I'm just gonna dab in. And again, use a brush
that works for you. What I'll do is I'll
run this up this way. It does kind of go that way. In the original Okay. I
think I put too much. I could have let it dry
a little bit more, but, you know, we'll
see when it dries. It always dries lighter. There's some shadow under here, so I'm just gonna grab some of this and pull some of that down. You'll notice that I
sometimes while I'm painting, I just use my fingers
just to take off. I'm taking off some of
the water when I do that. Okay. And I'll just brush some clean water up in there to soften that down a bit. I do want more
shadow. There we go. Alright. Now, again, like
I said, we can come back. I can add in my
highlights there. I don't really need to,
but I will once it's dry. Then Maybe maybe we'll add in some more another layer here. So I think
actually, we will. Actually, we're going
to do it right now because and then maybe this will dry enough that
I can use the pen. Basically, what I want
to show you is doing this so that it blends together so that, you
know, you're gonna add, how do you keep this
really loose look, but add in another
layer of paint and not make it look like it's
starting to get overworked. One layer of watercolor paint is never overworking
your painting, which is essentially that's
all we have so far here. We've got one layer on here with the exception of this little
bit around the eyeball. This is all you
saw. You are there. I'm not making it up.
One layer of paint. So let's grab some clean water. Now, how much water? If we take a lot of water and
we start pushing in here, we're gonna lift those pigments. We don't want to do
that. We want to add to it. So it's really key. So my brush is damp, right? You can see there's a little
bit of water on there. I mean, it's hard to
get the exact amount. You don't want to dripping
off, but you want enough that, you know, you can add
in your pigment, right? So, again, we're just going to repeat the process that we did. We had some up here
and some down there. We had yellow and then some red. Ht some yellow in
here, a fair bit. Okay. Clean that off,
grab some clean water. And this is the key. It's just
the damp water underneath. So this basically should
blend seamlessly. So we've got our yellow
up at the top here, and we just want that to blend in down and follow down there. So now, when this dries, it should dry and make that almost invisible,
okay? Maybe not. Depending on the
pigment, though it may or may not be
totally invisible. Just go to reinforce
this up here so that this looks like it's underneath
that fluffy neck bit. I should have been a biologist with all my technical terms. Okay, so now you can see
we've got our red up here, and we're just trying to
make that shadow come down. I might even add a little
bit of magenta in there just to darken it up a
bit. There we go. Now, if we left it like that, we'd have a dark line,
which we don't want. We're just gonna
dampen this down. We're just blending
our colors out a bit. Okay. And this here we'll dry
as a second watermark here. So you can see down here we're gonna have a second watermark. We could take that out,
but I want to leave it because I think
it looks cool. Also, down here, we
had some more yellow. So I'm gonna add in some water, grab a bit of
yellow, put that in. Okay. Nothing too crazy. Two layers of paint, easy, easy. Up here, this is where
underneath the body where the tail
feathers come out. Okay, let's get that in. Some orange, some darker orange. Actually, you know what? I'm gonna grab I'm
gonna go crazy, and I'm gonna grab
some cacradonGld, which is almost like
a brownie orange. Orange is essentially brown, but we'll talk about that some other time when
we're talking about colors. Okay, I'm going to blend those
two together. There we go. Now we've got that dark, shadowy area under there. It's not too crazy,
not too powerful, but it's definitely showing that that comes out
in the back there. The other thing that we
should maybe do here is just maybe define this edge
a little bit more. So we're just running dark
dark some water on here. And then I'm gonna grab
some pigment, some blue. Maybe I'll use purple.
Yeah, I'll use purple. And we'll just touch
that in just a little. Now, I want this
to be invisible. I don't want that lying there. So my water was
not clean enough. Clean water along the edge. You just run along that edge
there and make it disappear. The More you pull it out, the
more it's gonna disappear. Okay, I don't want to overwork this. I'm gonna let that dry. We're gonna come back, and
I'm gonna show you adding in the little bit of white area on the bottom because I
messed it up. I'll be
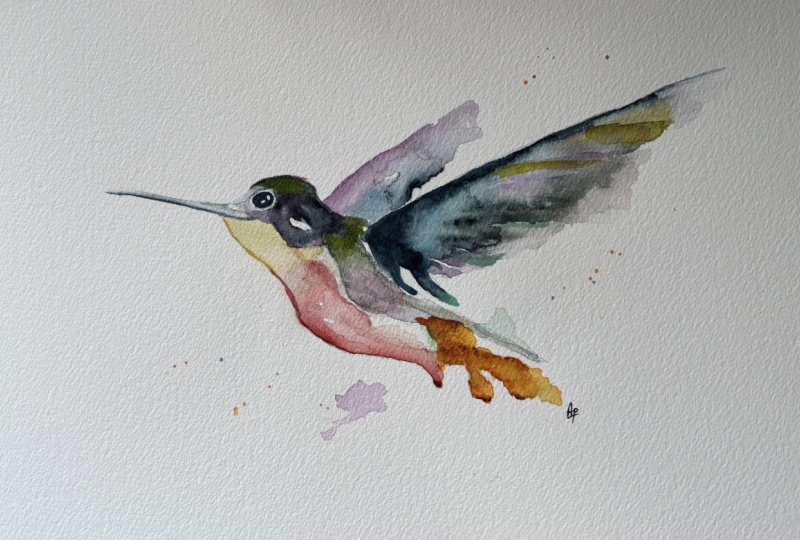
5. Adding the Final Details and Review: Okay, so I've got
some guash hair. Studio gouache Lucas.
It's a German company. It doesn't matter what you use. You could use white
acrylic paint, right? I mean, you could use
anything, really, as long as it's white
and it's opaque. So it doesn't matter, and we're using it so sparingly. So I'm using a very fine I think it's
called the liner brush. I'm not very technical.
Sorry about that. But it's a very
long skinny brush. Use the finest brush that you
have the most control with. I made my brush a little bit
damp, and then, you know, basically I took it
in the water and then it kind of pulled
get off like that. I only want to add a few
dabs in there on the bottom. I don't want to
overdo this because I like how subtle it is so far. I almost don't
want to add these, but I said I was going to,
so I'm gonna do it for you. So if it looks bad,
it's your fault. Okay. Just dabbing, touching
along. There we go. Ever so subtle. You can use this on any painting that you like, where you want some white
areas. Don't try to overdo it. Like, don't try to make,
like, a watermark with it. I've done it. It won't work out. Feel free to try, and then
you can say, You know what? You're right, Paul. I shouldn't have done that. I
wrecked my painting. Yeah. Well, yeah,
you didn't listen. So if you want to do it, do it. But anyways, I
just added it here to where I went a
little bit too far. My brush was probably
too big. And, yes. So I'm going to say, make sure you clean your brush
really well after you use this because it does harden
more than watercolor paint, and it doesn't re wet as well. Um, gouache does a little
bit, but not as much. It has I think it's talk or something in
it. I don't know. There's something
added. It's basically watercolor paint
with an additive. Anyways, back to a painting. It looks good, very happy with it. I hope yours does, too. Remember, do it more than once. Don't think, Oh, my painting didn't work, and now
I can't paint that. Because chances are the
first time you do it, it's not gonna look that great. Second time you do into it's gonna look a
little bit better. Third, fourth, fifth time,
it's gonna look fantastic. I have painted hundreds of hummingbirds and
birds in general, but hummingbirds in particular. And you learn
little things like, Oh, I know where this
is supposed to be. And when you do that, you
have a better understanding, and you're not so much
worried about, Okay, I need to put blue here
because Paul has blue here. I need to put yellow.
You're going to put blue here 'cause you know
that part of the hummingbird. It's dark. Right? That's what's the goal
you should be doing. You should be thinking as little as possible about
anything else and just understanding and knowing how the paint dries
on the paper. That is so, so, so important. You can even stop. Don't make a painting and
just take an area and say, I'm going to recreate
that area and do that like ten times and over
and over and over again. Regardless, when your paintings
done, please, please, please make sure you post it and share it in the projects
and resources section. It really helps
inspire other people, and I really enjoy
seeing what people make, and I can give you
feedback on your painting. Most people find
this very helpful, so do not forget to do that. Super, super, super,
super, super important. Okay, that's all.
I'm going to stop talking now and let you
make your painting. Thank you very much for
watching. Have a great day. Bye bye.
 Paul Cheney, Teaching watercolour and digital painting