Transcripts
1. Introduction: Welcome back, Skillshare people. For those of you that do not
know me, my name is Paul. I have been a Skillshare
teacher here for six years. I teach both traditional
watercolor painting as well as digital painting. Today we are focusing on watercolor painting,
and in particular, something I've wanted
to do for a while, a very simple easy lesson
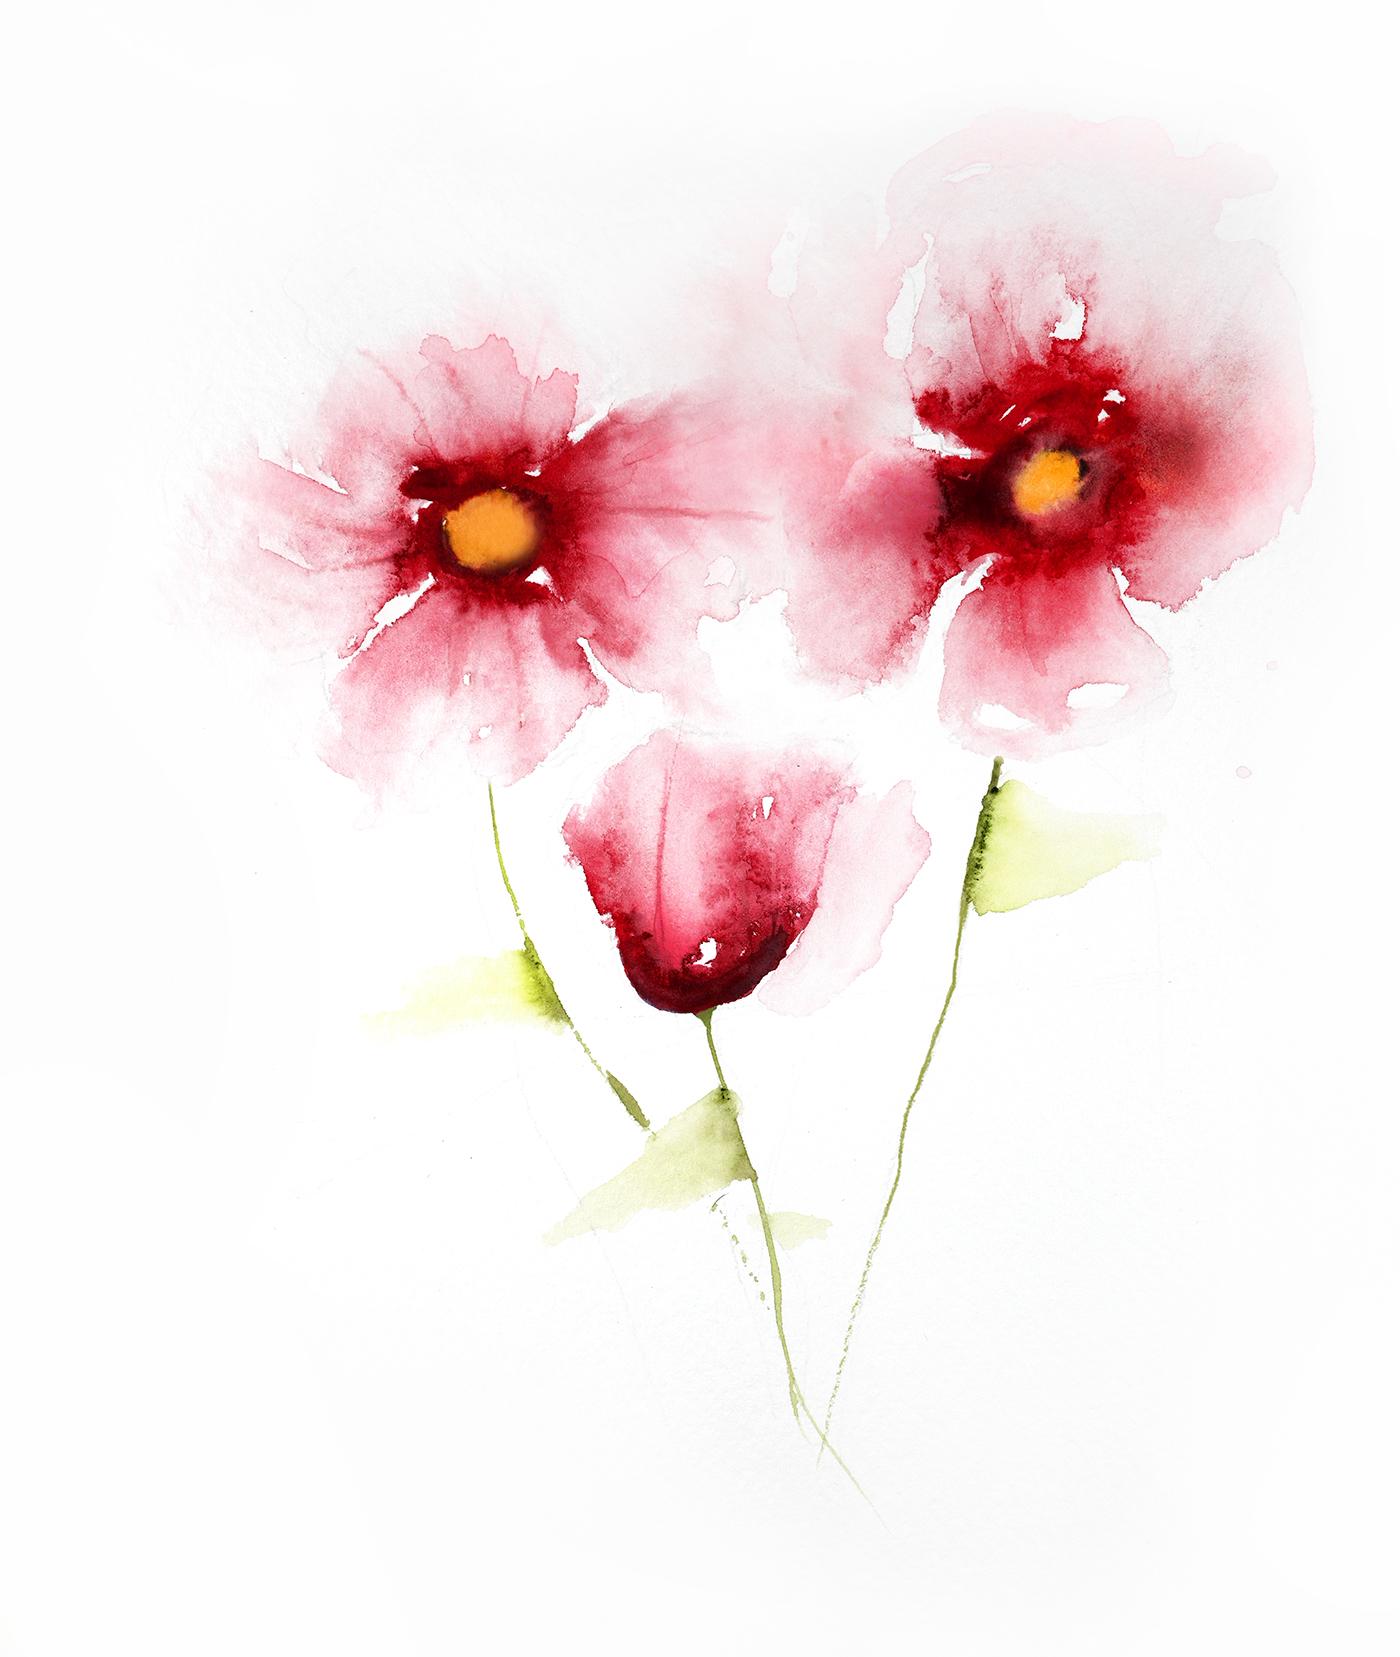
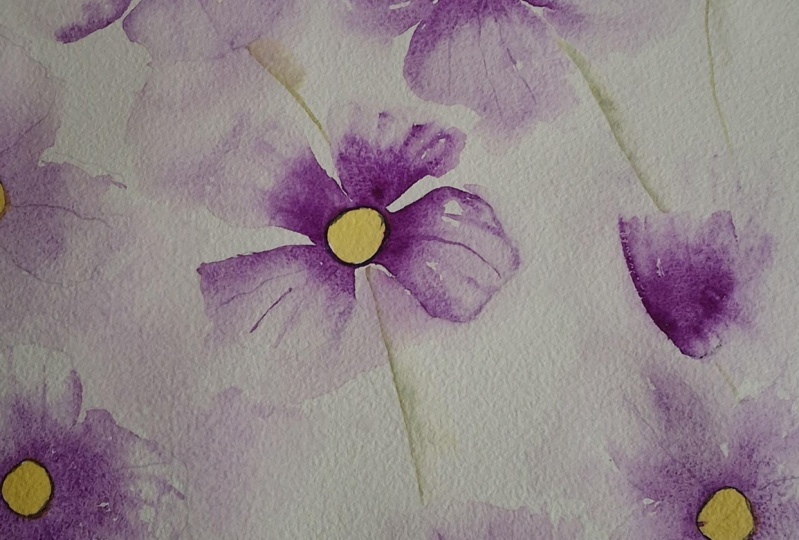
on painting these flowers. Here. This is just a
few quick sketches that I did up sketches, paintings that I did
the other day just in preparation for this class.
I'm looking forward to this. I think this is a
fantastic exercise, in particular, for
people that have never picked up a watercolor
painting brush, before you start
making bad habits of being too rigid and too tight with your
watercolor painting, this is a fantastic
way to start. One of the most well, actually, the most important
thing to learn in watercolor painting
is not how to paint, not what material you use, not what brush you use, not what paper you use,
not anything like that. Not how you apply the paint, anything, but understanding
how the paint dries. When you look at a
watercolor painting like this one, for example, or any watercolor painting, what you're seeing isn't
so much how I painted it. It's how that paint dried, how the water dried
and evaporate and what it left behind. So watercolor painting is
more about understanding what's going to happen versus
what you do in the moment. Um, I know that sounds
a little weird, but in traditional painting, you're brushing and you're painting and you're
moving it around. And where that paint is, what
you see is what you get. With watercolor painting,
that's not exactly the case. With watercolor painting, you're putting water down
with pigments in them, and the pigments are like
little grains of sand and they move around and they
float around in that water. And then as they hit the paper, which has a special
sizing in it, that determines how your painting is going
to look in the end. So understanding what
happens when you put down X amount of water with this color pigment
or this pigment or this paint because even the
pigments are different. They're granular, some are
staining, some are not. So can be moved around, some can't happens when you
move them around too much? What happens when you
don't put enough down? Anyways, there's
lots of variables. This really covers a
huge chunk of that, and it's really a great base, a place to start to learn
watercolor painting. And if you're already well deep into it and you find, Hey, my paintings are too tight, too rigid, well, this is
how you loosen them up. So let's talk about what we're going to
need today for that. One, we're going to
need some paper. I happen to have here 300
pound cold pressed paper. You do not need 300
pound cold press paper. In fact, I only mention it because I'm not taping
my paper down today. And if you watched
my videos before, which you should have,
and if you haven't, you should go watch them all. I always put tape down
to keep my paper flat so that it dries flat.
Today, I'm not. This is a very quick painting, and this paper being so
thick won't really buckle, so I don't need to
worry about it. I'm using synthetic
brushes today, and I actually have a
real one here, too, so I shouldn't say
all synthetic, but my point is, it doesn't matter what
brushes you're using. Use something that
you can control, something that can
pick up some water, get it on the paper. Now, you might have seen a
similar type of painting like this where people use
tubes of watercolor paint, where you have to
take wet paint. There is absolutely
no need to do that. That is a waste of
paint, in my opinion. I prefer mixing my
colors anyways, not using them directly out
of the tube all the time. Mind you, today, we will
be using straight colors. But what happens when your watercolor paint evaporates
is the water dries up. So you put the water back in.
That's all you do, right? My palette right here is sits
on this table, never moves. It's been here for
over a decade. It's never been
covered. Ever. And when I want to go and wet it, I just spray water on it. I will also be using
a liner brush here. That'll be for the
stems of the painting, just making very quick lines. Don't go out and buy one of
these if you don't have one. They're great to
have if you want to, but don't feel you have
to to do this painting. You could just use
a fine brush at the edge of a flat brush or any type of brush just to
get that fine line on there. You could draw it
with a pen, for example, or use just a pencil. It doesn't have to
be watercolor paint. It's just a very fine line that we're gonna put
in for the stems. Yes. And other than
that, we've got paint. We got water. This is meant for beginners, intermediate
or advanced. And at the end of it,
you know what to do. And if you don't tell you, you're going to
take your finished artwork and you're going to upload it into the sky into the projects and resources
section looks like this. And that way, I can
give you feedback. Otherwise, I can't it also
helps inspire other people. Some people are
nervous about this about doing this kind of thing, and they say, Hey,
whoa, that person did it, and that person did it. I can do it, too. And
yes, you can do it. So, speaking of that, let's
go do it now right now. Go into the picture. Go.
2. Planing the painting: Okay, here we are.
And here we go. I will just draw this out on
the other side here to show you kind of what we're doing because water's very
difficult to see. So what I'm going to
do is I'm going to be putting water down in kind of, like, a jagged, think about it. Well, what is like petals
of a flower, right? And those petals will kind of go around a circle like this, and I'm going to
be putting water down in this kind of
style, however I do it. I'm going a couple of things
I want to point out here, I'll zoom in a bit is
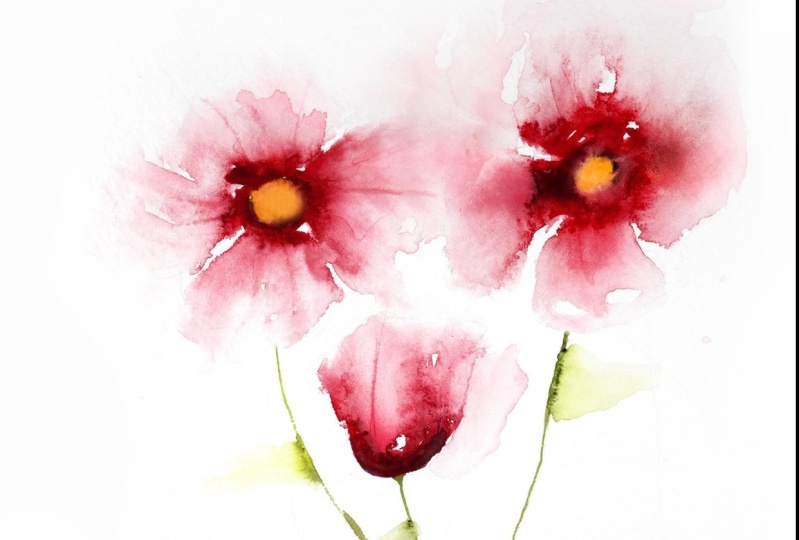
I'm going to leave a few spaces on here because those make
very interesting marks. You can see them here
on this painting. We're looking at
them right here, right here, right here.
Here's the circle. Here's the petal shape
that I was talking about. And those will leave
some interesting marks. We're not going to
touch this area. We're going to leave this
area in the center here dry. And if we don't happen is
there's so much water on here, it's all going to
go blow together, and then it won't
look like a painting. So that is part of
what I was talking about about
understanding how your paint's going to dry
and when you should put in those pigments and
when you shouldn't this case, this is when you shouldn't we're gonna
have some white marks. Then at the end, we're going to have our
little stem, right? And we're going
to, you know, this is about composition, okay? And if you're not
sure feel free. I'm using a water soluble
pencil here by Fabri Castle. I believe other companies
have started making these. These are fantastic because
really what they do is they allow you to
put a pencil line on, and then the water
makes it go away, or it bleeds into your painting. So you will go
around if you want, and you can basically
what I would suggest you do if you're going to do
that is draw a circle. That's your negative
area where you're not going to paint just yet,
you will eventually. And then from there,
you can draw your I'm gonna make it darker
so that you can see it and it shows
up on the camera. So you can draw
your petal shapes. Around. You're not gonna make them this dark because well, that'll be really
hard to get rid of 'cause I'm pressing
into the paper, right? You just basically want kind of, like, you're making kind of, like, a circle, but not really. You know, and then
you've got your line. You don't have to
put the line on because it's gonna be a line. Um, but then what we're gonna do is we're gonna
fill these in with water. We just want lots of water,
little blobs of water, okay? We're remember we're gonna leave some little white areas in
there where we don't want water just for that
watercolor look, right? Okay, so let's turn this
over and let's get started. So as I said, I know I said
I wasn't going to draw, but I'm going to do it anyways, just to illustrate and
reiterate what I'm doing. So, as I said, I'm
going to put down I'm there's a little circle area where I'm
not going to put water. Then I'm going to come in
here and I'm just going to make some interesting
petal shapes. I'm going to get them as close to that circle as possible. And I got to think in terms of my composition,
too, right? Because we do want this
painting to look good. And when you're thinking
in composition, try to think of a triangle, right? That makes it
very interesting. You can kind of have
your triangle coming from this side to that side, however, however you want, okay? So let's say we're going
to start it on this side. We've got our petals
here and our shapes over here around Okay? If you want if you're
not sure, you, you know, your first time doing
this and you're nervous and you don't have
a water soluble pencil, don't not draw it because you don't have a
water soluble pencil, it's okay to have pencil
lines in your painting. This is an exercise. This is
learning how to paint. Okay? Then I'm gonna have another
one I'm gonna kind of keep my composition going here, where I've got my
petal over here, I've got my circle here, and I've got my
another petal here, another one here,
another one here. And then maybe down
here, I've got one that isn't from the top, but we'll look kind
of like this petal, like the one that's over
here, which is, like, a kind of a closed
flower like that. Just again, keep it
very simple, right? It doesn't we're not making
botanical masterpieces here. We're making a very loose
abstract representation of flowers. That's all we're doing, okay? Keep it simple.
Don't overthink it. Even with the lines,
squiggle around, right? Okay, these are all
kind of coming in. And now, you know, you could if you wanted
to get really technical, you could put your flowers
in between each other, but then you're gonna have
to dry them, you know, and let it dry before
or else the colors will bleed in together too
much, which could look great. But we're not going to do
3. Applying the water: Alright. So here, again, I've got my brush here, my little mount brush, and I'm just going to
get on water on there. Make sure your water's
clean for this process. I mean, if it's gonna be dirty, it should be dirty with the
color that you're using. And I'm putting on a
very liberal amount of water here, okay? I'm basically filling in
those little petal shapes with water. But
don't overthink it. Just get the water in there,
get it close to your petals. I went and drew a
whole bunch of lines, so now I actually don't know
what I'm looking at here, so my flour might turn out a
bit funny, but that's okay. Not too worried about it. Okay. Here we go. I'm leaving
some space between them. You can always bleed them
together after if you want. But for now, I'm just
leaving some space in there, and I don't want to make it too rigid. I just
want lots of water. I'm not Like I'm putting
in puddles of water here not because it's
fairly dry where I am. So if you're in a
damper climate or, you know, it takes a while
for your paint to dry, then you could put
in less water. You can always dry it
with a hair dryer, if you want to speed it up. But remember, when
you're drying with hair dryer, if you've
got big puddles, it will push around the paint, which will change the
look of your painting. So many things to remember
here again. Okay. Now, you could do one at
a time. I don't need to do them all at once. I am. I don't know why. And
I also didn't leave any white lines that I said of marks that I was going
to. I'll leave some there. Okay. I'll leave
another one there. This one here is a big solid. Oh, well, is what it is. That's the thing when you're
talking and doing this is it's near impossible to do
everything exactly, right. Which is good. It's a great way to
learn how to paint, too. I always talk to myself
when I'm painting. Mind you, I always talk
to myself all the time. I talk a lot.
4. Adding paint to the water: Okay, for my pigment, paint, it's also called pigment. If I call it pigment, I'm
talking about the paint. I'm not actually
talking about little granular bits of pigment. Traditionally, it's called pigment
because that's what it is. Anyways, I'm using quinacridone, either violet, magenta or red. I'm not sure which one it is. Um, but it doesn't matter. You can use any color
you want for this. This isn't about the
color. You could use blue. You could use purple.
You could use green. You could use yellow, don't use yellow 'cause we're gonna
use yellow in the middle. Anyways, the point is, use
whatever color you like. Feel free to experiment with some crazy colors
if you've got them, like quinacridone gold
or something like that. Purple or blues. I'm using the red cause
that's what I used before, and I want to try and
stay consistent to say this is what I did, and
that's what I'm gonna do. Okay. So I've got I'm calling
this quinacridone red, 'cause it is the more reddish of them. Although it
might be violet. And what I want on this is I
want a lot of pigment, okay? So saturated pigment, okay? And I'm dabbing it in along
the bottom here, okay? Close to that little
circle that we left. Alright? That's important. Because when you're
looking at your flower, you've got your darker
spots on the middle, and they bleed out into
the other parts, okay? Alright, so you see
how not careful I was. I'm not even paying
attention what I'm doing, actually, and I probably should pay a little bit more attention. But I'm just putting this on
the bottom here of this one. And then I'm coming up
here to these ones here, where these petals
are, and I'm just dabbing in highly
saturated pigment. And I can come in and put
that where there isn't any water as long as it hits the part
where there is water. Like, I mean, it's close to this circle or if I
wanted to close that in, so let's say I want
to bring that in tighter, I can do that. I'll show you again over here. It doesn't have to be like
because as long as it bleeds into the water at some point, that's
all that matters. Okay. Now, see what's happening here this is starting
to dry and it's not bleeding that much. We want to avoid that. So to fix that,
I'm going to grab another brush with just
clean water, okay? And I'm using a smaller
one this time because I want to be able to
kind of pull these out. And with this smaller brush, and if you want these to be
really, really accurate, you can use a tiny brush, and you can wet that
with some water. And what we're
doing is basically, we're not applying
any more paint. We're just pulling these out.
See what's happening here? We're making those veins
that exist in the flour, kind of simulating that
uh, moving that out a bit. Try not to go too far, if you
go all the way to the edge. You get these little balls and circles there, which
we don't want. So depending on how
wet your paper is, we'll determine how
rigid those lines are. The other thing that's
going to determine it is the size of your brush. So if I were to take
that liner brush that I spoke of with
not a lot of water on it and I pull up here like this or pull down here so
you can see it better, you can see that
line is much finer, doesn't leave as much
of a blob at the end. When you're lifting
up your brush, you get these little circles or blobs, like you
can see there. So just dragging this out
into the wet areas there, getting some of those lines in, we might lose some of
these because we're gonna add in more
water, but that's okay. Alright. Let's get some
more pigment in here. There we go. Now, we're
talking nice and dark. And I'm gonna grab
a water brush, blend that around a bit. Keep trying to keep that clean. And we're gonna do a
little bit of push, a little bit of pull here. We just want to
spread this out more. Think of like how the petal
of a flower looks, right? It gets gradually lighter and it has these
little veins in it. That's what we're
trying to do here. So Now, here as we get
closer to the edge, we don't want this huge I don't want this huge
section in here anyways. You might. So I'm
gonna just fill this in and make this
just a little bit tighter in around
this area where the little the part that holds
the I'm calling it pollen. I don't know what the center
of the flower is called. I didn't do my research
on that before, sorry. So we'll just call
it the circle, and it's gonna be yellow. So I'm gonna call it the
yellow circle going forward. You know, the part that the bees like that they
go in and get. That's what we're
painting there. And I just want it to be a
little bit smaller. I don't want it to
be too prominent. So therefore, I'm just making that stick out a little less. And all I'm doing is I'm taking that paint and I'm pushing
it into where the water was. And you can see now where
we've got that water. I'm gonna take some clean water, and I'm going to push back in. When I'm pushing back in,
that's drying that out. Here's one of those cool
lines that I left or sorry, lines, one of those
circles that I left there. I'm just gonna leave
that, make sure that dries properly. I
wish I left more. Well, next painting I do I will. And here, again, I'm gonna
push some of this down in. I want to get some
more variation. So I've got clean water, and I'm pushing down
into that flour there. I want to have that nice shape, that nice three D kind
of look to it where I get the paint coming
out and drawing. I'm gonna go this way and see if that makes a
difference. Yeah. If you take some
paint on your brush and come into the middle
versus going out, you'll get less of those
little balls at the end. I'm gonna use my
liner brush for that. No, I got the ball at
the end there anyways. This is what I'm talking about buying the
ball at the end. So now you're looking at this, we can see different
parts of our painting where certain parts have dried and other
parts haven't dried. So are more wet than others. So if I come over here, for
example, onto this side, turn my page here, and I
draw this out this way, that line kind of stays. If I'm coming into
where it's more water, it's gonna bleed out more, obviously, because
there's more water there. And that both look good. Like, there's no right
or wrong way to do this. This is a very simple,
easy, loose painting. Oh
5. Painting the final details: Now, let's move on
to our stems here. So for that, I'm
using my liner brush, and I've got some green paint
here. What color green? I don't know. Use green. Yellow and blue make green. If you've got a
green tube of paint, that's the green that
you want to use. If you've got green
on your palette, that's the green that
you want to use. It doesn't matter for this.
If anybody does want to know, message me, I'll look it up. I don't really know
all the names of the colors on my palette.
They've been here for so long. I generally go with warm yellow, cool, yellow, warm, red, cool, red, warm you know, so
on and so on and so on, all the way around
the color circle. Because if you've watched
my videos before, you'll know I'm always saying value is far more important than
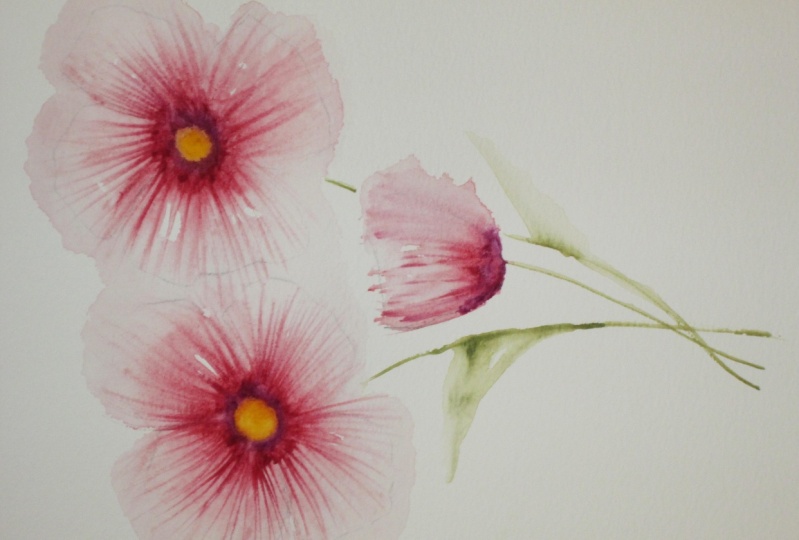
color. And what is value? Value is, think of it as
the lights and darks. So in this painting, this is the dark value of that
red that we're using, and this is a lighter value
of that red that we're using. If I were to change
this to blue, and kept these values the same, it would still look
like a flower. If I were to change this to
blue and reverse the values, where this is lighter
in the center, and this is darker
on the outside, it probably won't look like a flower. I hope
that clears that up. Again, we need another
little stem over here. I want to keep the
stems kind of together. And there we go. Now,
I'm going to put in some extra paint along here. In fact, I'm going
to use a tiny brush for that just so I can
pick up more pigment. I have a reason for
that. Bear with me. This is another one of
those things where I said, make sure you're
watching this through all the way before
you start painting. I'm just going to get
some extra pigment in here, maybe down here. And now I'm going to
take my water brush, and I'm just going
to come along here, while this is still
wet and I'm going to think of it as a little
flag, almost, right? I'm just dabbing this out so
I get. These are my leaves. So just like in the
rest of the painting, all we're doing is we're
adding in water and pigment, which is pretty much any
watercolor painting, but in this one, we're
doing it in a particular. Okay. You don't get
enough on there, go ahead and add
some more pigment. Draw it out. Don't
worry about it. Feel free also now,
while you're in different stages
of your painting, you can come along to the
edge here if you want, and you could add more water in around just for things
to start bleeding. You know, it makes
it more interesting. I did until I touched it
there. Oh, that looks good. And what else we got over
here? More water over here. We can add some more
bleeding over here. We've got this lots of
beautiful pigment over there. My as well use it.
We're just I'm trying to frame in
my composition here. I'm not trying to
make it look weird. I'm just trying to make it
I'm tying it all together. I'm trying to keep that
nice triangle shaped there. And at the same time I'm
gonna fill in some of those little circle that
circle area there. Okay. Beautiful. Looking good. Now, I think what
I would like to see on this one down here. And again, as your
painting's dry, I know my this is not dry here, but it's dry enough that I
can put in a few of these, uh, lines that you would
see on these flowers here. That's probably too symmetrical. So I'm going to grab
my synthetic brush. The one that I was
using for my pigment, I'm gonna clean off the pigment, and now I'm going to do the
opposite of what it did, and I'm going to push down. Now, keep in mind, I'm
using quinacridone. It is generally a
staining pigment. Oh, it's which it's not
doing now, of course. So this one might not
be heavily staining. It might just be
partially staining. And what I'm doing
is I'm pushing. You'll see again,
I do this often in lots of my videos is I'm pushing the pigment
water with the pigment. I'm not brushing it along.
I'm pushing it back. What is happening there is I'm taking imagine you've
got your paint on there, and I'm adding in water,
and that water is now picking up those
pigments off of the paper, and I'm pushing
them to the side. So it's kind of like
parting the pigment and then leaving that white
area in the middle. Why does that matter? Why
do you need to know that? Well, it's important to
know because, again, if we look at the edge of
the painting now here, we can see that we're getting some of these
little ridges here, which are cool, which
we can use those to make an amplify the
shape of our painting. I have too much white area over here. I'm just
going to bring this out. When I'm thinking of the petals as they're coming out like this, that's why I'm
curving those lines. I'm bringing those petals out. I'm just trying to amplify that, Hey, yeah, this is a flower. They've got some really
interesting shapes up there. I'm not touching that I love it. Got some white areas there.
I don't want to touch those. I'm just gonna get
some more water, and I'm basically just gonna
try and add in a second, almost like a second
layer here now. Giving a bit more value, which is the darkness
of our painting, and this will dry to a
nice gradual keep in mind. So when you're
looking at a flower, any subject like that, you know, it's out in the sunshine
and it's doing its thing. If this were to
move even a hair, it would look
completely different. So don't worry so much
about trying to make everything exactly the
way I'm making it. I'm not following any type
of pattern in particular. I'm just putting the paint on, and I'm using water to mix it, and I'm keeping it
very, very simple. Okay. If you try to make Oh, Paul's got this little tiny, you know, 10% less pigment
in there than I do, I better do that and you start
going in all these areas. It's not going to look
loose. It's gonna look like overworked and
overdone. So let it go. Let it dry. Like, up here, I would like to do more up here because I feel
like I want to paint more, but I love how this looks, and I'm not going to
mess with it, okay? Same here. This is the
one that we just pushed. We can see where
that pigment has kind of come out there,
which I'm really happy with. Gonna turn this this way. I just want to get a few
more lines in there. So my brush is just damp
on my liner brush here. And I'm just pulling some
of the pigment again. I'm getting those
lines in there. But now it's way
more wet up here. I probably shouldn't
do this cause wreck. Okay. Good. I'm not gonna
mess with that anymore. I'm pretty happy with
it. On this layer, we may come back and add
another layer. I don't know. We'll see how that goes. But
so far, it's looking good. So I'm gonna let this dry. Then I'm gonna come
back and we're gonna add in the actually, you know what? I'm
not gonna let it dry. No, we're not. Forget
that. Forget I said that. Usually, when I say
I'm gonna let it dry, I never do anyways. I've got my yellow paint here. You just so and pick it
up on the palette here. This is what is it? Cadium yellow hue, medium hue. And again, you can
see, it's very it doesn't even though
it's not real cadmium, it's still a very
saturated pigment. It goes on very yellowy. Okay, we're gonna put
that in the middle there. Don't be afraid to touch the edges, as long
as it's not too wet. If your paint is, like,
really dripping yellow, like a magenta still, it's gonna flood pretty heavily and you're gonna
get all mixed up in there. But don't worry about
getting a little bit, you know, adding some water over here to let that bleed in. And, you know, we don't
have much more to do. All we really need to do at this stage now is
we really want to amplify or try to give these flowers more of a
three dimensional shape. So there's lots of
ways we can do that. What makes a three
dimensional shape is the light that's hitting it. You've got your
light on the top. Think of it as a
sphere, for example, we had a sphere, you'd
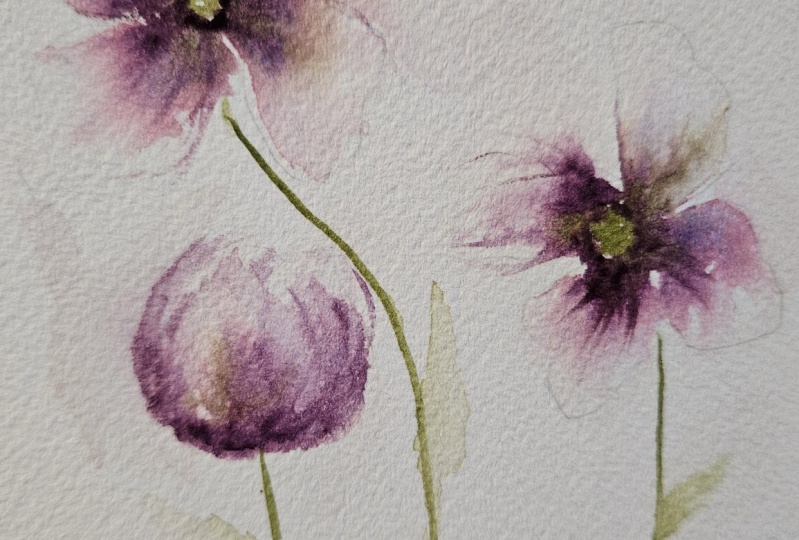
have a shadow underneath, light coming from one direction. This, the light it's getting darker as it goes into
those petals in here. So around these areas here. But I just put some
water on there. So if I go and add in a darker color like this
purple, for example, that I'm going to put
down here on the bottom, it's gonna bleed heavily into that yellow and ruin
our painting, not ruin it. I could just tell you
that I meant to do it, and most people would
probably believe me. And now, so I put
that purple line on the bottom there, a pigment. You could use you
could mix if you're not if you want to make
it very, very subtle, you could mix some of the
purple or blue or whatever or pains gray or brown or
anything into your red, just to darken it up, and
then you could use that. I use straight pigment, which is carbizol violet. I could have used
indigo. I could have used Pain's gray.
It doesn't matter. I just made it dark because
this is a shadow area, and I want to bring some
of that shadow area up over top of the lines
that I already have. Okay, good. How are we doing
here with this drying? Okay. I'm gonna I'm using the liner brush on this
because I want to test out what that area is like around here is
gonna bleed everywhere. So basically, it's hard
not enough pigment to really matter on here,
if there is, right? So it's a very safe
way to do that. And I've got indigo.
I could use purple. It doesn't matter. I'm just
gonna bring that in around. And this is kind of like
that inside shadow. Damming it in. So if I
were to use, like, say, this brush here and
start doing that, which I probably
could at this stage. But if it was really wet, it's gonna bleed a lot, and I don't want
it to bleed a lot. I want that to be a shadow. I want it to blend like
it does with this one, so I'm going to grab
some of my red, and I'm going to come back
in here over top of it, and I'm just basically grooming right up to that purple edge. I think of it as
an underpainting. My last video was all about
underpainting in watercolor. And this is, again,
you're basically changing the value of your color by putting another
color underneath it. And often you're changing
the actual color, too, so This is a bit pale up here. So I'm bringing some
of these lines out. I might try to pull some
more of the pigment out, grab some water. I still have paint on my brush, but that's okay.
It's just too light. There's not enough value there. And I know when it dries, it's gonna be hard
to see what it is. So that's why because I understand how my
paint is going to dry, which, again, is a huge
part of this lesson. This one's already
starting to dry. I don't want to mess
with it too much. I'm just gonna darken
this up around here. So it's just so it's not
a big solid yellow blob. Whoo, too much. Too much. There we go. Then I put in
a whole bunch of water. This is what I do. I
go to fix something. Then I put in a bunch of water. Then that water bleeds all over. And I just finished telling
you not to do that. So you're not alone. Um, what else we got going
on here? I think we're done. You know, I might
put in a little bit of darker pigment
around here, just yeah. Oh, I like that.
It gives it more, it makes that thing
pop out a bit more. I'm gonna have to watch that and make sure that doesn't bleed too much into the yellow there, 'cause you don't want to lose the vibrancy of your yellow. I think just making
that darker area larger makes it seem
more realistic. There we go.
6. Wrap up: What have we got here? We
got some beautiful flowers. Look at that. They're fantastic. I like them. You like
them. We're happy. We did it. Now, at this point, you should not have
started painting yet. If you have, you did it wrong. Remember at the
beginning of the video, I said, watch it all
the way through. The reason you're
watching it all the way through is certain things like, where did I put these, like, light areas here? When did I put my paint down? How dry was it in certain areas? Those things are
really important. That's what this whole
lesson is about. So now I want you to go through. I want you to paint this. And then, most importantly, I want you to put it
in the projects and resources section so that
I can give you feedback. I really appreciate you watching this super fast,
super fun video. And I hope to do more like this in the future
that are just easy, easy to follow along and
not too complicated. Let me know what
you want to see if you want to see other
things and other videos, what you want, as
far as content goes, whether it's digital or
watercolor painting. I'm happy to oblige. Thank you very much. Bye bye.
 Paul Cheney, Teaching watercolour and digital painting