Transcripts
1. Introduction: Hello, everyone.
My name is Paul. I've been a Skillshare
teacher for over six years. Today, we're going to paint
this grape hyacinth flower, and we're not doing it traditionally with
traditional watercolor. We're using an ink and
wash. That's right. There's ink and a
wash of watercolor. Not only that, we're
switching up how we do the watercolor
part. Traditionally, we put down our light colors
and then our dark colors. Today, we're switching it up. Today, we put down
the shadows first, and then we put the
wash over top of them. That's right. Super
crazy, super fun. This is a very, very easy class, but it's also an excellent
class to learn how to sketch, how to loosen up, how to
put your paints down. I teach you how to draw
the simple shapes. Very good. It's very fast. It's very easy, and at the end, you're going to have
a great painting. Super fun, super easy.
So make sure you do it. Don't feel like
you need to go out and buy anything fancy for this. This is a simple
class. It's meant for beginners,
intermediate, advanced. Everybody's going to learn
something from this. You're going to learn
how to loosen up. You're going to learn
how to get a win by making a quick painting, by learning how to sketch
anything, how to paint it. It's super easy, super fun. I know you're gonna love it.
I do recommend you watch the class all the way
through before you start. It really helps you to see
what's going to happen next so that you're not trying to figure it out as we go along. When you are done, this
is really important. Please, please
make sure you post your finished project up in the projects and
resources section. That really helps
inspire other people. It's what makes
Skillshare so great. So enjoy the class, try it out. Don't be afraid, get it done.
Let me know what you paint.
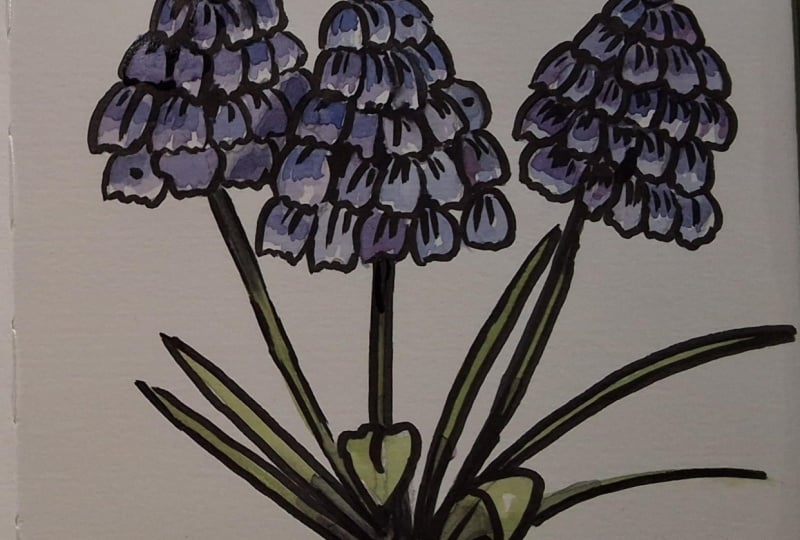
2. Drawing and Inking the Flowers: Ready to draw? Okay, good. First thing you want to
do is you need a pencil. You need a paper.
We break this down. Like we always do in
watercolor painting, drawing is no different. They look like a very
complicated shape because they go to all these little
balls and circles and, you know, dark areas, light
areas, you got to draw this. You got to draw that
and you end up, yay. You don't do any of that. Okay, none of that.
Okay. Back up. Stop. First, take
your pencil, okay? Let's look at the shapes.
What have we got here? We've got a triangle, okay? Three kind of triangles here. Then we've got some lines. That's it. What have we got? We've got a triangle shape here. When I say a triangle shape, I mean literally a triangle
shape like that, okay? If you want to make it longer, like the actual shape, you
could curve it down a bit. Generally, we're
going to look at the shape of the subject. In this case, the flour, okay? So our flower shape is this
kind of cool cone shape, and then it has a stem. Maybe we want one kind of
peeking out from behind here. So instead of making our cone
shape straight up and down, we're going to take
our cone shape, and we will make it, you know, you can put a line
down the middle, if you want to make
it simpler, right? Face, this guy's kind of
peeking out from behind there. And let's say we got
another one kind of coming down here like this. We've got a little cone shape
there. He's got a stick. Oh, this guy doesn't
have any legs. He needs a stick here. Or
a stem, sorry. A stem. See how simple that
was? That's it. Nothing more to
it. Yes, there is, but we're not going
to get carried away. The other thing we have,
we have our leaves, okay, our long green leaves. So for these, we're
just gonna one line up. See that? One line
up, one line down. Make them kind of, you know,
around. Look at how they go. Like they kind of like grass. They go, ch, ch ch. Right? And maybe there's one crazy one that's kind of like bent over,
like, facing you. Like, it's going this way into,
like, perspective, right? It's doing this and it's
kind of leaning down. So what's happening there? So what How am I
gonna draw that? I'm going to take
this shape here. I'm gonna make a
little triangle here. There's the front of my leaf. Then I'm going to come
down from the back, and there's the back of my leaf. Again, a triangle and a stick. All these shapes are the same. There's two sides to these here. You know, the most
complicated part is some things are in
front of other things. That's it. So where this thing here is in
front of this thing here, you can't see the
thing behind it. That's all. So there's
a shadow there. Let's look at the
top of our plan. We got these little kind of
doodads that stick up a bit, so I'm drawing little
circles, okay? And then underneath, I've got other circles that kind
of come down like this. Circle, circle, circle,
circle, circle, circle. Circle, circle. Circles,
you get the idea. I'm gonna stop seeing circle and just draw this out, okay? Underneath the ones that
kind of hang down lower, they have the little part at
the bottom that opens up. And some of them are kind of
the ball faces the camera. And for those ones
here, let's look here. We're going to have a
little circle in there. This is all gonna make
sense. Don't you worry. I should probably
draw this darker because you need to
see what I'm drawing. Normally, I don't
draw this dark, but I'm also going to put
pen and ink over top of it. So right now, I'm just kind of outlining where I'm
going to put the ink. I'm really you can
see how quickly and easily I'm going here. I'm making little shapes
in the shape of the flour. That's it. Nothing crazy. Again, where it goes behind, I cannot obviously
draw like ten draw, but it wouldn't make sense to overlap it because it's behind. And we got our little whatever's going up
at the top here. We'll say, these are
new flower petals. Okay, let's stop there. We're going to next lesson, video, whatever. I'm
gonna come right back. I'm actually not going anywhere. I'm gonna sit here, and then I'm just
going to appear again. And then we're gonna
move on to the ink. I'm gonna grab my pen. I'll show you different pens
if you like. Don't have to. Again, if you don't have a pen, don't worry about it.
Use any kind of pen. Ballpoint pen, use a
dark pencil, whatever. It's a dark line. That's all it is. Don't stress about it. Okay? And don't go buy stuff unless you like doing
that like I do, okay? Be right back. I'm still here. Didn't go anywhere. I
just stopped talking and started again.
Okay, I've got my pen. And now I'm gonna do. I'm gonna go over top
of what I just did. That's it. But I'll pay a bit more attention
this time, ok? So I'm gonna put in my
little doodads there. That's what they're called
official term. Do dads, okay? And these are kind of, like, little bells, almost,
so you can make, like, two bracket shapes like that, and then a little squiggly on the bottom for the ones
that are pointing down. For the ones that are
facing towards you, it's kind of like a circle
with a.in the middle. And it's either
one or the other. They can be half kind of more. Like, you know, your
circle could be, for example, like, it could
be, like, further down. Like, it's almost
hanging down, right? I think as they get more mature, like, bigger, they kind
of hang down like that. Some places, too, you're gonna have some
dark areas in your. Don't feel you ought
to jam them all up. A lot of times, there's no
I'm looking at these plants. I'm like, they're not all
symmetrically perfect. There's big gaps where some
of these things are like, maybe they're really
heavy and they're hanging down further, you know? Of course, I made this one
far too complicated because, you know, they're so
tightly overlapped. But but, but, but bear with me, okay? Bear with me. That's cool because
we're going to see some cool shading in
there. We can practice that. Okay? So now I'm
drawing my stem, which is two lines relatively parallel to one
another. But don't stress it. I mean, you know, you
don't want them, like, zigzagging, like,
way out, right? But at the same time,
it's a sketch, right? This is not something that you
need to overstress, right? And now we're doing
blades of grass here. Again, these are long
triangles, right? I want my little cool one
up here on the front to be, you know, front and
center, and he's got this little divot in there. Feel free to draw in some
lines down the middle.
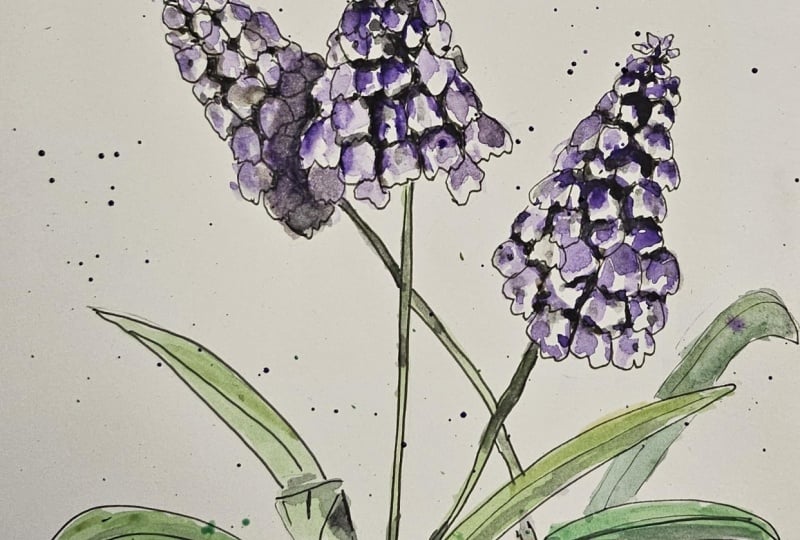
3. Applying the first wash the shadows: We're ready to paint. So normally, what we would do is we
look at this and go, Okay, underneath our painting here, we've got some light
washes on there. So let's find our light purple, and we'll put that
in and then we'll build up with the darker colors, and then we will, put on the
greens and stuff like that. No, not today. Not today, people. Today, we're going dark first. And for the dark areas, I'm going to use a neutral tint. The one I like in
particular is M gram, because I find it
more neutral than the Daniel Smith one or
the Windsor Newton one. And it looks kind of purply on when you put it on the
palette here, but it's not. We're gonna look at this as if the light is shining straight in front of our grape hyacinth. So that means that our light areas here will
be in the middle, and then the shadow areas
will be on the sides, okay? So in the background here where I've got the
pen and the ink, just like on this one, the
light areas are in the front, so that's where our
highlights will be. So I'm taking this. You know, you don't
want too much water. It's not like a big wet
wash like I normally do. This is more of like I'm kind of drawn in the dark areas here. And I'm going over
where I put some of that dark ink before. And I'm basically just
washing in some of, we'll call it
midtones or shadows. And these are at the sides, okay? Here and underneath. So wherever something's
overlapping, there's gonna be a
shadow underneath it. Why the sides where the light goes away, it's
going to get darker. Our light area, again, is going to be here in the
middle, okay down the middle. Now, I'm going to
take some because this guy's coming up
from behind here, I'm gonna be real crazy, and I'm just putting
all this on, big shadow area there, right? So you kind of get now
an idea what's going on. So light's coming down this way, and we got this dark
shadow area under there. You get a bit more
bleeded down in there. Like, so Let's take a look
at what we got. What we did is now
we've got some shape. So first, we started with our triangle, pencil,
triangle, right? Big triangle like that,
big triangle like that. We put one in behind there. Then we made our line down,
we made our line down there. Then we came back and we
put another line beside it, parallel so that
we've got our stem. In our triangle, we
made little balls and little Brackets with
a little squiggly bit on the bottom.
That's all we did. So we had basically like
three shapes, maybe. We'll call it four, if we
want to round up, okay? Four shapes. Then we said, Okay, where's the
light coming from? It's coming straight down
like this, easy peasy. If it was coming this way, our shadows would
be on this side. If it was coming this way,
if it was coming this way, our shadows would
be on this side. Well let that dry. We're gonna come back.
We're gonna put on some color. And then we're gonna
4. Adding the Color and Wrapping Up: Alright, welcome back.
Uh, this is all dry now. We've got our paint
on here that's dry. Let's add some color. You look on my palette here, you'll see there is
a brighter purple than what we had before. These are kind of
like in real life. They're kind of a
blue kind of purple, but I thought maybe
I'd try and make them a little bit
more vibrant, okay? We could mix in some
blue there if we want, but as soon as we do that,
it gets a little bit dull. So for the purple, red and blue, Carbizol violet,
Daniel Smith color. I think other people
make it as well. I've also got This is
a quinacridone purple that I'm just about to use here, and I put that on my brush. So we're going to do the
same thing that we did with our neutral tint, our midtones, our dark areas. And we're going to
go on the outside, and then we can wash some
color over top of that. Look at that.
There's some color. We got some purple.
I don't know how, you know, I'm not sure how
this color is gonna look. I've never used it before. But I'm just putting
it on so far so good. So what's happening underneath here is the darks
are staying there, and the lighter color is just kind of washing
over top of them. Just don't fill it all in. Like, don't feel you got
to paint every surface. Notice here, all these
little white areas there. Those add that contrast,
they add that interest. It's also, you know, shows
where the light is, too. The nice thing is,
I'm using like, you can use scrap
paper like I am, and you can just throw it in the garbage and
start over again. A great, great, great exercise. Lots of fun, and at the end, you're gonna get
something that looks good that you're gonna like, you're gonna be proud of, and you're gonna think,
Wow, thanks, Paul. Oh, yeah, underneath here, we'll put in some, you know, we'll fill this a
little wash there, just like we did cause
that's our dark area, right? Okay? Look at that. See how that shadow works now? See how carefree and
easy I'm painting. I'm just, you know,
dark areas first and then kind of
circle around them. So we've got some volume.
We've got some depth in there. Now, let's head on over to the
green side of our palette. I'm gonna mix up some
kind of green here. I'm not sure what these are. They're just different greens. One's like a gold green, one's the natural po green
color, which is very blue. I usually just mix
them together. And again, remember, it's
like a sketch kind of thing. This is the wash. That's
all it is simple wash. So just because we
painted this with a shadow, don't for, you know, make sure you go over
top of it with the green because it is a
green shadow, right? And again, very easy exercise. So when we're trying to get values and different things
in the lights and the darks, when we put down
that mid tone first, we're establishing where the midtones and the shadows are, then we're putting a
wash over top of that. So in this case,
you can see here, we just now have a darker green. So this is the same
color green over top of the neutral tint. And then this is here, the one that I just
stuck my hand in. Okay. Alright, see how much brighter it is because there's
nothing underneath it. Now, again, you can use
that two ways there. You can say, Okay, where's
that neutral tint? I'm going to you can come back in and do it the other way. Like, for example,
underneath here, I've got this shadow
area down here. We're gonna have some
darker areas down there because
they're overlapping. And essentially now, we've got this cool, little, very simple, nice, easy, some dirt. I'm brushing that
along. Eh wala. I want to make it a bit darker
right at the very base. I'm gonna throw in
some vinigo in there, while it's still wet. Tara we're done. Now I'm going to
move this aside. I'm gonna grab this one
here just to show you what I'm talking about so
that we don't have to stop. If you found, Oh, you know what? I want to define
some areas more. You can come back
now with your pen, and because it's
already got ink in it, you can darken up some areas. You can add in some
stronger accents. You can define the
shapes more, you know, there's no set process in
this where you have to say, Okay, the ink's on, that's it. Move on to the next
step. Can't do anymore. Here, you can do as much as
you like. You can come back. If you know what,
then you can say, Oh, hey, Oh, I want it
out of my color. You will get to the point where you overwork it.
So don't do that. You know, use common sense,
but don't feel like, you know, the end once
paint is on, that's it. I really like this. Very simple. I could see that in
a frame on a wall. And what did that take us?
Like, no time at all, okay? I don't know how long it
took. I wasn't timing. Maybe you'll put that
in at the end a little. That's how long it
took. But let's make sure when you're done,
this is really important. Please, please,
please post it on the Projects and
Resources section so that you can inspire
other people to do this. They can say, Hey, look
at that person did it. I can do it. Yay, and I can also give you feedback and help you
progress in your painting, and maybe you have
some questions. That's really the best
place for me to answer any questions that you have
is by posting your artwork, put it in the project
resources section. Start a dialogue. Let's go. Other people read
it, and they think, Oh, there's my question answer. Look at that. Wow, fantastic. Anyways, I'm gonna see you back. We're gonna do
another one of these, kind of a similar
series of these like we did with a loose
watercolor painting. Short, quick, easy paintings
that anyone can do. See you next time. Bye bye.
 Paul Cheney, Teaching watercolour and digital painting