Transcripts
1. Whimsical Watercolor Cat Ghost Intro: One of the most
beautiful qualities of water color is its ability
to be transparent. You can build up lots of layers and you can
have contrast between the very light and
transparent layers and the darker,
more opaque layers. This lends itself to creating
so many beautiful objects. In today's class,
we're going to use that technique to
create etheral ghosts. And not just any kind of
ghosts, but cat ghosts. So they're a little
bit whimsical and very fun now to dissect that ghost
to make it look like a cat, but not look so comical
but little abstract. We're only going to take
a few features from each, the ghost and the cat. Now to combine these things, we're going to take
some shapes from the cat to make that silhouette, but we also want it
recognizable as a ghost. So let me show you the
result of our work now. The ghost that we're
gonna paint is a cat. Ghost. But it's only
suggestive of a cat. It's part ghost, part cat. So it doesn't have a tail. It has the implication
of a tail by the way that the end tapers
off, but that's optional. If you want to put a
tail in, go right ahead. But for today's class, we're painting a cat ghost. So to that effect, I
want the perimeter, the shape, to be
indicative of a cat. So I have a little
paws here, the ears. I also took some liberties and added whiskers to
go with the face. But that's my version
of a cat ghost. So to get that result, we'll use just some basic
watercolor supplies. Just three colors of pigment. Your favorite brushes
and watercolor paper. You could make this
object any size you want. It could fit in a journal, or it can be a standalone image. So let me show you how I do it.
2. Class Supplies: For these ghosts, you'll
need your watercolor paper. Mine happens to
be seven by 10 ". It's 300 pounds. You can use any size.
That works for you. I also have a piece
of Washi tape here. My desk is stone and I'm going to just tape
it to my desk. It's an optional step. If you decide to tape it, you want to tape it with
a tape that's removable, so artist's tape or even a
painter's tape might work. You just want to be
able to remove it from your paper background. I have my palette where I
have three colors, a blue, a purple, and a black, but you can use any variation. I'm using a serilian blue, a purple and ivory black. But pains gray works just as beautifully and so do any other colors that
you want to use. I'd like to just
use two colors that are next to each other
on the color wheel. So that's where I get
the blue and the purple. But blue and green would work. Yellow and green,
red and orange. It really depends
on the highlights and the shadows
you want to make. If you want a cool feel versus a warmer feel of
the reds and the oranges. And then I have
two paint brushes. I have a 6.1 use the paint brushes you're
comfortable with. These sizes are great
for seven x ten. If you're making
a smaller ghost, you might want smaller
brushes and so on, if you're making a larger ghost.
3. Optional: Taping the Watercolor Paper: So to get started, I'm
going to tape down my piece because I'm
using Washi tape. It's very easy to use. You just peel it off the
roll and tape it down. If I was using Painter's tape, I would take it off
the roll and then just stick it to my leg
or my arm just to get a little of the
adhesive off before I put it down on my paper. The washi tape doesn't
tend to stick permanently, so it comes off easily as well. It may tear the
paper a little bit, but I'm only putting it just on the edge just to
hold it in place. It makes it easier
to film this way, and it makes it easier
to stay in place. If I was doing this off screen, for my own knowledge, I
probably wouldn't tape it down. I just don't feel the need
to tape down a piece. But it's totally optional. You can also tape it to a board or even a piece of
cardboard, just as easily.
4. Painting the Ghost Background: Now to get started
with the ghost, I'd like to take my larger brush and I have a jug of
water off screen, as well as a smaller jug. Use the smaller jug when
I need clean water on my paper and the larger
jug to clean my brush. Because this is one
painting and I don't have a lot of colors
on my palette, I don't really need to
worry about the water so much to start with. I like to take my brush, wet it, and then I just like to paint a round shape in the center. Now, you can't really
see this on camera, but I have just like
a round upside down. This starts my
painting from here. I want to add a
little bit of color. I'll put a little
water on my palette. I'm going to just take in
some of the Serilian blue. Now, you can use any
color that you want. I want it to be super light. I know this will dry very light, but I also want to
go on very light. This technique is
all about adding layers because it's a ghost. I wanted to look EtherleI'minga, Take this and I'm
going to go around the area where I made
that upside down, U wherever it was wet, it'll bleed a little and blend. I'll just continue adding color, dipping my brush in
water in between, and I dip my brush in
the water in between, because I'm just trying to
get a little bit of stain on the paper starting
with my U shape, because I want my cat ghost here to be looking at you
with their arms open. I start by making maybe the head and a
little bit of the body. Then I'm going to come in here and just bring up the arms. It's a very simple shape. Come around here, dip my
brush in water again. And just blend out that center. Now I'm going to come back in,
dip my brush in the water, and make those arms drape. I want them to look
like they're ghost with the hanging cape or the hanging costume
that the ghosts wear. I'll do this on
this side as well. It's a very loose painting. I don't even feel the need to do a pencil sketch ahead of time. I can come back in and
refine that a little bit. I'm tapering it down like
the base of a heart. I'll bring my water
and fill this in, trying to keep this wet and this pigment
moving in the center, because the center
is where I want the lightest color to dry. I'm going to come back in here, add a little bit of water and
a little bit more pigment. I want to finish
off the ghost here. I'm going to just create a
shape that comes around here. This is a closed shape. I'll fill it in with water on my brush just to keep this
color blending and moving. Now I can decide if this is the shape of the
ghost that I want. It's very cute. I can
refine it a little more. I'm going to pull
out the arms just a little bit over here. I like this one the way it comes down to try to mimic
that over here, I can leave this closed
shape just like it is. But I think I'm going to come
in here and change it up a little and just continue to add some unusual organic shapes. It doesn't taper off
to a complete tail. It has these little shapes here. I want a little bit of
a shape up top as well. I'll come in here, go
all the way around. And I can decide if
this is too narrow, it is a bit, is a little
narrow for me. I'll come in. I want this to taper
off even smaller, bring this up and around. I like that that's
our first layer. Before I leave it
and let it dry, rinse my brush in clearwater, and just press and push some of the pigment out from the
center just to the sides. If there are any areas
where I see harsh lines, I'll dip my brush in water and just blend
those out as well. It doesn't have to be
perfect for this layer, but this is a good start. Now I want to make sure that
all the edges are the way I want them going to around
this out just a little bit. Now, I'm going to let this
layer completely dry. You can dry it with a hair dryer or a heat tool if you want, and then we'll be back to
work on the next layer.
5. Painting the Cat Shape: Now that our first
layer has dried and it's a very light layer, we want to start introducing a little bit of
shadow and texture. There's nothing specific about where they go approximately. The bottom third to two of the ghost is going to be covered with darker color shadows, but we're going to incorporate purple as well as blue
and blends of them. I'm going to take
my brush and re, wet it and make a
puddle of blue just a little bit deeper than the blue we used in
the first layer. Then I'll make a separate
puddle with purple. I'll add a little bit of
whatever's on my brush to that palette to that color. And then I'll add
some purple here. I'm just trying to
make it loose and wet and the color will be as dark as maybe double
the first layer. You can play around with this. There's no set way to do it. I'd like to start with
my darker color here, which is the purple. And you can leave the
purple just as it is. But I'm going to mix a little of the serialan blue in with it. It just changes
the tone slightly. It's a beautiful color. Now, I have one more
brush full of water. Now I'm going to start and
I'm going to weigh it on the left hand side only because that's the way
I want to do that. You can easily do
it on the inverse. Perhaps if I was left
handed, I would. I'm going to take my brush and use the majority
of that brush. And I'm just going to
go over the edge here. I'm trying to have thick strokes and I'll come back in and rewet some of the strokes I had. And I'm going to
just push them up. I don't want to straight line. I want it to be a little
haphazard and just moving around because
it's a darker color. On a lighter color eye is
going to naturally follow it. It's going to draw my eye down the length of the piece or
wherever I put that color, because it's all
on one side here. I'm just going to go back in and dab a little pigment on
the edge so it doesn't dry. But because it's all
on one side here, I want to add a little
bit here and there on this side just to
balance it out, I'll add much less
color on this side. If I have say, 6 " of color on this side, I only want to add a couple
of inches on this side. I'll just add a little
bit up here as well. Now, I'm going to rinse
my brush so that's clear. And I'm going to go
in with that blue. And I want to make the cat ears. I make a very sharp
point with that brush. I just play with the ears,
how I want to make them. You can make them exaggerated
and really large. These are just medium ears. They have a rounded tip. I just think that looks
a little more ghost like than a pointed tip. I try and get them
somewhat symmetrical. I'll connect them then with
whatever's on my brush, I'll go around the edge up until where it
meets that purple. Again, I'm trying to continue
the shape that's already there on both sides, right around that perimeter. If I'm coming to the area
that has the purple on it, I'll overlap some, but not all. Now I want to come back in with my brush, dab it in the water. Just dab it around the edge. I'm trying to create
a blended line as opposed to a straight line. I really need to work quickly
before my pigment dries. If it dries, I'll go in
there and put another layer on top of it to re, wet it and to get
the pigment moving. I've gone around this edge, now I want to continue around this edge and I'm just using
clear water at this point. If there are any areas here that I didn't fill
in with the pigment, I just want to go
and gently scrub the paper just enough to
get the pigment moving. Then I'm going to
come back in, take a little more of that purple, a little Cerrillan blue. I'm deepening the shade
just slightly now, I want to come in here and deposit that color
on the wet paper, and that's one of the
reasons I wet it earlier, just a moment ago, is
so that it will have that beautiful blend come
over here and each layer incorporates a little
more saturation of color can play around with this. I'm using that first
layer as the guide, but if there are some areas
that I want to incorporate a little bit of color,
I'll do that now. Maybe on this ear,
I'll rinse my brush. I'm going to move to my blue. I just want to deposit some blue in some of the areas here. This way I get a blend
between the blue and the purple as well as
additional layers. And as you can see, none of my layers are
perfectly straight. There's a lot of blending, a lot of dabs with the brush. I'm really pleased with the
way this is coming out. I'm going to rinse my brush
completely. It's very damp. It's actually a little
more than damp, depositing a little bit of
water, but not so much. Now, I just want to blend out
some of those light edges. I really don't want
those harsh lines. I'll come in there with my
pigment just because I want to sharpen this particular arm up. I like how this one
comes up to a point. I'll look and see if there's any other areas I want to incorporate more color in. If there are, I'll just
dab that color on. I'm going to let this layer
completely dry again and then we'll come back and
take a look and see if there's anything we
want to incorporate.
6. Evaluating the Painting for Depth: Now my piece is dried and I really like the
way that came out. I love the blend from the super light blue and then
the gradual, darker blue. I'm going to come in
with my brush and just introduce one more layer and it's going to
be very subtle. I'm going to take a
little more of that purple and mix it in. I want to get just a little
bit of more saturated color. I'm just going to dab
it in a few areas, really making sure that I have that dabbing or
brush stroke down. Just do that in a
few areas here. Then I'll rinse my brush and blend it out
ever so slightly. I like that it's darker and it offers a little
bit of variation, but I also don't want
those harsh lines. I'll do the same
thing one time with the blue I have that I'll just
look for some spots here, particularly at the bottom, but I can still incorporate
a few here and there. Again, rinse my brush, so I have mostly
clear water and just dab out the edges here
just to help it blend. It's going right on dry paper, so it does need a
little coaxing. So now I'm going to
let that dry and then we'll come back and add
the facial features.
7. Painting the Face: Now it's dry and we're ready to start adding our cat features. This is very fun. We
have the cat ears. We don't have a tail per se, but the end of the cat's
body comes to a tail. I find that cats tails when you're trying to make an additional tail on the ghost. Look a little odd, shall we say. But it can be done. And it
can be done very effectively. It's just not for me. I want to take some of that color
here, that ivory black. I want it to be really dark. Add a little water to that. Then I'm also going to
take a little of the Cerrillan blue and
just mix it in. Just changes the color
ever so slightly. You could do the same
thing with the purple. Can even actually add a
little of that as well. It just alters the color. I'm taking that and I'm making a very sharp point on my brush. I'll move my palette over here. I'd like to start by doing the mouth first because
this is a ghost, We don't have to go
with a cat mouth shape, we want to go with
a ghost shape. You can make that oval, organic shaped, upside down
heart, Really, anything goes. You can even do a standard
cat shape if you like. I'd like to have like
almost a kidney shaped. I just think the organic
shape works very well. I do the outline and then
with whatever's on my brush, I fill in the top half. From there I'll dip my brush in water that dilutes
whatever's on the brush, and then I just fill in the
bottom half of that mouth. Now when that dries, because there's a lot of water there, it will dry a little
bit lighter than the top, very subtly lighter. And that's a very nice
look that I like. I like the little variation
instead of a solid dark line, get just a little
variation in it. Now I'll rinse my brush again, dip it into my pigment, and
make a very sharp point. Now I want to make two eyes. You can make cat
eyes if you want, but once again, I'm going to rely heavily on the ghost eyes. I'm going to make
upside down V's and I'd like to start out by just
making the V. I'll go back, add more pigment to my brush, and then I just thicken that up. I just think that's
a very cute effect. It's a different shape eye. I'll actually fill in
the center of that eye. I'm going to try to make
the eyes similar shaped. They don't have to be perfect, but similar is great. Lastly, I'll take my brush, make a very sharp point
by twirling it around. And I do like to
add cat whiskers. I come to the end because I don't want to distract
from the face. I pull off the center
whisker first, and then I'll have the
other two going out from it on this side pull off the center whisker and
then have the other two coming out there. I have my cat ghost. I
think it's adorable. I like the way the arms
or the paws are up, how it implies a tail. And it has the nice, pointy ears and whiskers
indicative of a cat. And the rest of it is
indicative of a ghost. The next chapter, I'm
going to show you some variations using the
same techniques we did here.
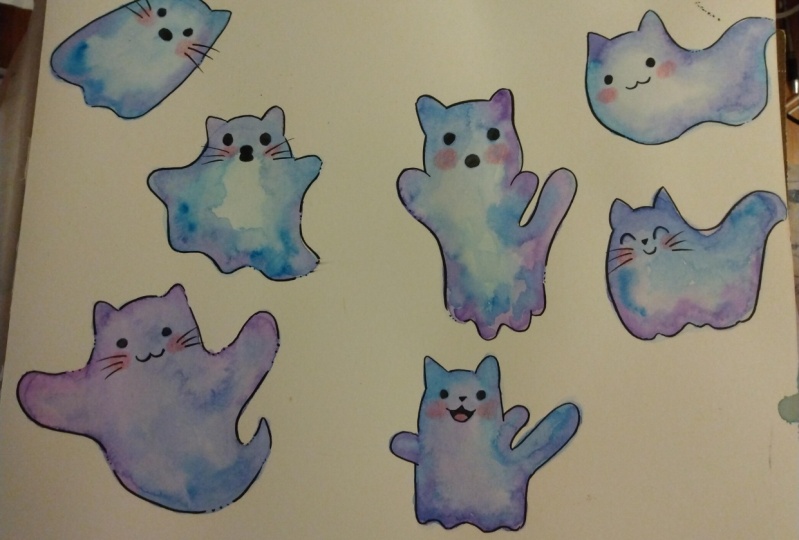
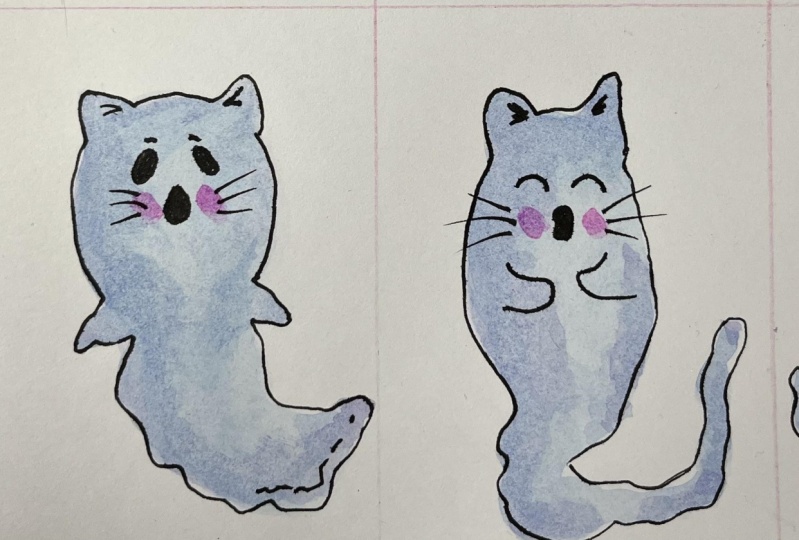
8. Class Wrap Up & Variations: Here's the ghost that
we painted in class. It's dried, You can see the
variation in the mouth, how it's just slightly
lighter on the bottom here and it gives just a little
bit of interest that way. I love the edge of this ghost, but you don't have
to do it that way. There are many variations. Let me show you some of them. Here I have a ghost
that's similar. It's done on a different scale. The paws here or the
arms are very short. There's just a slight
little curve to the piece. There's less
layering, but there's all this different color using the same colors and
the same technique. Whereas the whiskers
hang off the cat here, they're in the
center of the face. Again, I did the variation with the mouth where it gets
darker to lightest, and I copied that in
the eyes as well. I have the same basic shape. Head, very simple shape. Kind of like a
little bit of a worm with just the hands
and the tail. Again suggestive
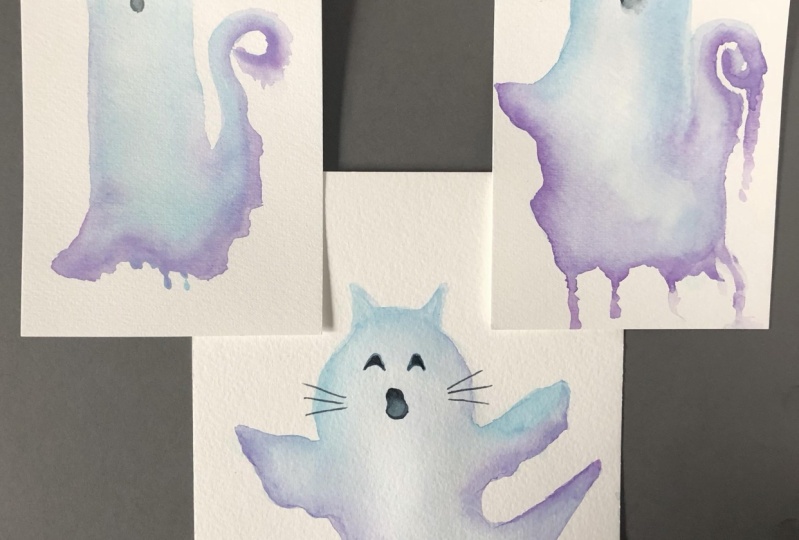
of a cat's tail. Another one here is
without that ragged shape, it's an elongated tail and just a little bit
of a curve here. There are no paws to speak of. Got a happy little cat
here with the ears. It's very abstract but fun and it has its place
in different artwork. Another version is this cat
here with the little edge. He looks like he's howling and he's got just a
teeny bit of a tail. This is like a cat sitting
on a ledge or something. And I love the way this
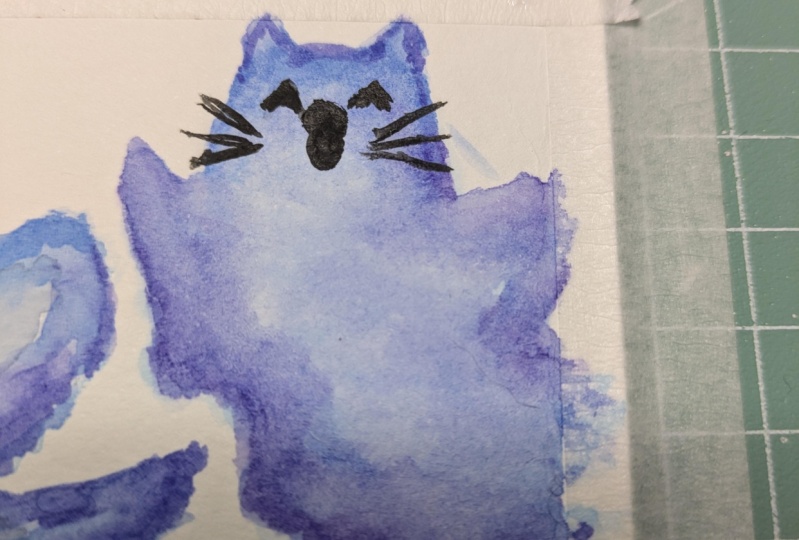
drapes right off of it. The last variation is a cat that's much more
loosely painted. There are thicker whiskers, the edges are really harsh. I just love that as well. I think there are just so
many ways you can do this. For this one, I
relied heavily on the purple color and just a little bit of
blue to cool it down. And I really like
the way these look. I like how they're all so different and have so
much personalities. I hope you've enjoyed
this class and if you paint one of these cute
little whimsical cat ghosts, please post it in
the project section. I'd love to see your work. Or if you're on Instagram,
be sure to tag me there. If you want additional
content that I create, please check me out on Youtube. Thanks for joining me today.
 Daniela Mellen, Artist & Author