Transcripts
1. Class Intro: Kayla and Pi is a favorite
dessert featuring lime custard that as smooth
as silk and yet sweetly sour. The crust is
crumbling and tender. Usually made from
Graham crackers. But Floridians have
their own versions with tropical ingredients like
coconut or macadamia nuts. No matter what the recipe, peeling Pi is a
favorite because it's like a glass of cold
lemonade on a hot day. But in Pi form. For artists, painting key
lime pie is a fun challenge because we can
have fun capturing those tropical inspired
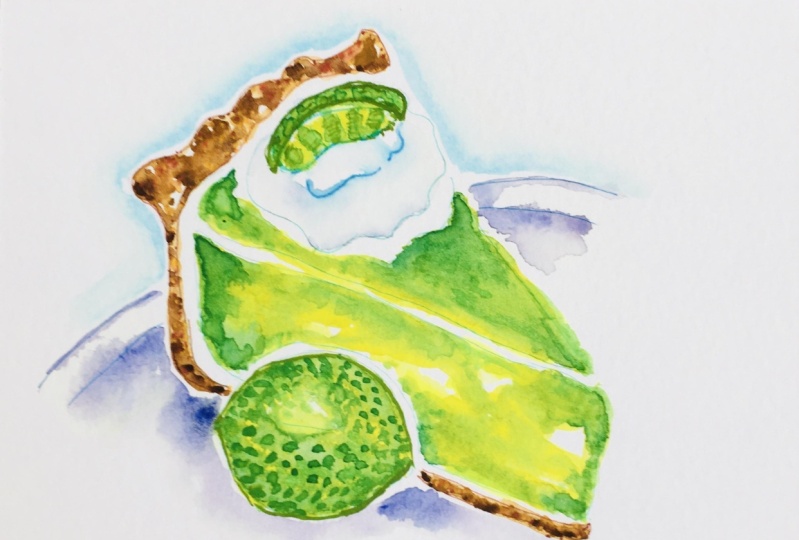
colors and textures. Hi, I'm Daniela Mellen, an author and artist. In today's class, we'll paint a watercolor slice
of key lime pie, complete with a doll
with a whip cream, and a Wim garnish. We'll practice
wet-on-wet techniques. Wet-on-dry, glazing,
and working with shadows in class will capture the leathery
texture of a line, the cloud-like pillow of a
dollop of whipped cream, and the line custard
that makes key lime pie famous
throughout the world. This class is for beginners, and I'll show the basic steps for each element of the pie. Students can
challenge themselves further with the chapters
on detail work for each of those elements
to really tighten up the image and bring
focus to the piece. I've included a class supply
list and a template that you can download to help
you sketch out your image. And as a bonus, I've included my key lime recipe that you can download to cook on your own. So gather your materials
and let's get started.
2. Class Supplies: Here are the class supplies
that we're gonna use for the watercolor key
lime pie painting. I have the template
which you can print out in the project section. You can just download
it and print it out onto a standard
piece of paper. And this will fit in
eight by ten painting. I have my eight by ten piece of watercolor paper, my pigments, and I'll list the specific ones that I use in the class supply, download a pencil and an eraser, and then I have
my paint brushes. I have a number six with a
sharp point and a number two. Those are the only ones that
I use for this project. In the next chapter, I'll show you how I use the template.
3. Using the Template: Now to use my template, I like to trace it onto
my watercolor paper. And to do this, I
have a light source. In this case it's a light pad, but you can use the
light from a window, just the sunlight will work. In that case, you just tape your template
onto your window. In this case, I'm
setting it down on my light pad and then I'm
setting my paper on top of it. Now if I illuminate
my light pad to replicate the
sunlight coming in, I can see the
template behind it. If I shut out my studio lights. You can see the image
a little bit better. From here I just
take a pencil and lightly trace over the image. I don't want to
scratch the paper. My goal is just to
get those lines printed down onto my paper. Now the template
is very forgiving. You don't have to
trace it exactly. You can make any changes
in your template. After you trace your image. When I turn my lights back on, you can see the image as
I trace it onto my paper. From here, I can make
any changes that I want. If I wanted to, I can
even flip the image over the reverse way and
get the opposite image. So there are ways you
can play around with a template to make it your own. The next chapter, we'll
start our painting.
4. Painting the Crust: I like to paint this in layers and then
I'm going to start by painting the first layer
of the crust, the crystal. Take a couple of layers. I'm just going to take
some water on my brush, and this is my number six brush. And I'm just going to
dab inside that crust, both the top part that sticks
out of the top of the pie. Just very lightly. I'm just going to
trace a little line on the bottom of the crust. Typically this is some sort of short bread or Graham
cracker crust. It's not pale like a
standard pie crust. Just what I wanted to
also have that texture. I'm going to take
some yellow ocher on my palette and a little bit
of sepia right next to it. Rinse my brush and I'm gonna take some of this
Van **** brown. Now I have three nice colors with whatever Van ****
brown is on my brush. I'm going to mix that
with my yellow ocher. Then I'll just add a
little more yellow ocher just to warm that up. Now with a sharp point, I'm just going to
paint every other area on this top crust. I wanted to look, make it
look like it's fluted. So I'm just going to paint
little dabs here and there. Not filling it in. But as you can see,
the area that I wet, the pigment is running. I'm going to switch
to my smaller brush. Just wet it, pick up
that color again and just add it to some of the
area on that lower crust. Not looking to fill
it in completely, just trying to create some of
that outline on that area. Again, I'll dip my brush
in the water again, pick up that pigment. Now I just want to kind
of create that shape, that rounded shape to the top of this crust over here on the pie. Now with whatever
is on the brush, I'm just going to gently
carve out the base. I bring it right up
to that pencil mark. Now I'm going to take a little
of that Van **** brown. Just add little dabs on the
lower areas of that crust. It'll blend with
the existing area, the existing places that
I've added pigment. And it gives a nice variation. Again with my small brush, I'm going to turn
my painting around. Just add some areas
of this darker color. Then I'll rinse my brush, pick up that yellow ocher color, and just carve out
a nice neat shape. Some areas will remain white. But I'm just really
trying to carve up and clean up that shape. So that's the first
layer to the crust. It's still moving around. The paint will do
interesting things and we're going to let
that completely dry.
5. Painting the Lime Custard: Now that our crust is dry, I want to start working
on the actual pi because it's a key lime pie. Sometimes it's shown very green and sometimes
inch shown pale yellow. So there's a lot of variation
that you can achieve. And as watercolor artists, we can even throw in some
additional colors that are totally unexpected because
they give an interesting look. So really, you choose how bold you want to
make your painting. I'm going to start
by just wetting my number six brush
with clear water. And I'm going to paint
each area where I want that little kind of custody Pi to show that's
gonna be underneath this blob. And that blob is usually
a whipped cream. And now I'm just
painting the side here, the slice that is
cut that you see and it gives a very iconic
and beautiful image. I have my water down. I didn't wet it completely, but I'd say 75 to 80%. Now I'm going to take
some lemon yellow and make a nice puddle here, fairly light, like
a second puddle with whatever's on the brush. And then I'll take
some of this yellow, green and mix that in. That's a very vibrant green. It's almost neon. Going to make a
third little puddle here with whatever
is on my brush and I dipped in water and a little
deep brain, I have quit. So quite some variation here. Now with whatever is on that
brush from that deep green, I'm going to try and
scrape off most of it and just mix the remainder. Would that yellow green. I'll even take a little
more yellow green. You can see that tones
it down somewhat. I'm going to just dip in a
very small amount of perylene red and mix that in with
that very bright neon green. And that just turns it
down a little further, making it a little more natural. Now what I'm going to
wash my brush again, I'm going to go
back in with that. Let me in yellow.
And I'm going to start by laying my color down. Now I like to turn my
paper to the side here. I'm going to do
large, gentle soft brushstrokes going down
the length of the pie. And I'm not looking to fill
in the pie was yellow. I'm really carving out the
shape and adding a base layer. I'll come back in, put some
yellow behind this doll up. Just carve out the shape underneath that
whip cream doll up. Again, I'll pick up more pigment
again with long strokes, drag it down the
length of my pie. Now I'm avoiding that
area where we're going to paint a line for garnish. I'm not trying to fill in the
area and just trying to add some base color here of this yellow and saturate
the paper a little bit. As you can see, I have about 80 to 90% of my
pie with this yellow. Now with whatever
is on the brush, I'm gonna pick up that
medium green that we mixed and just dab in some pigment here right on top of the area. We already added
that yellow pigment, carving out some of the
perimeter with others. Now just introducing that
softer green into our yellow. Some areas I want it to
be a little more intense. Some areas I want that
yellow to peek through. I really play around
with what I have here. Go around that lime. Now, just pick up a
little more pigment and just dab it in places. This is kind of a light green
with yellow undertones. You could stop here, but
I'm gonna take some of that deeper green with
my smaller brush. And I'm just going to dab it on the area that's still wet. Underneath that dollop
of whipped cream on the back end of my pie here that the custody lime custard. And I'm going to
pull in some color, some of this pigment, the length of the pie. I'm just playing around here, adding a little variation
to what you see and carving out that beautiful
shape of that pie, that wedge. I liked that it's in some
areas a lot greener, a little more intense. And other areas you see just a hint of yellow
peeking through. This is a great first layer. Going to go in here. Bring up that pigment
right to that top layer, but leave a little gap of white just to
show the difference. Then I can come down here and really just build up that color. Rinse my brush, pick up
more of that lemon yellow. Again, just introduced
that in some areas, this will help that
green blend give a little contrast and a little interest
to our layer here. I'm just using my
small brush right now, just trying to build
up that color. I have a lot of
variation which I like. I'm going to let this layer dry. And then we'll come back
and work on our whip cream.
6. Painting the Whipped Cream: Now to work on the whip cream, The challenge with a whip cream is we want it to look white, which we know is the
back-end of the paper. But I also want there
to be a little bit of shadow with a brush
with clear water. I'm just going to go in there
and just soften the paper. I'm adding water to that
dollop of whip cream. Just softening that paper. I'll give it a moment to sink
in and I'll mix my color. I'm going to take
a little cobalt blue right on my palette. Very small hint of it. I know it dries lighter
than what you see here. It'll dry lighter on the paper. And then with whatever
is on the brush, I'll mix a second little well, and I'm going to
take a little bit of purple in with that. I can play around with
the proportion of cobalt blue and purple. And so I get a bluish purple. And really whatever blend that you like is what
you should use here, I like it to look very blue. Just a little bit of that
purple really cools it down, but I like that blue effect. So now I'm going to switch
to my smaller brush because I have control here. My goal is to have a
lot of white showing from the dollop of whip cream. But I want to emphasize
the boundaries. I'm going in there
with that purply blue. And I'm just carving out the boundary where
it's wet on the paper. The edge bleeds nice and softly and I really
liked that look. I'll come around
behind that doll up, going right up to
that pencil mark. I'll just continue
all the way around. I can see areas here where I didn't wet the whip
cream doll up. So I'll go back in
with a wet brush, the Clearwater, and just
let that blend out. I'll come in again and continue all the way
around with this shape, creating that perimeter
with this blue color. Then I'll rinse my brush and
just blend out those edges. I don't want any solid lines. Now I know it's going to
dry a little lighter and I'm really liking
the way that looks. I'm going to take a
little bit of that blue, not the cool blue, cobalt blue. And in just certain
areas I'm going to just add a little dollop of pigment as if it looks like little pillows of whip cream. Can add a few back here. I'll stop when I'm happy. I liked the way that
looks right now. So I'm gonna let
that completely dry. We'll come back and
we'll work on our line.
7. Painting the Limes: We have the beginnings
of our pie here, we have nice light layers. We're gonna go back in, in a few chapters and
really add details. But I'd like to get
the basic layers down for the lime
and the plate first, we'll start with a
line with a wet brush, my number six brush, I'm going to wet all the
way around this line except for this center
circle that we added. More of an oval. That's gonna
be where the highlight is. I don't want my water to
go up to that pencil mark. And I don't want to leave
any pigment on that area. Then I'm gonna take
my brush and just paint the inside of this line. This outer area is gonna
be the lion's skin. So I'm going to leave that dry so that we can make
it nice and vibrant. Won't be painting
that wet on dry. I'm going to take some
more of this lemon yellow on my palette. And I'm just going
to paint my first layer of my line here. Just going to dab it in. Not looking to fill
the line completely. But I want to have a base
layer of that yellow. And I want it to be more vibrant than that custard filling. The custard will look a lot lighter than that
line. That's our goal. I'm also going to take whatever
is on my brush and just dab in inside this line, garnish up top here. I'm going to come back in and
get a little more pigment and drop it in this line. Now I start with
the yellow first because that's the
underlying color. It's the underpainting. Going to switch to
my smaller brush. You could take some of this
yellow green on my palette. Going to mix a little
perylene red with that. Then a little of
this deep green. I get the makings of a
really beautiful line color. I can play around with the proportions to really
get some variation. I use the yellow, green, the deep green and
perylene read, but a very small percentage
of the perylene red. Now I'm gonna take my brush and I'm going to outline the
bottom of that line. The line itself where I
painted it yellow and it looks like lemon is
very wet right now. And it's got a lot of
that yellow pigment just going to go in there and very gently carve out that shape, a top of that line
all the way around. Once I have that shape carved
out, I'll switch brushes. I'm going to take a
little of this deep green right on my palette. And I'm just going to add a
little deep green as well. I want there to be more
green than yellow, but I do like a
little bit of yellow showing right through what
we've painted already. I'll take a little of
that medium green. Just dab it on. I like the way we're getting
a lot of variation here. Lastly, I'm going to switch
to my smaller brush, and I'm going to pick
up that medium green. And using the
wet-on-dry technique, I'm just going to
paint the perimeter of that line skin for
the garnish year, it's a line wedge. Dip my brush in
the darker green. Now I just want to incorporate
some darker green, not looking to get
a straight line, but I like little areas where
I have that darker green. I'm also going to
have a little bit of white showing with
whatever is on my brush. I'm gonna mix it in
with that medium green. And I'm just going
to dab that inside. That lime on top
of the whip cream. It's blending and it's
doing interesting things. And I liked the way that looks. I'm going to come
back down here, take a look at my lime and see if there's something
I want to do with it. So I'm going to rinse my brush, take a little of the yellow on this small number
two brush and just build out just with a little
bit of yellow, that edge. I'm pretty happy with
the way this looks. This is a great first layer. I'm going to let this
dry and then we'll come back and start
working on our dish, as well as our detail work.
8. Painting the Dish: Before we started
working on our dish, I just took my eraser. I erase the pencil
marks on the line. And up top here, I didn't need that remained around the pie. I left the ones up top
on the top of the crust because we're still
going to go back in detail, work those. Right now. I want to work on the dish. I want to really just paint
the shadows from the dish. So this little rim and just some shadows coming out from the dish
as well as the pie. With my number six brush. I'm just going to wet
beneath the line here, that curve that we made to
resemble the rim of the dish. And I'll do that on both sides. I'll also come around the pie. The lime, just with clear water. Not touching the
lime or the pie. I'm just wetting that
paper right now. I'll pull down that
line just a little bit. Now I want to mix my color. I'm going to take some
purple right on my palette. Mix a little water
and with that, and I'm going to make
some Prussian blue. Now I want this color to be a little more purple than blue. And that will give
a little variation. Once I have that color, I'm going to switch
to my smaller brush. I want this to look
like a shadow, so it's going to be very subtle. I'm going to take the
small number two brush, dip it in that pigment and just run it along the
edge of that plate. And as I get closer to
the edge of my painting, I wanted to really fade out. I'm going to dab in my pigment, really emphasize a
little bit over here. Rinse my brush and just
pull that pigment to it. I wanted to blend slightly
and just sort of fade out. Then I'm going to
take more pigment on my brush and just go over
the top here very gently, very lightly to emphasize
that rim up top. And I go right to the edge, rinse my brush, and then
just gently fade it out. I like to come in there
with that wet brush and just gently blend it down. Just so it's not a straight
line out of nowhere. I'll take a little more pigment. Just come over
here and pull that out just so it blends
a little shadow, take some clear
water, pull it down. We have this part of the plate. I want to do the same
thing over here. I'm coming just gently
underneath that plate. Just gently up top. Come over here as well. Build the edge of that plate. Rinse my brush, and just
blend out that edge. Now I'm gonna take
that same color. I'm gonna come up here
underneath that pie, leaving a nice little
gap between the pie, the line and this pigment
we're putting down. And I'm using my smaller brush just because I can control it. But if you're comfortable using your number six brush,
go right ahead. I'm just going to blend
out those colors. Once I have my color laid down, I'll switch to my larger brush. Wet it. Take just a tiny bit of pigment
and just blend that out. I'm looking just to
blend it out slightly. Still a little rough right now. But I'm starting to get
my shadow for my Pi, as well as the line. I can just play
around blending that out until it's nice and smooth. I wanted to just
come in here with my smaller brush and
tidy up this edge. Now take some more pigment. Just dab it to make it a little
darker around that lime. I liked the way that looks. Now if you want to introduce
a different color, whether it's pink, blue, any color that would
go nicely with that purple. I'm gonna take a
little brilliant pink to show you what I mean. Put it down on my palette. Take a little perylene
red with that. Just to change that. I'm just going to
dab a little bit of pigment here and there, just for an unexpected
pop of color. If there's any area
where it didn't blend. I'll dab my brush. We've got pigment
to help it blend. And I can come back
in and even add a little more pigment because I know it's
going to dry lighter. You can do this with blues. I thought the pink was a
nice unexpected color. Then I just want to help it
blend out. Just like that. We're going to let this
layer completely dry. And then we'll come back and
work on our detailed work, starting with our Pi and
then working our way out.
9. Painting Details on the Lime Custard and Crust: Now you can stop
here for your Pi. It looks realistic. It's obvious that it's a
slice of key lime pie, but I'd like to add
some more detail work. Start with the actual lime
custard and work our way out. What I want to do is
put a glaze over this. I want this to be
a little greener. If you want this to be
a little more yellow, add a little more yellow of
a glaze to make the glaze, I put some water on my palette. They take this
yellow green color, mix a little deep green. And with that, Then one
more brush full of water. It's a light color, but it will add an
interesting glaze, little more intensity. This pie custard. You don't have to color the
entire area. With this layer. I'm gonna cover
most of it though. Any areas that aren't covered. I'm going to make a
second little puddle here with just
some yellow green. And I'll just go in
there and add that in. Just for a little variation. I'll come back in with
my original color. Swooped down the lines. Now another thing we want
to work on when we do this pi is the different
textures that you see. You see the silky
custard texture, which is what we're
aiming for right now. Then you see the
crumbly and somewhat crunchy texture of the crust. Then you want that
almost leather like texture of the line. Then the cloud-like
texture of the whip cream. So when you have your pie
done to your satisfaction, you can come in here with
a little water as well. You can stop right there. Add detail to the crust, you decide what you want. I'm going to add a
little more golden, so I'm going to add some yellow
ocher here on my palette. Then in the second palette I'm going to add just
a little sepia. Going to rinse my brush and
switch to my smaller brush. And with that yellow ocher, I just want to go around
the inside area here, just on the left of all
these little fluted edges. This warms it up a little bit, not coloring the entire area. And then I just
want to carve out the shape all the way around
with this yellow ocher. Some areas will
have that line of pigment and go back in with a little more
pigment on my brush. Some areas will have that
line of pigment and that's okay because we want this
texture to look crumbly. Kind of like Graham crackers. Going to go around, just going around the perimeter, sharpening up any edges. I'll do the same thing here
on the bottom of the pie. Right now I'm just using
this yellow ocher. Not going over everything. Just any areas where
I think it needs a little more intensity of color or just cleaning
up that edge. I'll just come in there with a little more yellow
ocher and dab it just in little dots along the bottom and in some areas on
the top of this pie. Then lastly, I'll take a
little sepia on my brush. And I'm going to look
for areas that I haven't added pigment yet. I'm just going to
add a little dab of little spots of
this sepia color. It'll blend, it will dry and it starts to make our
crust look a little crumbly. Do it throughout the crust. Can emphasize some areas a
little more than others. If there's any area that
was still a little wet from that yellow ocher will get a nice blending of these colors. Now I just want to go in
the areas that we first put down in-between the
fluted edge here. Just dab a little
more of the sepia. Come around here, a little
bit here and there. Just some on the edge. I don't want any lines with this sepia because it's so dark. But I do like a little
bit of texture like this. How much you want to
add is up to you. You can speckle the entire pie. The entire pie
shallow if you want. I just like a little bit
of texture here and there. I can come back in with
some yellow ocher, a little more intensity and add a few little
speckles of that. Let this dry and then
we'll come back and add some detail work on our
lime and our whip cream.
10. Painting Details on the Limes & Whipped Cream: Now to add texture to our lime, I want to add some
texture to this lime to make the skin look a little
bit more like leather. And I'm going to add just
a little bit of texture to the top of this skin
as well as this flesh. I'm going to mix my color first. I'm just gonna make some
dark green on my palette. Make a second well, mixing that yellow
green with it. Then I'm going to take just
a tiniest amount of perylene red and mix that in. And as you can see,
you get a very much like an a line color. Rinse my brush and dry it. You can switch to
a smaller brush, but I want that big
brush right now. With a dry brush,
I'm gonna pick up that pigment and I'm
just going to dab it all the way around that lime. Staying within the boundaries. Just adding some more
intense color and it's a very subtle
difference in color. Rinse my brush. I'm gonna switch to
my smaller brush, picking up a little more
of that pigment and mixing it in with
that deeper green that we already mixed. And I just want to come
around the edge here, not the entire way, but just adding areas of intense pigment just to
the edge of this line. Just on the skin here. Can add a few little dots and then elongate
some of the dots. Now for this one, I'm going
to take some of that yellow, green and mix it with whatever we have
left on our puddle. I just need a little bit
of color going to start. And maybe three or four lines. Dip my brush in water and
just blend those lines out. Having a skinny part at the end and a wider part at the top. Take a little bit of that
deeper green and just dab it on the top
and let it run. And there I have my line. Now I want to take some
of this deeper green on my smaller brush. I'm just going to dab
little specs right here. Ever so often. Dab a little more
pigment on my brush. Just get a few little specs. I want to make sure I
have specs right to the edge of that lime. Rinse my brush, take a
little lemon yellow, mix it in with just a
little bit of green, and continue with my dabs. And this will give
a nice little blend where the pigment is wet. It will blend further and it gives a little
more intensity of color. I'm adding just a little bit to the top of the line because I want most of that going on
the bottom and the main area. Now I just want to work a
little bit on the whip cream. Again with my number two brush, going to clean my brush, take a little bit of
this cobalt blue and a little purple and
mix it together until I get the
color that I like. And I like it to be a little
more blue than purple. With a very sharp
point on my brush. I just want to create
some areas where I'm barely touching the
paper right on the edge. I'm just adding a
little definition, not going over all the areas, just a few areas. Then I'll rinse my brush, remove some of that water, and just blend it
out a little bit. These areas we'll look a little
more intense in pigment, but they're not definite lines. They just start to look
like little shadows. Now I want to come over here and create just a little pillow, a little fold on the fabric, a little fold on the whip cream. I made my mark with that pigment and now we'll
just blend out the top of it. Ever so gently. Just like that. I'll let this layer
dry and then we'll work just a little bit
on the background.
11. Painting the Background: To really finish
off my painting, there's just two things I want
to do with my large brush. I'm gonna come in here with
a little lemon yellow. I just want to blend out that yellow it around
this highlight area. Just give it a little
hint of that yellow. I can even go in there
with that green, that yellow green and just add a little bit of that as well. It's not necessary, but it's something I
liked the look of. Now going to take
my number six brush and we'll just with some water. I'm just going to wet
around the pie here. I'm going to go a little
bit further down, leaving a little gap between
the plate and this border. I just want to create
a little border around the pie crust. The top of the crust here, all the way around, matching the curves, leaving
a little gap of dry paper. You can't really see the water. But you know, once you've
done it where it's been. And I'm just going to gently go around the perimeter here. I want to take a different
color than we've used here. We did a lot of purples, but I want to take
some just cobalt blue, similar to the color we
used for the whip cream. I want to mix water
with it because I wanted to just be very light. Then very gently. I'm gonna drag my brush around that area that we already
wet with just clear water. And any area that was dry from the paper will just absorb
a little bit more pigment. And I want that look. Just going to pull some pigment out all the way around here, slowly creating a background. The same thing over here. Dad, my color up top. Not looking to fill
in the background. I'm just trying to give a little contrast
between the pie, the dish, and the
white of the paper. Now I come in there with
just a clean, wet brush. I'm going to blend out those
edges so they just form a seamless gap into the
background and fade out gently. Now when I look at the pie, I can see where I need
a little more pigment. I pick up that blue, dropping a little
pigment over here. Little more up top and
a little more here. I'm not creating a shadow. I'm just looking to add a
little background to this pie. I'm choosing blue because
the colors are harmonious, but you can use any
color that you like. Then I'm just gonna go in there
with a wet brush one more time and blend out those edges. Just so it's a beautifully
seamless gradient. It'll be a very light color
and it will dry light. But I liked the way that looks. I want to come in here. Just enhance those edges a little more of
that blue pigment, just a teeny bit. Now I'm gonna take
some of that purple blue mixing a
little more purple. I just want to go
over that edge, a little more, particularly
around that line. Really emphasizing that shadow. That around the pie as well. Rinse my brush, get
a little more of a brilliant pink over here. Now we've just with some
clear water on my brush. I just want to feather
out that edge, trying to make that shadow
a little more intense, but I don't want straight lines. I'll blend out that
edge and then I'll introduce a little of that pink. Again. I keep going in there
with some clear water. Working on that edge. Having a little pigment
here and there. Finally, I'll take
that brilliant pink. Just dab it in
places because I do like that pop of color, that little unexpected color. You can drag out that
shadow as far as you want. I liked the way it just fades. It just disappears. But if you wanted to go further, feel free to do that. Went out the edge. There we have the key lime pie. We'll let this dry. And then the next chapter we'll come back and take a look at our work and discuss some
of the techniques we used.
12. Class Wrap Up: So today in class
we started out with a template and we
created this painting. Now with the painting, we have all the different textures
of the pie lists. Silky custard, the airy
doll up a whip cream, the little leathery
texture of the line. Well as the crumbly crust, we also worked on shadows, just implying the background and the plate for our painting. Now I wanted to show
you a variation. I took that same template. I created just a slightly
different version. I didn't work on adding
texture to the lime. I still use the shadow technique for both the background
and the plate, but I just played
around and added more yellow to the pi
instead of the green. So that gives you some ideas. I also added a pop of blue into the pie instead of a pop
of pink on the plate. Those are different
ways you can play with using the same techniques
and get different results. They're very similar
and yet there's quite a few differences
between them. I also have a bonus
for you where I took my painting and
I added my recipe. So you can download my own key lime pie
recipe if you want. This is the class
that I posted for April 2020 to the
watercolor key lime pie. Please be sure to
follow me here on Skillshare to get notified of future classes and please
consider leaving a review. I also post regularly on
YouTube throughout the week. Thanks for joining me today.
 Daniela Mellen, Artist & Author