Transcripts
1. Class Intro: Watercolor painting is the
process of combining water and pigments in various proportions to achieve a pleasing results. Artists use the terms wet-on-wet and
wet-on-dry techniques to explain just how they
achieve these results. But all watercolor uses water. The challenge is knowing
how much to use, when to use it, and what the results might
be when adding the water. Hi, I'm Daniela Mellen, an artist and author. In today's class,
watercolor orbs. Ten practice techniques
for beginners will practice methods to develop
our watercolor instinct. This means we'll play with the combinations of
pigment and water. More importantly,
we'll play with the timing of these combinations in class will make rows of beautiful orbs, rounded shapes. That will give us an opportunity to review ten techniques using two pigments and water and
their various combinations. I use two jugs of water. One to clean the
brushes and want to keep as a clean jug of water. Think of it as its own
particular color of paint. I showed you how
I mix two colors, but you can use any two
colors that you like. You can either mix them or use them straight
from the tube. These practice techniques
are very flexible. You can use any paper, any size brushes, and any
colors that you like. The main focus is on techniques. Gather your supplies,
and let's get started.
2. Class Supplies: Here are the supplies
that we're going to use for our watercolor orbs. I have some eight by
ten watercolor paper, but you could easily use a watercolor page from
a journal as well. This is really good
practice and if you find a design that you like, it's a great jumping
off point for creating a piece of
abstract art as well. I'm an assortment of paper
towels that I'm going to use both to dry my
brush while I'm me, using my painting supplies, as well as for a
technique at the end. I'm gonna sort of
watercolor pigments. And I'll include the list of
the specific colors I use. But the specific colors are less important than using
the colors that you like and colors that
might be close to each other on the color wheel
or opposites as well. Then I have two jugs of water. The importance of having
two jugs of water is to have a clean jar of water to always use to put clean
water on your piece, and then a jar of water to clean your brush in-between uses. Lastly, I'm using one brush I have here a six
and a number four. They have fairly sharp points. I tend to use the six
more often than the four, but I like having
a little bit of variety with me as well. And then I have water
to just wet my paints and I keep this in
a spray bottle. In the next chapter, we'll
start our first technique.
3. Technique #1: Wet On Dry: To make our page of orbs, we're going to start in
each row going across, it's gonna be a
different technique. You can extrapolate this
by making a whole page of just using that same
row, that technique. So our first technique
is wet on dry. To do this, I take
my brush and I select a pigment and
I mixed my color. Now you can use colors straight
from any of these tubes here that are put in each of these watercolor wells
where you can mix your own. I think I'm going to mix my own. Gonna put some water
on my palette. And then I'm gonna take
some of this cobalt blue, mix it down on my palette. I have a good amount of water and a good amount of pigment. And then I'm going to
take some Prussian blue and mix it in. And I just liked
the way that really introduces a very rich blue. I'll add one more
brushstroke of water. Now, from here, I'm just
going to create orbs using the wet brush
on the dry paper. That's called
wet-on-dry technique. I'm just going to take
that brush and just create an orb here. So I'm gonna make a round shape. Then I'll just fill it
in as much as I want. And I can leave some spots of the paper because that makes
it very interesting effect. Now your orb doesn't have
to be perfectly filled in, but it certainly can
be if you'd like it. And then I'm just going
to continue that filling in that row with my orbs. And I'm using that same
technique where I'm making the orb, the shape. I'm going to just depositing few more splotches of pigment. Now for this one, because
I'm really testing out my limits and just
what I'm doing here, the techniques, I
create the perimeter. Then it can enlarge it just to make it the shape that I want. Then when I fill it in, I'm just going to stamp it with my brush again to
get that interest. For the next one,
I think I'll try a different technique
where I create that shape, fill it in mostly. And then I want to pick
up some more pigment on my brush and just dab it in. Now I'm not trying
to dab it in around the entire piece because I
want that little variation, that variation in
color intensity. For this one, I'm going
to create an orb, but I'm not going
to close the shape. So I still have a little spot of dry paper between the
top of that shape. And now I'll just fill
it in as much as I want. I can elongate the
shape as well. Then lastly, I'll do one more. Once I have my shape down, come in and fill it in closed
or is it closed as I want? I'm going to go back in,
take a lot of pigment on my brush and just deposit that intensity on certain
areas of these various orbs. Then I'll let this
layer dry and we'll come back and work on
a different technique.
4. Technique #2: Wet On Dry Plus Water: For our next technique, we're gonna do a variation
of the wet-on-dry. This one's gonna be wet-on-dry with the introduction
of clean water. So it's wet-on-dry plus water. Good or create a new color here with a little
bit of a puddle, I'll take some of
this viridian hue, which is a beautiful green, and I'll set it down. Then I'm going to add a
little of that cobalt blue. I get kind of a
turquoise color here. You can play around with the
proportions of each color. Now, with the
pigment on my brush, I'm going to create that circle, again, that orb, but I'm
going to keep the center dry, the center of it dry. I'll just do two or three at a time because I don't
really want them to dry. In-between paintings. I'll create that outline. And I'll leave my brush here. And with my second brush, I'll just take some clean water. I'm introducing clean
water to the center. And that'll just gently
work it right to the edge. So it interacts with the
pigment that's there. Now continue this on
this row with each one. I can play around with the shape where I have an ORB
for the outside. But for the inside, it's different amounts of dry paper that I'm just
wedding with clear water. Now the reason I do
it with a clear water is because I want those edges to run and blend and be completely natural where I'm not controlling
it with my brush. I really go into clear
water here and then just introduce it so that the
pigments Mary and join. Now in this one, because this is all about trying
different variety. I'm going to sharpen
my brush to a point and just make it a
thin perimeter here. Then I'll just come with my
wet brush with clear water. I wet the center so that gives you the pigment area to move. Then I'll just
introduce that edge. I can come back in with my pigment and just
deposit it here and there. Again. Creating intensity and letting the water and the wet
paper move that pigment. I'll come back in
with my next one, adding a little more
water to my color. I create my shape. Again, I don't want to
fill in the center. And then I switch
brushes to my brush. And I'm just going to dab in the center and I have the center of my orb, wet the paper. Then I can just slowly
introduce a little bit. So that catches on the
already wet pigment. Then I'll come over here
and do the last one. I'm still using wet on
dry paper to start with. I'll come over here and put
a lot more pigment just to really play and see what
happens when it's very intense. Then I'll just come
over here with my wet brush, dab it on, and just let it move
with the existing color, the existing pigment
that's down. I'll get a different effect with all the processes
here that I've done. Depending on how much pigment, how much water I'll get different looks and that's
why I do multiple ones across so that I can see all the variations
and really play around with it to see
which ones I like. Some will have a softer edge, some will have a sharper edge. And as you can see,
the perimeter on the outside of all of these
has a nice hard edge. But the inside, interesting things happen and that's the beauty of watercolor. There are some blooms and
some color variation. And that's what we're going
for with this practice. In the next chapter, we'll
work more on the wet on wet.
5. Technique #3: Wet on Wet Water: Now for our third technique, we're gonna do a wet-on-wet, but really a wet on
water technique. I'm going to start with my brush and I'm just gonna take water. And they might be hard
to see with the camera. But I'm going to create
my first circle here. If you're painting
and you can't really see the circle you've painted. Just tilt your head and look for the glare of that circle. Now I'm going to jump back
to my first color here, which was the cobalt blue that we mixed with a
little Prussian blue. I have my circle down
and I want to come in here and just add
just a little dab, a little dot of pigment
to this circle. And I'm just eyeballing around
the edge of that circle. And I'm just dabbing in more
and more pigment as I go. Now I'm just going
to let the water and the wet paper do its thing. I'm going to rinse my
brush and I'll make another circle over
here for our next orb. And I'll do one more
while I'm here. So I have two orbs. Now I'm going to pick
up that blue again. For this one, I'm gonna
make a nice sharp point. I'm just going to go
around the edge of that circle of that orb. Again because it's wet, it's running and
the color is doing its thing, causing a blend. And depending on how
much pigment you add, you can add so much
pigment that it just fills it in right away. Versus this one. We're
kind of creeps to the center because I brought
my line to the edge. I have a nice hard outer edge, whereas here I have kind
of that softer ruffled edge on that third
circle that I made. And then pick up that color. Just going to gently drag my brush right around
the edge again. Not going to go with
as much intensity, but I'm going to
create that shape. And then just dab a
little bit of pigment. Now I'm going to rinse my brush and still with clear water, I'm going to introduce it to
the center of that circle. I'll start my next one. I have my circle down, my orb. Come in and pick up that blue. Just fill it in. Again, I'm not going
right to the edge of that clear water
circle that I made, but I'm just trying to put in my pigment to
let it move around. I'll come over here
and do the same thing. And I'll make a final
clear water circle. I'm going to pick up my pigment, which is the cobalt blue
and a little Prussian blue. Get a nice quantity on my brush. Just dab it on and I'll
just start at the top here. And then I'll come over here and I'll just do
it on the bottom. Create that shape. Now I'll come back in, pick up that pigment and
just continue to feed it. Just on that half
circle that I made. I'll do the same thing up here. That's wet on wet. I have the clear
water background and I introduced my pigment. And what depending
on the wetness, I can actually tilt the page and see that
pigment move around. And that's an interesting
effect to it's kind of the natural effect of
the water and the pigment, but you're helping it
along by tilting the page, depending on how you
have the paper dry. If you have it dry flat
versus tilting it up or down, you'll get a different effect with the circles as they dry. We'll let that dry
and then we'll come back and work on a
different technique.
6. Technique #4 Wet on Water: Now for our next row, our next technique,
we're gonna do the wet on water technique again. And we're going to use our turquoise colored pigment here, where we mix cobalt
blue with viridian hue. Again, I want to do my
circles in clear water first, so I'll just do two
of them at a time. I have wet paper here
and that will give my pigment somewhere to flow. Mix a little more of that color, cobalt blue and
the viridian hue. So it's kind of a
turquoise color. Now I'll make a
very sharp point. And I'm going to start here, and I'm just going
to make little dots, not touching or not trying to touch the
dots to each other, but just allowing them to
run and do their thing. It'll do the same
thing over here. And I can play with the
amount of dots that I leave and how much I
hold the pigment down. The longer I hold it, the more pigment will be left on the piece,
on the circle. You get different effects. Using that same technique. I put my clear water orbs down. Then I'll go in there. And depending on the
size brush point you have and the size brush, you'll get different effects. Here. I'll hold it down for
quite a bit and remove it. And do the same thing. And I get different blooms. I'm just trying to try to see what happens
here. What I get. Let's just practice. It makes very
interesting results. And I can go back in and
add even more pigment. If there's an area that
I don't feel is moving, I can direct it and
move it around. Then I'll have my last two. Forbes put them down
with clear water. Now I'm going to pick
up a lot of pigment and a very sharp point
here in this one, I'm gonna just start
in the center and just continue to dab my brush
right in the center, up and down, straight
up and down. Then on the last one, I'm going to do the same thing up and down with the pigment. Come back in, add a
little more pigment. Want to rinse my brush so
that it's just clear water. And the point would that wet
brush dab in the center. And you can see that
pigment move and run. Pick up my paper. Again, just move it around. When it dries. We'll take a look at the result, will come back and work
on a few more techniques.
7. Technique #5: Water on Wet: Now for this technique, we're gonna do water on wet. We're going to go back to
that original blue color that we mixed the cobalt
and the Prussian blue. I'll mix up a little
more of that. You can mix any color you
want for this as well. Then I'm just going to paint
my circles, my little orbs. I'll paint about three of them. Really taking care to make
them circular shaped. Again, fill them in
whatever level you'd like, whatever level you're
most comfortable can leave a little
bit of white exposed. Once you have those good clean my brush that I have
clear water on my brush. And I'm just going to drop water and I'll drop
in the center here. I'll come back and pick
up a little more water and drop it in a
couple of spots, maybe three on the next one. Pickup some more clear
water and just drop it. And we'll see what
that does is it changes the dynamics and add
some blooms to our piece. Come over here and make
my last three orbs. Again with this beautiful
blue that we mixed. Come back in and introduce a little more
pigment just to make that one a little more vibrant. Do that again. Make one last orb here. Add a little more pigment to make it a little
more vibrant. Then I'll rinse my brush, pick up some clear water, and just deposit some clear
water and little drops. When you deposit
the clear water, you'll see how it moves the pigment and
floats that around. And the result will be very
interesting when it dries. And as you can see here, even though we did the same
technique for each one, just a slight variation caused a variation in shape and
color and intensity, as well as the edges made
them very interesting.
8. Technique #6: Drops on Water: For our next row here, we're gonna use both
colors of pigments. So I'm going to mix my pigments to make sure I have enough. I'll add that viridian Q and some cobalt blue just to get
that really turquoise color. If I need more of
the bluish color, I'll pick up more cobalt
and a little Prussian blue. Now I want to start
by painting circles, painting my orbs just
with clear water. And again, I'll do three. And then I'll come in here
and pick up some of my blue. And I'm just going to dot it in certain areas on that orb. You can make the dot is
long and large as you want, holding it down for longer time, repeatedly adding
it to your orb. Then I'm gonna continue making
my remaining three orbs. I'll pick up my blue again and
just dot it in some areas. I think I'll do this one
right in the center. Just do three over here.
Three on this one. Now I'll clean my brush, remove some of that clear water, and pick up that
turquoise color. I'm going to sharpen
it to a point. I'm just going to add
that turquoise to areas where I don't
have the pigment. Could add it to a few areas. That a skip this one for a
moment and just add it to my pigment here and you can
see how it floats around. It does interesting things. Now I'll come back
to that center one. And I'm just going to dot
it right around the edge. Now my watercolor is floating on the water because I had an abundance of water. And it'll do interesting things. I can turn the page and create
very interesting effects. And then I'll let that
layer completely dry. We'll come back and do
another wet on wet technique.
9. Technique #7: Dark Wet on Light Wet: For our next technique, we're gonna do a
wet on wet again, but we're gonna do
a dark wet on wet. You choose the color that
you feel is the lightest. And again, I can always
go with different colors, but because I'm sticking
with colors this time, I'm going to take my
lighter turquoise and I'm going to create
three or so orbs. Again, I'll fill them in
to whatever degree I want. Now once I have my light down and I can really
carve out the shape, I'll come in here
with my darker color. I rinse my brush, remove some of the water, pick up the pigment, and now I'm just going
to deposit it. This one, I'm just
going to deposit one dot here all
deposit two dots. I can go back in and really
emphasize that color. Pick up a little
more of that blue. I'll add a four dots. I'll make three more. I pick up my pigment
and create my orbs. Go back in, really introduced that color because we know
watercolor dries lighter. Then I'll rinse my brush, remove the water, and pick
up that blue pigment. Now I just want to introduce that color just
by dabbing it in. The next one, I think I'm going to slide it around half of the orb over here. I'll just dab it in
maybe three spots. When it dries. It will
be interesting to see the variation between
the one above and this one will come back and do one more row of
orbs on this page.
10. Technique for #8:Light Wet on Dark Wet: We're gonna do a technique
of wet-on-wet light on dark. So I'm going to mix up
more of my dark color, which I chose in the previous
example to be that blue. I'll mix that cobalt blue with that Prussian blue just
to get enough pigment. I'll do the same thing with
this little turquoise that we mixed with a cobalt blue
and the viridian hue. I'll take that dark
color, that blue. I'll make three orbs. Make these a little
smaller just to fit on this page nicely. Again, carving out the shape, filling it in to
whatever degree I want. I'll rinse my brush,
remove the water. Once it until it's clear. Pickup that lighter
shade, that turquoise. Now I'm just going to dab it. I'm going to switch, picking
up that blue color again. Making my final three orbs. Really carving out that shape. Rinsing my brush. And I'll come out with
that lighter color. I'll dab that in a few spots. Dab it on 1.5 side of this form. It will be interesting to note the difference between
those last two rows. We'll come back and start a new sheet with just
a few more techniques.
11. Technique #9: Wet on Dry on Wet Plus Water: For this technique, I'm just
going to make two orbs. One's going to have
the green background and one's going to have
the blue background. So I'll start with my
green, my turquoise here. And I'll make one orb. Come around, carving
out that shape. Wet-on-dry. I'm just using the dry paper, my wet brush, carving
out the shape. I'll come in here
and fill it in. Whatever degree of filling
in I want for that orb. Now this is all about technique. It's not really
about the result. This is just something
to show you what it will look like
when it's done. After I've carved out the shape, I'll pick up a little
more of my pigment. Just introduce it
basically around the edge. Just because I know
that wherever it's wet it will bleed accordingly. I can tilt my page a
little and if I see any areas that had
already started to dry, I'll move that pigment around. Now. We'll do the same
thing with the blue. I'll come back in,
create my orb. Whatever degree of
filling in I want. Pick up that pigment,
just really deposited to make it nice and vibrant
right around that shape. Now I have my wet layer down. I'm going to come back in
and pick up more blue. And starting with
this first orb, I'm just going to deposit
it right in the center. Now I have my wet blue on my wet background
of my light color. And I'll come back in
and really just dab it. I'm not trying to bring
it all the way to the end of my orb, but I really want it to flow
and really fill the center. I'll rinse my brush and
I'll do the same thing on this one with my turquoise
right in the center. And I'll just dab it
all the way around. Just keep it a moment to
absorb into the paper and to flow with the existing
wet pigment of the blue. Here I have the light background and the dark color
in the center. And here I have a
dark background with a light color
in the center. I can turn my paper
just helping that color flow most pigments
to marry and join. And then I'm just
going to come in here and rinse my brush. The clear brush. I'll just
set some water on my palette. I'm going to take
that clear water, get a nice full brush, and just add a drop of
water to the center. I'll come back in and
just add a second drop, maybe even a third. Then I'll do the
same thing here. That clear water will chase that pigment around and there'll be a little blooms that form. We can't really control them, but we can get an idea of some of the things
that they'll do. We'll let this dry and we'll take a look at our
finished work. Now, as you can see here, the color is dried a little bit differently and it's
different effects. Now there are a lot of things
that go into that result. The amount of water that you use to add your clear water spot, the amount of pigment
that you had on the page and the
amount it was dried, you added all those
different elements. There are many factors,
but as you can see, it produced very
interesting blooms. And that's the look
we were going for.
12. Technique #10: Lifting Pigments: For our next technique, we're gonna do a wet on dry. We're going to let that dry and then we're going
to lift color. To do this technique,
you need time and you need some
paper towels as well. I'm going to make six orbs, three of each color. So I'll mix a little bit
more color to start with, just so I have enough
pigment for my orbs. Again. I'm mixing the cobalt blue and the viridian hue just to
get that turquoise color. And then the other
one was a Prussian blue and a cobalt blue. With my darker colors, I'm just going to
make three orbs, really carving out the shape. This is good practice
because you want to make the Orbs approximately
the same shape. Now they won't be
perfectly the same shape. But it is good practice. It's repetition. And it's about stroking the brush with
a little bit of control, particularly for
making these shapes. I'll come around just trying
to keep a nice even edge. I can go back in and deposit
any more pigment as I want. Then I'll rinse my brush. And I'll make three orbs
here just to make them fit. Make them a little smaller
than our original three. I'll put one underneath
here just because I didn't plan out
my space very well. I'll come back in. And for this
technique, it's nicer when the colors are a
little more vibrant. I'll just deposit a
little more pigment. Then I'm going to let
this layer dry before we come back to do
the color lifting. To finish our technique, we weren't going
to lift off color. I have just some
paper towels that I folded just because
it's very neat. You can use a rag just as easily as long as
it's absorbent. Now I'm going to take
my brush and just get some clear
water on my brush. I'm gonna make a
very sharp point. Then I want to make a shape. And I'm painting with
clear water onto my piece. The simpler the
shape the better. So a triangle or
a little circle. If I make a circle right
in the center here, I want to create that circle, not really trying to move the
pigment or paint too much. But I just want to
add that circle, give it just a moment to
absorb into the paper. Then I want to
press down on with my paper towel and lift up. I picked up the
shape that I made. Now I can go back
in very gently, adding a little more
clear water to my shape, again, giving it a moment
to absorb into the paper. Then pressing down
the paper towel to absorb at shape to pick it up. I can of course go
back in there with my blue and really carve out
that shape to sharpen it. But this is an interesting
way to remove color. Instead of making a shadow, you make a highlight
in your piece. Again, I'll take some
clear water on this one. Really sharpen my point. And I'll just make a swirl. Swirl, come around. Again, get some clear water. You want to add plenty
of water and I'll go back in and deposit some more water on the place I put down this
brushstroke of water. And I'll come right
here to make my shape. I'm not scrubbing
it with my brush. I'm just letting the
water do all that work. I'll take my paper
towel and refold it. Then I'll press it down and
pick up some of the color. And as you can see, it's
not a very crisp image, but it is very effective. The next one, I'll
just make a letter. Take my brush, make
a sharp point. I'll make the letter
M can come back in, really go over that letter, Give it a moment to
absorb into the paper. Press my paper towel on it, and pick up the color. I might want to do that again to really get a crisper image. I'll go down my
brush and my water, giving it a moment
to absorb funding fairly clean spot on my paper towel and
absorbing the water. Now, I'm careful not
to scrub the paper. I don't want to tear it, but as you can see,
I've lifted the color. This doesn't work
with every color. Some colors work a little
better than others, and some brands work a
little better than others. So you really have
to experiment. You're not going to
get clean white paper by doing this technique. But you will get a
little highlight, a little bit of area
bleached on the paper. Always start with clear water. You don't want to
introduce any pigment. You can repeat the
process as long as your gentle. I'll
come over here. I made three dots. They're not very prevalent. Triangle over here. You can see that a lot better. And a circle over here. I just am curious. I'd like to go back in
with those three dots, adding a little bit more
water right on the dots, giving it a moment to
absorb into the paper. Then I'll press it out. It made it a little
more distinct, particularly in this area. But that's an idea if
you want to really add interesting
highlights to your work.
13. Bonus: 3 More Techniques: Just as a bonus, particularly if you're
working with the shape, the rounded shape in
your abstract work, there are a couple of
other things you can do. You can always make rings, which are just a modified
version of our orb, where you take a wet brush on dry paper and you just spin
it around to get your ring. Now this is a very interesting
effect because you get some brushstrokes and you
get some imperfections. But it's a very
interesting look. And you might find
this technique very beneficial or
very helpful to you. Another technique is to
take some clear water, make your giant orb so
that you have a wet basis. Pick up your pigment with your brush and do
that same technique. Just make your ring
on the wet area. Now the boundaries, if you did it all within the wet area, will be soft as opposed
to these hard edges. If I brought my brush over
any dry areas of paper, the edges will be hard. And if I brought my brush
over the wet areas, they soften and dole out. That's a very interesting
effect if you're playing with the hard edges versus the
soft edges in your work. Lastly, one more technique for a wet-on-dry with water is
to take your pigment. In this case, I'll
use that turquoise. And I know we've
been making orbs, but this time I'm
only going to make half to three-quarters
of an orb. And I'll put my color
down just on that spot. And you can see with
your eye how you'd fill in the remainder of this orb. I'm purposely not filling it in, but I am creating
the silhouette. I want to do the same
thing over here. But in this way, when I have a lot more
pigment than the other, I have more ground
covered on this one. Wet my brush and now I have just clear water on my
brush and I'm going to wet that area that would fill in
that silhouette on my paper. I have just clear water. Go back in, wet my brush
with more clear water. And then I'm just going to
take that boundary and just barely touch that
area of the pigment. Rinse my brush, get
some clear water, and really finish that edge. Now I've started a guide
for my pigment to run. I'll rinse my brush again. Do the same thing over here. I saturate the paper with clear
water, create that shape. And then just barely touch it to the edge that we've
already painted down. This will blur the edge of the pigment that has dried
somewhat on the paper. Allowing it to run
and finish creating that orb will let these dry and just take a quick look at
them when they're done.
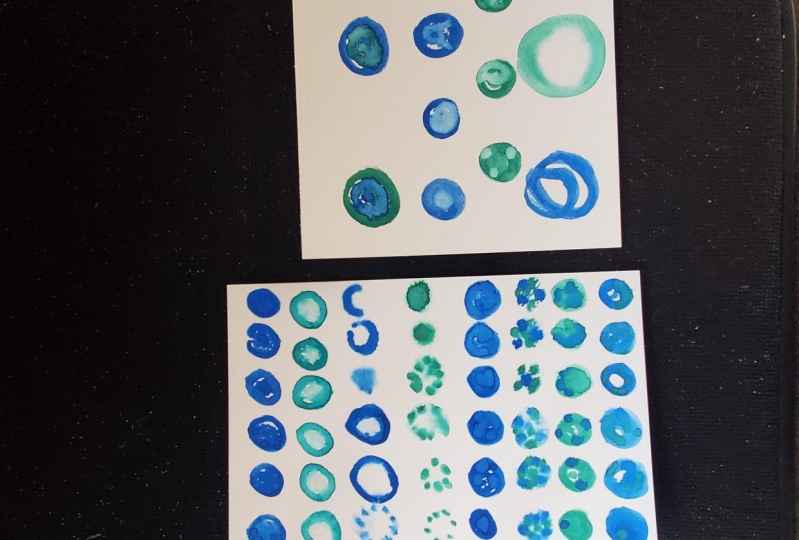
14. Class Wrap Up: In class today we have
the ten techniques that we used on our orbs. Each row represents a
different technique. They were all very simple, but as you can see, they're
very subtle differences. We stayed with using the same two colors to
create our techniques, but there's many variations
that you can come up with. Additionally, I have
three more variations that I'll show in a
bonus class at the end. This is just helpful with your work if you're
creating orbs, particularly in abstract art and you want just
different effects. They all use just the
two colors that we mixed and the addition
of clean water. Now I wanted to show you
some variations and how you use your rounded
pieces using the various techniques in
either your sketch book or in work stepping
stones for larger pieces. Here are my sketch book page. I created a page using the same techniques and instead of using the
blue and the turquoise, I used red and a pink. I wrote down the techniques where I mixed water with them if I would do wet on dry
and whatnot over here. And it's an interesting
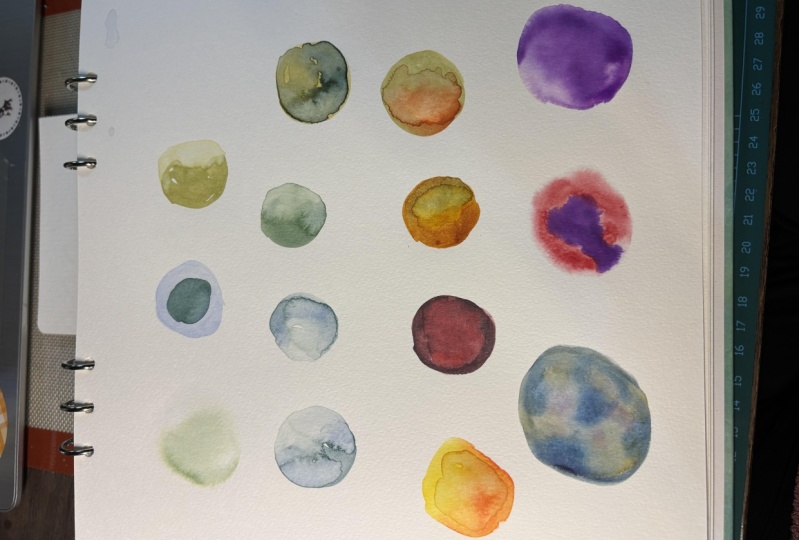
sketchbook page. Another way to do
them is to actually work on a rainbow of colors. Started with my reds and
ended up with some purples. They are not solid red and
they're not solid purple. But I have that
gradient traveling from one end to the other of using wet or dry paper and combining them
with a separate color. Some of the circles and the orbs are filled
and some are not. And you can see the
little white of the paper flowing through. Here. I created
something a little more abstract by introducing
another element, and in my case it was spatter, but you could add many
different things. I use the same clear water
and colors to create them. And each row used
just two colors. So I hope you found
these techniques helpful to use in your work. If you make a page
using these techniques, or just select the techniques
that you find most enjoyable and snap a picture of them and post it in
the project section. I post new videos three times a week on my
YouTube channel. So join me there for
more techniques as well. If you found this class helpful, please consider
leaving a review. Be sure to subscribe to get
notified of future classes. Thanks for joining me today.
 Daniela Mellen, Artist & Author