Transcripts
1. Watercolor Brush Strokes Class Intro: What are colorists have
incredible brush control. Now to learn brush control, you only need to practice. There are many ways to practice. You can just continue with
your painting as normal. But I have some very
detailed specific exercises for working on a flat
brush to obtain control. Hi, I'm Daniela Mellen, an author and artist. In today's class,
we're going to take a look at a flat
watercolor brush. You can use any brush, any size that you have from a large to a very small
and detailed brush. These exercises are designed to take a look at a
flat brush and get a feel for how much
pigment and water you need to create
various strokes. Now the beauty of a flat
brush is you can make thick and wide strokes
or very thin strokes. And in the exercises
that I have for you, we'll practice them. In class. I take each exercise and
we repeat it four times. But you can vary that and
repeat it as often as you like. If you find that you
are struggling with a particular stroke or
particular exercise, why not finished the whole
page with that stroke? But if not, and you seem to be sailing
right through them, just do your four repetitions and you'll see
improvement right away. This class is for beginner
watercolor artists will use a single brush
and a single brush color. And of course, you can vary
that as much as you'd like. If you'd like to
create a rainbow of strokes by all means, please go right ahead. But this class is very specific. It's about creating
the brushstrokes and the hand motions that are
needed to create them. And by repeating them, will have them in our repertoire
to use in the future. So gather your materials
and let's get started.
2. Class Supplies: The supplies that we're
going to use today for our brush control exercises include a few sheets
of watercolor paper. Now I'm using eight by
£1040 watercolor paper, but you can use a
watercolor journal or any size sheets you want. We're gonna do a
lot of repetition and lots of different strokes. I have my watercolor
pigment and I just chose an ultramarine blue. But again, choose whichever
color you'd like. I have my jug of water. And then today we're
going to explore the use of flat brushes. Here I have three
different sizes. I'm only going to use
this number eight, this one in the center. But I wanted to show you
the various sizes they come in because it's
the same process. Depending on the size brush, it will hold more water and the marks will actually
be made larger. So you'll use them
for a larger scale, the larger brush and a little more control
with the smaller brush. But it's the same
technique regardless. And that's based on
the brushes shape, the edge that you can achieve, and the width of the brush. In the next chapter, we'll start our first exercise.
3. Exercises #1 & #2: Line & Wave: So to start our first exercise, will do our exercise and then
we'll repeat it four times. You can repeat it as
much as you want. If you want a lot of practice, I suggest you fill the page with that
different techniques. But for time should
be sufficient. So I'm taking my flat brush and I'm dipping into my pigment. And just so that you can see it, I have a little palette
here that I can use just to clean off my brush
or sharpen that edge. And to do that, to
sharpen the edge, I'll just repeat the stroke. And that helps the brush. The hairs of the brush
form that nice sharp edge. For the first one, I
want to make sure that my brush is soaked with water. It's not dripping uncontrollably off the edge of the brush. And I just want to create a
smooth controlled stroke. And I'll start at the
left side of the page and drag it across to
the right-hand side, trying to maintain
a straight line. And my goal is to have a
completely solid line. Again, I'll make sure
that my brush is nice and filled with the pigment. I start by setting my brush down and I slowly drag
it across the page. And I get a feel for how
much water is coming off the brush and absorbing
into the page. So it looks very nice. I want to come back in
and on that same line, go over it again, adding a little more pigment. And again, each time
I go over this line, I get a feel for how
much pigment and water are transferring
off the brush. This will help me so
that my next line, and I'll do four of them. I can get a feel with the
amount of pressure to add. How many times I need to go over that line to make that happen
in a nice even format. So again, I'll start here, gently press down and
drag my line across. I'll continue this on my third one where
I'm pressing down, dragging and even line
and then releasing. Again, I pick up more pigment. And I can do this again. Now for the last one,
I'm gonna do my line. But instead of going twice, I'm gonna go three times. I want to see what that does to the vibrancy of
the pigment here. Each time I'll re-wet my brush. I'm looking for control. And just to go over that area, I've already set
down the pigment and not looking to
widen the line. So that's our first exercise. Will do the second
one while we're here. And it's a slight variation
on this first one. And again, we're gonna
do for exercises. I'll take my brush and again, I want to fill it with water. I'm going to set my brush down and just add a
slow, steady wave. Each time I put my brush down. I want that wave to be solid and filled all the way
to the end of the paper. I can pick it up again, go just a little bit slower this time and match that wave. And again, I'm not trying
to widen the wave. I'm just trying to go over it to make it a
little more vibrant. For my next wave, I'm going to try and
follow that design. I'll go slowly. I set my brush down
and I just follow the existing wave right
to the end of the paper. And then I release. I'm only going to go
over one layer this time because I'm going over
brush control and practice. I'm not trying to
make it any more vibrant than it was
the first time. And then I'll pick
up the last amount, set my brush down,
and follow that. I have my wave. And I can continue
just filling up the page as many
times as I'd like. This is good practice because I'm working on the
tension of the brush, the smooth drag, and how much
pressure I'm using a cross. And I have some very
nice even waves here. I'm going to get a new paper and we'll start with our
next techniques.
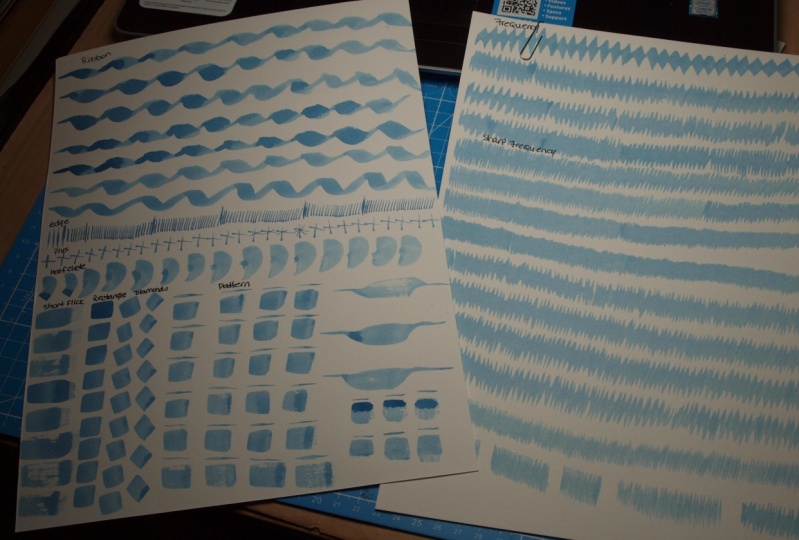
4. Exercise #3: Frequency Wave : So for my next exercise, I want to do a frequency wave. So it's gonna be a wave
similar to the way we made the first time where our brush is not going to leave the paper. I'm going to load up the brush, but I'm going to start up top here with my brush only
at a slight angle. Again, I want the sharp
edge to start on the paper. And then I'm going to
bring it up and down. This is my frequency wave. I can control the thickness of this wave by what angle my
brush touches the paper. So as I raise the brush higher, I get eight thinner wave. And as I have the brush
at more of an angle, I get the thicker wave. So again, I'll come back in and I'll keep
this one all fic. And I'm just trying
to press that brush, controlling it on the
paper, making that wave. I'll come back in, re-wet
the brush and just introduce more of that wet
pigment, creating that wave. Now my goal is to have a nice thick center with just an interesting
edge to this wave. Come back in and I'll work on reloading the
brush with pigment. As I see it starts to fade. And I'll try and
keep that in mind. So I'm working on not
only the brush control, but getting a feel for the various amounts of liquid
that I have on my brush. And I'll do this one more time. I don't want the brush
dripping with pigment. I wanna be able to control it. And I'm just setting it down. I'll come back in, reload
the brush, and continue. Again with this
basic brush control. Controlling the shape. I'm allowing the
pigment to run freely. And I have my little
frequency wave here. We'll come back and work
on our fourth technique.
5. Exercise #4: Sharp Frequency: So now for my fourth technique, I wanted to work on
a frequency wave, but I want it to be very
carefully controlled wave with a very sharp point of
the brush that I'm going to hold perpendicular
to the paper. Again, I may sharpen
the edge of the brush, hold it down almost
at a 90 degree angle, and create very short
frequency waves. I'm using a little less pigment because to hold
that sharp angle, I need a little less pigment
on the brush stroke. And I'm just barely
touching it to the paper, controlling it up and down. I'll do one more line
and you can see how thin by comparison this line is. Come around and across. Do another row. Again, keeping my brush at the proper angle and barely
touching it to the paper. Again. Cross. Pick up more pigment, sharpen the edge, and
create that across. I'll do two more rows
just so that we have four rows for each
of these techniques. And this is very good practice. I can increase the
speed which I go. But I'm always working
on that same goal. I want a sharp edge, barely touching it to the paper and bringing that
brush up and down. Again. I like to make sure that
I've rubbed my brush to get that sharp edge and
create those shapes, these very sharp frequencies. Working on even
pressure on the brush. It just takes time. It's a very valuable
technique to rehearse so that you can execute it when
you want in your work. So I'll switch paper
and we'll come back and work on our
fifth technique.
6. Exercise #5: Wet to Dry Bar: So now taking a flat brush
for our fifth technique, we're going to start by
creating a bar of a line. And then we just
wanted to taper off in fade out towards the end. Now the beginning of our
stroke would be nice and thick and the color and the
pigment will be filled in. And as that water and pigment is absorbed from the
brush onto the paper, it will dry and
we'll start to see brushstrokes on the
right-hand side. So I'm going to dip my
brush loaded up. Again. I don't want it to
be dripping pigment. I'll start on the left-hand
side of the page here by just gently pressing the
edge of my brush down. Then I'll increase the
pressure and drag this right across with the goal of
just pulling off the brush. And as you can
see, it starts out nice and colored and thick. And it ends up with
more of a brushstroke. And again, I want to
do this four times. I load my brush, make sure that I don't have
too much pigment on it. Set my brush down,
increase the pressure. Gently pull it across my page and you can start
to see brushstrokes form. I'll do the same thing. Each time I do this,
I'm trying to get a feel for how much pigment
this brush is holding. And based on the pigment
that it's holding, the results that I can expect. With less pigment, I can expect more
brushstrokes to show. I'll come back in and
on my fourth one, I'll hold up a lot of pigment, not going to clean it off. I'm just going to
keep that brush. They're fresh my brush
down and pull it across. This is my way to play to
see what affects I can get. Next chapter, we'll
come back and work on a similar effect.
7. Exercise #6: Flick: So now we have a long bar drawn out with our
brush and the pigment. And as it fades off, you get to see brushstrokes. We're gonna do a
similar technique, but it's gonna be much shorter. So I'm going to pick up
my pigment on my brush. Starting with the
same procedure where I pressed the edge of the
brush into the paper. And I'm just going
to flick it across. And I'm only shooting for approximately an
inch to two inches. I get an interesting edge. And that's what I want to see, is what I can do and what
this process brings me. Again, it's just a straight
down press technique and pull across. Just like that. I get a nice edge on one side and then it
fades on the other.
8. Exercises #7 - #10: Flicking, Stamping, Controlled Press: For my next technique, I'm going to take my brush loaded up with pigment
and just press it down. And for this technique,
I'm going to press down So my brush handle is
horizontal, not vertical. So I'm going to press
down and up, down and up. And I'm looking to stamp the
image and see what results. I'll do this the
length of the piece. Now for the next technique, I'm going to switch it
around and do it vertical. I want to make a nice
dab and press down. And I can come in here, pick up more pigment
and press down. Here I get the shape of the
brush and the impression. For the next technique
I want to come in here, pick up my pigment
and my goal is to make not a perfect square, but a perfectly even rectangle. So I'm going to practice
this technique. I'm going to press
down to start with, drag it, release
it, and come up. And you can see the difference
that makes compared to just stamping the brush. Again. I'll load
the brush up again. I'll do a whole row of these. Now this edge didn't come
out the way I wanted. So I have to come back in, try it again and find out what
I have to do differently. And I have to drag the
edge and then pull up. And again, this takes practice. I'm trying to
control the edge of that brush to make the
shape that I want. Press down, continue to
press up and come across. Press down, drag the brush, and continue to let it taper
until I have that edge. Now I could go in there, turning my brush around
and sharpen the edge. But for this practice, I'm looking to do this all
with just a brush stroke. I'm going to load
up my brush again. And I'll just try and do
the same thing vertically. You might find it's
easier to do it vertically than it
is horizontally. So again, I'm trying
to be careful and mindful of where my
pigment is being drawn. And as you can see, I'm
getting some very good results just by pressing
that those bristles, pulling it and then
controlling where those bristles leave the paper.
9. Exercise #11: Thin Line: So now we're gonna work
on some techniques that are very particular
for a flat brush. I'm going to wet my brush so
that I have a nice shape. Remove some of that water and then I'll pick
up the pigment. And yet again, I
want there to be a nice sharp edge and I
want to be able to control this pigment so I don't want
so much that it's dripping out if I just do a light
shake of the brush. So I have my sharp edge and
I'm gonna come down and very gently just going
to set my brush on the paper and
slowly drag it across. And my goal is to have a nice
straight line, very thin. It's okay if I had a
little hiccup here are stutter and that's why
we're doing practice. So I make that sharp edge, set my brush down and just drag a thin line
across the paper. And I'll do this as many times as I need a minimum of four. I can see the more
pressure I add, the thicker that lines gets. So for my last one, I'm going to work on
creating a very thin line. Takes barely touching
it to the paper. And I have my line.
10. Exercise #12: Thin Thick Line: For my next technique, I want to incorporate this
thin line with a thick line. So once again, I'll
load my brush. And I'm just going to
start very gradually. I want a thin line dragging
it across the paper. And I'm going to
twist down to thicken the brush and then make
that thin line again. So we'll try that again. Thin line. Twist that brush back
to the thin line. And again, thin line, twist the brush and
then twist it back. And you can see the
different ways and the different shapes that I get just by twisting that brush. Thin line, twist to thicken
it and make it thin. Again.
11. Exercise #13: Ribbons: For our next exercise, we want to load the brush, again, creating that sharp edge. And now we're going
to create a ribbon. We go from thin line to
thick line to back to thin line just by dragging it and pulling
it across the page. And I have a thin line
and a thick line, and then it turns
thin and thick. Again, this just takes practice. Start with a thin line. Drag it, get it thick again. Like a world ribbon. Do this two more times. Thin, thick, making a V. And I'll do one more time. Feel free to practice
this as much as you want to get a feel
for your brush.
12. Exercise #14: Full Page of Exercises: So now we're gonna
do techniques and we'll just gonna
do a row of them. And we'll do them
all at once here. Instead of breaking them
down into chapters, I'm going to start
by wetting my brush. I haven't wet with water
and then with pigment. And again, I'm going
to control it so that I have a nice sharp edge. We're going to take
advantage of this edge. We're going to just create little straight lines as
thin as we can make them. And I'm going to space them
fairly good distance apart. I'll go back in,
rework that one. So now I want to
pick up more pigment because I don't want
my brush to dry. And then we're going to add two bars close together to
each of the existing ones. And this is just a
good way to practice your spacing and your
position of your strokes. And in this case it's
really just a simple stamp. And now I want to come
in here and just fill in that area with these
parallel bars. And I can do that
on all of these. Again. I'm just trying to
keep the lines as thin as possible and not have them intersect with the
existing ones. You can do as many of
these as you'd like. You're trying to
control the brush so you get the right angle, as well as just the right amount of pigment on your paper. You're not trying to saturate or connect any of those images. It's a nice sharp edge.
For the next one. Again, we're going to
load up our brush. And I want to create plus signs. I go vertical and
then horizontal. And again, I'm just working
on practicing this technique. Vertical and then horizontal. All the way across. For the next technique, I'm going to load my brush
and work on a comma. Then it's not really a comma, but it's taking advantage
of the shape of this brush, where I'm going to set my brush down and then twist
it to the bottom. So it's essentially
a half circle. And I just want to
continue this in one distinct motions
all the way around. And I can practice not dipping my brush and
dipping my brush. And my goal is to have that brush not skip
like it did here, and not go past
like it did here. So I just got to take my time and create that
shape that I like. A can, of course, always go
back in and fine tune them. And that's okay, that's what
we do while we're painting. But my goal is to work on the exercise of actually
pressing down that shape, controlling that brush,
and then stopping. Now I want to work
on a little flick. I'm going to take my brush, set it down and flick up. And I want to control it, making a whole row of them, whole column of them,
the same length. In this case, because I'm
dragging it fairly quickly. I'm getting an
interesting brushstroke, but I'm really just working
on the length of that flick. For the next row, I want
to sharpen my brush. And we're just going to
create a straight angle. Again. We're working on the size, repeating the size all the
way along this column. Now for the next
row, we're just do a slight variation of that. And this row is just very
good practice for this. We'll sharpen our edge. And now I want that angle. And I want to
continue that angle. So it's almost a slight diamond. Again, I bring it across. I'll do this the entire column. Again, approximately the
same size for each of them. I can also try it with a
slightly different method. Where I'm starting at the top of my brush vertical and pulling
it across diagonally. Again, I want them all
approximately the same size. I like that sharp edge. And I have a different
variation on that diamond. And I'll just continue this
entire column this way. And for my last technique, I want to create a fine
line and then a thick line, and then vary it, a fine
line and a thick line. This helps you to get into the form and the practice
of creating a pattern. So you're not just
doing a single stroke. You're changing you
the way you hold your brush and the way your
brush touches the paper. Those are all our
versions of using a flat brush to practice
some brush exercises.
13. Class Wrap Up: So today in class, we went over a
number of exercises using just this flat brush
to create different strokes. We did multiples, so
repetition in order to get a feel for the particular
brush that we're using, regardless of size and how
much pigment and water that we need to make our stroke smooth or to have texture in it. Now, by angling the brush
differently in a single stroke, we can create these long
lines or these wavy lines. And depending on
how many times we go over that initial image, just as we did during
the exercises, we can have different
level of vibrancy. So that's something important to note and something
very beneficial to practice when we're
using these exercises. By changing the
tilt of the brush, the angle and the motion. We get these what
I call frequencies that can be very thick. And as you can see, the amount of
pigment on the brush affected the way
that color dried. And that's just as important
to observe that in your final result as it is
to actually practice it. Practice making that same
frequency but only sharper. And by doing that,
we changed and rehearsed the amount of
liquid and pigment in the brush to obtain those super sharp lines
versus those smoother blends. And it's very interesting
and a great exercise to get brush control a little bit more fine tuned
with what we want. We did a swipe from wet to dry, whereas the brush pushed
the water off, the paper, absorbed it and
we were left with whatever remnants
were on the brush, whatever remnants of
pigment was leftover. And depending on the
drag, the pressure, the amount of pigments
we started with, we got very different textures. Now, all these textures are very valuable for watercolor artists, particularly when
you're working wet, wet brush on dry paper, and that's when you
get your most pigment. So it's quite
interesting to see we worked with a single color
and a single layer today, this was the very beginnings
of brushstroke exercises. So from here, instead of
doing long single strokes, we did little flicks. And again, we've got a
very vivid image and very light flick here that resulted in more
texture and more shape. And then we practice just
using the actual brush shape. And this will vary depending
on the size of the brush, depending on how we hold it, we get a different result. As you can see, the
area that I had the most texture and
the most pressure gave the most vibrancy than
we worked on just creating a little bar and then
really try to control it. So that when we
lifted our brush, we got a more controlled shape. By having that more
controlled shape, we can repeat it to have
an abundance of them. So that's a very
effective technique in watercolor as well, and particularly
in abstract art. Now, really focusing on the
qualities of a flat brush. We played around
with the angle and the pressure of
holding that brush to get a very thin line to twisting it and then back to get that thicker wave going on, but without lifting the
brush off the paper. And then by doing that quicker, we got this beautiful ribbon. Then lastly, we had a page
of exercises where we played with different techniques from this particular brush. Not only did we make small, thin parallel lines,
but then we went back in and tried to place
them without touching them. So that was a really
interesting exercise, a little different than
spacing it quite so widely. And we got a lot of strokes, a lot of images here. Then we made pluses just by
alternating the brush angle. And again, you can
get different angles. You don't have to have
these perpendicular ones. Here. We did a half
circle or a comma. And again, we never lifted
the brush off the paper. We kept it down and you
have different results. More common alike and
more half circle like. Then lastly, we just looked
at some different shapes. The flick, looking for lots
of texture, the rectangle. And then just do
a slight tilt to the brush with how we
placed it on the paper. We could either get that
rectangle or that diamond. And here we achieved the
diamond, but going vertically. The last one is we combine
them just to make a pattern. And this was just
done to rehearse the motion of changing our
brush position each time. I hope you found
this class helpful, and I hope you found a lot
of exercises to help you fine tune your flat
brush abilities. There are many ways you
can go about creating a page of exercises as
we've done in class today. You can feel each exercise on its own page in a
watercolor journal. Or you can just pick and choose the exercises that you
find most valuable. If you've enjoyed this class, please consider
giving it a review. Be sure to subscribe
for future updates, and please be sure to
follow me on YouTube if you're interested in
more art activities. Thank you for joining me today.
 Daniela Mellen, Artist & Author