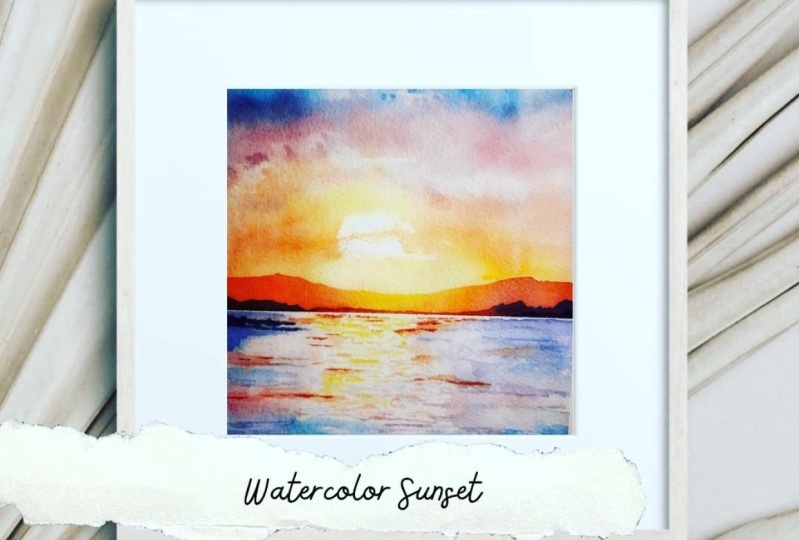
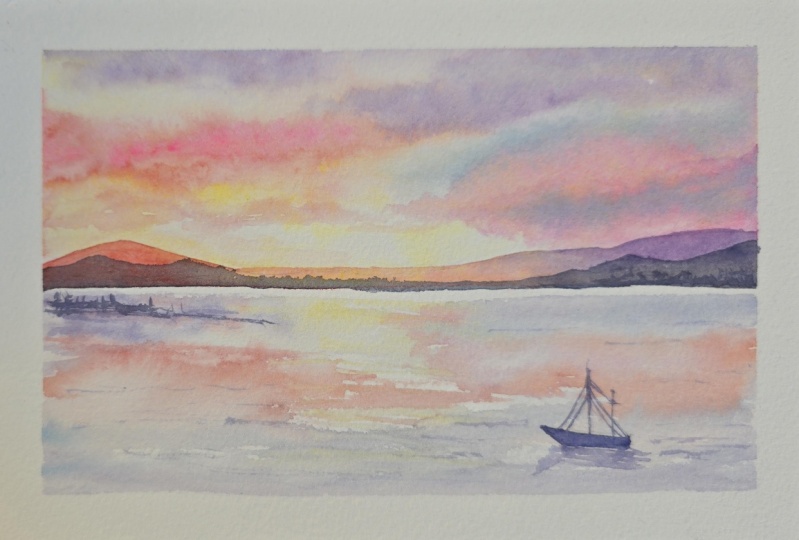
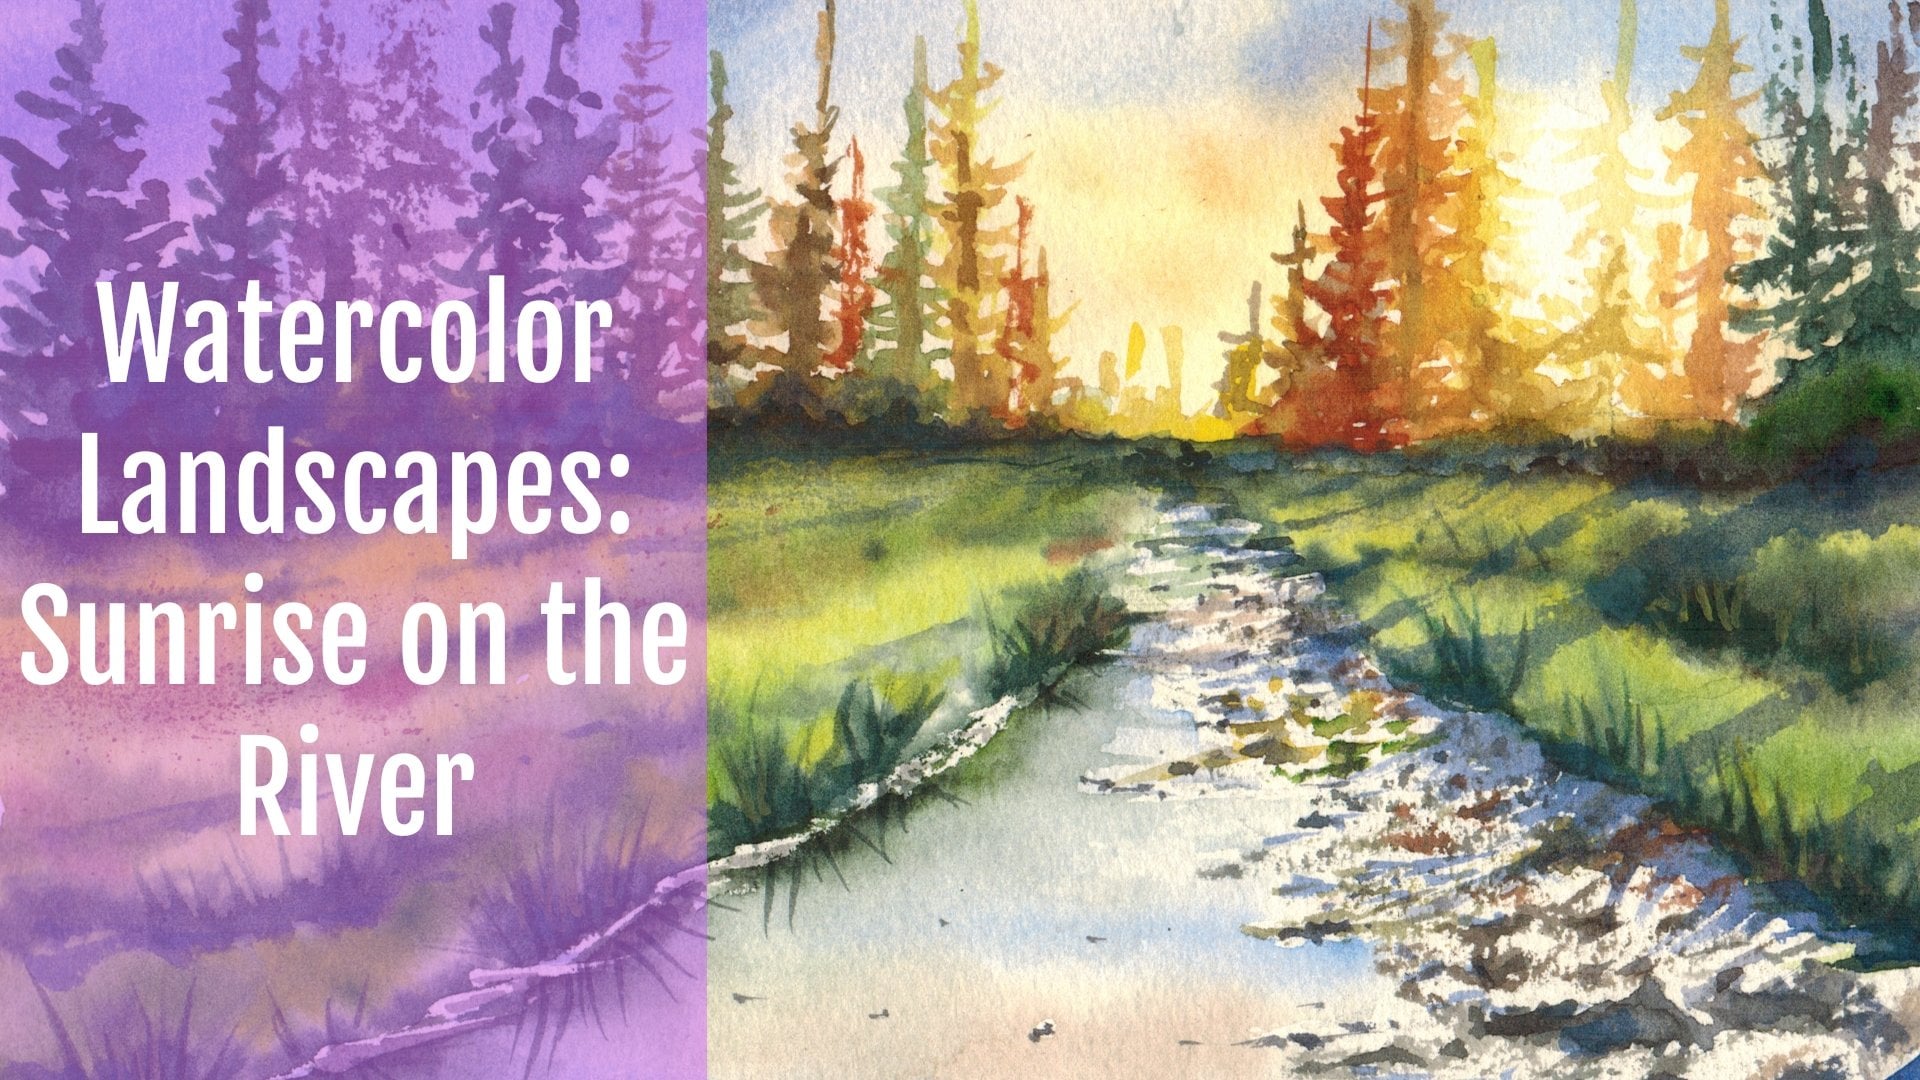
Transcripts
1. Intro: Have you ever watched the
sunset and such desire? And have you ever
tried to capture the beautiful Athens
here and then maybe ended up
with muddy colors. We're lightning and a very
frustrating final results. So if this is your case, this class for you. Hello everyone. My name is I'm an Italian,
whatever color it is. And since I've started to die, and I've always been drawn
by the magic of light, which is an element
that really strive to convey in each and every
landscape that I'm paint. This class which is suitable
for all levels, salary T2, which are the few colors
that you need to have in your palette to paint all
kinds of sounds as possible. I will share with you all
my tips and tricks that are useful when you want to convey maximum light on the paper without using any masking fluid. And most important, I
will teach you which are the key elements that
you have to bear in mind. That will become very
strategic planning or sunsets. And you will have all the elements that will
give you beautiful results. So if you are serious
about painting sunsets, and you are very curious and willing to learn
all of my secrets. Grab your brushes. You'll call us you paper, and let's do this.
2. Materials: So let's have a look at the materials that I'm going
to use in this tutorial. I will be using my pencil, my poetry Robert and a ruler because we're going to
trace the horizon line. And I want to be
a straight line. And I will be using also some masking tape to have a nice frame
around my painting. I will be using ultrasound
tissues or paper towels, napkins, whatever you like. Of course, water
and you will need. So our palette to mix your
colors can be ceramic, plastic, metallic
bond, whenever you have, there's no problems. And then the most important
parameter to me is paper. I will be using a
100% cotton paper. Paper must be thick cut. My paper is at
least the 300 grams and 300 grams per square meter, sorry, and it's a cold press. You can buy single
sheets is paper and then cut them as
I have done here. Or you can buy also blocks, Like for example by arches. And if you buy arche, my advice would be to buy a block which has gone
down the four sites. So if paper will stay flat until the end and it will give
you a nicer result. The other thing that
is very important, a Scholars and I will be
using a yellow Coriolanus, which is a very
transparent color, and let the light pass
through the light, the white of the
paper pastel colors. And so the final result
is very, very bright. I will be using also an
ultramarine blue, cobalt blue, and ocher, or a burnt sienna. And I will be using
also permanent calming. And then I will show you
what I'm talking about so that you can have
an idea of the tail. So this is a yellow
light orally. You can use something
like burnt sienna, red ocher if you like. This kind of round two is very useful because they
eat mixed with Oreo Lynn will give you a very nice oranges color and permanent carmine
or quinacridone, red, R2, very nice red colors and they are towards the
purple side of the red shades, and I really like them. Then you're cold blue and ultramarine blue
is all you need. I am very fond of
limited palette because this way we can explore better the way that the
colors mix together. And I will be using tubes, but you can feel free to use pounds as well because
they are perfectly fine. It's up to you and
what you have at home. And last but not least, we're going to use brushes. So what kind of brushes I'm
going to use, of course. So we will have flat brushes and we use ulcer round
brushes like these one. All my brushes are synthetic. These are imitation of squirrel
and they are very useful when you have to paint
the sky because they are soft and they
retains a lot of war. They retain a lot of water, which is very useful for
painting clouds, for example. And then I have also sharper or stiffer brush brushes
you can have all. So for example, something like this one which is
an imitation of sable, which is soft but not as much as the limitation of square
or something stiffer, which is like this one which
is any mutation of mongoose. And they can be very, can be used one or the other according also to
your way of painting, when you have to paint details or places where you need to be precise and you don't need a very high load of
color on your brush. And that's it. So let's move on.
3. Mixing colours: So in this lesson
we're going to explore all the potential of the five
colors that I've chosen. And here we have Oreo Lynn, red ocher, permanent Kami, cobalt blue, and
ultramarine blue. And I will show you how
we can get many colors. We are perfect to paint the sunset and we're
going to mix them. So first thing first we
need to some clean water and we're going to
wash to walk me to, to water one piece of
paper in this way. And we're going to take a bit of orderly and we drag, we move it. So you can see that is
a very bright color. And wanting to be mixed
with my red ocher, that is a very
powerful brownish red. And you see that in-between
when they emerge, they create a very
nice orange color. We can have also we can mix
them also on our palate. And we get this bright orange that is perfect as a mid
tone to have in the sky. We have also my red
permanent carmine. Let's wet the paper and add it by itself so that
you can notice that you can get a very nice red color, but used by itself, it will give you
also the pinky tone. That can be very useful. And of course we can
mix it with our orally. We will get a very
interesting orange color. We have it maybe a bit more so that you can see it's
more of an orange color. You can also makes permanent common with red ocher and have a more reddish brownish color. That can I have a
place in a sunset when the sun has almost
completely faded away. And then we have the blue
color is white via KB. Pay attention now because, because if you make your cobalt blue with
permanent common, you will get a very nice color. And here we have it. And you can use it
also by itself. And it will be very useful. So for aerial perspective
to have this dark tones. You can mix cobalt blue with permanent come in and a bit of red ocher to get a violet tone towards the
brown site of the spectrum. Or you can make so, so cobalt blue by
itself with red ocher, and you will get a
sort of gray color. Brownish gray color. Very, very useful
if you want to pay, for example, a sunset
with stormy sky. Then we have coal blue,
ultramarine blue. Ultramarine blue can be
mixed with permanent common. And we will get deeper, darker, violet, very strong
and powerful. And you can make
soul so ultramarine with red ocher or burnt sienna. And you will get a very
dark green color of, let's say, an egg brown
color if you prefer. And also very similar
to a gray also. And this could be
very interesting. Always. The case that
you want to pay into or a very dark sunset or if
you have a stormy sky. So as I told you before, you don't beat that
match colors To, you don't need all
the colors possible, all the oranges, all the
reds, all the brown style. It's very useful to have a limited palette
so that you can use an explorer to have a more harmony
inside the painting. And it can be also
useful because you will have all the shade that you want to create together
in a very concentrated, in a very small palette. And you will get a very astonishing results just by using these four
or five colors. And I encourage you to try
all the different combination between all of your
colors so that you learn how to
mix them properly. And once you're ready and you know all the potential
of your colors, you can move on and face the other part of
the hope of the metal, which is the technical part. So let's move on.
4. Techinque concepts behind a succesful sunset painting: Cell niche in every facet, there are some key
common elements that will help you to
achieve a very good results. And I really want to
draw your attention to those main aspects
because it will be easier for you also when
taking photographs, for example, like you can use as a guidance or
reference later on. So before starting to paint, I really want to focus
on this main aspects. And I want you to grasp these concepts
because in this way, very solid method of working and you will be strategic
goals about planning, your son said before
starting to fade. And in this way, you will reach your
goal more easily. So let's dive into it. The first thing that have to
bear in mind is that one of the main characteristics
and one of the common characteristics of all the sunset is
the area of white. You always have an area of white which is
offered by the white of the paper and that you
need to preserve it can be on one side. You can be at the very center. Like for example, in this case, it can be towards the
horizon in the lower part. And anyway, once you
have decided that the light is coming
from that point, you start to build
your sunset all the way around the
other elements. Second elements that you
need to bear in mind is that the sky color is move in a
gradient from light to dark. So the darkest value
are at the top. And this is very useful
because that will help us in building the
area of perspective. So we go from light to dark, for example, in this case, when we have also dark clouds, we have dark clouds always
also over the horizon, but we have a very gradient, a very particular gradient
also in this case. And this is the
same exact story. So we have an area of light and then we start
from light to dark. And we have the darkest spot at the very top of the
base of the painting. The third element is
that there is always a dark element or a contrasting element of the
landscape in the foreground. So this adds depth and also increases the three-dimensionality
of your painting. For example, in this case, it's the darker
flexion of the boat. We have the fruit
trees, we have. Can, it can be the
farm or it can be some human elements
of, for example, so building block in this case, or it can be like in this case, the leaves of this tree. But it's something
that really helps to increase the depth and create a more rounded
and structured landscape. And the last but
not least of all, the key points that
you have to bear in mind is that the area of
the law under the sun, or close to the sun, lighter and then
gradually become darker as you get further away. So in this case, we
have the leaves, the heap where the sun, I wish our lighter, for example, orange
or yellow or orange, then they become gradually darker as we go towards the top. And for example, in this case, you see we have a very
light area under the sun and we have gradually
darker areas of the site. And in our final project, we will see this process in the very specific way so that you will get very comfortable with the process to convey
the maximum light in the area where the sun hits the elements
of the landscape. So you feel confident
with all these aspects and you will try to grasp Merlin to apply them in
your watercolors. I'm sure that you will have very successful paintings
even when using, for example, different palette. But you will convey really
very good harmonic results. And now that you know, even these parts of theory, we can go back to
practice once again. So let's move on.
5. Technique basics for light an gradient in the sky: So now that you have all
the concepts that you need for painting a
very successful Sunset. Let's try to understand the technique so how we
can preserve the white of the paper and to get the area of perspective
without getting muddy colors and getting
the maximum light. So we said that we don't want
to use any masking fluid. This means that we need
to leave a white area. When we are going to do this, we will use a round
brush like this. The imitation squirrel. We will use clean
water and we're going to wet more or less all the area that we're
going to paint with light, with the lightest value in
this case will be orally. And we will be careful to leave a dry area in the place that
we want, the maximum white. So in this way, the colors will flow
all around and we'll leave the area of white
completely untouched. But we don't want harsh lines, so we need to paint our
area very carefully. Then. We are going to use
R, for example, our oil in and we
will start to paint. I will show you from this way
very far and let the color flow toward the area
that we left dry. So that will get a very fluid
and nice gradient color without any harsh line. And this is very few
think it's necessary and you'll want to encourage the color to flow
more on your paper. You can add some water so that it can
spread a little bit, ie in a more easy way. But without exaggerating
because you don't want to cover the
area that she left white. In this case, you will
have the widest part of the whitest white and you will get the
maximum or flight as well. So the most important
thing is to start very far from the
EC that this is the dry area that I left and I started far so that the
color can spread easily. But you will not have any
Asch line at the center. So when it will be
completely dry, you can if you want or
you see that you didn't wetter in a very uniform way or some harsh lines are for me, you can always use
some clean water and soft until the paper, you can do this while
the paper is still wet. You can soft. The edge is to encourage
to have your, for example, your circular shape of the
sun, if you like that, but feel free to encourage
this movement of the color. But be careful because you
don't want the color to go too close to the dry area. And encouraging the flow of the class will help you to get a very nice gradient
if you want, because you want to increase maybe the darkness of the sky. You can put some clouds. In this way. Believe me, the paper is still
wet as you can see because we have
the light that can help us do it to see where it is still shining
and where it's not. So you know that it is dry. So if this is your son, you see we have cloud's going in front of it with
a very nice gradient. But in this case, the car will stay
where you put it will not spread all
around the cell. I've tried to do this exercise as much as you can
until you don't get very confident
with this technique. The most important
thing is to start very far from the dry
area that she left. And if you want, you can encourage
the blending or softening any harsh line
until the paper is still wet. And you can put in
also some clouds in front of this and
to make the light, the whitest part to
result in even more. Then the other thing
that we have to learn is to create a gradient
from the darkest part, which is at the top and going
down toward the bottom. And usually we have some colors
like for example yellow. And we have also
blue in the sky. And the most important
thing is that we don't end up with a green skies. So what we're going to do, we're going to use a
Beta of strategies. So when you have
to plan a sunset, you need to understand that
the upper part must be the darkest and it
should be blue. The lightest spot is
usually yellow as we see. And you must be careful because in-between you should play some colors like orange or red or purple, even if you like
purple, for example, let's mix some cobalt blue
with our permanent common. We have purple. We can have also a
bit of ground given by blue and red ocher. But in this way, we have a gradient. For example, if we add
red ocher to these, you see we have a gradient, but we didn't end
up with a gray, with a green sky, sorry. So this is very, very important. You have to be strategic
about your color choices so you can use whatever
color you like. But the most important thing
you have to remember is that blue and yellow
bus be as separate as possible so you can use all the purple color
combination that we saw. You can have that color, you can have brown color, you can have oranges, the colors that you like, but yellow and blue must be at the very farthest point and they never touch so that you don't have any green
color in your sky. Now that you know
everything about the theory, let's get started. Let's start our final project.
6. Technique basics for painting clouds and sparkling water: So before getting started
with the final project, I want you to show
two techniques that are very useful
because we are going to paint a sky with clouds and
also sparkles on the sea. So for the sky, one thing that I usually do is to wet my paper and I'm
using a flat brush, but you can use
also the spiritual, the imitation of square brush
that I told you before. And you have to
wear a uniform way. The surface of papers that
you don't you don't have dry areas and you don't have
pools of water as well. And then using your
flat brush doesn't matter what kind of
colors you pick. It's just for the
sake of the exercise. And you have to use a bit of color and then you want
to get very soft clouds. You have to put them on
your paper twisting. Doing this movement that I'm showing you with the hand
in this way you will get very soft clouds living also the whitespace between one set
of cloud and the other end. If you haven't used
this technique before, I encourage you to try a bit before starting
the final project. As you can see, we
have a dry area here. So it's nice if you want some hard edges in the
sky that can be a nicer, a variation on a theme. Otherwise, you must be
sure that the paper is very uniformly wet. And if it's not too late, you can always solve
the edges using the soft brush and going around them so that you'd get a very fluid and soft and
feathery edge for the clouds. And so this is step number one. And before practicing the
fool, the final tutorial, I encourage you to
try and to get a little bit used to this kind
of movement with the wrist. And the second part instead is concerning the fact that we're
not using masking fluid, but we are living some
whitespace in the sea area. So the most important
thing that you need to focus on
is the materials. So you can use a flat brush or you can use
ulcer round brush. The most important thing
is that we are going to be working wet on dry, and we will leave the
sparkles without painting them or masking them with white goulash or we're not using masking fluid, get tolls. So be sure that the paper
that you're using is cold press so that it has a good texture and the paper
has a little bit of tooth. The other thing is
that you want your brush to be not
loaded with color, but just a bit and the surface
of the paper must be dry. Then you will use
our show you here. You will use the color as it is, and you are going to drag lines. In this way. Maybe this is too dry, but we're going to see, we're going to capture the
texture of the paper with the wet color on
the dry surface. And we will leave some white areas that will give the impression of
the sparkles on the sea. So these are the two most
important technique aspects that you have to practice before starting the final project. Try to paint the clouds. So with the flat brush, twisting your wrist and getting very soft edges and controlling
water on the paper. And then on the contrary, we have wet on dry, so the paper is
completely dry if you use your dry brush works so you
load your brush with color, but the paper is completely
dry and you drag the brush on the paper so
that you catch the surface, but you leave the
whitespaces off the texture that we get. The sparkle effect without
using masking fluid or any other tool so that we
get a very natural result. So when you think that you
had these graphs completely, these two concepts,
you are ready to start our final project.
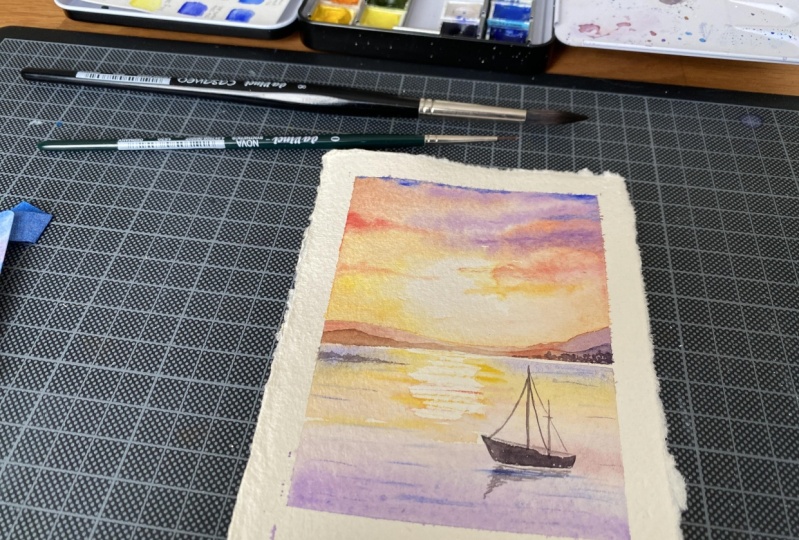
7. Main project: drawing: So here we go. We're ready to start our drawing
before painting. And in this case we have
a very simple landscape. The first thing that I'm going to trace
is the horizon line. And for the sake
of compensation, the horizon line will not
be exactly at the center of my area, but it will be, let's say, two-thirds for
the sky and 1 third for C. This is because if the horizon line is exactly at the center
of our paintings, the final effect can be a
bit contrived, a bit ugly. And so I encourage
you also to work on a small piece of paper because if you are
at the very beginning, maybe it's a good idea
not to start with a very large area of paper so that you have to control
water on a white space. But if you work on
a small surface, you can control
water better and you can move in an easy
way and it will dry also more quickly
so that you won't have many time to wait before
one step and the other. So this is about, let's say 15 centimeters, so will be something
like That's around 8.58. So eight centimeter and a half. And then I will draw my horizon line so that
we have the horizon line. The sketch is very simple. We are going to trace some
hills in the distance, but very, very, in
a very light way. And we will have also some he'll send the front
because they will get to they will help us with the
aerial perspective to get the depth of this
small watercolor. And we are going also
to trace a ship. I like to put in very small
objects because they will, they will serve as the
purpose of creating a focal point so that the eye of the observer
will be of course, drawn by the light
of the watercolor. But we great also
another point of interest and something
that will provide the contrast that
I told you before. We get a nice composition. But it must be really, really simple morph something too difficult because
it will be just a hint. The most important thing is
to preserve the atmosphere. So that's everything we
need to for our sketch. And we can move on and
start to mix the colors.
8. Main project: sky: Okay, so let's get started. As a reminder, I have the palette that I used
before just in front of me, but I will use also another
one to show you better how I mix the colors and
which tones I am using. Because I want you to
understand it exactly the process that there is behind it, a painting like this. So I'm going to put
in my yellow again. And as I told you before, I will use also red ocher. I have it in my other palette, but it's better to
prepare things together. Then I have my permanent common. Put it here. These colors are very powerful, so you just need us light. Teeny tiny beads. You don't need that
much of the color, but, you know, you never know how much color you are
going to use in a painting. So have your colors handy
because if you ran out of them, it might be useful to be quick because the paper
will dry really fast. So whatever color is. A matter of thinking
before painting, I think that all the
things that you can do in advance are you very useful because once you
have prepared everything, then you can go and start
and lay down the color on the paper without stopping
and you get a better result. First thing first, we're going
to prepare the colors for the sky because
as I said before, we don't want to be
in the middle of the sky and discovered that
we have run out, of course, and we have to waste time
for mixing some color again and maybe the
tone is different, and so we get an Aggie result. So first thing first, we're going to paint
the yellow area. So we need to be sure that your brush is completely clean. So we have yellow
and that's fine. Then we're going to mix a bit of yellow and permanent carmine. And remember that even if it's very concentrated
on your palate, once you lay down the
color on the paper, it will be diluted because
the paper is wet and wet. Watercolor dries. It dries in a lighter way. So it's more or less
the 2530 per cent lighter than the color that
you see on your palate. So don't be afraid
of a strong color because that would
be different once it has fully dried and it can be useful to have all
the shades and colors. So we have also mixed with red ocher or burnt
sienna, whatever you like. Then we went also some
purple color that I really enjoy because he helps us to achieve the aerial perspective
as we saw before in our technical focus that
we do in our theory, focus that we had before. But it's also vary. Nice color to see at the sunset. And I'm mixing ultramarine
blue and permanent carmine. And I have this kind of
color that I really enjoy, but I want also
something more bluish. So I think it will get
cobalt blue as SHE is. A very small drop off. Yeah. Maybe mute more cobalt blue
with a very small drop-off. Permanent carmine or rose
matter, or quinacridone red. Now quinacridone, Scarlett,
whatever color you like. Okay, so I think we have all the colors that
we're going to use. And one thing that is
very important is that the very same colors
will be used also in the sea because the water
reflects the colors of the sky. So remember that
these are the colors. And if you want to
be absolutely safe, you can maybe mix
a little bit more. Because in this way, you will not run out of color. And you will be ready to put them again in
the sea without changing tones and light anyway. You will be able to evaluate what's
going on on your paper. And in that case, be ready to put in some
order to make some car and be ready to lay down on the paper
before it dries completely. Okay, So we have all the
colors on the palette. And now the most important thing is that we are going
to wet the paper. So before starting. I want you to focus on the most important thing
that we're going to do. So we will leave a dry area more or less here in the center because as I told you before, we want the color to flow, but we don't want
to cover the white of the paper that will
give us the maximum light. And then we will progress
from light to dark. Moving from this area of the painting
towards the upper part and increasing the
darkness of the color. So going from the yellow to the oranges and reds and
then ending with the purple. And we will be very strategic so that our purple or
blue color will not get in touch with
a yellow so that we don't end up with the green sky. So let's get started. I have my round brush. Really mutation and I'm going to wet the paper in a
very uniform way, as I told you before, I will avoid the center because I want to
leave this area white and I will probably go down to the horizon wetting the area. And I will be very, very careful to stay
away from the horizon when I will be close to the distant hills because
I don't want the water to, the color to flow into the sky place so you can
look at your paper sideways if you see that there aren't any dry areas apart
from the center, you know that shyness, shining in a very uniform way. It's wet in the right, the correct way with
no puddles at all. And then we will start
with our flat brush. You can use all two round
brush if you prefer. I will use the flat one because I think
that for the skies, it will give us a
bit more capacity to move and to get nicer clouds. So as I told you before, this is the lightest thought. If you see that there
are some areas that needs to be wet, you can now decide to
wet the paper again. Like in this case is C. I have left to dry here, but I want a very soft plowed. So I'm going to put in
my oranges here and I'm twisting my words so that
I get this nice fluid way. Oh, let's put in a
bit more orange. And also beautiful orange here. Now, be conscious
of the fact that this guy doesn't need to be
totally covered with color. You can label so some white areas because they
will give the impression of light under the clouds. So be aware of the fact
that we don't want to pay into under
the horizon line. So we need to be
very, very careful. And now I think I've put
in some more orange with my lane and red ocher
here in the upper part. And you see that
the paper is dry. Before going on, you
can bring your brush. And where we wet the
area that are dry. Because remember that we don't
want any any soft I mean, we don't want any hard
lines or hard edges. And then we are going
in with our purple sky. So you see that the paper is really whether the right point. So we get very soft shapes. If you want, you
can correct them, bleed and guide the
color on the paper and let it move according
to your own taste. So then you get the shape
that you really like. And the software
AT is the better because we want a very
relaxed atmosphere. We are at the sunset, we're at the end of the day. You want to put in some
contrast here you can use also. Permanent communist cheese
and put in some stronger TO remember that you can work just as long as
the paper is still wet, otherwise you will
have a very ugly resolved and we don't want to have any hard
lines in our sky. Then. We want to add to increase the contrast between
the light at the center. We can wet just in
front of this guy here. And there's the sun
area on the y you, the very tip of your soft brush. You can with these small area. In using Russian for example, these orange color, we can
paint some soft clouds. Very soft clouds, that we lead our observer to this
point of maximum light. Then if the paper is still wet or you see that
it's drying too fast, you can soften the edges
of these clouds using your your brush and guide
it for a very good result. So I will put in some. You can use also the soft
brush to lift the color. Always just this time
not loaded with color, but just with clean water. And if you want to add
a bit of contrast, we will put in purple here
and maybe something blue, really, really blue
here at the very top. So you see that we obtain the gradient
we were talking about leaving also the
whitespace for the light. Across the clouds. The colors are a bit separating
on paper so that we get a very nice blue and
red shades and we preserve the area of maximum light at the
center of our paintings. So before I'm putting
in the heels, we want the sky to be perfectly
dry because in this way, we are sure that the
color will move from our heels to the sky and we
will work in a safer way. That is why you can
leave your painting here and waited for it to wait for it to
be completely dry. And then we can move
on to step two.
9. Main project: distant hills part 1: So now that this guy
has completely dry, we are going to bake
the distance yields, but we must be very
careful because as we want to convey the
maximum light in this painting, we must paint in
a very light way, the area just
underneath the sun. So here in this position we will use a very light orange color, and then we will
increase the dark, the dark colors Towards the
two sides of the painting. So we will start with
the lightest area. As always, if you have a very light
orange on your palette, you can use the one that we
mixed before using Arlene and red ocher or it will be your yellow and burnt
sienna for example. And we're going to
paint wet on dry because we don't want
a very dark area. So be careful when you arrive more or less sunder the
sun exactly under the sun, you dilute your color because you want it to
be really, really light. And why we are moving
towards the left side. We're going to use a
darker shade of orange. And we will mix then
also some brown. I will show you how. Just increase the tone. Because it's all a matter
of balance between light and dark tones. That must be correct so that we convey also the sense of
distance, central recession. While in this area, we can use always the
orange that we mix before, and we will put you in a
bit of purple, violet. So always using a
very light wash of the violet that
we make before, we are going to complete
the first step. And be careful to paint just exactly to the horizon line and don't go any further
because you don't want that The convert
to go underneath. So if you think that you need bit more splash of color here, you see how beautiful it sees the gradient that
we're going to create. And maybe we can make it
a bit more purple color, a darker one here. And it will be
just in the front. And then you need some blending. You can do that
using your brush. And so we have the
distant hills completed, and now we're going to wait
for them to dry before moving on to the hills that
we have in the front, we will prepare it darker
colors because we want to increase the tone as they
are more near to us. So we are going to see them
in a more defined way. But we need to have
our painting is completely dry because
we don't want to ruin what we have just painted. So let's stop here
and we will move on. When he tells fully dry.
10. Main project: distant hills part 2: Okay, so now that the
hills are completely dry, let's put in the darker
ones just in front of them. We need to make a dark brown. And we're going to use
our coal blue. Yeah. We had a bit of a red ocher, burnt sienna so that
we get a very nice, almost like make
chocolate brown, um, this kind of color. And we need also
a lighter shade. So a bit of red, orange or red ocher, and just a teeny tiny
bit of cobalt blue. Then we need also the purple color for the
other part of the hills. So let's put in here
we have this violet, ultramarine blue and
permanent common. And we need also very rich dark brown that will be the darkest
value in our paintings. So we need ultramarine blue and our red ocher burnt sienna. So you see you get this
gray color, almost black. If you add more
brown or red over, you will get a very dark brown, very similar to Van **** brown. But in this case,
you will get at the end a very harmonic
result because we made all the colors starting
from our limited palette. And you will see that the result will be
very pleasant for the I. So let's start with
the second layer. We are always working wet and dry because the
paper is completely dry. And we're going to use
our chocolate brown. And we're going to put in
the color and then we wash the brush and we drag it
towards the horizon line. Because we want to
create a dark shadow. And remember that while
moving towards the fight, with the maximum area
under the sun colored, we move towards the yellow and the orange
color, the orange part. And we will put in
all some bit of oil in here because we
want a darker shade, but just a very light one. Then we go back to our orange color with
Oreo ln n, red ocher. Or you can use
diluted red ocher. And then let's use our
purple color here to create the shape of
this heel in the front. And let's go in with a bit of dark brown
with chocolate brown, but the stronger version. And then with the brush
loaded with clean water, you dilute it towards
the the C line. So you see, we are creating
our layers and our planes. So we have the very far sky
with a light at the center, with the maximum area of light. Then we have the
distant hills and we have the hills that
are closer to us. And then we will tackle the c. So if we are very careful, we can start to put in the
C exactly just right now. But for the sake of
the work that we did, we did before and we
don't want to rename. My advice is if you are
at the very beginning, just stop here and wait for the hits to be
completely dry. And then we will move
on and we will do the C and then the
final touches, adding the little boat.
11. Main project: the sea: Okay, So we are now ready
to tackle the seat. Most important thing
before starting to paint, we're going to prepare the colors because
we don't want to run out of them just in the
middle of the painting. Another thing that we have
to be careful about is where we're going to place the
sparkle so the reflection, they must be just right under the area of
the maximum light. So if this is the, my white space for the son, my sparkles will be
just in this area. I don't want you to use the
pencil to define this line, this area because of the
lines of the pencil, will be chapter forever
Ina in our painting body. If it's useful for you, you can trace them very, very lightly just to adjust as a reminder because
you know that you don't want to use that much
faint in this area because it's the place where we are catching
the maximum light. So the sparkles that
I showed you before, the tips and techniques spot
will be placed around here. And this means
that you will work wet on wet in this side and
this side of the painting, but not at the center, the very center because
we are going to use wet on dry and dry and dry. And will, you will
drag the color on the surface of the
paper in the splice. This is very important
that we will have also some Are there areas
will, will, will make. So both the techniques, the wet on wet, wet on
dry or dry and dry, that these are the two things that we have to bear in mind. You can work with a brush
loaded of color here and here, but you must be
very careful here, n If you want, you can trace to very
fine line to delimit the space that you have to leave with very few
lines of colors. On. The other thing that
we're going to do is to leave a very fine white line. And the horizon line
because we eat will help to increase the luminosity of the painting and it will help us to divide Earth from water. So first thing first, as I said before, we are going to paint
to prepare the colors because the C is going to reflect the colors of
the sky more or less, it will be a bit darker
because there will be more blue or purple in it. But we need to prepare them all. And as I said before, be careful because we don't
want to mix yellow and blue. Because otherwise we
will get also green. Green is fine in the sea, but it's better to, let's say, to mirror exactly
what's going on in the sky. So check what's in your palette. Maybe you have all
of them so you don't need to prepare
them again anyway. We have a bit of yellow. We're not going
to use that much, but of course we are
going to use purple. So permanent come in and
cool blue and also orange. Okay, I have orange
allele is enough. Let's talk a bit of that. And also these orange made
from RNN and permanent common, and also the dark purple colors. So it's ultramarine blue and
permanent coming together. Okay. So I think we have all
of the colors that we need. We have the very dark
brown that we're going to use throughout some details to
increase the depth. So we need to wet the area. We will work in bits and pieces. So we will wet the area. Be careful and leave
a very fine line. We're not going to wet this part of the painting
as I told you before, because we don't
want it to be too wet because we are going to
use the wet on dry technique. So we will take our brush. Maybe I will start with
this one, and let's begin. So we will put in
a bit of purple. I just wanted to be a
bit more brilliant. Okay, so you see I'm
leaving these white area. Then I will bring
a bit of yellow. Just to solve them in. With a very dry brush. I am dragging the colors
leaving the white. As I told you before. We are dragging
the color just to leave the areas that will give the impression
of this file. So now let's put some
violent and brutal. So here, it doesn't matter if the colors
are not perfectly blending on paper because
we can always put in some more and get the
effect that we want. Maybe we'll use
some orange here. You move across the surface
with the point of the brush and tried to get very
nice and soft results. If you leave some sparkles also. Other places that's fine. So let's go with the darker orange made
with our red ocher here. And now it's time
to wet the site of the central area again. And as we are moving
towards the the foreground, the very front of the painting, we are going to increase
the dark colors. So we will have a bit of blue, blue here at the very front. And then we have
some red color here. So Let's go in with the purple, maybe a bit more diluted. And always be the tip of the brush so that you increase
an encourage the blending. And if you leave
some white areas, it doesn't matter because
they will help you to increase the sense of light. The most important thing
is that you don't end up with a very strong harsh lines. So this time I will use
a very small brush. This is optional, but you
can use it if you want, because I want to put in some dark lines to accentuate the
consciousness of the waves. And I want to put them
just here and there. Not too many, because
you don't want to end up with too many lines. But they are, they
will give the sense of the waves that are moving. Because the ocean and the
sea is not a steel place. The only thing that you have
to bear in mind is that you can do this while
it's still wet, but not too much because you want to keep the
contrast between the colors. So in this case
it's a bit too wet because it will
completely disappear. While here you see we
have a good contrast. Because the paper
is starting to dry. These very few lines will help us to increase the
movement of the sea. Now, we will try, okay, with a bit
of orange color. But as I said before, not too many because we
don't want to cover and to feel all of our painting
with these lines. Just to, to suggest that
the movement of the sea and the waves keep
it very delicate. And always using the
tip of the brush. And always using wet on dry. Or almost should be also dry on dry would
be fine as well. Because in this way you see, you will accentuate also the sparkles that
we reserved before. Okay, I think that
this is enough. And now the last
thing that we need to do or the final
details and the boat. But once again, we
have to stop and wait for our painting
to be totally dry.
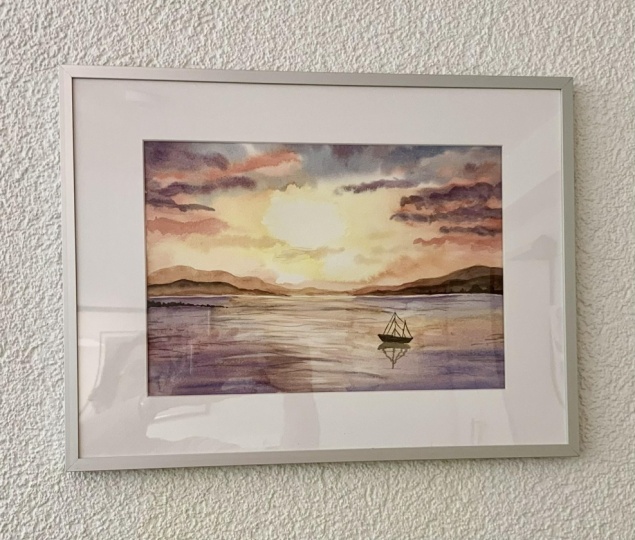
12. Main projects: final touches: We are at the very end of our process and
we are very close to the final details
that will make our watercolor become alive. We need to make just a few adjustments
and out some few details. So first of all, I want you to make
a very dark brown. You remember that we
painted it before, we mixed it before
we used ultramarine blue and our red ocher. Or if you have burnt sienna, It's fine at the very center you see it's very, very dark. It's our darkest value. And if you need a very fine
brush with a very fine point, you can use also something a little bit
bigger than this one. The most important thing is that it's comfortable for you. It's appropriate with the size of the painting that
you are realizing, and it will be very
useful for the details. So we are going to
add some rocks. We're going to sketch. Some rocks are here. Because we want to add some like a piece of ghost
coming into the sea. You don't need to be
very precise because it's just an idea. We're suggesting some objects and we are coming almost near the lightest area so
that you see that the light becomes even more
brighter if that's possible. We add some details also in
front of these distant heels. Just a very simple strokes. So they will suggests maybe a distant town
or a distant houses, or maybe a bush or a forest
in the very far distances. So we have movement in our planes going on and now
we are going to pay the boat. Also in this case, you don't need to be very, very precise because it's just an element that will increase the depth
of our painting, but it's not the main focus. The main focus is the light. We will add also be a reflection of this boat in a
very few strokes. Remember that the reflection
are the opposite. So you will see something
like this anyway, in this case that
the boat is moving. Now we're going to put
in most and some ropes. If you prefer, you can have a very precise
drawing underneath. I usually don't do this, but I just like to
paint that freehand, but it's kind of in a
personal preference. So do what it feels easier
and more comfortable for you. And then we maybe
want a lighter shade. Okay, here to
increase the details. And we are completely done
so we can call it finished. And we don't need to add anything else if you
want, you cannot adjust. For the rivers of
increasing attempt me, maybe with your purple color, some few lines here and there to suggest that the
movement of the waves. But as I said before, I wouldn't do these too much
because it will be two. Looks like something too strong. We don't want to
ruin the fact that these sounds that is very
delicate and intensive, very nice and
relaxing atmosphere. So yes, the only thing that we need to do is to
remove our masking fluid. If it's not completely dry, you can wait until you can leave it in place until
it's completely dry, then you can remove
the masking tape. And one other thing, if you are using a block of paper gummed on the foresight. The foresights, please
leave it in place until it is fully dry
before removing this. And then we will see the
magic happens because the y's that we left frames our small sunset in
a very nice way. And I hope you are so
satisfied with this one. And I hope that, that you succeeded in conveying all these light and all these serine atmosphere
in urine little painting.
13. Final thoughts: We are at the very end. Thank you so much
for joining me in this class and I hope
you enjoy the process. This is our final
project and I'd really love to see all the projects
that you have realized this. So feel free to share, to ask in the comments below
if you have questions, if you have some
difficulties so that we can try to solve
them together. And let's do a quick recap of
the things that we learned. So we analyze, we
tried a few colors that you need to pay all
kind of sunsets ever. We saw also some tips
and tricks on how to paint it white areas without
using any masking fluid. We had some tips and tricks on how to paint clouds
and sparkling water. And we had also very short but intense
segment on the main criteria, the main key elements that you need to bear in mind before starting to paint
a sunset so that you can have very good results, a solid method of work and achieve your goals in
an effortless way. If you want to follow me, you can follow me on Instagram. I will leave you my link
in the description below, and I hope to see you soon
for my next t-shirt glass. And in the meantime,
happy painting everyone.
 Eleonora Serra, Italian watercolorist