Transcripts
1. Intro and Welcome: Hi, I'm hi. And I welcome you to this class where we are going to learn how to create simpler spring watercolor flowers using geometrical shapes. I will be guiding you through the whole process of getting the ideas in finding the chain you can work with, and selecting the colors and making them assign unique and full of 2D own expression. Please do only for this class. And I will see you in the next video.
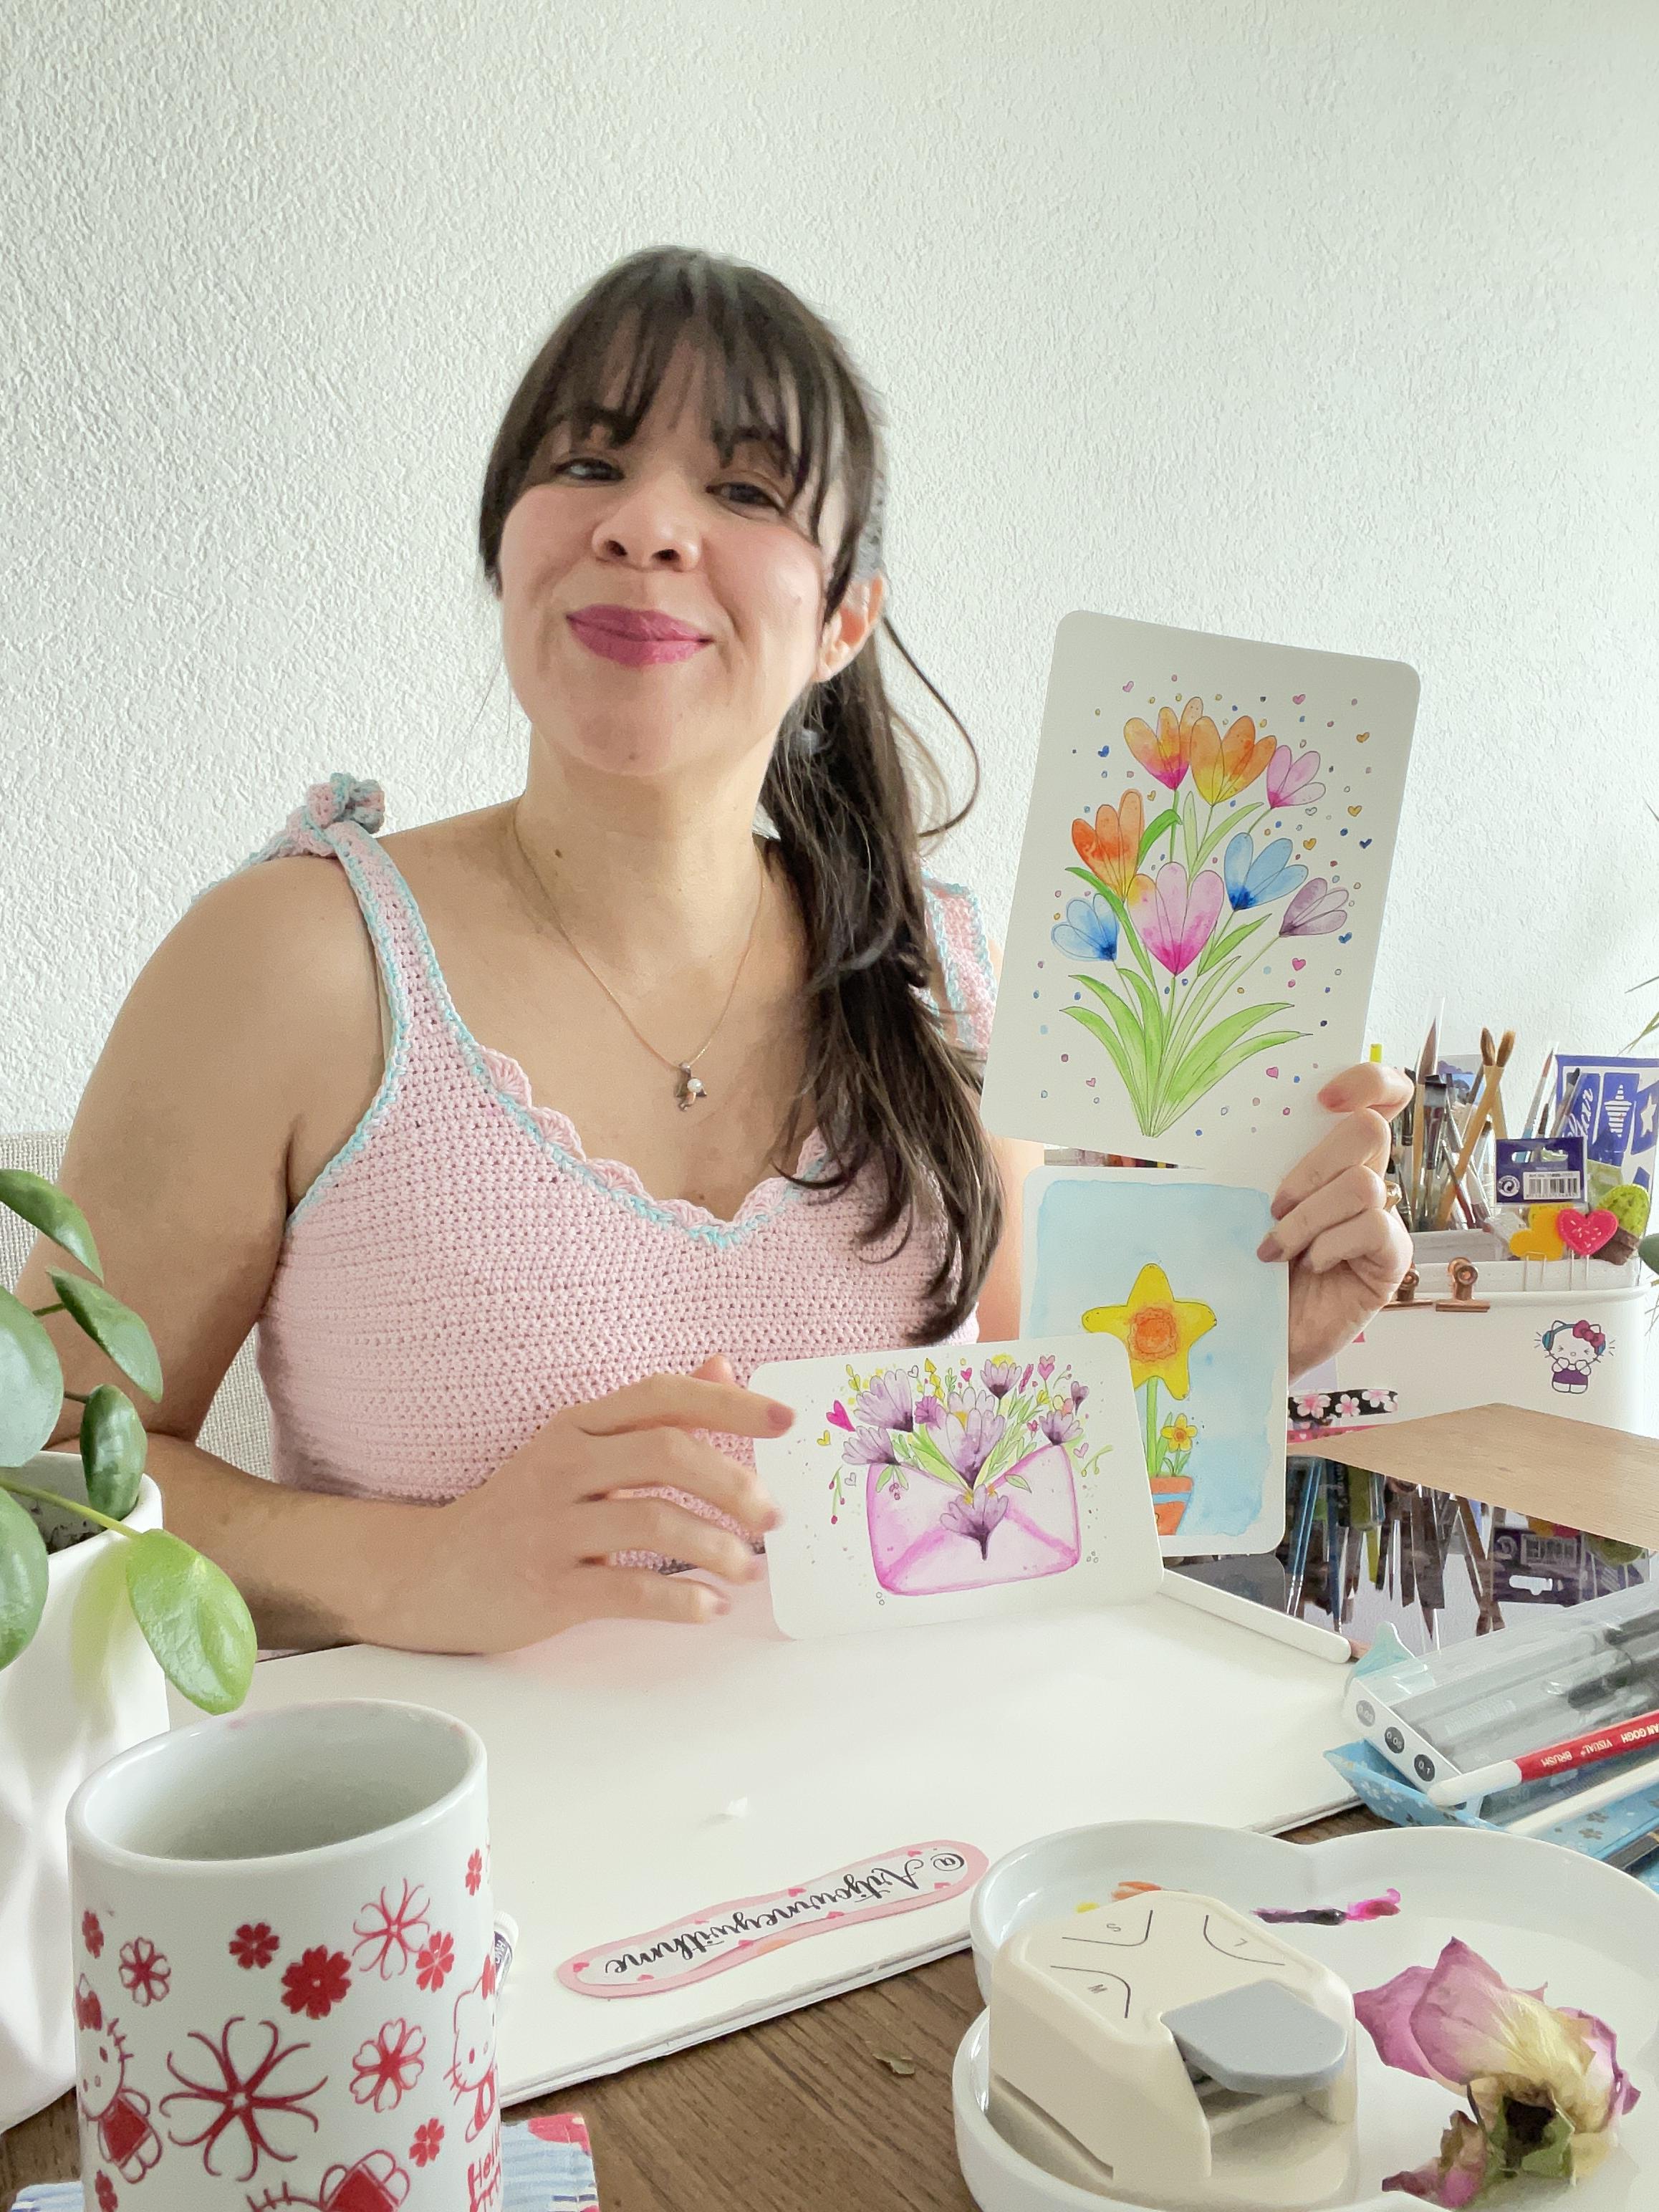
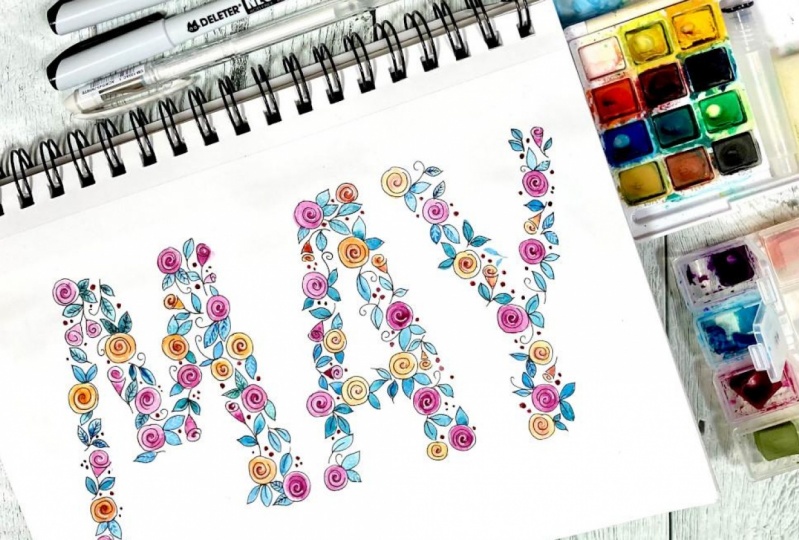
2. Supplies: Welcome. Does that whole class. Let's see what kind of materials we're going to be using. This is a watercolor class, so we are going to be sketching. And for that we need some pencils, some watercolor. Brushes. Finally enters into different sizes. A brush, pen, white pen, clean water, and some paper, watercolor paper, and some paper to the sketches. For the watercolor paper, I am using the 100 grams because this is the best to hold the water when we're painting with it. And to do the watercolor chats, Asquith, to mix all watercolors. We are going to be using a mixing plate. You can use whatever you have at hand, even a plate or whatever surface that these preferably, of course, Elaine or glass so it doesn't stain. I also have some washi tapes to fix a my paper. This is a paper cardinal punch. And it's very useful to make it the coordinates of the paper round. But if you don't have it, you can use AC source and it will do the job as well. I also have a ruler. And you'd Acer because we are going to be sketching or geometrical shapes to make our flowers. I'll see you in the next video.
3. Geometrical shapes Inspiration: Welcome to this class. Let's start by taking our time to look around or look at nature and see that everything is made of lines. If you take a closer look, you will find that every shapes is made of lines, like the geometrical shapes that we know that we learn in school. We see those shapes everywhere in the West. But our field is, we can create something refreshing and beautiful. Just looking at the lights, look at this flower for example. And it is made about frown lines in, I will say, overall shapes. And look at this rose is dry. But two, if you'd look buried, paying attention, you will see that there is a silhouette that you can draw. Does this what we are going to do today, we're going to take some shapes and we're going to create something innovative, something refreshing, using those cute lines. We can use tools like this, cookie, cookie, cookie Carter's, or whatever we have that resembles the same shapes. Let's imagine their son, ford, all fears. Exercise. Close your eyes and imagine the sun that I do see, the lines that are composing or drawing their son. If we can look at the center, it is a spherical. So we see the circle. And if we look a little bit more further away from the sun, we can see like little triangles around the sun. Please make that as realistic as you can, use your imagination or you can, even if you are not that visual, you can look at other song, that picture of the sun. The sun and tried to look on the lines and then tried to paint it through to draw it. So if you take then the the lines of the sun and we asked, we were doing at the beginning, you can make a flower, you can paint are some flour. If you look at the sunflower, insert assembles, the sun, isn't it? So we are going to do in this class, they're saying with a different flowers of a spring. I hope you have debiting much fun creating your own designs using all these simple shapes in this shapes that we're so used to, to create your unique flowers. So here we have all freed exercise was the sunflower. Sometimes we are going through life too fast and we miss out the profoundness and the beauty that is around us. But if you take your time in the field, you smell the roses. So we always are live everywhere. You can discover some new ways to see life to an experience, life to connect with life. I will see you in the next class where we are going to construct or to draw daft foils using a status. See you in the next video.
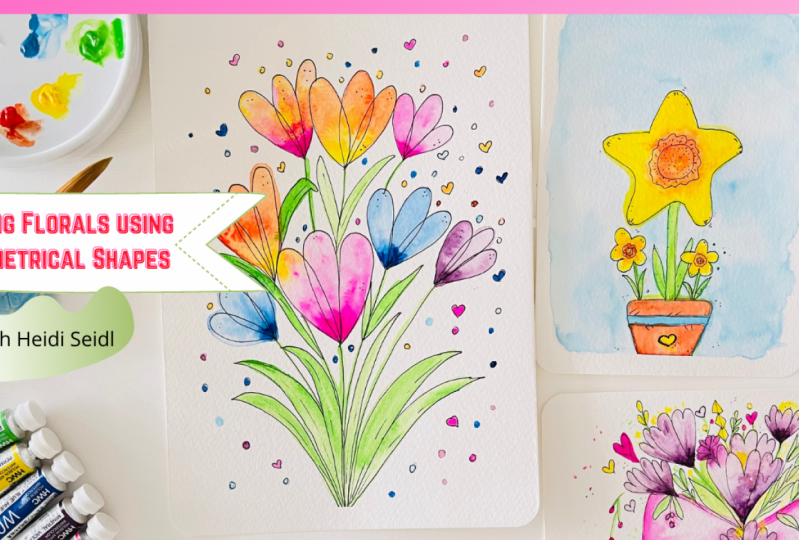
4. Cute Daffodils using Stars: Welcome to this class. We're going to start by looking at some reference picture to make our, therefore this more realistic. But I don't want to make a decent one asset realistic as they are. I want to make them more to look like a cartoon. And what we are, we, we are using the classical one that jello daffodils. But there are many other combinations of colors that you can use or you can use the colors that you prefer. But feeds a, we are going to be starting with the sketching for daffodils. We are going to be using stars, that shape of a stat. And for the centerpiece, uh, we are going to use this you'd kill. I will start sketching my daffodils and I will play with the sizes. I will use a bigger a daffodil and small dogs. Daffodils doesn't have outdoors a warm up exercises. We are going to sketch together the final piece and you can follow me here. Do your exercises, use the same shapes? Or if you want to, can choose another type of shapes to make your daffodils. But the thing is to play to get the creativity flowing and don't hold back, please. Just be creative. Does is the most important parts. So we can all learn together something new and some new ways to see and to draw beings enjoy is the sketching part. And I will meet you when we are starting to sketch on watercolor paper. Now we're ready to start painting on our watercolor paper. And I am just dreaming and the corners, making them route. And decides in that I will use this vertical format. And I will fix this with my washy tapes and I will start sketching with you using this dot shape. I will trace a star shape because I want just one daffodils flower inner part. So you will see that I am just making the edges of my flower grounder. And having an idea of how I want this to look. My little part. But acute. And I am making in the leaf using an oval shape, more elongated a little bit. So you have an idea of how you can make a jure leaves. And I am adding some small little dot for deals to make this more acute in a way, remember, I am not looking for that realistic vision here. I am just wanting to have more comic look category to look. And then I will proceed to make it the outer lines with my fine liner. You get a 1.5 here, 0.3. And I, before I outline my sketch, I will erase a little bit. So the watercolor pencil is not that dark when I am painting with my watercolors is important that do make the outlines very slow. The vignette looks a little bit fast, but that is not my speed. I just forward that the radius so it doesn't take too long for you to look at it to make the outline inside of the flowers. I then using this model, fine liner that I have his acidified alarm, do need to do this in a bear is low. Enough. Inducible, pays for the lens. Look neat and very beautiful. Take your time. Don't rush on things and enjoy the process. Thus, it's all love art. It is to paint and to enjoy the moment. Creating something beautiful. Now, I will paint the background with a very light blue. Then I will proceed to a start painting the flower, starting with the, with the petals and then the center. And then there are the builders model once and the leaves and the pot. I am using this color, yellow, orange, blue, and green. And I will be using a lot of water to dissolve the paint, the water color. To start painting the background, I will use blue with a lot of water three years IN using that technique. Wet on wet. It means my paper is wet with only clear water. And then I will with a my watercolor in my brush and start to pay very light blue. If you want to learn more about this technique, I have a class where I explained everything in details and you can watch it. I put a link on the description for this class. You can choose whatever color you want. I just choose blue because it makes a beautiful contrast with the color of this flower. I will start painting in the outer petals with a jello. I want this to be very bright, so I won't dilute the color I will use in the wet-on-dry technique. This is another glass, thereby have imbedded detail. You can look for it in my BO or on the description box for this class. And you will get all how to, how to use this technique. I want this color to be very bright soil and not using much water IN applying bedding. That callers that is not so diluted. Okay. I have a problem with a BV in the government. I didn't film when I apply it, the orange in the center, but I hope you can see how I do it in the little flowers is a bit easy. Just take water, apply water on the center of the flower, and then Buddha leads US bit of color. In this case, I am using orange and tried to pull the color so it looks more faded, like faded. If you take my class, you will understand how this technique, wet on wet works better. Inserted for the inconvenience. But it's very easy. Dose. Take the color, put it in the center and apply water and it will their watercolor with the magic alone. If you have any question, just ask me in the question box for this class. Now I will proceed to painting the stems and the leaves and the part. You can use whatever colors you want IN using green, permanent green in with water. But I am using the dry on wet technique. The wet on dry technique. When we finish painting with watercolors, we need to let this dry completely before we start adding the highlights with our fine liner. Yeah. You can also use a white gel pen to make the highlights. I am using the black because I think it looks much better on the colors that I have. And I am just adding little points and let the lines, so the flower looks cute. Our fears flower using geometrical shapes. He said, maybe. Now you can use some handed that if you use this Alpha carbon or you can frame it and put it into your favorite place, or give me that, give the dear friends, our family. I hope you enjoyed this first path. Fears flower and I can't wait to see what you create. I will see you in the next BBR.
5. Spring Crocus Envelope using Hearts: Welcome to this class is always a good idea to have a reference picture when you are painting or if you have the object in your front, this is a much better. But for now, I don't have Caracas around here. And I just, I'm looking in some reference pictures to take that shape that I am thinking is the head shape are little bit more elongated. If you look closely, you will see that this resembles are hurt but more, longer. And does this well, we are going to do, now, we're going to sketch or glucoses the warm-up, and then we're going to sketch on watercolor paper. Just the idea of the head shape in making more elongated, MR. as Saleema, you can play with the openness or the closest, closeness of the buttons and have fun with it. Create your own design, and then see how you want to recreate it. The idea that they have for, for this painting is the bane, an invalid full width Caracas as flour bigger the solvus. Beautiful when you receive ongoing do give flowers to other Burson and going up invalid in an envelope. I think these are better romantic and delegate type of painting and this is where they want to create. And now i and then doing the outline and the sketching of the envelope. And then I will add the flowers that they could acacias using a elongated head shape for the flower, for the petals of the flower. And the colors that I'm using a, using the bayonet or the Lena in pink asda main colors. And then I will add soon all the daughters of jello in blue, maybe green for the leaves. And make contrast in the painting. As you can see I am doing and the elongated head shapes trying to assemble the crocus flowers. When they add in blue, I am making some of them like they are close and others I will make that they're looking like open. In also add in some stems, some leaves. Some berries to bring a little bit of aliveness to this painting. You can do the same as I am doing now. Or you can make, of course, do your own design, your own idea, or use another type of container, like a bottle or like flower base or a port or a guard when Jupiter DVT flow weakest does is what I am looking to make Judo lecture collectivity flows and bring up those expression of yourself. As I told you, please don't hold back a Jew creativity. And if you feel like it, use another shape or add another shape to this composition. And you will see that it will be refreshing a style that do are exploring and just make it alive to bring that to life. Because does is what we want to see on Japan DU. We want to see your own expression. We want to get inspired by you. And where we hold back or on creativity, we are depriving others could look at it. Here I have this idea of making this kind of law banned by the width, little squares in this position. And they look pretty cute. Let's see how they look when we apply the colors. I will be finishing all the details on this envelope. And I will see you when we are going. I will see you when we are starting to outline or a sketch. To outline your sketch, use the beaker, a fine line and then you have to remember to do it very slow. This is a forward, be there. This is not my speed, but it would be to take too long for you to watch. So I just speed up a little bit up. And I will see you when we start adding in the corners to get the effect that I want to have on these flowers. I will show you how I do it. I just take a little bit of color and I put it on the base of my flowers, very dark. And I do this with other flowers that I want to paint in the same shade, in the same color. And then when I finished selecting all the flowers I want in this color, I just take my brush, clean up their colored, the excess of color and we just water. I will pull up the color from the base to the app Up worse. And they're color-coded with faded. The color wheel will be like the last looser in it, will make a really beautiful effect where the delegate and you will see that do want to use this technique everywhere because it makes things more beautiful. As you can see, I then applied in and they're darker color on the base. And the scholars is the violent or Laila. And then do we, do, we'll see how I will just pull up the color with my brush with clean water. So pay attention. Here comes this. Just with water. Those start to pull up the colored upwards in the petals of my flower. If you feel like the colors to that, just clean your brush and take more water in apply there. As you wish. This effect is very easy to make and it allows the colors to blend. Very beautiful and very harmonic. And it's super nice. I think. It's very easy, just water and pull up the color uppers. And then take a leader production pigment from the basin, pull up, pull up, pull up until you get the desire effect that you want. And remember, if you see that the color is too dark, then just add more water. Clean your brush constantly in your clean towel. And just like lead them, magic happens because it's where the garden is, just magic for me. Super magical. I will do the same with all the flowers and then with the next color, which is pink. And I will catch up with you. Later on. When we are ready with this process. I will paint the single petals in pink to start giving a little bit of contrast and I answer, we'll paint the envelope using the same technique. I will outline the envelope with a darker shade of pink. In then with my brush and just water, I will pull up the color to the center. So I just covered the whole envelope surface. And it look romantic, so to speak. It look translucent, but with some lines outlining the envelope so we can see that it is a amble, a envelope. Be ready, gentlemen, careful to not mix up this too much with the color, the flowers that we've painted already there. Try and do when you need to wait. Always with every layer that doing watercolors to need to wait until they are dry, bathed in there all the layers that you want to paint. For example, I am painting them, but up now and then I will wait until their envelope is dry to start painting, for example, the leaves or other details, details that I want to add to the painting. The thing is, don't rush into watercolors because they need time and they need to be treated with gentleness. So you can get the desired effect that you really want. And this applies to all types of watercolors. No mother worth water girls too are using. Do you need to be very slow, very gentle? Have patients, even if they are a watercolor brush pens, watercolor, pencils, watercolor, tubes, watercolor, whatever kind of watercolors, Judaism. Now that my envelope is dry, I instead to bang the lips with their green. And then I will proceed to add all the details when the leaves are dry. It gives a more nice and neat look to your bank. If you wait between the layers in, I mean by ledgers, every subject or every, for example, in this every petal, every leaves, every berry, the envelope. The other little details you need to weigh on the layer dry so you can continue painting the other parts or layers of your work. When the whole painting is dry, I am adding the last layer and add in some splashes to my paint and voila or envelope caucuses. Using head shapes is I hoped you enjoyed this and I can't wait to see what you create. See you in the next video.
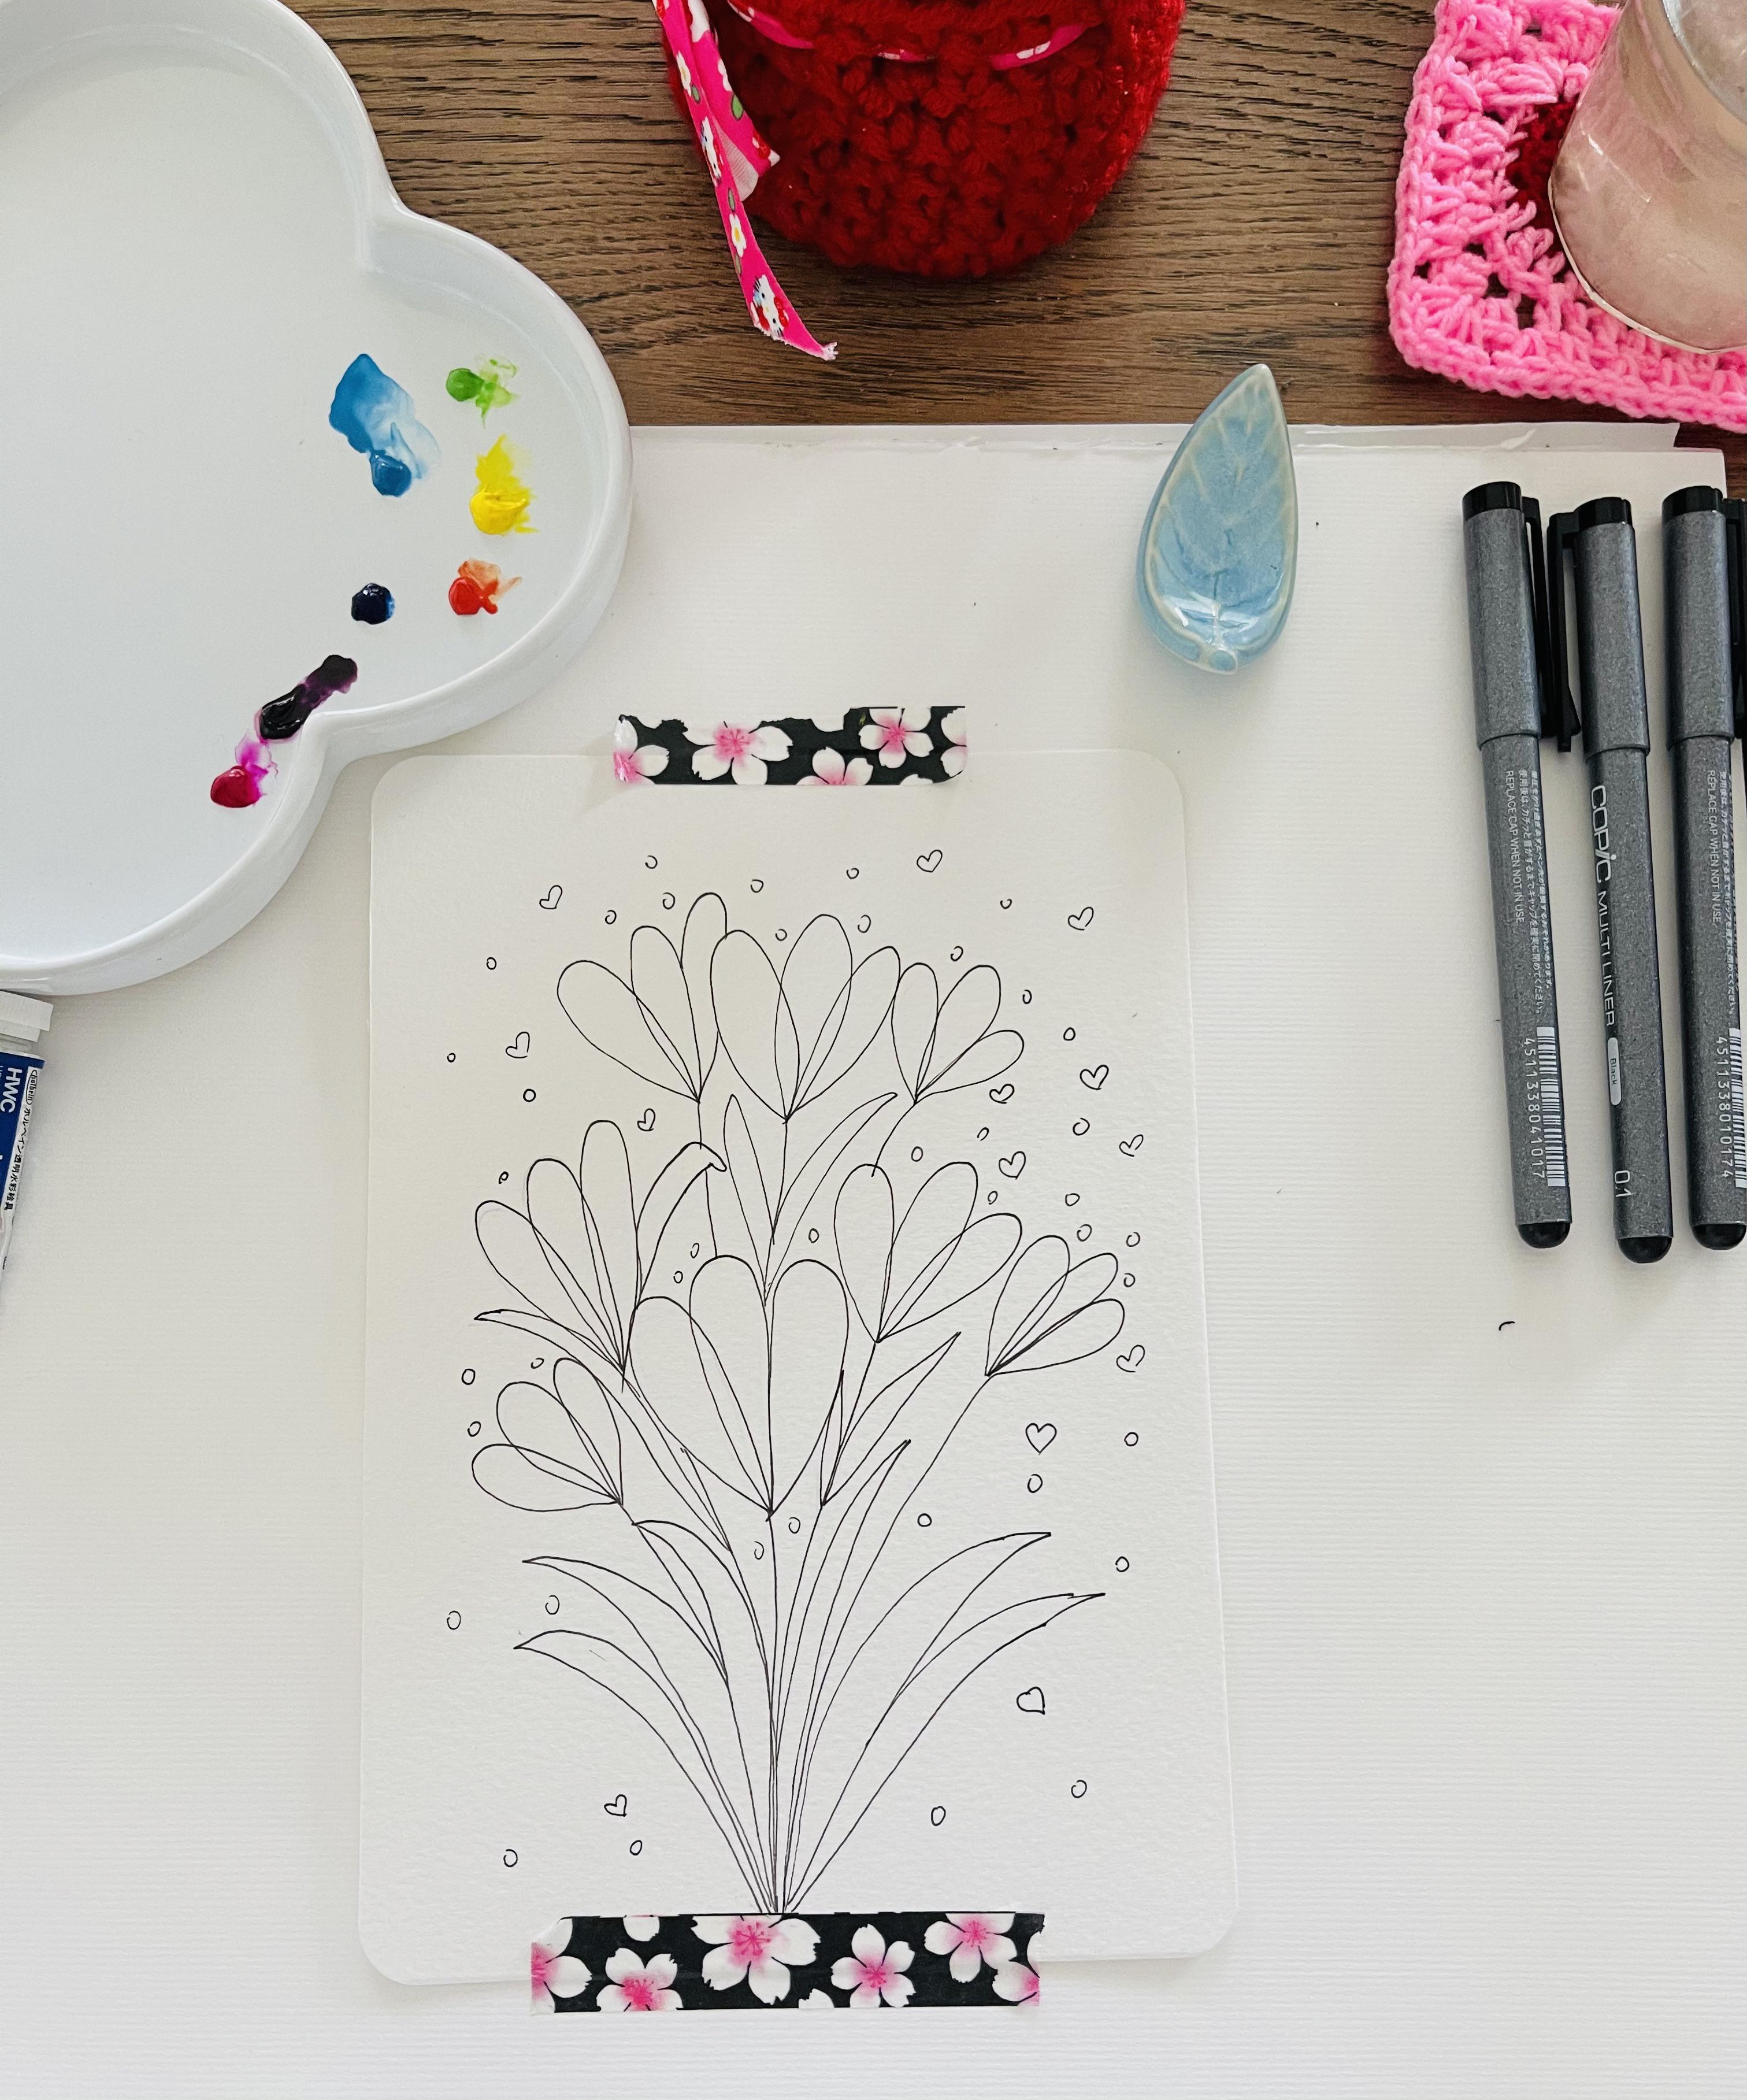
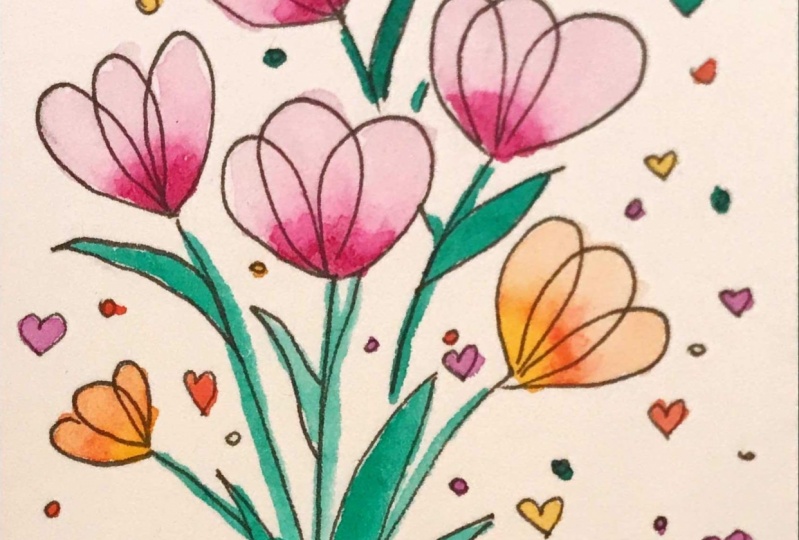
6. Delicate Tulips Bouquet using Ovals : Welcome to this class. For this class we are going to be looking at some reference picture for tulips that are many varieties of shapes and classes of tulips and different color combinations and shapes. We are using the ovals to make or to design or delegate tulips bouquet. And this is the most simple style of tulips. And they're very beautiful and we see there more common on the fields or on the market. So let's start with the stem of the tulips and with the leaves. For the leaves, I will be using the same shape of the petals but more lemurs or more elongated mark fine, so to speak. And for the petals of the tulips, I am going to play with the sizes and with a elongate style and with the width of the petals. And then I will be overlapping the petals to make it more. Looking more like the real tulips. Let's play with this. And remember, you can use wherever shapes do like to try. Maybe you can use the crescent moon, or maybe you can use even the triangles or squares. Just play with it because it is very important that do play with the shapes and with adults that you have. And you will discover new ways of painting or creating. Your pieces are repaint. I will still be playing with the shapes a little bit. And I will see you when we start to sketch on the watercolor paper. When do I finish playing with shapes? Then start creating a Geodesign. The idea that I have for this one is a bouquet, but not advocate that comes in our base. I would gather this in the field, in the garden and for example, and I will be playing with the sizes of the petals using the orbitals, overlapping them to each other and making them harmonized. In the painting. I will add some leaves, bigger leaps. At the bottom of my painting using elongated a crescent moons shape. Because this look very nice. They will just place the lines very high and very close to each other. And then pointy on the, on the ends. You're going and some can make the petals of the, of the tulips more pointy or more rounder or more frequent. And it gives more texture. Digital painting. I went to cover MOF of the space on my paper. So I them a painting, different sizes and different positions of the petals of my tulips. And then at the end I will be adding some details to make the paint more fuller. I am also adding some leaves on the stems of the tulips that, that, that, that are on the upper side of my, of my painting. Just play with the composition and look where our empty spaces and then add the details that you want to make here. You can also add another type of flowers if you wish, like a Lublin there, or maybe some berries because they make the painting more cohesive. And the final piece you will see that will look more like a better composition. Add more, more leaves this, you see that anymore. And even when you're inking the sketch, you will see that maybe you will need more here and more there. And thus give German free for this. Now that we are ready with the sketching, then let's start to ink or peace. I will be used a big deep of my fine liner. This is 0.3. And I will start inking the petals of my tulips. You can play here with the position as steel and see how they look better. I am starting from the top to the bottom. And now I will start adding the color. The dignity that I will be using here is the same we use for the glucoses, adding a rich pigments on the base of my tulips. In this case, the pink, the colors the most, the most scholar that I will be using for the flowers are pink, violet, and blue. And I will add some jello. To make the color more better contrast. So that thickness is the same as in the ritual pigment on the base of my burdens. And then pulling it up with just water or with another color that is more fluid. Let's do that together. I just added the pink on their importance of my petals. I will let a little bit of a dry this. And then I will start pulling the color with my brush and water. Well, in unsub painting some of the little details. So the colors start to combine it to drain a Guan to see how they look when they are dry. So here we start pulling up the color with just water, leading spaces, white spaces, and adding more texture to our painting. It may look a little bit bright, but when these watercolors are completed dry a day, they fade a little bit in color, not him in quality. So you need to pay attention to this. And if you see, you see that the colors is too translucent than Dr going to a little bit more color. If you see that do need more team members to keep her bed slower, pace, because it is important that you take your time. We watercolors so it can make its magic. Okay, For this tulip, I went to mix some colors, so I will let some whitespace between my colors. And then I will add the second color. And you will see how these mics and blends together, giving it a beautiful effect. I will be taking a little bit of jello. So it combines with my pink and give these rays of light on the petals of the tulips. You can play with the colors as well and make petals of the tulips pop up as you wish. You're going answer. Use another color palette, a more pastel or a more vibrant. And it will play really well together. So I will continue with all the other colors doing the same. I didn't the brightest or the delicious, a pigment at the bottom. And then pulling the color. Just my brush and water and looking at it and then adjusting to my desire finish effect. I will see you at the end of the painting. For now on, I will spit out a little bit the pizza. But remember to go slow with the colors and wait for them to dry the different layers out. We spoke in the last part of the glass. I am mixing orange with a jello and adding water or color depending on what effect I want to create. Now I will start adding the blue using the same technique, adding the pigment at the bottom, and then pulling them up with just water. The other girdle we will be using for the last two lips is the violet or Leila. And then we are just start working on the lips and the rest of the details for the Digital using circles like drops, resembling the poem. And some head shapes because I love half-steps if you know me. And then you can use whatever shapes you like for the details. Or you can just blushes if you prefer that technique. Now, as we start pulling up the color blue in this case, and see how beautiful they are. The effect looks like this ellipse here are like open two lips and they are looking for the sun LUT. Let's paint the last tulip using the color violet. Using the same technique. Making some darker parts of my spots, of my tulips, petals. So they look more alive and beautiful. And when we're finished with the last two groups, we will let this dry a little bit and then start painting the leaves. For the leaves, I am using the permanent green, the salt in water. So the green is more like spring-like green and it will bring more light to the painting. But remember, you can use whatever tones or shades you like and see how it looks like. At the end, when the whole painting is dry and drain. When the painting is completely dry. Then we will start adding some details on the leaves with the fine liner in the smallest sizes to have. Some lines on the leaves and some details on the petals of the tulips. In Allison. Upon four points. On the edges of my tulips lives to make them pop up a little bit. This highlights and very, very small, but they make a difference. When you look at it. The painting. You can use also white or you can use gold if you prefer. Remember to play with it. Or painting is now related to look at it. And remember, you can use it as a guard or you can frame it and give to other people or hanging on home. I can wait to see what you create. And I will see you in the next video.
7. Your Class Project: You are amazing. Thank you for taking my class and for your Blackberry, do can create the same styles in flowers that we made in the class. Uses asset guy or framing IDO wherever the workers may delete and speech. Then the last project for this class I do with this new identity and allotrope to have so much fun.
8. Thank You: Congratulations, you did it, do finish this class and I can wait the sequence Hadoop created. Thank you for taking my class and we hope to see you in my next class.
 Artjourneywithme Heidi, ARTIST AND FACILITATOR